Skip to content
DisclaimerTerms Of UseGDPR PolicyCookie Policy

Lisa Dishes

  • Home
  • Drinks
  • Appetizers
  • Dinner
  • Dessert
  • About
  • Contact
  • Privacy Policy
DisclaimerTerms Of UseGDPR PolicyCookie Policy

NO-ING-IMG

To make a tasty veggie fried rice, you need: - 2 cups cooked jasmine rice (day-old is best) - 1 tablespoon sesame oil - 1 cup mixed vegetables (carrots, peas, bell peppers, corn) - 1/2 cup green onions, sliced - 2 cloves garlic, minced - 1 teaspoon fresh ginger, grated - 2 tablespoons soy sauce - 1 tablespoon oyster sauce (use vegetarian option if needed) - 2 eggs, beaten (or silken tofu for vegan) - Salt and pepper to taste - Sesame seeds for garnish - Fresh cilantro for garnish You can change things up with these add-ins: - Chili paste for heat - Cooked chicken or shrimp for protein - Other veggies like broccoli or snap peas - Cashews or peanuts for crunch To cook your veggie fried rice, gather these tools: - A large skillet or wok - A spatula for stirring - A cutting board and knife for prepping ingredients - A measuring spoon for accurate measurements To make veggie fried rice, gather your ingredients first. I recommend using day-old jasmine rice. It cooks better and has less moisture. You need: - 2 cups cooked jasmine rice - 1 tablespoon sesame oil - 1 cup mixed vegetables (carrots, peas, bell peppers, and corn) - 1/2 cup green onions, sliced - 2 cloves garlic, minced - 1 teaspoon fresh ginger, grated - 2 tablespoons soy sauce - 1 tablespoon oyster sauce (or a vegetarian option) - 1 teaspoon chili paste (optional) - 2 eggs, beaten (or silken tofu for vegan) - Salt and pepper to taste - Sesame seeds for garnish - Fresh cilantro for garnish Chop your vegetables and slice the green onions. Mince the garlic and grate the ginger. Having everything ready speeds up cooking. Now, let’s cook! Start by heating a large skillet or wok over medium-high heat. Add sesame oil and let it warm. Once hot, add minced garlic and ginger. Stir quickly for about 30 seconds until you smell the aroma. Next, toss in your mixed vegetables. Stir-fry for about 3 to 4 minutes. You want them tender yet crisp. Push the veggies to one side of the skillet. Pour the beaten eggs or silken tofu on the other side. Scramble until fully cooked. Now, add the cooked rice, breaking up any clumps. Stir everything together. Pour in the soy sauce and oyster sauce. If you like heat, add chili paste too. Mix until the rice is coated. Season with salt and pepper. Stir-fry for another 2 to 3 minutes to heat through. Finally, toss in the sliced green onions and turn off the heat. - Use day-old rice. Fresh rice is too sticky. - Keep the heat high. This helps fry the rice well. - Stir-fry quickly. This keeps the veggies crisp. - Scramble eggs separately. This prevents overcooking. - Adjust sauces to taste. Experiment with flavors you like. Serve your veggie fried rice in bowls. Top with sesame seeds and fresh cilantro for a nice touch. Enjoy your meal! When making veggie fried rice, avoid using fresh rice. Day-old rice works best. Fresh rice is sticky and clumps together. It can lead to mushy fried rice. Also, don’t skip the sesame oil. It adds a lovely nutty flavor. Be careful not to overcook the veggies. They should be tender but still crisp. Use a large skillet or wok for cooking. This allows even heat distribution. Start with high heat to achieve that nice stir-fry effect. Always heat the oil before adding ingredients. This helps to lock in flavors. Push the veggies to the side before adding eggs. This method ensures even cooking and better texture. To boost the flavor, try adding a splash of lime juice. This adds brightness to the dish. You can also use fresh herbs like cilantro for extra taste. If you want heat, add chili paste or fresh chilies. Experiment with different sauces like hoisin or teriyaki for variety. Using a mix of vegetables also adds different textures and tastes. {{image_2}} You can easily make veggie fried rice vegan. Just swap the eggs for silken tofu. Tofu gives a nice texture and keeps it light. Use vegetarian oyster sauce for added flavor. This option keeps it delicious without any animal products. Mix and match your favorite veggies in this dish. Try broccoli, zucchini, or snap peas. You can also use frozen mixed vegetables if you are short on time. The key is to keep the veggies bright and crispy. It adds color and nutrition to your meal. Want some heat? Add chili paste to your oil when you cook. Start with a small amount. You can always add more if you like it spicy. For a milder dish, skip the chili paste altogether. It’s all about your taste preferences! Store your veggie fried rice in an airtight container. Let it cool to room temperature first. It will last up to four days in the fridge. To keep it fresh, make sure the lid seals well. This keeps out moisture and air. If you notice any off smells or changes in color, toss it out. To freeze veggie fried rice, pack it in freezer-safe bags or containers. Remove as much air as possible before sealing. It can stay frozen for up to three months. Label your containers with the date. This way, you won’t forget what’s inside. Thaw it in the fridge overnight before reheating. When you’re ready to eat, reheat the rice in a skillet. Add a splash of water or oil to prevent sticking. Heat it over medium heat for about 5-7 minutes. Stir it often to help it warm evenly. You can also use a microwave. Heat it in short bursts of one minute, stirring in between. This keeps the rice moist and tasty. Yes, using leftover rice makes this dish even better. Day-old rice dries out a bit. This helps keep the rice grains separate. When you stir-fry, they won’t turn mushy. If you don’t have day-old rice, cook fresh rice and let it cool. Spread it on a tray for about 30 minutes. This will help it dry out a little. To spice up your fried rice, add chili paste. You can mix in one teaspoon or more, based on your taste. You can also use fresh chopped chilies. Add them when you cook the garlic and ginger. This way, they will blend nicely into the dish. Another option is to serve with hot sauce on the side. You can switch up the flavors by using different sauces. Instead of soy sauce, try tamari for a gluten-free option. For a sweet touch, add hoisin sauce. If you like a smoky flavor, try adding a splash of liquid smoke. You can also use teriyaki sauce for a different flavor. Mix and match sauces to create your own unique dish! To make delicious Veggie Fried Rice, start with key ingredients and essential tools. Follow the step-by-step cooking process to avoid common mistakes. Use tips to enhance flavors and adjust spice levels to your taste. Consider variations like vegan options to suit different diets. Finally, remember proper storage methods to enjoy this meal later. Cooking veggie fried rice can be fun and rewarding. With practice, you’ll perfect this dish and impress everyone. Enjoy your cooking journey!

Veggie Fried Rice Tasty and Quick Weeknight Meal

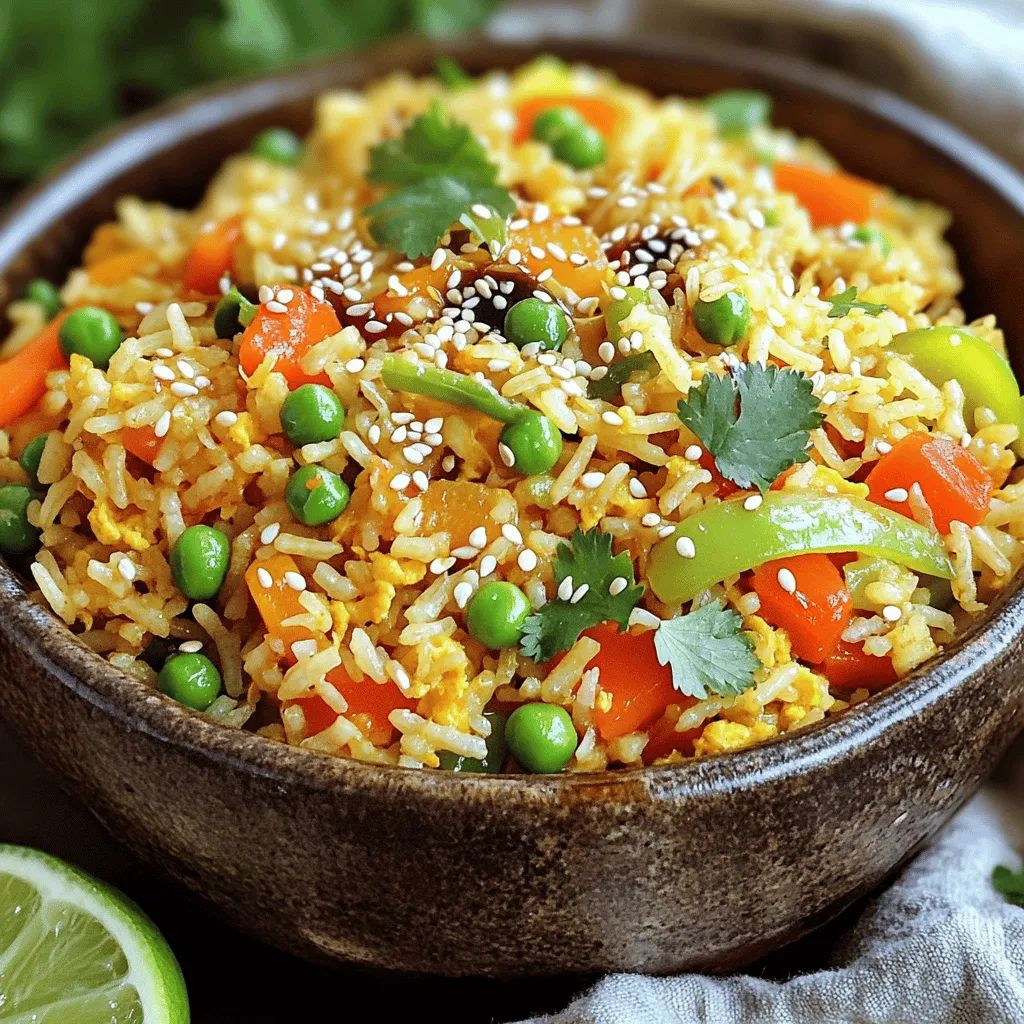
Looking for a quick and tasty meal? Veggie fried rice is the answer! This dish is full of flavor, colorful

- 1 lb ground beef - 2 tablespoons soy sauce - 1 tablespoon gochujang (Korean chili paste) - 1 tablespoon brown sugar - 1 tablespoon sesame oil - 3 cloves garlic, minced - 1 inch ginger, grated - 1 teaspoon black pepper - 1 cup cooked jasmine rice - 1 cup kimchi (store-bought or homemade) - 2 green onions, sliced - 1 tablespoon sesame seeds - 1 cup spinach leaves You can add fun toppings to make your bowls even better. Try adding: - Sliced cucumbers for crunch - A sprinkle of cilantro for freshness - Extra sesame seeds for more flavor If you don't have some ingredients, here are easy swaps: - Use ground turkey instead of beef for a lighter option. - Substitute rice with quinoa or cauliflower rice for a low-carb choice. - Swap kimchi for pickled vegetables if you prefer a milder taste. These tips help you customize your Spicy Korean Beef Bowls to fit your taste. Enjoy making your meal unique! To start, grab a medium bowl. Add the ground beef, soy sauce, gochujang, brown sugar, sesame oil, minced garlic, grated ginger, and black pepper. Mix everything well. You want the beef to soak up all those tasty flavors. This step makes the beef both spicy and sweet. Now, heat a skillet on medium-high heat. Once hot, add the beef mixture. Cook it for 5 to 7 minutes. Stir it often. You want the beef to brown and cook fully. If you see any extra fat, drain it off. This keeps the dish light and tasty. Next, stir in the fresh spinach leaves. Cook for another 2 to 3 minutes. The spinach will wilt and become soft. Now, it's time to build your bowl. Start with a scoop of jasmine rice at the bottom. Top it with the spicy beef and spinach mix. Finally, add a spoonful of kimchi on top. Sprinkle sliced green onions and sesame seeds for extra crunch. Enjoy this bowl while it's hot. If you want more spice, add a little extra gochujang. When cooking ground beef, start with a hot skillet. Heat your skillet over medium-high heat for great results. Use a spatula to break the meat apart as it cooks. This helps it brown evenly. Always drain excess fat after cooking. This keeps your dish light and tasty. If you want extra flavor, add minced garlic and ginger early. They release their oils and enhance the beef. Spice can make or break a dish. If you love spice, add more gochujang. Start with one tablespoon in the beef mixture. Taste as you go. You can also add red pepper flakes for extra heat. For a milder dish, use less gochujang. You can even skip it and use soy sauce instead. If you find it too spicy, add a bit of brown sugar. It helps balance the heat. Having the right tools makes cooking easier. Use a large skillet for even cooking. A spatula is great for breaking up the beef. A bowl is needed for mixing the marinade. Don’t forget measuring spoons for accuracy. A good knife helps with chopping garlic and ginger. Finally, consider a rice cooker for perfect jasmine rice. These tools make your cooking experience smooth and fun. {{image_2}} You can make a vegetarian version of Spicy Korean Beef Bowls. Instead of beef, use tofu or tempeh. Both options soak up flavors well. For tofu, press it to remove excess water. Then, cube it and sauté until golden. Use the same marinade with soy sauce, gochujang, and spices. This makes a tasty, plant-based meal. If you want to switch proteins, try ground turkey or chicken. They work great in this recipe. The cooking time will stay about the same. Just make sure to check for doneness. You can also use beef strips for a stir-fry style. Adjust the marinade amounts to suit the protein you use. Feel free to mix in global flavors. Add some taco seasoning for a Mexican twist. Or, use curry powder for an Indian flavor. You can even add lime juice for a zesty kick. This recipe is flexible and fun. Explore different spices and herbs to make your own version. To store your Spicy Korean Beef Bowls, let the dish cool first. Place the beef, rice, and toppings in separate airtight containers. This helps keep the flavors fresh. Store the containers in the fridge for up to three days. When you're ready to enjoy your leftovers, heat them up in the microwave. Use a microwave-safe dish and cover it with a lid or wrap. Heat for one to two minutes or until hot. Stir halfway for even heating. You can also reheat the beef in a skillet over low heat. Add a splash of water to keep it moist. If you want to save some for later, you can freeze the beef mixture. Place it in a freezer-safe container. Leave some space at the top to allow for expansion. It will keep well for about three months. When you’re ready to eat, thaw it in the fridge overnight. Reheat it as mentioned above. Enjoy your tasty meal again! Gochujang is a spicy Korean chili paste. It has a unique sweet and savory flavor. You can find gochujang in most grocery stores. Look in the international aisle or the Asian section. You can also buy it online or at Asian markets. Yes, you can make Spicy Korean Beef Bowls ahead of time. Cook the beef and spinach, then store them in the fridge. When ready to eat, reheat the beef mixture. Serve it over fresh rice for the best taste. You can serve Spicy Korean Beef Bowls with many sides. Try steamed broccoli or sautéed bok choy for a fresh touch. You can also add a side of pickled vegetables for extra flavor. Another option is to serve it with a light salad. Each side will enhance the meal and add variety. In this article, we explored how to make Spicy Korean Beef Bowls. We covered the key ingredients, cooking steps, and helpful tips. You can adapt flavors, use different proteins, and even try vegetarian options. Storing leftovers and reheating them is easy, making this dish a great choice for meal prep. Keep experimenting with spices and toppings to find your perfect bowl. Enjoy your cooking journey!

Spicy Korean Beef Bowls Simple and Flavorful Recipe

Welcome to your new favorite meal: Spicy Korean Beef Bowls! This simple and tasty recipe is packed with flavor and

To make delicious blackberry lime scones, you need the following ingredients: - 2 cups all-purpose flour - 1/3 cup granulated sugar - 1 tablespoon baking powder - 1/2 teaspoon salt - 1/4 cup cold unsalted butter, cubed - 1/2 cup fresh blackberries, lightly mashed (reserve a few whole for topping) - Zest of 1 lime - 1/4 cup lime juice - 1/2 cup heavy cream - 1 large egg - 1/2 teaspoon vanilla extract Choosing the right blackberries elevates your scones. Here are my tips: - Look for shine: Fresh blackberries should have a natural shine. - Check for plumpness: They should feel firm and plump. - Avoid mold: Stay away from any berries with mold or soft spots. - Color matters: Choose deep black or dark purple berries. Fresh blackberries add flavor and sweetness. They also give your scones a lovely color. Room temperature ingredients help your scones become light and fluffy. Here’s why: - Butter blends better: Cold butter creates a flaky texture. If it's too cold, it won’t mix well. - Eggs and cream: They mix more evenly when at room temperature. This helps the dough rise. - Lime juice and zest: They add flavor. When at room temperature, they blend into the dough smoothly. Take out your eggs and cream ahead of time. This small step makes a big difference! To make the dough, start by preheating your oven to 400°F (200°C). Line a baking sheet with parchment paper for easy cleanup. In a large bowl, mix 2 cups of all-purpose flour, 1/3 cup granulated sugar, 1 tablespoon baking powder, and 1/2 teaspoon salt. This blend is the base of your scone. Next, add 1/4 cup of cold, cubed unsalted butter. Use a pastry cutter or your fingers to mix the butter into the flour. Aim for a crumbly texture, like coarse crumbs. Now, gently fold in 1/2 cup of lightly mashed blackberries and the zest of 1 lime. Be careful not to overmix. In another bowl, whisk together 1/2 cup of heavy cream, 1/4 cup of lime juice, 1 large egg, and 1/2 teaspoon of vanilla extract. Once smooth, pour this mixture into your flour mix. Stir gently until just combined. The dough should be slightly sticky. Turn the dough out onto a floured surface. Knead it a couple of times until it holds together well. Pat the dough into a circle that is about 1 inch thick. This will help your scones rise nicely. Now, cut the circle into 8 wedges. Transfer these wedges to your prepared baking sheet. For a nice touch, brush the tops with a bit of cream and place a few reserved whole blackberries on each scone. This not only looks great but adds extra flavor. Place the baking sheet in your preheated oven. Bake the scones for 15 to 20 minutes. They should turn golden brown on top. To check if they are done, insert a toothpick in the center of one scone. If it comes out clean, they are ready. Once baked, remove the scones from the oven. Allow them to cool slightly before serving. Enjoy these fresh scones warm, drizzled with a lime glaze for added sweetness. To make your scones fluffy, start with cold butter. Cold butter creates steam when it bakes. This steam helps the scones rise. Cut the butter into small cubes. This way, it mixes well with the flour. Do not overwork the dough; mix just until combined. Overmixing makes the scones dense, not fluffy. When mixing, use a light touch. Combine the dry and wet ingredients gently. Use a spatula or wooden spoon. This helps keep air in the dough. Fold in the blackberries carefully. If you mash them too much, they can turn the dough purple. You want to see bright specks of fruit in the scones. One big mistake is using warm butter. Always use cold butter for the best texture. Another common error is not checking the oven temperature. An oven that’s too hot can burn the scones. Always preheat your oven to 400°F (200°C). Lastly, avoid skipping the cream brush on top. This gives the scones a nice golden finish. {{image_2}} You can switch the blackberries with other fruits. Try blueberries, raspberries, or chopped strawberries. Each fruit gives a unique taste. Cherries and diced peaches also work well. Use fruits that are in season for the best flavor. Just remember to adjust the amount if the fruit is larger or smaller. To make gluten-free blackberry lime scones, replace all-purpose flour with a gluten-free blend. Look for a blend that contains xanthan gum. This will help give the scones the right texture. You may need to add a bit more liquid. Use coconut milk or almond milk instead of heavy cream for a dairy-free option. You can add different flavors to your scones. Consider mixing in nuts, like chopped pecans or walnuts. These add crunch and depth. Spices, like cinnamon or nutmeg, can also enhance the taste. A pinch of cardamom can add a nice twist. Experiment with these options to find your favorite combination! To keep your blackberry lime scones fresh, store them in an airtight container. They stay best at room temperature for up to two days. If you want to keep them longer, refrigerate them. Just make sure to wrap them well to avoid drying out. To enjoy your scones warm, preheat your oven to 350°F (175°C). Place the scones on a baking sheet. Heat them for about 5 to 10 minutes. You can also microwave them for about 15 to 20 seconds. This method works well if you are in a hurry. Freezing scones is a great way to save them for another day. Let the scones cool completely first. Then, wrap each one tightly in plastic wrap. Place them in a freezer bag or container. They can last up to three months in the freezer. When you're ready to eat, thaw them in the fridge overnight and reheat as needed. Yes, you can use frozen blackberries. Just remember to thaw them first. Pat them dry with a paper towel. This will help reduce extra moisture in the dough. Using fresh blackberries adds a nice burst of flavor, but frozen works well too. Serve blackberry lime scones warm for the best taste. You can drizzle them with a lime glaze for added sweetness. Garnish with fresh mint leaves for a pop of color and flavor. Enjoy them with tea or coffee for a delightful treat. Making a glaze is simple! Mix powdered sugar with lime juice until smooth. Start with one cup of powdered sugar and two tablespoons of lime juice. Adjust the lime juice to reach your desired thickness. Drizzle it over the warm scones for a zesty finish. Creating the perfect blackberry lime scones requires fresh ingredients, good technique, and practice. We discussed the necessary ingredients, how to prepare the dough, and some common mistakes to avoid. Remember, using room temperature ingredients can make a big difference. Don't hesitate to try different fruits or flavors. Explore storing and reheating methods to enjoy these treats later. With these tips in mind, you’ll make delicious scones every time you bake. Enjoy your scone-making journey!

Blackberry Lime Scones Flavorful and Simple Recipe

Looking for a tasty treat to brighten your day? In this blog post, I’ll show you how to make delicious

- 1 cup rolled oats - 1/2 cup cottage cheese - 2 eggs - 1 scoop chocolate protein powder - 2 tablespoons unsweetened cocoa powder - 1 tablespoon honey or maple syrup These main ingredients form the base of your pancakes. Rolled oats give a hearty texture, while cottage cheese adds protein and creaminess. Eggs bind everything together and provide structure. Chocolate protein powder packs a flavor punch and boosts nutrition. Unsweetened cocoa powder enhances the chocolate taste without extra sugar. Honey or maple syrup adds just the right amount of natural sweetness. - 1 teaspoon baking powder - 1/2 teaspoon vanilla extract - A pinch of salt - 1/2 cup chocolate chips (dark or milk chocolate) - Cooking spray or coconut oil for frying The additional ingredients are key to perfect pancakes. Baking powder helps them rise, creating a fluffy texture. Vanilla extract adds depth to the flavor. A pinch of salt balances the sweetness. Chocolate chips bring extra chocolate goodness, making each bite rich and satisfying. Cooking spray or coconut oil helps prevent sticking while frying, ensuring your pancakes flip easily and stay intact. Blending the batter To start, grab your blender. Add these ingredients: - 1 cup rolled oats - 1/2 cup cottage cheese - 2 eggs - 1 scoop chocolate protein powder - 2 tablespoons unsweetened cocoa powder - 1 tablespoon honey or maple syrup - 1 teaspoon baking powder - 1/2 teaspoon vanilla extract - A pinch of salt Blend until smooth. You want it to look like pancake batter. Mixing in the chocolate chips Once the batter is smooth, gently stir in 1/2 cup chocolate chips. Use a spatula to fold them in. This adds nice chocolatey bites. Preheating the skillet Now, heat a non-stick skillet or griddle over medium heat. Lightly grease it with cooking spray or coconut oil. This helps the pancakes cook evenly. Cooking the pancakes Pour about 1/4 cup of batter onto the skillet for each pancake. Cook for 2-3 minutes. Look for bubbles forming on top to know when to flip. Carefully turn the pancakes and cook for another 1-2 minutes, until they are browned. Serving suggestions Serve the pancakes warm. You can top them with more chocolate chips, sliced bananas, or your favorite nut butter. This adds flavor and makes it even better! To make the best double chocolate protein pancakes, start with the right batter. It should be thick but pourable. If it’s too thick, add a splash of milk. If it’s too thin, mix in more oats. Cooking temperature is key. Use medium heat. If the pan is too hot, the pancakes burn. If it’s too cool, they won’t cook well. Wait for bubbles to form before flipping. You can swap cottage cheese for Greek yogurt. This change keeps the pancakes creamy. It also adds a tangy flavor. Different protein powders work too. You can use vanilla or plant-based powder. Just remember, this will change the pancake's flavor a bit. Choose a powder you like best. {{image_2}} You can change the flavor of your pancakes easily. Adding fruits like bananas or berries makes them sweet. Slice some ripe bananas and fold them into the batter. You can also sprinkle in blueberries or strawberries for a burst of flavor. This adds natural sweetness and extra nutrients. Spices can also enhance the taste. Infusing spices like cinnamon or nutmeg creates warmth. Just a pinch can make a big difference. These spices pair well with chocolate, making each bite richer. You can experiment with how much you add based on your taste. If you want a different texture, try using alternative flours. Almond flour or coconut flour works great. These flours change the flavor and add unique health benefits. They can make the pancakes gluten-free too. Just remember, you may need to adjust the liquid in your batter. For a vegan twist, use plant-based ingredients. Substitute the eggs with flaxseed meal. Mix one tablespoon of flaxseed with three tablespoons of water. Let it sit for a few minutes until it thickens. You can also use plant-based yogurt instead of cottage cheese. These changes keep the pancakes tasty and healthy for everyone. To keep your pancakes fresh, store them in the fridge. Use an airtight container. They last about three days this way. You can also freeze pancakes for longer storage. Stack them with parchment paper between each one. Place the stack in a freezer bag. They will stay good for up to two months. When it's time to eat, you have two good options. You can use a microwave or a skillet. The microwave is quick. Heat them for about 30 seconds per pancake. For a crispy edge, heat them in a skillet. Use medium heat and cook for one to two minutes per side. Enjoy them warm! Can I make these pancakes without protein powder? Yes, you can skip the protein powder. Use extra oats instead. This will keep the texture similar. You may want to add a little extra protein from another source, like yogurt or eggs. How do I store leftover pancakes? Store leftover pancakes in an airtight container. They will last for about three days in the fridge. For longer storage, freeze them. Just place parchment paper between each pancake to avoid sticking. What can I use instead of cottage cheese? Greek yogurt is a great substitute for cottage cheese. It adds creaminess and protein. You can also use ricotta cheese for a different taste and texture. Are these pancakes good for meal prep? Yes, they are perfect for meal prep! You can make a batch ahead of time and enjoy them all week. Just reheat them in the microwave or on a skillet. Can I make these pancakes gluten-free? Absolutely! Use gluten-free oats for this recipe. Be sure to check that your protein powder and any other ingredients are also gluten-free. This way, everyone can enjoy them! You learned how to make tasty and healthy pancakes using simple ingredients. We covered main ingredients like rolled oats, cottage cheese, and protein powder. You now know how to blend, cook, and even customize your pancakes. Remember to store leftovers properly for future meals. With these tips and tricks, you can enjoy pancakes that fit your diet. Keep experimenting and find what flavors you love most. Enjoy your delicious creations and feel great about eating healthy!

Double Chocolate Protein Pancakes Healthy Start Today

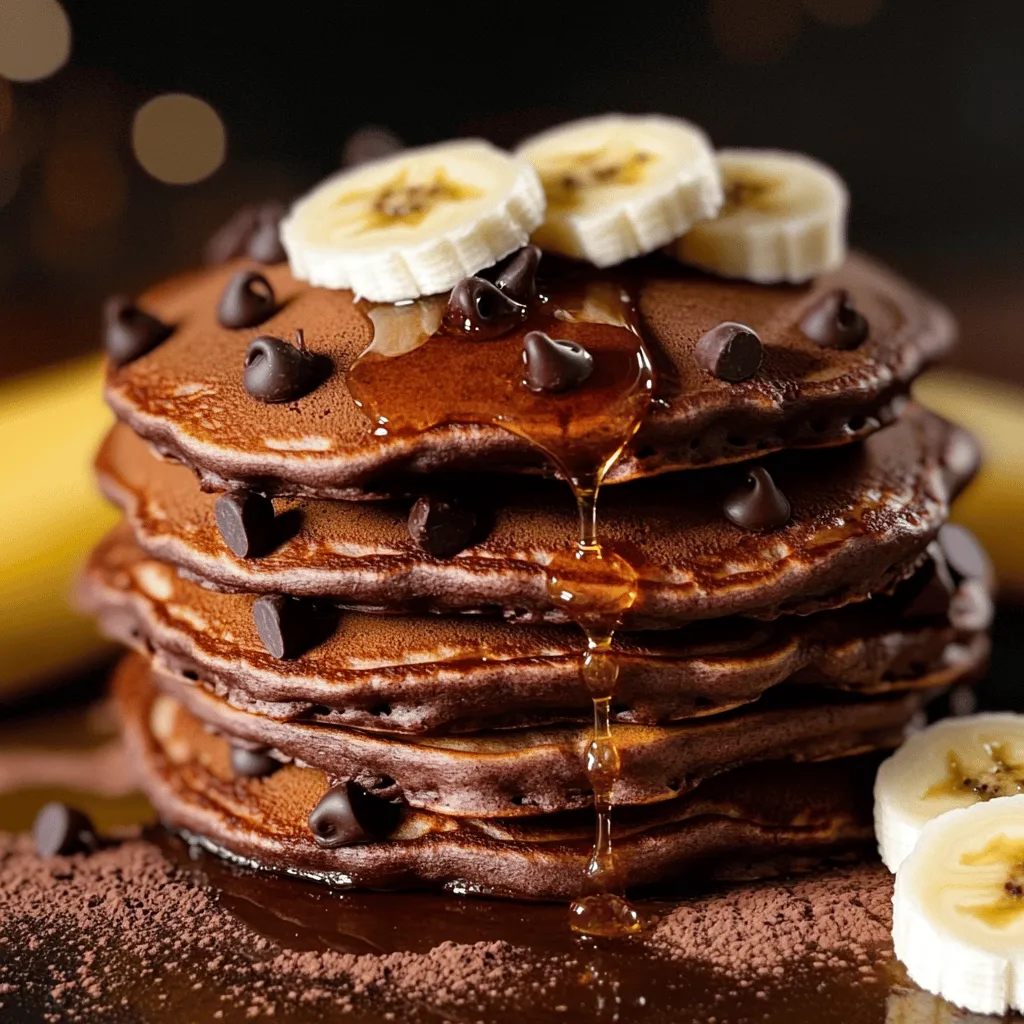
Start your day right with my Double Chocolate Protein Pancakes! They’re packed with flavor and nutrition. You’ll love the rich

Here’s what you need for Parmesan Crusted Tilapia. Gather these ingredients: - 4 tilapia fillets - 1 cup grated Parmesan cheese - 1/2 cup breadcrumbs (panko preferred for extra crunch) - 1 teaspoon garlic powder - 1 teaspoon dried Italian herbs (oregano, basil, thyme) - 1/2 teaspoon paprika - 1/4 teaspoon black pepper - 1/4 teaspoon salt - 1/4 cup mayonnaise - 2 tablespoons fresh parsley, chopped (for garnish) - Lemon wedges (for serving) Each ingredient plays a key role in making this dish tasty. The tilapia is mild and flaky, while Parmesan adds a rich flavor. Panko breadcrumbs give a nice crunch. Garlic powder and Italian herbs add depth. Paprika, black pepper, and salt enhance the taste. Mayonnaise helps the crust stick and keeps the fish moist. Fresh parsley brightens the dish, and lemon wedges bring a zesty touch. Prepare these ingredients, and you are ready to create a delicious meal! - Preheat your oven to 400°F (200°C). - Line a baking sheet with parchment paper or lightly grease it. - In a shallow bowl, mix together: - 1 cup grated Parmesan cheese - 1/2 cup breadcrumbs (panko is best) - 1 teaspoon garlic powder - 1 teaspoon dried Italian herbs (oregano, basil, thyme) - 1/2 teaspoon paprika - 1/4 teaspoon black pepper - 1/4 teaspoon salt - Spread 1/4 cup mayonnaise evenly over one side of each tilapia fillet. - Press the mayo-coated side into the Parmesan mixture. Make sure it sticks well. - Place the fillets on the baking sheet, crumb side facing up. - Bake for 15-20 minutes. Check if the fish flakes easily with a fork. - The crust should be golden and crispy. To get that perfect crunch, use panko breadcrumbs. They add a nice texture. Skip the mayonnaise, and you may end up with a dry fish. The mayo keeps the tilapia moist and helps the crust stick well. When picking fresh tilapia, look for clear eyes and shiny skin. This shows it is fresh. If you buy frozen tilapia, thaw it safely in the fridge overnight. This keeps it safe and tasty. This dish pairs well with many sides. Try serving it with steamed veggies or a fresh salad. You can also drizzle some lemon juice over it for a zesty touch. It makes the flavors pop! {{image_2}} To make Parmesan crusted tilapia even better, try adding different herbs and spices. You can mix in fresh dill or some zesty lemon zest for a bright taste. You could also try adding some chili powder for heat or fresh garlic for a fragrant kick. You can play with cheese too. While Parmesan is great, using a mix of cheeses can add depth. Try using Gruyère for a nutty flavor or a bit of cheddar for sharpness. These choices can make your dish stand out. You can bake or fry the tilapia. Baking is simple and keeps the fish moist. Just coat it and pop it in the oven. Frying gives a crispy texture but adds more oil. If you want a lighter option, air-frying is great. It cooks fast and keeps the crunch without much oil. If you have dietary restrictions, there are good swaps. Instead of mayonnaise, try Greek yogurt for a tangy touch. For breadcrumbs, gluten-free options like crushed rice or cornflakes work well. For vegan options, you can use cashew cream as a base. Instead of cheese, try nutritional yeast for a cheesy flavor without dairy. These changes keep the dish tasty while fitting different diets. To store your Parmesan Crusted Tilapia, place it in an airtight container. Make sure to cool it first. Refrigerate the leftovers within two hours of cooking. They will stay fresh for up to three days. For longer storage, you can freeze the fillets. Wrap them tightly in plastic wrap and foil. Label the package with the date. Frozen tilapia can last for up to three months. When you reheat your tilapia, keep the texture in mind. The best method is to use the oven. Preheat it to 350°F (175°C). Place the fillets on a baking sheet. Cover them with foil to keep them moist. Heat for about 10 to 15 minutes. You can also use a microwave, but it may make the crust soggy. If using the microwave, heat on low for short bursts. Parmesan Crusted Tilapia lasts about three days in the fridge. You’ll know it’s spoiled if it has a sour smell or the texture feels slimy. If you freeze it, thaw it in the fridge overnight before reheating. Always check for signs of spoilage before eating. If in doubt, throw it out! To check if the tilapia is done, look for a few signs. First, the fish should be opaque and have a white color. Second, it should flake easily with a fork. If it does not flake, give it a few more minutes in the oven. The internal temperature should reach 145°F (63°C) for safe eating. This is the key to great tilapia! Yes, you can make this dish gluten-free! Instead of regular breadcrumbs, use gluten-free breadcrumbs or crushed gluten-free crackers. For the mayonnaise, check the label to ensure it's gluten-free. This way, you can enjoy the same tasty crust without the gluten. There are many great sides to pair with tilapia. Here are a few ideas: - Steamed broccoli for a healthy crunch - Lemon rice for a zesty flavor - Simple mixed greens salad for freshness - Roasted vegetables for a colorful plate - Mashed potatoes for a creamy side These options will make your meal even more delicious! You now have a clear path to make delicious Parmesan crusted tilapia. We covered the key ingredients, easy steps, and handy tips to ensure a perfect dish. Remember, using panko breadcrumbs and mayonnaise adds crunch and flavor. Don't hesitate to try variations to suit your taste. Store leftovers properly to enjoy them later. With these insights, you can impress at your next meal. Enjoy cooking!

Parmesan Crusted Tilapia Tasty and Simple Recipe

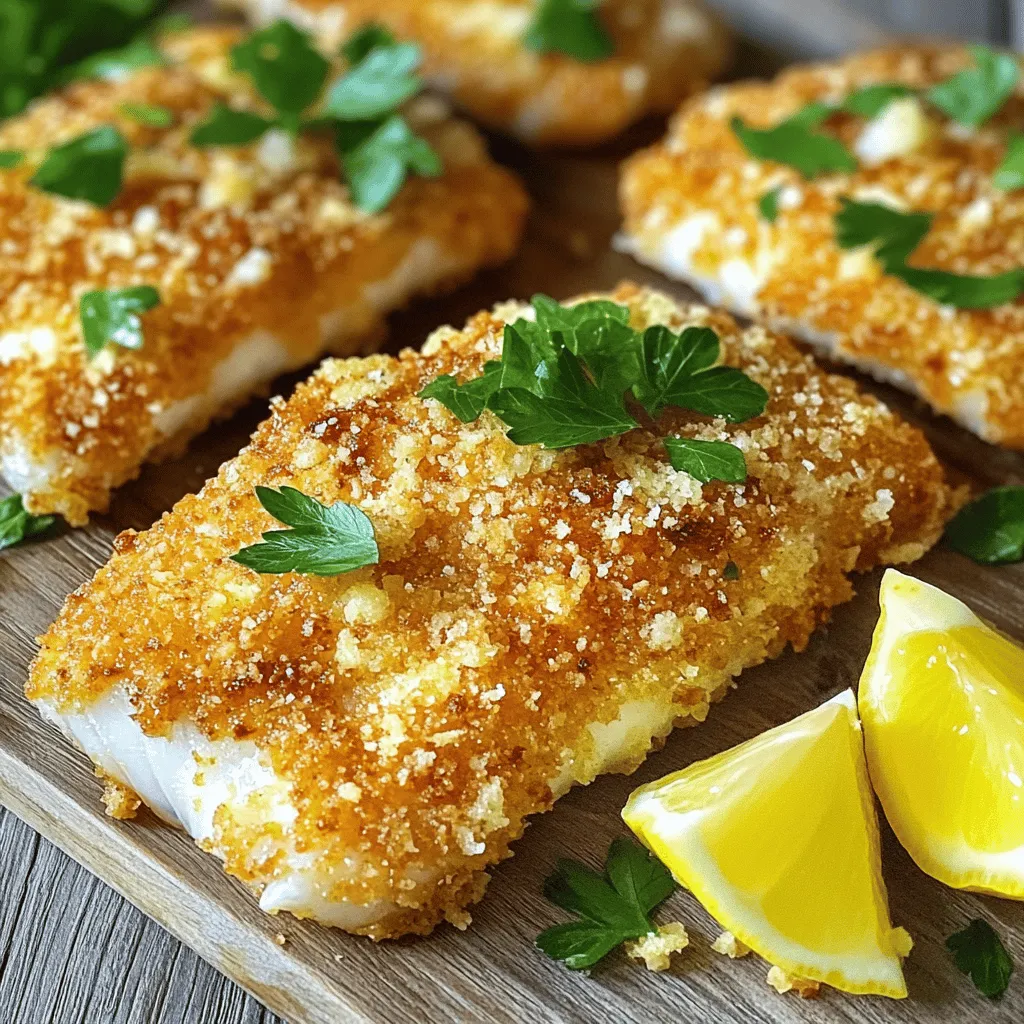
Looking for a dish that’s both tasty and easy to prepare? I’ve got you covered with my Parmesan Crusted Tilapia

- 1 cup fresh spinach, washed and stems removed - 1 cup strawberries, hulled and halved - 1 ripe peach, pitted and sliced - 1 banana, frozen for creaminess - 1 cup unsweetened almond milk (or any milk of choice) - 1 tablespoon honey or maple syrup (for sweetness) - 1 tablespoon chia seeds (for added nutrients) - Ice cubes (for a frostier texture) - Blender - Measuring cups - Serving glasses When making a Strawberry Peach Spinach Smoothie, using the right ingredients is key. Fresh spinach adds vital nutrients and a vibrant green color. Strawberries give the smoothie a sweet and tangy taste. Ripe peaches add a juicy sweetness that blends well. A frozen banana creates a creamy texture, making the drink delightful. Unsweetened almond milk keeps it light and smooth. For those who enjoy a sweeter taste, you can add honey or maple syrup. Chia seeds are optional but add fiber and protein. If you like a chilly drink, toss in some ice cubes. Make sure to have a blender, measuring cups, and serving glasses on hand. These tools help you create the perfect smoothie. First, wash the fresh spinach well. Remove any tough stems. Spinach adds a nice green boost to your smoothie. Next, hull and halve the strawberries. A cup of strawberries gives great flavor and color. Then, pit and slice the ripe peach. The peach adds sweetness and a soft texture. For creaminess, grab a frozen banana. It makes your smoothie rich and thick. Now, it's time to add everything to the blender. Start with the spinach. This helps it blend smoothly without clumping. Then, toss in the strawberries, peach slices, and frozen banana. Pour in one cup of almond milk. If you want extra sweetness, add a tablespoon of honey or maple syrup. Finally, sprinkle in the chia seeds for some added nutrients. If you like a colder drink, toss in a few ice cubes. Blend the mixture on high speed. Aim for about 30 to 60 seconds. This time helps all the ingredients mix evenly. Watch for a smooth and creamy texture. If the smoothie seems thick, add a bit more almond milk. If it's not sweet enough, add more honey or maple syrup. Taste it to find your perfect mix. Pour the smoothie into tall glasses. You want it to look as good as it tastes. For a pretty touch, garnish with a slice of peach on the rim. Add a few whole strawberries on top for color. Drizzle some chia seeds over the smoothie for added texture and style. Enjoy this energizing and fresh treat! To make your smoothie just right, you can adjust the sweetness and texture. If it tastes too sour, add a bit of honey or maple syrup. Start with one tablespoon. Blend again and taste it. If you want it sweeter, add more little by little. For the best consistency, always blend the spinach first. This helps it mix easily with the other fruits. After that, add the strawberries, peach, and banana. Pour in the almond milk next. If you want a thicker smoothie, toss in some ice cubes before blending. This smoothie is not just tasty; it’s also healthy. Spinach is full of vitamins A and C. It helps your body stay strong. Strawberries are rich in antioxidants and help keep your heart healthy. Peaches add vitamins and fiber, which are great for digestion. Adding chia seeds boosts the smoothie’s nutrients. They are high in omega-3 fatty acids, which are good for your brain. They also help you feel full longer. If your smoothie isn’t sweet enough, don’t worry! Just mix in more honey or maple syrup. Blend it again and taste. You can keep adding until it suits your taste. If your smoothie is too thick, simply add more almond milk a little at a time. Blend it again until you reach the right thickness. If it’s too thin, add a frozen banana or some ice cubes to thicken it up. {{image_2}} You can switch almond milk for other options. Try coconut milk for a tropical twist. Oat milk adds a creamy texture too. If you prefer, use dairy milk or soy milk. You can also mix up the fruits. Swap strawberries for blueberries or raspberries. Pineapple adds a fun zing. Mango can give the smoothie a sweet taste. Get creative with what you have! Want to pump up the nutrition? Add protein powder or greens powder for extra benefits. They blend in well and make you feel full longer. Flavored yogurts can change the vibe of your smoothie. Vanilla or peach yogurt adds a nice touch. Nut butters like almond or peanut give a rich flavor and more protein. In summer, use fresh berries and peaches. In fall, add apples and pears for a cozy taste. Winter can be a time for frozen fruits like cherries or bananas. Spring is perfect for fresh greens and herbs, like mint. Enjoy the seasons with new flavors! To keep your Strawberry Peach Spinach Smoothie fresh, start by refrigerating any leftovers. Pour the smoothie into a sealed container and place it in the fridge. It’s best to consume it within 24 hours for the best taste and texture. If you have more than you can drink, freezing is a great option. Pour the smoothie into ice cube trays or freezer bags. This way, you can enjoy it later. Just thaw it in the fridge when you’re ready. In the fridge, your smoothie stays fresh for about one day. If it has been two days or more, it’s best not to drink it. Look for signs that the smoothie has gone bad. If you see separation, off smells, or a change in color, it’s time to toss it out. Got some smoothie leftovers? You can use them in fun ways. Blend the leftover smoothie into pancake batter for a fruity twist. You can also pour it over yogurt or oatmeal for added flavor. Another idea is to freeze it into popsicles for a cool treat. This way, nothing goes to waste! To make this smoothie vegan, simply replace the honey with maple syrup. This keeps the sweetness without using animal products. You can also use any non-dairy milk, like oat or soy milk. These options work well and still taste great. Yes, you can prep this smoothie in advance. I suggest blending all the ingredients except the liquid. Store this mix in an airtight container in the fridge. When you’re ready to drink, just add your almond milk and blend. This saves time and keeps it fresh. This smoothie is great for kids! It has fruits and veggies packed with vitamins. Spinach adds iron, and bananas give energy. Strawberries and peaches are sweet and tasty. You can adjust the sweetness based on your child’s taste. Just skip the honey if you want a less sweet drink. This blog post covered how to make a delicious smoothie. We looked at key ingredients like fresh spinach, strawberries, and almond milk. I shared tips to enhance taste and thickness. You learned how to store leftovers and how long they last. Finally, we discussed variations and answers to common questions. Enjoy crafting your smoothies with these easy steps and tips. The right mix can boost your health and delight your taste buds!

Strawberry Peach Spinach Smoothie Energizing and Fresh

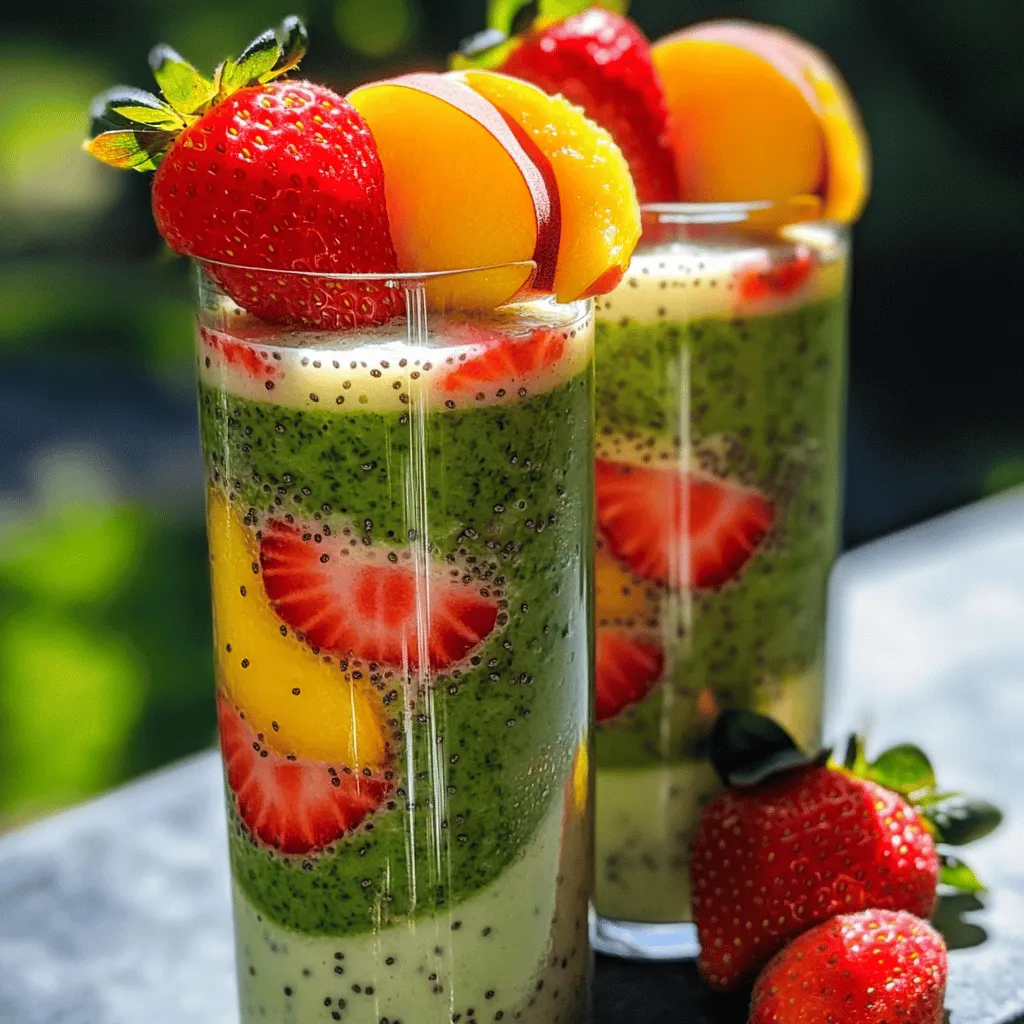
Welcome to the world of vibrant flavors and nutrition! Today, I’m sharing my Strawberry Peach Spinach Smoothie recipe. This drink

To make Sesame Orange Chicken, you'll need the following items: - 1 lb (450g) boneless, skinless chicken thighs, cut into bite-sized pieces - 1/4 cup cornstarch - 1/2 teaspoon salt - 1/4 teaspoon black pepper - 1/4 cup vegetable oil (for frying) - 1/2 cup fresh orange juice - Zest of 1 orange - 3 tablespoons soy sauce - 2 tablespoons honey - 1 tablespoon rice vinegar - 2 cloves garlic, minced - 1 teaspoon fresh ginger, grated - 1 tablespoon sesame oil - 2 tablespoons sesame seeds - 2 green onions, chopped (for garnish) You can swap some ingredients if needed: - Chicken thighs: Use chicken breast for a leaner option. - Cornstarch: Potato starch works well too. - Honey: Maple syrup can replace honey for a vegan option. - Soy sauce: Use tamari for a gluten-free choice. - Rice vinegar: Apple cider vinegar is a good substitute. - Fresh ginger: Ground ginger can be used, but use less. This dish serves four. Here’s a rough breakdown of the calories per serving: - Calories: 350 - Protein: 25g - Carbohydrates: 30g - Fat: 15g This meal gives you protein and flavor without too many carbs. Enjoy it with rice for a balanced meal! First, gather your ingredients. You need chicken thighs, cornstarch, salt, and pepper. Cut the chicken into bite-sized pieces. In a bowl, mix the cornstarch, salt, and black pepper. Toss the chicken pieces in this mix. Make sure they are fully coated. This step helps the chicken get crispy when cooked. Heat vegetable oil in a large skillet over medium-high heat. Once the oil is hot, add the chicken in batches. Do not crowd the pan. Cook for about 5-7 minutes until they turn golden brown and crispy. Use a slotted spoon to take them out. Place the chicken on a paper towel-lined plate to absorb extra oil. This keeps your chicken crispy and not soggy. In the same skillet, leave about one tablespoon of oil. Add minced garlic and grated ginger. Sauté for about 30 seconds until fragrant. Next, pour in fresh orange juice, orange zest, soy sauce, honey, rice vinegar, and sesame oil. Stir everything well. Let it simmer for 3-4 minutes until the sauce thickens a little. Finally, add the crispy chicken back to the skillet. Toss it in the orange sauce to coat well. Cook for another 2-3 minutes to heat through. Before serving, sprinkle sesame seeds on top and garnish with chopped green onions. To get the best chicken, use boneless, skinless thighs. They stay juicy and tender. Cut them into bite-sized pieces for even cooking. Coat the chicken well with cornstarch, salt, and pepper. This helps create a crispy crust. Fry the chicken in batches. This prevents overcrowding and keeps it crispy. To thicken your sauce, let it simmer. Simmering allows the flavors to blend and the sauce to reduce. If you want it thicker, mix a bit of cornstarch with water. Add this mix to your sauce while stirring. This will help the sauce become glossy and thick. Serving your sesame orange chicken well makes it look great. Start by placing the chicken over a bed of steamed rice or fluffy quinoa. Sprinkle sesame seeds on top for a nice crunch. Add chopped green onions for a pop of color. A slice of orange on the side adds a fresh touch. {{image_2}} You can easily spice up your Sesame Orange Chicken. To make it spicy, add red pepper flakes or hot sauce. I suggest adding one teaspoon of red pepper flakes to the sauce. This small change makes a big impact. You can adjust the heat level to your taste. If you love heat, go for more! The spicy version still keeps the sweet orange flavor. Adding vegetables boosts the dish's health and color. Try bell peppers, snap peas, or broccoli. Chop them into bite-sized pieces to make them easy to eat. You can sauté the veggies after cooking the chicken. Just add them to the pan for a few minutes until they are tender. They soak up the sauce well and add a nice crunch. You can switch the chicken for other proteins. Tofu is a great option for a vegetarian dish. Use firm or extra-firm tofu and cut it into cubes. You can also try shrimp or pork if you want variety. The cooking time may change based on the protein you choose. Always ensure your protein is cooked well for safety and flavor. After enjoying your Sesame Orange Chicken, you may have some left. To store it, let the chicken cool to room temperature. Place it in an airtight container. This keeps the flavors fresh. Store it in the fridge for up to three days. If you want to save it longer, consider freezing. To reheat, take the chicken out of the fridge. Place it in a skillet over medium heat. Add a splash of water or orange juice to keep it moist. Stir until heated through. This should take about 5-7 minutes. Avoid the microwave if you can. It may make the chicken dry. If you want to freeze your Sesame Orange Chicken, follow these steps. First, let it cool completely. Then, transfer it to a freezer-safe bag or container. Make sure to remove as much air as possible before sealing. Label the bag with the date. You can freeze it for up to three months. To use, thaw it in the fridge overnight before reheating. Yes, you can use chicken breast. Chicken breast is leaner and cooks faster. Keep an eye on cooking time. It may dry out if overcooked. If you choose breast, slice it into bite-sized pieces. This will help it cook evenly. If you need a soy sauce substitute, try tamari or coconut aminos. Both options have a similar taste. Tamari is gluten-free, while coconut aminos are lower in sodium. You can also mix equal parts of balsamic vinegar and water for a different flavor. To make this dish gluten-free, use tamari instead of soy sauce. Make sure the cornstarch is pure and does not contain gluten. Check all labels carefully when choosing ingredients. This way, you can enjoy the same great taste without gluten. This article covered everything you need for a tasty dish. We explored the ingredients, substitutions, and nutritional facts. I shared step-by-step instructions for preparing the chicken and making the orange sauce. You learned tips for perfecting your dish and ideas for fun variations. Finally, I provided smart ways to store and reheat leftovers. With these insights, you can create a delicious meal that impresses everyone. Try these ideas and enjoy cooking!

Sesame Orange Chicken Easy and Flavorful Recipe

Craving a dish that’s both easy to make and full of flavor? You’re in the right place! In this post,

To make this rich Greek yogurt chocolate mousse, you need a few key ingredients: - 1 cup dark chocolate chips (75-80% cocoa) - 2 cups plain, full-fat Greek yogurt - 1/4 cup honey or maple syrup (adjust to taste) - 1 teaspoon vanilla extract - A pinch of sea salt These ingredients work together to create a creamy and delicious mousse. The dark chocolate brings a deep flavor. The Greek yogurt adds a nice creaminess and a bit of tang. Garnishes can elevate your mousse. Here are some great options: - Fresh berries (like strawberries or raspberries) - Mint leaves These add color and freshness to your dish. They also provide a nice contrast to the rich chocolate. If you don't have some ingredients, here are a few substitutions: - Use semi-sweet chocolate chips instead of dark chocolate for a sweeter mousse. - Swap honey for agave syrup if you want a vegan option. - Greek yogurt can be replaced with a dairy-free yogurt for a lighter version. These substitutions keep the mousse tasty while fitting your needs. You can still enjoy a creamy dessert no matter the changes! To start, you need to melt the dark chocolate chips. You can use a microwave or a double boiler. If using a microwave, place the chocolate chips in a microwave-safe bowl. Heat them in 30-second intervals. Stir after each interval until the chocolate is smooth. If using a double boiler, heat water in the bottom pot and place the chocolate in the top pot. Stir until melted. Let the chocolate cool slightly before mixing it in. Next, grab a large mixing bowl. Add 2 cups of plain, full-fat Greek yogurt. Mix in 1/4 cup of honey or maple syrup for sweetness. Then, add 1 teaspoon of vanilla extract and a pinch of sea salt. Stir well until the mixture is smooth and creamy. This will be the base of your mousse. Now, it’s time to combine everything. Gently fold the melted chocolate into the yogurt mixture. Use a spatula for this step. Be careful not to overmix. You want to keep the mousse airy and light. Once combined, taste the mousse and adjust the sweetness if needed. Add a little more honey or maple syrup if you like it sweeter. Spoon the mousse into individual serving glasses or bowls. Cover them with plastic wrap or lids if you want. Place the mousse in the fridge for at least 2 hours. This will help it set and become deliciously creamy. Before serving, add fresh berries and a mint leaf on top for a touch of color and flavor. To make the best mousse, focus on texture. Start with full-fat Greek yogurt. This adds creaminess. When mixing, fold gently. This keeps air in the mousse. Air makes it light and fluffy. If it feels too thick, you can add a splash of milk. This helps thin it out while keeping it rich. Taste is key. Start with 1/4 cup of honey or maple syrup. Mix it into the yogurt. After folding in the chocolate, taste it again. If you want it sweeter, add more honey or syrup. Remember, the chocolate is rich. Too much sweetness can overpower the flavor. Adjust slowly for best results. Presentation makes your dessert special. Use clear glass cups to show off the mousse. This reveals its creamy layers. Top each serving with fresh berries for color. A mint leaf adds a fresh look. Drizzle honey or sprinkle cocoa powder on top for a finishing touch. These small details create a beautiful treat. {{image_2}} You can mix things up with Greek yogurt chocolate mousse. Try adding coffee for a rich taste. Just add 1 tablespoon of instant coffee to the melted chocolate. Want something fruity? Blend in some orange zest or a splash of almond extract. These little tweaks can give your mousse a unique flavor twist. If you want a dairy-free version, swap Greek yogurt with coconut yogurt. Make sure to pick a thick brand. Use dairy-free chocolate chips for a smooth and creamy feel. This way, you can enjoy a delicious treat without dairy. Garnishes make your mousse pop. In spring, use fresh strawberries or raspberries. In summer, top with blueberries or peaches. In fall, sprinkle chopped pecans or drizzle maple syrup. In winter, add a dusting of cocoa powder or crushed peppermint. These seasonal touches enhance flavor and make the dish look stunning. Store your Greek yogurt chocolate mousse in the fridge. Use airtight containers to keep it fresh. Cover each serving with plastic wrap or lids. This keeps the mousse creamy and prevents it from drying out. The mousse stays good for about 3 to 5 days in the fridge. If you notice any change in smell or texture, toss it out. Always check before enjoying a serving. You can freeze the mousse if you want to save some for later. Place it in a freezer-safe container. Leave some space at the top, as it may expand when frozen. It can last about 2 months in the freezer. To enjoy, thaw it in the fridge overnight before serving. Yes, you can use low-fat Greek yogurt. It will change the texture slightly. The mousse may not be as rich. Full-fat yogurt gives a creamier finish. If you choose low-fat, you might need to adjust the sweetener. To make this mousse vegan, use dairy-free yogurt. Look for almond or coconut yogurt. Replace honey with maple syrup or agave nectar. Use dark chocolate labeled as vegan. This way, you enjoy the same rich taste without dairy. Traditional chocolate mousse often uses eggs and heavy cream. This version uses Greek yogurt for a healthier twist. It’s lower in fat and higher in protein. The taste remains rich and delicious, but it’s lighter. Absolutely! Adding flavors can make this mousse unique. For coffee, mix in espresso powder. You can also add a dash of cinnamon or nutmeg for warmth. Experimenting with flavors can create a fun twist on this classic treat. Greek yogurt chocolate mousse is a simple treat. You learned the key ingredients, swaps, and optional garnishes. The step-by-step guide ensured easy preparation. Tips helped you get the right texture and look. Variations offered fun ways to personalize your mousse. In the end, this dessert is versatile and healthful. You can enjoy it any time with simple adjustments. Now, get creative and make your own delicious version!

Greek Yogurt Chocolate Mousse Decadent and Creamy Treat

Indulging in dessert doesn’t have to be a guilty pleasure. With this Greek Yogurt Chocolate Mousse, you can enjoy rich

- 1 can (15 oz) chickpeas, drained and rinsed - 1 large onion, chopped - 2 cloves garlic, minced - 1 medium sweet potato, diced - 1 red bell pepper, chopped - 1 zucchini, chopped Chickpeas are the star of this stew. They add protein and a creamy texture. Onions and garlic create a strong base. Sweet potatoes add sweetness and heartiness. Red bell peppers and zucchini bring color and crunch. - 1 tablespoon ground cumin - 1 tablespoon ground coriander - 1 teaspoon ground cinnamon - 1 teaspoon turmeric - ½ teaspoon cayenne pepper (adjust for spice preference) - 2 cups vegetable broth - 2 tablespoons olive oil The spices give this stew a warm, inviting taste. Cumin and coriander are key for that classic Moroccan flavor. Cinnamon adds depth, while turmeric brings a lovely color. Cayenne pepper gives it a kick, but you can adjust it. Olive oil adds richness and helps blend all the flavors. - Fresh cilantro or parsley - Lemon wedges Fresh herbs brighten up each bowl. Cilantro or parsley adds a fresh touch. Lemon wedges let you add a zesty burst to each bite. This stew is perfect with crusty bread or over fluffy couscous. Start by adding the chopped onion and minced garlic to the bottom of your slow cooker. This creates a fragrant base that will infuse the stew with great flavor. Next, layer the diced sweet potato, chopped bell pepper, and zucchini right over the onion and garlic. This mix of veggies not only adds color but also texture. Now rinse the canned chickpeas under cold water. This step helps remove excess salt. Add the rinsed chickpeas on top of the veggie layers. Then, pour in the can of diced tomatoes, juices included. The tomatoes will help create a nice sauce for the stew. In a separate bowl, mix together the vegetable broth with ground cumin, coriander, cinnamon, turmeric, cayenne pepper, salt, and pepper. Stir it well to blend the spices. Pour this spiced broth mixture over the ingredients in the slow cooker. It should cover everything nicely. Finally, drizzle the olive oil over the top to add richness and depth of flavor. Cover the slow cooker and set it to cook on low for 6-8 hours or high for 4-5 hours. This slow cooking helps meld all the flavors together. After the cooking time, check for doneness. The vegetables should be tender and the stew should smell amazing. If needed, adjust the seasoning before serving. How to adjust spice levels To change spice levels, start with less cayenne pepper. Taste the stew after cooking. If you want more heat, add a bit more cayenne. You can also use hot sauce at the end. Varying cook times based on slow cooker models Each slow cooker cooks a bit differently. Check your stew for doneness after about six hours on low. If your cooker is faster, it may be done sooner. If it’s slower, it may need more time. Always trust your taste buds! Additional spices and herbs to consider You can add more spices for a deeper flavor. Try some smoked paprika or ginger. Fresh herbs like thyme or mint can also add a nice touch. Mix and match to find your favorite blend. Suggestions for umami boosters To boost umami, add a tablespoon of soy sauce or miso paste. These add a savory depth to your stew. You can also include a splash of balsamic vinegar for extra richness. Serving suggestions and pairings Serve the stew over fluffy couscous or rice for a filling meal. You can also pair it with warm, crusty bread. A side salad with lemon vinaigrette brightens the meal. Creative garnish options Garnish each bowl with fresh cilantro or parsley. Add a sprinkle of toasted sesame seeds for crunch. A squeeze of lemon juice right before eating enhances the flavors wonderfully. {{image_2}} You can customize your stew with different vegetables. Try using carrots or eggplant. These veggies add unique flavors and textures. If you want a new twist, swap chickpeas for lentils or black beans. Each bean brings its own taste and texture, making your stew special. To make the stew vegan, ensure your broth is plant-based. The current recipe is already vegan friendly. If you need it gluten-free, check your vegetable broth. Most are gluten-free, but it's good to confirm. For low-sodium diets, use low-sodium broth and skip the added salt. You still get great flavor while keeping it healthy. Add dried fruits for a sweet touch. Raisins or apricots pair well with the spices. They add a nice contrast and depth to the dish. Feel free to play with spices too! Instead of the usual mix, try curry powder or garam masala. These options will give your stew a whole new vibe. To store leftover stew, let it cool first. Then, transfer it into a container. Use a glass or plastic container with a tight lid. This keeps the stew fresh and prevents spills. Keep it in the fridge for up to five days. You can freeze portions for later use. Divide the stew into smaller containers or freezer bags. Make sure to leave some space for expansion. When you're ready to eat, take it out and thaw in the fridge overnight. Reheat it on the stove or in the microwave until hot. In the fridge, the stew lasts for about five days. In the freezer, it can last up to three months. Make sure to label your containers with the date. This helps you keep track of how long it’s been stored. Yes, you can use dried chickpeas! You must soak and cook them first. Soak the dried chickpeas overnight in water. This helps them soften. After soaking, drain and rinse them. Then, boil them in fresh water for 1 to 1.5 hours. Ensure they are tender before adding them to the stew. This method takes more time but adds a great texture and flavor. You can serve this stew with several tasty sides. Here are some ideas: - Steamed rice or quinoa - Crusty bread or pita - A fresh green salad - Couscous for an extra Moroccan touch - Yogurt for a creamy contrast These pairings balance the flavors and add variety to your meal. To increase the heat, add more cayenne pepper. Start with a small amount, around a half teaspoon. Taste the stew, and add more if you like. You can also try adding fresh chili peppers or red pepper flakes. For a smoky flavor, include smoked paprika. Just be careful not to overpower the other spices. Adjust to your taste for the perfect spicy kick! In this post, we explored the rich, tasty world of Moroccan Chickpea Stew. We covered the key ingredients, including chickpeas and various vegetables. I shared easy steps for preparing and cooking the stew, along with tips to enhance its flavors. We also discussed ingredient swaps and dietary options to suit different needs. This stew is simple, healthy, and full of flavor. It's perfect for any meal. Enjoy making it your own and delight in the warmth it brings to your table.

Slow Cooker Moroccan Chickpea Stew Flavor Boost

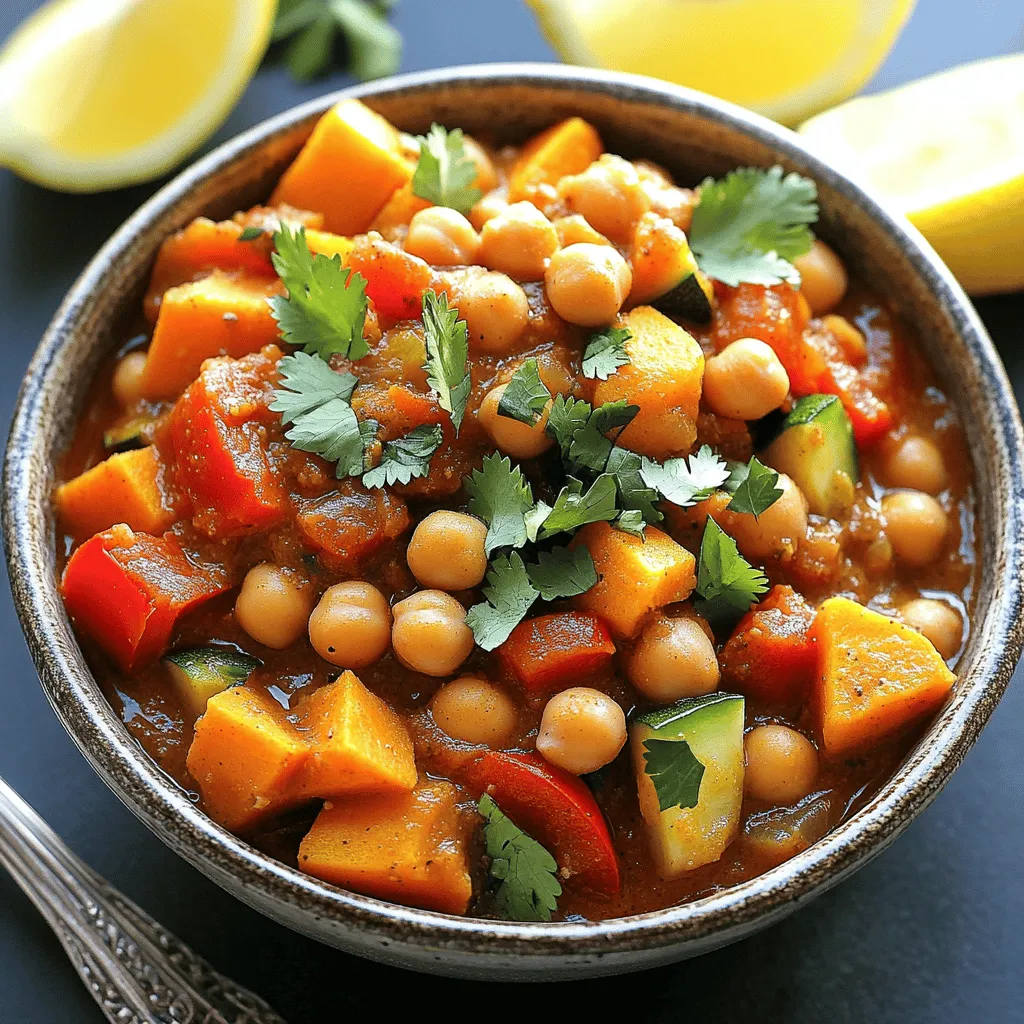
Looking for a dish that warms your heart and excites your taste buds? This Slow Cooker Moroccan Chickpea Stew is

To make this delightful bread, you will need the following key ingredients: - 4 cups all-purpose flour - 1 packet (2 ¼ tsp) active dry yeast - 1 ½ cups warm water (110°F) - 2 tablespoons sugar - 1 teaspoon salt - 4 tablespoons unsalted butter, softened - 4 cloves garlic, minced - 2 tablespoons fresh parsley, chopped - 1 tablespoon fresh rosemary, chopped - 1 tablespoon fresh thyme, chopped - ½ teaspoon black pepper Each ingredient plays a key role. The flour gives the bread its structure. Yeast makes the dough rise and adds flavor. Warm water helps activate the yeast. Sugar feeds the yeast for a good rise. Salt enhances all the flavors. Butter adds richness and a soft texture. Garlic adds that famous aroma and taste, while fresh herbs bring a vibrant touch. Feel free to get creative with your garlic herb swirl bread. Consider adding: - Shredded cheese (like mozzarella or cheddar) - Chopped sun-dried tomatoes - Crushed red pepper for heat - Walnuts or pecans for crunch These add-ins can boost flavor and texture. Cheese melts and creates a gooey center. Sun-dried tomatoes add a sweet-tart kick. Red pepper can spice things up, while nuts provide a nice crunch. Try a mix of these to see what you love best! Using fresh herbs is crucial for the best flavor. Dried herbs can work, but they lack the punch fresh herbs offer. Fresh parsley, rosemary, and thyme add bright notes to the bread. They also provide a lovely aroma while baking. Always chop the herbs just before using them to keep their flavor strong. Then, your garlic herb swirl bread will taste fresh and delicious! To start, grab a small bowl. Combine 1 ½ cups of warm water, 2 tablespoons of sugar, and 1 packet of active dry yeast. Let this sit for 5-10 minutes. Watch for it to become frothy. This means the yeast is active and ready to work its magic in your dough. Next, take a large mixing bowl. Add 4 cups of all-purpose flour and 1 teaspoon of salt. Make a small well in the center. Pour in your frothy yeast mixture and 4 tablespoons of softened butter. Mix it all together using your hands or a wooden spoon. Once a dough forms, knead it on a floured surface. Knead for about 8-10 minutes until it feels smooth and elastic. After kneading, place your dough in a greased bowl. Cover it with a damp cloth and let it rise in a warm spot for 1 hour. When it doubles in size, punch it down. Turn it out onto a floured surface. Roll the dough into a rectangle, about 12x18 inches. In a small bowl, mix 4 cloves of minced garlic, 2 tablespoons of chopped parsley, 1 tablespoon of chopped rosemary, 1 tablespoon of chopped thyme, and ½ teaspoon of black pepper. Spread this garlic herb mixture evenly over your dough, leaving a small border on the edges. Carefully roll the dough into a tight log and pinch the seams to seal. Now, slice the log into 1-inch thick rounds. Place them in a greased baking dish, cut side up. Cover the rolls with a kitchen towel. Let them rise for another 30 minutes. Preheat your oven to 375°F (190°C). Bake the rolls for 25-30 minutes until they are golden brown on top. When ready, allow the bread to cool slightly before serving. Pull apart the rolls to reveal the delicious swirl of garlic and herbs inside. Enjoy every bite! To get your bread to rise well, use warm water. The ideal temperature is about 110°F. This warmth helps the yeast wake up and grow. Mix the yeast with warm water and sugar. Let it sit for 5-10 minutes until it looks frothy. This shows the yeast is alive. Once your dough forms, put it in a warm spot. Cover it with a damp cloth. Let it rise for about an hour. The dough should double in size, which means it's ready to shape. Kneading is key to great bread. It helps develop gluten, which gives bread its nice texture. Use a floured surface and your hands. Push the dough down and fold it over. Turn it a quarter turn and repeat. Keep kneading for about 8-10 minutes until the dough feels smooth and elastic. You can also use a stand mixer with a dough hook for this step. Just mix it on low speed until it comes together. To get a nice swirl, roll the dough into a rectangle. Aim for about 12x18 inches. Spread the garlic herb filling evenly, but leave a border. This helps seal the log when you roll it up. Start from one long edge and roll tightly. Pinch the seams well to keep the filling inside. After slicing the log, let the rolls rise again. This second rise helps build that lovely flaky texture. When baked, you'll have a tasty swirl of garlic and herbs! {{image_2}} Cheese can make your garlic herb swirl bread even tastier. I love using mozzarella or cheddar. These cheeses melt well and add a rich flavor. Simply sprinkle the grated cheese over the garlic herb mixture before you roll it up. This way, the cheese gets all gooey and delicious during baking. It creates a wonderful cheesy swirl that pairs great with the herbs and garlic. You can also try adding a little parmesan for a nice salty touch. Feel free to mix up the herbs in your swirl. You can use basil, dill, or oregano for a unique twist. Each herb brings a new flavor and scent to the bread. If you want some heat, try adding red pepper flakes or smoked paprika. This change can add a fun kick. When you choose your herbs, go for fresh ones whenever you can. They give the best taste and aroma. If you need a gluten-free version, you can still enjoy this bread. Use a gluten-free all-purpose flour mix. Make sure it has xanthan gum, as this helps the bread rise. The steps are the same, but the dough may feel a bit different. Don't worry! It will still taste great. Keep an eye on the baking time. Gluten-free bread can bake a little faster, so check for a golden color. Enjoy your gluten-free garlic herb swirl bread warm with your favorite dip! To keep your Garlic Herb Swirl Bread fresh, place it in an airtight container. You can also wrap it tightly in plastic wrap. This helps prevent it from drying out. If you plan to eat it within a few days, store it at room temperature. For longer storage, the fridge is an option, but it may change the bread's texture. When you have leftover rolls, reheating them is simple. Preheat your oven to 350°F (175°C). Place the rolls on a baking sheet. Cover them with foil to keep them moist. Heat for about 10-15 minutes, or until warm. You can also microwave individual rolls for 20-30 seconds. Just be careful not to overheat, or they may get tough. Freezing is a great way to save extra rolls. After baking and cooling, place the rolls in a freezer bag. Squeeze out as much air as possible before sealing. They will stay fresh for about three months. When you want to eat them, thaw in the fridge overnight. Reheat as mentioned before, and enjoy that fresh, warm taste again! Serve Garlic Herb Swirl Bread warm. It tastes best right out of the oven. Place it in a rustic basket for a nice look. Garnish with fresh herbs for a pop of color. You can also pair it with olive oil or soft butter. This bread works well as a side for soups or salads too. Yes, you can make garlic herb bread ahead of time. Prepare the dough and let it rise. After rolling and filling, you can wrap it tightly and store it in the fridge. Bake it fresh the next day. This way, you have warm bread ready when you need it. Homemade garlic herb swirl bread lasts about 2-3 days at room temperature. Store it in a bread bag or wrapped in plastic. If you want it to last longer, freeze it. It can stay fresh in the freezer for up to 3 months. Just remember to thaw it before enjoying. You can find pre-made garlic herb swirl bread at many grocery stores. Check the bakery section for fresh options. Some local bakeries may also offer this bread. If you're looking for a specific brand, check online retailers or specialty shops. Garlic Herb Swirl Bread is simple yet delicious. We explored key ingredients, from fresh herbs to tasty add-ins. I shared steps to make it, helping you rise and bake perfectly. Use the tips to get that flaky swirl just right. Don’t forget variations like cheese or gluten-free options for all diets. Proper storage keeps your bread fresh longer. Enjoy serving it warm or reheated. This bread adds flavor to any meal and brings joy to your kitchen. Make it often, and share it with friends!

Garlic Herb Swirl Bread Flavorful and Irresistible Treat

Are you ready to bake something truly special? Garlic Herb Swirl Bread is not just a treat; it’s a delight

Older posts
Newer posts
← Previous Page1 … Page34 Page35 Page36 … Page84 Next →

dsad

© 2026 Lisa Dishes • Built with GeneratePress

Our Policies

  • Copyright Policy
  • Cookie Policy
  • GDPR Policy
  • Privacy Policy
  • Disclaimer
  • Terms Of Use

More Information

  • Home
  • About
  • Contact
  • Appetizers
  • Dessert
  • Dinner
  • Drinks
©2026, Lisa Dishes About Back To Top