Skip to content
DisclaimerTerms Of UseGDPR PolicyCookie Policy

Lisa Dishes

  • Home
  • Drinks
  • Appetizers
  • Dinner
  • Dessert
  • About
  • Contact
  • Privacy Policy
DisclaimerTerms Of UseGDPR PolicyCookie Policy

NO-ING-IMG

To make high-protein peanut butter oatmeal cookies, gather these key items: - 1 cup natural peanut butter - 1/2 cup cooked quinoa (cooled) - 1/2 cup rolled oats - 1/4 cup honey or maple syrup - 1/4 cup protein powder (vanilla or unflavored) - 1/4 teaspoon baking soda - 1/4 teaspoon salt - 1/2 teaspoon cinnamon You can add extra flavors or texture with these options: - 1/2 cup dark chocolate chips - 1/4 cup chopped nuts (almonds or walnuts) If you run out of something, here are some easy swaps: - Use almond butter instead of peanut butter. - Replace honey with agave syrup for a vegan option. - Swap quinoa with cooked brown rice or oats for added fiber. - Use a plant-based protein powder if you prefer. Start by preheating your oven to 350°F (175°C). This step is key for even baking. Line a baking sheet with parchment paper. This will stop the cookies from sticking. In a large bowl, mix together 1 cup of natural peanut butter and 1/4 cup of honey or maple syrup. Stir until the mix is smooth. This creates a nice base for your cookies. Next, add 1/2 cup of cooled cooked quinoa and 1/2 cup of rolled oats to the wet mix. Stir well to combine. This gives your cookies a hearty texture and boosts protein. In another bowl, whisk together 1/4 cup of protein powder, 1/4 teaspoon of baking soda, 1/4 teaspoon of salt, and 1/2 teaspoon of cinnamon. This blend adds flavor and structure to the cookies. Gradually add the dry mix to the wet mixture. Stir until the dough comes together. If you want, fold in 1/2 cup of dark chocolate chips and 1/4 cup of chopped nuts. This makes the cookies even more fun. Use a spoon or cookie scoop to drop tablespoons of dough onto your prepared sheet. Leave space between each cookie. They will spread a bit while baking. Bake the cookies for 10-12 minutes. Look for golden edges. The centers may seem soft, but they will firm as they cool. Let them sit on the baking sheet for 5 minutes, then move them to a wire rack. This cooling step keeps them from becoming soggy. To get the right texture in your cookies, focus on the peanut butter. Use natural peanut butter without added sugar or oils. This helps keep your cookies chewy. You can also add a bit more honey or maple syrup for extra moisture. If you want a firmer cookie, add more protein powder to the mix. For even baking, make sure your oven is preheated to 350°F (175°C). Use an oven thermometer to check accuracy. When baking, place the cookies in the center of the oven. This allows hot air to circulate around them. Rotate the baking sheet halfway through baking. This simple step ensures they cook evenly. Accurate measurements matter for great cookies. Use a kitchen scale for items like quinoa and protein powder. For sticky ingredients like peanut butter, use a measuring cup lightly coated with oil. This helps the peanut butter slide out easily. Always level off dry ingredients with a flat edge to avoid over-packing. {{image_2}} You can change the flavors in your cookies easily. Try adding spices like nutmeg or ginger for warmth. A dash of vanilla extract gives a sweet touch. You can also add cocoa powder for a chocolate twist. Each change creates a new taste. If you have dietary needs, swap ingredients with ease. Use almond butter or sunflower seed butter instead of peanut butter. For a nut-free option, choose pumpkin seed butter. Substitute honey with agave syrup for a vegan cookie. You can also use a gluten-free protein powder if needed. Add healthy ingredients to boost nutrition. Dried fruits like cranberries or raisins add sweetness. Seeds like chia or flaxseed give extra fiber and protein. You can also toss in shredded coconut for flavor and texture. Each of these add-ins makes your cookies more delicious and healthy. Store your cookies in an airtight container. This keeps them soft and fresh. Place parchment paper between layers to avoid sticking. Keep the container in a cool, dry place. If you live in a warm area, the fridge is a good choice. To freeze, let the cookies cool completely first. Place them in a single layer on a baking sheet. Freeze until solid, then transfer to a freezer-safe bag. Remove as much air as possible from the bag. You can freeze them for up to three months. When stored correctly, these cookies last about one week at room temperature. In the fridge, they can stay fresh for up to two weeks. If frozen, they can maintain their taste and texture for three months. Always check for any unusual smells or textures before eating. Yes, you can use other nut butters. Almond butter or cashew butter works well. Each nut butter has a unique taste. This can change the flavor of your cookies, so choose what you like. To make these cookies vegan, swap honey for maple syrup. Use a plant-based protein powder. Ensure your nut butter is also vegan. This way, you keep the cookies tasty and plant-based. Each cookie has about 5 grams of protein. This comes from the peanut butter and protein powder. If you add nuts or seeds, the protein content increases. These cookies make a great snack for muscle recovery. Yes, you can use quick oats. They will give a slightly different texture. The cookies may be softer and less chewy. If you prefer a chewier cookie, stick with rolled oats. If your cookies did not spread, the dough may be too dry. Make sure to mix well. Also, ensure you did not add too much protein powder. If the dough is too stiff, add a little water or more nut butter. In this post, we covered all you need for amazing cookies. We listed the must-have and optional ingredients, shared step-by-step instructions, and gave tips for perfect results. You can also explore variations and proper storage practices. Remember, baking is fun! Feel free to try new flavors and swaps. With practice, you’ll bake cookies everyone loves. Enjoy your cookies fresh or frozen. Happy baking!

High-Protein Peanut Butter Oatmeal Cookies Recipe

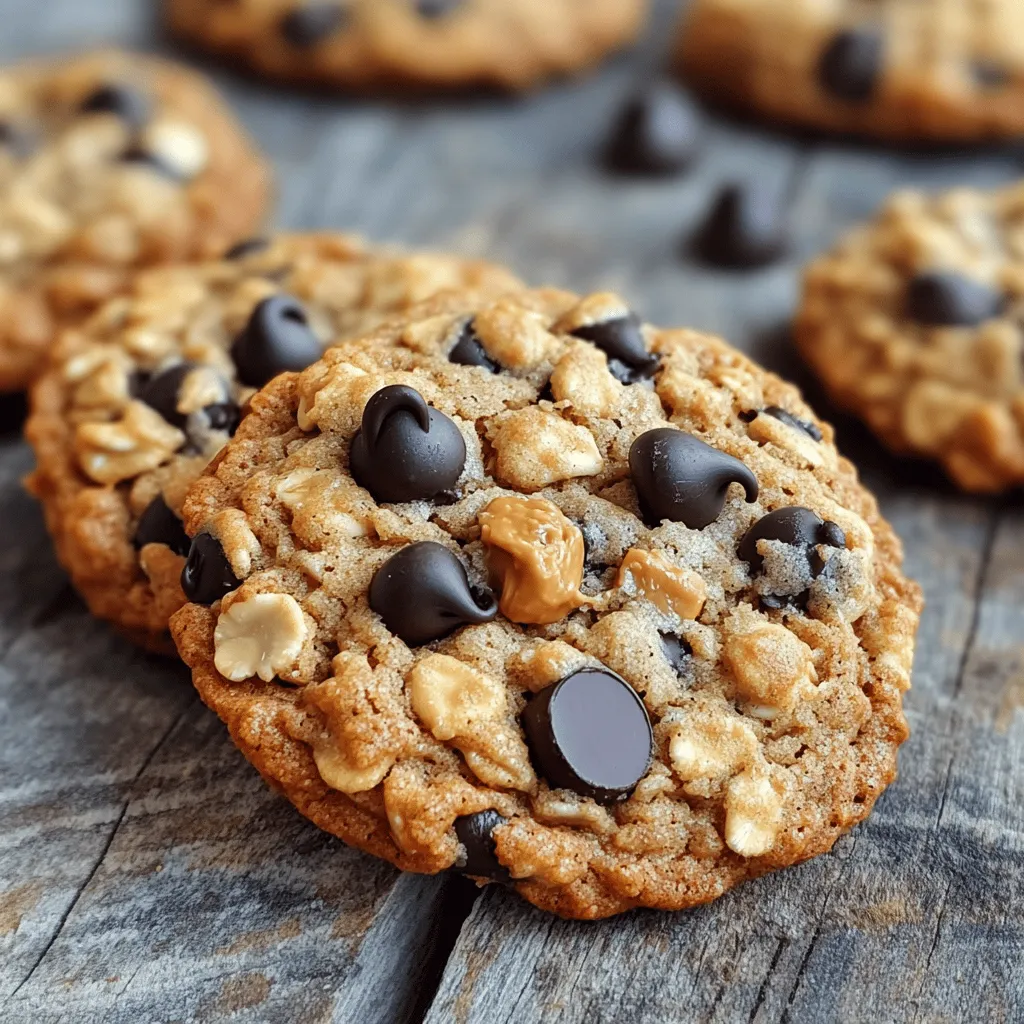
Are you ready to whip up a delicious treat that packs a protein punch? My High-Protein Peanut Butter Oatmeal Cookies

- 2 cups graham cracker crumbs - 1/2 cup unsalted butter, melted - 1/3 cup granulated sugar - 1/2 teaspoon ground cinnamon - 1 quart vanilla ice cream - 1 cup cream cheese, softened - 1/2 cup powdered sugar - 1 teaspoon vanilla extract - 2 cups finely diced apples (preferably Granny Smith) - 1/2 cup caramel sauce (plus extra for drizzling) - Sea salt for garnish Gathering the right ingredients is key for making Caramel Apple Cheesecake Ice Cream Sandwiches. Start with graham crackers. They form the base. Use unsalted butter to bind the crumbs. Granulated sugar adds sweetness. Ground cinnamon gives a warm spice to the crust. For the creamy filling, you need cream cheese and powdered sugar. They mix together for a smooth texture. Add vanilla extract for flavor. Apples bring a fresh crunch. Granny Smith apples work best because they are tart. Finally, the caramel sauce adds richness. You also want some sea salt. It balances the sweetness. With these ingredients, you create a tasty treat that everyone will love. Gather these items before you start cooking. To start, you need to make the cookie base. In a large bowl, combine the graham cracker crumbs, melted butter, granulated sugar, and ground cinnamon. Mix it until it looks like wet sand. Next, take a 9x13 inch baking dish and line it with parchment paper. Press the crumb mixture firmly into the bottom of the dish. You want it even and smooth. Bake this in a preheated oven at 350°F (175°C) for 10 minutes. Keep an eye on it until it turns lightly golden. Once it's ready, remove it and let it cool completely. Now, let’s move on to the cheesecake layer. In a medium bowl, beat the softened cream cheese, powdered sugar, and vanilla extract together. Mix this until it’s smooth and creamy. Then, fold in your diced apples and half of the caramel sauce. Be gentle when folding so you keep the apples intact. This mix adds a nice tartness and sweetness. With the cookie base cooled, spread the cheesecake mixture over the crust evenly. Use an ice cream scoop to add dollops of vanilla ice cream on top. Spread the ice cream gently to cover everything. Next, drizzle the remaining caramel sauce over the ice cream. Use a knife to swirl it in for a beautiful marbled effect. Cover the dish with plastic wrap and freeze it for at least 4 hours. This helps everything set into one delicious treat. When you’re ready to serve, take the sandwich out of the freezer. Let it sit for about 10 minutes to soften a bit. This makes cutting easier. Cut into squares or bars. Drizzle with extra caramel sauce and sprinkle a pinch of sea salt on top. For a great touch, serve on a wooden board with fresh apple slices. Enjoy each bite of this delightful treat! To get a great texture for your ice cream sandwiches, focus on the crust. Press the graham cracker mixture firmly into the pan. This will help it hold together well. Bake it until it's just golden, about 10 minutes. Let it cool completely before adding layers. This step is key for a sturdy base. When making the cheesecake layer, ensure your cream cheese is soft. This helps it blend smoothly. Beat it well with the sugar and vanilla. Then, fold in the diced apples gently. This keeps the apples intact. You want to taste the crunch in every bite. For a twist, try different ice cream flavors. Cinnamon or caramel ice cream pairs nicely with the apple taste. If you want a lighter option, consider using Greek yogurt instead of cream cheese. It adds creaminess but with less fat. For healthier toppings, use chopped nuts or fresh fruit. Sliced almonds or walnuts add crunch. You can also sprinkle cinnamon for extra flavor. These options will keep your dessert tasty and satisfying. {{image_2}} You can make this treat even more special with different flavors. Try adding spices like nutmeg or ginger to the graham cracker crust. These spices can give it a warm, cozy taste. You can also add flavored extracts. A bit of almond or maple extract can enhance the dessert. Using different types of apples can change the flavor too. While Granny Smith apples work best, you can try Honeycrisps for sweetness. Fuji apples add a nice crunch and flavor, too. Each apple brings its own unique taste to the dish. For parties, you can serve these ice cream sandwiches in fun ways. Arrange them on a wooden board for a rustic look. Drizzle extra caramel sauce over each piece for added flair. Add fresh apple slices around the sandwiches for color and freshness. For a creative touch, stack two sandwiches on top of each other. This makes for an eye-catching dessert. Use small bowls for caramel sauce for dipping. These ideas will impress your guests and make your dessert stand out. To store your caramel apple cheesecake ice cream sandwiches, wrap them tightly in plastic wrap. Place them in an airtight container or a resealable plastic bag. This method keeps them fresh and tasty. If you make them ahead of time, they can last in the freezer for up to a month. To maintain freshness and flavor, avoid leaving them exposed to air. Air can cause freezer burn, which affects taste and texture. If you plan to enjoy them later, label the container with a date to track how long they've been in the freezer. When you're ready to serve, remove the sandwiches from the freezer. Let them sit at room temperature for about 10 minutes. This short wait softens them just enough for easy cutting. If you want them a bit softer, you can also place them in the microwave. Heat them for about 10-15 seconds. Be careful not to overheat, as you don't want to melt the ice cream. Enjoy these delightful treats when they are perfectly soft! Can I use store-bought caramel sauce? Yes, you can use store-bought caramel sauce. It saves time and taste great. Just drizzle it over the ice cream before serving. If you want, you can warm it slightly to make it easier to drizzle. How long can I keep these ice cream sandwiches in the freezer? You can keep these ice cream sandwiches in the freezer for up to two weeks. Make sure to wrap them tightly in plastic wrap to prevent freezer burn. You want them to stay fresh and tasty. What can I do to prevent the apples from browning? To keep the apples from browning, soak them in a mix of lemon juice and water for a few minutes. Drain and pat them dry. This simple step keeps your apples looking fresh and bright in the cheesecake. Can I make this recipe gluten-free? Yes, you can make this recipe gluten-free. Use gluten-free graham crackers or swap them for almond flour. Just make sure all other ingredients are also gluten-free. Enjoy the same great taste without the gluten! This blog covered how to make delicious ice cream sandwiches with a cookie base and cheesecake filling. We explored key ingredients, step-by-step instructions, and helpful tips. You learned about flavor variations and how to store them for later enjoyment. In summary, these sandwiches blend creamy and crunchy in each bite. Enjoy experimenting with flavors and sharing them at gatherings. Your friends and family will love your tasty treats!

Caramel Apple Cheesecake Ice Cream Sandwiches Delight

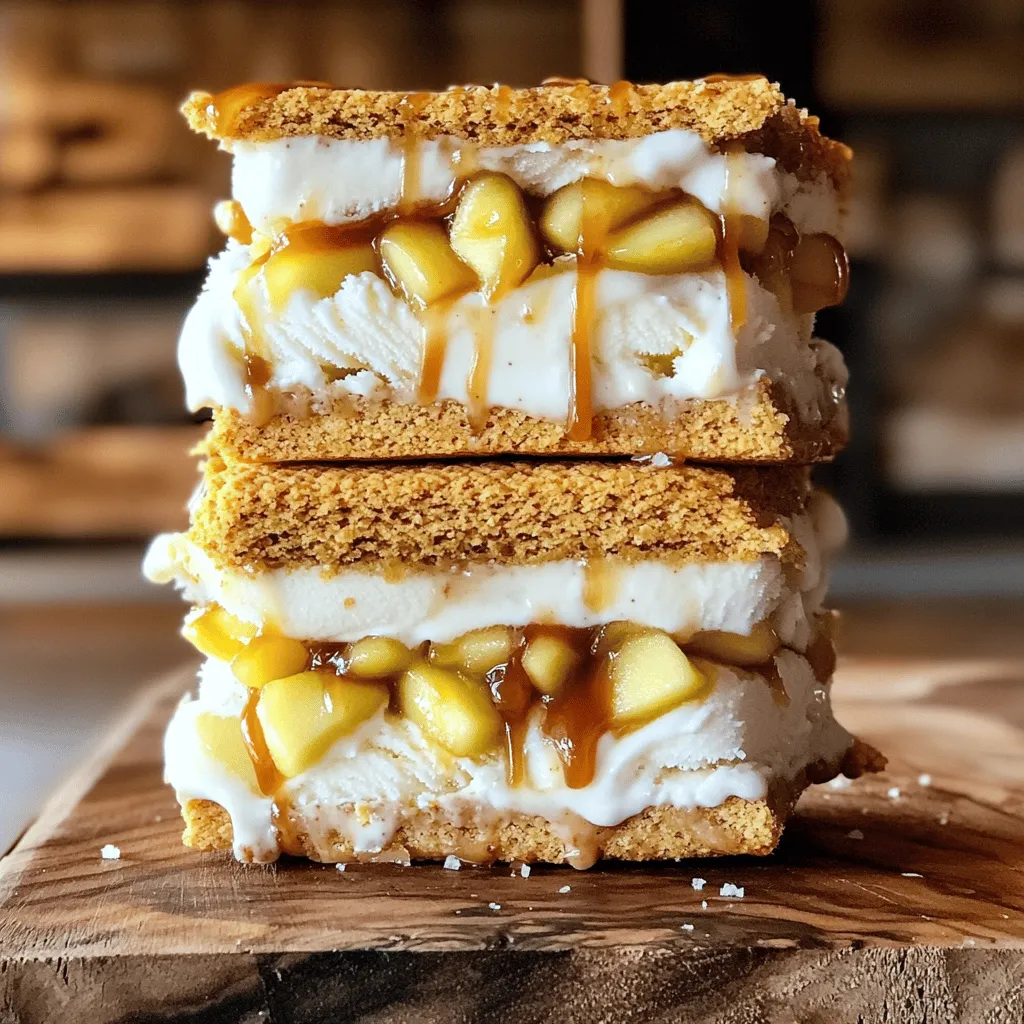
Get ready to treat your taste buds! In this blog post, I’ll show you how to make delicious Caramel Apple

To make delicious Mongolian Beef Noodles, you'll need the following ingredients: - 8 oz. egg noodles - 1 lb. flank steak, thinly sliced against the grain - 3 tablespoons soy sauce - 2 tablespoons oyster sauce - 1 tablespoon cornstarch - 2 tablespoons vegetable oil - 3 cloves garlic, minced - 1-inch piece ginger, grated - 1 cup sliced bell peppers (red and green) - 1 cup broccoli florets - 2 green onions, chopped - 1 tablespoon sesame oil - 1 teaspoon red pepper flakes (optional) - Salt and pepper to taste Each ingredient plays a role in creating rich flavors. The egg noodles are the base that holds everything together. Flank steak adds protein and a great texture. Soy sauce and oyster sauce give depth and umami. Cornstarch helps the meat stay tender and adds a nice glaze. Vegetables like bell peppers and broccoli add color and nutrients. Garlic and ginger bring warmth and aroma. Sesame oil finishes the dish with a nutty flavor, while red pepper flakes can give it a kick if you prefer heat. Gather all these ingredients before you start cooking. It makes the process easy and fun! First, bring a large pot of salted water to a boil. Add the 8 oz. of egg noodles to the water. Cook them for about 4-5 minutes, or until they are tender. Stir occasionally to prevent sticking. Once they are done, drain the noodles in a colander. Set them aside for later. In a medium bowl, combine the 1 lb. of thinly sliced flank steak with 3 tablespoons of soy sauce, 2 tablespoons of oyster sauce, and 1 tablespoon of cornstarch. Mix well to coat the beef. Let it rest for at least 15 minutes. This helps the beef absorb the flavors and become tender. Heat a large skillet or wok over medium-high heat. Add 2 tablespoons of vegetable oil. When the oil is hot, add the marinated beef in batches. Cook for about 2-3 minutes on each side, until it is browned and cooked through. Remove the beef from the pan and set it aside. In the same skillet, add 3 cloves of minced garlic and 1-inch piece of grated ginger. Sauté for about 30 seconds until fragrant. Next, add 1 cup of sliced bell peppers and 1 cup of broccoli florets. Cook for about 4-5 minutes until they are tender-crisp. Return the cooked beef to the pan. Add the drained noodles along with 1 tablespoon of sesame oil and 1 teaspoon of red pepper flakes if you like heat. Toss everything together gently until well combined and heated through, about 2-3 minutes. Season with salt and pepper to taste. You can also add more soy sauce for extra flavor. Top with 2 chopped green onions before serving. - Best practices for beef slicing When slicing flank steak, cut against the grain. This helps keep the beef tender. Aim for thin slices, about 1/4 inch thick. A sharp knife makes this easier. If the beef is too soft, chill it for 15 minutes before slicing. This gives you better control. - Importance of marinating Marinating the beef adds flavor and helps tenderize it. Use soy sauce, oyster sauce, and cornstarch for the marinade. Let it rest for at least 15 minutes, but longer is better. This time lets the meat soak up the flavors. - Suggestions for additional sauces To boost the flavor, try adding hoisin sauce or chili sauce. Both add depth and a unique twist. If you want a sweeter taste, consider a drizzle of honey. This can balance the savory notes. - Optional spices for extra heat If you like spice, add red pepper flakes. Start with a teaspoon and adjust to your taste. Fresh chili peppers are another option. They add heat and color to your dish, making it more vibrant. - Serving styles and garnishes Serve the noodles in deep bowls. This helps keep everything in place. Top with chopped green onions and sesame seeds for a pop of color. A sprinkle of cilantro can also brighten the dish. - Ideal dishware for serving Choose wide, shallow bowls for a modern look. These create a beautiful presentation. If you want a rustic feel, use wooden bowls. They add charm and warmth to your meal. {{image_2}} If you want to switch up the meat, try chicken or tofu. Chicken works well and cooks fast. Use boneless chicken thighs or breasts. Slice them thinly like the beef. Marinate them the same way. Tofu is a great plant-based option. use firm tofu for best results. Press it to remove water, then cube it. This helps it soak up the flavors. You can still use the same sauces to keep the taste rich. Adding seasonal vegetables is a fun way to change the dish. You can use carrots, snap peas, or mushrooms. These veggies add color and crunch. When you cook them, aim for a tender-crisp texture. This keeps all the nutrients and flavors. You can even toss in some zucchini or baby corn for variety. Feel free to swap in what you have on hand! If you need a gluten-free option, swap the egg noodles. Use rice noodles or zucchini noodles instead. Rice noodles are easy to find and cook quickly. Just soak them in hot water until soft. Zucchini noodles, or zoodles, are a low-carb choice. Spiralize the zucchini and sauté it briefly. This keeps them crisp and fresh. Adjust the cooking time so they don’t get too soft. To keep your Mongolian beef noodles fresh, follow these steps: - Cool Down: Let the dish cool to room temperature. This prevents condensation. - Containers: Use airtight containers to store the noodles. Glass or BPA-free plastic works well. - Fridge Storage: Place the sealed container in the fridge. Enjoy within 3 to 4 days. - Freezing: For longer storage, freeze the noodles. Use freezer-safe bags or containers. They last up to 2 months in the freezer. When it’s time to enjoy leftovers, here’s how to do it right: - Microwave: Place the noodles in a microwave-safe bowl. Add a splash of water to keep them moist. Heat for 1-2 minutes, stirring halfway through. - Stovetop: For a better texture, reheat on the stovetop. Add a little oil to a pan. Heat over medium until warmed through, about 5 minutes. Stir often to prevent sticking. Both methods work well, but stovetop heating keeps the noodles nice and chewy. Enjoy your delicious meal again! To make Mongolian Beef Noodles from scratch, gather these key ingredients: - 8 oz. egg noodles - 1 lb. flank steak, thinly sliced - 3 tablespoons soy sauce - 2 tablespoons oyster sauce - 1 tablespoon cornstarch - 2 tablespoons vegetable oil - 3 cloves garlic, minced - 1-inch piece ginger, grated - 1 cup sliced bell peppers - 1 cup broccoli florets - 2 green onions, chopped - 1 tablespoon sesame oil - 1 teaspoon red pepper flakes (optional) - Salt and pepper to taste Here are the main steps: 1. Cook the egg noodles as per the package. Drain them and set aside. 2. Marinate the flank steak with soy sauce, oyster sauce, and cornstarch for 15 minutes. 3. In a large skillet, heat the vegetable oil. Cook the beef until browned. 4. Sauté garlic and ginger for 30 seconds. Add bell peppers and broccoli, cooking them until tender. 5. Combine the beef, noodles, and sesame oil. Toss everything together for a few minutes. 6. Season with salt, pepper, and more soy sauce if you like. Top with green onions. Yes, you can use different types of noodles. Here are some options for noodle substitutions: - Rice noodles: These are lighter and gluten-free. - Soba noodles: They add a nutty flavor and are also gluten-free. - Udon noodles: These are thicker and chewier, giving a different texture. - Spaghetti or linguine: If you have these on hand, they can work too in a pinch. When serving Mongolian Beef Noodles, consider these side dishes: - Steamed dumplings: They add a nice bite. - Fried rice: A classic pairing that complements the flavors well. - Sesame cucumber salad: It brings a refreshing crunch. - Pickled vegetables: They offer a tangy contrast to the savory noodles. For drinks, try green tea or a light lager to balance the dish. Mongolian Beef Noodles offer a delicious meal filled with flavor and fun. We covered ingredients like egg noodles, flank steak, sauces, vegetables, and seasonings. Then, we walked through each cooking step, from boiling noodles to marinating beef. Remember, you can customize with different proteins and fresh veggies. Always store leftovers properly for best taste. Follow these tips, and enjoy a tasty dish that brings excitement to your table. Happy cooking!

Mongolian Beef Noodles Quick and Easy Recipe Guide

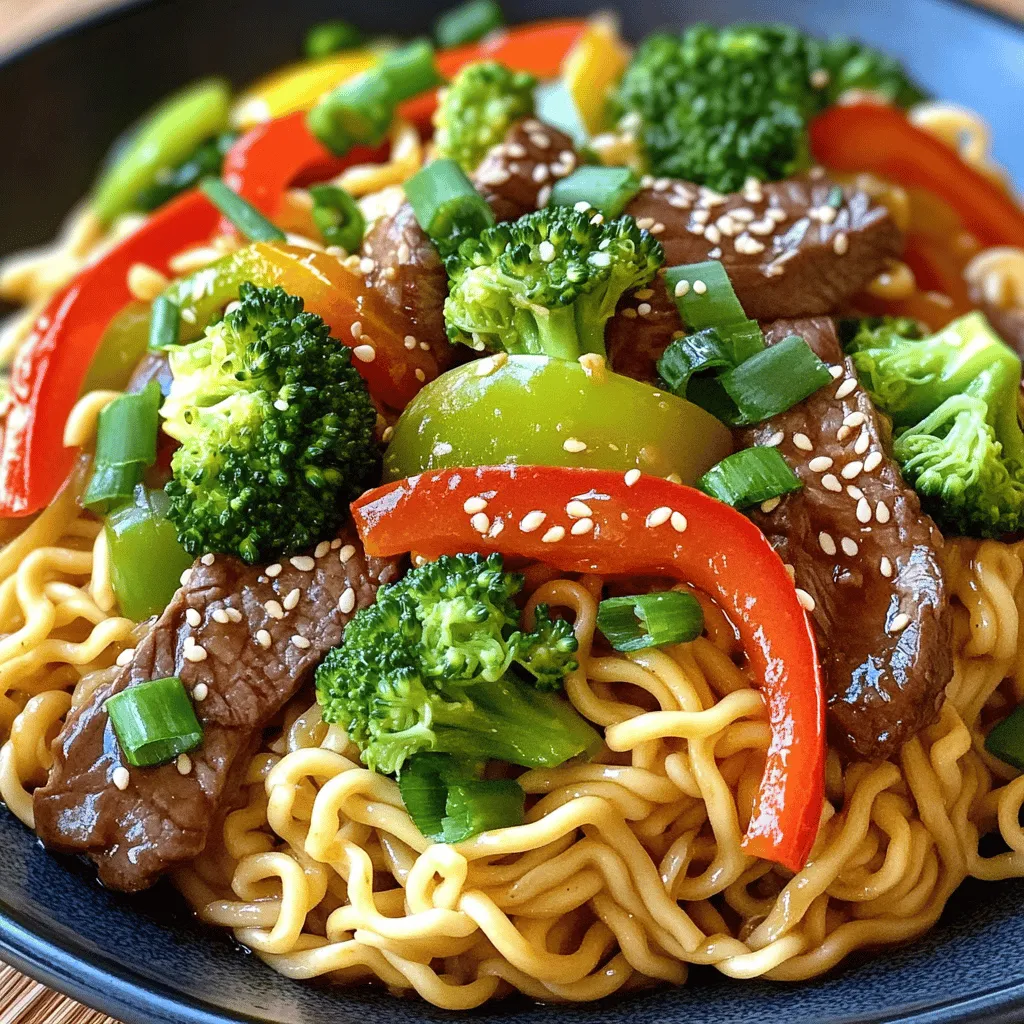
Craving a hearty dish that bursts with flavor? My Mongolian Beef Noodles recipe is simple and quick to make. With

- 12 oz fettuccine pasta - 1 lb shrimp, peeled and deveined - 2 tablespoons olive oil - 3 cloves garlic, minced - 1 cup cherry tomatoes, halved - 2 cups fresh spinach - 1 cup heavy cream - 1/2 cup grated Parmesan cheese - 1 teaspoon Italian seasoning - Salt and pepper to taste - Fresh basil for garnish To create a creamy Tuscan shrimp pasta, you need simple yet fresh ingredients. Fettuccine pasta forms a lovely base. Shrimp adds a tasty protein that pairs well with the sauce. Olive oil is key for sautéing and flavor. Garlic gives a strong, savory punch. Cherry tomatoes add sweetness and color. Fresh spinach brings a nice green touch. Heavy cream makes the sauce rich and smooth. Grated Parmesan cheese adds a salty, nutty flavor. Don’t forget Italian seasoning for that authentic taste. Lastly, salt and pepper help to enhance all the flavors. Fresh basil is perfect for a bright finish. You can find these ingredients at most grocery stores, making it easy to whip up this dish. Enjoy gathering your fresh ingredients as you prepare for a delightful cooking experience! Start by boiling a large pot of salted water. Use enough water to allow the pasta to move freely. Once the water boils, carefully add 12 oz of fettuccine pasta. Cook it according to the package instructions, usually around 8-10 minutes. Your goal is to achieve al dente texture, which means it should be firm yet tender. To check, bite a piece; it should have a slight chew. When done, drain the pasta and set it aside. In a large skillet, heat 2 tablespoons of olive oil over medium heat. Wait until the oil shimmers, then add 1 lb of peeled and deveined shrimp. Season with salt and pepper. Cook the shrimp for about 2-3 minutes on each side. They should turn pink and opaque when cooked through. Remove the shrimp from the skillet and set them aside. Using the same skillet, add 3 cloves of minced garlic. Sauté for about 30 seconds until it smells great. Next, add 1 cup of halved cherry tomatoes. Cook them for 3-4 minutes until they start to soften. Then, stir in 2 cups of fresh spinach. Cook until it wilts. Pour in 1 cup of heavy cream and add 1/2 cup of grated Parmesan cheese. Stir until the cheese melts and the sauce thickens. Season with 1 teaspoon of Italian seasoning, salt, and pepper to taste. Now, add the cooked fettuccine and sautéed shrimp back into the skillet with the creamy sauce. Toss everything together gently. Make sure the pasta and shrimp are well coated with the sauce. This step ensures every bite is rich and flavorful. To serve, plate the creamy Tuscan shrimp pasta with care. Garnish with fresh basil leaves for a pop of color and flavor. This simple touch makes the dish look beautiful and inviting. Enjoy your delightful dinner! To ensure shrimp are perfectly cooked, watch the color closely. Raw shrimp are gray. Cooked shrimp turn pink and opaque. This change means they are ready to eat. Sauté them for about 2-3 minutes on each side. Overcooked shrimp become tough and rubbery. For best results, remove them from the heat as soon as they change color. To achieve a creamy sauce, use heavy cream. This ingredient gives the sauce the richness it needs. If the sauce is too thick, add a splash more cream. For flavor enhancements, add Italian seasoning and a pinch of salt. Fresh herbs like basil also boost flavor. Consider garlic for an extra kick. For ideal side dishes, serve with a crisp salad or garlic bread. A light white wine pairs well, enhancing the meal's flavors. When it comes to presentation, plate the pasta neatly. Garnish with fresh basil for a pop of color. This makes the dish look more inviting and special. {{image_2}} You can switch fettuccine for other pasta types. Penne or spaghetti work well. These options change the texture but keep the flavor. For shrimp, you can use chicken or tofu instead. Cook chicken until it is golden brown. For tofu, press it first, then sauté until crispy. Both choices give new tastes and protein. To boost flavor, add spices like garlic powder or Italian herbs. Fresh herbs also add brightness. Try mixing in bell peppers or zucchini. These vegetables add color and taste. Want some heat? Mix in red pepper flakes for a spicy kick. Start with a pinch and add more if you like it hotter. If you need gluten-free options, choose gluten-free pasta. Many brands taste great and hold sauce well. To make it dairy-free, swap heavy cream for coconut milk or cashew cream. Use a dairy-free cheese for a cheesy flavor. These swaps keep the dish creamy without dairy. To store your creamy Tuscan shrimp pasta, let it cool first. Place it in an airtight container. This helps keep it fresh. Store in the fridge for up to three days. Make sure to label it with the date. When you reheat leftovers, avoid the microwave if possible. Microwaving can make the pasta soggy. Instead, use a skillet. Heat it on low. Add a splash of cream or broth to refresh it. Stir gently to keep the texture nice. Freezing this dish is easy. First, let it cool completely. Then, divide it into portions. Use freezer-safe bags or containers. Remove as much air as you can. This helps prevent freezer burn. It can stay fresh in the freezer for up to three months. To defrost, move it to the fridge overnight. For reheating, use the skillet method again. Add a little cream for a creamy texture. Enjoy the taste of fresh pasta even after freezing! It takes about 30 minutes to make Creamy Tuscan Shrimp Pasta. You will spend 15 minutes prepping and 15 minutes cooking. This dish comes together quickly, making it perfect for busy nights. Yes, you can use frozen shrimp. Just remember to thaw them first. To thaw, place the shrimp in a bowl of cold water for about 15-20 minutes. Cook them as directed in the recipe. They will taste great! If you want a lighter option, try using half-and-half or whole milk. You can also use coconut cream for a dairy-free choice. Keep in mind that the sauce may not be as thick, but it will still be tasty. Absolutely! To make it more kid-friendly, you can adjust the seasoning. Use less salt and keep the garlic mild. You can also add more spinach or tomatoes for extra color and nutrients. Yes, you can make it ahead of time. Cook the pasta and shrimp, then store them separately in the fridge. When ready to eat, heat them together in a pan with the sauce. This keeps everything fresh and tasty! This blog post guides you through making Creamy Tuscan Shrimp Pasta. We covered ingredients, cooking steps, and tips to perfect your dish. Remember to check for al dente pasta and properly season your shrimp. Feel free to explore substitutes, enhance your flavors, and make it your own. Use the storage and reheating tips to enjoy your meal later. With a few simple tweaks, you can impress anyone at your table. Happy cooking!

Creamy Tuscan Shrimp Pasta Flavorful Dinner Delight

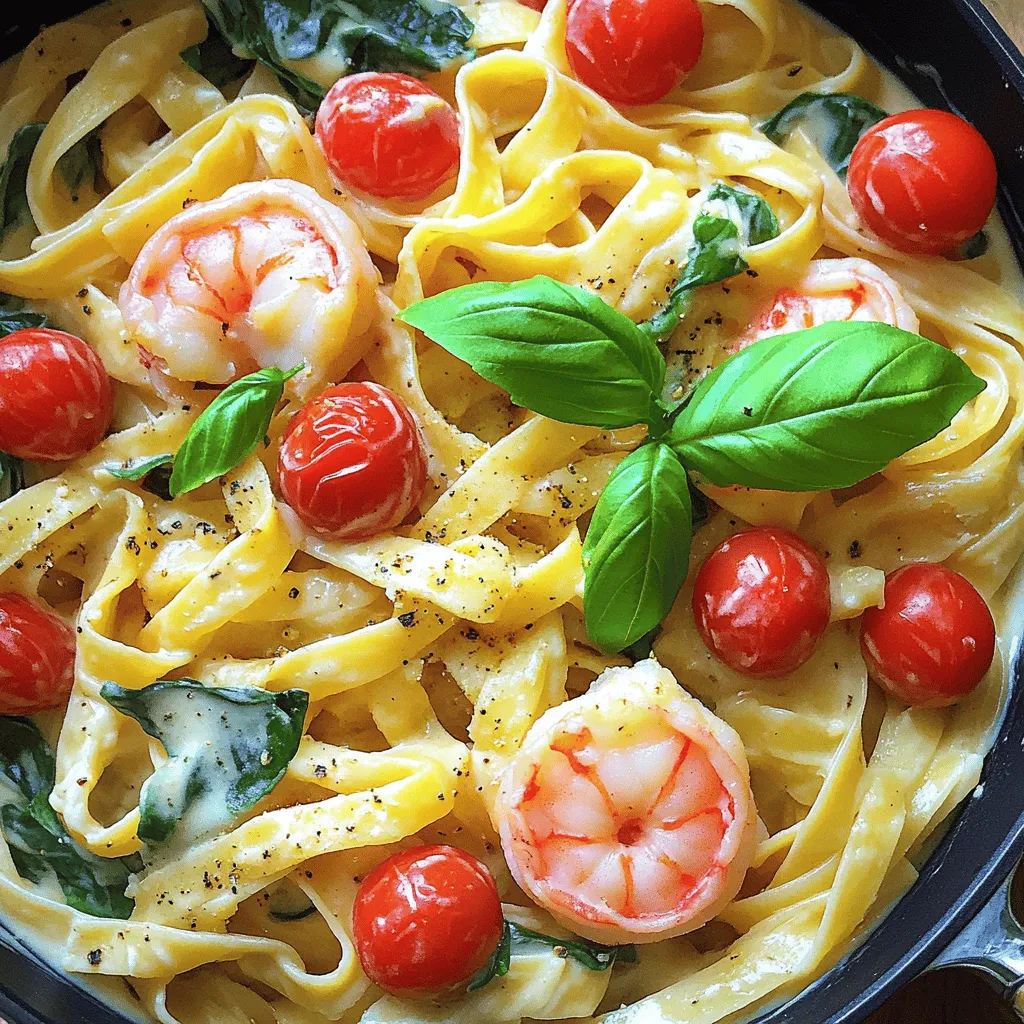
Looking for a dinner that is both quick and delicious? Creamy Tuscan Shrimp Pasta is your answer! This dish blends

- 8 oz cream cheese, softened - 1 cup pumpkin puree - 1 cup powdered sugar - 1 teaspoon vanilla extract - 1 teaspoon pumpkin spice blend - 1 cup graham cracker crumbs - 1 cup white chocolate chips, melted - Optional toppings: crushed walnuts or pecans These ingredients create a rich and creamy treat. The cream cheese gives a smooth base. Pumpkin puree adds a warm flavor, making it perfect for fall. The powdered sugar sweetens the mix well. Vanilla extract enhances the taste with a lovely aroma. The pumpkin spice blend brings a mix of cinnamon, nutmeg, and ginger. These spices make each bite cozy and festive. The graham cracker crumbs provide a crunchy texture. They also help bind everything together. Finally, the melted white chocolate coats the truffles. This adds sweetness and a nice finish. You can also roll the truffles in crushed nuts for extra crunch. With these ingredients, you create a delightful treat that everyone will love. Start with 8 oz of cream cheese. Use a mixer to beat it until smooth. Cream cheese should be soft and fluffy. Next, add 1 cup of pumpkin puree, 1 cup of powdered sugar, 1 teaspoon of vanilla extract, and 1 teaspoon of pumpkin spice blend. Mix all of this well until it’s creamy and combined. You want a light and airy texture. Now, stir in half of the 1 cup of graham cracker crumbs. This adds crunch and flavor. Cover the bowl and chill the mixture for about 1 hour. This makes it easier to handle. Once chilled, scoop out about 1 tablespoon of the mixture. Roll it into a small ball, about 1 inch in size. Place each ball on a parchment-lined baking sheet. Chill them again for 30 minutes to set. While the truffles chill, melt 1 cup of white chocolate chips. Heat them in a microwave-safe bowl in 30-second bursts. Stir in between until smooth. Dip each chilled truffle ball into the melted chocolate. Make sure to coat it fully. Use a fork to lift it out and let excess chocolate drip off. Place it back on the parchment. Before the chocolate hardens, roll the truffles in the remaining graham cracker crumbs or sprinkle with crushed walnuts or pecans. Let the truffles cool at room temperature. Store them in an airtight container in the fridge until serving. To make great truffles, you need a few tools. A large mixing bowl, an electric mixer, and a baking sheet lined with parchment paper work best. Keep your ingredients cold. This helps the truffles hold their shape. When mixing, beat the cream cheese until smooth. This step is key for creamy truffles. To get the right consistency, chill the mixture for at least one hour. This makes it easier to roll into balls. If it’s too soft, add more graham cracker crumbs. This helps firm it up. You can add more flavors to your truffles. Try a pinch of nutmeg or a dash of ginger. These spices boost the pumpkin taste. You can also use vanilla bean for a richer flavor. When dipping in chocolate, make sure it’s fully melted. Stir it well to avoid lumps. Use a fork to dip the truffles. This keeps your hands clean. Let excess chocolate drip off before placing them on parchment paper. For a fun finish, roll them in graham cracker crumbs or sprinkle with crushed nuts. This adds texture and flavor. {{image_2}} You can change the flavor of these truffles easily. One option is to use dark chocolate instead of white chocolate. Dark chocolate adds a rich taste and makes the truffles a bit more adult-friendly. You simply melt dark chocolate and dip your truffles in it. This swap gives a nice contrast with the sweet cheesecake filling. You can also swap out the pumpkin spice with other flavors. Try adding a bit of peppermint extract for a winter twist. You might want to use orange zest to give it a fresh, citrusy note. Each flavor brings a new life to these truffles. Experimenting is part of the fun! If you want to make these truffles gluten-free, simply use gluten-free graham cracker crumbs. Many brands now offer these, and they work just as well. This way, everyone can enjoy the treat without worry. For vegan adaptations, use a dairy-free cream cheese. There are many brands that offer tasty vegan options. Replace the white chocolate with dairy-free chocolate chips. This keeps the truffles creamy and delicious while being plant-based. You’ll have a delightful treat for all diets! To keep your pumpkin spice cheesecake truffles fresh, store them in an airtight container. Glass or plastic containers work well. These containers will help keep the moisture in and prevent the truffles from drying out. Place parchment paper between layers of truffles to avoid sticking. Refrigerate the container right after making the truffles. They will stay fresh and tasty when stored in the fridge. Pumpkin spice cheesecake truffles last about one week in the fridge. If you want to keep them longer, freezing is a great option. To freeze, place the truffles on a baking sheet lined with parchment paper. Make sure they are not touching. Freeze them for about one hour. Once frozen, transfer the truffles to an airtight container or freezer bag. Label the bag with the date. When you want to enjoy them again, take out as many truffles as you need. Thaw them in the fridge overnight. This keeps them creamy and tasty. Yes, you can make these truffles in advance. They hold up well in the fridge. Make them a day or two ahead of time. This way, you save time when guests arrive. Just store them in an airtight container. They stay fresh and flavorful. If you want a cream cheese substitute, use mascarpone cheese. Ricotta cheese can also work. Both will give you a rich and creamy texture. You can also try a dairy-free cream cheese if needed. Just ensure it fits your taste. You can tell the truffles are set when they feel firm to the touch. After chilling, they should hold their shape well. If they are still soft, give them more time in the fridge. The chocolate coating should also feel hard. Absolutely! Homemade pumpkin puree can add a fresh taste. Just ensure it is smooth and thick. Drain any excess water for the best results. This will help your truffles stay firm and delicious. Yes! If you want a nut-free option, skip the nuts entirely. Instead, roll the truffles in more graham cracker crumbs. You can also use shredded coconut or sprinkles for a fun touch. These alternatives will keep your truffles tasty and safe for all. You learned how to make delicious pumpkin spice cheesecake truffles. We covered the key ingredients, step-by-step instructions, and helpful tips. You can also explore tasty variations and learn best storage practices. These truffles are easy to make and fun to customize. Try them for your next gathering or treat yourself. Enjoy the festive flavors and impress your friends! Happy cooking!

Pumpkin Spice Cheesecake Truffles Delightful Treat

Are you ready to indulge in a treat that screams fall? These Pumpkin Spice Cheesecake Truffles combine rich cream cheese

To make this dish, you need a few key items. Here are the main ingredients: - 1 lb boneless, skinless chicken thighs, sliced into strips - 2 tablespoons honey - 3 cloves garlic, minced - 2 tablespoons soy sauce - 1 tablespoon sesame oil - 1 bell pepper (red or yellow), sliced - 1 cup broccoli florets - 1 cup snap peas - 1 tablespoon cornstarch mixed with 2 tablespoons water (for thickening) These ingredients bring a sweet and savory flavor to the dish. The chicken thighs stay juicy, while the veggies add crunch. You will need some basic tools for this recipe. Gather these supplies: - A large bowl for marinating - A skillet or wok for cooking - A whisk for mixing - A cutting board and knife for chopping Using the right tools makes cooking easier and more fun. A wok is great for stir-frying, as it heats evenly. To make your dish look and taste even better, try these garnishes: - 2 green onions, sliced - Sesame seeds These add color and a touch of extra flavor. They make your meal more appealing and delicious. {{ingredient_image_1}} Start by getting a large bowl. In it, whisk together 2 tablespoons of honey, minced garlic, soy sauce, and sesame oil. Slice your chicken thighs into strips and add them to the bowl. Mix well to coat the chicken. Let the chicken marinate for 15 minutes. This step adds great flavor and makes the chicken tender. Next, heat a large skillet or wok over medium-high heat. Once it is hot, add the marinated chicken and all the marinade. Cook the chicken for about 5-7 minutes. Stir occasionally, so it cooks evenly. Look for a nice brown color and make sure it is cooked through. Now, add your sliced bell pepper, broccoli florets, and snap peas into the skillet. Stir-fry for another 3-4 minutes. You want the veggies to be tender but still crisp. They add color and crunch to your dish. Finally, add the cornstarch mixed with water to the skillet. Cook for 1-2 minutes until the sauce thickens slightly. Remove from heat and garnish with green onions and sesame seeds before serving. Enjoy your honey garlic chicken stir-fry over rice or noodles! To make a great stir-fry, keep a few tips in mind: - Use high heat: This helps to cook quickly and adds a nice sear. - Prep all ingredients first: Have everything ready before cooking. It makes the process smooth. - Don’t overcrowd the pan: Cook in batches if needed. This keeps the chicken juicy. - Stir constantly: This helps the food cook evenly and prevents burning. If you don’t have the exact ingredients, here are some swaps: - Chicken thighs: Use chicken breast or tofu for a different protein. - Honey: Maple syrup or agave nectar works well too. - Soy sauce: Coconut aminos or tamari are great gluten-free options. - Vegetables: Feel free to swap in carrots, snap peas, or zucchini. To take your dish up a notch, try these ideas: - Add ginger: Fresh ginger gives a warm, spicy kick. - Include citrus: A squeeze of lime adds brightness. - Use fresh herbs: Cilantro or basil can enhance freshness. - Sprinkle with chili flakes: This adds heat without changing the dish too much. Pro Tips Marinate for Maximum Flavor: Allow the chicken to marinate for at least 15 minutes, or up to an hour for a deeper flavor infusion. Use Fresh Vegetables: Fresh vegetables not only enhance the color of your dish but also provide better texture and nutrition. Adjust the Sauce Thickness: If you prefer a thicker sauce, add a little more cornstarch mixed with water until you reach your desired consistency. Garnish for Presentation: Don't skip the garnishes! Sliced green onions and sesame seeds add a beautiful touch and extra flavor to your dish. {{image_2}} You can easily add more veggies to this dish. Try carrots, zucchini, or mushrooms. These add color and nutrition. Just chop them up and toss them in while cooking. The cooking time stays the same. This way, you get a mix of flavors and textures. If you want to switch proteins, chicken is not the only choice. You can use shrimp, beef, or tofu. Shrimp cooks fast and brings a nice taste. Beef adds a hearty feel. Tofu is great for a vegetarian option. Just make sure to cut them into bite-sized pieces. The cooking times may vary, so keep an eye on them. To make your dish spicy, add red pepper flakes or sriracha. Start with a small amount and taste as you go. You can always add more heat. If you prefer fresh spice, try sliced jalapeños. They give a fresh kick. Adjust the heat based on your taste. This way, you can enjoy the sweet honey garlic flavor with a fiery twist. To keep your honey garlic chicken stir-fry fresh, store it in an airtight container. Place the cooled dish in the fridge within two hours. It will last for about three to four days. Always let it cool before sealing. This helps prevent moisture buildup. When it's time to enjoy leftovers, the microwave is quick and easy. Place the stir-fry in a microwave-safe bowl. Heat it in short bursts of one minute. Stir between each burst to heat evenly. You can also reheat it in a pan over low heat. Add a splash of water or broth to keep it moist. You can freeze honey garlic chicken stir-fry if you want to save it for later. First, let it cool completely. Then, transfer it to a freezer bag or container. Remove as much air as possible to prevent freezer burn. It will stay good for about three months. When ready to eat, thaw it overnight in the fridge before reheating. You can serve honey garlic chicken stir-fry with cooked rice or noodles. Both options soak up the tasty sauce. You can also add a side of steamed veggies or a fresh salad. This balance makes your meal colorful and healthy. Yes, you can make this dish ahead of time. Cook the chicken and veggies, then store them in the fridge. You can reheat it before serving. However, prepare the rice or noodles fresh for the best taste and texture. To add spice, include sliced chilies or red pepper flakes. You can also use spicy soy sauce or add a splash of sriracha. Start with a small amount and taste as you go. This way, you can find the heat level you enjoy best. This blog post showed you how to make honey garlic chicken stir-fry. We covered key ingredients, cooking steps, and useful tips. You learned about variations and storage methods for leftovers. I hope you feel inspired to try this dish. It’s easy and delicious. Enjoy making your stir-fry and share it with friends and family. You will impress them with your cooking skills!

Honey Garlic Chicken Stir-Fry Simple and Flavorful Meal

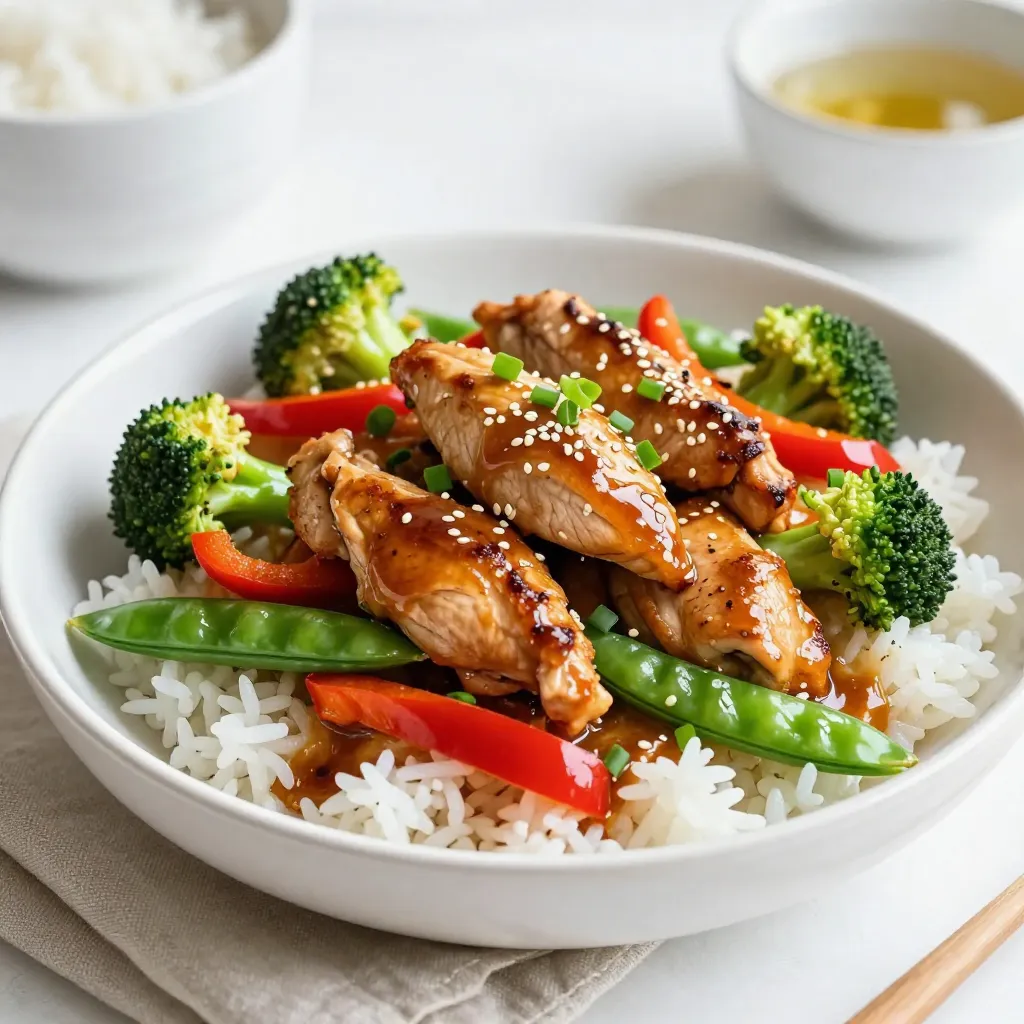
Are you ready to cook a meal that’s both simple and full of flavor? My Honey Garlic Chicken Stir-Fry is

To make Air Fryer Cinnamon Apple Chips, you will need: - 2 medium-sized apples (any variety you prefer) - 1 tablespoon ground cinnamon - 1 tablespoon sugar (or a sugar substitute) - Pinch of salt - Optional: 1 teaspoon lemon juice (to prevent browning) You can change the ingredients as needed. Here are some ideas: - Apples: Try different types like Fuji, Granny Smith, or Honeycrisp. Each gives a unique taste. - Sugar: Use a sugar substitute like stevia or erythritol if you want a lower-calorie option. - Cinnamon: Swap ground cinnamon for apple pie spice for a different flavor. You can add more fun to your apple chips. Consider these options: - Drizzle honey or maple syrup for extra sweetness. - Add nutmeg or allspice for a warm flavor. - Sprinkle a bit of sea salt for a sweet and salty mix. These ingredients help create tasty, crunchy snacks that everyone will love! Start by washing and drying your apples well. I like to use two medium-sized apples. You can pick any variety you enjoy! Next, grab a sharp knife or a mandoline slicer. Slice the apples into thin rounds, about 1/8 inch thick. If you want to stop them from browning, toss the slices with a teaspoon of lemon juice. This small step makes a big difference. Now it’s time to add flavor! In a small bowl, mix together one tablespoon of ground cinnamon, one tablespoon of sugar, and a pinch of salt. This mix gives your chips a sweet, spicy kick. Put the apple slices in a mixing bowl. Sprinkle your cinnamon-sugar mixture over them. Toss the slices gently until they all get coated evenly. You want every bite to taste great! Preheat your air fryer to 300°F (150°C). While it heats, arrange the apple slices in a single layer in the fryer basket. Make sure they don’t overlap; this helps them cook evenly. Cook the slices for about 15-20 minutes. Flip them halfway through to ensure they crisp up nicely. Keep an eye on them as cooking times can vary. Once they turn golden brown and crispy, take them out. Let the chips cool on a wire rack. They'll get even crunchier as they cool down. If you have leftovers, store them in an airtight container to keep them crisp. Enjoy your tasty snack! To get your apple chips nice and crispy, slice the apples thinly. Aim for about 1/8 inch thick. If the slices are too thick, they won't crisp well. Make sure to arrange the slices in a single layer in the air fryer. Overlapping will cause uneven cooking. Also, flip the slices halfway through cooking. This helps each side get that golden crunch. One common mistake is not drying the apples well after washing. Moisture can make them soggy. Another mistake is using too much cinnamon or sugar. You want to enhance the apple flavor, not mask it. Lastly, don't crowd the air fryer basket. This will lead to uneven cooking and less crispiness. Choose firm apples for the best results. Varieties like Fuji, Gala, or Honeycrisp work well. These apples are naturally sweet and hold up during cooking. Look for apples without bruises or soft spots. Fresh apples will give you the best flavor and texture for your chips. {{image_2}} You can switch up the flavor of your apple chips. Try adding caramel flavoring for a sweet kick. A sprinkle of nutmeg can bring warmth to your chips. You can also mix in a bit of vanilla extract for a lovely aroma. These tweaks make the chips fun and unique! Don’t just stop at apples! You can use pears, bananas, or even peaches. Slice them thin, just like the apples. Adjust the cooking time since different fruits may take longer or shorter to crisp up. This way, you can enjoy a variety of healthy snacks. Want a lower-sugar option? Replace regular sugar with a sugar substitute. Stevia or monk fruit sweetener works well. You can also skip the sugar altogether and focus on the fruit's natural sweetness. This keeps your snack tasty and guilt-free! To keep your air fryer cinnamon apple chips crispy, store them in an airtight container. This method prevents moisture from making them soggy. I recommend using a glass jar or a plastic container with a tight lid. You can also add a silica gel packet to absorb any extra moisture. Keep the container in a cool, dry place away from sunlight. If your apple chips lose their crunch, you can easily revive them. Preheat your air fryer to 300°F (150°C). Place the apple chips in the basket for about 2-3 minutes. This quick reheat will bring back their crisp texture. Watch them closely to avoid burning. Properly stored, apple chips can last for about one week. I find they taste best within the first few days after making them. However, if you keep them in an airtight container, they may stay fresh for longer. Just remember: the longer they sit, the less crispy they become. Enjoy them while they are at their best! Yes, you can use many apple types. I love using Fuji, Honeycrisp, or Granny Smith. Each type brings its own taste. Fuji apples are sweet, while Granny Smith adds a nice tartness. Try a mix for fun flavors! Check the color and texture. The chips should be golden brown and crispy. They might bend but should not feel soft. If you hear a crisp sound when you tap them, they are ready! Keep an eye on them since air fryers can vary. Yes, you can bake them! Preheat your oven to 225°F (107°C). Place the apple slices on a baking sheet lined with parchment. Bake for about 1.5 to 2 hours. Flip them halfway. Keep checking until they are crisp. Baking takes longer, but the taste is still great! You learned the key ingredients and how to prepare them for delicious apple chips. I shared tips for perfect crispiness and common mistakes to avoid. You can explore flavor variations and healthier options too. Proper storage will keep your apple chips fresh longer. Remember, you can use different apples and even bake them if needed. Enjoy your tasty snack and get creative with different fruits! Your apple chip journey starts now, so dive in and have fun.

Air Fryer Cinnamon Apple Chips Crunchy and Tasty Snack

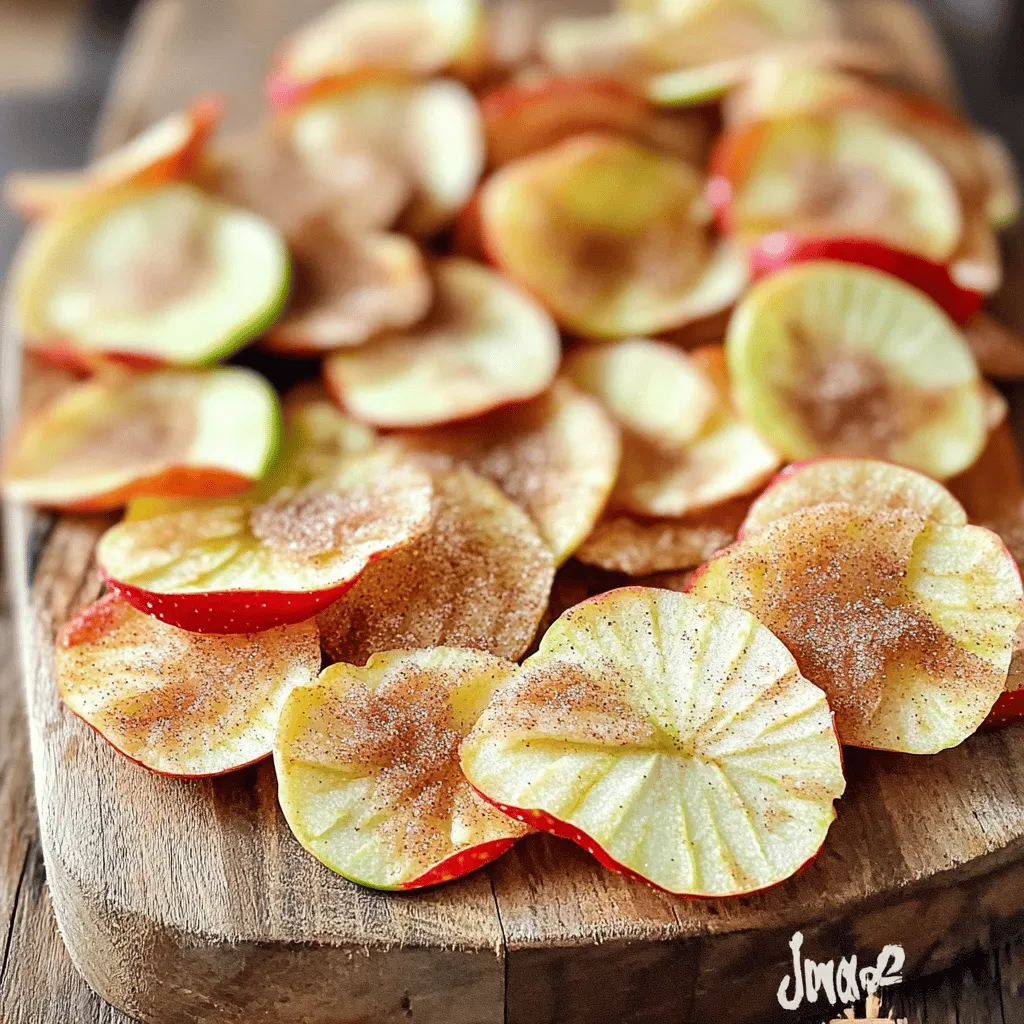
Looking for a quick and healthy snack? You’ll love these Air Fryer Cinnamon Apple Chips! They are crunchy, tasty, and

- 1 pound baby carrots, peeled and trimmed - 3 tablespoons unsalted butter, melted - 3 tablespoons honey - 3 cloves garlic, minced - 1 teaspoon fresh thyme leaves (or ½ teaspoon dried thyme) - Salt and pepper to taste - Fresh parsley for garnish (optional) To create the best honey garlic butter roasted carrots, you need fresh baby carrots. They are sweet and tender. The unsalted butter adds richness and depth. Honey brings a lovely sweetness and helps with caramelization. Garlic gives a warm, savory flavor. Thyme adds an earthy touch that blends perfectly. Don’t forget salt and pepper to enhance all these flavors. - Baking sheet - Mixing bowl - Whisk You will need a baking sheet to roast the carrots evenly. A mixing bowl helps you combine all the ingredients. A whisk works well to mix the butter, honey, and spices smoothly. Make sure you have everything ready before you start cooking. This way, you can focus on making your dish perfect! Preheating your oven to 400°F (200°C) is a key step. This warms the oven so your carrots cook evenly. If you skip this, the carrots may not roast correctly. Start with this step to ensure a great outcome. For the sauce, combine these ingredients in a large mixing bowl: - 3 tablespoons unsalted butter, melted - 3 tablespoons honey - 3 cloves garlic, minced - 1 teaspoon fresh thyme leaves (or ½ teaspoon dried thyme) - Salt and pepper to taste Whisk these together until they blend well. This mix gives your carrots a sweet, salty, and fragrant flavor. The butter helps everything stick to the carrots. Next, add 1 pound of peeled and trimmed baby carrots to the bowl. Toss them well in the honey garlic butter mixture. Use your hands or a spoon to make sure each carrot is evenly coated. This step helps the flavors reach every bite. Now, arrange the coated carrots in a single layer on a baking sheet lined with parchment paper. This helps with easy cleanup. Roast them in your preheated oven for 25-30 minutes. Stir halfway through for even cooking. You want them tender and slightly caramelized for the best taste. After roasting, remove the carrots from the oven. Let them cool for a couple of minutes. Transfer them to a serving dish. For a pop of color, garnish with freshly chopped parsley if you like. This adds freshness and makes your dish look great! To get the best texture, timing is key. Roast the carrots for 25 to 30 minutes. This gives them time to become tender and sweet. Halfway through cooking, stir the carrots. This helps them cook evenly and get a nice caramel color. If you leave them alone, they may caramelize better but may not cook as uniformly. Want to boost flavor? Try adding herbs like rosemary or dill. A pinch of cumin or paprika can also work well. If you want a sweeter taste, maple syrup or agave can replace honey. Just adjust the amount to fit your taste. These carrots pair well with many main dishes. Think roasted chicken, grilled fish, or even a veggie burger. For a nice presentation, use a clean white plate. Arrange the carrots in a fan shape, and sprinkle fresh parsley on top. This adds color and makes the dish pop. {{image_2}} You can mix baby carrots with other veggies for a colorful dish. Try adding small potatoes or parsnips. These veggies roast well and soak up the sweet sauce. Just cut them to the same size as the carrots. This way, they cook evenly. The mix of flavors makes each bite exciting. If you like heat, add chili flakes or a splash of sriracha. This brings a nice kick to the sweet honey and garlic. Start with half a teaspoon of chili flakes. You can adjust it to your heat level. The spice pairs well with the buttery carrots. It creates a tasty balance that surprises your taste buds. For a vegan twist, swap butter for vegan butter. Maple syrup can replace honey. This keeps the dish sweet and rich without animal products. Use the same amount of vegan butter and syrup as the recipe calls for. You won’t lose any flavor, and it stays just as delicious! To store leftovers, let the carrots cool first. Place them in an airtight container. They will stay fresh in the fridge for up to five days. Make sure to seal the container tightly. This keeps out moisture and odors. If you want to freeze roasted carrots, start by cooling them completely. Spread them on a baking sheet in a single layer. Freeze them for about two hours. Once they are firm, transfer the carrots to a freezer bag. Try to remove as much air as possible. They can last up to three months in the freezer. To reheat, the oven is the best option. Preheat your oven to 350°F (175°C). Spread the carrots on a baking sheet. Heat for about 10-15 minutes. This keeps them tender and helps them regain that nice texture. You can also use the microwave if you're in a hurry. Just heat them in short bursts, stirring in between. This helps avoid sogginess. Roast carrots for 25 to 30 minutes at 400°F. The time may vary based on size. Stir them halfway through for even cooking. You want them tender and a little caramelized. Yes, you can use regular carrots. Just cut them into smaller pieces. They may need a bit longer to cook. Aim for similar sizes to ensure even roasting. You can use maple syrup or agave nectar as a honey substitute. Both add sweetness. Adjust the amount to taste, as they can vary in sweetness. Yes, they are healthy. Carrots are rich in vitamins A and K. Honey adds natural sweetness, while butter provides healthy fats. Enjoy them as a tasty, nutritious side dish. This recipe for honey garlic butter roasted carrots is simple and tasty. You learned about the key ingredients, the steps to prepare and cook them, and some tips for getting it just right. Remember, little tricks can make a big difference. Whether you want to spice things up or keep it classic, there are many options to try. Keep these storage tips in mind for leftovers, and enjoy these delicious carrots!

Honey Garlic Butter Roasted Carrots Flavorful Side Dish

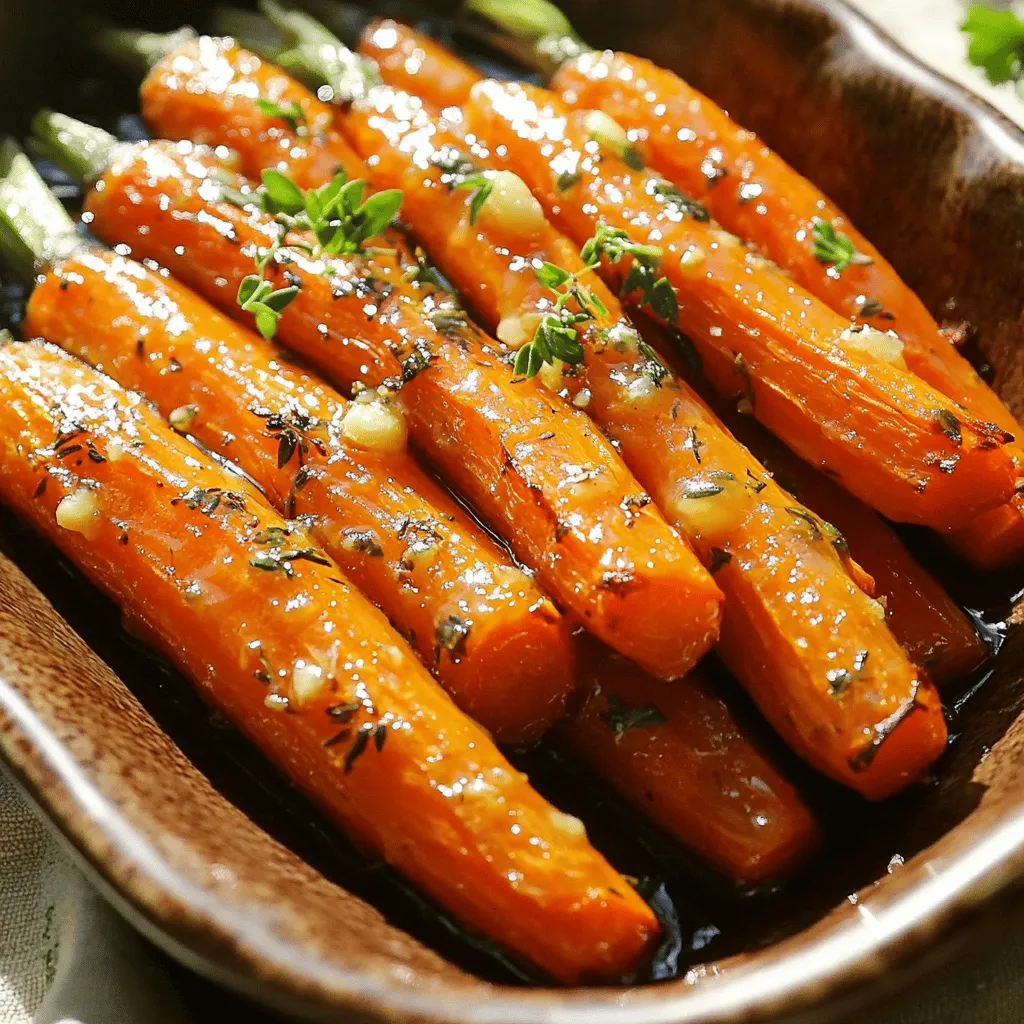
Looking for a delicious side dish? Honey garlic butter roasted carrots are your answer! With just a few simple ingredients,

- 1 ½ cups graham cracker crumbs - ½ cup unsalted butter, melted - 2 tablespoons sugar - 2 cups Greek yogurt (plain, full-fat) - 1 cup sweetened condensed milk - ½ cup fresh key lime juice (or regular lime juice) - Zest of 2 key limes - 2 large eggs - 1 teaspoon vanilla extract - Pinch of salt - Extra lime slices and whipped cream for garnish Greek yogurt is a star in this pie. It adds creaminess and a tangy taste. The full-fat version brings richness, making every bite a treat. Sweetened condensed milk sweetens the mix, balancing the tartness of the lime juice. Fresh key lime juice gives the pie its zesty flavor. Key lime zest adds more aroma and taste. The eggs help set the filling, creating a smooth texture. Graham cracker crumbs make the crust crunchy and sweet. Butter helps hold the crust together, while sugar adds a hint of sweetness. The vanilla extract enhances the pie's flavor, tying everything together. You can swap Greek yogurt for low-fat yogurt if you want fewer calories. Use honey or maple syrup instead of sugar for a natural sweetener. If you want a gluten-free crust, try almond flour or gluten-free graham crackers. Instead of sweetened condensed milk, coconut milk can offer a lighter option. Just be sure to adjust the sweetness based on your choice. First, set your oven to 350°F (175°C). This warms up your oven for baking. Next, grab a medium bowl. Mix 1 ½ cups of graham cracker crumbs with ½ cup of melted butter. Add in 2 tablespoons of sugar. Stir until you have a nice, even mixture. Now, take a 9-inch pie dish. Press the graham cracker blend into the bottom and up the sides. This forms your pie crust. Bake this crust for 10 minutes. You want it to be lightly golden. After baking, take it out and let it cool for a bit. In a large bowl, combine 2 cups of plain Greek yogurt with 1 cup of sweetened condensed milk. Add ½ cup of fresh key lime juice and the zest of 2 key limes. Crack in 2 large eggs and pour in 1 teaspoon of vanilla extract. Don't forget a pinch of salt! Whisk these ingredients together until you have a smooth, creamy mix. Pour this yogurt mixture into your cooled crust. Make sure to spread it evenly in the dish. Now, bake this pie for 15 to 20 minutes. You want the filling to be set but still slightly jiggly in the center. Once baked, take the pie out of the oven. Let it cool at room temperature for about 30 minutes. After that, place the pie in the fridge. Chill it for at least 3 hours. This helps it set fully and get even tastier. When you're ready to serve, garnish the pie with lime slices and dollops of whipped cream. This adds a lovely touch and makes it look great! Enjoy your creamy Greek yogurt key lime pie! To make a great crust, use fresh graham cracker crumbs. You can crush the crackers in a zip bag. Mix the crumbs with melted butter and sugar. This blend should feel like wet sand. Press it firmly into the bottom and sides of your pie dish. Bake it until it's lightly golden. This step gives you a crispy base. Let it cool completely before adding the filling. The filling needs to be smooth and creamy. Start with plain, full-fat Greek yogurt for the best taste. Combine it with sweetened condensed milk in a large bowl. Add fresh key lime juice and zest for zesty flavor. Mix in two large eggs and vanilla extract. Whisk until everything is well blended. A pinch of salt can enhance the flavor. The filling should be thick but pourable. Pour it into the cooled crust and spread it evenly. Garnishing adds a fun touch to your pie. Use extra lime slices for a pop of color. Place them on top or around the pie. Add dollops of whipped cream for a creamy finish. A sprinkle of lime zest can add flair too. These simple touches make your pie look more inviting. They also enhance the overall flavor. {{image_2}} You can change the flavor of your Greek yogurt key lime pie. Instead of key lime, try lemon or orange juice. Both will give a nice twist. You can also mix in fresh berries. Blueberries or raspberries work well. Just fold them into the yogurt mixture before baking. This adds color and taste to your pie. If you want a vegan version, swap Greek yogurt for coconut yogurt. Use maple syrup instead of sweetened condensed milk. For the crust, use dairy-free butter or coconut oil. Make sure to use aquafaba instead of eggs. Aquafaba is the liquid from canned chickpeas. It helps bind the pie together. This way, you still get a creamy and tasty pie without dairy. No-bake pies are easy and fun. To make a no-bake version, simply skip the baking steps. Mix the yogurt, lime juice, and other ingredients as usual. Pour the mixture into the prepared crust and chill for at least 4 hours. This helps it set nicely. You can enjoy a cool, refreshing pie without turning on the oven. Don't forget to garnish with lime slices and whipped cream! To keep your Greek yogurt key lime pie fresh, store it in the fridge. Cover it tightly with plastic wrap or use an airtight container. This will help keep the flavors intact. Enjoy leftovers within three days for the best taste. You can freeze this pie too! First, slice it into pieces. Wrap each slice in plastic wrap, then in aluminum foil. This helps prevent freezer burn. You can freeze the pie for up to two months. Thaw it in the fridge overnight before serving. This pie is best enjoyed fresh, but it can last in the fridge for up to five days. Check for any off smells or changes in texture. If you notice any, it’s time to toss it. For the best flavor, serve it within the first few days. Yes, you can use regular yogurt. However, Greek yogurt gives the pie a thick, smooth texture. Regular yogurt may make the filling runnier. If you choose regular yogurt, strain it first. This will help remove excess liquid and improve the texture. You can use fresh lime juice instead of key lime juice. The flavor will be a bit different, but still tasty. Lemon juice is another option. It adds a nice zing to the pie. Just keep in mind, the taste will change slightly with each option. You can bake the pie a day in advance. Just let it cool and then refrigerate it. This helps the flavors blend. The pie will taste even better the next day. Just remember to add the whipped cream and lime slices before serving. This keeps them fresh and pretty. This article covered essential ingredients, step-by-step instructions, and helpful tips for making key lime pie. You learned about ingredient substitutions and different variations to try, including vegan options. Proper storage methods help maintain freshness, while FAQs answered common questions. Making this pie can be fun and rewarding. Enjoy experimenting with flavors and share your delicious results with friends and family. Your key lime pie journey starts now!

Greek Yogurt Key Lime Pie Delightfully Smooth Recipe

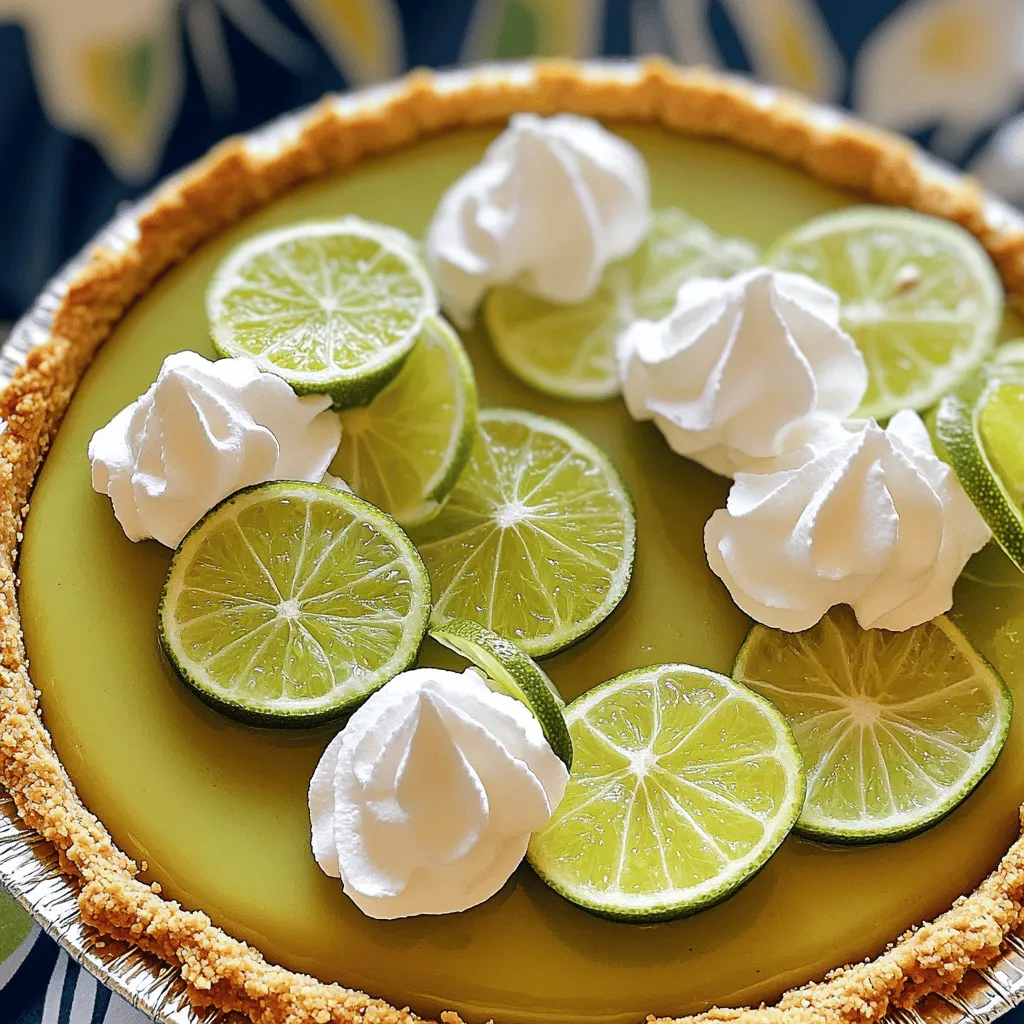
If you’re craving a dessert that’s both tangy and creamy, you’ve hit the jackpot! My Greek Yogurt Key Lime Pie

You can use store-bought or homemade potato gnocchi. I love making it from scratch, but store-bought saves time. Look for gnocchi made with good-quality potatoes. This will give you a nice, fluffy texture. If you choose store-bought, check the package for cooking instructions. Fresh mozzarella is the star here. I recommend using soft, creamy mozzarella. Cut it into small cubes to make stuffing easier. You can also try burrata for a richer flavor. Just be sure your cheese melts well. This will create a gooey, delightful center. Choose sun-dried tomatoes packed in oil for the best taste. The oil adds extra flavor to the dish. Chop them finely so they mix well with the cheese. You can also use dried tomatoes, but be mindful to rehydrate them first. Their sweet, tangy taste pairs perfectly with the cheese. First, grab a medium bowl. Add the fresh mozzarella cubes to the bowl. Then, chop the sun-dried tomatoes and add them in. Next, chop some basil and mix it all together. This mix will create a burst of flavor in each gnocchi. Set this bowl aside while you prepare the gnocchi. Next, fill a large pot with salted water and bring it to a boil. Once boiling, add the gnocchi in batches. Cook them until they float, which takes about 2-3 minutes. Use a slotted spoon to take them out and place them on a plate. When the gnocchi cool a bit, press your thumb gently into the center of each one. This creates a small space for the stuffing. Take a spoon and add some of the mozzarella mix into each gnocchi. Pinch the edges to seal them tightly. Now, take a large skillet and pour in the olive oil. Heat it on medium. Add the minced garlic and sauté it. Cook until it smells amazing, which should take about 1 minute. Be careful not to let the garlic burn, as it can turn bitter. This step adds a nice depth to the dish before you add the stuffed gnocchi. I start by heating some olive oil in a large skillet over medium heat. Once it’s hot, I gently add the stuffed gnocchi. Be careful not to overcrowd the pan. I let them cook for about five minutes. I shake the pan often to make sure they brown evenly. The goal is to achieve a golden and crispy texture on all sides. This step is key for great flavor. After the gnocchi are browned, I season them with salt and pepper. This simple step boosts their taste. Since the filling already has flavor from the sun-dried tomatoes and cheese, I keep it light. You can always adjust the seasoning to your liking. If you enjoy spice, a pinch of red pepper flakes adds a nice kick. To serve, I plate the gnocchi on a large dish or shallow bowl. I sprinkle some grated Parmesan cheese on top for added richness. Fresh basil leaves add a pop of color and flavor. For a fancy touch, I drizzle a bit of the olive oil from cooking around the edges. This makes the dish look appealing and inviting. Enjoying this gnocchi is truly a delightful experience! {{image_2}} To get the best stuffed gnocchi, choose the right gnocchi. Fresh or homemade gnocchi work well. If you use store-bought, check for quality. Always cook the gnocchi until they float. This means they are ready. For the filling, use cold cheese and chopped sun-dried tomatoes. This helps keep the filling firm. When you create the pocket, press gently. Don’t overstuff; a little goes a long way. The most common mistake is overcooking the gnocchi. Keep an eye on them as they cook. If they fall apart, your water may be too hot. Also, watch the garlic. It can burn quickly. If that happens, it will taste bitter. Lastly, make sure to seal your gnocchi well. If they open while cooking, the filling will escape. Presentation matters. To plate your gnocchi, use a large dish. Arrange them in a circle for visual appeal. Drizzle some olive oil around the edges for a nice touch. Top the gnocchi with grated Parmesan cheese for extra flavor. Fresh basil leaves make a great garnish. They add color and a fresh taste. A sprinkle of black pepper can elevate the look, too. You can swap fresh mozzarella for other cheeses. Try using ricotta for a creamier feel. Goat cheese adds a tangy twist. You could also use fontina for a rich, melty texture. Each cheese brings a new flavor to stuffed gnocchi. Choose one that excites your taste buds! Herbs can change the whole dish. If you love parsley, use it instead of basil. Thyme or oregano can also work well. Fresh or dried herbs can add depth. Experiment to find what you enjoy most. It’s a fun way to make the dish your own! You can easily make this dish vegan. Use plant-based mozzarella for a dairy-free option. Replace gnocchi made with eggs with a vegan version. For the filling, try using cashew cream mixed with sun-dried tomatoes. This keeps the dish creamy and satisfying. You will still enjoy that rich flavor! It takes about 15 minutes to prep and 15 minutes to cook. So, the total time is around 30 minutes. This makes it a quick dish for any meal! Yes, you can freeze stuffed gnocchi! To freeze, place the uncooked gnocchi on a baking sheet. Make sure they are not touching. Once frozen, transfer them to a freezer bag. They will last for up to three months. When ready to cook, just boil them straight from the freezer. You can serve stuffed gnocchi with a simple green salad or garlic bread. A light tomato sauce also pairs well. For a fancy touch, drizzle some basil pesto on top. This adds color and flavor! In this post, we explored how to make sun-dried tomato mozzarella stuffed gnocchi. We discussed ingredients like cheese and cooking techniques. You learned tips to ensure perfect stuffing and avoid common mistakes. Finally, we covered variations like using vegan cheeses. Enjoy making this dish and impressing your loved ones. Cooking can be fun and rewarding. With practice, you'll master stuffed gnocchi and create delightful meals every time.

Sun Dried Tomato Mozzarella Stuffed Gnocchi Delight

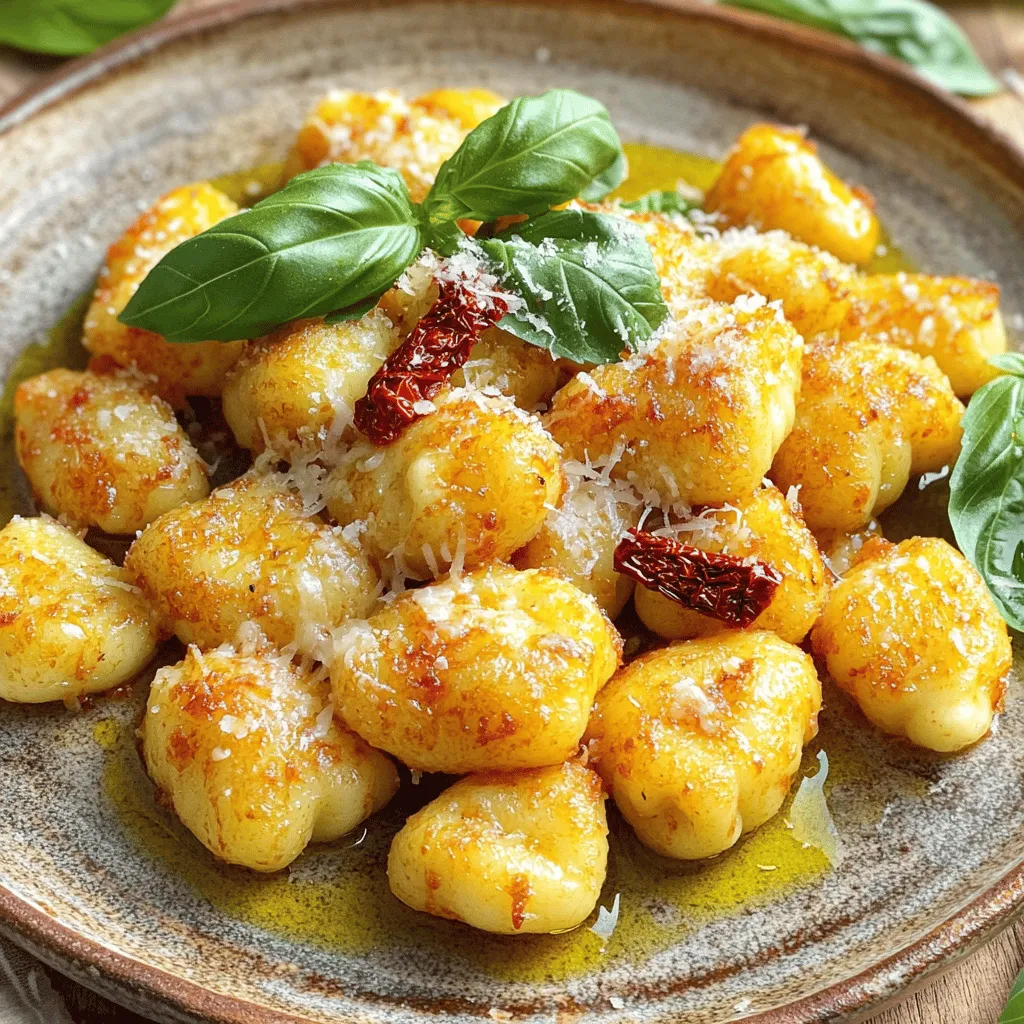
Are you ready to elevate your dinner game? In this post, I’ll show you how to make Sun Dried Tomato

Older posts
Newer posts
← Previous Page1 … Page31 Page32 Page33 … Page84 Next →

dsad

© 2026 Lisa Dishes • Built with GeneratePress

Our Policies

  • Copyright Policy
  • Cookie Policy
  • GDPR Policy
  • Privacy Policy
  • Disclaimer
  • Terms Of Use

More Information

  • Home
  • About
  • Contact
  • Appetizers
  • Dessert
  • Dinner
  • Drinks
©2026, Lisa Dishes About Back To Top