Skip to content
DisclaimerTerms Of UseGDPR PolicyCookie Policy

Lisa Dishes

  • Home
  • Drinks
  • Appetizers
  • Dinner
  • Dessert
  • About
  • Contact
  • Privacy Policy
DisclaimerTerms Of UseGDPR PolicyCookie Policy

NO-ING-IMG

- 4 chicken thighs, bone-in and skin-on - ¼ cup honey - 3 cloves garlic, minced - 2 tablespoons soy sauce (or tamari for gluten-free) - 1 tablespoon olive oil - 1 teaspoon fresh ginger, grated - 1 teaspoon paprika - Salt and pepper to taste - 2 cups mixed vegetables (such as bell peppers, broccoli, and carrots) - Sesame seeds for garnish - Chopped green onions for garnish The first step to this recipe is selecting your ingredients. I love using bone-in, skin-on chicken thighs. They stay juicy and flavorful. The honey adds a nice sweetness, while garlic gives a punch of flavor. Soy sauce enhances the dish with a savory touch. You will need fresh ginger for a hint of warmth. Paprika gives a nice color and a mild spice. Don't forget your mixed vegetables! Bell peppers, broccoli, and carrots bring color and crunch. For garnishes, sesame seeds and chopped green onions are perfect. They add a fresh finish to your dish. First, set your oven to 400°F (200°C). This ensures the chicken cooks evenly. In a small bowl, whisk together ¼ cup honey, 3 minced garlic cloves, 2 tablespoons soy sauce, 1 tablespoon olive oil, 1 teaspoon fresh ginger, 1 teaspoon paprika, salt, and pepper. Mix until smooth and well combined. This honey garlic sauce adds a sweet and savory flavor to the dish. Next, take 4 chicken thighs and place them on a large sheet pan. Make sure they have enough space. Pour half of that honey garlic mixture over the thighs. Use a brush or spoon to coat the chicken evenly. This helps each bite be full of flavor. Now, choose 2 cups of mixed vegetables. Bell peppers, broccoli, and carrots work great. Wash and chop them into bite-sized pieces. Arrange the veggies around the chicken on the same sheet pan. Drizzle the rest of the honey garlic sauce over the vegetables. Use your hands or a spatula to toss the veggies, ensuring they are well coated. This step makes sure every part of the dish gets that tasty sauce. Place the sheet pan in the preheated oven. Bake for 30 to 35 minutes. Keep an eye on the chicken, aiming for an internal temperature of 165°F (74°C). The skin should be crispy, and the edges will caramelize. Stir the vegetables halfway through baking for even cooking. Once the dish is done, take it out of the oven. Let it rest for a few minutes. This helps the juices settle in the chicken. For a nice presentation, garnish with sesame seeds and chopped green onions. This adds a pop of color and flavor to your dish. To get that crispy skin on your chicken thighs, I have some solid tips. First, make sure the skin is dry before cooking. Pat it with paper towels. The drier the skin, the better. Next, bake the chicken at a high temperature, like 400°F (200°C). This helps the fat render out quickly and gives you that nice crunch. To avoid sogginess, do not crowd the pan with chicken or veggies. Leave some space for air to flow. Stir the veggies halfway through cooking. This way, they cook evenly and stay crisp. Marinating is key for flavor. Use a mixture of honey, garlic, soy sauce, and olive oil. This blend makes the chicken juicy and full of taste. You should let the chicken marinate for at least 30 minutes. For best results, marinate for 2 hours in the fridge. The longer it sits, the more flavor it absorbs. Pair your honey garlic chicken thighs with simple sides. Rice or quinoa makes a great base. Steamed broccoli or a fresh salad adds nice color and crunch. For presentation, slice the chicken thighs before serving. Arrange them on a platter and sprinkle with sesame seeds and chopped green onions. This adds a pop of color and makes the dish look stunning! {{image_2}} You can swap chicken thighs for other proteins. Try using pork chops or tofu. Pork gives a nice richness and pairs well with honey. If you prefer tofu, choose firm or extra-firm for the best texture. Cut it into cubes and marinate like the chicken. Both options work great with the honey garlic sauce. Seasonal veggies add fun to this dish. Use zucchini, asparagus, or green beans in the spring. In the fall, try butternut squash or Brussels sprouts. Each vegetable adds different colors and textures. You can mix them up based on what you like or have on hand. This keeps the meal fresh and exciting. For spice lovers, add chili sauce or sriracha to the honey garlic mix. This adds heat and excitement. You can also switch up the sauce. Use teriyaki for a sweet and savory twist or barbecue for a smoky flavor. Each variant creates a new taste experience, making your meal different each time. After you enjoy your honey garlic chicken thighs, store any leftovers in the fridge. Place the chicken and mixed veggies in an airtight container. Make sure the lid seals well to keep the flavor locked in. The dish can stay fresh for up to three days in the fridge. If you want to save leftovers for later, freezing is a great option. Place the cooled chicken and veggies in a freezer-safe bag. Squeeze out as much air as you can before sealing. This helps prevent freezer burn. When you are ready to eat, thaw in the fridge overnight. Reheat in the oven or microwave until hot. In the fridge, your honey garlic dish lasts about three days. In the freezer, it stays good for up to three months. Just remember to label your containers with the date. This way, you always know when to use them for the best taste. Yes, you can use boneless chicken thighs. They cook faster than bone-in thighs. Adjust your cooking time to about 25-30 minutes. Check the internal temperature to reach 165°F (74°C). Boneless thighs will soak up the honey garlic flavor well. If you don’t have honey, use maple syrup or agave nectar. Both add sweetness and work well in this dish. Use the same amount as the recipe states for honey. You can also mix brown sugar with water for a similar taste. To make this recipe gluten-free, use tamari instead of soy sauce. It has a similar taste and works great. Check your mixed vegetables to ensure they are also gluten-free. Many fresh or frozen vegetables are safe to use. Serve honey garlic chicken thighs with rice or quinoa. Steamed broccoli or a fresh salad makes a great side too. You can also try mashed potatoes for a comforting option. If you have leftovers, chop the chicken and toss it into a wrap for lunch! This recipe for honey garlic chicken thighs is simple and tasty. You learned how to prepare the chicken, mix in colorful veggies, and bake it all to perfection. I shared tips for crispy skin and marinating. You can also explore variations with different proteins or spicy flavors. Storing leftovers is easy, too. Remember, even small changes can add more fun to your dish. Enjoy creating this meal with your own personal touch! Happy cooking!

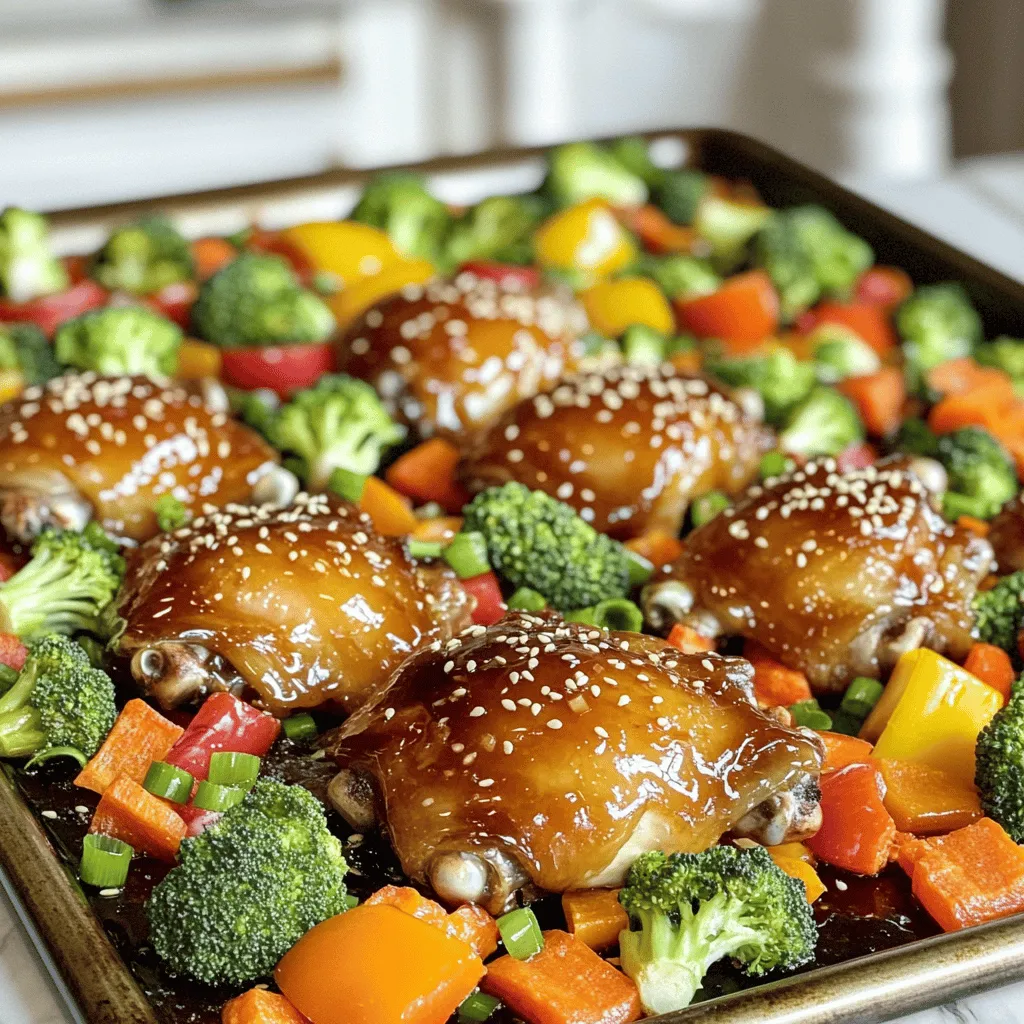
Honey Garlic Chicken Thighs Sheet Pan Delight

If you’re craving a dish that balances sweet and savory, you’re in the right place. My Honey Garlic Chicken Thighs

I use 1 cup of cottage cheese for these brownies. Blending it smooth gives the brownies a creamy texture. This ingredient also adds protein, making them more filling. You can use low-fat or full-fat cottage cheese, based on your choice. Next, I add 1/2 cup of creamy peanut butter. It gives the brownies a rich, nutty flavor. Any brand works well, but I prefer natural peanut butter without added sugar. This makes the brownies taste fresh and wholesome. I sweeten the batter with 1/2 cup of honey or maple syrup. Both options are great, but honey has a stronger flavor. Maple syrup adds a lovely caramel note. Choose what you like best! I use 2 large eggs and 1 teaspoon of vanilla extract. The eggs bind the ingredients and help the brownies rise. The vanilla adds a warm sweetness that enhances all the flavors. For the dry mix, I sift 1/2 cup of unsweetened cocoa powder, 1/4 teaspoon of baking powder, and 1/4 teaspoon of salt. The cocoa gives the brownies their chocolatey taste. The baking powder helps them rise, and salt balances the sweetness. If you want to make these brownies extra special, add 1/2 cup of dark chocolate chips or 1/4 cup of chopped nuts. I love walnuts or pecans for a nice crunch. These add-ins boost flavor and texture, making each bite more exciting. First, set your oven to 350°F (175°C). This heat makes the brownies bake just right. Next, take an 8x8 inch baking pan. Lightly grease it with cooking spray or line it with parchment paper. This step helps with easy removal later. In a large bowl, combine 1 cup of blended cottage cheese and 1/2 cup of creamy peanut butter. Stir them together until the mix is smooth and creamy. Then, add in 1/2 cup of honey or maple syrup, 2 large eggs, and 1 teaspoon of vanilla extract. Mix until everything is well blended. In another bowl, sift together 1/2 cup of unsweetened cocoa powder, 1/4 teaspoon of baking powder, and 1/4 teaspoon of salt. This dry mix adds flavor and helps brownies rise. Gradually add this mixture to the wet ingredients. Stir until just combined. Be careful not to overmix. If you want, fold in 1/2 cup of dark chocolate chips and 1/4 cup of chopped nuts. This step adds extra flavor and texture to the brownies. Make sure they are evenly spread throughout the batter. Pour the brownie batter into the prepared pan. Smooth the top with a spatula. Place it in the preheated oven. Bake for 25-30 minutes. Check if they are done by inserting a toothpick in the center. It should come out mostly clean. A few moist crumbs are okay. After baking, let the brownies cool in the pan for 10 minutes. Then, transfer them to a wire rack to cool completely. Once they are cool, cut them into squares. Serve them on a nice platter. Dust with cocoa powder or powdered sugar for a lovely touch. You can also add a dollop of whipped cream or a drizzle of peanut butter on top for extra flair. To get great brownies, blend the cottage cheese until it's smooth. This step helps create a creamy base. Mix the peanut butter in well, so it blends with the cottage cheese. Avoid overmixing your batter. This keeps the brownies soft and chewy. You can swap honey with maple syrup for a different flavor. Both sweeteners work well in this recipe. If you want less sugar, try a sugar substitute like stevia. Just remember to check the package for the right amount to use. Start by mixing wet ingredients first. This includes cottage cheese, peanut butter, honey, eggs, and vanilla. Stir until smooth, but don’t overdo it. Next, add in the dry ingredients. Mix gently until combined. Overmixing can lead to dense brownies. Serve your brownies on a nice platter. Dust them with cocoa powder or powdered sugar for a fancy touch. For extra flair, add whipped cream or a drizzle of peanut butter on top. You can also sprinkle some chopped nuts for added crunch. {{image_2}} You can easily make these brownies gluten-free. Just swap regular cocoa powder for a gluten-free brand. Use certified gluten-free oats instead of flour. This keeps the taste rich and smooth. To make this recipe vegan, replace the eggs with flax eggs. Mix one tablespoon of ground flaxseed with three tablespoons of water. Let it sit for five minutes to thicken. Use maple syrup as a sweetener, too. Want to spice things up? Add a pinch of cinnamon or nutmeg for warmth. You can also mix in a teaspoon of almond or mint extract. These little tweaks can add a fun twist to your brownies! You can store leftover brownies in an airtight container. Keep them at room temperature for up to three days. If you want them to last longer, place them in the fridge. They can stay fresh for about a week in the fridge. Just make sure they are covered well so they don’t dry out. To freeze your brownies, first let them cool completely. Cut them into squares and wrap each piece in plastic wrap. Next, place the wrapped brownies in a freezer bag. They can stay in the freezer for up to three months. When you’re ready to enjoy them, just take out how many you want. For reheating, you can use the microwave or the oven. If using the microwave, heat each brownie for about 10-15 seconds. Check if it’s warm enough, and add a few more seconds if needed. For the oven, preheat it to 350°F (175°C) and warm the brownies for about 5-10 minutes. This way, they taste fresh and gooey again. Yes, you can use low-fat cottage cheese. This will change the texture slightly. The brownies may be a bit less rich, but they will still taste great. Blending it smooth helps keep the texture creamy. To check if the brownies are done, insert a toothpick in the center. If it comes out mostly clean, they are ready. A few moist crumbs are okay. Bake for 25-30 minutes for the best results. Absolutely! These brownies are very kid-friendly. They are sweet, chocolatey, and have a fun texture. The cottage cheese adds protein, making them a better treat than regular brownies. If you want a different flavor, try almond butter or sunflower seed butter. Both will give a unique taste. Make sure they are smooth to mix well with the other ingredients. To boost the chocolate flavor, add more cocoa powder. You can also stir in extra dark chocolate chips. This will make the brownies rich and decadent. Enjoy exploring different chocolatey options! This blog post covered how to make delicious brownies using simple ingredients. We talked about key steps like mixing wet and dry ingredients and baking tips. Don't forget to explore variations for gluten-free and vegan options. Storing your brownies right ensures they stay fresh. Remember, you can adapt the recipe to make it your own. Enjoy your baking journey!

Cottage Cheese Peanut Butter Brownies Delight Recipe

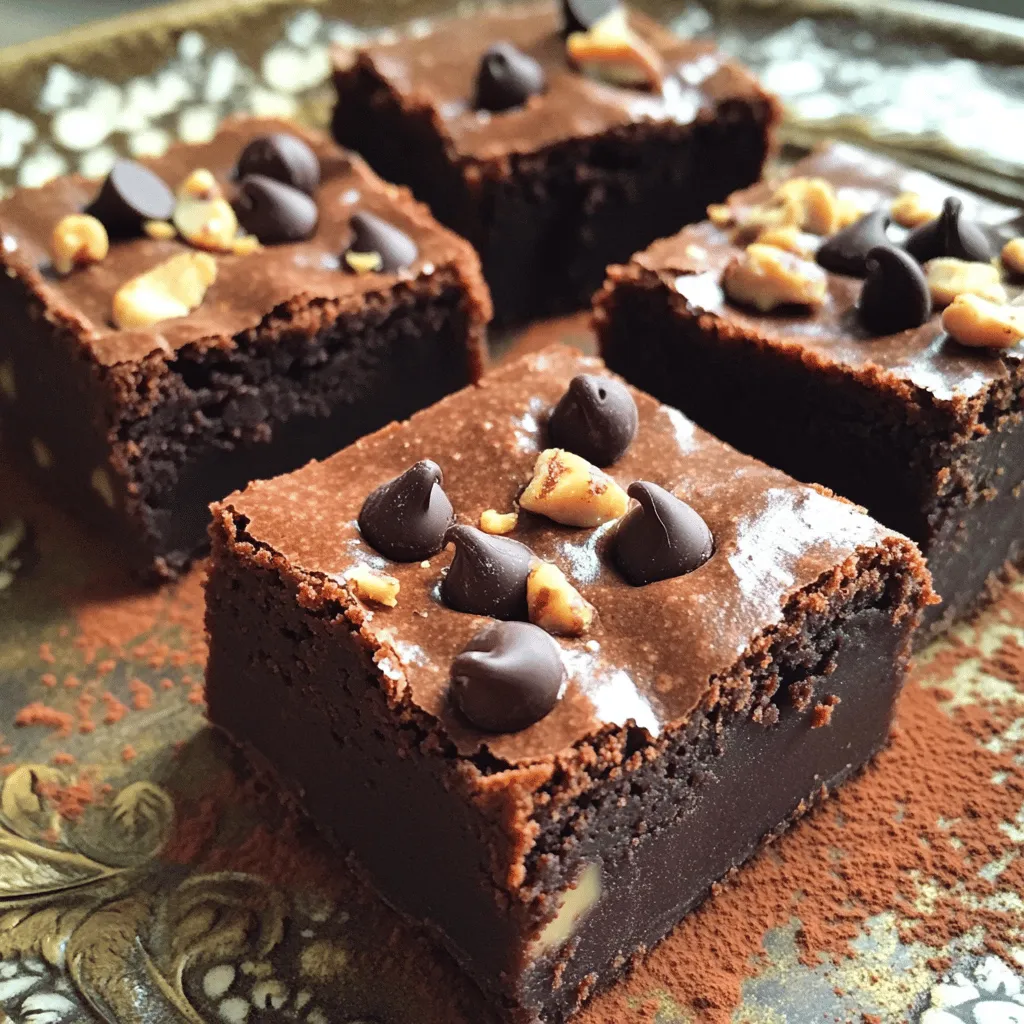
Craving a tasty treat that’s both healthy and delicious? Let me introduce you to Cottage Cheese Peanut Butter Brownies! These

To make Creamy Cajun Shrimp Alfredo, you need fresh and simple ingredients. Here’s what you will need: - 1 pound shrimp, peeled and deveined - 2 tablespoons Cajun seasoning - 1 tablespoon olive oil - 3 cups chicken or vegetable broth - 12 oz fettuccine pasta - 1 cup heavy cream - 1 cup grated Parmesan cheese - 2 cloves garlic, minced - 1 small onion, finely chopped - 1 bell pepper, diced (any color) - 1 cup cherry tomatoes, halved - Salt and pepper, to taste - Fresh parsley, chopped (for garnish) These ingredients come together to create a rich and creamy dish that’s full of flavor. Cajun seasoning is what makes this dish special. It has a mix of spices that add heat and depth. Common spices include paprika, cayenne, garlic powder, and oregano. Adjust the amount based on your spice preference. If you want a milder taste, use less seasoning. If you love heat, feel free to add more! When serving, think about adding some color and taste with garnishes. Fresh parsley adds a nice touch. You can also serve with garlic bread or a simple salad. These sides will enhance your meal and make it more satisfying. Enjoy your cooking adventure with this easy and flavorful dish! Start by taking one pound of shrimp. Make sure they are peeled and deveined. Place the shrimp in a medium bowl. Add two tablespoons of Cajun seasoning. Toss the shrimp well until they are fully coated. Set the bowl aside for now. This step adds a lot of flavor. Grab a large pot or Dutch oven. Heat one tablespoon of olive oil over medium heat. Once the oil is hot, add one small, finely chopped onion and one diced bell pepper. Sauté these for about three to four minutes. You want them to soften up nicely. Next, add two cloves of minced garlic. Cook this for one more minute until it smells great. Pour three cups of chicken or vegetable broth into the pot. Bring this mixture to a boil. Once it’s boiling, add twelve ounces of fettuccine pasta. Stir the pasta often as it cooks. Follow the package instructions, which usually take about ten to twelve minutes. In the last five minutes of cooking, add the seasoned shrimp and one cup of halved cherry tomatoes. When the pasta is done, lower the heat. Stir in one cup of heavy cream and one cup of grated Parmesan cheese. Mix well until the cheese melts into a creamy sauce. Season with salt and pepper as needed. Adjust the Cajun seasoning to your taste. Serve hot and finish with chopped fresh parsley for color. To get a creamy sauce, use heavy cream. It makes all the difference. Stir in the cream slowly after cooking the pasta. This helps blend it well. Adding Parmesan cheese last makes it even creamier. Mix until it melts fully. For extra richness, consider adding a bit more cheese. Use a large pot or Dutch oven. This gives enough space to cook and mix. A wooden spoon works best for stirring. A sharp knife is key for chopping veggies. I also recommend a measuring cup for measuring broth and cream. Having everyone ready will make cooking easier. Cajun seasoning can be spicy. If your kids don’t like heat, cut back on it. Use half the amount or even less. You can also skip it altogether. Instead, add extra garlic or cheese for flavor. A touch of lemon juice brightens the dish without adding spice. {{image_2}} You can make this dish more vibrant by adding vegetables. Consider bell peppers, like red or yellow. They add color and crunch. You can also use spinach or kale for a healthy touch. Toss in some peas or zucchini for added flavor. These veggies will not only boost nutrition but also make your plate look fantastic. If you want a change from shrimp, try chicken or sausage. Cook chicken pieces until golden for a hearty bite. For sausage lovers, andouille sausage gives a spicy kick. You might also consider tofu for a plant-based twist. Each protein adds its unique flavor to the dish. For a gluten-free meal, swap fettuccine with gluten-free pasta. Rice noodles or chickpea pasta work well too. If you’re avoiding dairy, use coconut milk instead of heavy cream. Nutritional yeast can replace Parmesan for a cheesy taste. These swaps let everyone enjoy the creamy goodness without worry. To keep your Creamy Cajun Shrimp Alfredo fresh, store it in an airtight container. Let it cool down before sealing. This helps prevent moisture build-up. You can keep it in the fridge for up to three days. Always label your container with the date. This way, you won’t forget when you made it. When you reheat your dish, use low heat on the stove. Add a splash of broth or cream to keep it creamy. Stir it gently to mix the flavors. Avoid using the microwave if you can. It can make the shrimp tough and the sauce clumpy. You can freeze this dish, but it may change the texture. To freeze, place the cooled dish in a freezer-safe container. Make sure to leave some space for expansion. This dish can last up to three months in the freezer. To thaw, move it to the fridge overnight before reheating. You can use any long pasta. Spaghetti or linguine works well. You can also try gluten-free pasta if needed. Just follow the cooking time on the package. To add heat, increase the Cajun seasoning. You can also add red pepper flakes. Fresh chopped jalapeños or a dash of hot sauce work great too. Adjust to your taste! Yes, you can prepare it ahead of time. Cook the pasta and sauce but leave out the shrimp. Store everything in the fridge. When ready to eat, add the shrimp and heat it up. This keeps the shrimp fresh! Creamy Cajun Shrimp Alfredo is a simple dish with bold flavors. We covered how to prepare shrimp, cook veggies, and boil pasta. You learned about tips for a creamy sauce and various ingredient options. Remember, you can add colorful veggies or switch proteins to suit your taste. Store leftovers well and reheat for the best results. This dish is fun to make and easy to customize. Enjoy your cooking adventure and share it with those you love!

Creamy Cajun Shrimp Alfredo One Pot Delight

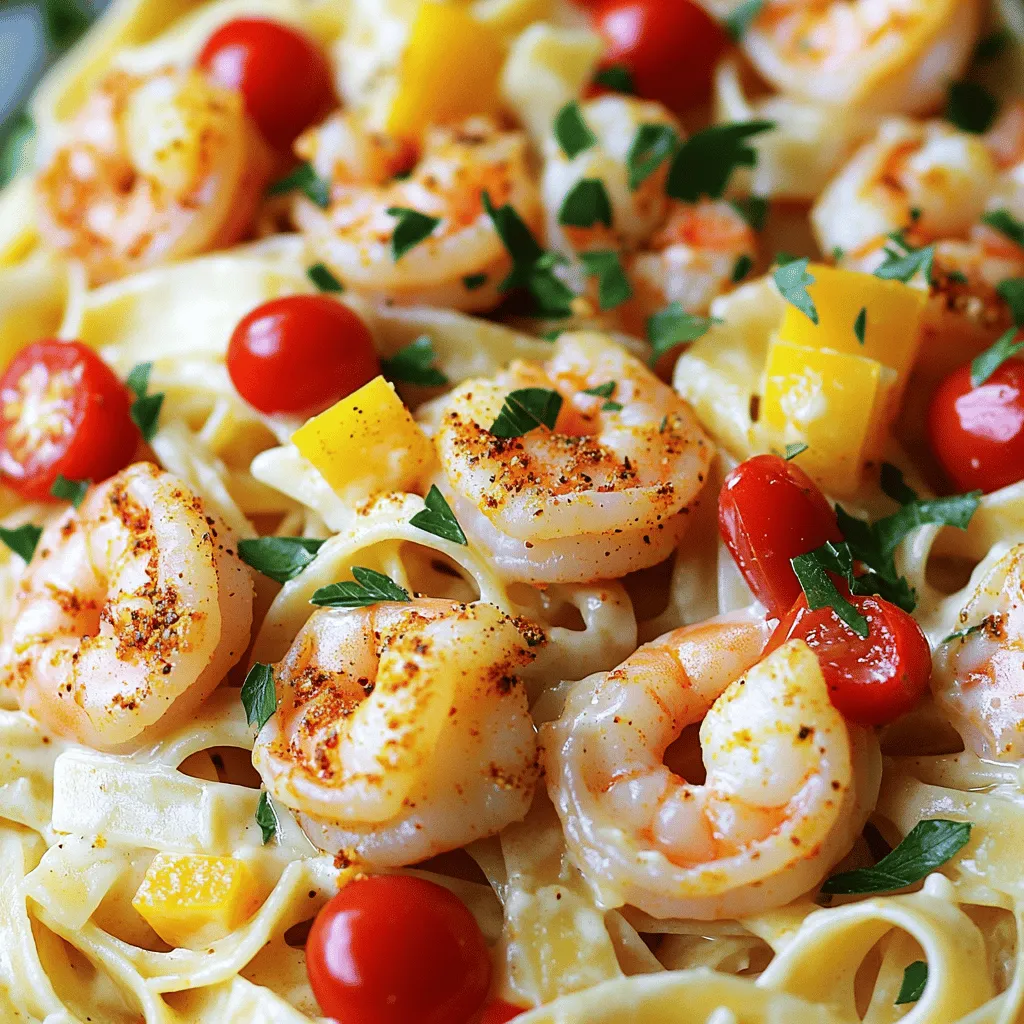
Welcome to your new favorite meal: Creamy Cajun Shrimp Alfredo One Pot Delight! If you love bold flavors and quick

- 1 lb beef sirloin, thinly sliced - 2 cups broccoli florets - 1 bell pepper, sliced (any color) - 2 tablespoons soy sauce - 1 tablespoon oyster sauce (optional) - 1 tablespoon cornstarch - 1 tablespoon sesame oil - 2 tablespoons vegetable oil - Salt and pepper to taste For this dish, I use beef sirloin for its tender texture and rich flavor. Broccoli florets add a nice crunch and vibrant color. I like to include bell pepper, which brings sweetness to the mix. The marinade consists of soy sauce, and for an extra layer of flavor, I sometimes add oyster sauce. Cornstarch helps to make the beef tender and gives it a nice glaze. In cooking, I always use sesame oil for its nutty flavor. Vegetable oil works well for frying due to its high smoke point. I finish the dish with a touch of salt and pepper to balance everything out. - In a bowl, mix soy sauce, oyster sauce, cornstarch, and a pinch of salt and pepper. - Add the thinly sliced beef to the marinade. Make sure each piece is coated. - Let the beef sit for about 15 minutes. This helps the flavors soak in. - Heat 1 tablespoon of vegetable oil in a large skillet or wok over medium-high heat. - Add the marinated beef in a single layer. Cook for 2-3 minutes until browned. - If your skillet is small, cook in batches. This keeps the beef from steaming. - In the same skillet, add another tablespoon of vegetable oil. - Add minced garlic and grated ginger. Sauté for about 30 seconds until fragrant. - Toss in the broccoli florets and sliced bell pepper. Stir-fry for 4-5 minutes until tender yet crisp. - Return the cooked beef to the skillet. - Add the sesame oil and toss everything together. Make sure the beef and veggies are well-coated and heated through. - Serve your beef and broccoli over cooked jasmine rice for a hearty meal. - Garnish with sesame seeds and sliced green onions for a delightful crunch. To make a great stir-fry, keep these tips in mind: - Heat your pan: Use high heat to ensure a quick cook. This helps keep your beef tender. - Cut beef thin: Thin slices cook faster and stay juicy. Aim for about 1/4 inch thickness. - Don’t overcrowd: Cook your beef in batches. This avoids steaming and ensures browning. To avoid overcooking your beef, follow these steps: - Watch the time: Cook the beef for only 2-3 minutes. You want it brown but not dry. - Use a thermometer: Aim for 145°F for medium-rare. This keeps the beef tender and juicy. If you want to switch things up, here are some options: - Alternatives for beef: Try chicken breast or tofu for a lighter dish. Both work well with the same marinade. - Different vegetables: Replace broccoli with snap peas or bok choy. You can also add carrots for more color. To make your stir-fry even tastier, consider these additions: - Additional sauces: Try hoisin sauce or teriyaki for a sweet twist. A splash of rice vinegar adds zing. - Spices: Add red pepper flakes for heat or five-spice powder for depth. Just a pinch goes a long way. For garnishes, I recommend: - Sesame seeds: They add crunch and a nutty flavor. - Sliced green onions: They bring freshness and a pop of color to your dish. {{image_2}} You can swap the beef for chicken or tofu. Chicken thighs work great and cook fast. Tofu adds a nice texture and absorbs flavors well. Just make sure to press the tofu first. For a twist, try shrimp. Cook shrimp for just a few minutes until they turn pink. This change gives a fresh taste to your stir fry. If you want a meatless meal, use mushrooms and other veggies. Shiitake or button mushrooms add umami flavor. You can also include snap peas, carrots, or bell peppers. For sauces, look for plant-based options. Soy sauce is a classic, but you can try teriyaki or hoisin sauce for a new flavor. Want some heat? Add fresh chilies or red pepper flakes. Slice jalapeños or serrano peppers for a kick. You can also use sriracha or chili garlic sauce. Just mix it in with the beef when you combine everything. Adjust the heat to match your taste. This will make your stir fry exciting and flavorful. To keep your beef and broccoli stir fry fresh, follow these tips: - Refrigeration: Place leftovers in an airtight container. Store them in the fridge for up to three days. Make sure to let the stir fry cool before sealing it to avoid condensation. - Freezing: You can freeze leftovers for later. Split the stir fry into portions and use freezer-safe bags or containers. It stays good for up to three months. When ready to eat, thaw it overnight in the fridge. To reheat your stir fry and keep it tasty: - Best Methods: Use a skillet over medium heat. Add a splash of water or broth to keep it moist. Stir often for even heating. You can also use the microwave. Heat it in short bursts, stirring in between. - Retaining Texture: To keep the veggies crisp, avoid overheating. If using the microwave, cover the dish loosely to steam it gently. This method helps maintain the crunch while warming the beef. Yes, you can prepare this dish ahead of time. To do so, marinate the beef and chop your veggies. Store them separately in the fridge. When ready to cook, heat the oil and stir-fry everything. This method saves time and keeps the dish fresh. You have many options for side dishes. Here are some ideas: - Steamed jasmine rice - Fried rice - Noodles - Spring rolls These sides complement the stir fry and make a complete meal. Yes, this recipe works well for meal prep. To make meal prepping easy: - Divide the stir fry into containers with rice or noodles. - Store in the fridge for up to four days. - Reheat portions as needed for quick meals. This keeps your lunches or dinners ready to go. To ensure tender beef, follow these tips: - Slice the beef against the grain. - Marinate for at least 15 minutes. - Use high heat when cooking. These methods break down the fibers and keep the beef juicy. This blog post covers how to make a delicious Beef and Broccoli Stir Fry. We discussed key ingredients like beef sirloin and fresh vegetables. You learned to marinate beef and cook it right for great taste. We went through tips for cooking and flavoring your dish. Plus, we explored variations and storage tips. Try your own spin on this recipe. Cooking can be fun and rewarding. Enjoy your meals and share them with others!

Beef and Broccoli Stir Fry Delight Better Than Takeout

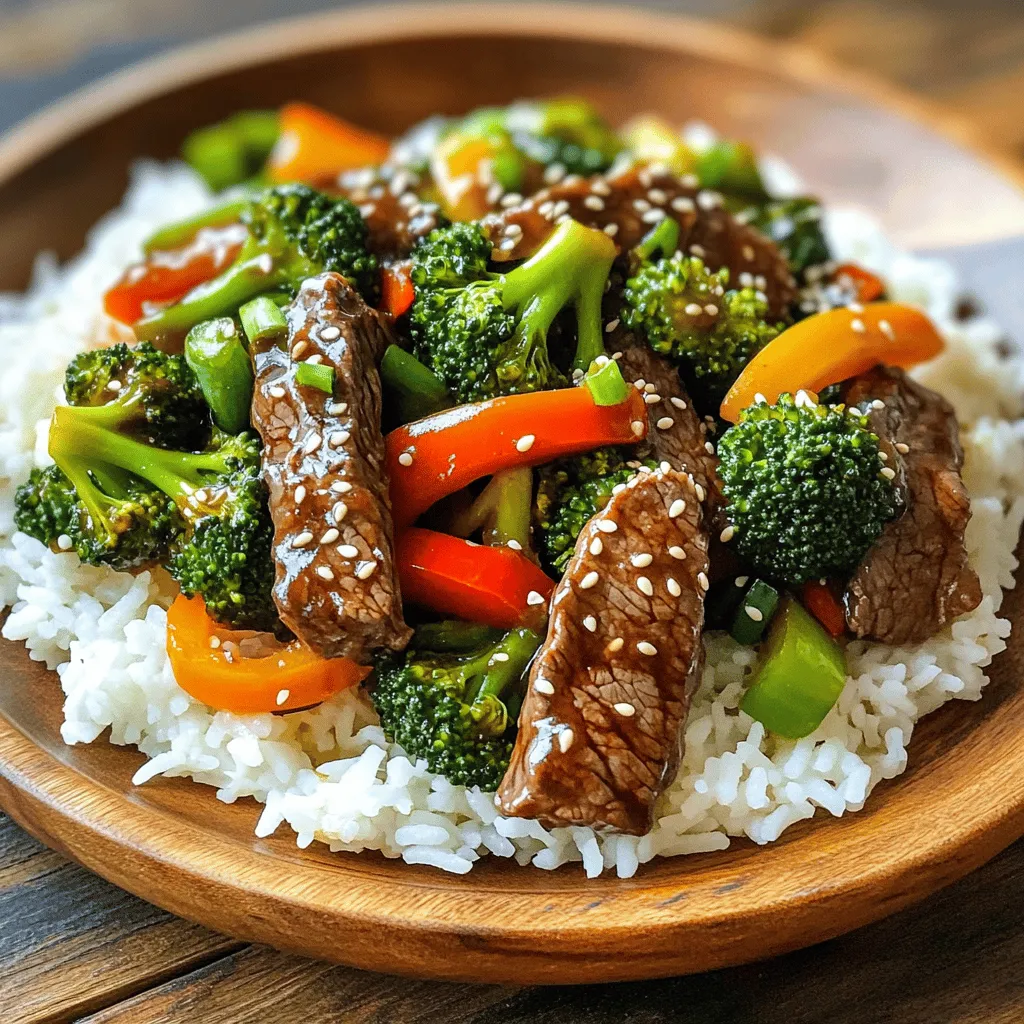
Are you tired of takeout that just doesn’t live up to your taste? Let me show you how to make

To make this tasty dish, you need some key ingredients. Here’s what you’ll need: - 1 cup cooked jasmine rice (day-old is best) - 200g shrimp, peeled and deveined - 2 tablespoons unsalted butter - 4 cloves garlic, minced - 1 small onion, finely chopped - 1 cup mixed vegetables (peas, corn, and diced carrots) - 2 eggs, lightly beaten - 3 tablespoons soy sauce - 1 tablespoon oyster sauce (optional) - 1 green onion, chopped (for garnish) - Salt and pepper to taste These ingredients blend to create a rich flavor profile. The shrimp adds protein, while the vegetables bring color and nutrition. You can add extra ingredients to boost flavor. Here are some suggestions: - A splash of sesame oil for a nutty taste - Fresh ginger, minced, for a zesty kick - Sriracha sauce for heat - A sprinkle of sesame seeds for crunch Feel free to experiment! Each extra ingredient adds a unique twist. If you don’t have something, don’t worry! Here are some easy swaps: - Use brown rice instead of jasmine rice for a healthier option. - Swap shrimp for chicken or tofu for a different protein. - If you don’t have oyster sauce, use soy sauce or hoisin sauce. - Green beans or bell peppers can replace mixed veggies. These substitutions keep the recipe flexible. You can still enjoy the dish with what you have on hand. To start, gather your ingredients. You need: - 1 cup cooked jasmine rice (day-old is best) - 200g shrimp, peeled and deveined - 2 tablespoons unsalted butter - 4 cloves garlic, minced - 1 small onion, finely chopped - 1 cup mixed vegetables (peas, corn, and diced carrots) - 2 eggs, lightly beaten - 3 tablespoons soy sauce - 1 tablespoon oyster sauce (optional) - 1 green onion, chopped (for garnish) - Salt and pepper to taste Make sure your rice is cold. This helps it fry well. Chop your onion and garlic finely. This ensures great flavor. Keep your shrimp ready to cook. Heat a large skillet or wok over medium heat. Add the butter and let it melt. Once melted, toss in the minced garlic and chopped onion. Sauté for about 2 minutes. You want the onion to turn soft and the garlic to smell good. Next, add the shrimp to the skillet. Cook for 2-3 minutes. Stir often until the shrimp turns pink and opaque. Season with salt and pepper to taste. Now, push the shrimp to one side of the skillet. Pour the beaten eggs into the other side. Scramble the eggs until they are fully cooked. Then, mix them with the shrimp and garlic. Add the mixed vegetables to the skillet. Stir everything together for another minute. This helps the veggies heat through. Then, add the cooked rice. Pour in the soy sauce and oyster sauce, if you like. Stir well to coat the rice evenly. Sauté for another 2-3 minutes. This allows the rice to heat thoroughly. Taste and adjust seasoning if needed. Add more salt or soy sauce if you want. Finally, remove the skillet from heat. Garnish with chopped green onions for a fresh touch. For perfect shrimp, look for those that are firm and have a pink color. Don’t overcook them; they can turn rubbery. When it comes to rice, always use day-old rice if possible. It’s drier and fries better. If you want even more flavor, try adding a splash of sesame oil at the end. This adds a great nutty taste. Enjoy your cooking! To make the best fried rice, use cold, day-old rice. Fresh rice can be sticky. Cold rice separates easily, giving you that perfect texture. Always prep your ingredients first. This keeps everything ready and makes cooking fast. Cook over high heat, and stir often. This helps get a nice char on the rice. For richer taste, use a mix of soy sauce and oyster sauce. The oyster sauce adds depth. You can also add a splash of sesame oil for a nutty note. Fresh herbs like cilantro or basil can brighten the dish. Toss them in right before serving for a fresh kick. One common mistake is adding too much liquid. This makes the rice mushy. Avoid overcrowding the pan; cook in batches if needed. Don’t forget to season throughout the cooking. A pinch of salt here and there builds layers of flavor. Lastly, don't skip the garnish. Chopped green onions add color and freshness. {{image_2}} You can swap shrimp for other proteins in this dish. Chicken, beef, and tofu work great. Use cooked chicken or beef strips for a quick meal. Tofu adds a nice texture and is perfect for a vegan twist. Just make sure to adjust the cooking time based on your protein choice. Each option gives a unique taste while keeping the dish fun. To make this recipe vegetarian or vegan, skip the shrimp and eggs. You can add extra veggies like bell peppers or mushrooms instead. Use tofu for protein. Also, make sure to use a vegan soy sauce. This version keeps the flavor while making it suitable for everyone. It’s colorful, healthy, and still very tasty. You can boost the flavors by trying different sauces. Instead of soy sauce, try teriyaki or sweet chili sauce for a twist. Add a splash of sesame oil for a nutty flavor. If you like spice, toss in some sriracha or chili flakes. These small changes can elevate your fried rice dish. It keeps each meal exciting and new. To store leftover fried rice, let it cool first. Place it in an airtight container. Make sure to cover it well to keep out air. Store it in the fridge. It will keep fresh for about 3 to 4 days. If you want to keep it longer, consider freezing it. When you reheat fried rice, add a splash of water. This helps to keep it moist. Use a skillet or microwave for reheating. If you use a skillet, heat it on medium. Stir often until it warms up. If using a microwave, cover it with a damp paper towel. Heat in short bursts. This prevents it from drying out. To freeze garlic butter shrimp fried rice, let it cool completely. Portion it into freezer-safe bags or containers. Remove as much air as possible to prevent freezer burn. Label and date the bags. You can freeze it for up to 2 months. When ready to eat, thaw it overnight in the fridge. Reheat properly for the best taste. Yes, you can use fresh shrimp. Fresh shrimp has a great flavor. Just ensure they are peeled and deveined. You can cook them the same way as frozen shrimp in this recipe. Fresh shrimp cooks quickly, so watch them closely. They turn pink and opaque when done. For fried rice, jasmine rice works best. It has a light and fluffy texture. Day-old rice is even better because it dries out a bit. This helps the rice fry without becoming mushy. If you don’t have jasmine rice, use long-grain rice. To spice up your garlic butter shrimp fried rice, try adding red pepper flakes. You can also chop fresh chili peppers for a kick. If you like heat, add sriracha or chili garlic sauce when cooking. Adjust the amount based on your spice level. Enjoy the extra flavor! Garlic butter shrimp fried rice is a tasty dish that is easy to make. We explored the key ingredients, cooking steps, and helpful tips. You can customize it with different flavors and proteins. Storing leftover rice is simple. Just remember to keep it in the fridge or freezer. Don't be afraid to experiment with spices or sauces to make it your own. Enjoy mixing flavors and cooking this delightful meal at home!

Garlic Butter Shrimp Fried Rice 15 Minutes Delight

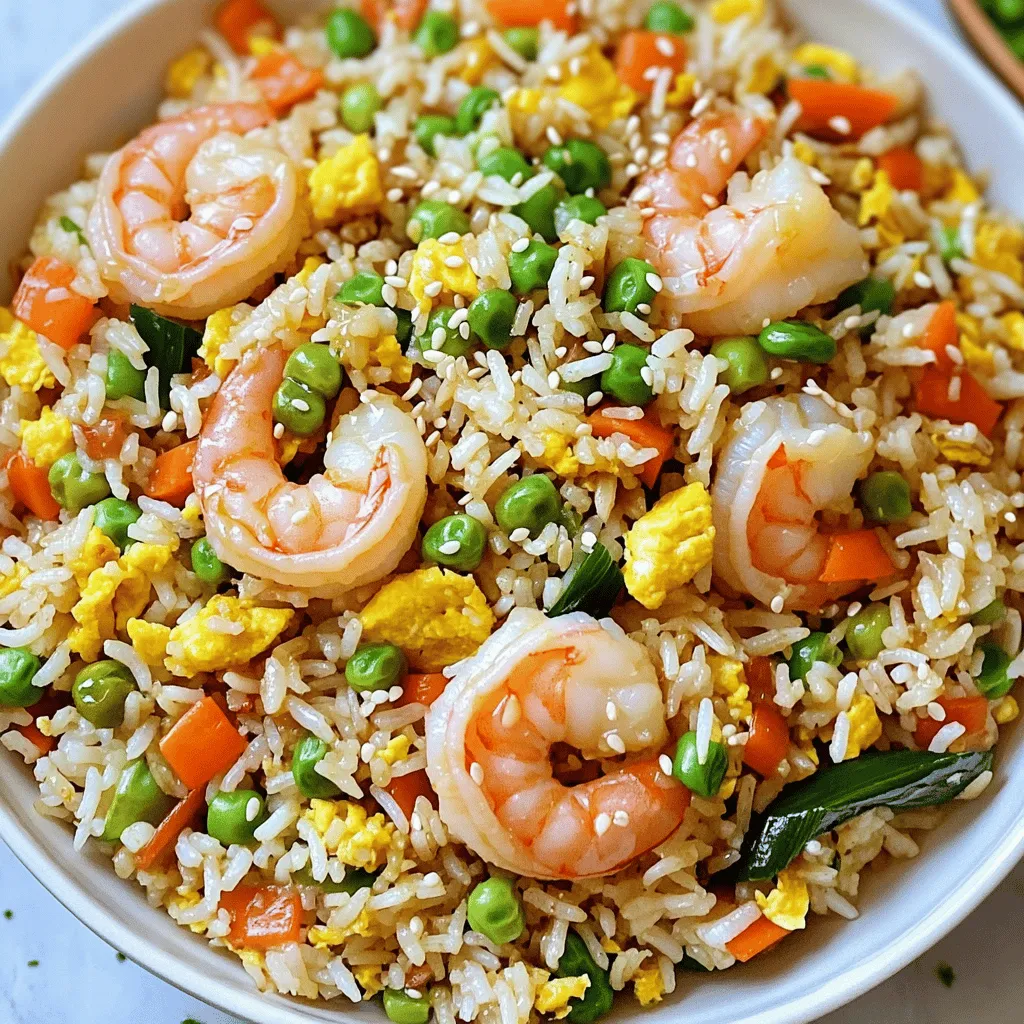
Ready for a quick and tasty dish? This Garlic Butter Shrimp Fried Rice takes just 15 minutes! You’ll enjoy each

To make a delightful Maple Chai Tea Latte, you need a few key ingredients. Here’s what you will need: - 2 cups milk (dairy or non-dairy) - 1 cup water - 2 tablespoons loose chai tea blend or 2 chai tea bags - 2 tablespoons pure maple syrup (adjust to taste) - 1/2 teaspoon vanilla extract - 1/2 teaspoon ground cinnamon - 1/4 teaspoon ground ginger - A pinch of ground nutmeg (optional) - Whipped cream (optional, for topping) These ingredients come together to create a warm and cozy drink. If you want to change things up, you can easily swap ingredients. For milk, use: - Almond milk - Oat milk - Coconut milk These options give the drink a unique flavor. If you prefer a sugar-free option, try using: - Stevia - Erythritol Maple syrup has a rich taste, but these sweeteners still work well. To boost the flavor of your latte, add a few extras. Here are some ideas: - A splash of almond extract for a nutty note. - A small pinch of cardamom for warmth. - A drizzle of honey for a floral sweetness. These enhancements make your Maple Chai Tea Latte even more special. Feel free to experiment and find your favorite mix! Start by pouring 1 cup of water into a medium saucepan. Place it on the stove over high heat. Wait for the water to reach a rolling boil. This part is crucial because hot water extracts the flavors from the chai tea. Once the water boils, remove the saucepan from the heat. Add 2 tablespoons of loose chai tea blend or 2 chai tea bags to the hot water. If you use loose tea, steep for about 5 to 7 minutes. For tea bags, follow the package instructions. This step allows the tea to release its spices and warmth. After steeping, strain the tea back into the saucepan. Discard the leaves or bags. Now, pour in 2 cups of your choice of milk. Return the saucepan to low heat. Stir gently until the mixture is warm but not boiling. Next, add 2 tablespoons of pure maple syrup, 1/2 teaspoon of vanilla extract, 1/2 teaspoon of ground cinnamon, and 1/4 teaspoon of ground ginger. If you like, add a pinch of ground nutmeg. Stir well until all flavors blend. Taste and adjust the sweetness if needed. Finally, pour the latte into mugs. For a treat, top with whipped cream and a sprinkle of cinnamon. Enjoy your cozy drink! To make your Maple Chai Tea Latte just right, start with two tablespoons of pure maple syrup. This amount gives a nice balance of sweetness. If you like it sweeter, feel free to add more syrup, one teaspoon at a time. Taste as you go. Remember, you want the sweetness to enhance, not overpower, the chai flavor. For the best texture, use two cups of milk. You can choose dairy or any non-dairy milk you like. When heating the milk, keep the heat low. This step helps prevent boiling, which can change the texture. Stir gently until the milk is warm. The goal is a creamy, smooth latte. Make your latte look as good as it tastes. Pour the latte into a nice mug, leaving a little room at the top. If you want to add a special touch, top it with whipped cream. A sprinkle of cinnamon or nutmeg on top adds a lovely look and extra flavor. Serve with a cinnamon stick for a fun stirrer. Enjoy your beautiful drink! {{image_2}} You can make a tasty, dairy-free Maple Chai Tea Latte. Use almond, coconut, or oat milk. Each option gives a unique flavor and texture. Almond milk adds a nutty taste. Coconut milk brings creaminess and sweetness. Oat milk offers a smooth finish. Just follow the same steps with your choice of milk. Want a sugar-free Maple Chai Tea Latte? You can swap maple syrup for a sugar-free sweetener. Try stevia or monk fruit. These sweeteners give you the same flavor without the sugar. Just start with a small amount. You can always add more to taste. To make an iced version, brew the chai tea as normal. After steeping, let it cool. Pour the cooled chai tea over ice in a glass. Add cold milk of your choice. Mix in maple syrup and spices. For a fun twist, top it with whipped cream and a sprinkle of cinnamon. Enjoy this cool treat on a hot day! To store leftover maple chai tea latte, let it cool first. Pour it into a clean, airtight container. Place the lid on tightly. Store it in the fridge for up to three days. When you want to enjoy it again, you can reheat it. To reheat your maple chai tea latte, pour it into a saucepan. Heat it over low to medium heat. Stir gently to avoid burning. Do not let it boil. You can also use the microwave. Heat for 30 seconds, then stir. Repeat until it reaches your desired warmth. Each ingredient has its own shelf life: - Milk: Lasts about 5-7 days after opening. - Chai Tea: Store in a cool, dry place. It can last for months. - Maple Syrup: Refrigerate after opening. It lasts for a year. - Spices: Ground spices stay fresh for about 6 months if stored well. Understanding these times helps you enjoy the best flavor and quality. The best chai tea for this recipe is a blend rich in spices. You can use loose chai tea or chai tea bags. Look for blends with cinnamon, cardamom, and ginger for a warm taste. I enjoy using a strong chai that packs a punch. This enhances the flavor of the Maple Chai Tea Latte. Yes, you can make Maple Chai Tea Latte without milk. For a lighter version, try using water or a milk alternative. Almond milk, oat milk, or coconut milk work great. These options keep the drink creamy while adding their own flavors. Adjust the sweetness to balance the taste without milk. You can customize your Maple Chai Tea Latte in many fun ways. Try adding different spices like cloves or allspice for extra warmth. You can also use flavored syrups, like vanilla or caramel, for a twist. For a spicy kick, add a dash of cayenne pepper. Experiment with toppings too, like chocolate shavings or nuts. In this post, I showed you how to make a Maple Chai Tea Latte. We covered essential ingredients, handy substitutions, and ways to enhance flavors. I shared step-by-step instructions to brew your tea just right. Then, we explored tips for sweetness and serving. I also included fun variations and storage details. This drink is easy and tasty. You can mix it up however you like. Enjoy your latte any way you prefer!

Maple Chai Tea Latte Flavorful Creamy Delight

If you’re craving a drink that warms your soul, you’ve come to the right place! The Maple Chai Tea Latte

- 4 salmon fillets - 2 cups fresh green beans, trimmed - 1/4 cup teriyaki sauce - 2 tablespoons sesame oil - 1 tablespoon honey - 2 cloves garlic, minced - 1 teaspoon grated ginger - 1 tablespoon sesame seeds - 2 green onions, sliced - Salt and pepper to taste Gather all these ingredients for a tasty teriyaki salmon dish. The salmon fillets should be fresh for the best flavor. The green beans should be crisp and bright green, as they add a nice crunch. The teriyaki sauce will give the dish its sweet and savory kick. Use sesame oil in the marinade to add depth and a nutty flavor. Honey will balance the taste and make the glaze sticky. Fresh garlic and grated ginger will bring warmth and zest. Finally, sesame seeds and green onions will add a nice touch for garnish. Make sure to have salt and pepper on hand to season. These simple ingredients will help create a dish that is not only delicious but also beautiful. Each bite will be a delight! - Preheat your oven to 400°F (200°C). Line a large baking sheet with parchment paper. - In a small bowl, mix together the teriyaki sauce, sesame oil, honey, minced garlic, and grated ginger. This will be your tasty marinade. - Place the salmon fillets on one side of the baking sheet. Season them with salt and pepper. Brush them generously with the teriyaki marinade. - On the other side of the sheet, arrange the trimmed green beans. Drizzle a little sesame oil on them. Sprinkle with salt and pepper, then toss to coat. - Bake the salmon and green beans for 12-15 minutes. The salmon should flake easily with a fork, and the green beans should be tender but still crisp. - Once done, remove the sheet from the oven. Drizzle the remaining teriyaki marinade over the salmon and green beans. Sprinkle sesame seeds on top. - Garnish with sliced green onions before serving for a fresh finish. To cook salmon perfectly, aim for a time of 12 to 15 minutes at 400°F (200°C). This heat helps it cook through without drying out. A good sign that your salmon is ready is when it flakes easily with a fork. If the flesh turns from translucent to opaque, you are on the right track. For green beans, you want them tender yet crisp. This means they need to stay bright green and not mushy. A drizzle of sesame oil and a sprinkle of salt enhances their natural flavor. You can also try adding lemon juice or red pepper flakes for a different twist. To store leftovers, let the dish cool first. Then, place it in an airtight container. It will last in the fridge for up to three days. When reheating, use the oven at a low temperature to keep the salmon moist and the green beans crisp. Enjoy your meal again without losing flavor! {{image_2}} If you want to switch things up, you can use chicken instead of salmon. Just make sure to adjust the cooking time. Chicken should cook until it reaches 165°F (74°C). Tofu is also a great choice for a plant-based option. Use firm tofu and press it to remove extra moisture. As for vegetables, you can try bell peppers, broccoli, or snap peas. These will add different textures and flavors to your dish. To make this dish even tastier, think about adding spices or herbs. A pinch of red pepper flakes can give it a nice kick. Fresh herbs like cilantro or basil can add a burst of freshness. You can also tweak the teriyaki sauce. If you want it sweeter, add more honey. For a tangy twist, squeeze in some lime juice. Adjusting these flavors can make each meal unique. You can grill the salmon and green beans for a smoky flavor. Just use a grill pan or an outdoor grill. The cooking time will be similar, around 12-15 minutes. If you prefer a slow cooker, it works too! Just layer the salmon and green beans, and pour the marinade over. Cook on low for 4-6 hours for a tender meal. Each method changes the taste and keeps it exciting. To keep your teriyaki salmon and green beans fresh, store them in an airtight container. Make sure to cool them down before sealing to avoid moisture build-up. Place the container in the fridge for up to three days. Always check for any odd smells or changes in texture before eating. If you want to save some for later, freezing is a great option! First, let the dish cool completely. Then, portion the salmon and green beans into freezer-safe bags or containers. Remove as much air as possible to prevent freezer burn. You can freeze it for up to three months. When you're ready to eat, thaw it overnight in the fridge. Reheat in the oven or microwave until hot. This dish is perfect for meal prep! You can make it on a Sunday and enjoy it all week. Portion the salmon and green beans into individual containers for easy grab-and-go meals. You can even pair them with rice or quinoa for a complete meal. This way, you save time on busy weeknights and always have a tasty dish ready to enjoy! I bake salmon at 400°F for 12 to 15 minutes. This time gives the salmon a nice, flaky texture. You want it to be cooked all the way through but still moist. Check it with a fork. If it flakes easily, it's done! Yes, you can use frozen salmon! Just remember to thaw it first. Place the salmon in the fridge overnight or use cold water to speed it up. After thawing, follow the same steps in the recipe. The cooking time might be a bit longer, so keep an eye on it. To season green beans, I use salt, pepper, and a drizzle of sesame oil. This adds a nice flavor. You can also toss in some minced garlic for a punch. For a twist, add lemon juice or sprinkle red pepper flakes for heat. This makes the green beans taste fresh and vibrant! In this blog post, we explored a delicious salmon and green bean recipe. We covered ingredients, step-by-step instructions, and useful tips. You learned how to achieve perfect salmon and flavor-packed green beans. I also shared storage tips and cooking variations. I hope you feel inspired to try this recipe. Enjoy cooking and sharing it with others!

Teriyaki Salmon Green Beans Sheet Pan Delight

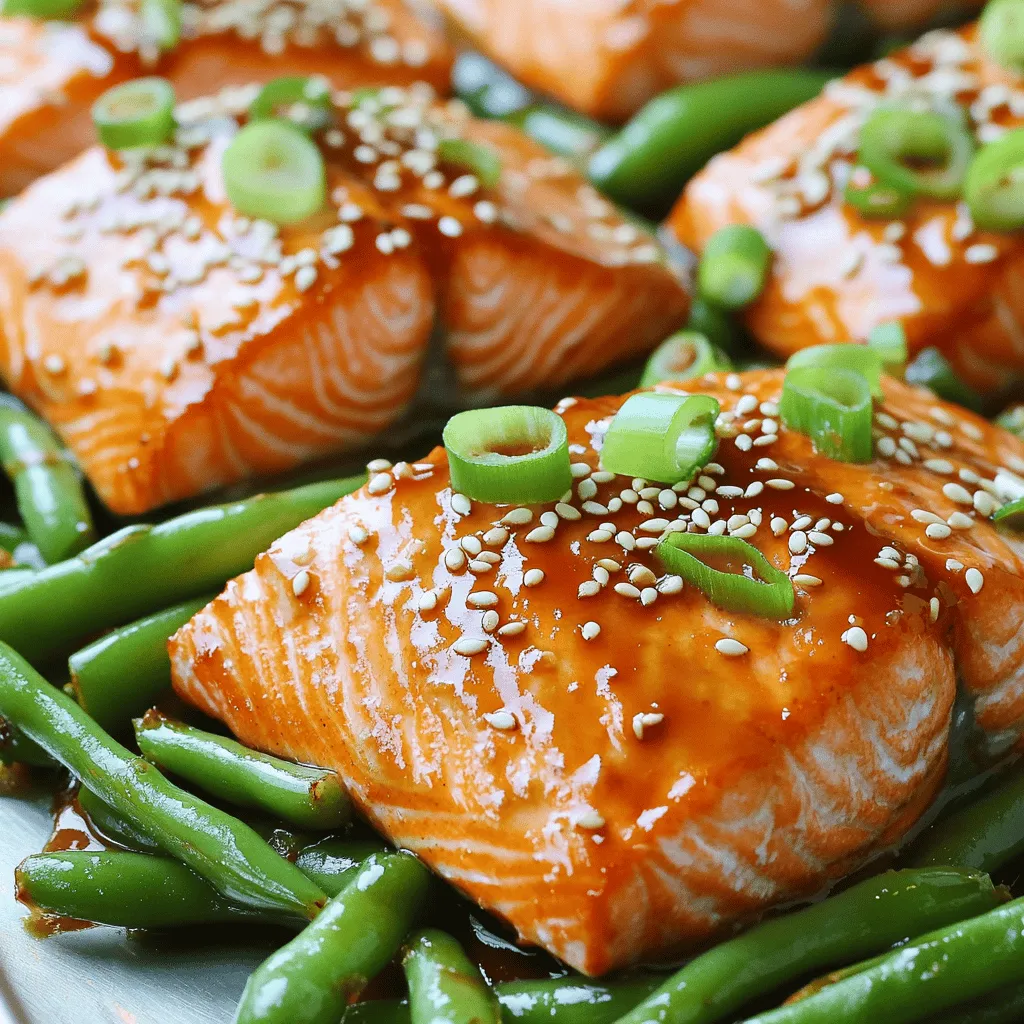
Looking for a quick and tasty dinner idea? My Teriyaki Salmon Green Beans Sheet Pan Delight is the perfect solution!

To make these yummy pumpkin chocolate chip blondie bars, you need a few key items: - 1 cup pumpkin puree - 1/2 cup unsalted butter, melted - 1 cup brown sugar - 1/2 cup granulated sugar - 2 large eggs - 1 teaspoon vanilla extract - 1 teaspoon baking powder - 1/2 teaspoon baking soda - 1/2 teaspoon salt - 1 teaspoon ground cinnamon - 1/2 teaspoon ground nutmeg - 1 1/2 cups all-purpose flour - 3/4 cup chocolate chips (semi-sweet or dark) These ingredients create a rich and moist treat that you will love. The pumpkin adds warmth and flavor, while the chocolate brings a sweet touch. You can swap some ingredients if you need to. Here are a few ideas: - Use applesauce instead of butter for a lower-fat option. - Replace granulated sugar with coconut sugar for a healthier choice. - For a gluten-free version, use a 1:1 gluten-free flour blend. - If you don’t have eggs, try using flaxseed meal mixed with water. These swaps keep the taste great while meeting your needs. To bake these blondies, you will need some tools: - 8x8 inch baking pan - Mixing bowls - Whisk - Spatula - Parchment paper - Toothpick (for testing doneness) Having these tools ready makes baking easy and fun! To make your pumpkin chocolate chip blondie bars, start by gathering all your ingredients. You will need pumpkin puree, butter, brown sugar, granulated sugar, eggs, vanilla extract, baking powder, baking soda, salt, cinnamon, nutmeg, flour, and chocolate chips. This makes the process smooth and fun. 1. Preheat your oven to 350°F (175°C). This ensures even baking. 2. Grease and line an 8x8 inch baking pan with parchment paper. Let the edges hang over for easy removal. 3. In a large bowl, mix together melted butter, pumpkin puree, brown sugar, and granulated sugar. Stir until smooth. 4. Add the eggs one by one. Beat well after each egg. Then stir in the vanilla extract. 5. In another bowl, whisk together flour, baking powder, baking soda, salt, cinnamon, and nutmeg. This helps to blend the dry ingredients well. 6. Fold the dry mix into the wet mixture slowly. Mix until just combined. Do not overmix! This keeps the blondies soft. 7. Gently fold in the chocolate chips. Make sure they spread evenly in the batter. 8. Pour the batter into the prepared pan. Use a spatula to spread it evenly. 9. Bake for 25-30 minutes. A toothpick should come out with a few moist crumbs, not wet batter. To check if your blondies are done, insert a toothpick in the center. If it comes out with a few moist crumbs, they are ready. If the toothpick has wet batter, bake for a few more minutes. After baking, let the blondies cool for about 10 minutes in the pan. Use the parchment overhang to lift them out. Cool them completely on a wire rack before cutting them into squares. Enjoy! To make the best pumpkin chocolate chip blondies, follow these tips: - Use fresh pumpkin puree for a richer flavor. - Make sure your butter is melted but not hot; this helps blend well. - Mix the wet ingredients until smooth but don’t overmix. - Fold in the chocolate chips gently to keep them whole. - Spread the batter evenly in the pan for uniform baking. Avoid these common pitfalls: - Don't overmix the batter; it can make the blondies tough. - Make sure to check for doneness with a toothpick; it should have a few moist crumbs, not wet batter. - Let the blondies cool before cutting them; this helps them set properly. - Skipping the parchment paper makes it hard to remove the blondies later. For the best experience, try these serving ideas: - Serve warm with a scoop of vanilla ice cream on top. - Dust with powdered sugar for a sweet touch. - Pair with a hot drink like coffee or chai. - Add a sprinkle of sea salt for a sweet-salty balance. - Enjoy them fresh or slightly warm for gooey chocolate goodness. {{image_2}} You can switch up the flavors in your pumpkin chocolate chip blondies. Try adding nuts like walnuts or pecans for a crunchy bite. Dried fruit, such as cranberries or raisins, adds sweetness too. If you love spices, add a pinch of ginger or allspice for a warm twist. You can even swap chocolate chips for white chocolate or butterscotch chips for a fun change. Making these blondies gluten-free is easy. Simply substitute the all-purpose flour with a gluten-free blend. Look for one that works well in baking. You may also want to add a bit of xanthan gum if your blend doesn’t include it. This helps give the blondies a nice texture. The taste will still be delicious, and no one will know they are gluten-free! To make vegan pumpkin chocolate chip blondies, replace the eggs with flax eggs. Mix one tablespoon of ground flaxseed with three tablespoons of water. Let it sit until it thickens. Use coconut oil instead of butter for a rich flavor. You can also choose vegan chocolate chips. These swaps keep the blondies soft and tasty while fitting a vegan diet. To store your leftover pumpkin chocolate chip blondies, place them in an airtight container. Layer them with wax paper or parchment to keep them from sticking together. This method helps keep them fresh and moist. You can also cover the container with plastic wrap for added protection. If you want to freeze your blondies, start by letting them cool completely. Once cooled, cut them into squares. Wrap each square tightly in plastic wrap. After wrapping, place them in a freezer bag or container. Make sure to label the bag with the date. This way, you can enjoy them later! When stored at room temperature, your blondies will stay fresh for about four days. In the fridge, they can last up to a week. If you freeze them, they can stay good for about three months. Just remember, the longer you store them, the more they may lose their fresh taste and texture. Yes, you can use fresh pumpkin. First, cook the pumpkin until soft. Then, mash it until smooth. Make sure to drain any excess water. This will keep your blondies from being too wet. You can use applesauce as an egg substitute. Use 1/4 cup of applesauce for each egg. You can also use flaxseed meal. Mix 1 tablespoon of flaxseed with 2.5 tablespoons of water. Let it sit for a few minutes before adding it to the batter. To check if the blondies are done, insert a toothpick in the center. It should come out with a few moist crumbs, but not wet batter. Bake them for 25-30 minutes. If they look golden brown, they are likely ready. You learned about the key ingredients and steps for making pumpkin chocolate chip blondies. We covered substitutions, tools needed, and how to check for doneness. I shared tips for baking success and variations to meet different diets. You also discovered storage methods to keep them fresh and long-lasting. Enjoy your baking journey, and remember to experiment with flavors. Each batch can bring new joy!

Pumpkin Chocolate Chip Blondie Bars Simple and Yummy

If you’re craving a fall treat that’s simple and packed with flavor, you’ll love these Pumpkin Chocolate Chip Blondie Bars!

To make this tasty Apple Cider Sangria, gather these ingredients: - 4 cups apple cider - 2 cups sparkling water - 1 cup fresh cranberries - 2 apples (like Granny Smith or Honeycrisp), cored and thinly sliced - 1 orange, sliced - 1 cinnamon stick - 2 tablespoons maple syrup (optional, for sweetness) - Fresh mint leaves for garnish You can add a twist to your sangria with these options: - A splash of red wine for depth - Pear slices for added sweetness - Pomegranate seeds for extra color - Ginger slices for a spicy kick When picking apples and oranges, look for firm fruit. Firm apples hold up well in the drink. Choose apples with vibrant skin. For oranges, select ones that feel heavy for their size. Fresh cranberries should be bright and firm. Avoid any that are mushy or discolored. This way, your sangria bursts with flavor and looks great too! To start making your Apple Cider Sangria, gather all the ingredients. You will need: - 4 cups apple cider - 2 cups sparkling water - 1 cup fresh cranberries - 2 apples, cored and thinly sliced - 1 orange, sliced - 1 cinnamon stick - 2 tablespoons maple syrup (optional) - Fresh mint leaves for garnish 1. First, grab a large pitcher. Pour in the apple cider and sparkling water. Stir gently to mix. 2. Next, add the fresh cranberries, apple slices, and orange slices. 3. Now, drop in the cinnamon stick. This will add warmth and flavor. 4. If you want a sweeter drink, mix in the maple syrup until it dissolves. 5. Cover the pitcher and place it in the fridge for at least one hour. This lets the flavors blend. Infusing flavors is key to making a great sangria. The longer you let it sit, the better it tastes. Here’s how to do it right: - Use fresh fruits for the best flavor. - Slice the fruits thinly. This allows for more juice to mix in. - Always add herbs, like fresh mint, right before serving. This keeps them vibrant and fresh. - Feel free to experiment! Try adding different spices, like cloves or nutmeg, for extra warmth. Before serving your Apple Cider Sangria, give it a good stir. This ensures all the flavors mix well. Taste it to see if you need to adjust the sweetness. Here’s how to finish up: 1. Grab some glasses and fill them with ice. 2. Pour the sangria over the ice. 3. Finally, garnish each glass with fresh mint leaves. This adds a pop of color and extra flavor. Enjoy your delicious Apple Cider Sangria with Cranberries! When making apple cider sangria, use fresh ingredients. Fresh fruit adds flavor and color. Choose crisp apples like Granny Smith or Honeycrisp. These apples pair well with cider's sweetness. Always slice the fruit thin. This helps release their juices into the drink. Mix the apple cider and sparkling water gently. You want bubbles from the sparkling water to stay. Let the sangria sit in the fridge for at least one hour. This time helps the flavors blend well. The longer it sits, the tastier it gets. If your sangria tastes too tart, add maple syrup. Start with one tablespoon and mix well. Taste it after mixing. You can always add more if needed. If it’s too sweet, add more apple cider or sparkling water. This helps balance the flavors without losing the fruit essence. Serve the sangria in clear glasses. This way, everyone can see the fruit. Fill the glasses with ice to keep the drink cold. Garnish each glass with fresh mint leaves. The mint adds a pretty touch and a fresh scent. Consider using a large pitcher for serving. It makes it easy for guests to refill. You can also add extra fruit slices to the pitcher for a lovely look. Enjoy your sangria with friends and family for a fun gathering! {{image_2}} You can enjoy Apple Cider Sangria without alcohol. Use only apple cider and sparkling water. This mix still tastes great! Add fresh fruits, like oranges or berries, for extra flavor. You can also spice it up with cinnamon sticks or ginger slices. This way, everyone can enjoy a tasty drink. Why not switch up your fruits? Try pears, peaches, or even pomegranates. Each fruit brings a new twist. You can also add berries for a burst of color and sweetness. If you want a touch of zest, squeeze in some lemon or lime juice. Fresh herbs like basil or rosemary can add a fun taste, too. Experiment with what you love! You can make this sangria all year! In winter, add warm spices like nutmeg or cloves. This gives a cozy feel. During spring and summer, use fresh berries and citrus fruits. They will keep it light and refreshing. In fall, keep the cranberries and apples, but try spiced rum for a kick. No matter the season, this drink stays delightful! To store leftover sangria, pour it into a clean, airtight container. Glass jars or pitchers work well. Seal it tightly to keep out air and odors. Place the container in the fridge. Sangria tastes best cold, so chilling it is key. When you’re ready to serve leftover sangria, give it a good stir. This helps mix the flavors again. Taste it first. If it's lost some sweetness, add a little maple syrup. Pour the sangria into glasses with ice. Add fresh mint for a nice touch. Leftover sangria lasts about three days in the fridge. After that, the fruit may spoil. If you see any off smells or colors, it’s best to toss it out. Always check before drinking. Enjoy your sangria safely! Yes, you can make Apple Cider Sangria up to 24 hours ahead. Just prepare it and chill it in the fridge. This gives the fruit time to soak up the flavors. If you make it early, add the sparkling water just before serving. This keeps it fizzy and fresh. For Apple Cider Sangria, a dry white wine works best. Choose a wine like Sauvignon Blanc or Pinot Grigio. These wines balance the sweetness of apple cider and cranberries. You want the flavors to shine without being too sweet. You can easily adjust the sweetness of your sangria. To make it sweeter, add more maple syrup. Stir it in until it dissolves well. For less sweetness, use less maple syrup or try a drier wine. Taste as you go to find your perfect balance. You learned how to make delicious Apple Cider Sangria. We covered fresh ingredients, step-by-step prep, and ways to customize it. I shared tips for serving and storage, plus fun variations for all seasons. Try different fruits or adjust the sweetness to match your taste. Making this drink ahead is easy, and it keeps well. Enjoying Apple Cider Sangria can bring joy to any gathering. Now, get ready to impress your guests with this refreshing drink!

Apple Cider Sangria with Cranberries Flavor Burst

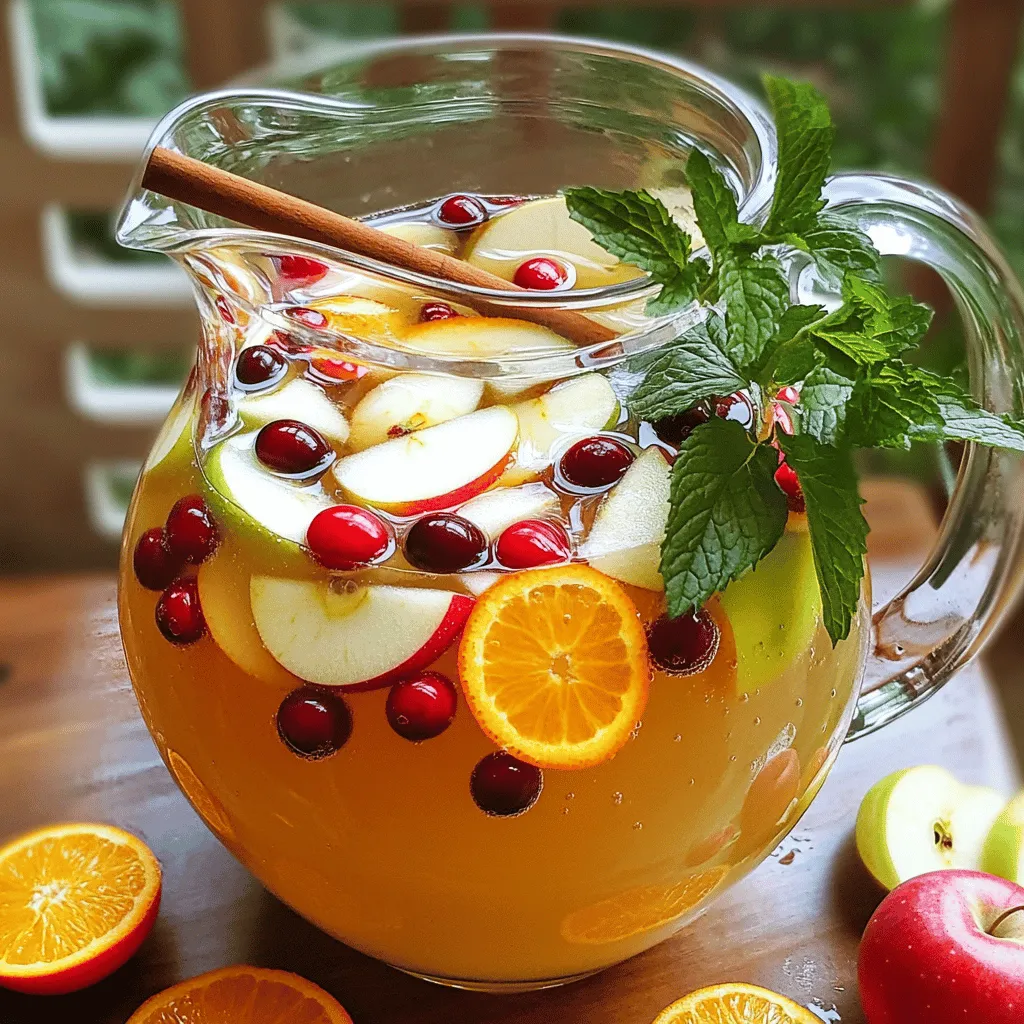
Welcome to a flavor adventure! Today, I’m sharing my favorite recipe for Apple Cider Sangria with Cranberries. It’s a delightful

- 1 tablespoon olive oil - 1 medium onion, diced - 2 cloves garlic, minced - 2 medium carrots, chopped - 2 celery stalks, chopped - 1 pound boneless, skinless chicken breasts, diced - 6 cups chicken broth - 1 cup orzo pasta - 1 teaspoon dried thyme - 1 teaspoon oregano - 1 lemon, zested and juiced - 1 cup heavy cream (or coconut milk for a lighter option) - Salt and pepper to taste - Fresh parsley, chopped (for garnish) Each ingredient plays a role in the soup's flavor. Olive oil adds richness. If you're out, you can use butter or vegetable oil. The onion is key for a base flavor. Shallots can work if you prefer a sweeter taste. Garlic gives great aroma, so always use fresh. The carrots and celery add crunch and sweetness. For the chicken, boneless, skinless breasts are great. You can substitute with thighs for more flavor. Chicken broth adds depth. If you want a lighter broth, use vegetable broth. Orzo is perfect for this soup, but you can swap it out for any small pasta, like ditalini or even rice. Lemon brightens the soup. Make sure to zest and juice it for full flavor. Heavy cream makes it rich, but coconut milk offers a lighter option. Lastly, fresh parsley adds color and freshness. If you don’t have it, you can skip it or use dried parsley. I love garnishing with fresh parsley. It adds a pop of color and flavor. You could also add a sprinkle of grated Parmesan cheese for extra richness. A few lemon slices on top can make it look beautiful. If you want a little heat, red pepper flakes can add a nice kick. First, gather all your ingredients. You will need olive oil, onion, garlic, carrots, celery, chicken, chicken broth, orzo, herbs, lemon, cream, salt, and pepper. Chop the onion, garlic, carrots, and celery. Dice the chicken into small pieces. Zest and juice the lemon. Heat the olive oil in a large pot over medium heat. Add the diced onion. Sauté for about 3-4 minutes until it turns clear. Next, stir in the minced garlic, chopped carrots, and celery. Cook for 5 minutes until the veggies soften. Now, add the diced chicken. Season it with salt and pepper. Cook until the chicken turns white, about 5-7 minutes. Pour in the chicken broth and let it boil gently. Once boiling, add the orzo, thyme, and oregano. Lower the heat and simmer for 10-12 minutes until the orzo is tender. After cooking, stir in the lemon zest, lemon juice, and heavy cream or coconut milk. Mix well and heat for another 2-3 minutes. Taste the soup and adjust the salt, pepper, or lemon juice as needed. Serve hot and top with fresh chopped parsley for a bright finish. Enjoy your creamy lemon orzo chicken soup! To make the best One-Pot Creamy Lemon Orzo Chicken Soup, follow these tips: - Use fresh ingredients for the best flavor. - Dice the chicken into small pieces for even cooking. - Sauté your veggies until they soften to boost taste. - Adjust the lemon juice to your liking. More juice means more zest! - Stir the soup gently to keep the orzo intact. Feel free to customize your soup with these ideas: - Swap the orzo for rice or quinoa for a different texture. - Add spinach or kale for extra greens and nutrients. - Use different herbs like basil or dill for unique flavors. - Try chickpeas instead of chicken for a plant-based option. - Substitute heavy cream with Greek yogurt for a lighter touch. You will need a few key items for this recipe: - A large pot or Dutch oven works best for even cooking. - A sharp knife and cutting board for chopping veggies and chicken. - A ladle helps serve the soup without spills. - A whisk is handy for mixing in the cream smoothly. - Use measuring cups and spoons to ensure accurate ingredient amounts. {{image_2}} You can make this soup lighter by swapping heavy cream for coconut milk. Coconut milk adds a rich, creamy texture while lowering the calories. It also brings a hint of sweetness that pairs well with the lemon. Just use one cup of coconut milk in place of heavy cream. This change keeps the dish flavorful and satisfying without the extra fat. If you want a vegetarian version, skip the chicken. Instead, use more veggies like mushrooms, bell peppers, or zucchini. Add a can of chickpeas for protein. Replace the chicken broth with vegetable broth to keep the flavor rich. You can still use orzo and all the spices. This way, you create a hearty soup that is full of nutrients and flavor. To boost the flavor, add fresh herbs like basil or dill. These herbs add brightness and depth. You can also sprinkle in spices like smoked paprika or red pepper flakes for a kick. A splash of soy sauce or a teaspoon of miso can add umami. These small changes can transform your soup, making it even more delicious and exciting. After enjoying your One-Pot Creamy Lemon Orzo Chicken Soup, let it cool to room temperature. Then, transfer the soup into airtight containers. This keeps it fresh and safe. Store in your fridge for up to three days. If you have extra soup, you can keep it for later. To reheat, pour the soup into a pot over medium heat. Stir it often until it warms through. If the soup thickens too much, add a splash of chicken broth or water. You can also microwave it. Use a microwave-safe bowl and heat in one-minute bursts, stirring in between. For long-term storage, freeze the soup. Make sure it’s completely cool before you freeze it. Use freezer-safe containers, leaving some space at the top. The soup can stay in the freezer for up to three months. When ready to eat, thaw it in the fridge overnight. Then, reheat as described. Yes, you can make this soup ahead of time. Cook it, then cool it down. Store it in an airtight container in the fridge. It will stay fresh for about three days. When you are ready to eat, just reheat it on the stove. Add a bit of broth if it seems too thick. This soup tastes even better the next day! If you don’t have orzo pasta, you can use other small pasta. Options like ditalini or small shells work well. Rice is another good substitute. If you choose rice, it will absorb more liquid, so you may need to add extra broth. To thicken your soup, there are a few easy tricks. You can mix a tablespoon of cornstarch with water and stir it in. Another option is to add more cream or let it simmer longer. This will help the soup reduce and become creamier. Just keep an eye on it so it doesn’t burn. Absolutely! Leftover chicken is perfect for this soup. Just shred or chop the chicken and add it in when you add the broth. This saves time and adds great flavor. It’s a smart way to use what you have and reduce waste. This blog post covered the key steps to make a delicious One-Pot Creamy Lemon Orzo Chicken Soup. We explored the ingredients, helpful tips, and fun variations to try. I shared how to prepare, cook, and serve the soup perfectly. You can use different ingredients and methods to make it your own. Remember, leftovers store well and heat up nicely. Enjoy making this soup today! It’s sure to become your new favorite dish.

One-Pot Creamy Lemon Orzo Chicken Soup Delight

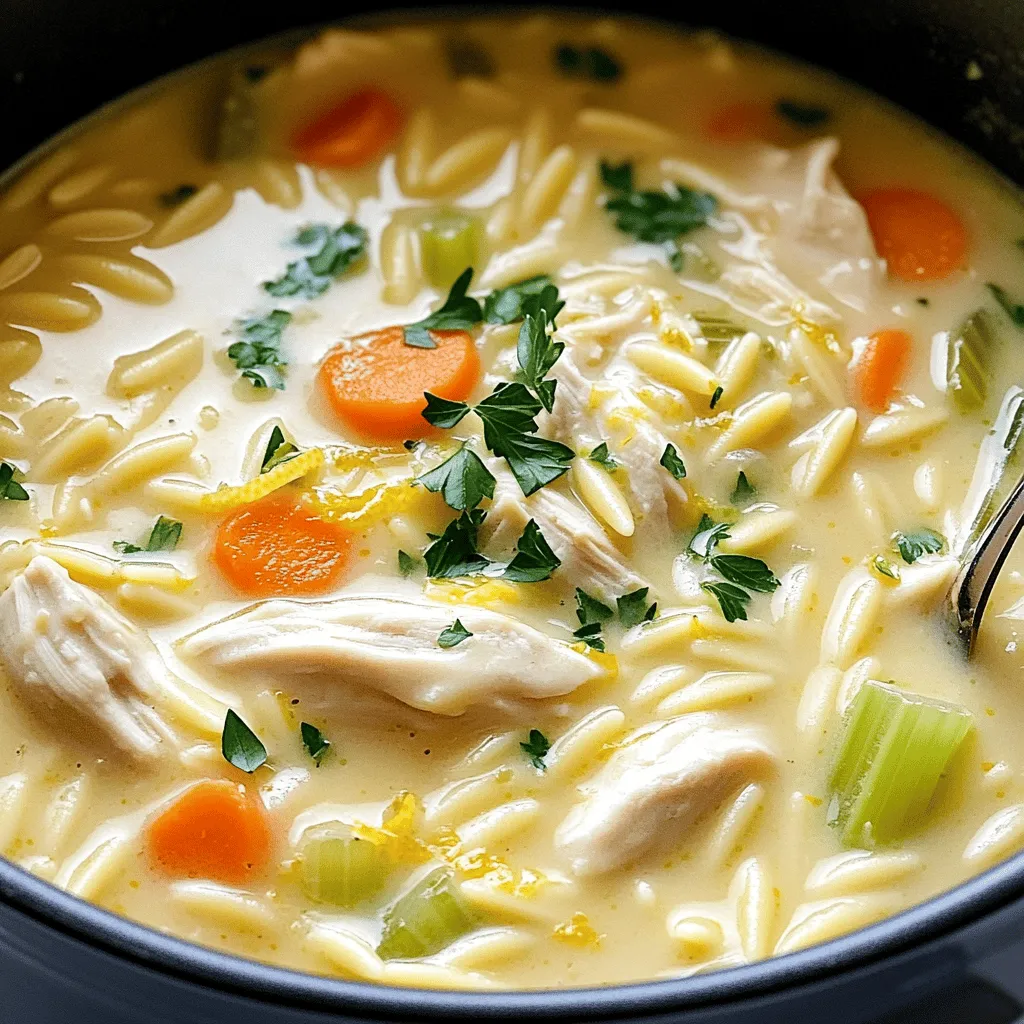
Are you ready to whip up a comforting bowl of One-Pot Creamy Lemon Orzo Chicken Soup? This dish is not

Older posts
Newer posts
← Previous Page1 … Page29 Page30 Page31 … Page84 Next →

dsad

© 2026 Lisa Dishes • Built with GeneratePress

Our Policies

  • Copyright Policy
  • Cookie Policy
  • GDPR Policy
  • Privacy Policy
  • Disclaimer
  • Terms Of Use

More Information

  • Home
  • About
  • Contact
  • Appetizers
  • Dessert
  • Dinner
  • Drinks
©2026, Lisa Dishes About Back To Top