Skip to content
DisclaimerTerms Of UseGDPR PolicyCookie Policy

Lisa Dishes

  • Home
  • Drinks
  • Appetizers
  • Dinner
  • Dessert
  • About
  • Contact
  • Privacy Policy
DisclaimerTerms Of UseGDPR PolicyCookie Policy

NO-ING-IMG

- 2 cups cooked chicken breast, shredded - 1 cup fresh or dried cranberries, chopped - 1/2 cup walnuts, chopped - 1/2 cup celery, diced - 1/4 cup red onion, finely chopped For this cranberry walnut chicken salad, cooked chicken is key. It adds protein and texture. You can use rotisserie chicken for ease. Fresh or dried cranberries bring sweetness and a pop of color. Walnuts add crunch and healthy fats. Celery gives a nice crunch, while red onion adds a mild bite. - 1/2 cup Greek yogurt - 1 tablespoon honey - 1 tablespoon Dijon mustard - 1 tablespoon lemon juice - Salt and pepper to taste The dressing is simple yet tasty. Greek yogurt serves as a creamy base. Honey adds a touch of sweetness. Dijon mustard brings tanginess, and lemon juice brightens the flavor. Don’t forget salt and pepper for seasoning. Mix it all together until smooth. - Fresh greens (like spinach or mixed salad) for serving - Garnishments like extra walnuts or cranberries To serve, lay fresh greens on plates or a platter. Then, scoop the salad on top. You can add extra walnuts or cranberries for a nice finish. This dish is great for lunch or a light dinner. {{ingredient_image_1}} First, take a large mixing bowl. Add the shredded chicken to the bowl. Next, chop your celery and red onion. Dice them small for a nice crunch. Then, add the chopped celery and red onion to the bowl. Now, take your cranberries and walnuts. If you use fresh cranberries, chop them small. If you use dried cranberries, just add them whole. Add both to the bowl. Stir everything together gently. Make sure the chicken, veggies, cranberries, and walnuts are mixed well. In a separate small bowl, add the Greek yogurt. Then, pour in the honey, Dijon mustard, and lemon juice. Mix it all together until smooth. The dressing should blend well. Now, season the dressing with salt and pepper to your taste. Taste it and adjust if needed. You want a nice balance of flavors. Pour the dressing over the chicken mixture. Gently toss everything together. Ensure all the chicken and veggies are covered in the dressing. For serving, lay fresh greens on plates. You can use spinach or a mixed salad. Top the greens with generous scoops of the chicken salad. Feel free to garnish with extra walnuts or cranberries. This adds a nice touch and extra flavor. Enjoy your colorful and tasty dish! For the best chicken in your salad, you can use three methods: boiling, baking, or grilling. Boiling keeps the chicken moist. Baking gives you a nice roasted flavor. Grilling adds a smoky touch. Each method works well, so choose what you like best. If you want a quick option, use rotisserie chicken. It saves time and adds great flavor. Just shred it and mix it into your salad. Adjusting the dressing is easy. Start with the base of Greek yogurt. If you want it creamier, add more yogurt. For a sweeter taste, add extra honey. If you like tang, try more lemon juice. You can also switch Greek yogurt for sour cream or mayo. Each will change the flavor slightly, making it your own. Toasting walnuts boosts their flavor. Just heat them in a dry pan for a few minutes. Watch them closely, as they can burn quickly. Adding herbs or spices can elevate your salad. Try fresh parsley or dill for a fresh taste. A pinch of garlic powder adds depth without overpowering the dish. These simple changes can make a big difference in flavor and texture. Pro Tips Fresh vs. Dried Cranberries: Using fresh cranberries will give a tart flavor, while dried cranberries add sweetness. Choose based on your taste preference! Chill Before Serving: Allowing the chicken salad to chill in the fridge for at least 30 minutes can enhance the flavors and improve the texture. Nut Alternatives: If you're allergic to walnuts, feel free to substitute with pecans or almonds for a different flavor and texture. Make It Ahead: This salad keeps well in the fridge for a couple of days, making it a great option for meal prep! {{image_2}} You can change the nuts in this salad. Instead of walnuts, try pecans or almonds. Both will add a nice crunch. You can also use sunflower seeds for a nut-free option. This makes the salad fun and fresh. If you want to switch up the fruit, go for it! Use chopped apples or grapes instead of cranberries. Dried apricots or raisins also work well. Each fruit brings its own flavor and texture, giving you many ways to enjoy the salad. If you need a gluten-free meal, this salad is easy to modify. All the ingredients are naturally gluten-free. Just check that any packaged items, like mustard, are gluten-free as well. For a vegan twist, replace the chicken with chickpeas. You can also swap Greek yogurt for a plant-based yogurt. Use maple syrup instead of honey for sweetness. These changes keep the salad tasty and full of nutrients. You can serve this salad in many ways. It makes a great sandwich filling. Just scoop it between two slices of bread or in a wrap. This is perfect for a quick lunch or picnic. You can also present it on an appetizer platter. Serve small portions in cups or on crackers. This way, it becomes a fun snack for parties. No matter how you serve it, it will be a hit! Store any leftover cranberry walnut chicken salad in an airtight container. This keeps it fresh longer. It can last in the fridge for about three days. After that, the taste and texture may change. Always check for signs of spoilage before eating. You can freeze the salad if you need to keep it longer. To do this, place the salad in a freezer-safe container. Leave some space at the top for expansion. It will stay good for about one month in the freezer. When you're ready to eat it, transfer it to the fridge for a slow thaw overnight. For the best taste, I recommend eating the salad cold. If you prefer it warm, heat it gently in a pan. Avoid using the microwave, as it may change the texture. After reheating, taste the salad again. You might want to add a bit more salt or lemon juice to bring back the flavors. Cranberry Walnut Chicken Salad can last about three to five days in the fridge. To keep it fresh, store it in an airtight container. Make sure to avoid letting it sit out for more than two hours. If you want to keep it longer, consider freezing it. Just remember to thaw it in the fridge overnight before serving. Yes, you can use canned chicken. Canned chicken is quick and easy. It saves time, but it may not have the same flavor as fresh chicken. If you use canned chicken, drain it well and shred it to mix with the other ingredients. This option works well when you're in a hurry, but fresh chicken often tastes better. Here are some tasty and healthy sides to pair with your salad: - Whole grain crackers - Sliced cucumbers - Fresh fruit salad - Quinoa salad - Steamed broccoli These sides add color and nutrition to your meal. They balance the flavors of the salad and make a complete dish. Enjoy! This article covered how to make a tasty Cranberry Walnut Chicken Salad. You learned about the key ingredients, how to prepare the salad, and tips for serving. I shared ideas for variations and storage, ensuring your salad stays fresh. In conclusion, this salad is simple to make and fun to enjoy. You can customize it to fit your tastes. With just a few steps, you create a dish that impresses. Enjoy your cooking journey!

Cranberry Walnut Chicken Salad Easy and Tasty Recipe

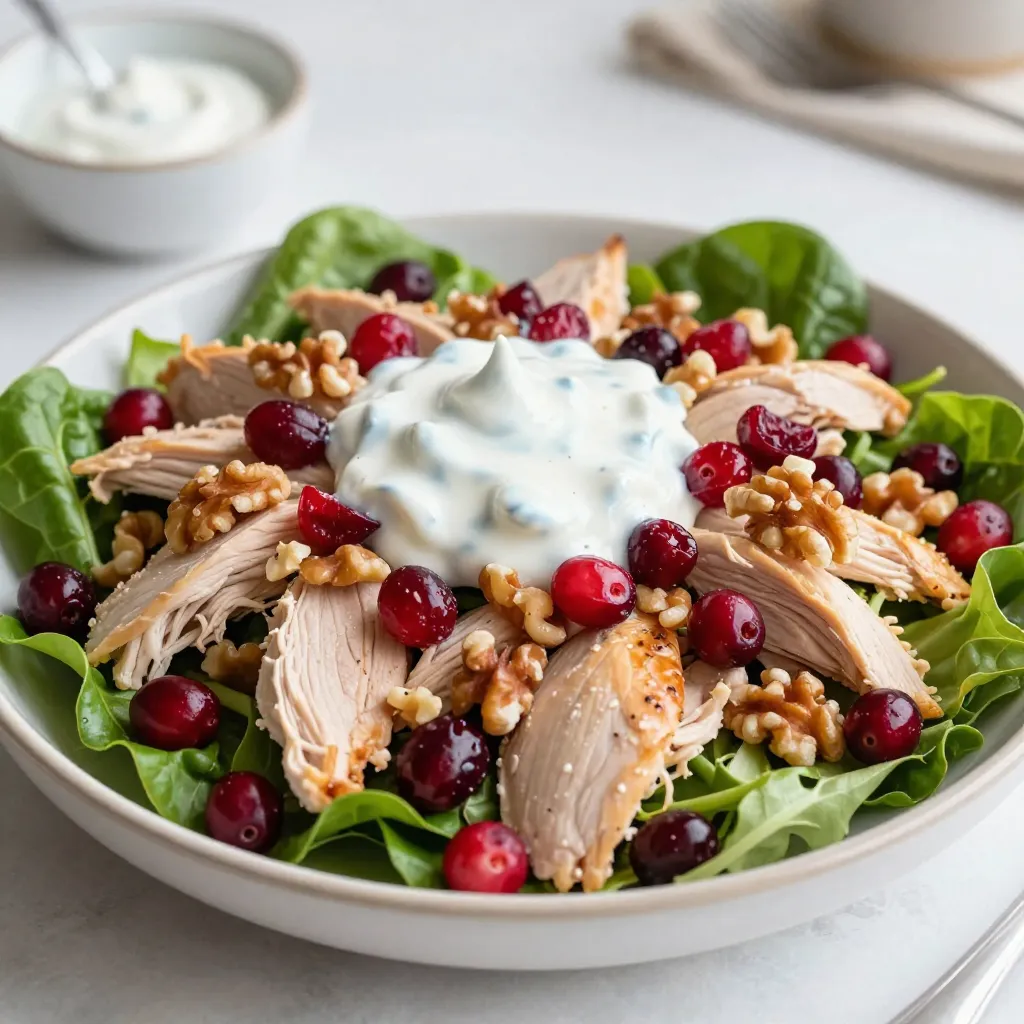
Looking for a quick and tasty meal? You’re in the right place! This Cranberry Walnut Chicken Salad is easy to

To make this dish, you need the following ingredients: - 4 boneless, skinless chicken breasts - 1 cup cherry tomatoes, halved - 8 ounces fresh mozzarella, sliced - 1/2 cup balsamic vinegar - 2 tablespoons olive oil - 2 cloves garlic, minced - 1 teaspoon dried basil - Salt and pepper to taste - Fresh basil leaves for garnish When picking ingredients, look for bright-colored tomatoes. They should feel firm and smell sweet. For mozzarella, choose a ball that feels soft and moist. The cheese should have a pleasant, milky smell. Chicken breasts should be pink with no odor. Always check the sell-by date on the package. Fresh basil should be vibrant green and may have a slight shine. You can make this dish work for different diets. If you're dairy-free, use a vegan cheese alternative. For a lower-carb dish, skip the tomatoes and serve with leafy greens instead. If you want to cut back on fat, you can grill the chicken instead of frying it. For gluten-free options, this recipe is already safe as there are no gluten ingredients. Adjust these swaps to fit your taste and needs. {{ingredient_image_1}} First, I preheat the oven to 375°F (190°C). This step is key for cooking the chicken evenly. Next, I season the chicken breasts with salt, pepper, and dried basil on both sides. This simple mix adds great flavor. I use a large oven-safe skillet for this dish. I heat olive oil over medium heat. Then, I add the chicken breasts and let them cook for about 5 minutes on each side. I look for a golden brown color. Once done, I remove the chicken from the skillet and set it aside. In the same skillet, I add minced garlic and sauté it for about 30 seconds. The smell of garlic is amazing! Then, I pour in the balsamic vinegar, scraping up any bits stuck to the bottom. I let it simmer and reduce for about 5-7 minutes. The glaze should thicken slightly—this is my magic moment! Now, I return the chicken to the skillet. I top each piece with halved cherry tomatoes and fresh mozzarella slices. Finally, I transfer the skillet to the oven and bake for 20-25 minutes. I check that the internal temperature reaches 165°F (74°C) and the cheese is bubbly and melted. Before serving, I drizzle the remaining balsamic glaze over the chicken and tomatoes. To keep your chicken juicy, start with good seasoning. Use salt and pepper generously. Let the chicken rest after cooking. This helps keep the juices inside. Searing on medium heat gives a nice crust. Don’t rush the cooking process. Cook until it reaches 165°F (74°C) inside. A meat thermometer helps you check this easily. The balsamic glaze brings the dish to life. Use fresh balsamic vinegar for the best taste. Simmer it slowly to help it thicken. Stir often to avoid burning. Adding minced garlic right after searing gives great flavor. Make sure to scrape the pan to get all the tasty bits. This adds depth to your glaze. Presentation is key for a great meal. Serve the chicken on a large platter. Drizzle extra glaze over the chicken before serving. Top with fresh basil leaves for color. Pair it with a colorful salad or roasted veggies. This adds a nice touch and brings more flavor to the table. Guests will love the look and taste! Pro Tips Marinate for Extra Flavor: Consider marinating the chicken in balsamic vinegar, olive oil, and herbs for at least an hour before cooking. This will enhance the flavors and make the chicken even more tender. Use Fresh Ingredients: For the best flavor, always opt for fresh mozzarella and ripe cherry tomatoes. They will elevate the dish and provide a burst of freshness. Monitor Cooking Time: Keep an eye on the chicken while it bakes to prevent overcooking. Use a meat thermometer to ensure it reaches 165°F (74°C) for perfectly juicy chicken. Serve with a Side: Pair the dish with a light salad or roasted vegetables to add balance. A side of garlic bread also complements the meal beautifully. {{image_2}} You can swap chicken breasts for turkey. Turkey is leaner and very tasty. Use low-fat mozzarella if you want to cut calories. Try a balsamic reduction made with less sugar. This gives you a lighter option without losing flavor. You can also add herbs like oregano or thyme for more taste. In spring or summer, add fresh zucchini or bell peppers. These vegetables brighten the dish. In fall, try adding roasted butternut squash. It adds a sweet touch. You can also include spinach or kale for extra greens. They bring more nutrition and color to your plate. While fresh mozzarella is classic, you can use burrata for a creamier texture. Feta cheese gives a nice tangy flavor. You can also try goat cheese for a unique twist. Each cheese brings its own taste, making this dish fun to change. To store your Balsamic Glazed Caprese Chicken, let it cool first. Place the chicken in an airtight container. Make sure to separate any sauce or toppings. This helps keep the flavors fresh. Store it in the fridge for up to three days. If you want to enjoy it later, freezing is a great option. When you are ready to reheat, use the oven for best results. Preheat your oven to 350°F (175°C). Place the chicken in a baking dish. Cover it with foil to keep it moist. Heat for about 20 minutes or until warm. You can also use a microwave. Just heat it in short bursts, checking often. This keeps the chicken juicy. For freezing, wrap the chicken tightly in plastic wrap. Then, place it in a freezer-safe bag. Label the bag with the date. Your dish will stay fresh for up to three months. When ready to eat, thaw it overnight in the fridge. Then, reheat as described above. This method saves time and gives you tasty meals ready to go! Balsamic Glazed Caprese Chicken lasts about 3 to 4 days in the fridge. Store it in an airtight container. Make sure it cools down before you put it in the fridge. This helps keep the chicken juicy and tasty. Yes, you can use chicken thighs. They are a bit richer and more flavorful. Just make sure to cook them until they reach 165°F (74°C). Thighs can give your dish a different taste and texture, which some people love. You can serve this dish with many sides. Here are some tasty options: - A light salad with mixed greens. - Roasted vegetables like zucchini and bell peppers. - Garlic bread to soak up the balsamic glaze. - Quinoa or rice to add heartiness. These sides make your meal more colorful and filling. You learned how to make Balsamic Glazed Caprese Chicken, from ingredients to cooking tips. I shared easy steps for tasty, juicy chicken and a rich glaze. Remember to pick fresh ingredients for the best flavor. Experiment with variations to suit your needs, and store your leftovers safely. Enjoy making this dish and wow your family with your cooking skills. Trust me: this recipe will become a favorite!

Balsamic Glazed Caprese Chicken Juicy and Flavorful Dish

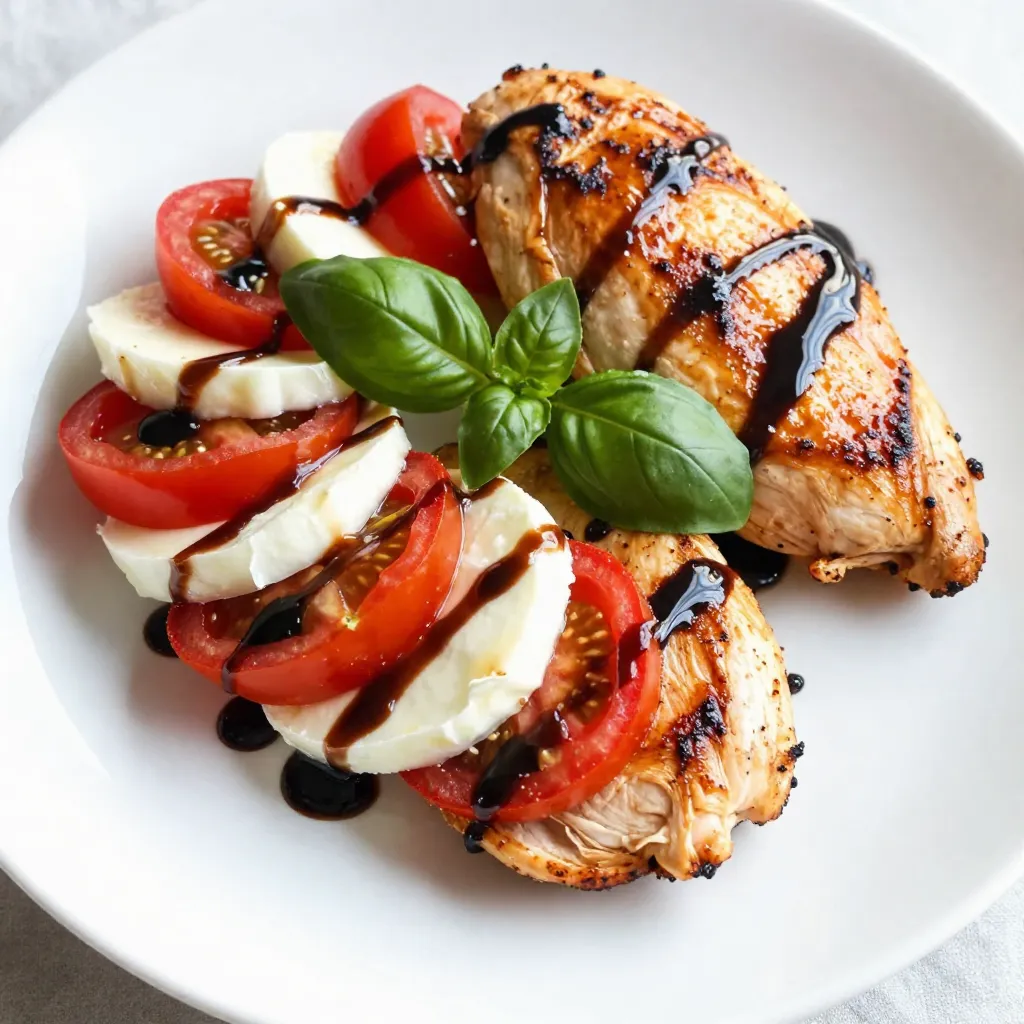
Are you ready to impress your family with a juicy and flavorful dish? Balsamic Glazed Caprese Chicken is your answer!

- 1 ½ cups graham cracker crumbs - ⅓ cup granulated sugar - ½ cup unsalted butter, melted The crust sets the stage for the cheesecake. First, I mix graham cracker crumbs with granulated sugar. This blend gives a sweet crunch. Then, I add melted butter. This binds everything together. I press the mixture firmly into a springform pan. Baking it for 10 minutes brings out the flavors. Let it cool while you prepare the cheesecake. - 16 oz cream cheese, softened - 1 cup granulated sugar - 3 large eggs - 1 teaspoon vanilla extract - 2 tablespoons cocoa powder - ½ cup buttermilk - 1 ½ tablespoons red food coloring The cheesecake itself is rich and creamy. I start by beating softened cream cheese until smooth. Adding granulated sugar comes next. This makes it sweet and silky. I mix in eggs one at a time, ensuring a smooth batter. Then, I add vanilla extract and cocoa powder for flavor depth. Buttermilk adds a tangy twist, while red food coloring gives it that iconic look. - 2 cups fresh strawberries, hulled and sliced - ¼ cup granulated sugar - 1 tablespoon lemon juice - 1 tablespoon cornstarch (optional, for thickening) Fresh strawberries bring brightness to this dessert. I slice them and mix them with sugar and lemon juice. This helps draw out their juices. It creates a lovely syrup. If I want a thicker topping, I add cornstarch. This optional step helps hold the strawberries together. First, preheat your oven to 325°F (160°C). This helps the cheesecake cook evenly. Next, take a 9-inch springform pan and grease it with non-stick spray or butter. Make sure to cover the sides well. This step helps the cheesecake come out easily after baking. In a large bowl, mix 1 ½ cups of graham cracker crumbs, ⅓ cup of sugar, and ½ cup of melted unsalted butter. Stir until everything combines well. Now, press this mixture firmly into the bottom of the springform pan. This forms the crust. Bake it for 10 minutes. After baking, let it cool completely. In a large mixing bowl, beat 16 oz of softened cream cheese until it’s creamy. Add 1 cup of granulated sugar slowly. Mix until smooth and fluffy. Now, add 3 large eggs one at a time, mixing well after each. Scrape the sides of the bowl to get all the cream cheese mixed in. Next, mix in 1 teaspoon of vanilla extract, 2 tablespoons of cocoa powder, ½ cup of buttermilk, and 1 ½ tablespoons of red food coloring. Blend until the batter is vibrant and smooth. Pour the cheesecake batter over the cooled crust in the springform pan. Bake it for about 50-60 minutes. Check the center; it should be set but still slightly jiggly. When done, turn off the oven and let the cheesecake cool inside for an hour with the door slightly open. This helps prevent cracks. While the cheesecake cools, prepare the strawberry topping. In a medium bowl, combine 2 cups of hulled and sliced fresh strawberries with ¼ cup of sugar and 1 tablespoon of lemon juice. Let this mix sit for about 10 minutes. This allows the strawberries to release their juices. If you want a thicker topping, stir in 1 tablespoon of cornstarch. Once the cheesecake has cooled, refrigerate it for at least 4 hours, or overnight for the best taste. When ready to serve, carefully remove the sides of the springform pan. Top the cheesecake with the marinated strawberries. Drizzle some of the strawberry juice over the top for extra flavor. Enjoy every slice! To get a smooth cheesecake, avoid overmixing. Mix just until smooth. If you mix too much, air bubbles form. These bubbles cause cracks when baking. After mixing, cool your cheesecake slowly. Letting it cool in the oven helps. Keep the door slightly open while cooling. This method prevents sudden temperature changes. For beautiful slices, use a sharp knife. Clean the knife with a cloth between cuts. This gives you neat edges. Serve the cheesecake on a nice platter. Garnish with whole strawberries and a drizzle of strawberry juice. This adds color and makes it look fancy. Watch for two key mistakes: underbaking and overbaking. Underbaked cheesecake is too soft, while overbaked is dry. Always check your cheesecake at the end of baking time. Another mistake is incorrect ingredient measurements. Use measuring cups and spoons for accuracy. Even a small difference can change the texture and taste. {{image_2}} You can add a fun twist to your cheesecake. Try mixing in chocolate chips for a rich surprise. The chocolate pairs well with the creamy cheesecake. You can also use different fruits for the topping. While strawberries are great, blueberries or raspberries work well too. They add color and flavor to your dessert. If you need a gluten-free option, swap the graham cracker crumbs for gluten-free ones. Many brands offer great substitutes. For a vegan version, use dairy-free cream cheese and replace eggs with flaxseed meal mixed with water. This keeps the cheesecake creamy and delicious while meeting dietary needs. Pair your cheesecake with a scoop of vanilla ice cream for a creamy treat. Coffee or tea also goes well with it. You can get creative by serving slices on a bed of fresh fruit or drizzling chocolate sauce on top. For a fun touch, add whipped cream and sprinkle some nuts for extra crunch. Store your cheesecake in the fridge. Cover it well to keep it fresh. Use plastic wrap or a tight lid. This helps keep out air and moisture. You can freeze the cheesecake whole or in slices. Wrap it tightly in plastic wrap, then in aluminum foil. This helps avoid freezer burn. To thaw, move it to the fridge overnight. In the fridge, the cheesecake lasts about five days. If you see any mold or off smells, throw it away. Always check for signs of spoilage before eating. Red Velvet Strawberry Cheesecake is a sweet dessert that mixes red velvet cake with creamy cheesecake. The red velvet adds a rich color and slight cocoa taste. This dessert has roots in Southern cuisine. It often appears on special occasions. The combination of flavors creates a delightful experience. The cheesecake's creaminess pairs perfectly with the sweet strawberries on top. Yes, you can make this cheesecake ahead of time. I recommend preparing it a day before you plan to serve it. This gives the cheesecake enough time to chill and set properly. The flavors also blend better when it sits overnight. Just store it in the fridge once it cools down. It will taste fresh and delicious when you serve it. To adjust the sweetness, try using less sugar in the batter. You can start with half a cup instead of a full cup. If you want more sweetness, add more sugar to the strawberry topping. Taste as you go. This way, you can find the right balance. Remember, too much sugar can mask the cheesecake's flavors. Yes, you can skip the red food coloring if you want. Instead, you can use beet juice for a natural color. This will give you a nice hue without artificial colors. The taste will remain similar, thanks to the cocoa powder. If you prefer, you can also make a plain cheesecake. Just follow the cheesecake recipe without adding the cocoa and food coloring. This Red Velvet Strawberry Cheesecake combines rich creaminess with fresh fruit. We covered crust and cheesecake ingredients, and I shared step-by-step baking instructions. Avoid common mistakes to get the best texture. You can also try different flavors and adjust recipes for dietary needs. Store your cheesecake well for long-lasting enjoyment. Don’t hesitate to experiment with variations to make this dessert your own. Enjoy every delicious slice of your creation!

Red Velvet Strawberry Cheesecake Delightful and Creamy

Are you ready to impress your friends and family with a dessert that looks as good as it tastes? This

To make a tasty Chilled Cucumber Lemonade, gather these simple ingredients: - 2 large cucumbers, peeled and chopped - 1 cup fresh lemon juice (about 4-6 lemons) - 1/2 cup honey or agave syrup (adjust for sweetness) - 4 cups cold water - Fresh mint leaves for garnish - Lemon slices for garnish - Ice cubes Each ingredient plays a key role. The cucumbers add a crisp and refreshing taste. Fresh lemon juice gives a zesty kick. Honey or agave syrup sweetens the drink. Cold water helps balance the flavors. Mint leaves and lemon slices make it look pretty. Ice cubes keep your drink cold and refreshing. When you choose your cucumbers, go for firm, bright ones. They should feel heavy for their size. This ensures great flavor and texture. The lemon juice should be fresh for the best taste. If you want, you can adjust the sweetness to your liking. This drink is all about your taste! 1. Start by peeling and chopping the two large cucumbers. Place them into your blender. Blend the cucumbers until smooth. This step creates a fresh cucumber juice that gives your lemonade a crisp taste. 2. Next, strain the cucumber juice into a large pitcher. Use a fine-mesh sieve for the best results. This helps remove any pulp. 3. In the pitcher with the cucumber juice, add one cup of fresh lemon juice. This usually comes from about four to six lemons. Then, add half a cup of honey or agave syrup. This will sweeten your drink nicely. 4. Pour in four cups of cold water. Mix everything together well. Taste it, and if you want it sweeter, add more honey or agave. 5. Chill the lemonade in the fridge for at least thirty minutes. This waiting time allows the flavors to blend beautifully. 6. When you're ready to serve, fill glasses with ice cubes. Pour the chilled cucumber lemonade over the ice. 7. For a lovely touch, garnish each glass with fresh mint leaves and a slice of lemon on the rim. Enjoy your refreshing drink! - Choosing the right cucumbers Pick firm, fresh cucumbers with smooth skin. Look for ones that feel heavy for their size. This helps ensure your lemonade tastes crisp. - How to adjust sweetness Start with half a cup of honey or agave. Taste the mix and add more if you like. If you want it sweeter, add a bit more. Always mix well before tasting. - Importance of chilling Chill your lemonade for at least 30 minutes. This step makes the flavors blend better. A cold drink is always more refreshing on a hot day. {{image_2}} When you make chilled cucumber lemonade, you can change it up in fun ways. Here are some ideas for flavor enhancements that will make your drink even better. Adding fresh herbs can give your lemonade a nice twist. Mint adds a cool taste, while basil brings a sweet and spicy note. To use herbs, just chop them up and mix them in before you chill your drink. You can also garnish your glasses with mint leaves for a fresh look. If you want to cut down on sugar, try using stevia. It is a natural sweetener with no calories. You will need to adjust the amount since stevia is much sweeter than honey or agave. Start with a little, taste it, and then add more if needed. This way, you can find the perfect sweetness for your lemonade. You can also add other fruits to your cucumber lemonade. Strawberries bring a sweet and fruity flavor, while watermelon adds a refreshing touch. To infuse your drink, simply blend the fruits and strain the juice, just like you did with the cucumbers. Mix the fruit juice with the cucumber lemonade for a colorful and tasty drink. These variations will keep your chilled cucumber lemonade exciting all summer long! - Storing in the fridge After making your chilled cucumber lemonade, pour it into a clean pitcher. Cover it tightly with a lid or plastic wrap. Place it in the fridge. This keeps it fresh and cool. - Duration of freshness Your lemonade stays fresh for about three days in the fridge. After that, the flavors may fade. It might also start to separate. Always give it a good stir before serving. - How to freeze for later use If you want to save some for later, pour the lemonade into ice cube trays. Freeze it until solid. You can then pop out the cubes and store them in a bag. This way, you have chilled cucumber lemonade ready for hot days! Just drop a cube into water for a quick refresh. Chilled Cucumber Lemonade stays fresh for about three days in the fridge. After that, it may lose its crisp flavor. Always check for any changes in smell or taste before serving. Yes, you can make this lemonade ahead of time. Prepare it a day before your event. Just chill it well in the fridge. This allows the flavors to blend nicely. Cucumber lemonade is very hydrating. Cucumbers contain vitamins and minerals. They also have antioxidants that help fight inflammation. Lemon juice adds vitamin C, which boosts your immune system. Absolutely! You can use sugar-free sweeteners like stevia or erythritol. Adjust the amount to fit your taste. This way, you can enjoy a healthier version without added sugar. This blog shows how to make a refreshing chilled cucumber lemonade. You need a few simple ingredients like cucumbers, lemon juice, honey, and fresh mint. Follow the easy steps to blend and chill your lemonade. Remember, you can change flavors by adding herbs or fruits. Store it well for later enjoyment. Making your own lemonade is fun and tasty. Enjoy your perfect drink on a sunny day!

Chilled Cucumber Lemonade Refreshing Summer Drink

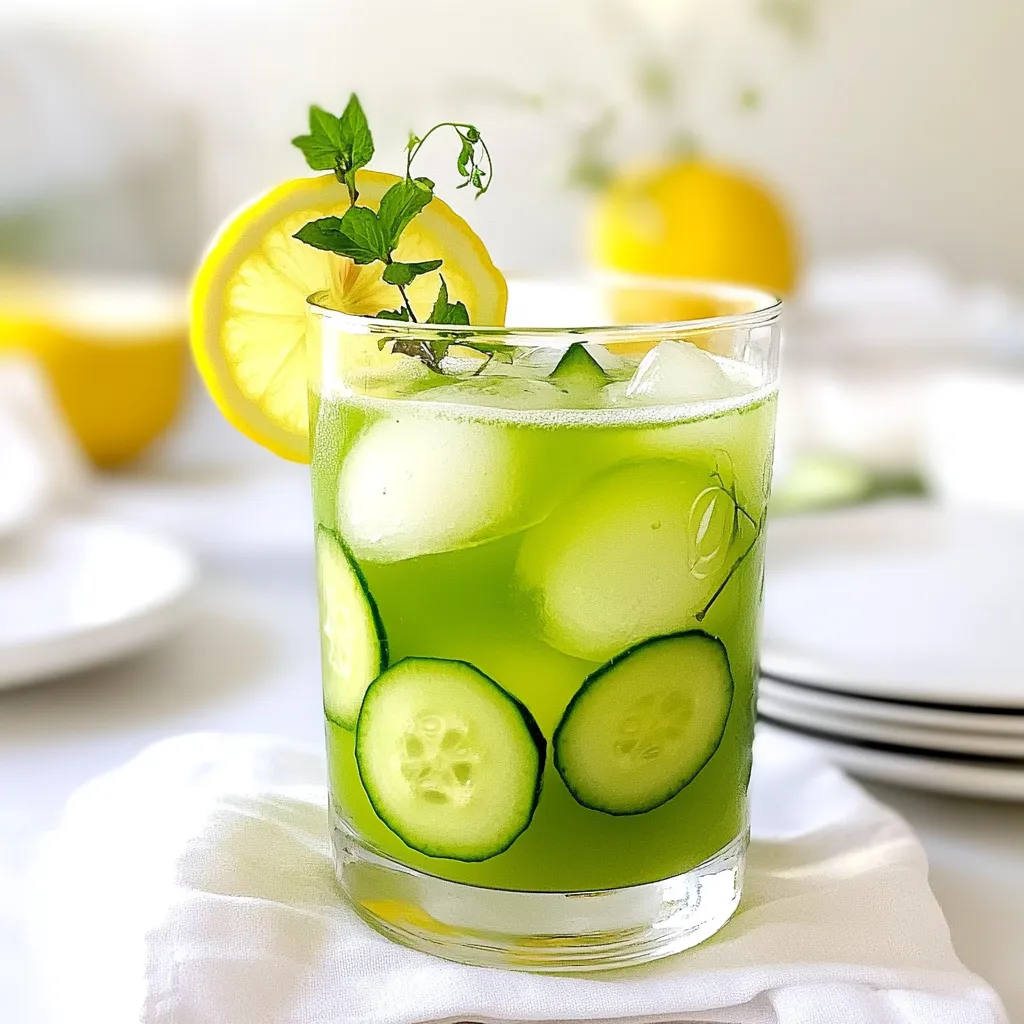
Looking for a cool and refreshing drink this summer? I’ve got just the thing for you! Chilled Cucumber Lemonade is

To make a great curry dumpling soup, you need some key ingredients. Here’s what you will need: - 1 cup all-purpose flour - 1/2 cup water - 1 teaspoon salt - 1 tablespoon olive oil - 1 tablespoon ginger, minced - 2 cloves garlic, minced - 1 medium onion, diced - 2 carrots, chopped - 1 bell pepper, diced - 2 tablespoons curry powder - 4 cups vegetable broth - 1 can (14 oz) coconut milk - 1 cup frozen peas - 1 tablespoon soy sauce - Fresh cilantro, for garnish These ingredients work together to create a warm and inviting dish. The flour and water form the dumpling dough, while the ginger and garlic add depth of flavor. If you want to enhance your soup, consider adding these optional ingredients: - Chopped green onions for a fresh kick - A squeeze of lime juice for brightness - A dash of chili flakes for heat - Fresh herbs like basil or mint for aroma These extras can elevate the flavor and make your soup even more enjoyable. You can easily swap some ingredients if needed. Here are a few ideas: - Use whole wheat flour instead of all-purpose for a healthier option. - Replace vegetable broth with chicken broth for a richer taste. - Substitute coconut milk with almond milk for a lighter version. - Swap frozen peas with other veggies like corn or spinach. These substitutions allow you to customize the soup to your taste or dietary needs. Experimenting can lead to delightful surprises! To start, grab a mixing bowl. Add 1 cup of all-purpose flour and 1 teaspoon of salt. Mix these dry ingredients well. Next, slowly pour in 1/2 cup of water and 1 tablespoon of olive oil. Stir until a soft dough forms. Knead the dough for about 5 minutes. You want it smooth and elastic. Once done, cover it with a damp cloth. Let it rest while you prepare the filling. In a large pot, heat 1 tablespoon of olive oil over medium heat. Add 1 tablespoon of minced ginger and 2 cloves of minced garlic. Sauté them until they smell great and the onions turn translucent. This should take about 5 minutes. Now, add 1 medium diced onion, along with 2 chopped carrots and 1 diced bell pepper. Cook these for 3 to 4 minutes, until they start to soften. Then, sprinkle in 2 tablespoons of curry powder. Stir it well to coat all the veggies. Pour in 4 cups of vegetable broth and 1 can of coconut milk. Bring this mixture to a boil, and then reduce the heat to let it simmer. While the soup simmers, take the dough and roll it out on a floured surface. Aim for about 1/8 inch thickness. Use a cookie cutter or glass to cut out circles that are about 3 inches in diameter. For each circle, place a small spoonful of the vegetable mixture in the center. Fold the circle over and pinch the edges to seal the dumpling tightly. Repeat this until you use all the dough and filling. Now, gently place the dumplings into the simmering soup. Cook them for about 8 to 10 minutes. They will float to the top when they are done. Lastly, stir in 1 cup of frozen peas and 1 tablespoon of soy sauce. Let it simmer for 2 to 3 more minutes. Adjust the salt if needed, and enjoy your delicious curry dumpling soup! To make the best dumplings, follow these tips: - Knead the dough: Knead the dough for about five minutes. This helps make it smooth and elastic. - Cover the dough: Keep the dough covered with a damp cloth while you work. This prevents it from drying out. - Use a floured surface: Roll out the dough on a floured surface to avoid sticking. - Cut evenly: Use a cookie cutter for even circles. This helps ensure uniform cooking. - Seal tightly: When filling, pinch the edges well. This keeps the filling inside during cooking. To boost the flavor of your soup, try these ideas: - Fresh spices: Use fresh ginger and garlic. They add a bright, bold flavor. - Quality broth: Choose a good vegetable broth. It forms the base of your soup. - Add lime juice: A squeeze of lime juice right before serving adds a zesty kick. - Experiment with herbs: Fresh cilantro adds a fragrant touch. You can also try basil or mint. - Adjust seasoning: Always taste the soup. You can add more salt or soy sauce if needed. Avoid these common pitfalls when making your curry dumpling soup: - Overcooking dumplings: Watch the cooking time. Dumplings float when done, usually 8-10 minutes. - Too much filling: Don't overstuff the dumplings. A small spoonful is enough for each one. - Skipping the simmer: Let the soup simmer gently. This helps flavors mingle well. - Not tasting: Always taste as you cook. Adjust flavors to your liking for the best result. - Ignoring presentation: Ladle soup carefully and garnish nicely to make it appealing. {{image_2}} You can easily make this soup vegetarian or vegan. For a vegetarian version, just use vegetable broth and coconut milk. This soup is already packed with veggies. You can add even more! Try adding mushrooms or spinach for extra flavor. If you're going vegan, skip the eggs in any dumpling recipe. Use the dumpling dough made with flour and water. It works perfectly! If you love heat, make a spicy version! Add chopped chili peppers to the soup while cooking. You can also use a spicy curry powder or paste. For extra kick, sprinkle red pepper flakes when serving. This will bring a warm glow to your bowl. Adjust the spice level to fit your taste buds. It’s all about what you enjoy! Curry dumpling soup changes around the world. In some Asian countries, people use rice flour for dumplings. This gives a different texture. In Indian cuisine, you might find spices like cumin and turmeric added. In Chinese recipes, they might include bok choy or other greens. Explore these flavors to find your favorite twist. Each version tells a story of its culture and ingredients. Store leftover curry dumpling soup in an airtight container. Let the soup cool completely before sealing it. Place it in the fridge for up to three days. This keeps the flavors fresh and delicious. If you want to enjoy it later, consider freezing it. You can freeze both the dumplings and the soup. For dumplings, arrange them on a tray and freeze them until firm. Once frozen, transfer them to a freezer bag. This way, they won’t stick together. For the soup, cool it completely before placing it in a freezer-safe container. It stays good for about three months. To reheat the soup, pour it into a pot over medium heat. Stir it often until it’s hot. If the soup seems thick, add a splash of vegetable broth or water. For frozen dumplings, you can cook them directly in the simmering soup. Just add them and cook until they float. This keeps them tender and delicious. Yes, you can make the soup ahead of time. Prepare the soup base and dumplings separately. Store the soup in the fridge for up to three days. The dumplings can also be made in advance and stored in the freezer. This helps keep them from getting too soft. When ready to eat, just cook the dumplings in the warm soup until they float. I recommend using a mild curry powder for this soup. It balances well with the coconut milk and other flavors. Look for a blend that includes turmeric, cumin, and coriander. If you like more heat, you can try adding a bit of cayenne pepper or a spicy curry blend. Each type of curry powder brings its own unique taste, so feel free to experiment. To keep your dumplings intact, make sure to seal them tightly. Pinch the edges well after adding the filling. The dough should be soft but not sticky. If it feels too wet, add a little more flour while kneading. Also, cook the dumplings gently in simmering soup. High heat can make them break apart. When they float, they are ready to eat. In this article, we explored how to make delicious curry dumpling soup. We went over key ingredients, step-by-step instructions, helpful tips, and fun variations. I showed you how to avoid common mistakes and how to store your leftovers for later. Curry dumpling soup is not only tasty but also easy to customize. By trying different spices or keeping it vegetarian, you can make it your own. Enjoy your cooking journey and share this dish with others!

Curry Dumpling Soup Flavorful Comfort in a Bowl

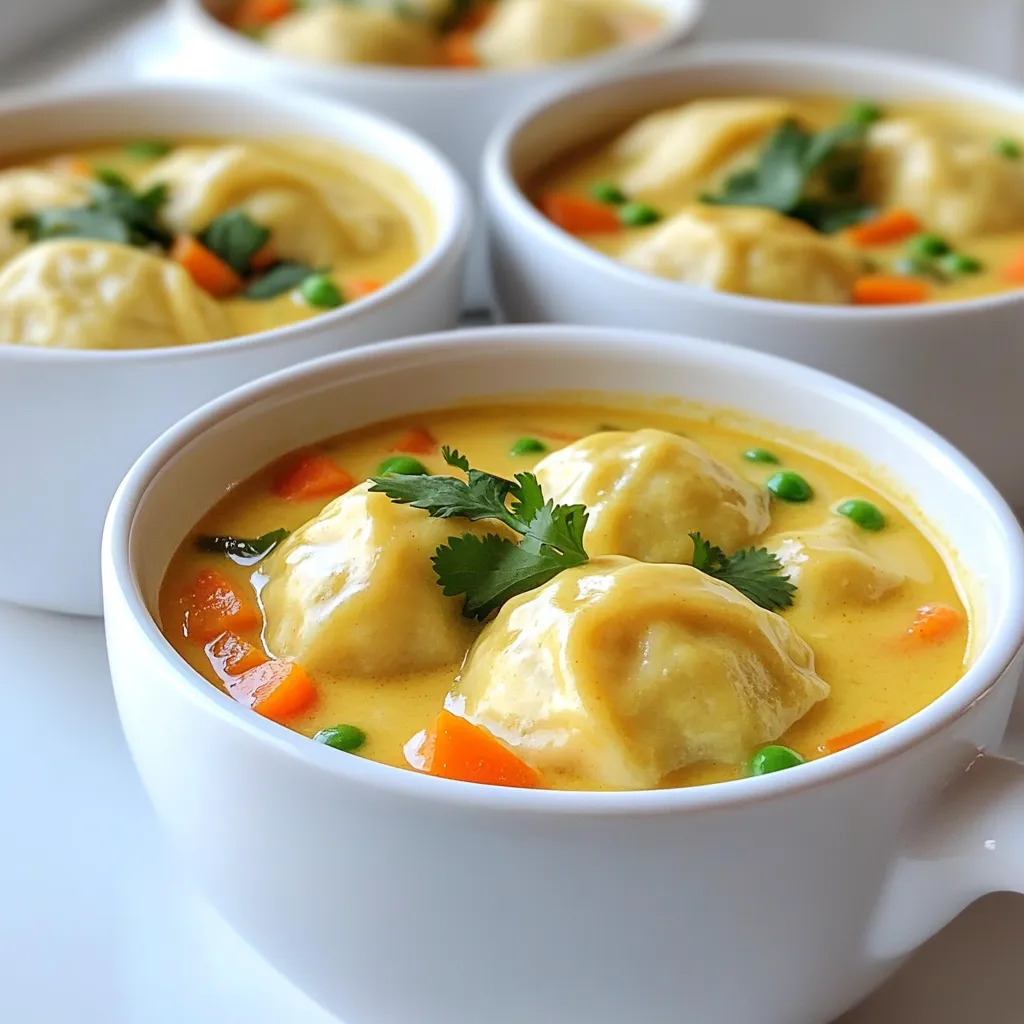
Welcome to your new favorite comfort dish: Curry Dumpling Soup! This tasty soup warms you up with soothing flavors and

To make a great baked potato soup, you need some key ingredients. Here’s what you’ll need: - 4 large russet potatoes, baked and cooled - 1 tablespoon olive oil - 1 medium onion, diced - 3 cloves garlic, minced - 4 cups vegetable broth - 1 cup heavy cream - 1 cup shredded sharp cheddar cheese - 1/2 cup sour cream - 1 teaspoon smoked paprika - Salt and pepper to taste These ingredients create a rich, creamy soup. The russet potatoes add a hearty base. The heavy cream and sour cream make it smooth and rich. Sharp cheddar cheese gives it a nice flavor. You can make your soup even better with garnishes. Here are some tasty options: - 4 green onions, chopped - Crumbled crispy kale or bacon bits These toppings add crunch and flavor. The green onions give a fresh taste. If you love bacon, it adds a salty kick. You can change some ingredients if needed. Here are a few ideas: - Instead of heavy cream, use coconut cream for a dairy-free option. - Use chicken broth instead of vegetable broth for a different flavor. - If you want a lighter soup, reduce the amount of cream. Feel free to mix and match ingredients as you wish. Cooking is all about finding what you love! Start by preheating your oven to 400°F (200°C). Take four large russet potatoes and wash them well. Place the potatoes directly on the oven rack. Bake for about one hour. You want them soft. Once baked, let them cool down for a bit. After they cool, cut each potato in half lengthwise. Use a spoon to scoop out the insides into a bowl. Leave a thin layer of potato in the skin. This adds some nice texture. In a large pot, pour in one tablespoon of olive oil. Heat it over medium heat. Add one diced medium onion. Sauté it until it turns translucent, which should take about five minutes. Next, add three minced garlic cloves. Cook for one to two minutes until the garlic smells good. Now, pour in four cups of vegetable broth. Bring this mix to a simmer. Stir in the scooped potato flesh, one cup of heavy cream, and one cup of shredded sharp cheddar cheese. Add one teaspoon of smoked paprika, along with salt and pepper to taste. Mix it well until the cheese melts and the soup becomes creamy. Once the soup base is ready, grab an immersion blender. Blend the soup until it reaches the consistency you like. You can make it smooth or leave some chunks for texture. Stir in half a cup of sour cream to enhance creaminess. Taste the soup and adjust the seasoning if needed. Serve it hot, garnished with chopped green onions. You can also add crumbled crispy kale or bacon bits for an extra touch. Enjoy your creamy baked potato soup! To get that creamy texture, use heavy cream. It adds richness. Blend the soup well. If you want chunks, blend only half. This mix makes each bite exciting. Seasoning your soup is key. Use smoked paprika for a deep flavor. Don't forget salt and pepper. They bring out the taste of the potatoes. Fresh herbs like chives can add brightness. Avoid using raw potatoes. Cook them first for a smooth base. Don't skip the blending step. This is crucial for creaminess. Lastly, be careful with salt. Taste as you go to prevent over-salting. {{image_2}} You can make baked potato soup even more fun! Add crispy bacon bits for a salty crunch. Top it with extra cheese for a cheesy bite. You might also like adding sour cream on top for creaminess. Chopped chives or green onions add a fresh taste. You can even throw in some broccoli for a veggie boost. For a vegetarian twist, skip the bacon and use vegetable broth. You can replace heavy cream with coconut milk for a vegan option. Use cashew cream for richness and flavor without dairy. Tofu can add protein and creaminess too. Always check labels to ensure all ingredients are vegan. Want to spice things up? Add more smoked paprika for a smoky flavor. You can mix in some cayenne pepper for heat. If you love herbs, try thyme or rosemary for extra depth. A squeeze of lemon juice can brighten the soup. Experiment with these flavors to find your favorite. After you enjoy your baked potato soup, store leftovers in the fridge. Use an airtight container to keep it fresh. The soup stays good for about 3 to 4 days. Before you put it away, let it cool down first. This helps prevent extra steam inside the container. When you want to heat up your soup, pour it into a pot. Use medium heat on the stove. Stir it well to avoid sticking. Heat until warm, but don’t let it boil. You can also use the microwave. Just heat it in short bursts, stirring in between. This way, it warms evenly. You can freeze this soup for later! First, let it cool completely. Then, put it in a freezer-safe container. Leave some space at the top for expansion. It can stay in the freezer for up to 3 months. When you’re ready to eat it, thaw it in the fridge overnight before reheating. Yes, you can make baked potato soup ahead of time. Just follow the recipe, and let it cool. Store it in the fridge for up to three days. When you're ready to eat, reheat it on the stove. Stir it well to keep it creamy. To thicken the soup, you have a few options. You can add more potatoes. Just cook and mash a few more russet potatoes. You can also mix in some cornstarch. Just blend one tablespoon of cornstarch with cold water, then stir it into the soup. Let it cook for a few minutes to thicken. If you need a substitute for heavy cream, try using half-and-half. You can also use coconut milk for a dairy-free option. If you want something lighter, use whole milk and add a bit of butter. This will give you some creaminess without being too heavy. Yes, baked potato soup is gluten-free. Just make sure your vegetable broth is gluten-free. Most store-bought broths are, but it's always good to check the label. This soup is great for those who need to avoid gluten. To make baked potato soup in a slow cooker, first, bake the potatoes. Once they cool, scoop out the insides and add them to the slow cooker. Add the onion, garlic, vegetable broth, and seasonings. Cook on low for 6-8 hours. Stir in the cream and cheese during the last 30 minutes. This will keep your soup creamy and warm. Baked potato soup is a simple and satisfying dish. We covered key ingredients and tasty toppings. You learned how to prep, cook, and blend the soup. I shared tips for a creamy texture and flavor boosts. We also explored variations, including veggie options. Lastly, I explained storage methods for leftovers. Enjoy making this comforting soup at home. Experiment with flavors and share it with friends. Happy cooking!

Baked Potato Soup Creamy and Comforting Delight

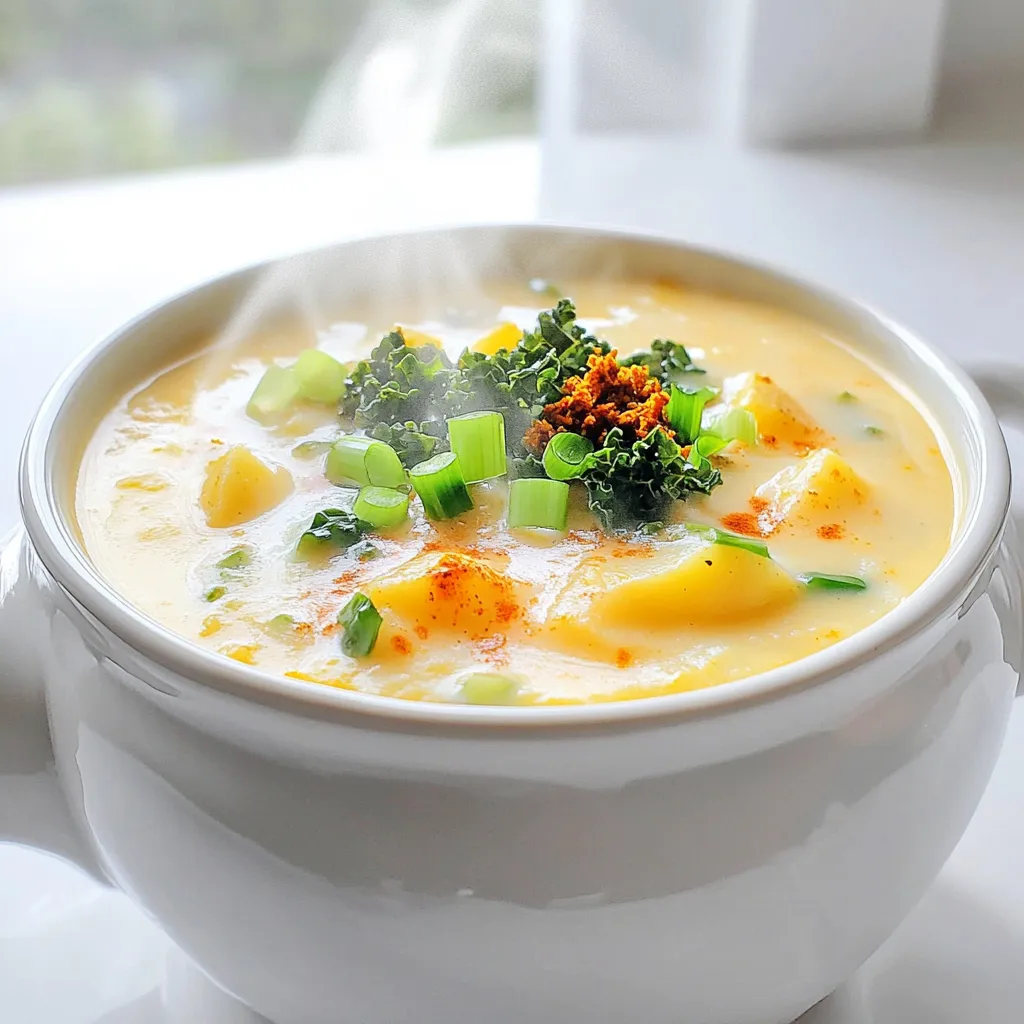
If you crave a warm bowl of comfort, look no further than this creamy baked potato soup! It’s thick, rich,

To make a perfect pineapple lemonade, you need some fresh and tasty ingredients. Here’s what you will need: - 2 cups fresh pineapple chunks - 1 cup fresh lemon juice (about 6-8 lemons) - 3/4 cup granulated sugar (adjust to taste) - 4 cups cold water - 1/4 teaspoon sea salt - Fresh mint leaves for garnish - Pineapple slices for garnish - Lemon slices for garnish Fresh ingredients give your drink the best flavor. The bright taste of lemon and sweet pineapple mix well. The sugar balances the tartness. Cold water makes it refreshing. The sea salt adds a hint of flavor. Don’t forget the garnishes! They make your drink look appealing. Using fresh pineapple chunks is key. They provide a rich, sweet base. Fresh lemon juice brightens the drink. It's best to squeeze the lemons yourself. Store-bought lemon juice can taste different. Adjust the sugar to your liking. If you prefer it sweeter, add more sugar. Keep your ingredients ready before starting. This makes the process quick and easy. Enjoy making this tasty drink! To start, I blend the fresh pineapple chunks. I put two cups of pineapple chunks in my blender. Then, I add half a cup of cold water. I blend it until smooth. This makes a thick puree. Next, I strain the juice using a fine mesh sieve. This step removes any pulp. I pour the juice into a pitcher and discard the pulp. Now, I mix the pineapple juice with fresh lemon juice. I use one cup of lemon juice, which is about six to eight lemons. Next, I add three-fourths cup of granulated sugar to the pitcher. I stir well until the sugar dissolves. After that, I pour in the remaining cold water. I add a quarter teaspoon of sea salt too. I stir everything together until it’s well mixed. Next, I chill the lemonade in the refrigerator. I let it sit for at least 30 minutes. This waiting time lets all the flavors blend nicely. When ready to serve, I pour the lemonade over ice in glasses. For a fun touch, I garnish with fresh mint leaves, pineapple slices, and lemon slices. This makes the drink look extra special and refreshing! To balance the sweetness in your pineapple lemonade, start with less sugar. You can always add more later. Taste the mix after you stir it. If it needs more sweetness, add it slowly. Remember, too much sugar can cover the fresh fruit flavor. If your lemonade is too strong, dilute it with cold water. Add a little at a time until it tastes just right. This way, you keep the pineapple and lemon flavors while making it lighter. For serving, use tall glasses to show off the vibrant colors. Clear glass lets your guests see the bright yellow drink and garnishes. This adds to the fun. When it comes to ice, use large cubes or even ice spheres. They melt slower and keep your drink cold longer. You can also freeze pineapple or lemon slices as ice cubes. This keeps your lemonade chilled and adds a nice touch. Enjoy your drink! {{image_2}} You can make your pineapple lemonade even better with a few simple tweaks. Adding herbs like mint or basil gives it a fresh twist. Mint adds a cooling touch, while basil brings a unique taste. Just chop the herbs and stir them in right before serving. You can also mix in other fruits for more flavor. Strawberries add sweetness, and kiwi brings a fun tartness. Blend these fruits with the pineapple for a colorful drink. You can even layer the juices for a pretty look. Presentation makes your drink even more fun. Use different garnishes to make it pop. Fresh mint leaves look great and smell good too. Pineapple slices and lemon slices on the rim add color and style. You can serve this drink in jars or pitchers. Jars make it easy for guests to grab their drink. Pitchers are great for parties, so everyone can pour their own. These simple changes will impress your friends and family! To store leftover pineapple lemonade, pour it into a clean pitcher. Cover it tightly with a lid or plastic wrap. This keeps out air and light. Store it in the fridge. It stays fresh this way for about three days. Nutritional changes happen over time. The vitamin C from the lemons may decrease. Sugar can break down, which changes the taste. Always check the flavor before serving it again. You should drink pineapple lemonade within three days for the best taste. After that, the flavors can fade. Look for signs of spoilage. If it smells off, it’s time to toss it. If you see any mold or changes in color, do not drink it. Safety first! To make your pineapple lemonade less sweet, you can try a few options. - Use honey or agave nectar instead of granulated sugar. They add sweetness but with a lighter taste. - Try stevia or monk fruit. These natural sweeteners have no calories and are very sweet, so use them sparingly. You can also reduce the sugar amount in the recipe. Start with less sugar and taste as you go. This way, you find the right balance for your taste. Yes, you can use canned pineapple, but it may change the drink's flavor. Fresh pineapple gives a bright and bold taste. Canned pineapple can be sweeter and softer. It also might not have the same fresh aroma. If you choose canned, drain it well and use the juice for blending. Pineapple lemonade has several health benefits. - Pineapple is rich in vitamin C. It helps boost your immune system. - Lemon juice is great for hydration and digestion. It can also aid in detoxing your body. Here’s a quick look at the nutritional value per serving: - Calories: About 90 - Sugars: Roughly 18 grams (if using 3/4 cup of sugar) - Vitamin C: High amounts from both pineapple and lemons. Enjoying pineapple lemonade offers refreshment and health perks, making it a great summer drink! In this blog post, we explored how to make delicious pineapple lemonade. We went through the key ingredients, step-by-step instructions, tips to adjust sweetness, fun variations, and how to properly store your drinks. Remember, you can customize your lemonade to fit your taste. Whether you add herbs or other fruits, the choice is yours. Enjoy this refreshing drink, and share it with friends. It’s a tasty way to stay hydrated and celebrate sunny days!

Pineapple Lemonade Refreshing and Easy Summer Drink

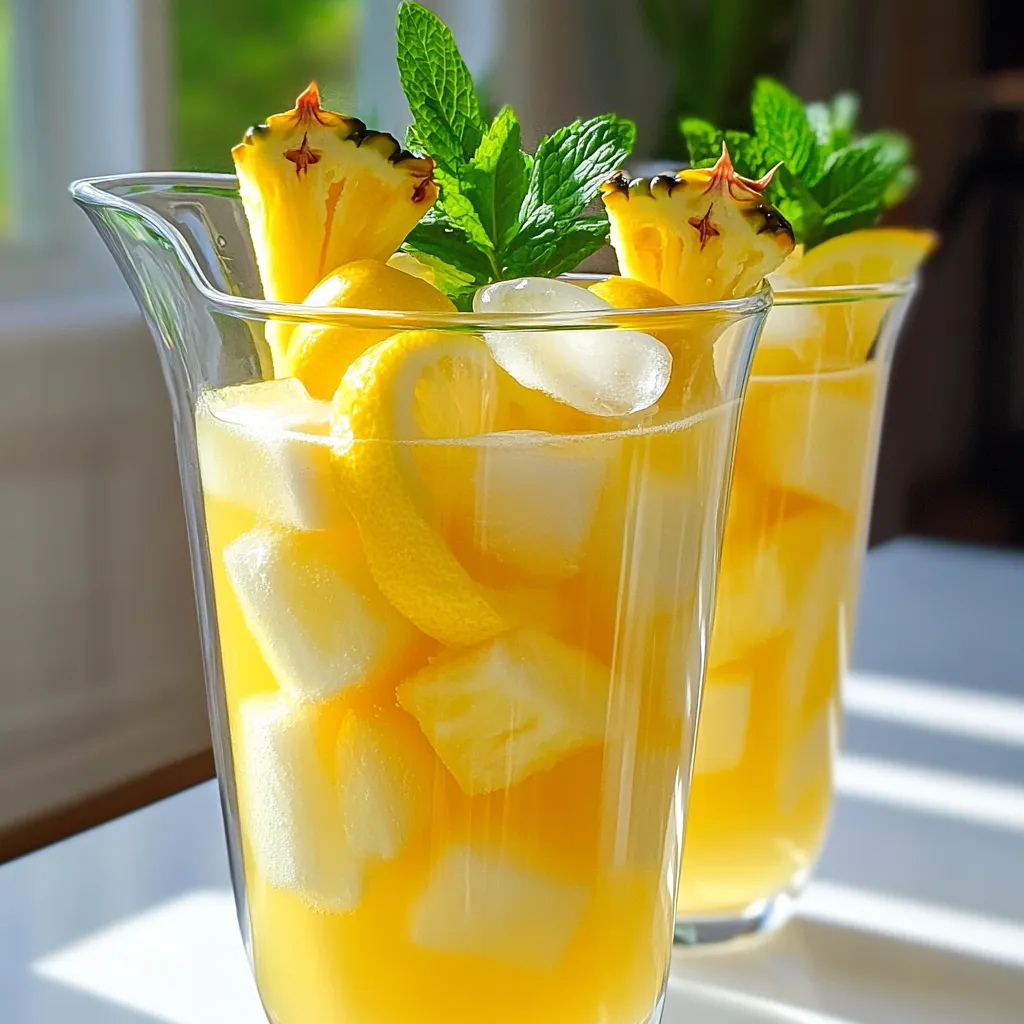
When summer heat hits, nothing cools you down like a glass of Pineapple Lemonade. This easy drink mixes bright pineapple

- 8 oz orzo pasta - 1 lb shrimp, peeled and deveined - 4 cloves garlic, minced - 1 lemon (juiced and zested) - 1 cup cherry tomatoes, halved - 2 cups spinach, roughly chopped - 3 tablespoons olive oil - Salt and pepper to taste - Fresh parsley, chopped for garnish Lemon Garlic Shrimp Orzo is simple yet full of flavor. You start with orzo pasta. It cooks quickly and has a nice texture. I love using shrimp because it cooks fast and tastes amazing. You want fresh shrimp, so look for pink ones that smell like the sea. Garlic adds a strong taste that blends well with the lemon. For the extra ingredients, I like juicy cherry tomatoes. They burst with flavor in the heat. Spinach gives a pop of color and nutrition. Lemon juice and zest bring brightness to the dish. When it comes to seasoning, I always use olive oil. It adds richness without being heavy. Don’t forget salt and pepper; they enhance all the flavors. Fresh parsley adds a nice touch at the end. It’s all about balance and freshness in this dish. Each ingredient plays a role. Enjoy the process of cooking this tasty meal! {{ingredient_image_1}} - Start by boiling a large pot of salted water. - Add 8 oz of orzo pasta and cook until al dente. - Reserve 1/2 cup of pasta water before draining. - Heat 2 tablespoons of olive oil in a large skillet. - Add 1 lb of peeled and deveined shrimp. - Season with salt and pepper. - Cook for 2-3 minutes on each side until shrimp turns pink and opaque. - Remove the shrimp from the skillet and set aside. - In the same skillet, add 1 tablespoon of olive oil and 4 minced garlic cloves. - Sauté for about 1 minute until the garlic smells fragrant. - Add 1 cup of halved cherry tomatoes and cook for 3-4 minutes until soft. - Stir in 2 cups of roughly chopped spinach and cook until wilted. - Add the cooked orzo to the skillet, mixing well. - Pour in the juice and zest of 1 lemon. - Add a splash of the reserved pasta water to mix everything together. - Fold the cooked shrimp back into the mixture. - Heat through for another minute. - Adjust the seasoning with salt and pepper to taste. To cook shrimp just right, watch for a few signs. Fresh shrimp turns pink and opaque when they’re done. They should curl slightly but not be tight. If they are rubbery, you cooked them too long. Common mistakes to avoid include overcooking and not seasoning enough. Always season with salt and pepper before cooking. This simple step adds great flavor. To boost flavor, consider adding spices like paprika or red pepper flakes. Herbs like basil or dill also work well. They add depth and freshness to the dish. Balancing acidity with lemon is key. The lemon juice brightens flavors. Use the zest for an extra punch. This adds a lovely aroma and taste. To avoid mushy pasta, always cook orzo until al dente. This means it should have a slight bite to it. Stir the orzo while it cooks, so it doesn’t stick together. When to drain orzo? Drain it right after cooking. Reserve some pasta water to help mix everything later. This water adds starch, which helps the sauce cling to the orzo. Pro Tips Fresh Shrimp: Use fresh or high-quality frozen shrimp for the best flavor and texture. Reserved Pasta Water: Don't forget to reserve pasta water; it helps to create a creamy sauce and enhances flavor. Customize Veggies: Feel free to add or substitute your favorite vegetables like zucchini or bell peppers for extra nutrition. Lemon Zest: For a more intense lemon flavor, add extra lemon zest before serving. {{image_2}} If you want to switch up the shrimp, you have options. You can use chicken breast, cut into small pieces. Cook it the same way as shrimp. For a seafood twist, try scallops or crab meat. Both add a nice flavor. If you prefer a vegetarian meal, chickpeas work well. They add protein and texture. Tofu is another great choice. Use firm tofu and sauté until crispy for more flavor. You can add many vegetables to this dish. Zucchini, bell peppers, or asparagus mix well. Just chop them into bite-sized pieces. Sauté them with garlic for a tasty addition. Seasonal veggies also work great. In spring, add peas or snap peas. During summer, fresh corn and green beans shine. These add color and crunch to your meal. To switch up the citrus flavor, use limes or oranges. They add a different zest to the dish. If you want a bit of spice, consider red pepper flakes or cayenne pepper. Just a pinch can bring a nice kick. Another option is to add fresh herbs. Basil or cilantro can brighten the dish. Experiment with these ideas to find your favorite mix. To keep your Lemon Garlic Shrimp Orzo fresh, store it in an airtight container. Make sure it cools down before sealing. This will help retain its taste and texture. Place the container in the fridge. It can stay good for up to three days. For best results, avoid mixing in any extra sauce until you reheat. You can freeze Lemon Garlic Shrimp Orzo for longer storage. First, let it cool completely. Then, scoop it into freezer-safe bags or containers. Remove as much air as you can before sealing. It can last up to three months in the freezer. When you are ready to eat it, thaw it overnight in the fridge. To reheat, warm it in a pan on low heat. Add a splash of water or broth to help it along. In the fridge, Lemon Garlic Shrimp Orzo lasts about three days. Look for signs of spoilage. If it smells sour or has a strange color, it is time to toss it. Fresh food should always look bright and smell good. If you see mold or an off texture, don’t eat it. Always trust your senses! You can pair Lemon Garlic Shrimp Orzo with a fresh side salad. A simple green salad with mixed greens and a light vinaigrette works well. Grilled vegetables also make a great side. For drinks, try a crisp white wine like Sauvignon Blanc. It complements the lemon and shrimp flavors nicely. If you prefer non-alcoholic options, a sparkling water with lemon fits perfectly. Yes, you can prepare this dish ahead of time. Cook the orzo and shrimp separately. Store them in airtight containers in the fridge. You can mix them with veggies and lemon juice before serving. If you make it the night before, just reheat gently. Use medium heat to warm it up on the stove. Add a splash of reserved pasta water to keep it moist. Orzo is not gluten-free as it is made from wheat. However, there are gluten-free orzo options available. Look for brands that use rice or corn flour. If you need a gluten-free alternative, try quinoa or rice. Both options work well in this recipe and keep the dish tasty. In this post, we explored the vibrant Lemon Garlic Shrimp Orzo. We covered key ingredients like shrimp, orzo, and garlic. I shared step-by-step cooking methods and tips for perfect results. You can mix in different proteins and veggies for variety. Remember to store leftovers properly to keep them fresh. Enjoy making this dish your own with personal touches!

Lemon Garlic Shrimp Orzo Flavorful and Easy Recipe

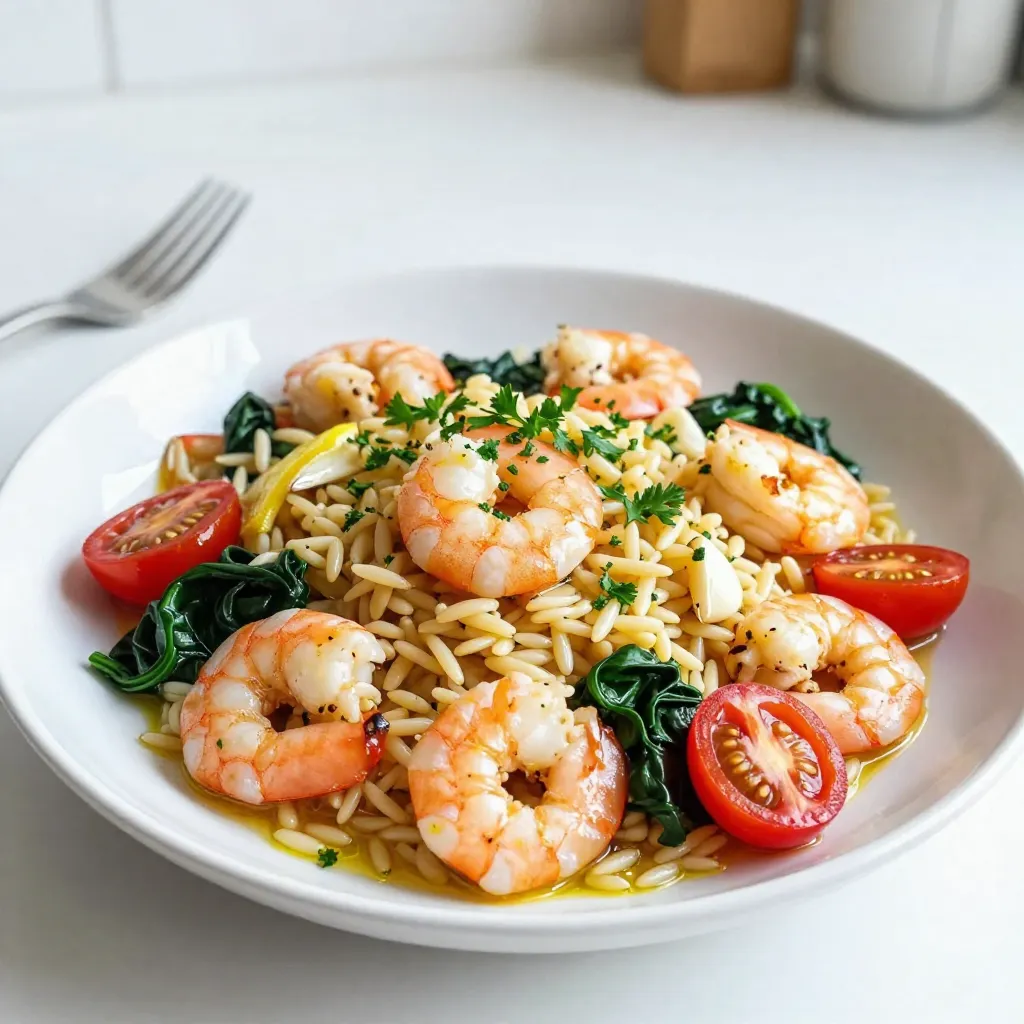
Looking for a quick, tasty meal? You’ve found it! Lemon Garlic Shrimp Orzo is both flavorful and easy to make.

To make BBQ Chicken Stuffed Sweet Potatoes, you need a few key ingredients. These will help you create a tasty and filling dish. - 4 medium sweet potatoes - 2 cups cooked shredded chicken - 1 cup BBQ sauce (your choice) - 1 cup black beans, drained and rinsed - 1 cup corn (fresh, frozen, or canned) - 1 cup shredded cheddar cheese - 1/2 cup green onions, sliced - 1/4 cup fresh cilantro, chopped - 1 teaspoon smoked paprika - Salt and pepper to taste - Olive oil for drizzling Sweet potatoes are the star here. They add sweetness and nutrition. Cooked shredded chicken gives protein. BBQ sauce adds flavor and moisture. Black beans and corn bring texture and color. The cheese melts beautifully on top, while green onions and cilantro make it fresh. Smoked paprika adds a nice smoky touch. Remember to use salt and pepper to balance all the flavors. Gather these ingredients before you start cooking. This will make your cooking process smooth and enjoyable. {{ingredient_image_1}} First, wash and scrub the sweet potatoes. Make sure to remove dirt and grit. Next, use a fork to prick each potato. This helps steam escape while baking. Then, rub a bit of olive oil on each potato. Sprinkle some salt on top for extra flavor. Now, preheat your oven to 400°F (200°C). Place the sweet potatoes on a baking sheet. Roast them for about 45 to 60 minutes. Check for doneness by piercing them with a fork. They should feel soft and tender when done. While the sweet potatoes cook, prepare the BBQ chicken filling. In a bowl, mix together the cooked shredded chicken and BBQ sauce. Add black beans, corn, smoked paprika, and a pinch of salt and pepper. Mix until everything is well-coated with the sauce. Once the sweet potatoes are done, take them out of the oven. Let them cool slightly before handling. Carefully slice each potato down the middle. Use a fork to fluff the insides. Then, fill each potato with a generous portion of the BBQ chicken mixture. Top each stuffed sweet potato with shredded cheddar cheese. Return them to the oven for about 10 more minutes. This will melt the cheese and make it bubbly. When ready, remove them from the oven. Garnish with sliced green onions and fresh cilantro for a tasty finish. Choosing the right potatoes When picking sweet potatoes, look for medium-sized ones. They should be firm and smooth. Avoid ones with soft spots or blemishes. This will ensure a tasty and creamy filling. Cooking methods (baking vs. microwaving) Baking sweet potatoes gives them a sweet and rich flavor. To bake, preheat your oven to 400°F (200°C). Wash, prick, and oil them. Bake for 45-60 minutes until soft. Microwaving is faster. Prick and wrap them in a damp paper towel. Cook on high for 5-8 minutes. While it's quick, the flavor may not be as deep. Best store-bought options Look for BBQ sauces that are thick and tangy. Brands like Sweet Baby Ray's or Stubb's are great choices. They have a good balance of sweet and smoky flavors that work well with the chicken. Homemade BBQ sauce suggestion Making your BBQ sauce is easy. Mix 1 cup of ketchup, 1/4 cup of apple cider vinegar, 1/4 cup of brown sugar, and 1 tablespoon of Worcestershire sauce. Add garlic powder and onion powder for extra depth. This sauce brings a homemade touch to your dish. Additional herbs and spices To take your dish up a notch, add spices like smoked paprika or cumin. Fresh herbs like cilantro or parsley can brighten the flavors. A squeeze of lime juice will add a fresh kick. Pairing options for sides Serve your stuffed sweet potatoes with a simple salad or coleslaw. These sides add crunch and freshness. You can also pair them with grilled veggies for a colorful plate. Pro Tips Choose the Right Sweet Potatoes: Opt for medium-sized sweet potatoes that are firm and smooth for even cooking and better flavor. Perfect BBQ Sauce Balance: Adjust the BBQ sauce to your taste; you can mix in a bit of honey or vinegar for added sweetness or tang. Customize Your Fillings: Feel free to add other ingredients like diced bell peppers or jalapeños for an extra kick and different textures. Make Ahead: Prepare the BBQ chicken mixture ahead of time and store it in the refrigerator for up to 3 days to save time on busy nights. {{image_2}} You can switch up the protein in your BBQ chicken stuffed sweet potatoes. Try using turkey instead of chicken. Turkey is leaner but still tasty. If you want a meat-free option, use tofu. Just press it, cube it, and marinate it with BBQ sauce before cooking. Explore different sauces to give your dish a new twist. Sweet sauces like honey BBQ bring a nice flavor. Try spicy sauces for a kick! You can also add unique toppings to your stuffed potatoes. Think creamy avocado or a dollop of sour cream. These toppings add richness and balance. Incorporate seasonal veggies to boost nutrition and flavor. Try adding roasted bell peppers or zucchini for a fresh touch. During holidays, consider themed toppings. For example, use cranberry sauce for a festive twist. This adapts your dish to fit any event or season. To keep your BBQ chicken stuffed sweet potatoes fresh, store them properly. If you plan to eat them within a few days, place leftovers in the refrigerator. Use an airtight container to keep them safe. They can last up to three days in the fridge. If you want to save them for a longer time, freezing is a good option. Wrap each stuffed sweet potato in plastic wrap, then place them in a freezer bag. They can stay good for up to three months in the freezer. When it’s time to enjoy your leftovers, reheating is simple. For the best taste, use the oven. Preheat it to 350°F (175°C). Place the stuffed sweet potatoes on a baking sheet and cover with foil. Heat for about 20 minutes or until warm. You can also use the microwave if you’re short on time. Simply place one stuffed sweet potato on a microwave-safe plate and heat for 2-3 minutes. Check if it’s warm throughout. Making BBQ chicken stuffed sweet potatoes ahead of time is easy. You can cook the sweet potatoes and prepare the BBQ chicken filling in advance. Store each part separately in the fridge. When you're ready to eat, just fill and bake them. For easy meal portions, you can stuff and wrap each sweet potato individually. This way, you can grab one for lunch or dinner anytime. Yes, you can use raw sweet potatoes. You will need to cook them before stuffing. The best ways to cook them include: - Baking: Preheat your oven to 400°F (200°C). Wash the potatoes, prick them, and rub with olive oil. Bake for 45-60 minutes until tender. - Microwaving: Pierce each potato with a fork. Microwave on high for 5-10 minutes, turning halfway through. Yes, you can freeze these stuffed sweet potatoes. Here are my tips: - Freezing: Allow the stuffed sweet potatoes to cool completely. Wrap each one tightly in plastic wrap, then place in an airtight container or freezer bag. - Thawing: To thaw, place them in the fridge overnight. Reheat in the oven or microwave. These stuffed sweet potatoes pair well with many sides. Here are some tasty options: - Coleslaw: The crunch adds great texture. - Corn on the cob: Fresh and sweet, it complements the flavors. - Green salad: A light salad balances the meal. Leftovers last about 3-5 days in the fridge. Store them in an airtight container. Reheat as needed, but enjoy them within that time for the best taste. BBQ Chicken Stuffed Sweet Potatoes are easy to make. You learned how to prep and cook sweet potatoes, prepare a tasty BBQ chicken filling, and assemble the dish. I shared tips for picking the best potatoes and suggested cooking methods. You can even try variations using different proteins or flavors. Lastly, I provided storage and reheating advice. Enjoy your cooking and make this dish your own!

BBQ Chicken Stuffed Sweet Potatoes Flavorful Delight

Are you looking for a delicious, easy meal that packs flavor and nutrition? BBQ Chicken Stuffed Sweet Potatoes are the

- 4 oz dark chocolate (70% cacao), chopped - 4 oz milk chocolate, chopped - 4 oz white chocolate, chopped - 2 tablespoons unsalted butter - 3 large eggs, separated - 1/2 cup granulated sugar - 1 cup heavy cream - 1 teaspoon vanilla extract - Pinch of salt - Cocoa powder (for dusting) - Chocolate shavings or curls (for garnish) Using high-quality chocolate is key for this cake. It affects both flavor and texture. Good chocolate has a rich taste that makes the mousse feel special. I recommend using chocolate with high cocoa content. This gives your cake a deep, complex flavor. When you use quality chocolate, you create a dessert that impresses everyone. You can switch some ingredients if needed. For example, use dark chocolate with a lower cacao percentage if you prefer a sweeter taste. You can also try dairy-free chocolate if you're avoiding dairy. Instead of heavy cream, use coconut cream for a dairy-free option. These swaps keep the mousse delicious while catering to different diets. {{ingredient_image_1}} Start by gathering your dark, milk, and white chocolate. Chop each type into small pieces. Place these pieces in a heatproof bowl with the butter. Set this bowl over a pot of simmering water. This method helps melt the chocolate gently. Stir the mixture until it is smooth. Remove the bowl from heat and let it cool for a bit. In a fresh bowl, separate three eggs. Add the yolks to the bowl. Whisk in half of the sugar until it turns pale and creamy. Next, carefully stir in the melted chocolate mixture. Make sure everything blends well. Now, take another bowl for the egg whites. Beat the egg whites with a pinch of salt using a mixer. Keep beating until soft peaks form. Slowly add the other half of the sugar. Beat until the peaks are stiff and glossy. In a different bowl, whip the heavy cream until it forms soft peaks. Add the vanilla, then whip until it’s just firm. Gently fold the whipped cream into the chocolate mixture. Do this until they blend together. Next, fold in the egg whites, one-third at a time. Be careful not to flatten the mixture. Once combined, pour half of this mousse into a springform pan. Smooth the top with a spatula. Refrigerate this layer for about 30 minutes. After it sets, pour the rest of the mousse on top and smooth it out. Cover the pan and place it in the fridge. Chill the cake for at least four hours. For the best results, let it sit overnight. This waiting time helps the mousse set nicely. When it’s ready, remove the sides of the springform pan. Dust the top with cocoa powder and add chocolate shavings to make it look fancy. To get the best mousse, you need to fold carefully. When combining whipped cream and egg whites, use a gentle motion. This keeps air in the mix, making it light and fluffy. Remember to fold in thirds. This way, you won't deflate the mixture. Be careful when melting chocolate. If it gets too hot, it can seize. Always use a double boiler and keep the heat low. When whipping egg whites, ensure your bowl is clean and dry. Any grease can stop them from whipping well. Lastly, don’t skip the chilling time. This helps the mousse set properly. For a stunning look, dust the top with cocoa powder. Use a fine sieve for even coverage. Chocolate shavings or curls add a nice touch. Serve each slice on pretty dessert plates. Pair it with fresh berries for a pop of color. A drizzle of chocolate sauce on the plate makes it extra special. Pro Tips Quality Chocolate Matters: Use high-quality chocolate for the best flavor. Look for chocolate that is at least 70% cacao for the dark layer, as it provides a rich depth to the mousse. Temperature Control: Allow the melted chocolate to cool slightly before mixing with egg yolks to prevent cooking them. This helps maintain the smooth texture of the mousse. Gentle Folding Technique: When combining the whipped cream and egg whites with the chocolate mixture, use a gentle folding motion. This preserves the airiness of the mousse, ensuring a light and fluffy texture. Chill Time is Key: For the best results, chill the mousse cake overnight. This extended time allows the flavors to meld and the textures to firm up, resulting in a more satisfying dessert. {{image_2}} You can easily add new flavors to the mousse. Coffee adds depth. Just mix in one tablespoon of instant coffee. This will enhance the chocolate taste. For a refreshing twist, you can use mint. Add a few drops of mint extract. This gives a cool flavor that works well in summer. Fruits can also make the mousse exciting. Use purees like raspberry or orange. Just fold in a quarter cup of fruit puree before layering. These flavors brighten the dessert and add a colorful touch. This cake is naturally gluten-free. The main ingredients are chocolate, eggs, and cream. There’s no flour. So, you don’t need to worry about gluten. Just make sure to check your chocolate for any added ingredients. Choose brands that are labeled gluten-free to be safe. You can make this cake vegan with a few swaps. Use dark chocolate that is dairy-free. For the cream, use coconut cream instead. This gives a rich texture. Replace the eggs with aquafaba, the liquid from canned chickpeas. Whip it until it forms soft peaks. Then, use it like egg whites in the recipe. These changes keep the mousse delicious while meeting vegan needs. Enjoy your creamy, rich dessert without eggs or dairy! To keep your triple chocolate mousse cake fresh, store it in the fridge. Place it in an airtight container. If you don’t have one, cover it tightly with plastic wrap. This helps to prevent it from absorbing other odors. Always keep it in the coldest part of your fridge. Avoid the door, as it can get warm. You can freeze the mousse cake if you want to store it for longer. First, let it chill in the fridge for at least 4 hours. Once set, wrap the cake tightly in plastic wrap. Then, wrap it in aluminum foil to prevent freezer burn. This cake can last up to three months in the freezer. When ready to eat, thaw it overnight in the fridge. The mousse cake stays fresh in the fridge for about 3 to 5 days. After that, it may lose texture and flavor. If you freeze the cake, let it come to room temperature before serving. You don't need to reheat it. Just slice and enjoy! For best taste, serve it cold. You can tell the mousse is set by gently shaking the pan. If the mousse wobbles slightly in the middle but is firm around the edges, it is ready. You can also insert a toothpick to check. If it comes out clean, the mousse has set well. Yes, you can make this cake a day prior. It actually tastes better after chilling overnight. Just keep it covered in the fridge. This allows the flavors to blend and the mousse to firm up nicely. I recommend using high-quality chocolate. For this cake, use 70% dark chocolate, milk chocolate, and white chocolate. Each type adds depth and richness to the mousse. The better the chocolate, the better your mousse will taste. Yes, you can make this recipe without eggs. Use aquafaba, the liquid from canned chickpeas, instead of egg whites. It whips up just like egg whites. You can also use silken tofu blended until smooth for creaminess. We explored the key ingredients for a rich mousse cake, focusing on high-quality chocolate. I provided step-by-step instructions to ensure your cake turns out perfect. Tips and tricks helped you avoid common mistakes and achieve a great texture. We also looked at tasty variations and proper storage methods to keep your cake fresh. In the end, with careful attention to detail, you can create a delightful mousse cake that impresses everyone. Enjoy the process and get ready to savor each bite!

Triple Chocolate Mousse Cake Indulge in Rich Flavor

Welcome to the ultimate chocolate lover’s dream! This Triple Chocolate Mousse Cake combines dark, milk, and white chocolate for an

Older posts
Newer posts
← Previous Page1 Page2 Page3 Page4 … Page84 Next →

dsad

© 2026 Lisa Dishes • Built with GeneratePress

Our Policies

  • Copyright Policy
  • Cookie Policy
  • GDPR Policy
  • Privacy Policy
  • Disclaimer
  • Terms Of Use

More Information

  • Home
  • About
  • Contact
  • Appetizers
  • Dessert
  • Dinner
  • Drinks
©2026, Lisa Dishes About Back To Top