Skip to content
DisclaimerTerms Of UseGDPR PolicyCookie Policy

Lisa Dishes

  • Home
  • Drinks
  • Appetizers
  • Dinner
  • Dessert
  • About
  • Contact
  • Privacy Policy
DisclaimerTerms Of UseGDPR PolicyCookie Policy

NO-ING-IMG

- 1 cup crushed graham crackers - 4 tablespoons unsalted butter, melted - 2 (8 oz) packages cream cheese, softened - 1 cup pumpkin puree - 1/2 cup powdered sugar - 1 teaspoon vanilla extract - 1 teaspoon ground cinnamon - 1/2 teaspoon ground nutmeg - 1/4 teaspoon ground ginger - 1 cup whipped cream, plus extra for topping - Caramel sauce for drizzling (optional) To make this treat, use exact measurements. For a gluten-free option, swap graham crackers with gluten-free cookies. You can also use dairy-free cream cheese for a vegan twist. If you prefer less sweetness, cut the powdered sugar to 1/3 cup or use a sugar substitute. - Graham Crackers: These form the crust. They give a nice crunch and a sweet flavor. - Cream Cheese: This softens the mix and adds richness. It makes the cheesecake smooth. - Pumpkin Puree: This gives the pie its classic fall flavor. It’s healthy and adds moisture. - Spices (Cinnamon, Nutmeg, Ginger): These spices bring warmth and depth to the dish. They are key for that pumpkin pie taste. - Whipped Cream: This lightens the filling. It adds air and makes the cheesecake fluffy. This dessert is easy to make and full of flavor. The mix of sweet and spice makes it a must-try! To start, gather your ingredients for the crust. You will need: - 1 cup crushed graham crackers - 4 tablespoons unsalted butter, melted In a mixing bowl, combine the crushed graham crackers with the melted butter. Mix it well until the crumbs are coated. This step is key for a tasty base. Next, divide the crumb mixture among 6 to 8 small dessert cups or jars. Press it down firmly to form a solid crust at the bottom. It should feel compact and stable. Now, let’s move on to the filling. Here’s what you will need: - 2 (8 oz) packages cream cheese, softened - 1 cup pumpkin puree - 1/2 cup powdered sugar - 1 teaspoon vanilla extract - 1 teaspoon ground cinnamon - 1/2 teaspoon ground nutmeg - 1/4 teaspoon ground ginger - 1 cup whipped cream In a separate bowl, beat the softened cream cheese until creamy and smooth. This makes the base of your cheesecake filling. Then, add in the pumpkin puree, powdered sugar, vanilla extract, cinnamon, nutmeg, and ginger. Beat this mixture until everything is well mixed and smooth. Next, gently fold in 1 cup of whipped cream. Be careful not to deflate it. This step adds lightness to your filling. Now it’s time to put it all together. Spoon the pumpkin cheesecake mixture over the graham cracker crust in each cup. Use a spatula to smooth the tops. This helps to make them look nice and neat. After filling each cup, cover them with plastic wrap. Refrigerate for at least 4 hours, or overnight if you can wait. This chilling time allows the cups to set properly. When ready to serve, top each cup with a dollop of extra whipped cream. You can also drizzle caramel sauce on top for a sweet touch. Enjoy your delicious no-bake pumpkin pie cheesecake cups! To get the right texture for your cheesecake cups, soften the cream cheese well. I let it sit out for about an hour before mixing. This helps it blend smoothly with the pumpkin puree. When combining these ingredients, beat them until creamy and free of lumps. Folding in whipped cream gently keeps it light and fluffy. A soggy crust can ruin your dessert. To prevent this, ensure your graham cracker mixture is well mixed with melted butter. Press the crumb mix firmly into the bottom of each cup. After you layer in the cheesecake mixture, refrigerate the cups for at least four hours. This time allows the crust to firm up and hold its shape. When serving, add a dollop of whipped cream on top of each cup. It adds a nice touch and extra creaminess. Drizzling caramel sauce over the whipped cream gives a sweet finish. For a festive look, place the cups on a wooden platter with mini pumpkins or autumn leaves. This not only looks great but also enhances the seasonal vibe. Enjoy your delightful treats! {{image_2}} You can switch up the flavors in these cheesecake cups. For a chocolate twist, add cocoa powder to the cream cheese mix. Use about 1/4 cup for a rich taste. Melted chocolate drizzled on top also adds a nice touch. If you prefer maple, swap the vanilla extract for maple syrup. This gives a warm, cozy flavor that pairs well with pumpkin. Making these cups fit different diets is easy. For a vegan option, use plant-based cream cheese. You can also use coconut whipped cream instead of regular whipped cream. For a gluten-free version, just use gluten-free graham crackers. Check the labels to ensure they meet your needs. These swaps keep the dessert just as tasty. You can change these cups for different holidays and seasons. Add peppermint extract for a festive treat during winter. For Halloween, use spooky decorations like edible eyes or black sprinkles. In spring, try mixing in fresh fruit like strawberries or blueberries. These small changes make your dessert fun and fitting for any occasion. To keep your no-bake pumpkin pie cheesecake cups fresh, cover them tightly. Use plastic wrap or a lid. Store them in the fridge for the best taste and texture. They will stay good for about 3 to 5 days. Make sure they stay cold to keep the cream cheese from spoiling. If you want to save these delicious cups for later, freezing works well. First, let the cups set in the fridge for a few hours. After they firm up, cover each cup with plastic wrap and then with foil. This double wrap helps prevent freezer burn. You can keep them in the freezer for up to 2 months. When ready to eat, move them to the fridge overnight to thaw. These cheesecake cups taste best when fresh, but they last well in storage. If you store them in the fridge, eat them within 5 days. If frozen, consume them within 2 months for the best flavor. Always check for signs of spoilage, like off smells or changes in texture. Enjoy your treats while they are at their best! Yes, you can make these cups ahead of time. In fact, I recommend it! The flavors blend well when they sit in the fridge. Just prepare them up to two days in advance. Store them in the fridge until you are ready to serve. This makes them a great option for parties and gatherings. If you want to swap out cream cheese, you have options. You can use Greek yogurt for a tangy flavor. Silken tofu is another choice for a dairy-free option. Both will give you a creamy texture. Adjust the sweetness if you need to, as yogurt can be a bit tart. To boost the pumpkin flavor, try using fresh pumpkin puree instead of canned. You can also add a bit more pumpkin spice. A pinch of allspice or cloves can deepen the flavor too. If you like, mix in a little maple syrup for a sweet twist. We explored the key ingredients, step-by-step instructions, helpful tips, and variations for pumpkin cheesecake cups. I shared ways to achieve the right texture and prevent soggy crusts. You learned about storage practices and answers to common questions. These cheesecake cups are simple to make, delicious, and fun to customize. Enjoy creating your own unique versions and sharing them with friends and family. Your journey into pumpkin cheesecake starts now. Happy baking!

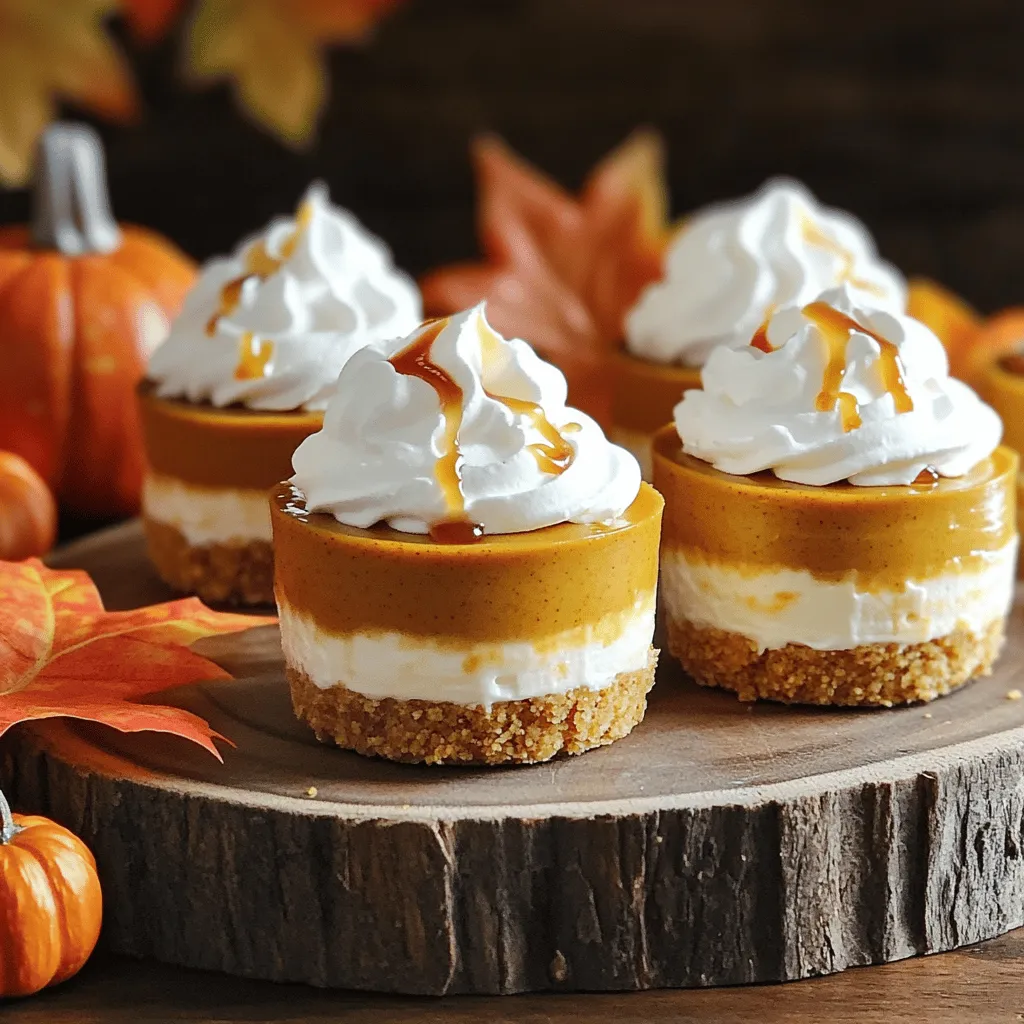
No-Bake Pumpkin Pie Cheesecake Cups Delightful Treat

Looking for a sweet treat that’s easy and delicious? You’ve found it! My No-Bake Pumpkin Pie Cheesecake Cups are perfect

To make cozy creamy butternut squash soup, gather these simple ingredients: - 1 medium butternut squash, peeled and cubed - 1 medium onion, chopped - 2 cloves garlic, minced - 1 carrot, diced - 1 apple (such as Granny Smith), peeled and chopped - 4 cups vegetable broth - 1 teaspoon ground cinnamon - 1 teaspoon ground nutmeg - 1 cup coconut milk (or heavy cream for non-vegan option) - 2 tablespoons olive oil - Salt and pepper to taste - Fresh parsley or chives for garnish You can easily swap out some ingredients if needed: - For butternut squash, use pumpkin or sweet potatoes. - Instead of coconut milk, try almond milk or heavy cream. - Use yellow onion if you don’t have a medium onion. - Any firm apple works, like Honeycrisp or Fuji. - For vegetable broth, you can use chicken broth if not vegan. Each serving of this soup is not just tasty; it’s healthy too. Here’s what you get per serving: - Calories: 220 - Protein: 3g - Fat: 9g - Carbohydrates: 34g - Fiber: 5g - Sugar: 6g - Sodium: 450mg With its rich flavors and wholesome ingredients, this soup is sure to warm you up! - Start by peeling the butternut squash and cubing it into small pieces. - Next, chop the onion and dice the carrot. - Peel and chop the apple, choosing a tart one like Granny Smith. - Mince the garlic cloves and set everything aside. - In a large pot, heat the olive oil over medium heat. - Add the chopped onion and diced carrot. Cook for about 5 minutes. - Stir until the onion looks clear. Then, add in the minced garlic. - Sauté the garlic for one more minute until you smell its nice aroma. - Now, toss in the cubed butternut squash and chopped apple. - Stir and cook for another 5 minutes. This helps the flavors mix. - Sprinkle in the ground cinnamon and nutmeg. Stir them well into the veggies. - Pour in 4 cups of vegetable broth. Bring it to a boil, then lower the heat. - Cover the pot and let it simmer for 20 to 25 minutes. Cook until the squash is soft. - Carefully remove the pot from the heat once the squash is tender. - Use an immersion blender to purée the soup until it’s smooth. - If you don’t have an immersion blender, transfer it to a regular blender. - After blending, return the soup to the pot. - Stir in 1 cup of coconut milk or heavy cream for richness. - Heat it gently until warm and season with salt and pepper to your taste. - For a lovely finish, serve in warm bowls, garnished with fresh parsley. To save time, prep your veggies in advance. Peel and cube the butternut squash the night before. Store it in the fridge. You can also chop your onion and carrot ahead of time. This way, you can make the soup in under 30 minutes. For a creamy soup, blend until smooth. Use an immersion blender for easy mixing. If you prefer a chunkier soup, blend only half of it. This gives you a nice balance of smoothness and texture. Add the coconut milk at the end for a rich feel without losing the texture. To boost flavor, add fresh herbs like thyme or rosemary while cooking. A squeeze of lemon juice can brighten the soup's taste. You can also sprinkle some chili flakes for a kick. Experiment with spices like ginger or cumin for a unique twist. {{image_2}} You can easily make this soup vegan or non-vegan. For the vegan version, use coconut milk. This gives the soup a rich, creamy taste without any dairy. If you prefer a non-vegan option, heavy cream works great too. Both choices add a lovely texture to the soup, so pick what you like best. Want a heartier soup? You can add protein easily. Chickpeas or lentils blend well with the flavors. They also boost the nutrition. For meat lovers, shredded chicken or turkey fits nicely. Just stir it in when you add the coconut milk or cream. This makes the soup filling and satisfying. Feel free to swap out ingredients based on the season. In fall, try adding roasted pumpkin or sweet potatoes. They pair wonderfully with the squash. In winter, root vegetables like parsnips or turnips can add depth. You can even toss in some fresh herbs for a burst of flavor. Experimenting keeps the soup fresh and exciting! To store leftover soup, let it cool first. Transfer the soup to an airtight container. This helps keep it fresh. You can store it in the fridge for up to five days. Make sure to label the container with the date. This way, you’ll know when to eat it. If you want to save the soup for later, freezing is a great option. Pour the cooled soup into a freezer-safe container. Leave some space at the top for expansion. Seal the container tightly and freeze it. The soup will last for about three months in the freezer. When you’re ready to enjoy it, just thaw it overnight in the fridge. Reheating soup is easy. You can use the stove or microwave. If using the stove, pour the soup into a pot. Heat it over medium heat until it’s hot. Stir often to prevent sticking. If you use a microwave, place the soup in a microwave-safe bowl. Heat it in 30-second intervals, stirring in between. Always check the temperature before eating. Enjoy your cozy soup! Yes, you can make this soup in advance. It tastes great after some time in the fridge. Just store it in an airtight container. When you are ready to eat, reheat it on the stove or in the microwave. The flavors will deepen, making it even more delicious. If you want to skip coconut milk, use heavy cream. You can also try almond milk for a lighter option. Soy milk can work, too. Each option changes the flavor slightly, but it still keeps the soup creamy. Absolutely! You can add carrots, sweet potatoes, or even spinach. Just chop them small so they cook well. Adding more veggies boosts nutrition and flavor. Feel free to get creative! This soup lasts about 4 to 5 days in the fridge. Make sure it stays in a sealed container. If you notice any off smells, it’s best to toss it out. Always trust your nose when it comes to food safety! This article covered the key ingredients, tips, and steps for making a delicious soup. I shared easy ingredient substitutes and nutritional info to help you choose wisely. I offered time-saving tips and ways to enhance flavor and texture. You learned about variations, like vegan options and adding protein. Finally, I discussed proper storage and answered common questions. Remember, cooking is fun. Experiment and make it your own! Enjoy your tasty soup!

Cozy Creamy Butternut Squash Soup Simple and Tasty

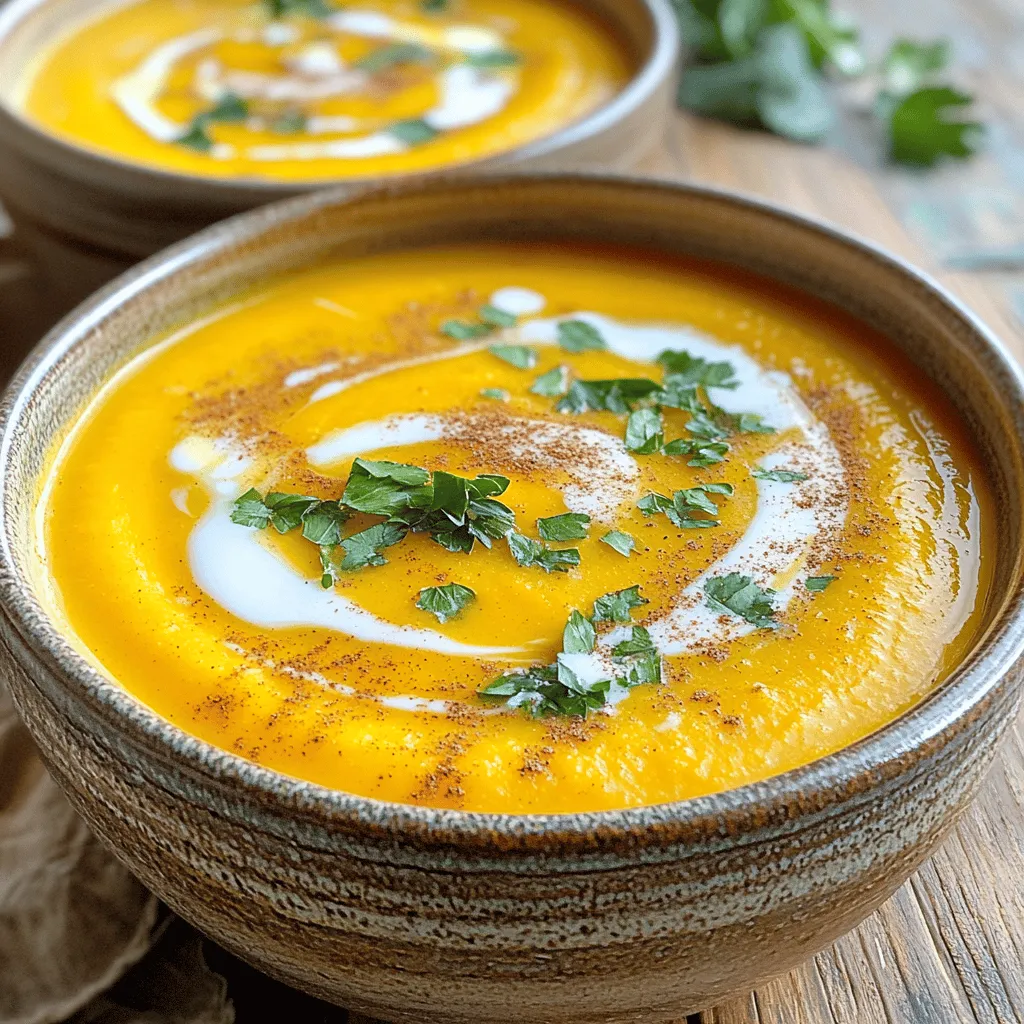
Warm up your kitchen with a bowl of Cozy Creamy Butternut Squash Soup! This simple and tasty recipe blends the

To make Air Fryer Garlic Herb Potato Wedges, gather these simple ingredients: - 4 medium russet potatoes - 3 tablespoons olive oil - 4 cloves garlic, minced - 1 tablespoon dried oregano - 1 tablespoon dried thyme - 1 teaspoon paprika - 1 teaspoon salt - ½ teaspoon black pepper - Fresh parsley, chopped (for garnish) Using russet potatoes gives a nice texture. They turn crispy on the outside and soft inside. Olive oil adds flavor and helps with browning. Fresh garlic brings a bold taste, while the herbs add depth. Feel free to adjust the spices to match your taste. If you love heat, add more paprika. If you prefer a milder flavor, use less garlic. The fresh parsley at the end adds a pop of color and freshness. Now, let’s get ready to cook! First, set your air fryer to 400°F (200°C). Let it preheat for about 5 minutes. This step helps the wedges cook evenly and become crispy. Next, wash your 4 medium russet potatoes. Cut them into wedges, making sure they are all about the same size. In a large bowl, toss the wedges with 3 tablespoons of olive oil. This step is key for flavor. Now, add 4 minced garlic cloves, 1 tablespoon of dried oregano, and 1 tablespoon of dried thyme. Sprinkle in 1 teaspoon of paprika, 1 teaspoon of salt, and ½ teaspoon of black pepper. Mix everything well. Make sure each wedge gets coated in that tasty mix. Place your seasoned potato wedges in the air fryer basket. Arrange them in a single layer. Avoid overcrowding. If you have too many, cook them in batches. This ensures they get crispy all over. Cook the wedges for about 15-20 minutes. Halfway through, shake the basket. This helps them cook evenly. Keep an eye on them. You want them golden brown and crispy on the outside. When they’re done, use tongs to carefully take them out. Place the wedges on a serving plate. To finish, sprinkle some fresh chopped parsley on top. Enjoy your crispy delight! To get those potato wedges nice and crispy, start by soaking them. Rinse the cut wedges in cold water for about 30 minutes. This step helps remove excess starch. After soaking, dry them well with a clean towel. The less moisture, the crispier they will be. When you toss them in olive oil, make sure they are evenly coated, but not dripping. Spread the wedges in a single layer in the air fryer. If they are too crowded, they will steam rather than crisp. The beauty of these potato wedges is in the spices. Feel free to mix and match! If you love heat, add a pinch of cayenne pepper. Want something zesty? A sprinkle of lemon zest works wonders. I often play with fresh herbs, too. Try fresh thyme or rosemary if you have them. Remember, you can always taste the mix before cooking. Adjust the salt and pepper to your liking. This way, you make sure every bite is packed with flavor. Keeping your air fryer clean helps it last longer and work better. After each use, wipe down the basket and the inner surface with a damp cloth. If there’s stubborn food stuck on, soak the basket in warm soapy water for a bit. Avoid using metal utensils, as they can scratch the surface. Regularly check the air fryer’s filters, too. A clean air fryer cooks evenly and gives you those perfect crispy potato wedges every time. {{image_2}} For a kick, add heat to your potato wedges. Mix in 1 teaspoon of cayenne pepper with the other seasonings. This spice gives a nice warmth. If you want more heat, add more cayenne. You can also serve these wedges with a spicy dipping sauce. A chipotle mayo works great! If you love cheese, this version is for you. After cooking the wedges, sprinkle ½ cup of shredded cheese on top. Cheddar or mozzarella both work well. Pop the basket back in the air fryer for 2-3 minutes. This melts the cheese and adds a creamy texture. You can easily make these potato wedges vegan. Simply use a vegan oil, like avocado or coconut oil. All the seasonings are vegan-friendly, so no need to change those. Garnish with fresh herbs for a tasty touch. These options keep the flavors bold and fun! To keep your leftover potato wedges fresh, let them cool first. Once cooled, place them in an airtight container. You can store them in the fridge for up to 3 days. If you want to keep them longer, consider freezing. When you're ready to enjoy the leftover wedges, preheat your air fryer to 350°F (175°C). This temperature helps them get crispy again. Place the wedges in the basket in a single layer. Heat them for about 5-7 minutes. Shake the basket halfway through to ensure even heating. If you want to freeze your potato wedges, first let them cool completely. Spread them out on a baking sheet in a single layer. Freeze them for about 1-2 hours until firm. Then, transfer the wedges to a freezer-safe bag or container. They can last for up to 2 months. When you're ready to eat, cook them straight from frozen for about 15-20 minutes in the air fryer. You cook potato wedges for 15 to 20 minutes. Start at 400°F (200°C). Shake the basket halfway to help them cook evenly. They should turn golden brown and crispy when done. If you want extra crispiness, add a few more minutes. Yes, you can use other potatoes. Yukon Gold or sweet potatoes work well. Each type has a different flavor. Just cut them into wedges like russet potatoes. Cooking times may vary slightly, so check for doneness. Dipping sauces add fun to potato wedges. Try these options: - Ketchup - Ranch dressing - Garlic aioli - Spicy mayo - BBQ sauce Feel free to mix your favorite sauces. The options are endless! You now have a clear path to making tasty air fryer potato wedges. We covered key ingredients and helpful steps to guide you. Remember to adjust seasonings to suit your taste. Try variations for extra flavor, like spicy or cheesy. Don't forget proper storage for leftovers and easy reheating tips. Experiment and enjoy your delicious creations! Happy cooking!

Air Fryer Garlic Herb Potato Wedges Crispy Delight

Looking for a tasty side that’s easy to make? My Air Fryer Garlic Herb Potato Wedges are your answer! Crispy

- 1 cup all-purpose flour - 1/2 cup sugar - 1 teaspoon baking powder - 1/2 teaspoon baking soda - 1/2 teaspoon ground cinnamon - 1/4 teaspoon ground nutmeg - 1/4 teaspoon ground ginger - 1/2 teaspoon salt For the dry ingredients, mix the flour, sugar, baking powder, and baking soda. Add the spices: cinnamon, nutmeg, and ginger. Lastly, sprinkle in the salt. This blend creates a warm and cozy flavor that pairs perfectly with pumpkin. - 1/2 cup canned pumpkin puree - 1/4 cup vegetable oil - 1 large egg - 1 teaspoon vanilla extract - 1/2 cup cream cheese, softened For the wet ingredients, blend pumpkin puree, vegetable oil, egg, and vanilla extract. This mixture gives the muffins a rich and creamy texture. The cream cheese adds a delightful surprise in the middle. - 1/4 cup powdered sugar - 1 tablespoon milk Finally, for the cream cheese filling, beat together the powdered sugar and milk. This mixture should be smooth and creamy. It adds sweetness and richness to each muffin. With these ingredients, you create a tasty treat. The mix of spices, pumpkin, and cream cheese makes these muffins stand out. They are a joy to make and even more fun to eat. Enjoy baking! - Preheat the oven to 350°F (175°C). - Line a muffin tin with paper liners. - In a large bowl, combine 1 cup of flour, 1/2 cup of sugar, 1 teaspoon of baking powder, and 1/2 teaspoon of baking soda. - Add 1/2 teaspoon of ground cinnamon, 1/4 teaspoon of nutmeg, 1/4 teaspoon of ginger, and 1/2 teaspoon of salt. Stir until mixed well. - In a separate bowl, mix together 1/2 cup of canned pumpkin puree, 1/4 cup of vegetable oil, 1 large egg, and 1 teaspoon of vanilla extract. Blend until smooth. - Pour the wet mix into the dry mix. Stir gently until just combined. It’s okay if there are a few lumps; don’t overmix. - In a small bowl, beat 1/2 cup of softened cream cheese, 1/4 cup of powdered sugar, and 1 tablespoon of milk together. Mix until creamy. - Fill each muffin liner halfway with pumpkin batter. - Add about a teaspoon of the cream cheese mixture in the center of each muffin. - Cover the cream cheese with the remaining batter. - Bake the muffins in the preheated oven for 18 to 20 minutes. - Check with a toothpick; it should come out clean. - Let the muffins cool in the pan for 5 minutes. After that, transfer them to a wire rack to cool completely. To avoid overmixing, mix the wet and dry ingredients just until they blend. A few lumps are perfectly fine. Overmixing can make your muffins tough. For a moist texture, add just enough oil and pumpkin puree. This keeps them soft and tender. You can add more spices for extra warmth. Try cloves or allspice for a richer taste. If you like sweet muffins, adjust the sugar to your liking. Taste the batter before baking, and add more sugar if needed. Garnish your muffins with powdered sugar for a sweet touch. A drizzle of cream cheese icing looks fancy. Serve them on a pretty plate with fresh mint leaves for a pop of color. These small details make your muffins look and taste even better. {{image_2}} You can make these muffins fit many diets. For gluten-free options, try using almond flour or coconut flour. Both work well and keep the flavor. Look for recipes that guide you on how to swap them in. If you're vegan, you can replace the egg with flaxseed meal. Mix 1 tablespoon of flaxseed with 2.5 tablespoons of water. Let it sit until it thickens. You can also use vegan cream cheese to keep that rich taste. Want to spice things up? You can add chocolate chips or chopped nuts to the batter. Chocolate makes a sweet mix with pumpkin. Nuts add a nice crunch. You can also change the spice blend. Try allspice or cardamom for a unique twist. Each spice adds a different taste and aroma. As the seasons change, so can your muffins. In fall, add diced apples or chopped pecans for extra flavor. They pair so well with pumpkin. During the holidays, think about adding peppermint or cranberries. These flavors bring cheer and warmth. Your guests will love the festive touch! To keep your pumpkin cheesecake muffins fresh, store them in an airtight container. This helps maintain moisture. You can leave them at room temperature for up to three days. Make sure to keep them away from direct sunlight. If you want them to last longer, consider refrigerating them. They will stay fresh for about a week in the fridge. If you want to save muffins for later, freezing is a great option. First, let them cool completely. Then, wrap each muffin tightly in plastic wrap. Place them in a freezer-safe bag or container. They can last up to three months in the freezer. When you're ready to eat them, take out the muffins and let them thaw in the fridge overnight. You can also thaw them at room temperature for a couple of hours. To reheat pumpkin cheesecake muffins, avoid drying them out. The best method is to use the oven. Preheat it to 350°F (175°C). Place muffins on a baking sheet and cover them with aluminum foil. Heat for about 10 minutes. This keeps them soft and warm. You can also use a microwave. Heat for about 20-30 seconds. Just be careful not to overheat, or they may become tough. Pumpkin cheesecake muffins stay fresh for about 3 to 4 days. Store them in an airtight container at room temperature. For longer storage, place them in the fridge. They can last up to a week when chilled. Yes, you can make mini muffins! Just reduce the baking time to about 12 to 15 minutes. Check them often to avoid overbaking. Mini muffins are perfect for a quick snack or party treats. The best way to check if muffins are done is to use a toothpick. Insert a toothpick in the center of a muffin. If it comes out clean or with a few crumbs, they are ready. If it comes out wet, they need more time. Absolutely! These muffins are great for meal prep. You can bake them ahead of time and store them in the fridge. They make a quick breakfast or snack during the week. Just grab and go! Yes, fresh pumpkin works well, too. Just cook and puree the pumpkin until smooth. Make sure to drain any excess liquid to keep the muffins from getting soggy. Fresh pumpkin adds a lovely flavor. In this blog post, I walked you through making delicious pumpkin cheesecake muffins. We covered the key ingredients, from dry to wet, and additional elements like cream cheese. I laid out clear steps for mixing, assembling, and baking. I also shared tips for perfecting your muffins, variations for dietary needs, and smart storage methods. These muffins are easy to make and perfect for any season. Experiment with flavors and enjoy them fresh or stored. Happy baking!

Pumpkin Cheesecake Muffins Delightful and Easy Recipe

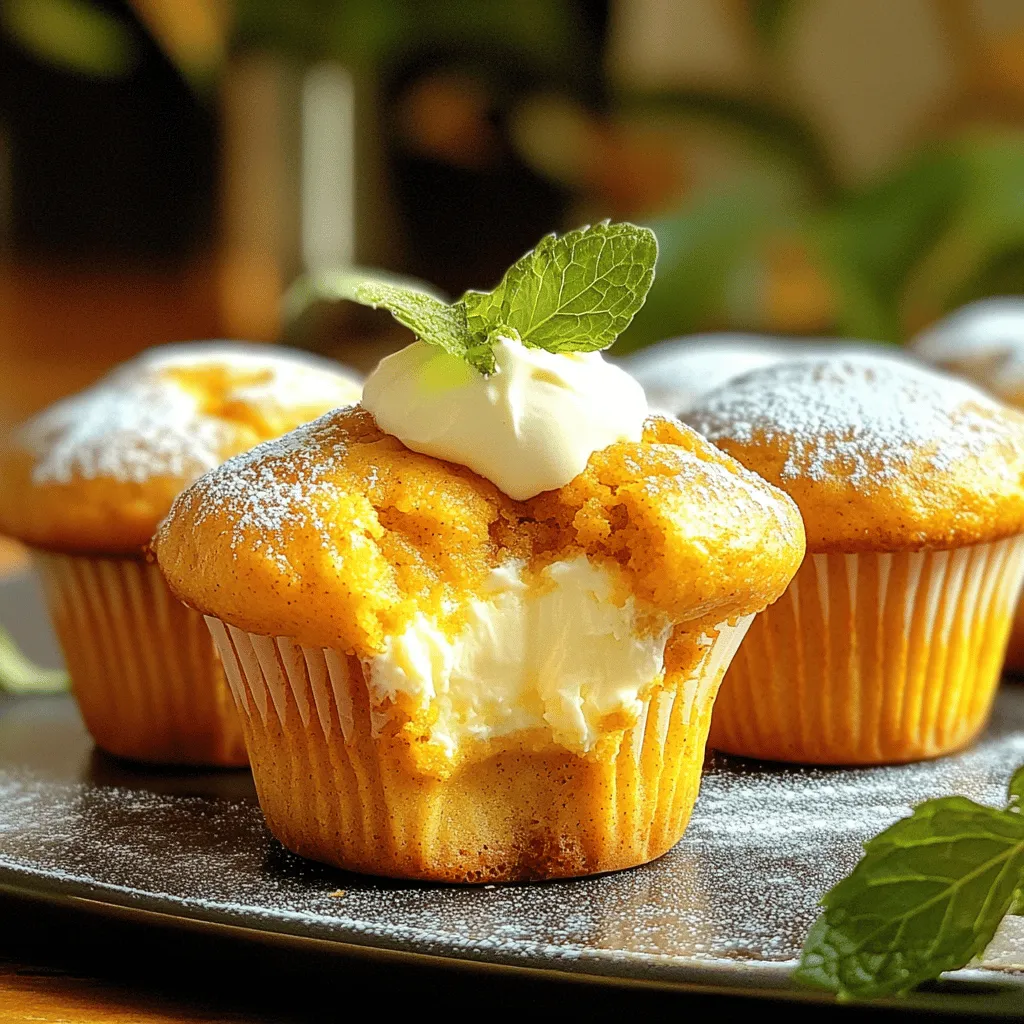
Indulging in the flavors of fall is easier than ever with my Pumpkin Cheesecake Muffins. This delightful recipe combines the

To start, gather these fresh veggies: - 1 cup cherry tomatoes, halved - 1 red bell pepper, diced - 1 yellow bell pepper, diced - 1 zucchini, sliced - 1 red onion, sliced - 2 cups broccoli florets Each of these adds color and taste. Cherry tomatoes burst with sweetness. Bell peppers bring crunch. Zucchini adds a soft texture. Red onion gives a nice bite. Broccoli florets offer a hearty feel. Next, we need to make a zesty balsamic dressing. Here’s what you need: - 3 tablespoons balsamic vinegar - 2 tablespoons olive oil - 1 teaspoon garlic powder - 1 teaspoon dried thyme - Salt and pepper to taste This dressing is easy to whip up. The balsamic vinegar gives a tangy kick. Olive oil smooths it out. Garlic powder adds depth. Thyme enhances the flavor with earthy notes. Don’t forget a pinch of salt and pepper. For a little extra flair, consider these toppings: - 1 cup cooked quinoa (for serving) - Fresh basil leaves, for garnish Quinoa adds protein and makes the bowl filling. Fresh basil gives a bright and fragrant touch. You can also drizzle more balsamic vinegar on top for extra flavor. Start by washing all your vegetables well. I love using cherry tomatoes, bell peppers, zucchini, red onion, and broccoli. Cut the cherry tomatoes in half. Dice the red and yellow bell peppers into small pieces. Slice the zucchini and red onion thinly. Finally, break the broccoli into small florets. Make sure each piece is about the same size. This helps them cook evenly. Grab a small mixing bowl. In it, add 3 tablespoons of balsamic vinegar and 2 tablespoons of olive oil. Then, sprinkle in 1 teaspoon of garlic powder and 1 teaspoon of dried thyme. Add salt and pepper to taste. Whisk everything together until it looks smooth. This dressing adds a lot of flavor to the veggies. Preheat your oven to 425°F (220°C). Line a large baking sheet with parchment paper. In a big bowl, toss your prepped vegetables with the balsamic dressing. Make sure every piece gets coated. Spread the veggies in a single layer on the baking sheet. Roast them for 20-25 minutes. Stir them halfway through for even cooking. When they are tender and slightly caramelized, they are ready. Remove them from the oven and let them cool a bit before serving. To get the best roasted veggies, cut them into even sizes. This helps them cook at the same rate. Use a mix of colors for a bright look. The cherry tomatoes, bell peppers, and broccoli add great flavor and texture. Make sure to toss them well with the balsamic mixture. This ensures every piece is coated and tasty. Roast them at 425°F for 20 to 25 minutes. Stir halfway through for even browning. Let them caramelize a bit for sweetness. I love serving these bowls warm, right from the oven. Divide the cooked quinoa into bowls first. Then, top with the roasted veggies. Add fresh basil leaves for a nice touch. You can also drizzle extra balsamic vinegar on top for more flavor. This dish works well for lunch or dinner. It’s great for meal prep, too. Enjoy with friends or family for a colorful feast! Want more flavor? Try adding garlic or onion powder to the veggies. Fresh herbs like thyme or rosemary can amp up the taste. You can also mix in some cheese for a creamy finish. Feta or goat cheese would taste amazing. For a bit of heat, toss in some red pepper flakes. This adds a fun kick. Feel free to experiment with flavors that you love! {{image_2}} You can add protein to your veggie bowls for more energy. Try cooked chicken, shrimp, or tofu. Just toss them in with your veggies before roasting. For a plant-based option, chickpeas are a great choice. They add protein and flavor to the mix. Feel free to swap or add different vegetables. Carrots, sweet potatoes, or asparagus work well. You can also use cauliflower or brussels sprouts for a unique taste. Just remember to cut them into even pieces for even cooking. You can easily adjust this recipe for various diets. For a gluten-free meal, make sure to choose gluten-free grains like rice or quinoa. If you're low-carb, skip the grains and add more veggies. For a dairy-free option, omit any cheese toppings and use a plant-based dressing. To keep your balsamic roasted veggies fresh, store them in an airtight container. Make sure to cool them first before sealing. This helps prevent moisture build-up, which can make them soggy. If you have leftover quinoa, store it separately. This keeps both fresh and tasty. Reheat your roasted veggies in the oven for the best taste. Set your oven to 350°F (175°C). Spread the veggies on a baking sheet and heat for about 10 minutes. You can also use the microwave. Place the veggies in a bowl, cover with a lid, and heat for 1-2 minutes. Stir halfway through to warm evenly. Leftovers can last up to five days in the fridge. Be sure to check for any signs of spoilage before eating. If you want to keep them longer, consider freezing. Roasted veggies can freeze well for about three months. Just thaw them in the fridge overnight before reheating. Yes, you can easily make this recipe vegan. The main ingredients are already plant-based. The balsamic vinegar and olive oil are also vegan. Just ensure the side items you use for garnishing are vegan-friendly too. Roasted veggies can last about 3 to 5 days in the fridge. Store them in an airtight container for best results. When you want to enjoy them again, just reheat them in the oven or microwave. If you need a substitute for quinoa, try brown rice or couscous. Both options work well and still give you a nice texture. You can also use farro or bulgur for a different flavor. This post covered fresh veggies, tasty balsamic dressing, and optional toppings. I shared steps for prepping, mixing, and roasting. Tips for perfect veggies and serving ideas can enhance your meal. Explore variations like adding proteins or switching vegetables for different diets. Proper storage helps keep leftovers fresh longer. Remember, cooking can be fun and simple. Enjoy your delicious roasted veggies!

Sheet-Pan Balsamic Roasted Veggie Bowls Delight

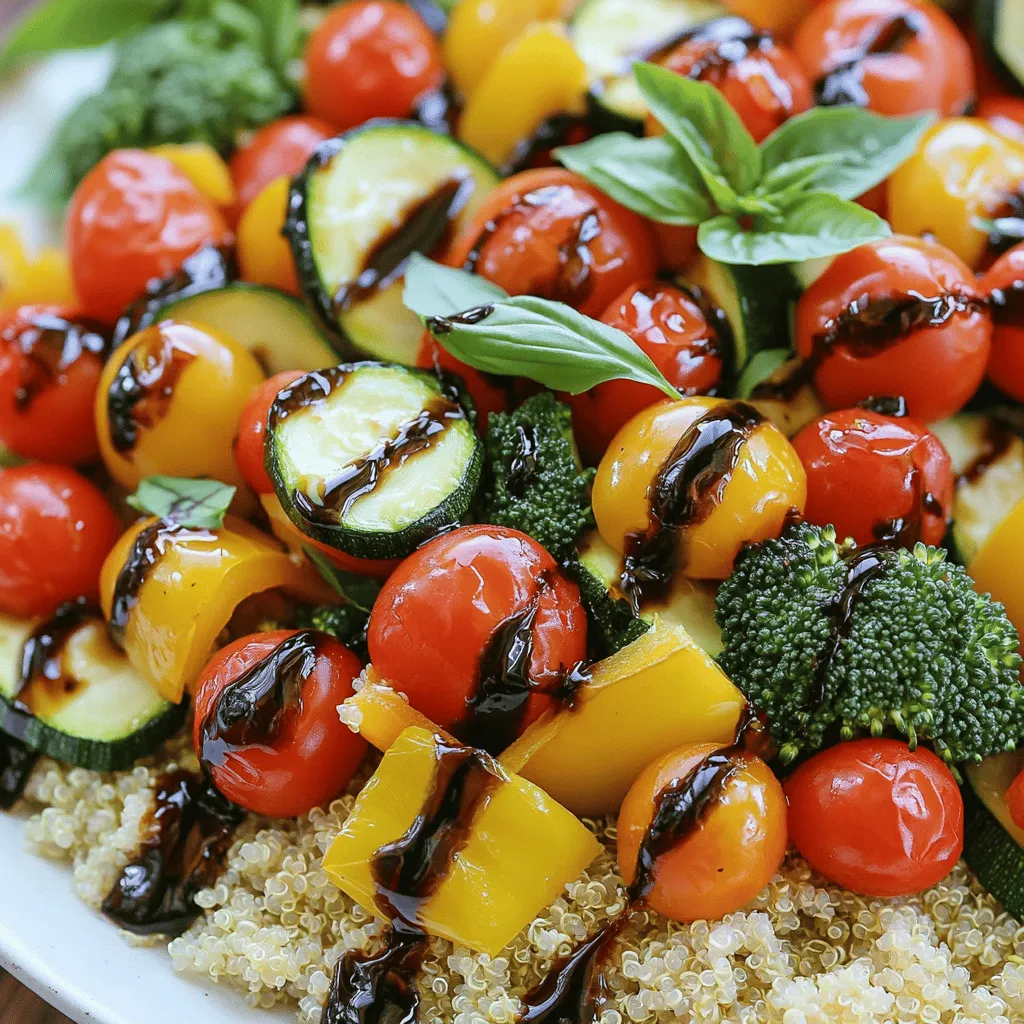
Want to enjoy a tasty, healthy meal with minimal fuss? Look no further than Sheet-Pan Balsamic Roasted Veggie Bowls! This

- 1 cup pumpkin puree - 8 oz cream cheese, softened - 1/2 cup powdered sugar - 1 teaspoon vanilla extract - 1 teaspoon ground cinnamon - 1/2 teaspoon ground nutmeg - 1/4 teaspoon ground ginger - 1 cup heavy whipping cream - 1 cup graham cracker crumbs - 4 tablespoons unsalted butter, melted - Whipped cream for garnish - Pumpkin pie spice for garnish To make these no-bake pumpkin cheesecake mousse cups, gather all your ingredients first. The pumpkin puree gives a rich flavor. Cream cheese adds creaminess to the mixture. Powdered sugar sweetens it perfectly. Vanilla extract brings a lovely scent. Ground cinnamon, nutmeg, and ginger add warmth and spice. Heavy whipping cream makes the mousse light and fluffy. For the crust, graham cracker crumbs mix well with melted butter. You will also need whipped cream and pumpkin pie spice for a pretty topping. Keeping your ingredients fresh is key for the best taste. With the right components, you can create a delightful treat that everyone will love. Start by mixing graham cracker crumbs with melted butter. You want the mixture to feel like wet sand. Take your time to mix it well. Next, divide this mixture into 4 to 6 cups. Press it down gently to make a solid crust layer at the bottom. This crust will give a nice crunch to the soft mousse. In a large bowl, beat the softened cream cheese until it is smooth. You can use an electric mixer or a whisk. Then, add in the pumpkin puree, powdered sugar, vanilla extract, ground cinnamon, nutmeg, and ginger. Mix everything together until it is fully combined. The flavors should blend nicely, giving you a rich, creamy texture. In another bowl, whip the heavy cream until you see soft peaks forming. It’s important not to over-whip. Once ready, carefully fold this whipped cream into the pumpkin cheesecake mixture. Use a spatula and be gentle. You want the mixture to stay light and fluffy, so take your time. Now, it’s time to layer! Spoon the pumpkin cheesecake mousse over the graham cracker crust in each cup. Fill them about three-quarters full. For a neat look, use a piping bag to layer the mousse. This makes it more fun and gives a nice presentation. Cover each cup with plastic wrap. Place them in the refrigerator for at least 2 to 4 hours. This chilling time allows the flavors to meld. It also helps the mousse to set up nicely. Trust me; the wait is worth it! Once the mousse has set, take the cups out of the fridge. Top each mousse cup with a dollop of whipped cream. Then, sprinkle some pumpkin pie spice on top for decoration. This adds a lovely touch and a burst of flavor. Enjoy your delightful treat! - Use soft cream cheese for better mixing: Start with room temperature cream cheese. It blends smoothly and helps avoid lumps. - Importance of not over-folding whipped cream: Gently fold the whipped cream into the mixture. This keeps your mousse light and fluffy. - Avoiding grainy texture in the cheesecake: Blend the cream cheese until very smooth before adding other ingredients. This prevents a gritty feel. - Ensuring the crust is tightly packed: Press the graham cracker mixture firmly into the cups. A good base keeps the layers from mixing. - Creative serving options for dessert tables: Use clear cups to show off the beautiful layers. Small mason jars also add a rustic charm. - Garnishing tips for an eye-catching finish: Top with a swirl of whipped cream and a sprinkle of pumpkin pie spice. Add a cinnamon stick for an extra touch! {{image_2}} You can easily switch up the flavors in your pumpkin cheesecake mousse. Adding chocolate or caramel layers can create a rich twist. Just melt some chocolate or warm caramel and layer it between the crust and mousse. It adds a sweet depth and surprises in every bite. You can also substitute spices. Instead of cinnamon, try allspice or clove for a different kick. You could even use pumpkin pie spice for more warmth. For those with dietary needs, making this dessert gluten-free is simple. Use almond flour or gluten-free crumbs for the crust. This keeps the treat tasty while meeting your needs. If you need a dairy-free option, swap cream cheese for a dairy-free cream cheese brand. Coconut whipped cream works well in place of heavy cream, adding a light coconut flavor. Pairing these mousse cups with coffee or tea enhances the experience. The warm drinks balance the cool, creamy dessert. For festive occasions, display the cups on a dessert table. You can add seasonal decorations, like mini pumpkins or fall leaves, for a cozy touch. These small cups work great for parties and gatherings, making them a perfect choice for fall celebrations. Store leftover mousse cups in the fridge. Use airtight containers to keep them fresh. This will help prevent moisture loss and keep the flavors intact. If you don’t have containers, wrap the cups in plastic wrap tightly. This also helps to seal in freshness. You can store the mousse cups for up to three days in the fridge. If you see any change in texture or smell, it’s best to throw them away. Signs of spoilage include a watery layer on top or an off smell. Always check before enjoying! Yes, you can freeze the mousse cups! To freeze, place them in freezer-safe containers. Make sure to leave some space at the top, as the mousse will expand. When you’re ready to eat them, thaw in the fridge overnight. Avoid refreezing after thawing for best results. Yes, you can make these mousse cups ahead of time. I suggest preparing them 1 to 2 days before serving. This allows the flavors to blend and the mousse to set properly. Just remember to keep them covered in the fridge until you are ready to serve. Serve these mousse cups cold for the best taste. After chilling, top each cup with whipped cream. A sprinkle of pumpkin pie spice adds a nice touch. Use clear cups to show off the lovely layers. This makes for a pretty presentation that your guests will love! You can use fresh pumpkin puree, but it requires more work. Fresh pumpkin has a different texture and taste. Make sure to cook and blend the pumpkin well to get a smooth puree. Canned pumpkin is easy and consistent, making it a great choice for this recipe. You now have a complete guide to making pumpkin cheesecake mousse cups. We covered the necessary ingredients, step-by-step instructions, and key tips. With these details, you can create delicious, festive desserts that impress your guests. Remember, the right balance of flavors and textures is key. Feel free to experiment with variations for a unique twist. Enjoy the process, and happy baking!

No-Bake Pumpkin Cheesecake Mousse Cups Delightful Treat

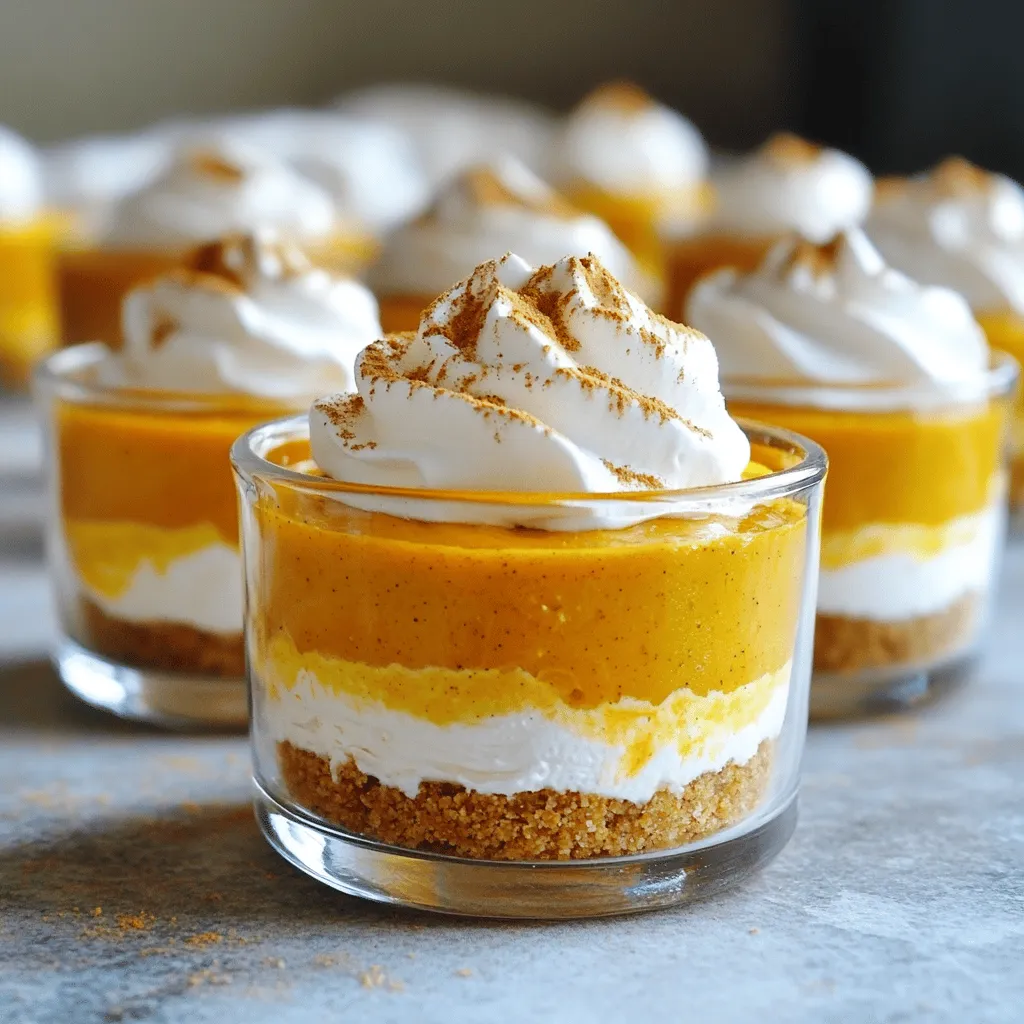
Indulge in the fall flavors of my No-Bake Pumpkin Cheesecake Mousse Cups! These delightful cups pair creamy pumpkin cheesecake with

- 8 oz fettuccine or linguine - 2 tablespoons olive oil - 4 cloves garlic, minced - 1 cup cherry tomatoes, halved - 1 bell pepper (any color), sliced - 1 zucchini, sliced - 1 cup broccoli florets - 1 cup heavy cream - 1 lemon (zested and juiced) - 1/2 cup grated Parmesan cheese - Salt and pepper to taste - Fresh basil leaves for garnish For this recipe, I use 8 ounces of pasta. Fettuccine or linguine works well. I add 2 tablespoons of olive oil to sauté. Use 4 cloves of minced garlic for flavor. I like 1 cup of halved cherry tomatoes for sweetness. One bell pepper, sliced, brings color and crunch. A sliced zucchini adds a nice texture. I choose 1 cup of broccoli florets for more greens. The creamy base comes from 1 cup of heavy cream. I zest and juice 1 lemon for brightness. Lastly, 1/2 cup of grated Parmesan cheese adds richness. Season with salt and pepper to taste. I garnish with fresh basil leaves for a lovely touch. You can swap fettuccine for any pasta you prefer. Whole wheat pasta is a great option. If you need a dairy-free choice, use coconut cream instead of heavy cream. Nutritional yeast can replace Parmesan cheese for a vegan option. Use any color bell pepper you like. If you don’t have broccoli, try spinach or asparagus. You can even add peas for a sweet bite. First, fill a large pot with water and add salt. Bring the water to a boil. Once boiling, add 8 oz of fettuccine or linguine. Cook according to the package instructions, usually around 8-10 minutes, until it is al dente. This means it should be firm to the bite. After cooking, save 1/2 cup of the pasta water. Drain the rest and set the pasta aside. Next, take a large skillet and heat 2 tablespoons of olive oil over medium heat. Once the oil is hot, add 4 cloves of minced garlic. Sauté the garlic for about 30 seconds. You want it to smell great, not burn. Then, add 1 cup of halved cherry tomatoes, 1 sliced bell pepper, 1 sliced zucchini, and 1 cup of broccoli florets. Cook these for 5-7 minutes. The veggies should be tender but still bright and colorful. Reduce the heat to low for the next step. Pour in 1 cup of heavy cream, along with the zest and juice of 1 lemon. Stir everything well. Heat the cream until it gets warm. This will create a rich and creamy sauce. Keep an eye on it; we don’t want it to boil. Now it's time to mix the pasta with the sauce. Add the drained pasta into the skillet with the creamy vegetable sauce. Toss everything together gently. If the sauce is too thick, add a bit of the reserved pasta water a little at a time. This helps to make the sauce smooth and perfect. Finally, stir in 1/2 cup of grated Parmesan cheese. This adds a nice cheesy flavor. Season the dish with salt and pepper to taste. Let it cook for another minute to blend the flavors. Once done, remove it from heat. Serve the pasta right away, garnished with fresh basil leaves on top for a lovely finish. Enjoy your meal! To make the best pasta, use a large pot. Fill it with water and add salt. This helps the pasta absorb flavor while cooking. Cook the fettuccine until it's al dente, which means it's firm but not hard. This usually takes about 8 to 10 minutes. Remember to save some pasta water before draining it. This water can help adjust your sauce later. For a creamy sauce, start with heavy cream. Heat it gently to avoid burning. Add lemon zest and juice for brightness. Stir everything well and keep the heat low. If the sauce is too thick, add some reserved pasta water. This keeps the sauce silky and smooth. Grated Parmesan cheese adds richness and helps bind the sauce. Mix it in right before serving. To boost flavor, try adding fresh herbs like basil. Chop it finely and sprinkle it on top. You can also add a pinch of red pepper flakes for a little heat. For texture, consider roasting the vegetables before adding them. This adds a nice char and depth of flavor. Lastly, don’t skip the salt and pepper. They are key to bringing out all the tastes in your dish. {{image_2}} You can easily swap ingredients in this dish. If you need gluten-free options, use gluten-free pasta. It cooks well and tastes great. For a lighter dish, try using half-and-half instead of heavy cream. You can also use low-fat cheese or no cheese at all if you're watching fat intake. Adding protein to Creamy Lemon Garlic Pasta Primavera makes it heartier. You can cook shrimp or chicken in the skillet after the garlic. Just sauté until cooked through, then add your veggies. Tofu or chickpeas can be great plant-based options. They add a nice texture and absorb flavors well. For vegetarian options, just skip the cheese or use a vegetarian-friendly cheese. For a vegan dish, replace heavy cream with coconut cream or cashew cream. You can make cashew cream by blending soaked cashews with water until smooth. This keeps the dish creamy while being plant-based. To store your creamy lemon garlic pasta primavera, let it cool first. Once cool, place it in an airtight container. This helps keep it fresh. You can store it in the fridge for up to three days. If you want to keep it longer, freezing is a good option. When you are ready to eat the leftovers, take them out of the fridge. You can reheat the pasta on the stove or in the microwave. If using the stove, add a splash of water or cream to help the sauce become smooth again. Heat on low until warm. In the microwave, cover it loosely and heat in short bursts. Stir in between to ensure even heating. To freeze the dish, use a freezer-safe container. Make sure to leave some space at the top for expansion. This dish can be frozen for up to three months. When you are ready to eat, let it thaw in the fridge overnight. Reheat as mentioned above for the best taste and texture. Pasta Primavera is a simple pasta dish. It features fresh veggies and a creamy sauce. The name means “spring pasta” in Italian. It highlights seasonal vegetables, making it bright and colorful. You can use any veggies you like. This dish is perfect for warm days or any time you want something fresh. Yes, you can choose other types of pasta. Fettuccine and linguine work well, but penne or rotini are great too. Just remember to adjust cooking times as needed. All pasta types pair nicely with the creamy sauce. The key is to cook them until they are al dente. To make this dish gluten-free, switch to gluten-free pasta. Many brands offer good options that taste great. Check the package for cooking times since they can differ. The rest of the ingredients are naturally gluten-free. Just be sure to read labels for any hidden gluten. Yes, you can prepare this dish ahead of time. Cook the pasta and veggies, then mix them with the sauce. Store everything in an airtight container in the fridge. When you’re ready to eat, just reheat it on the stove or in the microwave. It’s best to enjoy it fresh, but it keeps well for a couple of days. This blog post covered all key parts of making Pasta Primavera. We explored the specific ingredients and their measurements, plus substitutions you can use. The step-by-step guide helped in cooking, sautéing, and creating the creamy sauce. Helpful tips showed how to get perfect pasta and enhance its flavor. We also looked at ways to modify the recipe for different diets. With proper storage and reheating info, your leftovers will stay tasty. Keep experimenting, and you’ll create a perfect dish each time. Enjoy your cooking!

Creamy Lemon Garlic Pasta Primavera Easy Family Meal

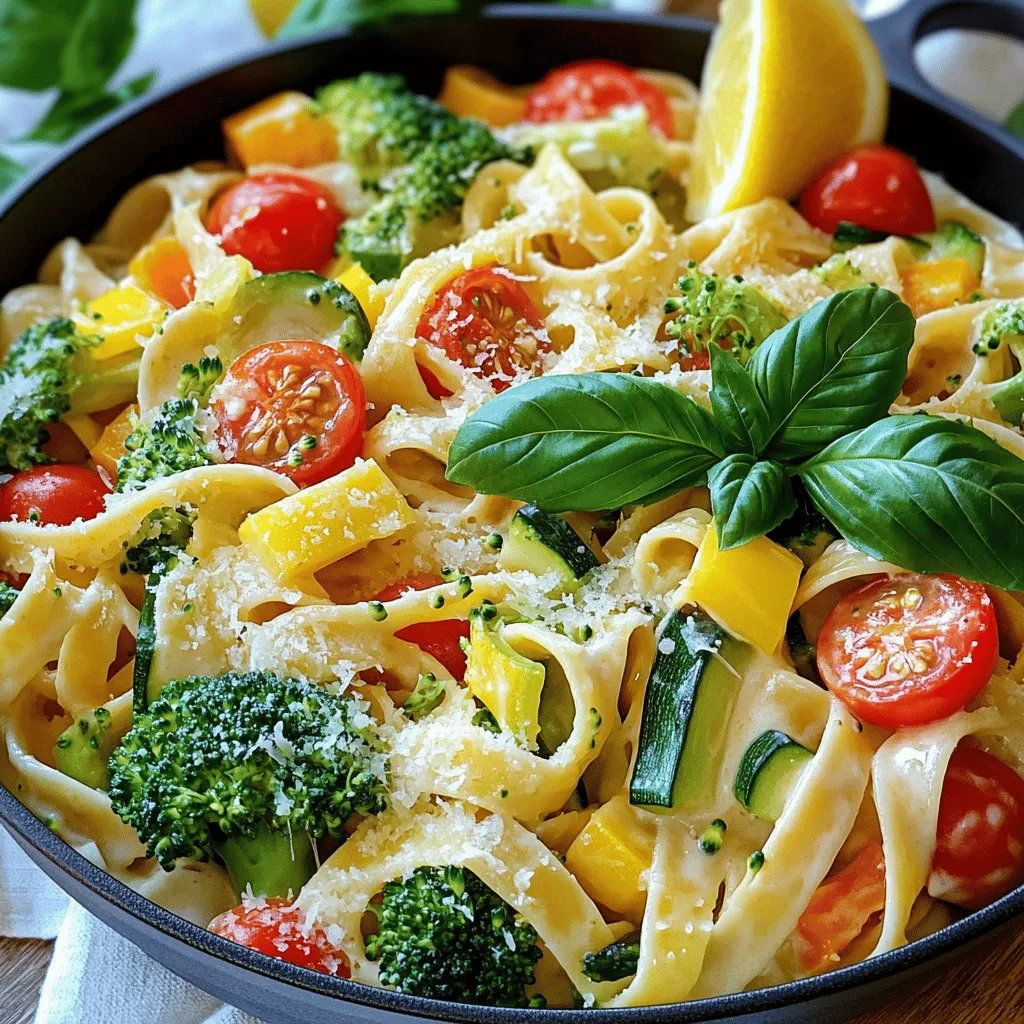
Looking for a quick and tasty family meal? This Creamy Lemon Garlic Pasta Primavera is just the ticket! With vibrant

To make these Pumpkin Pecan Cheesecake Bars, gather these ingredients: - 1 cup graham cracker crumbs - 1/4 cup melted butter - 1/4 cup brown sugar - 2 (8 oz) packages cream cheese, softened - 1 cup canned pumpkin puree - 1/2 cup granulated sugar - 1 teaspoon vanilla extract - 2 large eggs - 1 teaspoon pumpkin pie spice - 1/2 cup chopped pecans - 1/4 teaspoon salt These ingredients blend to create a rich, creamy dessert that sings fall flavors. You can switch some ingredients if needed. Here are some easy swaps: - Use crushed cookies instead of graham crackers for the crust. - Coconut oil can replace melted butter for a dairy-free option. - Maple syrup can stand in for brown sugar for a different sweetness. - Use dairy-free cream cheese for a vegan version. - If you cannot find canned pumpkin, fresh pumpkin works too! Just cook and mash it first. These substitutions keep the taste rich while meeting your needs. Add some flair to your bars with these toppings: - Whipped cream adds a light touch. - Drizzle caramel sauce for extra sweetness. - A sprinkle of cinnamon or nutmeg gives a warm spice. - More chopped pecans can add crunch and flavor. These toppings let you customize your bars to fit your taste! To start, preheat your oven to 350°F (175°C). Grab an 8x8-inch baking dish and grease it well. In a medium bowl, mix together 1 cup of graham cracker crumbs, 1/4 cup of melted butter, and 1/4 cup of brown sugar. Stir until the mixture is crumbly. Press this mixture firmly into the bottom of your prepared dish. Bake it for 10 minutes. Once done, take it out and let it cool a bit. Next, take a large mixing bowl. Beat 2 packages of softened cream cheese until it's smooth. You can use an electric mixer for this. Now, add 1 cup of canned pumpkin puree, 1/2 cup of granulated sugar, 1 teaspoon of vanilla extract, and 2 large eggs. Don’t forget to add 1 teaspoon of pumpkin pie spice and 1/4 teaspoon of salt. Mix it all together until it’s smooth and creamy. Gently fold in 1/2 cup of chopped pecans for a nice crunch. Now, pour your creamy cheesecake mixture over the cooled crust. Spread it out evenly. Bake the dish for 30-35 minutes. Keep an eye on it until the center is set and the edges turn lightly golden. Once it's baked, let the bars cool at room temperature for about an hour. After that, pop them in the fridge for at least 4 hours. If you have time, letting them set overnight works wonders. When they are fully set, cut them into squares and serve them chilled. Enjoy your delicious pumpkin pecan cheesecake bars! One mistake is using cold cream cheese. It should be soft for a smooth mix. If you skip the cooling time after baking, the bars may not set well. Also, don’t overmix once you add the eggs; this can make the texture too fluffy. To get a creamy texture, beat the cream cheese well before adding any other ingredients. Mix the pumpkin and sugar lightly, just until combined. Don’t forget to fold in the pecans gently. This keeps them from sinking and adds a nice crunch. Serve these bars chilled for the best taste. I love to top them with whipped cream or a sprinkle of cinnamon. You can also serve them with a scoop of vanilla ice cream for extra sweetness. Pair these bars with coffee or chai for a cozy fall treat. {{image_2}} To make gluten-free pumpkin pecan cheesecake bars, swap the graham cracker crumbs. Use gluten-free crumbs or crushed nuts instead. This change keeps the crust tasty and holds together well. Ensure your butter is also gluten-free. The rest of the recipe stays the same. You still get that rich flavor! For a vegan twist, replace the cream cheese with a vegan cream cheese. Use silken tofu blended until smooth as another option. Swap the eggs with flaxseed meal or chia seeds mixed with water. Use maple syrup instead of granulated sugar for sweetness. This way, you enjoy the same creamy texture without animal products. You can get creative with flavors. Add chocolate chips for a sweet touch. A swirl of caramel can add a nice surprise. Try mixing in dried cranberries for a fruity kick, or even a hint of orange zest for a fresh note. Each mix-in changes the bars, making them unique and fun! To store leftover pumpkin pecan cheesecake bars, place them in an airtight container. I like to use a glass dish with a lid. This keeps them fresh. You can also wrap them tightly in plastic wrap. Store them in the fridge for up to five days. Make sure they are fully cooled before storing. This helps maintain their lovely texture. If you want to save some bars for later, freezing is a great option. First, cut the bars into squares. Then, place them on a baking sheet lined with parchment paper. Freeze them for about two hours. Once frozen, transfer the squares into a freezer-safe bag. Squeeze out all the air before sealing. They can stay in the freezer for up to three months. When ready to enjoy, just thaw them in the fridge overnight. Reheating your pumpkin pecan cheesecake bars is simple. You can microwave them for about 15 to 20 seconds. This warms them without cooking them further. If you prefer to use the oven, preheat it to 350°F (175°C). Place the bars on a baking sheet and heat for about 10 minutes. I recommend enjoying them chilled for the best taste, but warm bars are also delicious! Yes, you can use fresh pumpkin. Start with a sugar pumpkin. Roast it until soft, then scoop out the flesh. Blend it smooth before adding to your cheesecake mix. This makes a tasty option, but canned pumpkin is easier and saves time. These bars can last up to a week in the fridge. Make sure to store them in an airtight container. If you want to keep them longer, consider freezing them, which can extend their life to three months. Yes, you can make these bars ahead of time! They taste even better after chilling for a day. Just prepare them, chill them in the fridge, and cut them into squares before serving. This makes them ready for any event. These bars pair well with whipped cream or caramel sauce. A scoop of vanilla ice cream also complements them nicely. You can even sprinkle extra chopped pecans on top for added crunch and flavor. This blog post covered all you need for pumpkin pecan cheesecake bars. We reviewed the key ingredients and their substitutes. I shared step-by-step instructions and tips to reach the best texture. I also highlighted variations like gluten-free and vegan options. Lastly, we discussed how to store leftovers properly. I hope you feel ready to bake these delicious bars. Enjoy sharing them with friends or family!

Pumpkin Pecan Cheesecake Bars Decadent Fall Delight

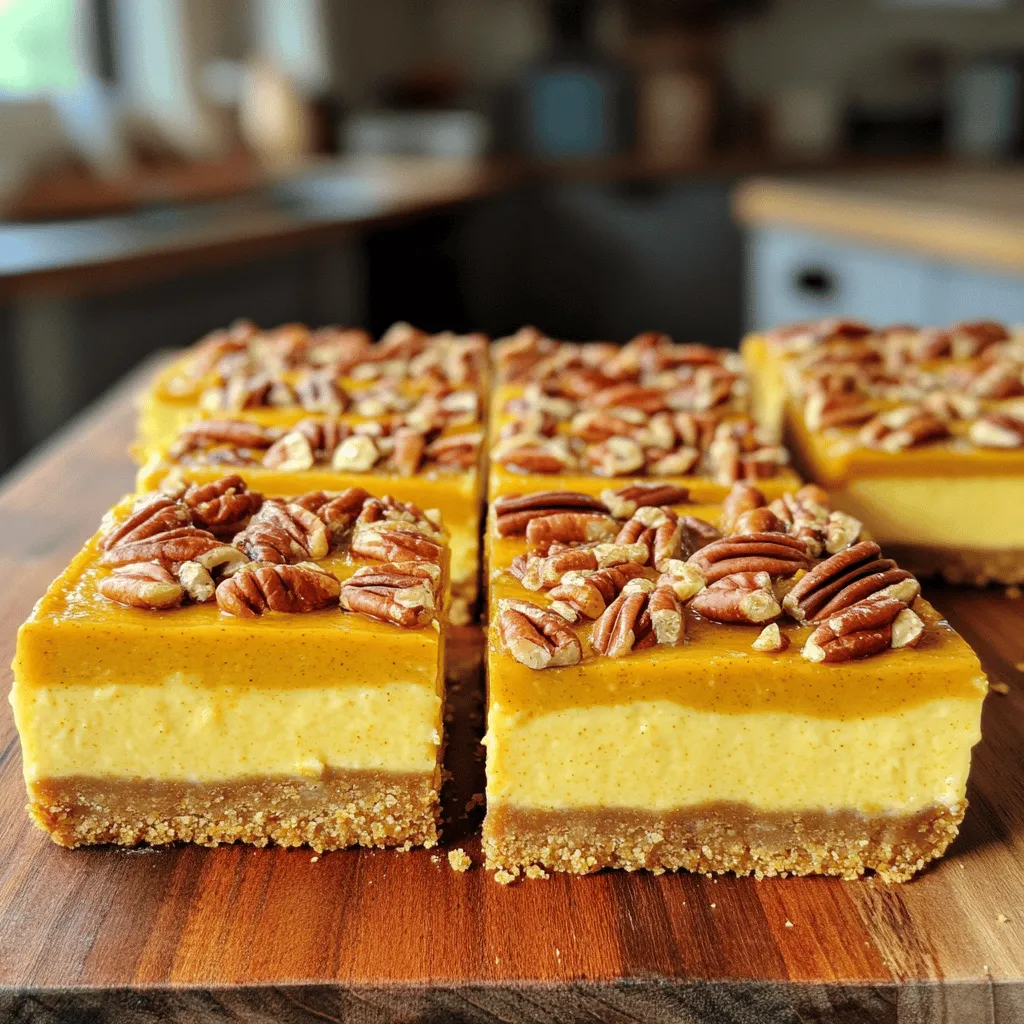
If you love fall flavors, listen up! Pumpkin Pecan Cheesecake Bars are the perfect treat. They blend creamy cheesecake with

To make a great Apple Cinnamon Streusel Cake, you need the following: - 2 cups all-purpose flour - 1 ½ teaspoons baking powder - ½ teaspoon baking soda - ½ teaspoon salt - ½ cup unsalted butter, softened - 1 cup granulated sugar - 2 large eggs - 1 teaspoon vanilla extract - 1 cup buttermilk (you can use regular milk mixed with lemon juice) - 2 cups apples, peeled, cored, and diced (about 2 medium apples) - 1 teaspoon ground cinnamon - ½ teaspoon nutmeg Each ingredient plays a role in making this cake delicious. The apples give it a sweet and fruity flavor. The spices add warmth and depth. Butter and sugar together create a soft and moist cake. For the streusel topping, gather these ingredients: - ¾ cup brown sugar - ½ cup all-purpose flour - ½ teaspoon ground cinnamon - ½ cup cold butter, cubed The streusel topping adds a crunchy texture to the soft cake. The brown sugar and cinnamon blend perfectly, giving it a sweet and spicy kick. Having these ingredients ready will help you create a lovely Apple Cinnamon Streusel Cake that your friends and family will love! 1. Preheat your oven to 350°F (175°C). This helps the cake bake evenly. 2. In a medium bowl, whisk together the flour, baking powder, baking soda, and salt. This step mixes the dry ingredients well. 3. In a large bowl, cream the softened butter and granulated sugar together until light and fluffy. This takes about 3 to 4 minutes. 1. Add the eggs, one at a time. Mix well after each addition. Stir in the vanilla extract for extra flavor. 2. Gradually alternate adding the dry ingredients and buttermilk to the butter mixture. Start and end with the dry ingredients. Mix until just combined for a smooth batter. 3. Fold in the diced apples, cinnamon, and nutmeg. This distributes the apples and spices evenly throughout the batter. 1. Pour the batter into the prepared baking pan, spreading it evenly. A nice base is key for the streusel. 2. For the streusel topping, mix together the brown sugar, flour, cinnamon, and cubed cold butter in a medium bowl. Use a fork or pastry cutter to blend until it looks like coarse crumbs. 3. Sprinkle the streusel topping evenly over the cake batter. This adds a crunchy layer. 4. Bake in the preheated oven for 40 to 45 minutes. Check if a toothpick inserted in the center comes out clean. 5. Allow the cake to cool in the pan for about 15 minutes before slicing and serving. Enjoy warm or at room temperature. To get a perfect cake, use room temperature ingredients. Eggs and butter mix better when they are not cold. This helps create a smooth batter. When you fold in the apples, do it gently. This keeps the apples from breaking too much. You want to keep the air in the batter. Want to add more flavor? Try nuts or raisins! They add a nice crunch and sweetness. You can also use different apple types. Granny Smith apples give a tart taste. Honeycrisp apples are sweet and juicy. Mixing these can create a fun flavor mix. How can you make your cake look even better? Dust it with powdered sugar. It makes the cake look fancy. You can also serve it with ice cream. A scoop of vanilla ice cream adds creaminess. For a fun touch, try creative plating. Use a slice of cake on a colorful plate. Add fresh apple slices or mint leaves for color. {{image_2}} To make this cake gluten-free, use a good gluten-free flour blend. Look for one that includes xanthan gum. You can swap the all-purpose flour with 2 cups of gluten-free flour. This will keep your cake light and fluffy. To create a vegan version, replace the eggs with flax eggs. Mix 2 tablespoons of ground flaxseed with 6 tablespoons of water. Let it sit for 5 minutes to thicken. For the buttermilk, use almond milk with a splash of lemon juice. This will help keep your cake moist and tasty. Want to mix it up? You can add spices like ginger or cloves for a warm kick. A teaspoon of each can change the flavor profile. Adding citrus zest, like lemon or orange, brightens the cake. Just a teaspoon makes a big difference. These small changes can make your cake unique and fun! To keep your Apple Cinnamon Streusel Cake fresh, store it in the refrigerator. Place the cake in an airtight container. If you do not have one, cover it well with plastic wrap. This method helps keep the cake moist and tasty. Store it in the fridge for up to five days. If you want to save the cake for later, freezing is a great option. First, let the cake cool completely. Then, slice it into pieces. Wrap each slice in plastic wrap. For extra protection, place the wrapped slices in a freezer bag. Be sure to remove as much air as you can. This way, the cake will stay fresh for up to three months. When you're ready to enjoy, just take out a slice and let it thaw in the fridge. When it’s time to eat your cake, you want it warm and soft. To reheat, preheat your oven to 350°F (175°C). Place the slice on a baking sheet. Cover it with aluminum foil to keep moisture in. Heat for about 10-15 minutes. You can also use the microwave. Place the slice on a microwave-safe plate and heat for about 20-30 seconds. Check to make sure it doesn’t get too hot. Enjoy your warm, delicious cake! Yes, you can use different types of milk. If you don’t have buttermilk, mix 1 cup of milk with 1 tablespoon of lemon juice. Let it sit for five minutes. This mix will work well in the recipe. You can also use almond milk or oat milk for a dairy-free option. Just remember, these changes might alter the flavor slightly. To check if the cake is done, use a toothpick. Stick it in the center of the cake. If it comes out clean or with a few crumbs, it’s ready. This usually takes about 40 to 45 minutes at 350°F. Keep an eye on it during the last few minutes. Every oven is different. Serve the cake warm or at room temperature. You can dust it with powdered sugar for a nice touch. It pairs great with whipped cream or vanilla ice cream. You can also enjoy it with a cup of coffee or tea. This cake is perfect for dessert or a sweet snack. In this post, we covered all you need for making Apple Cinnamon Streusel Cake. I shared the main ingredients, step-by-step instructions, and tips for the best results. You can even adapt the recipe for gluten-free or vegan diets. Remember to store your cake properly to keep it fresh. Feel free to experiment with flavors and toppings, too. Baking should be fun and tasty. Enjoy every bite!

Apple Cinnamon Streusel Cake Irresistible Delight

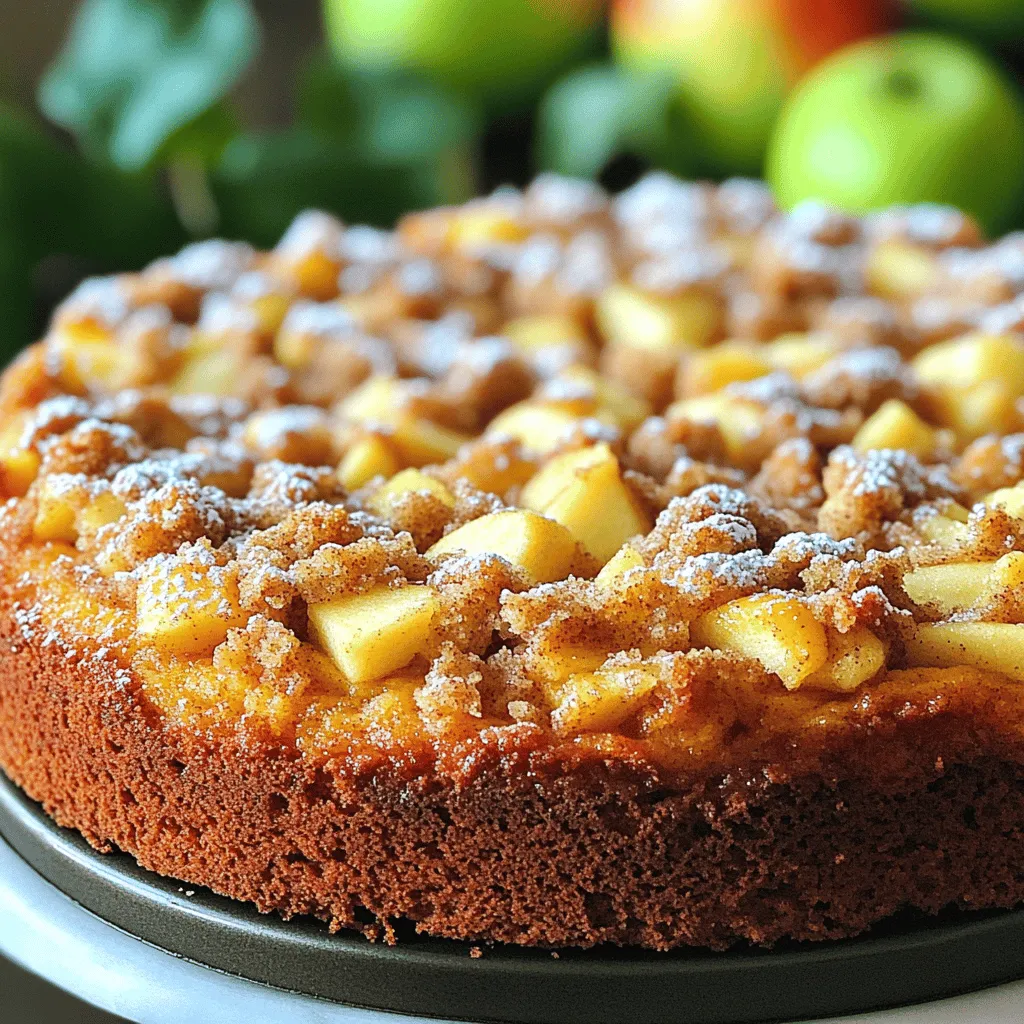
Craving something sweet and warm? Dive into the world of Apple Cinnamon Streusel Cake! This delightful dessert combines soft apples,

Let's dive into the key players of this butternut squash chickpea curry. Each ingredient adds its own magic to the dish. - Butternut squash: This is the star. It brings sweetness and creaminess. - Chickpeas: They add protein and a hearty texture. - Onion: This gives a base of flavor. It makes everything taste better. - Garlic: A must for its strong and savory notes. - Ginger: This spice adds warmth and a bit of zing. - Coconut milk: It creates a rich, creamy sauce. - Spices: Curry powder, cumin, and turmeric bring warmth and depth. - Olive oil: This helps to sauté and adds richness. - Seasoning: A pinch of salt and pepper to enhance all flavors. - Garnish: Fresh cilantro and lime wedges make the dish pop. Each ingredient plays a role in creating a flavorful delight. Choose fresh and good-quality items for the best results. 1. Sautéing the onions Heat a large pot over medium heat. Add one tablespoon of olive oil. Toss in the chopped onion. Cook for about five minutes. The onion should soften and turn slightly golden. 2. Cooking garlic and ginger Next, add two minced garlic cloves and one inch of grated ginger. Stir and cook for one to two minutes. You want the mix to smell fragrant and tasty. 3. Adding butternut squash Now, peel and dice one medium butternut squash. Add it to the pot with the onions, garlic, and ginger. Stir and cook for five minutes. This helps the squash start to soften. 1. Incorporating spices Sprinkle in one tablespoon of curry powder, one teaspoon of cumin, and one teaspoon of turmeric. Stir well to coat the squash in the spices. This adds rich flavor to your dish. 2. Adding coconut milk and chickpeas Pour in one can of coconut milk and add one can of rinsed chickpeas. Mix everything together. The creamy coconut milk will combine with the spices nicely. 1. Simmering the curry Bring the mix to a gentle simmer. Cover the pot and let it cook for about 20 minutes. Stir occasionally to avoid sticking. The butternut squash will become tender and soft. 2. Adjusting seasoning Taste the curry and add salt and pepper to your liking. Adjust the spices as you prefer. It should taste warm and inviting. Serve hot, garnished with fresh cilantro and lime wedges. To ensure the butternut squash is tender, cut it into small, even pieces. This helps it cook evenly. When you cook it, stir often. This way, it won’t stick to the pot. I like to check for doneness by poking it with a fork. It should feel soft but not mushy. Avoid sticking during cooking by using enough olive oil. Heat the oil before adding onions. If you notice sticking, add a splash of water. This can help lift any bits stuck to the pot. For added depth, try using spices like coriander or cinnamon. These can bring a warm flavor that pairs well with the curry. You can also add a pinch of red pepper flakes for heat. Adjust the spice levels to taste. If you prefer a milder curry, start small. You can always add more spice later. Taste as you cook to find the right balance that suits your palate. {{image_2}} You can change up the flavors of your butternut squash chickpea curry by using different veggies. Try sweet potatoes or carrots for a twist. Spinach adds a splash of green and extra nutrition. You can even mix in some bell peppers for added crunch. If you want to add protein, try chicken or shrimp. These options blend well with the curry's spices. You can also use tofu for a meat-free choice. It soaks up the sauce and gives you a hearty bite. This recipe is easy to adjust for different diets. To make it gluten-free, ensure all your spices and coconut milk are labeled gluten-free. Most spices are safe, but it’s good to check. For those who are vegan, this curry already fits the bill! It has no animal products. Vegetarians will enjoy it too, with plenty of plant-based goodness. You can add yogurt on top if you want a creamy touch, but it's not necessary. To keep your butternut squash chickpea curry fresh, store it in airtight containers. This helps keep out air and moisture. Place the curry in the fridge if you plan to eat it within three days. If you want to save it longer, consider freezing it. For freezing, let the curry cool completely. Then, use freezer-safe bags or containers. Label them with the date for easy tracking. This way, you can enjoy the curry for up to three months. When it's time to enjoy your leftovers, reheating correctly is key. The best method is on the stovetop. Pour the curry into a pot and heat it over medium-low heat. Stir it often to prevent sticking. If the curry seems thick, add a splash of water or coconut milk to loosen it. You can also use the microwave for a quick reheat. Place the curry in a microwave-safe bowl. Heat it in short bursts, stirring between each, to warm it evenly. Enjoy your flavorful delight again! How to make butternut squash chickpea curry spicier? To spice up your curry, add more curry powder or cayenne pepper. You can also add diced jalapeños or a pinch of red pepper flakes. Adjust these to your taste. Start with small amounts, then taste and add more if needed. This way, you control the heat level. Can I use frozen butternut squash? Yes, you can use frozen butternut squash. Just make sure to thaw it first. This will help it cook evenly in the curry. It may take a little less time to cook than fresh squash. Keep an eye on it while it simmers. What can I serve with this curry? This curry pairs well with rice, naan, or quinoa. You could also serve it with a fresh salad for a nice crunch. Adding lime wedges on the side gives a burst of flavor when squeezed over the dish. Caloric content and serving details One serving of butternut squash chickpea curry contains about 350 calories. This recipe makes four servings, perfect for sharing or meal prep. The healthy fats from coconut milk add richness without too many extra calories. Health benefits of key ingredients Butternut squash is full of vitamins A and C, which are great for your skin and eyes. Chickpeas provide protein and fiber, helping you feel full longer. Coconut milk adds healthy fats, while spices like turmeric have anti-inflammatory properties. This dish is not only tasty but also good for you! This blog post covered how to make butternut squash chickpea curry. You learned about the key ingredients, preparation steps, and cooking process. I also shared tips for flavor and variations to suit your needs. Plus, I gave storage advice to keep your leftovers fresh. Remember, this dish is versatile and easy to customize. Experiment with different spices and ingredients, and enjoy the rich flavors. You can make a hearty, healthy meal that will delight you and others. Cooking should be fun, so let your creativity shine!

Butternut Squash Chickpea Curry Flavorful Delight

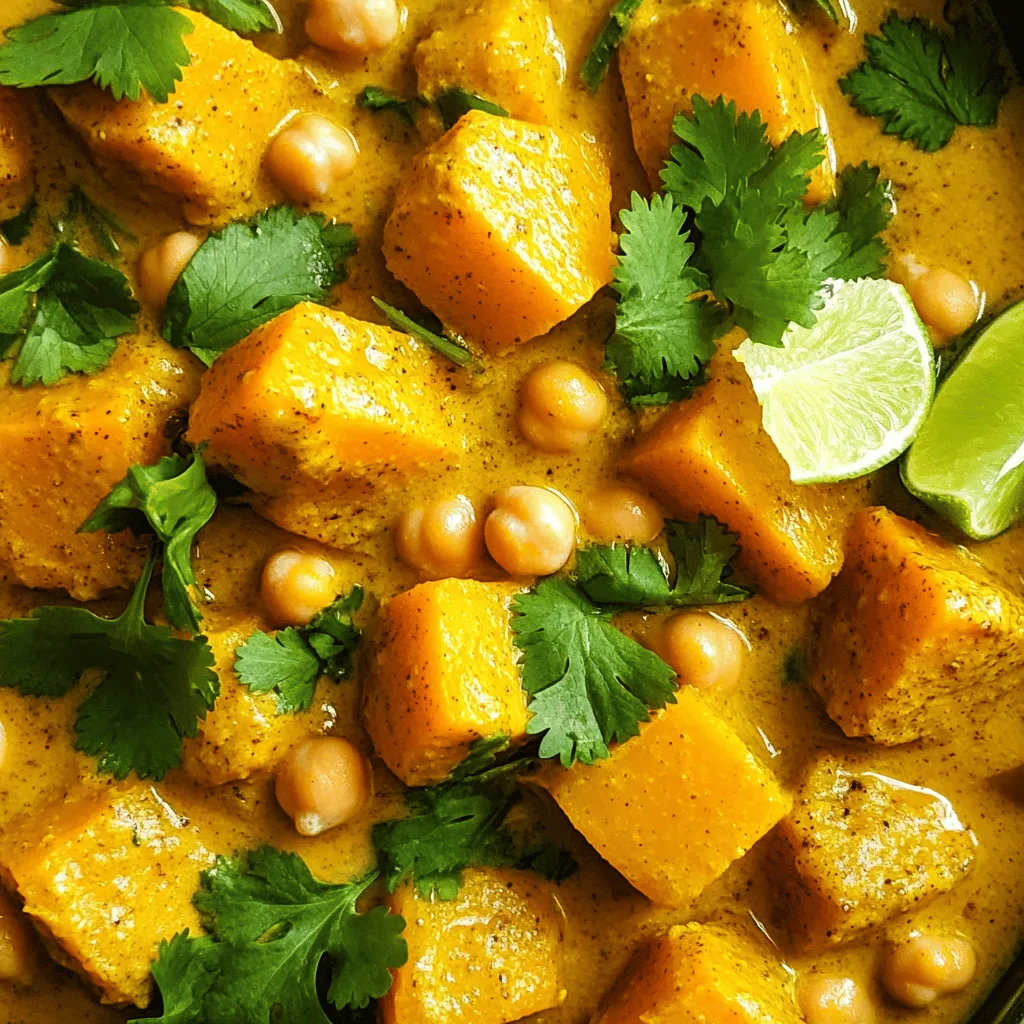
Looking for a warm and comforting dish? You’ll love this Butternut Squash Chickpea Curry! Bursting with flavors, it’s packed with

Older posts
Newer posts
← Previous Page1 … Page28 Page29 Page30 … Page84 Next →

dsad

© 2026 Lisa Dishes • Built with GeneratePress

Our Policies

  • Copyright Policy
  • Cookie Policy
  • GDPR Policy
  • Privacy Policy
  • Disclaimer
  • Terms Of Use

More Information

  • Home
  • About
  • Contact
  • Appetizers
  • Dessert
  • Dinner
  • Drinks
©2026, Lisa Dishes About Back To Top