Skip to content
DisclaimerTerms Of UseGDPR PolicyCookie Policy

Lisa Dishes

  • Home
  • Drinks
  • Appetizers
  • Dinner
  • Dessert
  • About
  • Contact
  • Privacy Policy
DisclaimerTerms Of UseGDPR PolicyCookie Policy

NO-ING-IMG

- 1 lb boneless, skinless chicken breasts, diced - 1 cup orzo pasta - 1 cup sun-dried tomatoes, chopped - 3 cloves garlic, minced - 1 teaspoon dried oregano - 1 teaspoon dried basil - 1/2 teaspoon red chili flakes (optional) - 2 tablespoons olive oil - Fresh parsley, chopped for garnish - Additional vegetables like bell peppers Start by heating 2 tablespoons of olive oil in a large skillet over medium heat. Add 1 pound of diced chicken. Season it with salt and pepper. Cook the chicken for about 5-7 minutes. It should be browned and cooked through. Once done, remove the chicken from the pan and set it aside. This step keeps the chicken juicy and flavorful. In the same pan, add 3 minced garlic cloves and 1 cup of chopped sun-dried tomatoes. Sprinkle in 1 teaspoon of dried oregano, 1 teaspoon of dried basil, and 1/2 teaspoon of red chili flakes for a little heat. Sauté this mix for 2-3 minutes. You want it fragrant and inviting. This step builds a strong flavor base for the dish. Pour in 2 cups of chicken broth and bring it to a simmer. Scrape the bottom of the pan to mix in all the flavors. Now, stir in 1 cup of orzo pasta and return the cooked chicken to the pan. Mix everything well, cover the pan, and let it simmer for about 10 minutes. Stir occasionally until the orzo is al dente and has absorbed most of the broth. Next, reduce the heat to low. Stir in 1 cup of heavy cream and 1 cup of baby spinach. Cook for an additional 3-5 minutes until the spinach wilts and the sauce becomes creamy. Adjust the taste with salt and pepper if needed. Finally, let it sit for a couple of minutes to thicken. Enjoy the rich and creamy flavors! To ensure your chicken is perfectly cooked, choose boneless, skinless chicken breasts. Cut them into small, even pieces. This helps them cook evenly. Sauté the chicken for about 5-7 minutes. Look for a nice brown color. The chicken should reach an internal temperature of 165°F (75°C). For a creamy sauce consistency, add heavy cream after cooking the orzo. Stir gently to combine. Let it simmer on low heat. This helps the cream integrate without curdling. If the sauce is too thick, add a little extra chicken broth. Serve the dish straight from the pan for a rustic feel. This keeps it warm and inviting. Use a large spoon to scoop out portions. For garnishing, sprinkle fresh parsley on top for color. You can also add extra sun-dried tomatoes for flair. A few chili flakes can add a nice touch too. To enhance the flavor, consider adding more spices. A pinch of smoked paprika can bring depth. Fresh herbs like basil or thyme can brighten the dish. You might also add vegetables like bell peppers or zucchini. Sauté them with the garlic and sun-dried tomatoes for extra nutrition. This will make your dish even more colorful and tasty. {{image_2}} You can swap the chicken for shrimp or tofu. Shrimp cooks fast and adds a nice seafood touch. Just sauté it until pink and tender. If you choose tofu, press it first to remove water. Then dice it and sauté until golden for a great texture. Both options work well with the creamy sauce. If you need a gluten-free dish, use gluten-free pasta instead of orzo. Many brands offer great alternatives that taste good. Just make sure to follow the cooking time on the package, as it may differ from regular orzo. This keeps your meal safe and delicious for all. You can change the flavor by adding different herbs and spices. Try thyme or rosemary for a fresh twist. A dash of lemon juice can brighten the dish. You can also use smoked paprika for a deeper taste. Experiment with what you love for a unique touch. To store leftovers, first let the dish cool down. Then, place it in an airtight container. You can keep it in the fridge for up to three days. Make sure to label the container with the date. This way, you will know when to eat it. To reheat this dish and keep it creamy, use a skillet. Add a splash of chicken broth or cream to the pan. Heat over low to medium heat. Stir often to prevent sticking. This will help maintain the creamy texture. You can also microwave it in short bursts, stirring in between. Yes, you can freeze this dish! Cool it completely, then transfer it to a freezer-safe container. Make sure to leave some space for expansion. Seal tightly and label it with the date. It can last up to three months in the freezer. When ready to eat, thaw it in the fridge overnight before reheating. Yes, you can make this dish ahead of time. Cook the chicken and orzo but skip adding the cream and spinach. Let them cool and store in the fridge for up to three days. When you're ready to eat, heat it in a pan. Add the cream and spinach, stirring until warm. This method keeps the dish fresh and creamy. This dish is filling, but sides can enhance your meal. Here are some ideas: - Garlic bread to soak up the sauce - A simple green salad for freshness - Roasted vegetables for added color and flavor - Steamed broccoli or green beans for crunch These sides pair well and add balance to your plate. You can easily modify this dish for diets. To make it dairy-free, swap heavy cream for coconut milk or a dairy-free cream. For low-carb options, use zucchini noodles or cauliflower rice instead of orzo. Adjust the seasonings to keep the flavors bright. These swaps allow everyone to enjoy this tasty meal. This blog post walks you through a tasty dish of creamy sun-dried tomato chicken orzo. We covered key ingredients like chicken, orzo, and seasonings. I shared step-by-step cooking instructions and helpful tips for the best results. You can even try protein swaps or serve it gluten-free. In the end, this dish is easy to make and fun to share. Whether for dinner or a gathering, it's full of flavor and comfort. Enjoy experimenting and making it your own!

Creamy Sun-Dried Tomato Chicken Orzo One Pan Delight

Get ready to whip up a delicious meal with my Creamy Sun-Dried Tomato Chicken Orzo One Pan Delight! This dish

- 2 medium sweet potatoes, peeled and diced - 1 cup red lentils, rinsed - 1 can coconut milk (400ml) Sweet potatoes bring a sweet, creamy flavor. Red lentils add protein and texture. Coconut milk gives a rich, smooth finish. These three work together to create a base that is both hearty and comforting. - Aromatics: 1 large onion, finely chopped - 3 cloves garlic, minced - 1-inch piece ginger, grated - 1 can diced tomatoes (400g) Aromatics kick off the flavor. Onions add sweetness, while garlic and ginger add warmth. Diced tomatoes give a slight acidity, balancing the sweetness of the sweet potatoes. - 2 tablespoons curry powder - 1 teaspoon cumin - 1 teaspoon turmeric - 1 tablespoon olive oil - Salt and pepper to taste Curry powder provides the main flavor. Cumin adds earthiness, and turmeric brings a beautiful color. Olive oil helps sauté the aromatics for rich flavor. Finally, salt and pepper enhance every bite. - Chop and Dice Vegetables Start by peeling and dicing two medium sweet potatoes. Aim for small, even pieces to ensure they cook evenly. Next, finely chop one large onion. You will also need to mince three cloves of garlic and grate a one-inch piece of ginger. These aromatics will add great flavor to your curry. - Rinse Red Lentils Measure one cup of red lentils and rinse them under cold water. This step helps remove any dust or debris. Rinsed lentils will cook better and taste fresher in your dish. - Sauté Aromatics and Cook Spices In a large pot, heat one tablespoon of olive oil over medium heat. Add the chopped onion and sauté for about five minutes. The onion should turn translucent and fragrant. Then, stir in the minced garlic and grated ginger. Cook for one more minute until the mixture is aromatic. It’s time to add two tablespoons of curry powder, one teaspoon of cumin, and one teaspoon of turmeric. Stir well to coat the onions with the spices. - Combine Ingredients and Simmer Toss in the diced sweet potatoes, rinsed red lentils, and one can of diced tomatoes (400g). Mix everything thoroughly. Next, pour in one can of coconut milk and two cups of vegetable broth. Bring this mix to a boil. After that, reduce the heat to a simmer. Cover the pot and let it cook for about 25 to 30 minutes. Stir occasionally. You want the sweet potatoes and lentils to be tender. - Seasoning and Blending Options Once the curry is cooked, season with salt and pepper to taste. If you like a creamier texture, blend some of the curry using an immersion blender. This gives you both smooth and chunky bites. - Serving Suggestions Serve the curry hot in beautiful bowls. Garnish with fresh cilantro for a pop of color. For a complete meal, consider pairing the curry with fluffy basmati rice or warm naan on the side. Enjoy your cozy dish! - How to Avoid Overcooking Lentils To keep lentils firm, watch the cooking time. Red lentils cook fast, usually in about 25 to 30 minutes. Check them often. If they get mushy, it’s too late. The goal is tender but not falling apart. - Achieving the Perfect Curry Texture For a creamy yet chunky curry, blend part of the dish. Use an immersion blender. This makes it smooth while keeping some texture. Stir well to combine blended and whole parts. This balance gives a great mouthfeel. - Ideal Pairings: Rice, Naan Serve this curry with fluffy basmati rice or soft naan. Both soak up the curry sauce well. They add a nice contrast to the dish’s creaminess. You can’t go wrong with either option. - Presentation Tips for Serving Use beautiful bowls to serve your curry. Garnish each bowl with a sprig of fresh cilantro. This not only adds color but also a fresh flavor. Make sure to serve it hot for the best taste. - Spice Variations to Try Add more flavor by varying spices. Try adding chili powder for heat or garam masala for warmth. Experiment with different spices to find your favorite mix. Each change can make the curry unique. - Adding Fresh Herbs Fresh herbs add brightness. Consider stirring in chopped cilantro or mint right before serving. These herbs lift the flavors and make the dish feel fresh and light. {{image_2}} Alternative Vegetables to Use You can swap sweet potatoes for other root veggies. Carrots, parsnips, or even butternut squash work great. These veggies add their own sweet and earthy notes to the curry. Different Types of Lentils Red lentils are my go-to, but you can use green or brown lentils too. Just remember, cooking times may change. Green lentils take longer to cook. They stay firmer and add texture to the dish. Brown lentils blend well into the curry, creating a hearty feel. Vegan and Gluten-Free Options This dish is already vegan and gluten-free. Use vegetable broth for more flavor. Make sure your broth is certified gluten-free if that’s a concern. Adjusting Spice Levels Do you like it spicy? Add more curry powder or a pinch of chili flakes. For a milder taste, reduce the curry powder or skip the chili. Always taste as you go to find the right heat for you. To keep your sweet potato lentil curry fresh, store it in an airtight container. Place the container in the fridge. It lasts about 4 to 5 days. Make sure it cools down before sealing. For freezing, allow it to cool completely. Then, use freezer-safe bags or containers. It can stay good for up to 3 months in the freezer. Label the bags with the date. The best way to reheat curry is on the stove. Pour it into a pot over low heat. Stir it often until it warms evenly. You can also use a microwave. Place it in a microwave-safe bowl. Cover it loosely and heat in short bursts, stirring in between. This way, it keeps its flavor and texture. Always taste before serving to see if it needs more seasoning. How long does Sweet Potato Lentil Curry last in the fridge? Sweet Potato Lentil Curry lasts about 4 to 5 days in the fridge. Store it in an airtight container. The flavors will deepen as it sits, making it even tastier. Can I make this curry in advance? Yes, you can make this curry in advance. It actually tastes better after a day. Make it and let it cool before storing it in the fridge. Can I use yellow or green lentils instead of red? You can use yellow or green lentils, but they cook differently. Red lentils break down and thicken the curry. Yellow and green lentils stay firmer. Is it possible to make this recipe without coconut milk? Yes, you can skip the coconut milk. Use vegetable broth or almond milk instead. This will change the flavor and creaminess but still keep it delicious. How do I make the curry thicker? To thicken the curry, let it simmer longer. You can also blend a portion of it with an immersion blender. This adds creaminess and keeps some texture. What if I do not have all the spices listed? If you lack some spices, don't worry! You can mix and match. Use curry powder and some salt to make a basic flavor. Even without all the spices, it will still taste good. Sweet Potato Lentil Curry is simple and tasty. It uses sweet potatoes, red lentils, and coconut milk as key ingredients. You learned to prepare it with step-by-step instructions, from chopping vegetables to simmering the curry. I shared tips to enhance flavor and suggestions for storing leftovers. Remember, you can adjust the recipe to fit your taste. I hope you feel excited to try new variations! Enjoy your cooking and the delicious meals that follow.

Sweet Potato Lentil Curry Cozy and Comforting Dish

Are you ready to warm up with a delicious bowl of Sweet Potato Lentil Curry? This cozy dish is an

- 8 oz egg noodles or chow mein noodles - 1 lb beef flank steak, thinly sliced against the grain - 2 tablespoons soy sauce (low sodium) - 1 tablespoon oyster sauce - 1 tablespoon cornstarch - 2 tablespoons vegetable oil - 1 bell pepper, sliced (red or green) - 1 large carrot, julienned - 1 cup snow peas or sugar snap peas - 3 green onions, chopped - 2 cloves garlic, minced - 1 inch piece of ginger, minced - Salt and pepper to taste - Sesame seeds for garnish You can add a few ingredients to make your beef chow mein even better. Here are some options: - 1 tablespoon rice wine or sherry for depth - A handful of bean sprouts for crunch - A splash of sesame oil for nuttiness - Chili paste or flakes for heat To make sure your dish is fresh and tasty: - Use fresh vegetables. Look for bright colors and firm textures. - Choose high-quality beef. Look for flank steak that is well-marbled. - Cook your noodles just right. They should be firm but not hard. Overcooked noodles turn mushy. - Always taste as you go. Adjust seasoning to your liking. These tips will help you create a beef chow mein that stands out and impresses! Start by cooking the egg noodles. Follow the package instructions carefully. Once cooked, drain the noodles and rinse them with cold water. This step stops the cooking process and keeps the noodles firm. Set the noodles aside. Next, we need to marinate the beef. Take a medium bowl and add the sliced beef. Pour in the low-sodium soy sauce, oyster sauce, and cornstarch. Mix everything well to coat the beef. Let it sit for at least 15 minutes. This helps the beef absorb all the flavors. Now, let’s stir-fry. Heat one tablespoon of vegetable oil in a large wok or non-stick skillet over high heat. Add the marinated beef in a single layer. Stir-fry for about 2-3 minutes until it turns brown and cooks through. Remove the beef and set it aside. In the same wok, add the remaining tablespoon of oil. Toss in the minced garlic and ginger. Cook for about 30 seconds until you smell the great aroma. Then add the sliced bell pepper, carrot, and snow peas. Stir-fry these for 4-5 minutes until they are tender yet still crisp. Lower the heat and add the cooked noodles and beef back into the wok. Gently toss everything together. Make sure the noodles mix well with the beef and vegetables. Season with salt and pepper to taste. If you want extra flavor, drizzle in a bit more soy sauce. Stir for 1-2 minutes to heat everything through. Now your Beef Chow Mein is ready to serve. Enjoy a meal that's better than takeout! To marinate beef well, use the right mix. I use soy sauce, oyster sauce, and cornstarch. This mix adds taste and helps tenderize the meat. Let the beef sit for at least 15 minutes. If you have more time, let it marinate longer for better flavor. The key is to coat each piece well, so it absorbs all the goodness. For great beef chow mein, cooking at high heat is vital. Use a large wok or skillet for even cooking. Start by heating the oil until it's hot. Add the beef in a single layer. This helps it brown nicely. Don’t overcrowd the pan; cook in batches if needed. Once the beef is done, remove it before cooking the veggies. This keeps the beef tender and juicy. To enhance your chow mein, think about adding extra ingredients. Snow peas add a crisp bite, while bell peppers give color. You can also add mushrooms or bean sprouts for more texture. A touch of sesame oil at the end adds a nice nutty flavor. For a kick, try adding chili sauce or fresh herbs like cilantro. Don’t forget to season with salt and pepper to taste! {{image_2}} You can make this dish without meat. Just swap the beef for tofu or tempeh. Use the same marinade to flavor the tofu. Cut it into cubes and stir-fry until golden. Add all your veggies like bell peppers and carrots. This method keeps it tasty and satisfying. You still get that great chow mein feel without the beef. If you want a gluten-free meal, use rice noodles instead of egg noodles. Check the soy sauce label to ensure it is gluten-free. Tamari is a great option for soy sauce. You can also skip the oyster sauce or find a gluten-free version. With these swaps, you can enjoy chow mein that fits your diet. You can easily change the protein in this dish. Try chicken, shrimp, or even pork. Just remember to adjust the cooking time based on the protein you choose. Chicken cooks faster than beef, while shrimp cooks quickly too. Each option adds a unique flavor to your chow mein, making it fun to experiment. To keep your beef chow mein fresh, place it in an airtight container. Let it cool down first. This helps prevent sogginess. Store it in the fridge for up to three days. For best taste, eat it within this time frame. When you’re ready to enjoy your leftovers, reheat them gently. Use a skillet over medium heat. Add a splash of water or broth to keep it moist. Stir often until it's hot. You can also use the microwave. Heat in short bursts of 30 seconds, stirring in between. If you want to save beef chow mein for later, freezing is a great option. First, let it cool completely. Then, place it in a freezer-safe bag or container. Remove as much air as possible to prevent freezer burn. It will stay good for about three months. To thaw, move it to the fridge overnight before reheating. To make beef chow mein less oily, use less oil when cooking. Start with one tablespoon instead of two. You can also drain excess oil after stir-frying. Another tip is to cook your beef in small batches. This method helps keep the meat from steaming in oil. You can also use leaner cuts of beef, like sirloin. They have less fat than flank steak. Lastly, choose low-sodium sauces. They often have less oil, which helps cut down on grease. Yes, you can use other noodles. Egg noodles work well if you can't find chow mein noodles. Rice noodles are also a great option. They give a different texture and taste. If you want something healthier, try using zucchini noodles. They add a fresh crunch and are low in carbs. Just remember to adjust cooking times based on the noodle type you choose. The secret to restaurant-style chow mein is high heat and quick cooking. Use a wok for the best results. A hot wok helps the ingredients cook fast and keeps them crisp. Also, marinate your beef well. This adds flavor and tenderness. Fresh veggies, cut into thin strips, also help. They cook evenly and stay crunchy. Lastly, finish with a drizzle of sesame oil for that authentic taste. In this post, I covered key ingredients for beef chow mein, with tips for quality. I shared step-by-step instructions and cooking tricks to enhance flavor. You can try variations like vegetarian or gluten-free options too. Lastly, I explained how to store and reheat leftovers effectively. These tips will help you create tasty meals at home. With practice, your chow mein will rival the best restaurants. Enjoy cooking and tasting your delicious creations!

Beef Chow Mein Better Than Takeout Simple Recipe

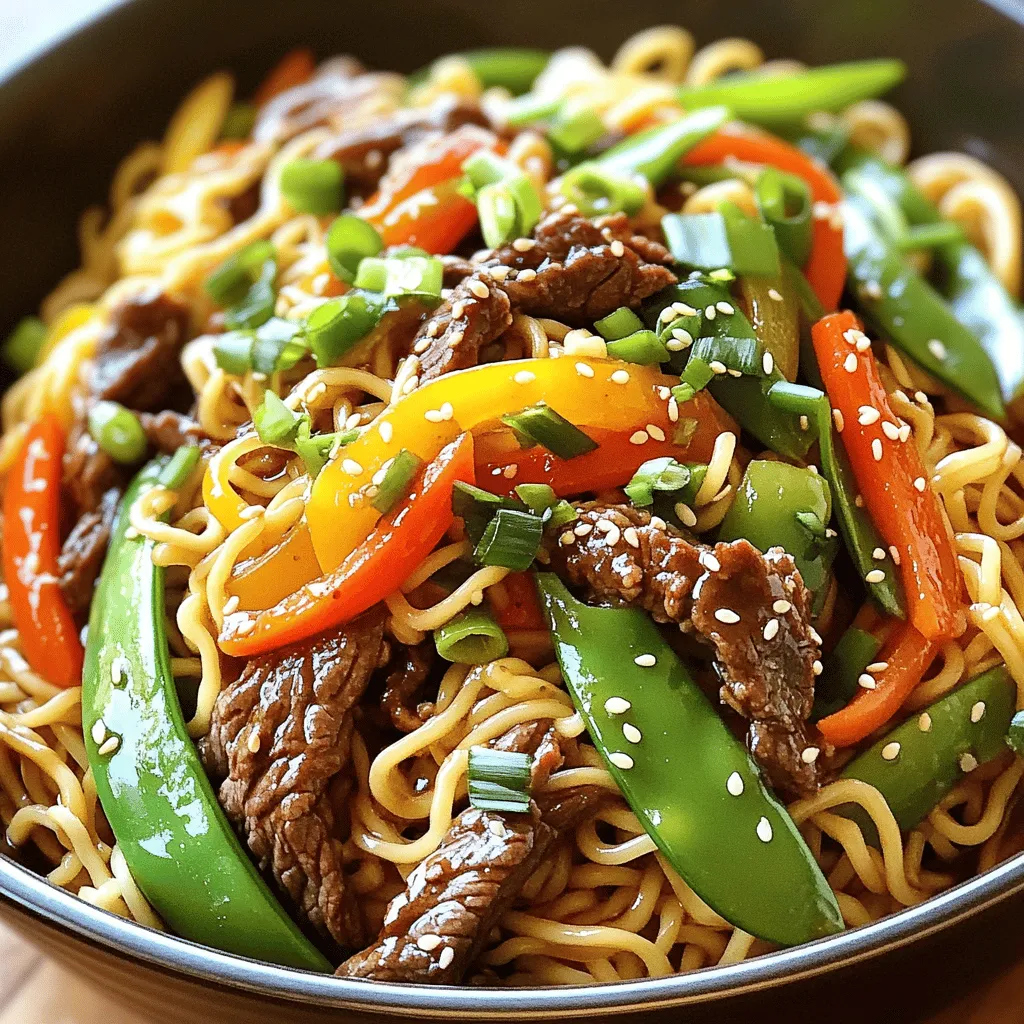
Are you tired of takeout that never quite lives up to your expectations? This Beef Chow Mein recipe will change

To make these tasty Pumpkin Streusel Muffins, you will need: - 1 ½ cups all-purpose flour - 1 cup canned pumpkin puree - ½ cup brown sugar, packed - ½ cup granulated sugar - 1/3 cup vegetable oil - 2 large eggs - 1 teaspoon vanilla extract - 1 teaspoon baking powder - ½ teaspoon baking soda - ½ teaspoon salt - 1 teaspoon ground cinnamon - ½ teaspoon ground nutmeg - ½ teaspoon ground ginger - ½ cup chopped pecans (optional) For the Streusel Topping: - ½ cup all-purpose flour - ¼ cup brown sugar, packed - ¼ cup rolled oats - ½ teaspoon ground cinnamon - ¼ cup cold butter, diced You can swap out some items if needed. Try these: - Use whole wheat flour for a heartier muffin. - Applesauce can replace vegetable oil for less fat. - Maple syrup works great instead of brown sugar. - If you don’t have pecans, walnuts or almonds are tasty too. Feel free to play with flavors! Here are some ideas: - Add chocolate chips for a sweet twist. - Dried cranberries or raisins can add a nice chew. - Mix in fresh ginger for a zesty kick. - Top with a drizzle of icing for extra sweetness. These ingredients and options will help you create scrumptious muffins that everyone will love! To make the muffin batter, start by preheating your oven to 350°F (175°C). Line your muffin tin with paper liners or lightly grease it. In a large bowl, whisk together 1 cup of canned pumpkin puree, ½ cup of packed brown sugar, ½ cup of granulated sugar, 1/3 cup of vegetable oil, 2 large eggs, and 1 teaspoon of vanilla extract. Mix until smooth. In another bowl, sift together 1 ½ cups of flour, 1 teaspoon of baking powder, ½ teaspoon of baking soda, ½ teaspoon of salt, 1 teaspoon of ground cinnamon, ½ teaspoon of ground nutmeg, and ½ teaspoon of ground ginger. Gradually add this dry mix to the wet ingredients. Stir until just combined. If you like, fold in ½ cup of chopped pecans for a nice crunch. Next, let’s make the streusel topping. In a small bowl, mix together ½ cup of flour, ¼ cup of packed brown sugar, ¼ cup of rolled oats, and ½ teaspoon of ground cinnamon. Then, add ¼ cup of cold diced butter. Use your fingers or a fork to blend it all together. You want to achieve a texture that looks like coarse crumbs. When filling the muffin tins, scoop the batter in until each cup is about two-thirds full. Do not overfill! Sprinkle the streusel topping generously over each muffin. Bake in the preheated oven for 18-20 minutes. To check if they are done, insert a toothpick into the center of a muffin. It should come out clean. Once baked, let the muffins cool in the tin for 5 minutes. Then, move them to a wire rack to cool completely. Enjoy the warm muffins with honey or maple syrup for a treat! To keep your muffins fresh, store them in an airtight container. This helps lock in moisture. If you plan to eat them within a few days, leave them at room temperature. For longer storage, refrigerate them. You can also freeze muffins for up to three months. Just wrap them well in plastic wrap. If you live at a high altitude, reduce the baking powder by 1/4 teaspoon. This small change helps your muffins rise properly. In humid areas, you may need to add a little more flour. This will help balance the moisture in the air. Test the batter for the right thickness before baking. Serve these muffins warm for the best taste. They pair well with honey or maple syrup drizzled on top. A cup of hot coffee or tea makes a great match too. For a cozy touch, arrange muffins on a wooden board. Add fresh rosemary for a pretty look. Enjoy them at breakfast or as a tasty snack! {{image_2}} You can make these muffins gluten-free easily. Use a 1-to-1 gluten-free flour mix instead of all-purpose flour. This mix helps keep the texture light and fluffy. Check the package for the right measurements. Your muffins will still taste great! To make vegan muffins, swap the eggs for flax eggs. Mix one tablespoon of ground flaxseed with three tablespoons of water. Let it sit for five minutes to thicken. Use plant-based oil instead of vegetable oil. Replace butter in the streusel with coconut oil or vegan butter. Your friends will love these! You can add fun flavors to your muffins. Try mixing in chocolate chips for a sweet twist. Dried cranberries or raisins add nice texture and flavor. For a nutty crunch, add chopped walnuts or almonds. You can even add a hint of orange zest for a fresh taste. Explore different ideas to find your favorite! To keep your muffins fresh, place them in an airtight container. Line the container with paper towels to absorb moisture. This helps prevent sogginess. Store them at room temperature for up to three days. If you want them to last longer, try refrigerating them. Just remember that refrigeration can change their texture. Freezing muffins is a great way to save some for later. First, cool the muffins completely. Then, wrap each muffin tightly in plastic wrap. Place the wrapped muffins in a freezer bag. Be sure to remove as much air as possible. You can freeze them for up to three months. When you’re ready to enjoy, just take out what you need. Reheating muffins helps restore their warmth and taste. For best results, use the oven. Preheat your oven to 350°F (175°C). Place the muffins on a baking sheet for about 5 to 10 minutes. You can also microwave them. Just heat for 15 to 20 seconds. Enjoy your warm, tasty muffins! Pumpkin streusel muffins stay fresh for about 3 to 5 days. Store them in an airtight container at room temperature. This keeps them soft and tasty. If you want to keep them longer, freeze them for up to 3 months. Just make sure to wrap each muffin well in plastic wrap before placing them in a freezer bag. Yes, you can make the batter ahead of time. Prepare the batter and place it in the fridge for up to 24 hours. When you're ready to bake, just fill the muffin tin and add the streusel topping. This is a great way to save time on busy mornings or gatherings. If you can't find pumpkin puree, use mashed sweet potatoes or butternut squash. Both options give a similar texture and flavor. You can also use applesauce for a different twist. Just make sure to adjust the spices to keep the taste balanced. You learned how to make delicious pumpkin streusel muffins. We covered essential ingredients, substitutions, and tasty add-ins. The step-by-step guide taught you to prepare the batter and make the streusel. I shared tips for storing muffins and cooking at different altitudes. You can even try gluten-free or vegan versions! Enjoying these muffins is easy, and they stay fresh for days. Now, get baking and delight your friends and family with a cozy treat!

Pumpkin Streusel Muffins Bakery Fresh and Tasty Treats

Welcome to the wonderful world of pumpkin streusel muffins! These tasty treats are perfect for chilly mornings or cozy gatherings.

To make these delicious chocolate covered strawberry cups, you need a few key ingredients: - 1 cup dark chocolate chips - 2 cups fresh strawberries, hulled and halved - 1 cup granola or crushed graham crackers - 1/2 cup whipped cream or coconut cream - 1 teaspoon vanilla extract - Sea salt for garnish (optional) Each ingredient plays a role in creating the perfect flavor and texture. The dark chocolate brings a rich taste, while the strawberries add freshness. The granola or graham crackers give a nice crunch. The whipped cream adds creaminess, and the vanilla enhances the overall flavor. You can customize these cups to fit your taste. Here are some optional ingredients: - Milk chocolate or white chocolate chips - Other berries like raspberries or blueberries - Chopped nuts such as almonds or walnuts - Different extracts like almond or mint These options let you mix flavors and find what you love best. Feel free to experiment! Having the right tools makes the process easier. Here’s what you need: - Microwave-safe bowl for melting chocolate - Silicone muffin cups or paper cupcake liners - Spoon for spreading chocolate - Mixing bowl for whipped cream - Refrigerator for chilling Using these tools helps ensure your cups come out just right. With everything ready, you can start your sweet journey! Start by measuring 1 cup of dark chocolate chips. Place them in a microwave-safe bowl. Heat the chocolate in 30-second bursts. After each burst, stir the chocolate. This keeps it from burning. Your goal is smooth, melted chocolate. If it’s still lumpy, heat for a few more seconds. Be careful not to overheat. Grab your silicone muffin cups or paper cupcake liners. Spoon a bit of melted chocolate into each cup. Use the back of a spoon to spread it. Cover the sides well to form a cup shape. Make sure the bottom has enough chocolate too. Once done, place the cups in the fridge. Chill them for about 10 to 15 minutes until firm. After the chocolate has set, take the cups out of the fridge. Add a layer of granola or crushed graham crackers. This layer goes at the bottom of each cup. Press the granola down gently to make it firm. Next, place the halved strawberries on top. Arrange them nicely to make it pretty. In a separate bowl, mix the whipped cream with 1 teaspoon of vanilla extract. Spoon or pipe this cream over the strawberries. For a final touch, drizzle some leftover chocolate over the cream. If you like, sprinkle a pinch of sea salt on top. This adds flavor and looks great. Chill the cups again for 10 minutes to set everything. To melt chocolate well, use a microwave-safe bowl. Heat dark chocolate chips in 30-second bursts. Stir the chocolate after each burst. This helps it melt evenly. Watch closely, as chocolate can burn quickly. If you see any lumps, keep stirring. The heat from the melted chocolate will smooth it out. You want it to be silky and glossy. To make great cups, use silicone muffin cups or paper liners. Start by adding a spoonful of melted chocolate to each cup. Use the back of a spoon to spread the chocolate up the sides. This creates a nice cup shape. Make sure the chocolate is thick enough to hold its shape. Chill the cups in the fridge for about 10-15 minutes. This helps them set firmly. You can boost the flavor with fun add-ins. For example, mix in some crushed nuts or a sprinkle of sea salt. Add a dash of cinnamon for warmth. You can also use flavored whipped cream. Vanilla extract adds a nice touch. Feel free to experiment with your favorite flavors. Each add-in can change the taste in a fun way. {{image_2}} You can change the flavor of your Chocolate Covered Strawberry Cups easily. Try using other fruits like raspberries or blueberries. They add a fresh twist. Nuts also work well. Chopped almonds or walnuts can give a nice crunch. Mix and match your favorites. The options are endless. Toppings can make your cups even better. Try adding crushed cookies, like Oreos or Digestives, for extra texture. You can also use a drizzle of caramel or white chocolate for a sweet touch. Shredded coconut adds a tropical vibe too. Get creative with what you have at home. Making these cups vegan is simple. Use dairy-free chocolate chips and coconut cream instead of whipped cream. For gluten-free options, make sure to use gluten-free granola or graham crackers. These easy swaps keep your dessert tasty and friendly for all diets. Enjoy your healthy treats without worry! To keep your chocolate covered strawberry cups fresh, store them in an airtight container. This helps prevent them from drying out or absorbing other smells from your fridge. Place a piece of parchment paper between layers if you stack them. This keeps them looking pretty and intact. These delightful cups last up to 3 days in the fridge. They taste best when fresh, but you can freeze them for up to a month. To freeze, place the cups in a single layer on a tray. Once frozen, move them to a freezer-safe bag. This keeps them safe from freezer burn. You won’t need to reheat these cups, as they are best enjoyed cold. If you prefer a softer texture, let them sit at room temperature for about 10-15 minutes before serving. This way, the chocolate can get a bit melty and the flavors can shine. Yes, you can use milk chocolate. It will give a sweeter taste. Just melt it the same way you would with dark chocolate. The cups will still be yummy and fun! These cups need to chill for about 10-15 minutes after you coat them with chocolate. After adding the other layers, chill again for another 10 minutes. This helps everything set nicely. Yes, you can make these cups a day before you plan to serve them. Just store them in the fridge. They will taste great and stay fresh! If you want a different topping, you can use coconut cream or a dairy-free option. You can also try yogurt or a non-dairy whipped topping. Each will add its own nice flavor! In this post, we explored how to make chocolate-covered strawberry cups. We covered essential ingredients, step-by-step instructions, and tips for success. You learned about fun variations and how to store your tasty treats. These cups are easy to make and can delight anyone. Get creative with flavors and toppings to match your taste. Try these tips, and you will impress friends and family with your skills. Enjoy your delicious creations!

Chocolate Covered Strawberry Cups No Bake Delight

Welcome to Chocolate Covered Strawberry Cups No Bake Delight! If you crave a sweet treat that’s easy to make and

- 2 medium zucchinis, cut into fry shapes - 1 cup panko breadcrumbs - ½ cup grated Parmesan cheese - 1 teaspoon garlic powder - 1 teaspoon onion powder - 1 teaspoon dried oregano - 2 large eggs - Salt and pepper to taste - Olive oil spray Using fresh ingredients makes a big difference. Fresh zucchinis have better flavor and texture. They help the fries taste amazing. When you use fresh cheese, it melts perfectly and adds rich flavor. Always check for quality when buying. This will make your zucchini fries the best they can be. You can switch out some ingredients if needed. If you want a different cheese, try mozzarella or cheddar. For a gluten-free option, use gluten-free breadcrumbs instead of panko. You can also add spices like paprika for a kick. Want more flavor? Toss in some herbs like thyme or basil. These changes let you customize your fries and make them your own. {{ingredient_image_1}} Start with two medium zucchinis. Cut them into fry shapes. Aim for even sizes for cooking. The more uniform they are, the better they cook. This helps them turn crispy all over. Grab a shallow bowl for the breading. Combine 1 cup of panko breadcrumbs and ½ cup of grated Parmesan cheese. Add 1 teaspoon of garlic powder, 1 teaspoon of onion powder, and 1 teaspoon of dried oregano. Mix them well. Add salt and pepper to taste. Make sure the mix is even and ready for the zucchini. In a separate bowl, whisk 2 large eggs until beaten. Dip each zucchini fry into the egg mixture. Let any extra egg drip off. Now, roll the fry in the breadcrumb mixture. Press gently so the crumbs stick well. This step is key for a crispy finish. Place the coated fries on a lined baking sheet in a single layer. Preheat your oven to 425°F (220°C). Before baking, lightly spray the tops of the fries with olive oil spray. This helps them crisp up nicely. Bake for 20 to 25 minutes. Flip them halfway through for even cooking. They should be golden brown and crispy when done. After baking, let them cool slightly before serving. Enjoy your tasty and healthy snack! To make your zucchini fries super crispy, follow these steps. First, use panko breadcrumbs. They are lighter and crunchier than regular breadcrumbs. Make sure to spray the fries with olive oil. This helps create that golden, crispy layer. Bake them at a high temperature, 425°F (220°C), for the best results. Flipping them halfway through baking also helps both sides crisp up nicely. If you have leftovers, store them in an airtight container. Keep them in the fridge for up to three days. To keep them crispy, avoid stacking them. If you want to reheat them, use the oven. This keeps them from getting soggy. Just pop them back in at 350°F (175°C) for about 10 minutes. These zucchini fries shine when served hot. Pair them with tasty dips. Marinara sauce adds a nice tang. Creamy ranch dressing offers a cool contrast. You can even try a spicy aioli for a kick. Serve them at parties or enjoy them as a snack. They are sure to please everyone! Pro Tips Use Fresh Zucchini: For the best flavor and texture, opt for firm, fresh zucchinis. Avoid any that are soft or have blemishes. Customize the Coating: Experiment with different spices or herbs in the breadcrumb mixture to suit your taste. Paprika or Italian seasoning can add a nice touch. Keep it Single Layered: Ensure the zucchini fries are spread out in a single layer on the baking sheet to promote even cooking and crispiness. Serve Immediately: For the best crunch, serve the zucchini fries right after baking. They tend to lose their crispiness if left out too long. {{image_2}} To make cheesy zucchini fries, add more cheese! Mix in 1 cup of shredded mozzarella with the panko and Parmesan. This will create a gooey, cheesy center. The extra cheese melts and makes the fries even more delicious. You can also sprinkle some extra cheese on top before baking. This gives your fries a nice, golden crust. If you love heat, try spicy zucchini fries! Add 1 teaspoon of chili flakes to the breadcrumb mixture. This will give your fries a nice kick. You can adjust the heat by adding more or less chili flakes. Pair these spicy fries with a cool ranch dip to balance the flavors. It makes for a fun and bold snack. Want gluten-free zucchini fries? Simply swap the panko breadcrumbs for gluten-free breadcrumbs. You can also use crushed cornflakes for a crunchy texture. These options still provide the same great taste. Just be sure to check the labels to ensure they are gluten-free. Enjoy your crispy fries without worry! If you have extra zucchini fries, store them in the fridge. Place them in an airtight container. They stay fresh for up to 3 days. Make sure they cool down before sealing the container. This helps keep them crispy. To reheat your fries, use the oven for best results. Preheat your oven to 375°F (190°C). Spread the fries on a baking sheet. Heat for about 10-15 minutes. This method revives their crunch. You can also use an air fryer. Just set it to 350°F (175°C) and heat for 5-7 minutes. You can freeze zucchini fries too! First, let them cool completely. Then, place them in a single layer on a baking sheet. Freeze for about 1-2 hours. Once frozen, transfer them to a freezer bag. They can stay in the freezer for up to 3 months. Just remember to bake them straight from the freezer. No need to thaw! To make zucchini fries crispy, follow these steps. First, cut the zucchini into fry shapes. The thinner you slice them, the crispier they get. Next, use panko breadcrumbs. They add a nice crunch. Mix in grated Parmesan cheese, garlic powder, onion powder, and oregano for flavor. The egg wash helps the coating stick. After coating, spray the fries lightly with olive oil. Bake at 425°F for 20-25 minutes. Flip halfway through for even crisping. Yes, you can use other types of cheese. Cheddar, mozzarella, or a mix can work well. Each cheese adds a different taste. If you prefer a stronger flavor, try aged cheeses like Pecorino Romano. Just remember to adjust the salt since some cheeses are saltier than Parmesan. Zucchini fries pair well with many dips. Marinara sauce is a classic choice. It adds a nice, tangy flavor. You could also use creamy ranch dressing for a cool contrast. Other great options include spicy mayo or tzatziki. Feel free to get creative! In this blog post, I shared a simple way to make tasty zucchini fries. We covered the key ingredients, the importance of freshness, and some fun variations. You learned how to achieve crispy fries and store them well. Using fresh ingredients makes a big difference in taste. Experiment with different cheeses and dips for fun. Enjoy making these fries for a healthy snack!

Crispy Parmesan Zucchini Fries Healthy and Tasty Snack

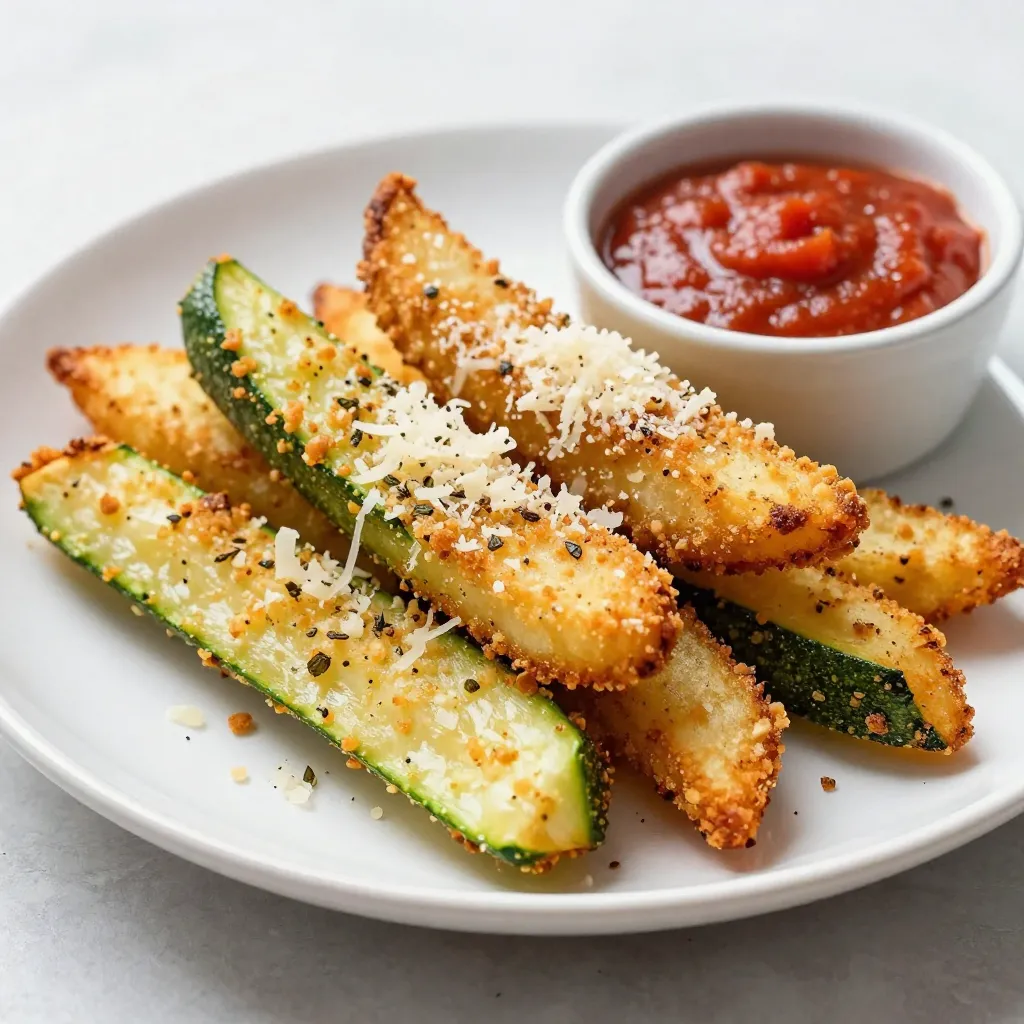
Are you ready to enjoy a snack that’s both crispy and healthy? These Crispy Parmesan Zucchini Fries make a perfect

To make Air Fryer Garlic Butter Shrimp Tacos, you need fresh and simple ingredients. Here’s the list: - 1 pound large shrimp, peeled and deveined - 4 tablespoons unsalted butter, melted - 4 garlic cloves, minced - 1 teaspoon smoked paprika - 1 teaspoon chili powder - Salt and pepper to taste - 1 tablespoon fresh lime juice - 8 small corn or flour tortillas - 1 cup shredded red cabbage - 1 avocado, sliced - Fresh cilantro, for garnish - Lime wedges, for serving These ingredients work together to create a tasty meal. The large shrimp provide a juicy base, while the garlic and butter add rich flavor. Smoked paprika and chili powder give a mild kick. Fresh lime juice brightens the dish, making it perfect for tacos. Using shredded cabbage adds crunch, and the creamy avocado balances the flavors. Don’t forget the cilantro for a fresh touch! Lime wedges on the side help enhance the taste even more. This combination makes every bite a delightful experience. First, gather your ingredients. In a large bowl, combine 4 tablespoons of melted butter, 4 minced garlic cloves, 1 teaspoon of smoked paprika, 1 teaspoon of chili powder, and salt and pepper to taste. Mix well to create a rich marinade. Next, add 1 pound of peeled and deveined shrimp to the bowl. Toss the shrimp gently until they are fully coated in the marinade. Let the shrimp marinate for about 15-20 minutes to soak up all those delicious flavors. Now it's time to bring out your air fryer. Preheat it to 400°F (200°C). Once it’s hot, place the marinated shrimp in the air fryer basket in a single layer. Cook the shrimp for 6-8 minutes. Remember to shake the basket halfway through for even cooking. The shrimp will turn pink and cook through perfectly. While the shrimp cooks, warm 8 small corn or flour tortillas. You can do this in a skillet over medium heat or in the microwave for about 30 seconds. Once warmed, layer shredded red cabbage in each tortilla first. Then, add a few pieces of your delicious shrimp. Top each taco with sliced avocado, fresh cilantro, and a squeeze of lime juice. Enjoy this vibrant and tasty meal! To avoid overcooking shrimp, keep a close eye on the timer. Shrimp cook quickly. They turn pink and curl when done, which takes about 6-8 minutes in the air fryer. You can also shake the basket halfway through cooking. This helps cook them evenly. Preheating the air fryer is very important. It ensures the shrimp cook at the right temperature right away. Preheating to 400°F (200°C) gives the best results. A hot fryer cooks shrimp quickly and perfectly. For a vibrant look, serve the tacos on a colorful platter. Add lime wedges and extra cilantro for a fresh touch. You can also include a bowl of your favorite salsa on the side. Salsa adds flavor and color to your meal. Recommended sides for these tacos include black beans and rice. These pair well and make your meal more filling. You can also serve a light salad or corn on the side for a refreshing crunch. For leftovers, it is best to store shrimp and taco components separately. This keeps the shrimp from making the tortillas soggy. Place shrimp in an airtight container in the fridge. They will last for about 1-2 days. Wrap the tortillas in foil or keep them in a separate bag. Shredded cabbage and toppings like avocado should also be stored separately. This way, you can enjoy fresh tacos later! {{image_2}} You can switch up the shrimp for chicken or fish. Both options cook well and soak up flavors nicely. Use the same marinade to keep things simple. For a vegetarian twist, try grilled veggies. Bell peppers, zucchini, and mushrooms add great taste and texture. Want some heat? Add jalapeños or your favorite hot sauce. This kicks up the flavor and spice level. You can also experiment with different herbs. Cilantro, parsley, or even dill can change the dish’s profile. Trust your taste buds and have fun with it! Try serving the shrimp as a salad bowl instead of in tortillas. Just layer the cabbage and shrimp in a bowl and add toppings. This makes a fresh and light meal. You can also use different types of tortillas or wraps. Flour, corn, or even lettuce wraps can change the vibe of your dish. You should marinate the shrimp for about 15 to 20 minutes. This time allows the shrimp to soak up the flavors from the garlic, butter, and spices. If you marinate too long, the shrimp may become mushy. Yes, you can make some parts in advance. You can marinate the shrimp a few hours ahead. However, cook the shrimp just before serving for the best taste. You can also prep the toppings like cabbage and avocado ahead of time. Some great sides include: - Mexican rice - Black beans - Grilled corn - A fresh salad - Chips with salsa or guacamole These sides pair well and add extra flavor to your meal. Absolutely! Use corn tortillas instead of flour tortillas. Always check labels to ensure they are certified gluten-free. This way, everyone can enjoy these tasty tacos without worry. - Try air fryer chicken wings for a crispy treat. - Explore air fryer roasted vegetables for a healthy side. - Check out shrimp scampi for a quick pasta dish. - Discover spicy shrimp skewers for your next grill night. - I recommend the Philips Air Fryer for even cooking. - The Ninja Foodi is great for multi-use cooking. - Use a sturdy cutting board and knife for prep. - Have a mixing bowl ready for marinating shrimp. - Keep a set of measuring spoons for accurate flavoring. - Watch this video to see the shrimp tacos in action. - Get tips from me on perfecting the shrimp cooking time. - Learn how to make your tacos look amazing on a plate. These shrimp tacos are easy to make and packed with flavor. We covered the tasty ingredients, step-by-step cooking, helpful tips, and fun variations. Whether you stick to shrimp or try chicken or veggies, these tacos can adapt to your taste. Enjoying them fresh with lime and toppings makes each bite special. Now go ahead, try this simple recipe, and impress your friends and family with your cooking skills!

Air Fryer Garlic Butter Shrimp Tacos Flavorful Delight

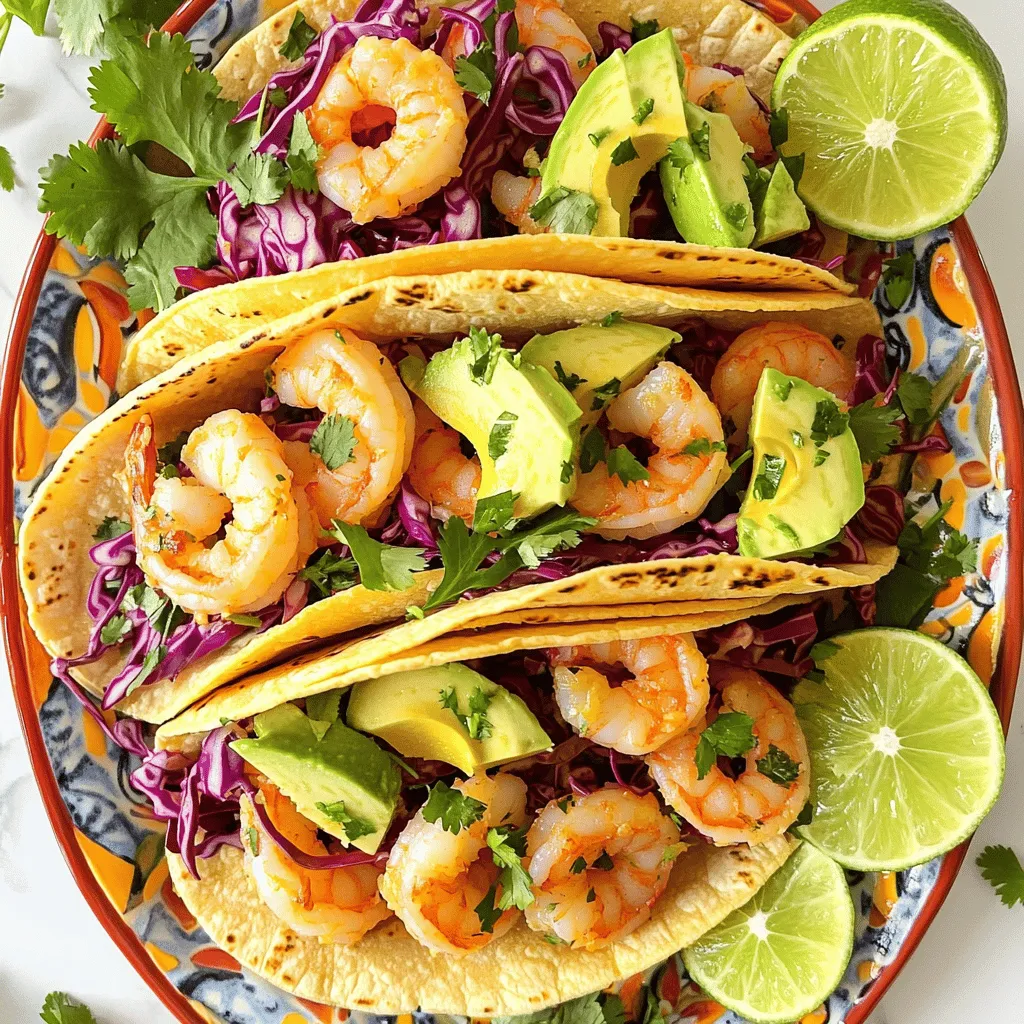
Are you ready for a zesty twist on taco night? Let me introduce you to Air Fryer Garlic Butter Shrimp

- 2 medium apples, peeled, cored, and sliced - 1 teaspoon cinnamon - 1/2 cup brown sugar - 1/4 cup unsalted butter, melted - 1 1/2 cups all-purpose flour - 1 teaspoon baking powder - 1/2 teaspoon baking soda - 1/4 teaspoon salt - 1/2 cup granulated sugar - 1/2 cup milk - 1/4 cup vegetable oil - 1 large egg - 1 teaspoon vanilla extract - Powdered sugar for dusting - Extra caramel sauce for drizzling For these caramel apple upside down muffins, fresh apples bring flavor and moisture. I love using crisp, sweet apples. They add a nice bite to the muffins. Brown sugar and butter create a sweet and sticky base. This is what makes the muffins upside down! The baking ingredients are key to a fluffy muffin. The all-purpose flour gives structure. The baking powder and baking soda make the muffins rise. Mixing these with salt balances the sweetness. Optional toppings can elevate your muffins. A dusting of powdered sugar adds charm. Drizzling with caramel sauce makes them even more decadent. You can customize these muffins to suit your taste. First, set your oven to 350°F (175°C). This helps bake the muffins evenly. Next, line a muffin tin with paper liners. If you don’t have them, grease the tin with non-stick spray. This step keeps the muffins from sticking. Make sure to cover each cup well so they pop out easily later. In a small bowl, mix melted butter and brown sugar. Stir until the mix is smooth. This will be the sweet base for your muffins. Spoon about one tablespoon into each muffin cup. Next, take your apple slices and place them over the brown sugar mix. Spread them out well. Sprinkle a bit of cinnamon over the apples for extra flavor. This adds warmth and depth to the muffins. Grab a large mixing bowl and whisk together the flour, baking powder, baking soda, and salt. This creates the dry mix for your muffins. In another bowl, combine granulated sugar, milk, vegetable oil, egg, and vanilla extract. Whisk until everything is well mixed. Slowly pour the wet mix into the dry mix. Stir gently until just combined. Be careful not to overmix, as this makes the muffins tough. Now, spoon the muffin batter over the apple slices in each cup. Fill each cup about three-quarters full. This allows the muffins to rise without spilling over. Place the muffin tin in the oven and bake for 18-20 minutes. Check if they are done by inserting a toothpick into the center. If it comes out clean, the muffins are ready. Once baked, let them cool for about five minutes in the pan. Carefully invert them onto a serving plate. Let them cool slightly before serving. Enjoy your sweet treat! - Use fresh apples for the best flavor. - Don’t peel the apples too far in advance. They can brown quickly. - Mix wet and dry ingredients gently. This keeps your muffins light and fluffy. - Fill each muffin cup three-quarters full. This helps them rise perfectly. - Keep an eye on your oven temperature. An oven thermometer can help. - Overmixing the batter will make your muffins tough. Mix just until combined. - Skipping the cinnamon can lead to bland muffins. It adds a sweet touch. - Forgetting to grease the muffin tin can cause sticking. Always line or grease it. - Not checking doneness can lead to raw centers. Use a toothpick for best results. - Cooling the muffins too long in the pan can make them soggy. Invert them soon. - A good muffin tin ensures even baking. Choose a non-stick or silicone one. - Use a mixing bowl that is large enough for all ingredients. This helps with mixing. - A whisk is great for blending wet and dry ingredients smoothly. - An ice cream scoop helps to portion the batter evenly. This makes for uniform muffins. - A toothpick is essential for checking your muffins. It tells you when they are done. {{image_2}} You can easily make these muffins your own. Adding nuts or dried fruit gives a fun twist. Try walnuts or pecans for crunch. They add a nice texture. You can also use raisins or dried cranberries for sweetness. Just fold in about half a cup of your choice into the batter. This small change makes a big difference. Spices can change the flavor of your muffins. While cinnamon is great, try nutmeg or ginger. These spices bring warmth and depth. For a unique flavor, mix in pumpkin pie spice or cardamom. Just one teaspoon of a new spice can create a fresh taste. Experiment with these options to find your favorite. If you need gluten-free muffins, it’s simple to adjust. Use a gluten-free flour blend instead of all-purpose flour. These blends often work well without changing the taste. Make sure your baking powder is gluten-free too. You can still enjoy these muffins without the gluten. Just follow the same recipe and enjoy! To keep your Caramel Apple Upside Down Muffins fresh, store them in an airtight container. This helps keep the muffins moist. Place them on the counter for up to three days. If you want to keep them longer, the fridge is a good option. Just make sure to wrap them well. You can freeze these muffins for later. First, let them cool completely. Then, wrap each muffin in plastic wrap. Place the wrapped muffins in a freezer bag. This way, they will stay fresh for up to three months. When you're ready to eat them, just take out what you need. To enjoy your muffins warm, use the oven or microwave. For the oven, preheat to 350°F (175°C). Place the muffins on a baking sheet for about 10 minutes. If you use the microwave, heat each muffin for 15-20 seconds. Be careful not to overheat; you want them warm, not hot. Enjoy your sweet treat! Yes, you can use different apples! Varieties like Granny Smith or Honeycrisp work well. Granny Smith adds a tartness, while Honeycrisp gives sweetness. You can even mix two types for more flavor. Choose apples that stay firm when baked for the best results. To make the muffins dairy-free, swap the milk and butter. Use almond milk or oat milk instead. For the butter, you can use coconut oil or a plant-based butter substitute. These changes keep the taste great and maintain the muffin's soft texture. These muffins pair well with many things. Serve them warm with a scoop of vanilla ice cream. A dollop of whipped cream also adds a nice touch. For a drink, try a cup of hot cider or coffee. Both complement the flavors nicely. Check if the muffins are done by poking a toothpick in the center. If it comes out clean, the muffins are ready. You can also look for a golden color on top. The muffins should spring back slightly when touched. To recap, we explored the key ingredients for caramel apple muffins, from fresh apples to optional toppings. Then, we detailed step-by-step instructions to ensure perfect results. I shared tips to avoid common mistakes and highlighted useful baking tools. We also discussed various fun variations, storage tips, and answered your burning FAQs. In short, with a bit of care, you can bake tasty muffins to share. Enjoy the process and savor every bite!

Caramel Apple Upside Down Muffins Delightfully Sweet

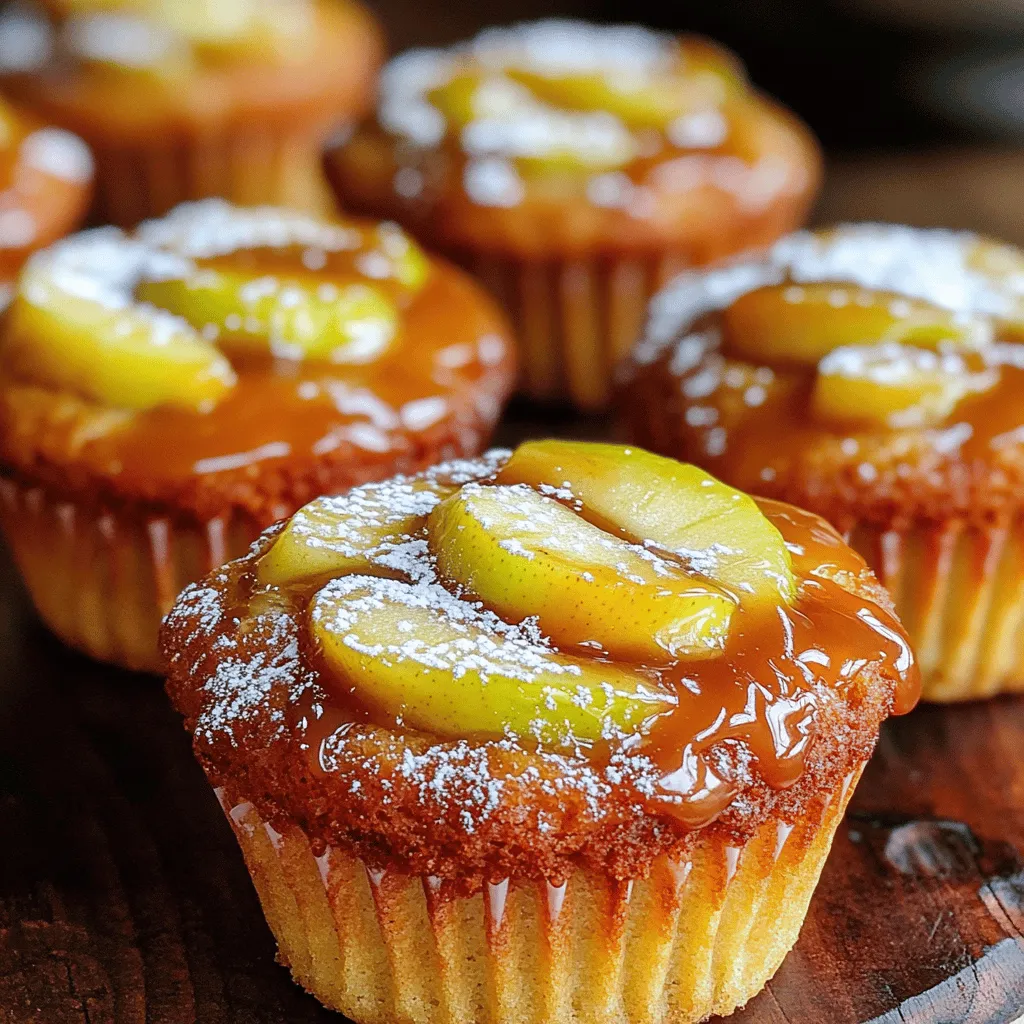
If you love sweet treats that warm your heart, you’re in for a treat! These Caramel Apple Upside Down Muffins

To make this delicious loaf, you need these key ingredients: - 1 ½ cups all-purpose flour - 1 cup granulated sugar - ½ cup unsweetened cocoa powder - 1 teaspoon baking powder - ½ teaspoon baking soda - ¼ teaspoon salt - ½ cup unsalted butter, softened - 2 large eggs - 1 teaspoon vanilla extract - ¾ cup brewed espresso, cooled - 1 cup semi-sweet chocolate chips These ingredients create a rich, moist loaf with a deep chocolate flavor. The espresso adds a nice kick. You can enhance the loaf’s flavor and crunch with these optional items: - ½ cup chopped walnuts - Powdered sugar for dusting Adding walnuts gives a lovely texture. A sprinkle of powdered sugar makes it look fancy. If you need gluten-free options, try using almond flour or a gluten-free blend. For dairy-free, replace butter with coconut oil or a dairy-free spread. These swaps ensure everyone can enjoy this treat without worry. First, heat your oven to 350°F (175°C). This step is key for baking. Next, grab a 9x5 inch loaf pan. Grease it well and line it with parchment paper. This makes it easy to remove the loaf later. In a large bowl, add these dry ingredients: - 1 ½ cups all-purpose flour - 1 cup granulated sugar - ½ cup unsweetened cocoa powder - 1 teaspoon baking powder - ½ teaspoon baking soda - ¼ teaspoon salt Whisk everything together until well mixed. This helps blend the flavors. In another bowl, beat ½ cup softened unsalted butter until creamy. Then add: - 2 large eggs - 1 teaspoon vanilla extract - ¾ cup brewed espresso, cooled Mix these together until smooth. This mixture will bring moisture to your loaf. Now, slowly add your dry mix to the wet mix. Stir just until combined. Be careful not to overmix, as it can make your loaf tough. After that, fold in: - 1 cup semi-sweet chocolate chips - ½ cup chopped walnuts (optional) Make sure they are evenly spread in the batter. Pour your batter into the prepared loaf pan. Smooth the top with a spatula. Now, place it in the oven. Bake for 50-60 minutes. Check if it’s done by inserting a toothpick. It should come out clean. Once baked, let the loaf cool in the pan for about 10 minutes. Then, transfer it to a wire rack to cool completely. You can dust it with powdered sugar before slicing. Serve slices on a nice platter with coffee or espresso. Add fresh berries or whipped cream for a yummy touch! To get a soft and moist loaf, use room-temperature butter. This helps create a creamy mix. Mix your dry ingredients well. This ensures even flavor throughout. When you combine wet and dry, stir gently. Overmixing can make the loaf dense. Bake until a toothpick comes out clean. This is key for the right texture. One mistake is not measuring ingredients correctly. Use measuring cups and spoons for accuracy. Another common error is skipping the cooling time. Let the loaf cool in the pan for a bit. If you slice too soon, it might crumble. Lastly, remember to preheat your oven! This sets the right baking environment. To keep your loaf fresh, wrap it in plastic wrap. This prevents it from drying out. Store it at room temperature for up to three days. For longer storage, freeze slices in an airtight bag. When you’re ready to eat, thaw at room temperature. You can also warm slices in a toaster oven for a quick treat. {{image_2}} You can make your chocolate espresso loaf even better with fun mix-ins. Try adding nuts or fruits to change the flavor and texture. For example, walnuts add a nice crunch. You can also use pecans or almonds for a different taste. If you want some sweetness, add in dried fruits like cherries or cranberries. These options give the loaf a unique twist. Just remember to fold them in gently so you don’t overmix the batter. Feeling adventurous? You can switch up the flavors in your loaf. Try adding orange zest for a fresh taste. Almond extract is another great option. It adds a lovely nutty flavor that pairs well with chocolate. If you enjoy spice, a pinch of cinnamon or nutmeg can warm up the loaf too. These little changes create a whole new experience while keeping the rich chocolate and espresso base. Want to make a gluten-free version? It’s easy! You can swap all-purpose flour for a gluten-free flour blend. Look for a blend that includes xanthan gum, which helps with texture. You might also try almond flour for a nutty taste. Just keep in mind that the loaf may bake faster. Check it a bit early to avoid overbaking. With these small adjustments, you can enjoy a delicious chocolate espresso loaf that fits your dietary needs. To keep your loaf fresh, wrap it tightly in plastic wrap. This keeps moisture in. Place the wrapped loaf in an airtight container for added protection. Store it at room temperature for up to three days. If you want it to last longer, refrigerate it. Be aware that refrigeration may change the texture slightly. Freezing the loaf is an excellent choice for long-term storage. First, let it cool completely. Next, wrap it in plastic wrap, then in aluminum foil. This double wrapping protects it from freezer burn. You can freeze it for up to three months. Label the package with the date, so you know when to use it. To thaw the loaf, take it out of the freezer and unwrap it. Leave it at room temperature for several hours. You can also speed up the process by placing it in the fridge overnight. If you want to enjoy it warm, preheat your oven to 350°F (175°C). Place the loaf in for about 10-15 minutes. This warms it up without drying it out. Enjoy your fresh-tasting chocolate espresso loaf! Yes, you can make this loaf ahead of time. Bake it, let it cool, and wrap it well. Store it in the fridge for up to five days. You can also freeze it for up to three months. Just thaw it overnight in the fridge before serving. Check the loaf at 50 minutes. Insert a toothpick in the center. If it comes out clean, the loaf is done. If there is batter on the toothpick, bake for another five to ten minutes. The top should look firm and slightly cracked. This loaf goes great with coffee, espresso, or a rich hot chocolate. You can also enjoy it with milk or a creamy latte. For a twist, try pairing it with a red wine, like a Merlot. The flavors will mix well. Yes, you can use instant coffee. Mix two tablespoons of instant coffee with three tablespoons of hot water. This will give you a strong coffee flavor, similar to espresso. Adjust the amount if you want a milder taste. If you don’t have a loaf pan, you can use a round cake pan. Just adjust the baking time. Check for doneness five to ten minutes earlier. You can also make muffins. Fill the muffin tin with batter and bake for about 20-25 minutes. You now have all the tools to bake a delicious chocolate espresso loaf. We covered the main ingredients, optional add-ins, and gluten-free swaps. I shared step-by-step instructions for mixing and baking, plus tips to avoid common mistakes. Remember to store your loaf right and try different flavors. Enjoy the warm taste and rich aroma with friends or family. Baking is fun, and you just learned how to make a tasty treat. Happy baking!

Bakery-Style Chocolate Espresso Loaf Delight Recipe

Are you ready to indulge in a rich, moist treat? My Bakery-Style Chocolate Espresso Loaf is a game changer. This

- 2 lbs beef chuck roast, sliced into thin strips - 1 cup low-sodium soy sauce - ½ cup honey - ¼ cup rice vinegar - 4 cloves garlic, minced - 1 inch fresh ginger, grated - 2 tablespoons sesame oil - 2 tablespoons cornstarch - 3 cups broccoli florets - Cooked rice (for serving) - 1 teaspoon sesame seeds (for garnish) When making slow cooker teriyaki beef and broccoli, the right ingredients matter. Start with 2 lbs of beef chuck roast, sliced thin. This cut is tender and flavorful. For the sauce, use 1 cup of low-sodium soy sauce. It gives that classic teriyaki taste without too much salt. Add ½ cup of honey for sweetness. This balances the salty soy sauce well. Then, add ¼ cup of rice vinegar for a hint of tang. Next, we need aromatics to boost the flavor. Use 4 cloves of minced garlic. Garlic adds a nice depth. Grate 1 inch of fresh ginger. Ginger brings warmth and spice to the dish. Finally, drizzle 2 tablespoons of sesame oil at the end. This oil adds a nutty taste. For a perfect finish, you will need cornstarch. Mix 2 tablespoons with water to thicken the sauce. The broccoli florets are a must! Use 3 cups for color and crunch. Serve the dish over cooked rice, and sprinkle with 1 teaspoon of sesame seeds for a lovely touch. This combination of ingredients makes for a delicious meal everyone will enjoy! First, you need to make the marinade. In a bowl, whisk together 1 cup of low-sodium soy sauce, ½ cup of honey, and ¼ cup of rice vinegar. This mix gives your beef a sweet and salty kick. Next, add 4 cloves of minced garlic and 1 inch of grated fresh ginger. These ingredients add great flavor to your dish. Mix it all well until smooth. Now, take 2 lbs of beef chuck roast and slice it into thin strips. Place the beef in the slow cooker. Pour the marinade from the bowl over the beef. Make sure every piece is coated. This step is key to achieving that rich teriyaki taste. For cooking, you can choose between low or high settings. If you cook on low, let it go for 6 to 7 hours. If you're short on time, the high setting works in 3 to 4 hours. Your beef should turn tender and flavorful. About 30 minutes before serving, make a slurry. Mix 2 tablespoons of cornstarch with ¼ cup of water in a small bowl. Stir this mixture into the slow cooker to thicken the sauce. Next, add 3 cups of broccoli florets to the cooker. Cover it and cook on high for another 30 minutes. The broccoli should be bright and tender. Finally, drizzle 2 tablespoons of sesame oil over the beef and broccoli. Stir gently to combine all the flavors. Serve this over cooked rice and sprinkle with 1 teaspoon of sesame seeds for a nice touch. To get tender beef, choose chuck roast. It has fat that makes it juicy. Cut the beef into thin strips. This helps it cook faster and become tender. If your slow cooker runs hot, reduce the cooking time. Each slow cooker is different. Want to boost the flavor? Add a pinch of red pepper flakes for heat. A dash of five-spice powder can add depth. Try topping with green onions or chopped cilantro. These add fresh taste and color. Serve this teriyaki beef over fluffy rice or noodles. Both soak up the sauce well. For sides, think about steamed edamame or a simple salad. These pair nicely and add crunch. {{image_2}} You can switch things up by using chicken or pork instead of beef. Chicken thighs work well for a juicy bite. If you choose pork, a tender cut like pork shoulder is a great choice. For those who prefer a vegetarian option, tofu is perfect. Use firm tofu for the best texture. Just cube it and let it soak in the sauce for flavor. Feel free to mix in different veggies to make it your own. Bell peppers add a sweet crunch, while snap peas bring a nice pop of color. You could also swap in seasonal veggies like carrots or green beans. This way, you can enjoy fresh flavors year-round. Always aim for vibrant colors to enhance both taste and presentation. If you like a bit of heat, add red pepper flakes to your sauce. Start with a pinch and adjust to your taste. You can also change the sweetness level. Add more honey for a sweeter dish or use less for a savory flavor. Making these small tweaks can elevate your meal and cater to your taste buds! Store your leftover teriyaki beef and broccoli in an airtight container. This keeps it fresh. Cool the dish first before sealing it. The beef will stay tasty for up to four days in the fridge. When you're ready to eat, reheat it gently on the stove. You can also use the microwave. Just make sure to stir it well and heat it in short bursts. This helps prevent uneven heating. To freeze this dish, let it cool completely first. Then, transfer it to a freezer-safe container or bag. Squeeze out excess air to avoid freezer burn. This meal can last up to three months in the freezer. When you're ready to eat, thaw it overnight in the fridge. Reheat it slowly on the stove or in the microwave. Add a splash of water if the sauce seems thick. Your slow cooker teriyaki beef and broccoli keeps well. In the fridge, it lasts about four days. In the freezer, it can stay fresh for up to three months. Always check for signs of spoilage, like changes in color or smell. Enjoy your meal knowing it’s safe to eat! You can use coconut aminos or tamari. Both are great options. They add flavor and keep the dish gluten-free. Coconut aminos is sweeter and milder. Tamari is similar to soy sauce but is often gluten-free. Yes, you can prep this dish ahead. Marinate the beef the night before and store it in the fridge. In the morning, just add the beef and sauce to the slow cooker. This makes it easy to enjoy a warm meal later. The beef is done when it is tender and easy to shred. You should see the meat breaking apart with a fork. Check that it reaches an internal temperature of 145°F. This ensures it is safe to eat. Yes, you can add more veggies! Try bell peppers or snap peas. Just remember to adjust the cooking time. Add them about 30 minutes before serving. This helps keep them bright and crunchy. This recipe is simple and rewarding. You learned how to prepare a tasty dish using beef, flavorful sauces, and fresh veggies. We discussed tips for cooking, enhancing flavor, and serving ideas. Feel free to change the proteins and veggies as you like. Remember, proper storage can keep your meal fresh. Enjoy creating meals that bring joy to your table!

Slow Cooker Teriyaki Beef and Broccoli Delight

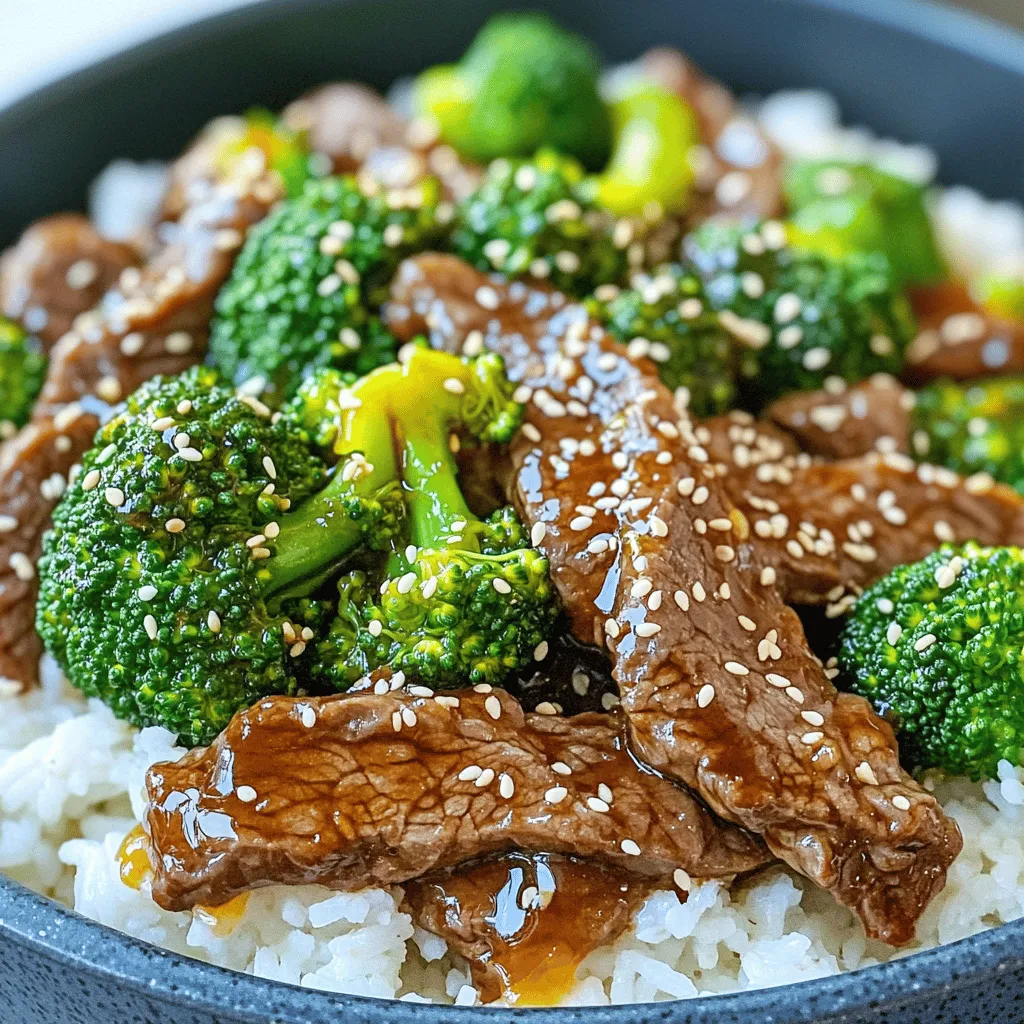
If you crave a warm, filling meal with bold flavors, you’re in the right place. Slow Cooker Teriyaki Beef and

Older posts
Newer posts
← Previous Page1 … Page27 Page28 Page29 … Page84 Next →

dsad

© 2026 Lisa Dishes • Built with GeneratePress

Our Policies

  • Copyright Policy
  • Cookie Policy
  • GDPR Policy
  • Privacy Policy
  • Disclaimer
  • Terms Of Use

More Information

  • Home
  • About
  • Contact
  • Appetizers
  • Dessert
  • Dinner
  • Drinks
©2026, Lisa Dishes About Back To Top