Skip to content
DisclaimerTerms Of UseGDPR PolicyCookie Policy

Lisa Dishes

  • Home
  • Drinks
  • Appetizers
  • Dinner
  • Dessert
  • About
  • Contact
  • Privacy Policy
DisclaimerTerms Of UseGDPR PolicyCookie Policy

NO-ING-IMG

- 1 cup rolled oats - 1 cup almond milk (or any milk of your choice) - 2 tablespoons chia seeds - 2 tablespoons maple syrup (or honey) - 1/4 cup almond butter (or peanut butter) - 1 teaspoon vanilla extract - 1/4 cup mini chocolate chips - A pinch of sea salt - Optional toppings: crushed nuts, additional chocolate chips, or a dollop of yogurt You can swap almond milk for any type of milk, like oat or cow's milk. If you prefer honey over maple syrup, go for it! Peanut butter works just as well as almond butter. For a nut-free option, use sunflower seed butter. If you're not a fan of chocolate chips, try dried fruit or seeds for a fun twist. Each serving of cookie dough overnight oats has around: - Calories: 350 - Protein: 10g - Carbohydrates: 45g - Fiber: 10g - Sugars: 10g - Fats: 15g This dish packs energy and flavor while keeping it healthy. The oats and chia seeds offer fiber, and the nut butter gives healthy fats and protein. Enjoy this treat while feeling good about your choices! Start by taking a mixing bowl. Add 1 cup of rolled oats. Next, pour in 1 cup of almond milk. You can use any milk you like! Then, add 2 tablespoons of chia seeds. These seeds help thicken your oats. Now, add 2 tablespoons of maple syrup for sweetness. Stir all these ingredients well. Make sure everything is mixed evenly. Now it’s time to add some flavor! Scoop in 1/4 cup of almond butter. If you prefer, you can use peanut butter. Add 1 teaspoon of vanilla extract for a nice touch. Whisk the mixture until it is smooth. Make sure there are no lumps of almond butter. Then, mix in 1/4 cup of mini chocolate chips. Finally, sprinkle in a pinch of sea salt. This salt will bring out all the flavors. Next, divide the mixture into two jars or airtight containers. Seal them tightly to keep it fresh. Place the jars in the fridge. Let them chill overnight, or for at least 4 hours. This allows the oats and chia seeds to absorb the liquid. In the morning, take out the jars. Give the oats a good stir. If they feel too thick, add a splash of almond milk. Enjoy your tasty cookie dough overnight oats! To get the right texture, use rolled oats. They soak well and stay chewy. Chia seeds help thicken the oats. If your oats are too thick in the morning, add a splash of almond milk. This makes them creamy and smooth. Stir well before serving to mix in any added milk. Toppings make your oats fun and tasty. You can add crushed nuts for crunch. More mini chocolate chips give a sweet touch. A dollop of yogurt adds creaminess and protein. Try different toppings to keep things exciting. Fresh fruit, like banana slices or berries, also works great. These oats are perfect for meal prep. Make them the night before and grab them in the morning. Store them in jars or airtight containers. You can keep them in the fridge for up to three days. This way, you save time and enjoy a quick breakfast. {{image_2}} You can switch up the flavor of your cookie dough overnight oats. Here are some tasty ideas: - Peanut Butter: Replace almond butter with peanut butter for a nutty taste. - Cookie Butter: Swap almond butter for cookie butter for a sweet twist. - Cocoa Powder: Add 1 tablespoon of cocoa powder for a chocolatey flavor. - Cinnamon: Mix in 1/2 teaspoon of cinnamon for a warm spice. These small changes can make each bowl unique and fun! To make your oats dairy-free and vegan, use almond milk or any plant-based milk. Almond milk works great, but you can also try oat milk or coconut milk. For sweetening, use maple syrup instead of honey. This keeps the dish vegan and delicious. You can still enjoy the creamy taste without dairy! If you need gluten-free oats, look for certified gluten-free rolled oats. Most rolled oats are safe, but cross-contamination can happen. Always check the label to make sure. This way, you can enjoy your cookie dough overnight oats without worry. Making these small changes keeps your dish both safe and tasty! To store your cookie dough overnight oats, use airtight containers. Glass jars work great. Make sure to seal them tightly. Place them in the fridge right after you prepare them. This helps keep them fresh. These oats last for about 3 to 5 days in the fridge. If you notice any odd smells or changes in color, it’s best to toss them. To keep them tasting fresh, avoid adding toppings until you serve. This keeps the oats from getting soggy. You can freeze cookie dough overnight oats for up to 3 months. Just make sure to use freezer-safe containers. When ready to eat, thaw them in the fridge overnight. You can then add toppings before serving. Enjoy your tasty meal any time! You can store overnight oats for up to five days in the fridge. After that, they may lose their best taste and texture. Always check for any signs of spoilage before eating. Yes, you can use any milk you like. Almond milk works well, but you can try oat milk, soy milk, or regular dairy milk. Each type will give a slightly different flavor and creaminess. Cookie dough overnight oats can be a healthy choice. They have oats, chia seeds, and nut butter, which offer fiber and healthy fats. You also get a touch of sweetness from maple syrup and chocolate chips. Just remember to watch the portion size, as toppings can add extra calories. This blog post covered the key steps to make cookie dough overnight oats. We discussed ingredients, substitutions, and nutritional info. I shared easy mixing instructions and tips for great flavor. You can create tasty variations, like dairy-free or gluten-free options. Also, storing your oats properly keeps them fresh. Enjoying this healthy meal can be fun and simple. You now have the know-how to make these delicious oats your way. Make it your go-to breakfast for busy mornings!

Cookie Dough Overnight Oats Quick and Easy Recipe

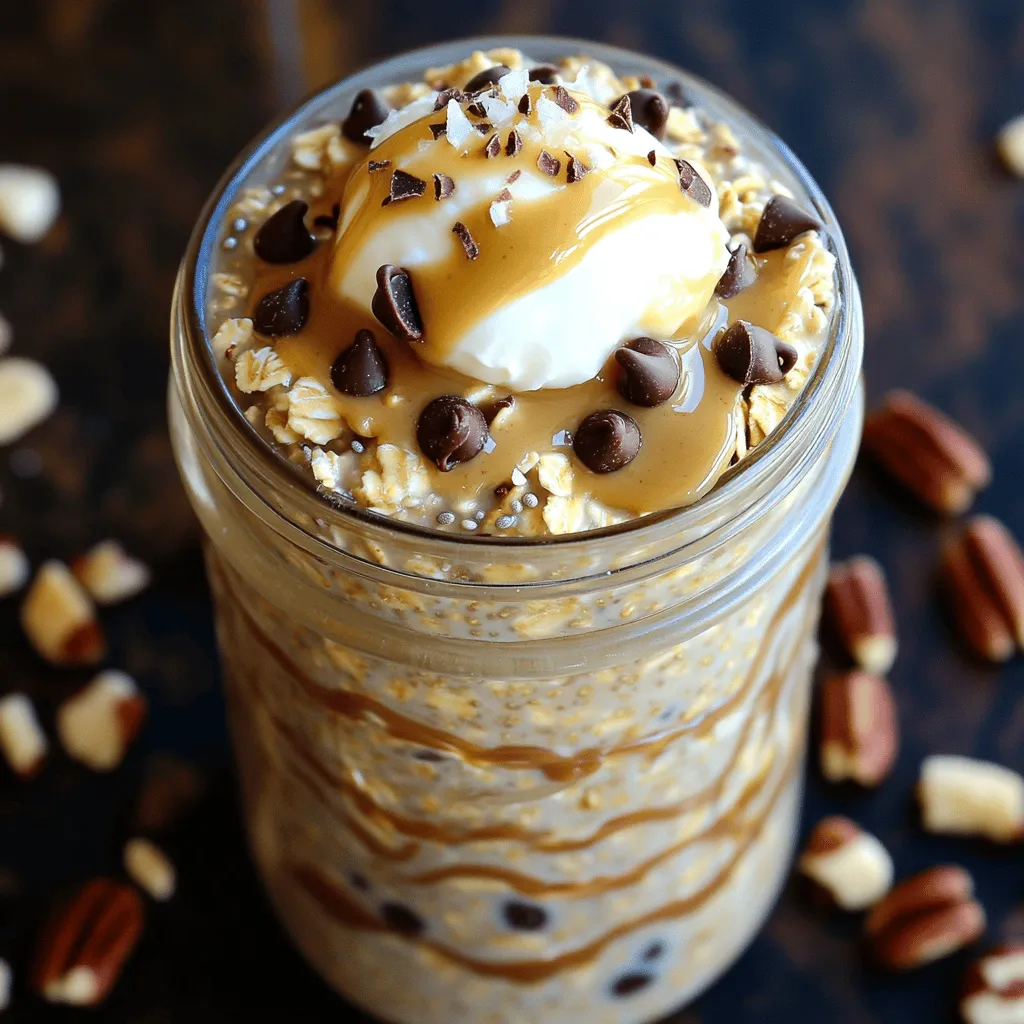
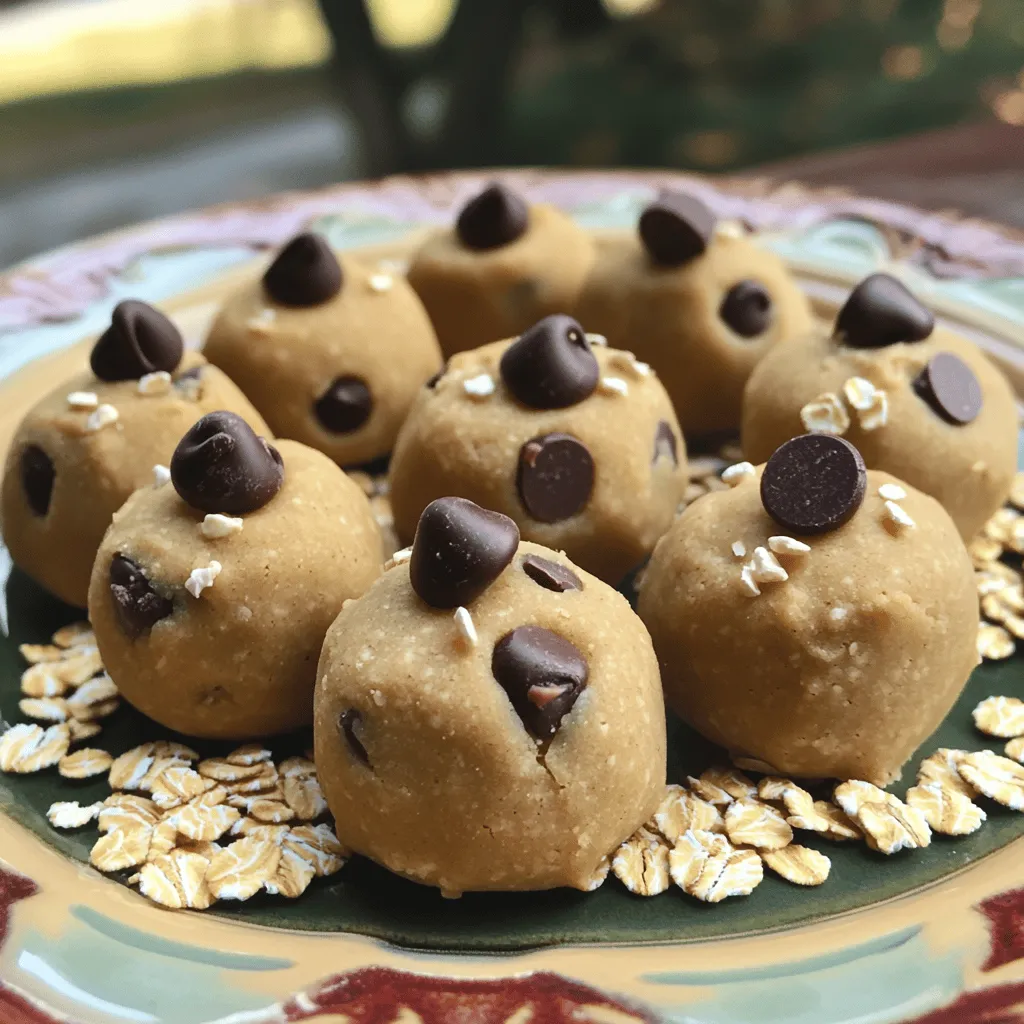
Are you ready to dive into a sweet breakfast treat? Cookie dough overnight oats combine all the best flavors of

- 4 boneless, skinless chicken thighs - 2 tablespoons olive oil - 2 tablespoons fresh lime juice - Zest of 1 lime - 1 teaspoon chili powder - 1 teaspoon smoked paprika - 1 teaspoon garlic powder - 1 teaspoon ground cumin - Salt and pepper to taste The chicken thighs are the star of this dish. They stay juicy and tender while cooking. Olive oil and fresh lime juice add great flavor and moisture. Zest from the lime gives a bright kick that pairs well with the chili lime seasoning. - 1 red bell pepper, sliced - 1 yellow bell pepper, sliced - 1 small red onion, cut into wedges - 1 cup cherry tomatoes - Optional garnish: Fresh cilantro The colorful veggies create a vibrant plate. Red and yellow bell peppers bring sweetness and crunch. Cherry tomatoes burst with flavor as they roast. The red onion adds a savory depth. You can top it off with fresh cilantro for added flavor. - 1 teaspoon chili powder - 1 teaspoon smoked paprika - 1 teaspoon garlic powder - 1 teaspoon ground cumin - Salt and pepper The blend of spices makes this dish shine. Chili powder adds warmth and spice. Smoked paprika brings a nice, smoky flavor. Garlic powder adds depth without being overpowering. Ground cumin gives a hint of earthiness. Salt and pepper balance the flavors perfectly. This dish is not just tasty; it's also easy to make. With fresh ingredients, you can create a wonderful meal that impresses everyone. First, I preheat the oven to 425°F (220°C). Next, I line a large sheet pan with parchment paper. This makes cleanup a breeze. While the oven warms up, I make the marinade for the chicken. In a big bowl, I whisk together olive oil, fresh lime juice, lime zest, chili powder, smoked paprika, garlic powder, cumin, and some salt and pepper. This mix gives the chicken great flavor. Now, I add the chicken thighs to the bowl. I coat them well with the marinade. I let them sit for at least 15 minutes. This time helps the flavors soak in while I prepare the veggies. I take the prepared sheet pan and start layering vegetables. I slice the red and yellow bell peppers, cut the onion into wedges, and toss in some cherry tomatoes. I spread them out evenly on the pan. Then, I position the marinated chicken thighs right on top of the veggies. I drizzle any leftover marinade over the chicken and veggies, adding more flavor to the dish. I place the sheet pan in the preheated oven. I bake the dish for 25 to 30 minutes. It’s key to check that the chicken reaches an internal temperature of 165°F (75°C). This means it’s fully cooked. The veggies should be tender and juicy, too. After baking, I remove the pan from the oven and let it sit for 5 minutes. This rest time helps the juices settle. Now, it’s ready to serve! To enhance flavor, I like to add a touch of smoked paprika and garlic powder. These spices bring depth to the marinade. You can also try adding a pinch of cayenne for heat. For the best flavor, marinate the chicken for at least 15 minutes. If you have time, marinating for one hour is even better. To avoid overcooked chicken, check the internal temperature. It should reach 165°F (75°C) for safety. Thick thighs need a little longer to cook, around 30 minutes. Keep an eye on the veggies, too. They should stay crisp and colorful. If they look done early, take them out to preserve texture. Serve this dish right from the sheet pan for a rustic feel. It looks great and makes cleanup easy! For a pop of color, garnish with lime wedges and fresh cilantro. Sprinkle the cilantro just before serving. It adds a nice finish and a fresh taste. {{image_2}} You can swap chicken with turkey or tofu. Turkey works well, but it cooks faster. Use boneless turkey thighs for the best results. For tofu, choose firm or extra-firm varieties. Cut tofu into cubes and marinate like chicken. Adjust cooking times to 20-25 minutes for turkey. For tofu, bake for 25-30 minutes or until golden. Feel free to mix in seasonal veggies. Try zucchini, asparagus, or broccoli for a change. If you like squash, add it for a tasty twist. You can also omit any veggies you don’t love. This dish is all about what you enjoy. The more you play with it, the more fun it becomes! Experiment with different spices to find your favorite flavor. Add cumin for a warm taste or chili flakes for heat. If you want milder flavors, reduce chili powder. You can also try herbs like oregano or thyme for a fresh touch. Remember, cooking is all about personal taste, so have fun and get creative! To keep your leftovers fresh, use airtight containers. Glass or plastic containers work well. Store the chili lime chicken and veggies in the fridge for up to three days. If you want to keep them longer, freeze them. Use freezer-safe bags or containers. They can last for about three months in the freezer. The best way to reheat this dish is in the oven. Preheat your oven to 350°F (175°C). Place the chicken and veggies on a baking sheet. Heat for about 15-20 minutes. This method helps keep the chicken juicy and the veggies crisp. You can also use a microwave. If you do, heat for short intervals. Stir the veggies to keep them from getting soggy. You can prepare the chicken and veggies in advance. Cut the veggies and marinate the chicken the night before. Store the marinated chicken in the fridge in a sealed bag. This saves time and makes meal prep easy. You can also slice the veggies and keep them in containers. This way, you're ready to cook when hunger strikes. I recommend marinating the chicken for at least 15 minutes. This short time helps the flavors mix well. If you have more time, marinate for up to an hour. The longer you marinate, the more flavor the chicken absorbs. Yes, you can use bone-in chicken thighs. They add great flavor but will need more time to cook. Bake them for about 35 to 40 minutes. Always check that the thickest part reaches 165°F for safety. This recipe is great for meal prep! You can make it ahead and store it in the fridge. Cooked chicken and veggies can last up to four days in airtight containers. Just reheat in the oven or microwave when ready to eat. This blog post covered a tasty sheet-pan chili lime chicken recipe. We explored the key ingredients, including chicken thighs, fresh veggies, and spices. I provided step-by-step instructions for easy preparation and cooking. You learned tips to perfect the dish and variations for protein and vegetables. Proper storage and reheating tips ensure your leftovers stay fresh. Feel free to get creative with the recipe. Enjoy your meal and wow your family!

Savory Sheet-Pan Chili Lime Chicken & Veggies Meal

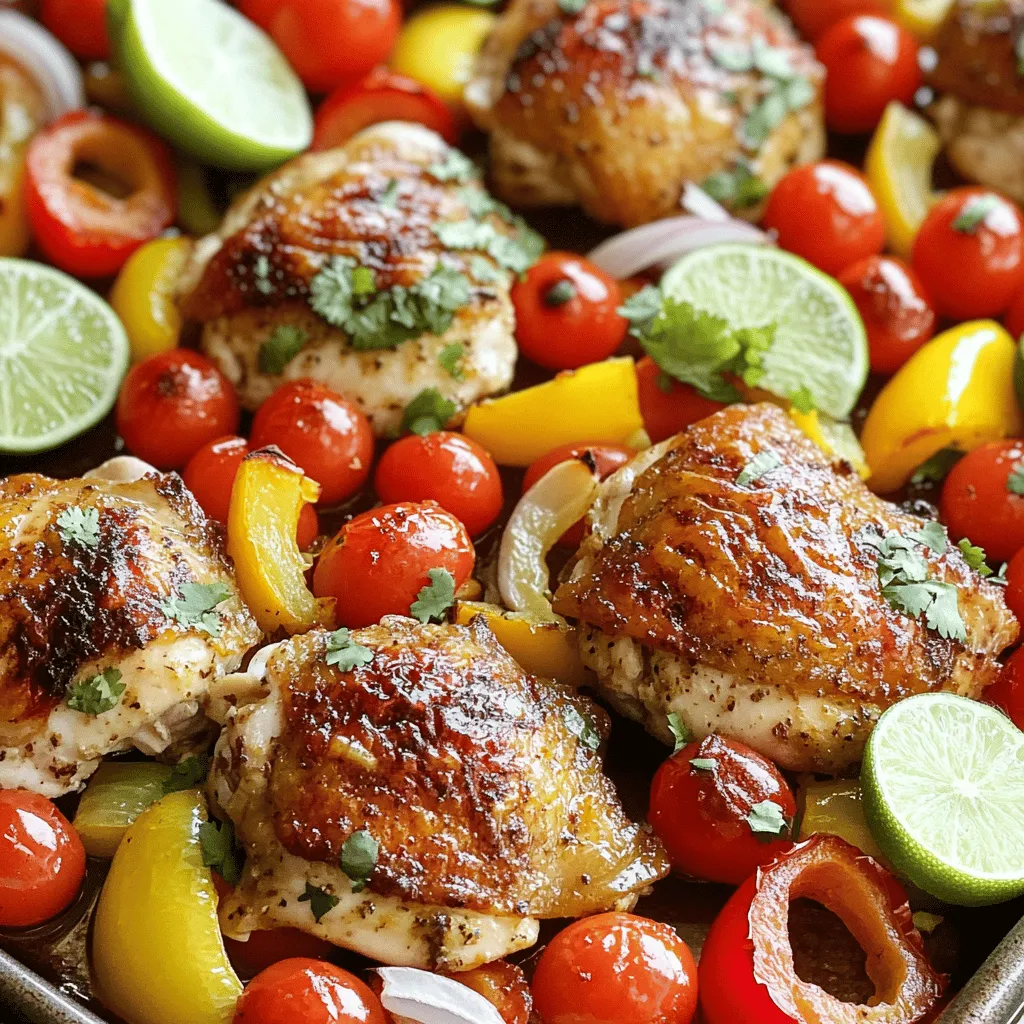
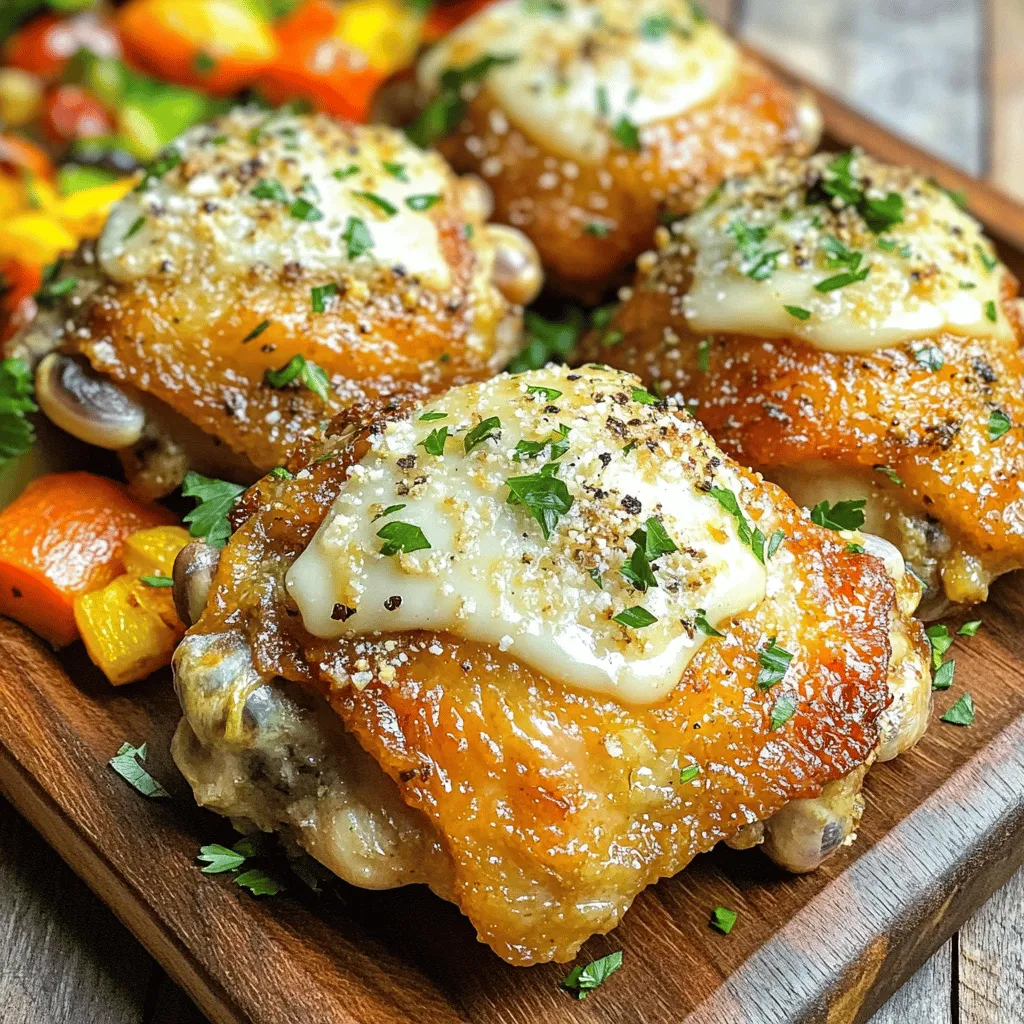
Are you ready for a meal that’s both tasty and easy? This Savory Sheet-Pan Chili Lime Chicken & Veggies recipe

To make No-Bake Oreo Peanut Butter Bars, you need a few simple items. Here’s what you will need: - 1 package (15.5 oz) Oreo cookies, crushed - 1 cup creamy peanut butter - 1/4 cup unsalted butter, softened - 1 cup powdered sugar - 1 teaspoon vanilla extract - 1 cup semisweet chocolate chips - 1 tablespoon coconut oil (optional, for shiny finish) These ingredients blend to create a rich and tasty treat. The Oreo cookies give a chocolatey crunch. The peanut butter adds a creamy texture, while the butter and sugar make it sweet and soft. You can use coconut oil to make the chocolate topping shiny. Each ingredient plays a role in making these bars delicious. Start by taking a large mixing bowl. Add one package of crushed Oreo cookies and a quarter cup of softened unsalted butter. Mix these ingredients together. You want the cookies to be well-coated and crumbly. This helps form a tasty base for the bars. Next, line an 8x8 inch baking pan with parchment paper. Make sure the paper hangs over the edges. This makes it easy to lift the bars out later. Now, pack the cookie mixture into the pan. Use the back of a spatula to press it down firmly. You want an even layer for the base. For the chocolate topping, take a microwave-safe bowl. Add one cup of semisweet chocolate chips. If you want a shiny finish, add one tablespoon of coconut oil. Heat the bowl in the microwave in 30-second intervals. Stir between each interval until the chocolate is smooth and fully melted. Pour the melted chocolate over the peanut butter cookie layer in the pan. Spread it evenly with a spatula. Now, refrigerate the bars for at least two hours. This helps them set firmly. For the best results, make sure they are completely firm before cutting. To make your bars just right, you can adjust the sweetness. If you like your treats sweeter, add more powdered sugar. Start with a little extra, then mix and taste. This way, you can find the perfect balance for you. For a smooth chocolate topping, melt the chocolate carefully. Use a microwave and heat it in short bursts. Stir often to help it melt evenly. If you add coconut oil, it gives the chocolate a nice shine. This makes your bars look even more delicious. Presentation matters when serving these treats. Use a decorative plate to showcase your bars. Drizzle some extra melted chocolate on top for a fancy touch. It adds style and makes them look special. Garnishing is also fun! Crush some Oreos and sprinkle them on top. This adds a nice crunch and makes the bars even more appealing. Everyone will love how they look and taste. {{image_2}} You can change the nut butter for fun flavors. Almond or cashew butter works well. Each will give a new taste to your bars. If you want a nut-free option, try sunflower seed butter. It has a nice creaminess too! For those who need gluten-free options, use gluten-free Oreo cookies. They taste just as good! This small change makes the bars safe for everyone to enjoy. Adding nuts or seeds can boost the texture. Chopped walnuts or pecans add a nice crunch. You can also mix in chia seeds for extra nutrition. Just a handful goes a long way! Want to kick up the flavor? Sprinkle in a little sea salt. It pairs well with the sweet chocolate. For a coffee twist, add a bit of espresso powder. It gives a rich depth to your bars. To keep your No-Bake Oreo Peanut Butter Bars fresh, store them in the fridge. Use an airtight container to prevent them from drying out. Place parchment paper between layers if stacking. This helps keep the bars intact and easy to grab. You can freeze these bars for longer storage. Cut the bars into squares first, then wrap each piece tightly in plastic wrap. Place the wrapped bars in a freezer-safe bag or container. This prevents freezer burn and keeps them tasty. When you're ready to enjoy them, move the bars to the fridge to thaw overnight. They should stay fresh for up to three months in the freezer. Enjoy your sweet treat whenever you want! Can I use other types of cookies? Yes, you can use other cookies. Try chocolate wafers or graham crackers. Each cookie gives a new taste. Just crush them like you do with Oreos. How long do these bars last in the fridge? These bars can last up to one week in the fridge. Store them in an airtight container. They stay fresh and tasty, making them perfect for snacks. Can I make these dairy-free? Yes, you can make them dairy-free. Use dairy-free butter and chocolate. Look for brands that fit your needs. You can still enjoy all the flavor. What can I use instead of coconut oil? If you don't have coconut oil, use vegetable oil or melted butter. Both will work well. This change will not affect the taste much at all. You now have a simple guide for making no-bake Oreo peanut butter bars. We covered all the key ingredients and step-by-step instructions. Remember, adjusting the sweetness can improve your bars. You can also customize them with different nut butters or fun mix-ins. Store them properly to enjoy a fresh treat later. These bars are not just easy to make; they are a fun and tasty way to share joy. Try making them, and delight in each bite. Explore, enjoy, and let your creativity shine in the kitchen!

No-Bake Oreo Peanut Butter Bars Easy and Quick Treat

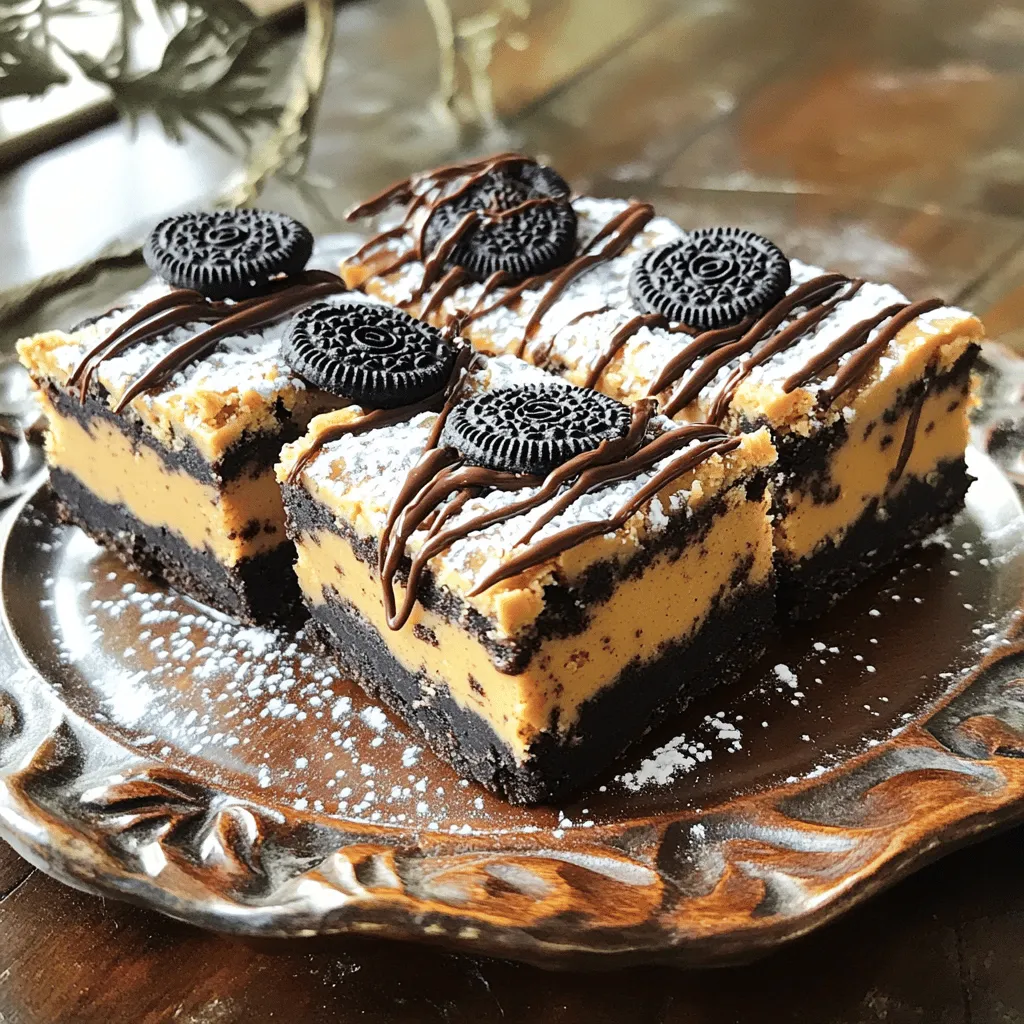
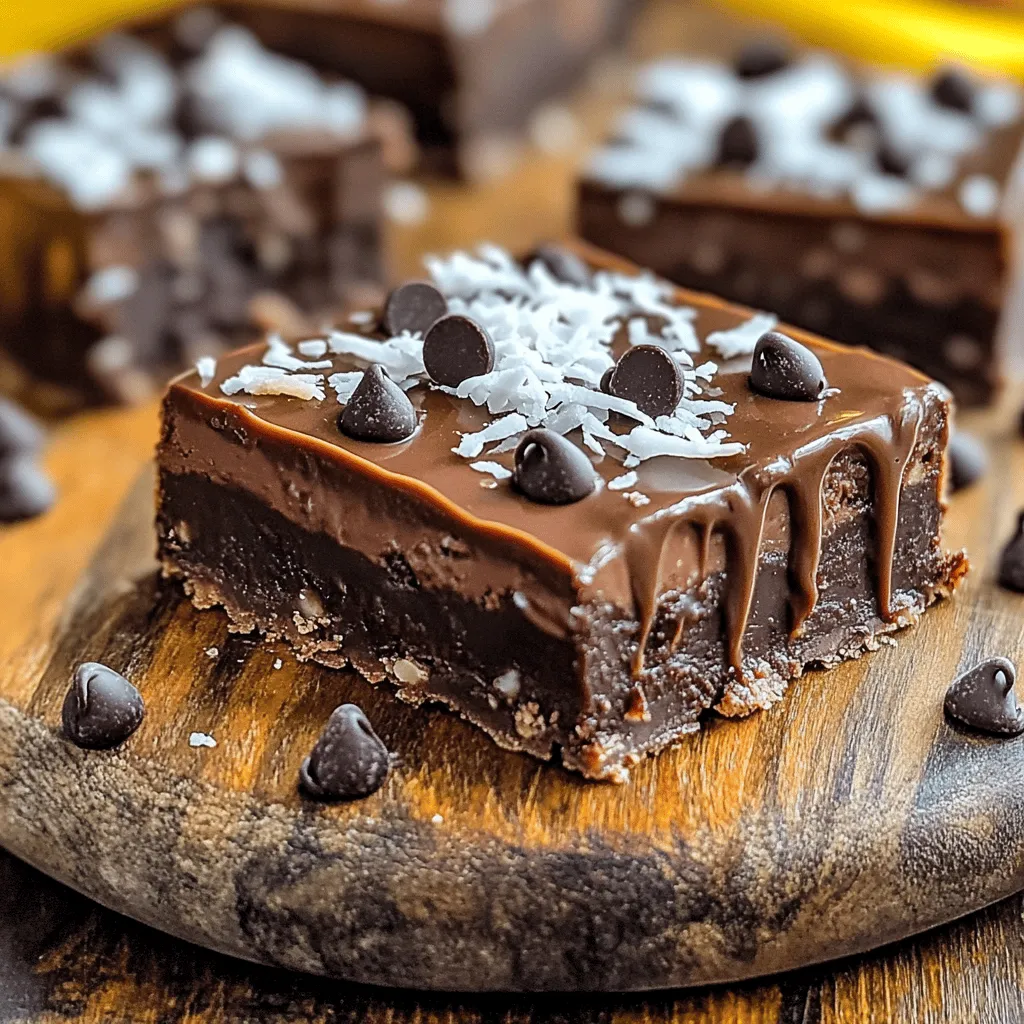
Craving a quick, delicious treat? Let me introduce you to No-Bake Oreo Peanut Butter Bars! These bars are easy to

- 9 oz cheese tortellini - 2 cups fresh spinach - 1 can diced tomatoes with herbs - 1 cup vegetable broth - 1/2 cup heavy cream - 1 tablespoon olive oil - 2 cloves garlic - 1 teaspoon Italian seasoning - Salt and pepper to taste - Grated Parmesan cheese - Fresh basil leaves The main ingredients make this dish shine. You need cheese tortellini, which gives a nice texture. Fresh spinach adds a burst of color and nutrients. Diced tomatoes with herbs bring a rich flavor. Vegetable broth enriches the sauce. Heavy cream makes it creamy and smooth. For seasoning, olive oil is key. It helps with flavor and keeps garlic from burning. Garlic adds a warm aroma. Italian seasoning gives it a classic touch. Salt and pepper enhance all the tastes. Finally, you’ll want grated Parmesan cheese for topping. Fresh basil leaves make it look lovely and add freshness. This dish is simple and quick. Gather these ingredients, and you’re ready to cook! - Heat olive oil and sauté garlic: Start by heating one tablespoon of olive oil in a large skillet over medium heat. Add two cloves of minced garlic. Sauté for about one minute. You want the garlic to be fragrant but not brown. - Prepare tortellini according to package instructions: While the garlic cooks, grab your cheese tortellini. You will need 9 ounces. Check the package for cooking times. This step is crucial for a great texture. - Combine diced tomatoes and vegetable broth: Once the garlic is ready, pour in one can of diced tomatoes. Make sure to include the juices for more flavor. Then add one cup of vegetable broth. Stir everything together. - Add tortellini and let simmer: Now, add the tortellini to the pan. Let the mixture simmer gently. Cook the tortellini for about 3 to 5 minutes. Stir occasionally to prevent sticking. - Stir in heavy cream and seasonings: After the tortellini is tender, add half a cup of heavy cream. Sprinkle in one teaspoon of Italian seasoning. Allow it to simmer for another 2 to 3 minutes. This will create a creamy sauce. - Incorporate spinach and adjust seasoning: Next, mix in 2 cups of roughly chopped fresh spinach. Season with salt and pepper to your taste. Cook for another 2 minutes until the spinach wilts and heats through. - Add garnishes before serving: Remove the skillet from heat. Serve hot, topped with grated Parmesan cheese and fresh basil leaves. Enjoy your dish! How to prevent tortellini from sticking To keep the tortellini from sticking together, stir them often. This helps them float in the broth. You can also add a bit of olive oil to the cooking water. Just a teaspoon will do. This will coat the pasta and keep it from clumping. Best practices for sautéing garlic When you sauté garlic, keep a close watch. Garlic cooks fast. I usually heat my oil first, then add minced garlic. Sauté it for about one minute. You want it to smell great but not burn. If it burns, it will taste bitter. Alternatives for heavy cream If you want a lighter dish, use half-and-half or whole milk. You can also use coconut milk for a dairy-free option. It adds a nice flavor and creaminess without the heaviness. Using frozen spinach instead of fresh Frozen spinach works well too! Just make sure to thaw and squeeze out the water before adding. It’s a time-saver and still gives you that green goodness in your dish. Suggested additional spices For extra flavor, add a pinch of red pepper flakes or a dash of smoked paprika. These spices bring warmth and depth. You can also sprinkle some fresh herbs, like thyme or oregano, for a fresh taste. Recommended serving suggestions Serve your tortellini with a side salad or crusty bread. Both add crunch and balance to the creamy dish. You can also top it with extra grated Parmesan cheese for a rich finish. Enjoy your meal! {{image_2}} You can easily change the protein in this dish. Adding chicken or shrimp makes it heartier. For chicken, cook bite-sized pieces in the skillet before adding garlic. When using shrimp, add them after the tortellini. They cook fast and add great flavor. If you want vegetarian options, try chickpeas or white beans. They give protein without meat. Just stir them in with the spinach for a boost. Feel free to mix in other vegetables. Kale or Swiss chard works well with this dish. You can also add peppers or zucchini for a different taste. Adjust your veggies based on the season. In spring, try asparagus or peas. In fall, add roasted butternut squash for a cozy vibe. You can switch up the sauce for new flavors. For a creamy twist, use Alfredo or pesto sauce. This makes the dish richer and more indulgent. If you like spice, add red pepper flakes or a dash of hot sauce. This will give your dish a nice kick. You can also try adding fresh herbs like thyme or oregano for extra depth. To keep your One-Pan Tomato Spinach Tortellini fresh, place it in the fridge. Use an airtight container to prevent moisture loss. Properly stored, it lasts up to three days. For best results, let it cool before sealing. When it’s time to enjoy leftovers, you have a few options. You can use the microwave or stovetop. If using the microwave, heat in short bursts. Stir in between to avoid hot spots. On the stovetop, add a splash of broth or cream. This keeps the dish creamy and tasty. You can freeze this dish for later. First, cool it completely. Then, transfer it to a freezer-safe container. This dish can last up to three months in the freezer. To thaw, place it in the fridge overnight. When ready to eat, reheat gently on the stove or microwave. Can I use dry tortellini instead of fresh? Yes, you can use dry tortellini. Just add a few extra minutes to the cooking time. Dry tortellini usually takes about 8-10 minutes to cook. Follow the package instructions for best results. How to make this dish gluten-free? To make this dish gluten-free, use gluten-free tortellini. Many brands offer great options. Check your local store for choices. Ensure the vegetable broth is also gluten-free. How long does it take to cook tortellini? Fresh tortellini cooks quickly. It usually takes about 3-5 minutes. Check the package for specific times. Dry tortellini needs about 8-10 minutes. What is the best way to know if tortellini is done? Taste a piece of tortellini. It should be soft but still firm. If it feels chewy, give it more time. Look for it to float in the water when it's done. What to serve with One-Pan Tomato Spinach Tortellini? This dish pairs well with a simple salad. Garlic bread also makes a great side. You can also serve it with roasted vegetables for added flavor. Can this be served as a meal prep option? Yes, this dish is perfect for meal prep. Store it in airtight containers. It keeps well in the fridge for up to three days. Reheat it in the microwave or on the stove. This blog post outlines a simple and tasty recipe for One-Pan Tomato Spinach Tortellini. You learned about the fresh ingredients, easy cooking steps, and smart tips to boost flavor. I shared ways to adjust the recipe for different diets and preferences. Lastly, I explained how to store leftovers properly. By following these steps, you can enjoy a delicious meal with ease. Experiment with variations to make it your own, and enjoy your cooking journey!

One-Pan Tomato Spinach Tortellini Scrumptious Dish

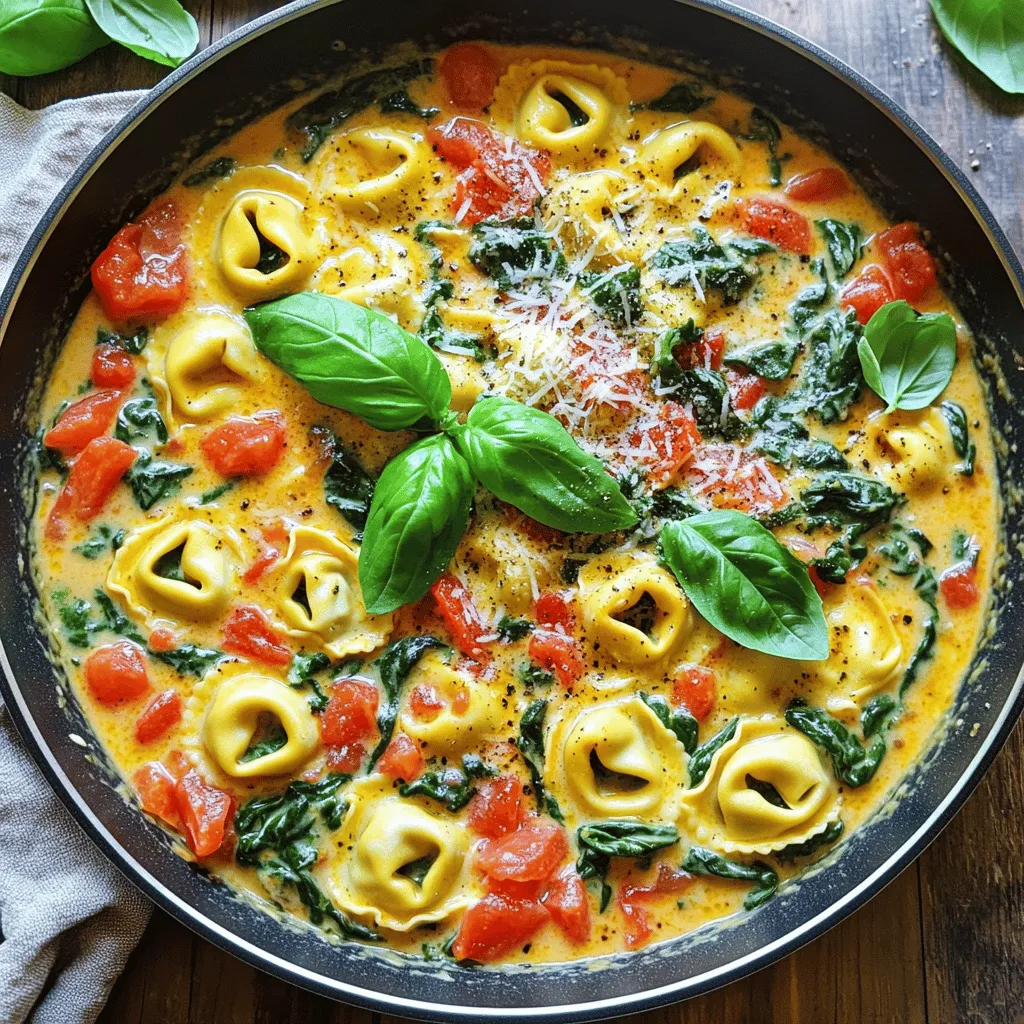
If you crave a simple, tasty meal, you’re in the right place! Our One-Pan Tomato Spinach Tortellini combines fresh spinach,

To make these delightful muffins, you need key ingredients that bring flavor and texture. Here’s your list: - 1 cup canned pumpkin puree - 1/2 cup cream cheese, softened - 1/2 cup granulated sugar - 1/2 cup brown sugar, packed - 1/2 cup vegetable oil - 2 large eggs - 1 teaspoon vanilla extract - 1 1/2 cups all-purpose flour - 1 teaspoon baking powder - 1 teaspoon baking soda - 1 teaspoon ground cinnamon - 1/4 teaspoon ground nutmeg - 1/4 teaspoon ground ginger - 1/2 teaspoon salt Each ingredient plays a role. The pumpkin puree gives moistness and flavor. Cream cheese adds a rich, creamy center. The sugars balance sweetness, and spices bring warmth. You might want to elevate your muffins with some extra touches. Here are a few optional ingredients: - Chopped nuts (like walnuts or pecans) - Chocolate chips for a sweeter twist - Dried cranberries for a fruity note Adding these can change the flavor profile. Nuts add crunch, while chocolate makes them sweet. Dried fruit brings a tangy burst. Do you have dietary needs? You can easily adjust this recipe. Here are some substitutions: - Use almond or coconut milk instead of regular milk. - Swap granulated sugar for coconut sugar or maple syrup. - Replace all-purpose flour with gluten-free flour. - Use vegan cream cheese for a dairy-free option. These swaps keep your muffins tasty while catering to your diet. Enjoy experimenting with flavors and textures! First, preheat your oven to 350°F (175°C). This step warms the oven for even cooking. Next, line a muffin tin with paper liners or lightly grease it. This helps the muffins come out easily after baking. In a medium bowl, add the softened cream cheese, granulated sugar, and brown sugar. Beat them together until smooth and creamy. Set this mixture aside. In a larger bowl, whisk the canned pumpkin puree, vegetable oil, eggs, and vanilla extract. Mix well until everything is blended. In another bowl, combine the all-purpose flour, baking powder, baking soda, cinnamon, nutmeg, ginger, and salt. Stir these dry ingredients until they are well mixed. Now, pour the dry mixture into the pumpkin mixture. Gently fold the two mixtures until just combined. Be careful not to overmix, as this can make your muffins tough. Fill each muffin cup halfway with the pumpkin batter. Then, add a spoonful of the cream cheese mixture on top. Use a toothpick to swirl it gently, creating a marbled effect. Top each muffin with a bit more pumpkin batter until the cups are about 3/4 full. Place the muffin tin in the preheated oven. Bake for 20 to 25 minutes. To check if they are done, insert a toothpick into the center of a muffin. If it comes out clean, they are ready. Let the muffins cool in the tin for 5 minutes. Then, transfer them to a wire rack to cool completely. For the best muffins, use fresh ingredients. Make sure your baking powder and baking soda are not expired. This will help your muffins rise well. Mix the ingredients gently to keep the muffins light and fluffy. Overmixing can lead to dense muffins. Use a toothpick to create fun swirls with the cream cheese. Don’t worry if they aren’t perfect; the charm is in their uniqueness! For a nice finish, dust the cooled muffins with powdered sugar. You can also serve them with maple syrup for extra sweetness. Enjoy your fall baking! One common mistake is overmixing the batter. This can make your muffins tough. Mix until just combined for a light and fluffy texture. Another mistake is not measuring ingredients correctly. Use dry measuring cups for flour and a liquid measuring cup for pumpkin. Lastly, don’t skip preheating your oven. This step ensures even baking. When mixing, always start with the wet ingredients. Combine the pumpkin, oil, eggs, and vanilla first. In a separate bowl, mix the dry ingredients well, so everything is even. Fold the dry ingredients into the wet ingredients gently. This keeps your muffins tender. Add the cream cheese mixture last. Swirl it in lightly for a marbled look. To check if your muffins are done, insert a toothpick into the center. If it comes out clean, they are ready. If there are wet crumbs, bake a few more minutes. Keep an eye on them to avoid overbaking. You want a soft, moist muffin, not a dry one. {{image_2}} You can make these muffins even more special. Add nuts like walnuts or pecans for crunch. Dried fruits, such as cranberries, offer a sweet twist. Consider orange zest for a fresh, citrusy note. You can also mix in chocolate chips for a rich flavor. Each addition gives a unique touch to the classic recipe. Want a healthier muffin? You can replace some sugar with applesauce. This keeps them moist while cutting calories. Try using whole wheat flour instead of all-purpose flour. This adds fiber and nutrients. You can also swap vegetable oil for unsweetened yogurt for a lighter option. These changes keep the muffins tasty and healthy. For gluten-free muffins, use a gluten-free flour blend. Look for blends that include xanthan gum. This helps mimic the texture of regular flour. Be sure to check ingredients in your cream cheese as well. Most cream cheeses are gluten-free, but it’s good to confirm. With these tweaks, everyone can enjoy delicious pumpkin cream cheese muffins! Store leftover muffins in an airtight container. This keeps them fresh and moist. You can place wax paper between layers to avoid sticking. They stay good at room temperature for up to three days. If you want to keep them longer, use the freezer. To freeze muffins, cool them completely first. Then, wrap each muffin tightly in plastic wrap. Place them in a freezer bag or container. Label with the date. They can last up to three months in the freezer. When ready to eat, simply thaw them at room temperature. Reheat muffins in the microwave for about 15-20 seconds. This warms them up nicely. For a crispier exterior, use the oven. Preheat the oven to 350°F (175°C). Place muffins on a baking sheet and heat for about 5-10 minutes. Enjoy your warm, fresh-tasting muffins! Yes, you can make the batter before baking. Just mix the ingredients and store it. Put the batter in the fridge for up to 24 hours. When ready to bake, stir the batter again. This helps keep it fresh and tasty. Just remember, do not add the cream cheese mixture until you are ready to bake. If you need a substitute for cream cheese, try using Greek yogurt. It adds creaminess and tang. Another option is mascarpone cheese, which is rich and smooth. If you want a dairy-free option, use a vegan cream cheese. This works well and keeps the muffins moist and fluffy. To check if your muffins are done, insert a toothpick into the center. If it comes out clean or with a few crumbs, they are done. If it has wet batter, bake a few more minutes. Keep an eye on them. They should be golden brown and spring back when touched. These easy pumpkin cream cheese muffins combine tasty ingredients and simple steps. You learned about the main and optional ingredients, substitutions, and how to avoid common mistakes. I shared tips for perfect mixing, checking for doneness, and variations for different needs. Plus, you now know how to store leftovers and reheat them. Enjoy baking these muffins, knowing you can customize them for any occasion!

Pumpkin Cream Cheese Muffins Perfect for Fall Baking

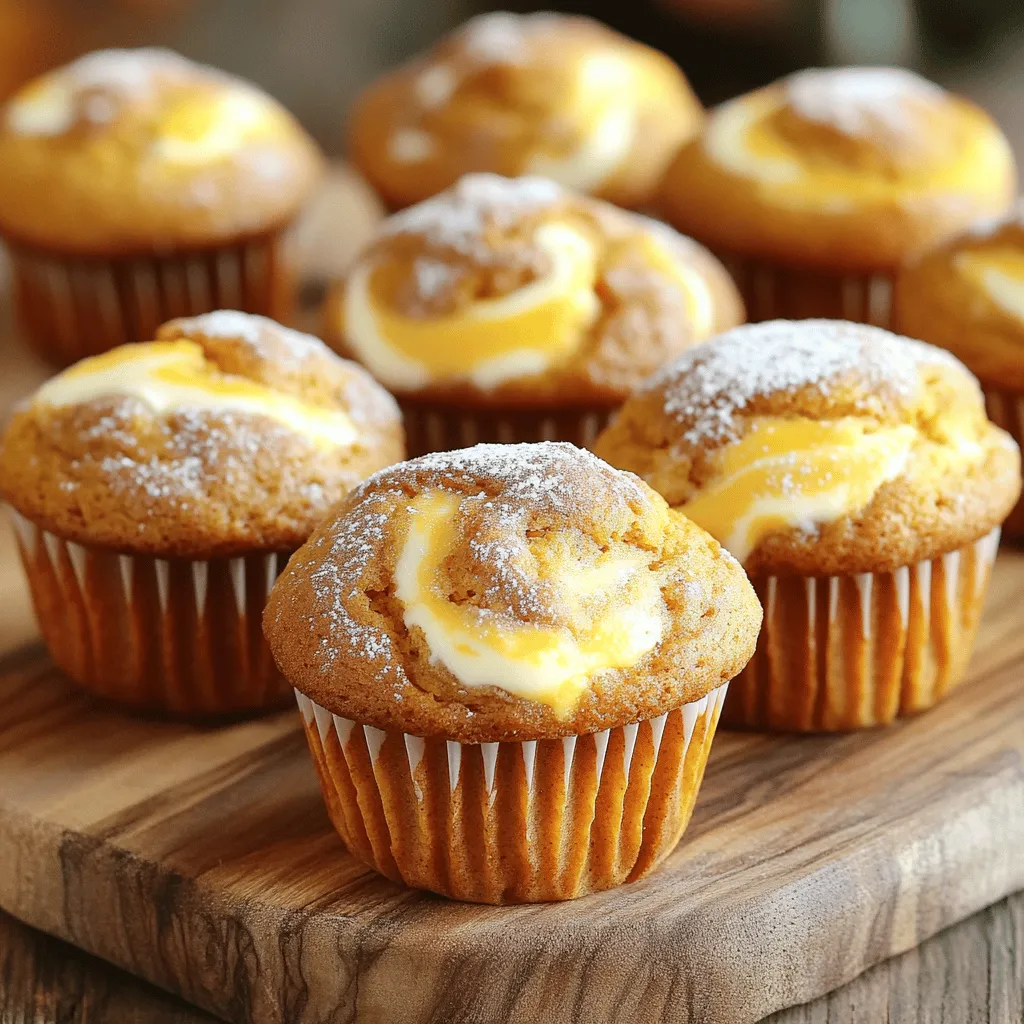
Fall is the perfect time for baking, and nothing says autumn quite like Pumpkin Cream Cheese Muffins. These soft, spiced

To make Chipotle Lime Shrimp Burritos, you need fresh and tasty ingredients. Here is what you'll need: - 1 lb large shrimp, peeled and deveined - 2 tablespoons chipotle in adobo sauce, minced - 2 tablespoons olive oil - 1 lime, juiced and zested - 1 teaspoon garlic powder - 1 teaspoon ground cumin - Salt and pepper to taste - 1 cup cooked white rice - 1 cup black beans, rinsed and drained - 1 cup corn (fresh or frozen, cooked) - 1 cup fresh cilantro, chopped - 1 avocado, sliced - 4 large flour tortillas - Sour cream and salsa for serving (optional) Each ingredient plays a key role. The shrimp give a light and juicy bite. The chipotle adds a smoky heat. Lime juice brings brightness and freshness. Garlic powder and cumin add depth and warmth. The rice, beans, and corn create a hearty base. Fresh cilantro and avocado give flavor and creaminess. Finally, tortillas wrap it all up. You can also add sour cream or salsa for extra zest. Enjoy crafting these burritos with these simple yet bold ingredients! {{ingredient_image_1}} - In a medium bowl, mix 2 tablespoons of minced chipotle, 2 tablespoons of olive oil, the juice and zest of 1 lime, 1 teaspoon of garlic powder, 1 teaspoon of ground cumin, salt, and pepper. - Add 1 pound of peeled and deveined shrimp to the bowl. Coat each shrimp well with the marinade. Let them marinate for at least 15 minutes. You can go up to 30 minutes for more flavor. - Heat a large skillet over medium-high heat. - Once hot, add the marinated shrimp in a single layer. - Cook for about 2-3 minutes on each side until the shrimp turn pink and opaque. Remove them from heat. - In a large bowl, combine 1 cup of cooked white rice, 1 cup of rinsed and drained black beans, 1 cup of corn, and 1 cup of chopped cilantro. - Mix well to ensure all ingredients blend together nicely. - Lay a large tortilla flat on your clean surface. - Spoon about 1/2 cup of the rice and bean mixture into the center. - Add several pieces of cooked shrimp and slices of avocado on top. - Fold the sides of the tortilla inward, then roll it up tightly from the bottom to seal the filling. Repeat with remaining tortillas. - If you want, pan-toast each burrito in the same skillet used for cooking the shrimp. - Cook until golden brown and crispy on both sides, about 2-3 minutes each side. To get the best flavor, marinate the shrimp well. Use chipotle in adobo sauce, olive oil, lime juice, and zest. Mix these in a bowl, then add garlic powder, cumin, salt, and pepper. Cover the shrimp completely with this mix. Let it sit for at least 15 minutes. The longer you marinate, the better the taste. If you can, let it marinate for 30 minutes. When cooking the shrimp, keep the skillet hot. This helps to cook the shrimp quickly. Cook them for about 2-3 minutes on each side. They will turn pink and opaque, showing they’re done. Don’t overcook! Overcooked shrimp can turn tough and rubbery. Choose large flour tortillas for this recipe. They hold all the tasty filling without tearing. When folding, place the filling in the center, leaving space around the edges. Fold the sides in first. Then, roll from the bottom tightly. This keeps the filling inside and helps avoid messy bites. If you find your tortillas tearing, warm them in a pan for a few seconds before folding. This makes them more flexible and easy to handle. For the best taste, serve your burritos with fresh sides. Slices of avocado add creaminess. A dollop of sour cream gives a nice tang. Salsa adds a burst of flavor. You can also sprinkle extra cilantro on top for a fresh look. Presentation matters! Cut each burrito in half for a nice display. Serve them on a colorful platter. Add a side of salsa and a scoop of sour cream. This makes your meal look as good as it tastes! Pro Tips Marinate for Flavor: The longer you marinate the shrimp, the more flavorful they will be. Aim for at least 15 minutes, but you can go up to 30 minutes for a deeper taste. Fresh Ingredients Matter: Using fresh shrimp and ingredients like lime and cilantro will elevate your burritos, giving them a vibrant taste and texture. Customize Your Fillings: Feel free to add other ingredients such as diced tomatoes, jalapeños, or cheese to personalize your burrito to your preference. Perfect Tortilla Technique: When rolling your burrito, ensure you tuck in the sides tightly to prevent filling from escaping. A little practice makes perfect! {{image_2}} If you want to switch things up, consider these alternatives: - Use chicken instead of shrimp for a hearty bite. - Tofu is a great choice for a vegetarian option. - Try fish for a lighter taste that still packs a punch. To boost the flavor, think about adding: - Smoked paprika for a rich, smoky taste. - A pinch of cayenne to add some heat. - Fresh herbs like parsley or chives for brightness. You can also play with dressings. A zesty lime vinaigrette works wonders! Burrito bowls are an easy option if you want to skip the wrap. Just layer everything in a bowl for a fun meal. Wraps or tacos can change the vibe. Use smaller tortillas and load them up with shrimp and toppings. They are perfect for sharing! To keep your burritos fresh, store them in airtight containers. This helps prevent moisture loss and keeps flavors intact. You can also wrap each burrito in plastic wrap before placing them in a container. This extra layer keeps them from drying out. If you store them correctly, they last up to three days in the fridge. To freeze burritos, wrap them tightly in plastic wrap, then place them in a freezer-safe bag. Make sure to squeeze out as much air as possible. This method helps avoid freezer burn. You can freeze the burritos for up to three months. For reheating, the best method is to bake them in the oven. Preheat your oven to 350°F (175°C). Unwrap the burrito and place it on a baking sheet. Bake for about 20 minutes or until heated through. You can also microwave them for a quick meal, but the tortilla may get a bit soft. To make these burritos, follow this simple recipe: 1. Mix the marinade: In a bowl, mix minced chipotle, olive oil, lime juice, lime zest, garlic powder, cumin, salt, and pepper. 2. Marinate the shrimp: Add the shrimp to the marinade. Coat them well. Let them marinate for 15 to 30 minutes. 3. Cook the shrimp: Heat a skillet over medium-high heat. Cook the shrimp for 2-3 minutes on each side until pink and opaque. 4. Prepare the filling: In a large bowl, mix cooked rice, black beans, corn, and cilantro. 5. Assemble the burritos: Place a large tortilla flat. Add 1/2 cup of the rice mix, shrimp, and avocado slices in the center. 6. Fold the burritos: Fold the sides inward and roll tightly from the bottom. Repeat with the remaining tortillas. 7. Optional step: Pan-toast each burrito in the skillet until golden brown, about 2-3 minutes per side. If you want a non-seafood option, try these: - Chicken: Use cooked, shredded chicken for a hearty bite. - Tofu: For a vegetarian option, use firm tofu. Cube it, marinate, and cook. - Beef: Ground beef adds a rich flavor. Cook it with spices and mix it in. - Beans: Extra black beans or pinto beans can be a great protein source. Yes, you can make these burritos ahead of time. Here are some tips: - Prep the filling: Make the shrimp mix and rice ahead. Store them in the fridge. - Wrap tightly: Wrap each burrito in foil or plastic wrap. This keeps them fresh. - Reheat: When ready to eat, reheat in the oven or microwave. To keep your burritos firm, try these tips: - Drain excess moisture: Rinse and drain beans and corn well. - Layer wisely: Place shrimp, rice, and beans evenly; avoid overfilling. - Toast the burritos: If you pan-toast them, it adds a nice crunch and texture. Here are some tasty side dishes and drinks: - Mexican rice: A flavorful side that complements the burritos. - Guacamole: Creamy and rich, it adds great flavor. - Chips and salsa: A crunchy snack that goes well with burritos. - Margaritas: A refreshing drink to enjoy with your meal. This guide covered all you need for making Chipotle Lime Shrimp Burritos. We went through the ingredients, marinating shrimp, cooking steps, and assembling the dish. I shared tips for perfecting flavors and preventing burritos from tearing. You can also explore variations and smart storage methods. In the end, you can enjoy tasty burritos your way. Get creative with swaps and serving styles to fit your taste. Make these burritos, enjoy with friends, and savor every bite!

Chipotle Lime Shrimp Burritos Flavorful and Fresh Meal

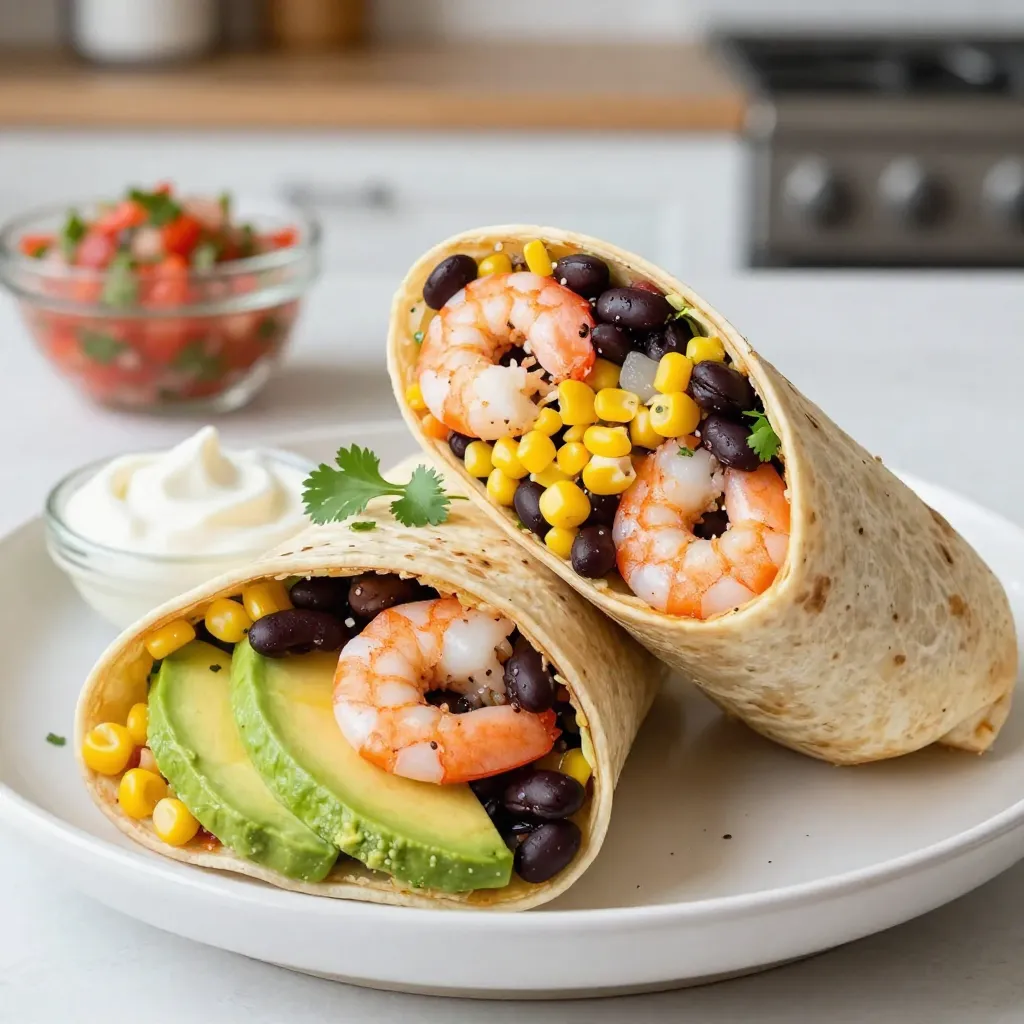
Are you craving a burst of flavor in your meals? My Chipotle Lime Shrimp Burritos are the answer! Fresh shrimp,

- 1 cup apple cider - 2 cups all-purpose flour - 1 teaspoon baking powder - 1 teaspoon baking soda - 1 teaspoon ground cinnamon - 1/2 teaspoon ground nutmeg - 1/2 teaspoon salt - 1 large egg - 3/4 cup granulated sugar - 1/4 cup brown sugar - 1/2 cup unsweetened applesauce - 1/4 cup vegetable oil - 1 teaspoon vanilla extract - 1/4 cup granulated sugar (for topping) - 2 teaspoons ground cinnamon (for topping) Gather these ingredients to make your apple cider cinnamon sugar donuts. You need apple cider for sweetness and flavor. All-purpose flour gives the donuts their body. Baking powder and baking soda help them rise. Ground cinnamon and nutmeg add warmth and spice. The large egg binds everything together. Granulated and brown sugar sweeten the batter and give it depth. Unsweetened applesauce keeps the donuts moist. Vegetable oil adds richness, while vanilla extract brings out sweet notes. You will also need extra granulated sugar and cinnamon to coat the warm donuts. This mix creates a delightful crunch that contrasts with the soft donut inside. Make sure you have all these items ready before you start baking. To start, take 1 cup of apple cider. Pour it into a medium saucepan and heat it over medium heat. Bring the cider to a boil, then reduce the heat. Let it simmer until it reduces to about 1/2 cup. This takes around 15-20 minutes. Once reduced, set it aside to cool slightly. In a large mixing bowl, combine the dry ingredients. You will need 2 cups of all-purpose flour, 1 teaspoon of baking powder, 1 teaspoon of baking soda, 1 teaspoon of ground cinnamon, 1/2 teaspoon of nutmeg, and 1/2 teaspoon of salt. Whisk them together until well mixed. This step is key for even flavor. Now, take another bowl and crack 1 large egg into it. Beat the egg well. Next, add 3/4 cup of granulated sugar and 1/4 cup of brown sugar. Then, mix in 1/2 cup of unsweetened applesauce, 1/4 cup of vegetable oil, 1 teaspoon of vanilla extract, and the cooled apple cider. Mix until the mixture is smooth and combined. Gradually add the wet mixture to the dry ingredients. Mix gently until just combined. Be careful not to overmix, as this can make your donuts tough. Once combined, spoon the batter into a greased donut pan. Fill each mold about 2/3 full to allow for rising. Preheat your oven to 350°F (175°C). Place the filled donut pan in the oven and bake for 12-15 minutes. To check doneness, insert a toothpick into the center of a donut. If it comes out clean, they are ready. Once baked, let the donuts cool in the pan for about 5 minutes before transferring them to a wire rack. While the donuts cool, prepare the cinnamon sugar topping. In a small bowl, mix together 1/4 cup of granulated sugar and 2 teaspoons of ground cinnamon. Once the donuts are still warm, generously coat each one in the cinnamon sugar mixture. Make sure they are evenly covered for the best taste. To make the best donuts, avoid overmixing the batter. When you mix, do it gently. Stop once you see no dry flour. Overmixing can make them tough. For measuring flour accurately, use the spoon and level method. First, fluff the flour in its bag. Then, spoon it into your measuring cup. Finally, level it off with a knife. This keeps the flour from packing down, ensuring the right amount. To get the best texture, focus on baking time and temperature. Set your oven to 350°F (175°C). Bake the donuts for 12-15 minutes. Check them with a toothpick. If it comes out clean, they are ready. Place the donut pan on the middle rack of your oven. This helps with even baking. If it's too high or low, some may bake faster than others. To enhance flavor, think about adding spices. Try a pinch of ginger or allspice. You can also add a bit more cinnamon for extra warmth. Using fresh apple cider gives a great taste. It has a richer flavor than store-bought cider. If you cannot find fresh cider, choose a high-quality brand. This will still give you a lovely taste in your donuts. {{image_2}} You can add fun twists to your donuts. One easy option is pumpkin spice. It gives a warm, cozy taste. Just mix in one teaspoon of pumpkin spice with the dry ingredients. This change adds a nice fall flavor. Another great idea is to add chocolate chips or nuts. You can fold in 1/2 cup of chocolate chips or chopped nuts when you mix the wet and dry ingredients. Both options give your donuts a delightful crunch and burst of flavor. If you want a healthier treat, consider using whole wheat flour. Swap the two cups of all-purpose flour for whole wheat flour. This adds fiber to your donuts and makes them more filling. You can also reduce the sugar. Instead of 3/4 cup granulated sugar, use only 1/2 cup. You might even try sugar alternatives, like honey or maple syrup. They can add sweetness without all the sugar. For those who need gluten-free options, you can use a gluten-free flour blend. Look for blends that work well in baked goods. They often have a mix of rice flour and starches. When using gluten-free flour, you may need to adjust the liquid. Gluten-free flour can absorb more moisture. Start with a little extra apple cider or applesauce to get the right batter texture. To keep your apple cider cinnamon sugar donuts fresh, store them in an airtight container. This will prevent them from drying out. You can use a plastic container or a resealable bag. Make sure to place a paper towel inside to absorb any moisture. This helps keep the donuts soft and tasty. If you want to save some donuts for later, freezing is a great option. First, let the donuts cool completely. Then, wrap each donut tightly in plastic wrap. After that, place them in a freezer-safe bag or container. They can stay in the freezer for up to three months. When you’re ready to eat one, take it out and let it thaw at room temperature for about 30 minutes. For a warm treat, you can also reheat the thawed donut in the oven for a few minutes. These donuts are best enjoyed fresh. At room temperature, they stay good for about two days. Keep them in a cool, dry place to maintain their flavor. If they start to feel hard or dry, it’s time to toss them. Always check for any signs of spoilage, like mold or an off smell, before eating. You can use apple juice, but the flavor will change. Apple cider has a deeper, richer taste. It adds warmth and spice to the donuts. Apple juice tends to be sweeter and lighter. This change affects the final taste of your donuts. If you want to skip eggs, try using applesauce instead. Use 1/4 cup of applesauce for each egg. You can also use mashed banana or flaxseed meal. For flaxseed, mix 1 tablespoon with 3 tablespoons of water. Let it sit for a few minutes before adding it to the mix. Yes, you can use a muffin pan. Just pour the batter into the molds. Fill each cup about halfway. Bake for about 15-18 minutes instead of 12-15. Check for doneness with a toothpick. Muffins will be larger and thicker than donuts. For the best flavor, use tart apples like Granny Smith. They add a nice balance of sweet and tangy. Other good choices are Honeycrisp or Fuji apples. Mixing different types gives a deeper taste. This will enhance the flavor of your donuts. You only need a few basic tools. A donut pan is best for perfect shapes. A mixing bowl and whisk are essential for combining ingredients. A measuring cup and spoons help with accuracy. A toothpick is useful for checking doneness. We've covered how to make delicious apple cider donuts from scratch. We discussed the key ingredients, step-by-step instructions, and helpful tips for perfecting your donuts. These treats are easy to customize and can fit various diets. Whether you want to spice them up or make them healthier, there’s a way for everyone. Remember to store leftovers properly and enjoy them at their best! Now, you can bake these tasty donuts for yourself or share them with friends. Get ready for delicious flavors and smiles all around!

Apple Cider Cinnamon Sugar Donuts Irresistible Treat

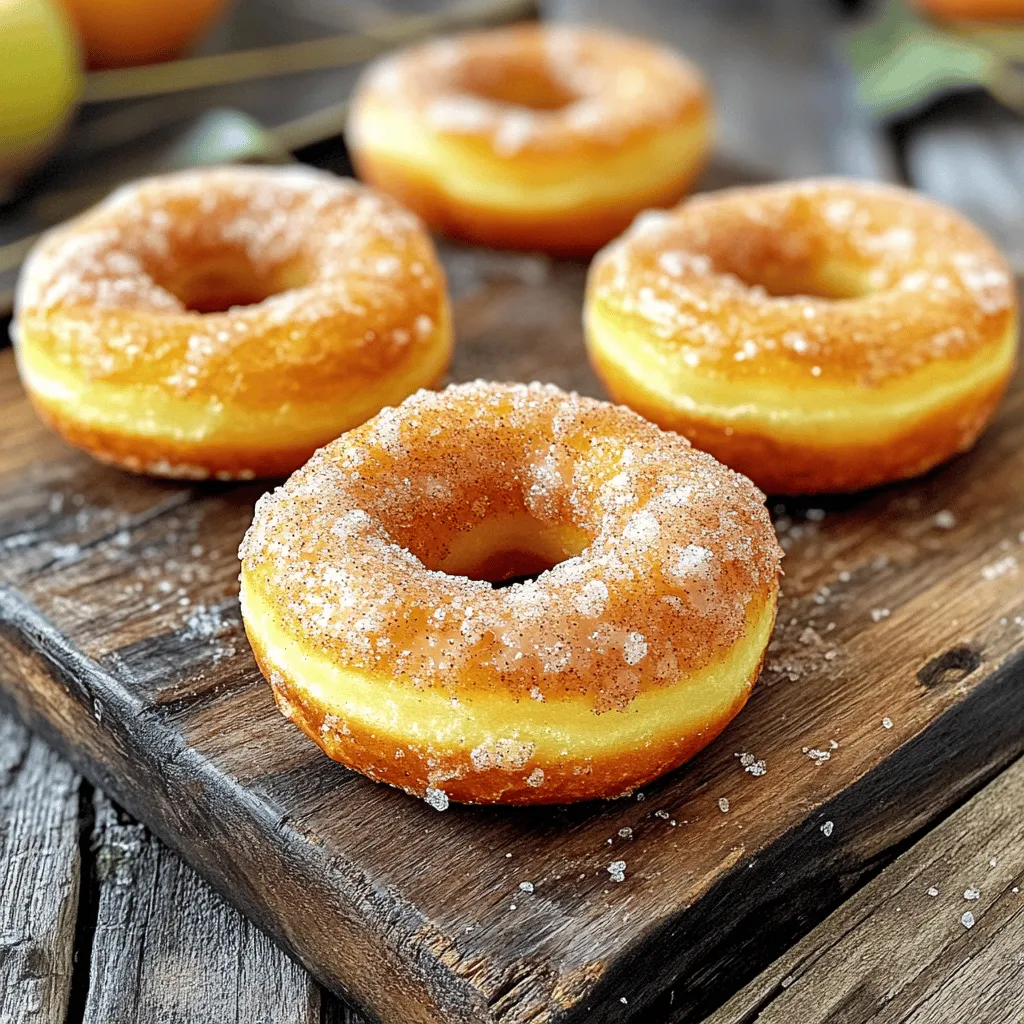
Get ready to enjoy fall with my delicious Apple Cider Cinnamon Sugar Donuts! These soft, warm treats burst with apple

To make Chocolate Almond Coconut No Bake Bars, you need: - 1 cup almond flour - 1 cup unsweetened shredded coconut - 1/2 cup natural almond butter - 1/4 cup pure maple syrup - 1/4 cup cocoa powder - 1 tablespoon coconut oil, melted - 1 teaspoon vanilla extract - A pinch of sea salt - 1/4 cup dark chocolate chips (dairy-free if desired) Choosing high-quality ingredients makes a big difference in flavor. Here are some tips: - Almond flour: Look for finely ground almond flour for a smooth texture. - Shredded coconut: Choose unsweetened coconut for a pure taste. - Almond butter: Go for natural almond butter without added sugars or oils. - Maple syrup: Use pure maple syrup for the best sweetness and flavor. - Cocoa powder: Select unsweetened cocoa powder with a rich chocolate taste. - Dark chocolate chips: Pick dairy-free chips if you want to keep it vegan. You can easily adjust this recipe to fit different diets: - Nut-free: Use sunflower seed butter instead of almond butter. - Gluten-free: This recipe is already gluten-free since it uses almond flour. - Sugar-free: Substitute maple syrup with a sugar-free syrup or a sweetener like stevia. - Coconut-free: Replace shredded coconut with more almond flour or oats for texture. These changes let everyone enjoy these tasty bars! Start by gathering all your ingredients. You need almond flour, shredded coconut, cocoa powder, almond butter, maple syrup, coconut oil, vanilla extract, sea salt, and dark chocolate chips. In a large bowl, mix the almond flour, shredded coconut, and cocoa powder. Stir until everything is mixed well. In another bowl, whisk the almond butter, maple syrup, melted coconut oil, vanilla, and sea salt. Keep whisking until the mixture is smooth. Now, pour this wet mix into the dry ingredients. Stir until you have a sticky dough. Make sure you mix well to blend all the flavors. If the mix feels too dry, add a bit more almond butter. If it’s too wet, add a little more almond flour. When you add the dark chocolate chips, fold them in gently. This way, they spread evenly in the dough. A spatula can help you press the mixture firmly into the baking dish. This step is key for a nice, firm bar. After chilling for at least one hour, remove the bars using the parchment paper. Cut them into squares or rectangles. For a lovely presentation, serve on a rustic wooden board. Drizzle some melted dark chocolate on top for an elegant look. You can also sprinkle extra shredded coconut for a nice touch. These bars are perfect for sharing or enjoying all by yourself! When making Chocolate Almond Coconut No Bake Bars, watch out for some common issues. First, don’t forget to measure your ingredients carefully. Too much flour or coconut can make the bars dry. Also, be sure to mix the wet and dry ingredients well. If they don't blend, the bars might fall apart. Finally, don't skip chilling them. Skipping this step leads to soft, crumbly bars. To make the bars firmer, add a bit more almond flour. You can also increase the cocoa powder for a richer taste. If you want softer bars, use a little less almond flour. You can also add more almond butter for extra moisture. Adjusting the maple syrup can help, too. More syrup makes the bars sweeter and softer. Serve these bars on a rustic wooden board for a nice touch. Drizzle some melted dark chocolate on top for extra flavor. You can also sprinkle extra shredded coconut for a beautiful look. For a fun twist, try adding fresh fruit or nuts on the side. These bars pair well with a cold glass of almond milk or coconut milk for a sweet treat. {{image_2}} If you want to make these bars nut-free, swap almond flour with sunflower seed flour. You can also use sunflower seed butter instead of almond butter. This way, you keep the creamy texture and flavor without any nuts. To add a twist, try spices or extracts. A dash of cinnamon can warm the bars nicely. You might enjoy a hint of orange zest for freshness. If you love mint, add a drop of peppermint extract. These small changes can make a big impact! Feel free to customize your bars with different mix-ins. Dried fruits like cranberries or raisins add sweetness. Chopped dates or figs offer a chewy texture. If you want extra crunch, throw in some seeds like pumpkin or sunflower seeds. Each mix-in brings new flavors and fun! To keep your Chocolate Almond Coconut No Bake Bars fresh, store them in an airtight container. Line the container with parchment paper to avoid sticking. Keep the bars in the refrigerator. This keeps them firm and tasty. If you plan to eat them within a week, this is best. For longer storage, freezing works well. These bars can last up to one week in the fridge. If you freeze them, they can last for up to three months. Cut the bars before freezing. Wrap each piece tightly in plastic wrap. Then, place them in a freezer bag. This prevents freezer burn and keeps the flavor intact. To enjoy your frozen bars, simply take them out of the freezer. Let them sit at room temperature for about 10 to 15 minutes. This softens them nicely. You can also place them in the fridge overnight to thaw. Enjoy them as a snack, dessert, or energy boost! Yes, you can use other nut butters. Peanut butter works great, too. Cashew butter adds a nice creaminess. Just pick a nut butter you love. The flavor may change a bit, but that’s okay! To make these bars vegan-friendly, ensure your chocolate chips are dairy-free. Use a plant-based butter if you choose to swap almond butter. The maple syrup is already vegan, so you’re all set! Just follow the recipe as is, and enjoy your treat! These bars pair well with fresh fruit. Try serving them with berries or banana slices. You can also add a scoop of coconut yogurt on the side. Drizzling extra melted chocolate on top is a fun touch! Enjoy serving these bars any way you like. This article covered key points for making delicious bars. We discussed choosing quality ingredients and offered tips for substitutions. You learned step-by-step instructions for mixing and serving them well. We also explored common mistakes and variations to suit your taste. Lastly, we shared storage tips and answered your FAQs. Remember, the right ingredients and methods lead to great results. Enjoy experimenting with flavors to find your favorites.

Chocolate Almond Coconut No Bake Bars Delight

Indulging in a sweet treat doesn’t have to mean hours in the kitchen. I’m excited to share my recipe for

To make Peanut Butter Cookie Dough Protein Bites, you need just a few simple ingredients. Each one adds flavor and nutrition. Here’s what you will need: - 1 cup natural peanut butter - 1/2 cup rolled oats - 1/2 cup vanilla protein powder (or any flavor of your choice) - 1/4 cup honey or maple syrup - 1/4 cup mini dark chocolate chips - 1/2 teaspoon vanilla extract - A pinch of sea salt Natural peanut butter gives a rich taste and healthy fats. Rolled oats add texture and fiber. The protein powder boosts the protein content, making these bites perfect for snacks or post-workout. Honey or maple syrup sweetens the bites naturally. Mini dark chocolate chips add a fun touch of sweetness. Vanilla extract enhances the overall flavor, while sea salt balances the sweetness. These ingredients come together to create a delicious treat. They are easy to find in any grocery store. Always look for natural peanut butter without added sugar or oils. Enjoy making these tasty protein bites! Mixing the Base Ingredients Start by taking a large mixing bowl. Add 1 cup of natural peanut butter, 1/4 cup of honey or maple syrup, and 1/2 teaspoon of vanilla extract. Stir these together until they blend well. This creates a creamy base that tastes great. Incorporating Dry Ingredients Next, add in 1/2 cup of rolled oats, 1/2 cup of vanilla protein powder, and a pinch of sea salt. Mix everything together until all the dry ingredients are fully combined. This step adds texture and boosts the protein content of your bites. Shaping the Bites Now comes the fun part! Scoop out small amounts of the mixture with your hands. Roll each scoop into a ball about 1 inch in diameter. Keep rolling until you shape the entire mixture. This should yield about 12 bites of deliciousness. Chilling Time Once shaped, place the protein bites on a parchment-lined baking sheet or plate. Refrigerate them for at least 30 minutes. This helps the bites firm up nicely. After they chill, you can transfer them to an airtight container. Store them in the fridge for up to one week for a tasty snack anytime! To get the best texture, use natural peanut butter. This kind is smooth and creamy. If your mix feels too dry, add a little honey or maple syrup. This helps bind the ingredients together. The goal is a sticky yet firm dough that holds its shape. Store your protein bites in an airtight container. This keeps them fresh longer. Place the container in the fridge for up to one week. If you want to keep them longer, freeze them. Just thaw them for a few minutes before eating. If you have dietary needs, you can swap ingredients. Use almond butter instead of peanut butter for a nut-free option. If you're vegan, use maple syrup and a plant-based protein powder. For gluten-free bites, choose certified gluten-free oats. {{image_2}} Alternative Nut Butters You can switch peanut butter for other nut butters. Almond butter gives a nice twist. Cashew butter adds creaminess and a mild taste. Sunflower seed butter works for a nut-free option. Each nut butter brings its own flavor and texture. Experiment to find your favorite. Adding Different Mix-ins Get creative with mix-ins! Try adding dried fruit for sweetness. Chopped nuts give a nice crunch. You can also use seeds like chia or flax for extra nutrients. Even coconut flakes can add a fun twist. Mix and match to keep things exciting. Using Flavored Protein Powder If you want a new taste, try different protein powders. Chocolate protein powder adds rich flavor. Cookies and cream powder makes it taste like dessert. You can even use unflavored for a more neutral taste. This small change can transform your protein bites. To keep your Peanut Butter Cookie Dough Protein Bites fresh, store them right. Use an airtight container. This helps keep moisture out and flavor in. I prefer glass or BPA-free plastic containers for best results. Refrigerate your bites for up to one week. They taste best when chilled. If you want to keep them longer, freezing works well. Just place them in a freezer-safe bag or container. For freezing, make sure to separate the bites with parchment paper. This way, they won't stick together. When you're ready to eat, thaw them in the fridge overnight. Enjoy your tasty treat whenever you like! To make vegan Peanut Butter Cookie Dough Protein Bites, use plant-based protein powder. Replace honey with maple syrup for sweetness. Ensure your peanut butter is natural and free from added ingredients. Follow the same steps in the recipe for mixing and shaping. Yes, you can use other sweeteners. Agave nectar, coconut sugar, or stevia work well. Just make sure to adjust the amount based on the sweetness level you prefer. Each sweetener may slightly change the texture, so keep that in mind. Each serving, or bite, has about 100 calories. You get 5 grams of protein, 6 grams of carbs, and 4 grams of fat. This may vary based on the exact ingredients you use. Always check your specific brands for precise numbers. You now have the tools to make delicious, healthy protein bites. We covered ingredients like natural peanut butter and rolled oats, plus tips to get your texture just right. Don't forget to explore flavor variations or dietary swaps that fit your needs. Use the storage advice to keep them fresh. I hope you feel inspired to try this easy recipe. Enjoy your tasty snacks while fueling your day!

Peanut Butter Cookie Dough Protein Bites Simple Treat

Are you ready to unleash your inner sweet tooth while keeping it healthy? These Peanut Butter Cookie Dough Protein Bites

- 4 bone-in chicken thighs (skin-on) - 6 cloves of garlic, minced - 1 cup grated Parmesan cheese - 1/4 cup olive oil - 1 tablespoon dried Italian herbs (oregano, basil, thyme) - Salt and pepper to taste - 1 tablespoon fresh parsley, chopped (for garnish) - Baking dish - Mixing bowl - Measuring cups and spoons Using the right ingredients is key to making Roasted Garlic Parmesan Chicken. You should start with bone-in, skin-on chicken thighs. They keep the meat juicy during cooking. Fresh garlic adds bold flavor. Grated Parmesan gives that rich, cheesy crust we love. For additional flavor, use good olive oil. Dried Italian herbs bring a classic taste. Don’t forget salt and pepper to enhance all the flavors. Fresh parsley makes a lovely garnish and adds color. You will need a baking dish to roast the chicken. A mixing bowl helps combine the ingredients well. Measuring cups and spoons ensure you use the right amounts. With these ingredients and tools, you're ready to make a meal that shines! - Preheat your oven to 400°F (200°C). - In a bowl, mix olive oil, minced garlic, dried herbs, salt, and pepper until well combined. This mix adds a rich flavor to the chicken. - Pat the chicken thighs dry with paper towels. Dry skin helps it get crispy. - Rub the garlic mixture all over each piece of chicken. Make sure to cover every part for full flavor. - Place chicken thighs in a baking dish skin-side up. - Pour any leftover garlic mixture over the chicken for extra taste. - Generously sprinkle grated Parmesan cheese over each thigh. This cheese melts and turns golden brown as it cooks. - Roast in the oven for 35-40 minutes. Check that the chicken reaches an internal temperature of 165°F (75°C). The cheese should be crispy and golden. After roasting, let the chicken rest for 5 minutes. This helps keep it juicy. Enjoy your meal with a sprinkle of parsley for a fresh touch! To get crispy skin on your chicken, follow some simple steps. Start by patting the chicken dry. This helps remove extra moisture. Moisture can make the skin soggy. If the skin is dry, it will crisp up better in the oven. Next, rub the garlic mixture evenly on each piece. Make sure the skin side gets enough rub. This adds flavor and helps crisp it up. When cooking, place the chicken skin-side up. This allows the heat to reach the skin directly. For better flavor, consider adding marinades. You can try lemon juice or honey for a sweet touch. Fresh herbs, like rosemary or thyme, work well too. Fresh herbs give a stronger taste than dried ones. You can mix them in the garlic rub, or sprinkle them on top. If you prefer dried herbs, use them too. They still add great flavor. Just remember to use less than fresh herbs, as their taste is more concentrated. Roasted Garlic Parmesan Chicken pairs well with many sides. Try serving it with roasted vegetables. Carrots, broccoli, and potatoes complement the dish nicely. You can also serve it with a fresh salad. For a colorful presentation, place chicken on a large platter. Sprinkle chopped parsley over the chicken for a pop of color. This simple touch makes your meal look great and inviting! {{image_2}} You can change the protein in this dish. Instead of chicken thighs, you can use chicken breasts or drumsticks. Chicken breasts cook faster but may dry out if overcooked. Drumsticks are juicy and flavorful, giving you a nice option. If you want a quicker cook time, try boneless chicken. Boneless thighs or breasts will save time. They are easy to coat and cook just as well. Just remember to check the internal temperature. It should reach 165°F (75°C) for safety. You can add your twist to this recipe. Try adding some lemon juice or lemon zest for a fresh taste. The brightness of lemon pairs well with garlic and Parmesan. You can also experiment with different cheeses like mozzarella or cheddar. Each cheese brings its own unique flavor. If you like heat, spice it up! Add crushed red pepper flakes to the garlic mixture. This will give your chicken a nice kick. You can adjust the amount based on how spicy you want it. You do not need to stick with baking. An air fryer works great for this recipe too. Preheat the air fryer to 375°F (190°C). Cook the chicken for about 25-30 minutes. Check for that perfect golden color and internal temperature. If you prefer a slow cooker, this method can make your chicken super tender. Simply place the chicken in the slow cooker with the garlic mixture. Cook on low for 6-8 hours or high for 3-4 hours. The flavors will blend beautifully, and you will have a delicious meal with less effort. To store your leftovers, place the chicken in an airtight container. Make sure it cools to room temperature first. This helps keep the chicken juicy. You can keep it in the fridge for up to four days. Just check for any off smells or changes in texture before eating. If you want to freeze the chicken, wrap each piece tightly in plastic wrap or foil. Then, place them in a sturdy freezer bag. This keeps air out and prevents freezer burn. You can freeze the chicken for up to three months. When you're ready to eat, thaw it in the fridge overnight. To reheat the chicken, use your oven for the best results. Preheat it to 350°F (175°C). Place the chicken on a baking sheet and cover it with foil. This keeps moisture in. Heat for about 20 minutes or until warmed through. Avoid using the microwave, as it can make the chicken soggy. Enjoy your flavorful meal! To get crispy skin, start by drying the chicken well. Moisture makes it hard to get that crunch. Next, apply a generous layer of oil and seasonings. This adds flavor and helps the skin crisp up nicely. Lastly, roast at a high temperature. I recommend 400°F (200°C) for great results. Yes, you can use different cheeses! Mozzarella gives a nice melt, while cheddar adds a sharp flavor. Feta brings a tangy twist, and gouda adds a smoky note. Each cheese will change the dish's taste, so feel free to experiment! Absolutely! This chicken is perfect for meal prep. You can cook a batch in advance and store it in the fridge. It stays tasty and can last for about four days. Just reheat it in the oven to keep it crispy. If you want to skip the garlic, you can still enjoy this dish. Try using shallots for a milder flavor. You could also add lemon zest for a fresh taste. Another option is to use a mix of herbs for more depth. Many sides go great with this chicken! Roasted vegetables, like carrots and broccoli, add color and flavor. A fresh salad balances the richness, too. You can also serve it with mashed potatoes or rice for a hearty meal. Roasted Garlic Parmesan Chicken is easy and tasty. We covered main and extra ingredients, key tools, and step-by-step cooking methods. You can switch proteins or add flavors for variety. Remember to store leftovers properly for later. Use the tips to make the skin crispy and flavorful. Now you can enjoy a delicious meal any day. Happy cooking!

Roasted Garlic Parmesan Chicken Juicy and Flavorful Meal

Are you ready for a delicious dinner that will impress everyone? This Roasted Garlic Parmesan Chicken is juicy, flavorful, and

Older posts
Newer posts
← Previous Page1 … Page24 Page25 Page26 … Page84 Next →

dsad

© 2026 Lisa Dishes • Built with GeneratePress

Our Policies

  • Copyright Policy
  • Cookie Policy
  • GDPR Policy
  • Privacy Policy
  • Disclaimer
  • Terms Of Use

More Information

  • Home
  • About
  • Contact
  • Appetizers
  • Dessert
  • Dinner
  • Drinks
©2026, Lisa Dishes About Back To Top