Skip to content
DisclaimerTerms Of UseGDPR PolicyCookie Policy

Lisa Dishes

  • Home
  • Drinks
  • Appetizers
  • Dinner
  • Dessert
  • About
  • Contact
  • Privacy Policy
DisclaimerTerms Of UseGDPR PolicyCookie Policy

NO-ING-IMG

- 2 cups uncooked elbow macaroni - 4 cups chicken broth - 2 cups cooked chicken, shredded - 1 cup buffalo sauce - 2 cups shredded sharp cheddar cheese - 1 cup cream cheese, cubed - 1/2 cup grated Parmesan cheese - 1 teaspoon garlic powder - 1 teaspoon onion powder - Salt and pepper to taste - Chopped green onions for garnish (optional) - Celery sticks for serving (optional) When I prepare Buffalo Chicken Mac and Cheese, I focus on the main ingredients first. The elbow macaroni is the heart of this dish. It's creamy, cheesy, and pairs well with the spice of buffalo sauce. I always use fresh chicken broth. It adds depth of flavor and keeps the pasta moist. Next, I add shredded chicken. This is where the dish gets its protein. The buffalo sauce provides that kick. You can adjust the amount based on your spice level. I love sharp cheddar cheese for its bold flavor. It melts beautifully, adding richness to our mac and cheese. Now, for the additional ingredients. Cream cheese adds a smooth texture. I cut it into cubes for easy melting. Grated Parmesan gives a nice tang. The garlic and onion powders enhance the flavor without overpowering it. Finally, I season with salt and pepper. I always taste as I go. For garnish, I like chopped green onions. They add color and freshness. Celery sticks on the side offer a nice crunch. This simple blend of ingredients makes a delightful dish that everyone loves. - Combine 2 cups of uncooked elbow macaroni with 4 cups of chicken broth. - Stir well to ensure the pasta is fully submerged. This step helps the pasta cook evenly. - Now, add 2 cups of shredded chicken and 1 cup of buffalo sauce. - Incorporate 1 teaspoon of garlic powder and 1 teaspoon of onion powder. Add salt and pepper to your taste. Mix until everything is well combined. - Place cubes of 1 cup of cream cheese on top of the mixture. - Next, sprinkle 2 cups of shredded sharp cheddar cheese and 1/2 cup of grated Parmesan cheese on top. This will create a rich, cheesy layer. - Cover the slow cooker and set it on low. - Cook for 2 to 3 hours. Check to see if the pasta is cooked through and has absorbed most of the broth. - Once done, stir gently to combine all the melted cheeses. - Taste the dish and adjust the seasonings as needed. If you want more heat, add a splash of buffalo sauce. Enjoy your creamy, spicy delight! To avoid overcooking pasta, keep an eye on the cooking time. Use low heat and cook for 2 to 3 hours. Check the pasta after 2 hours. If it's soft and has absorbed the broth, it's ready. Stir gently to avoid breaking the pasta. For even distribution of flavors, mix well after adding each ingredient. Stir the chicken and buffalo sauce in thoroughly. This helps every bite taste great. Adding spices early also helps the flavors blend well. For cheese alternatives, consider using gouda or mozzarella. These cheeses melt well and add unique flavors. If you want a richer taste, try adding Gruyère cheese. To achieve creamier mac and cheese, use more cream cheese. You can also add a bit of milk or half-and-half. This will enhance the creaminess and smooth texture. To customize spiciness, start with less buffalo sauce. You can always add more later. Taste as you go to find your ideal level. Adding ingredients like diced jalapeños or crushed red pepper can boost the heat. You could even throw in some spicy ranch dressing for extra flavor. Explore different hot sauces, too, for a unique twist! {{image_2}} You can switch chicken for turkey or beef. This change gives a new taste. Use cooked turkey or beef and shred it like chicken. It’s an easy swap that still tastes great. For a dairy-free option, you can replace cream cheese and cheese. Try using cashew cream or dairy-free cheese. These swaps offer a creamy texture without dairy. Look for brands that melt well for the best results. Want to boost nutrition? Add vegetables like spinach or bell peppers. These veggies mix well and add color. You can also toss in some peas or broccoli for added crunch. Consider using different sauces to change the flavor. Ranch dressing can add a creamy twist. BBQ sauce brings a sweet and smoky vibe. Experimenting with these sauces makes each batch unique. Pair your Buffalo chicken mac and cheese with side dishes. A fresh salad or crunchy coleslaw works well. The coolness of the salad balances the heat from the dish. Leftovers can be fun too! Serve them in a baked potato or as a dip. Just add some extra cheese on top and bake until bubbly. This way, you get a new meal from your leftovers. To store leftover Buffalo Chicken Mac and Cheese, let it cool first. Transfer it to an airtight container. This keeps the dish fresh and safe. You can store it in the fridge for up to three days. Glass containers work best for storage. They do not stain and are easy to clean. You can reheat your mac and cheese in the microwave or on the stovetop. For the microwave, place it in a bowl. Heat in short bursts, stirring often. For stovetop, use a pan over low heat. Add a splash of chicken broth to keep it creamy. Stir it well to avoid sticking. If you want to freeze your mac and cheese, let it cool completely. Portion it into freezer-safe containers. You can freeze it for up to three months. When you’re ready to eat, thaw it overnight in the fridge. Reheat it in the microwave or stovetop, just like before. Add a bit of broth to help with creaminess. You can still make Buffalo Chicken Mac and Cheese! Use a large pot on the stove. Start by boiling the elbow macaroni in chicken broth. Once the pasta is cooked, mix in the shredded chicken and buffalo sauce. Then add the cheeses and seasonings. Stir until everything melts together, and enjoy! To boost the heat, add more buffalo sauce. You can also mix in diced jalapeños or red pepper flakes. For a smoky flavor, try adding chipotle powder. Another fun idea is to serve with spicy pickles for an extra kick on the side. Yes, you can use gluten-free elbow macaroni! Look for brands made from brown rice or quinoa. These options cook well and taste great in this dish. Always check the cooking time, as it may vary slightly from regular pasta. If you set your slow cooker to high, it will take about 1.5 to 2 hours. Keep an eye on it to avoid overcooking. When the pasta is tender and the cheese is melted, it’s ready to serve. Absolutely! Swap the chicken for cooked lentils or chickpeas. You can also add veggies like spinach or bell peppers for extra flavor. Use vegetable broth in place of chicken broth for a tasty, meat-free meal. This slow cooker buffalo chicken mac and cheese is simple and tasty. It combines pasta, chicken, and cheese for a creamy dish. Remember to adjust spices to fit your taste. You can easily change ingredients or make it vegetarian. Proper storage keeps leftovers fresh for later. Whether you enjoy it spicy or mild, this dish satisfies cravings every time. Get ready to enjoy your next meal!

Buffalo Chicken Mac and Cheese Slow Cooker Delight

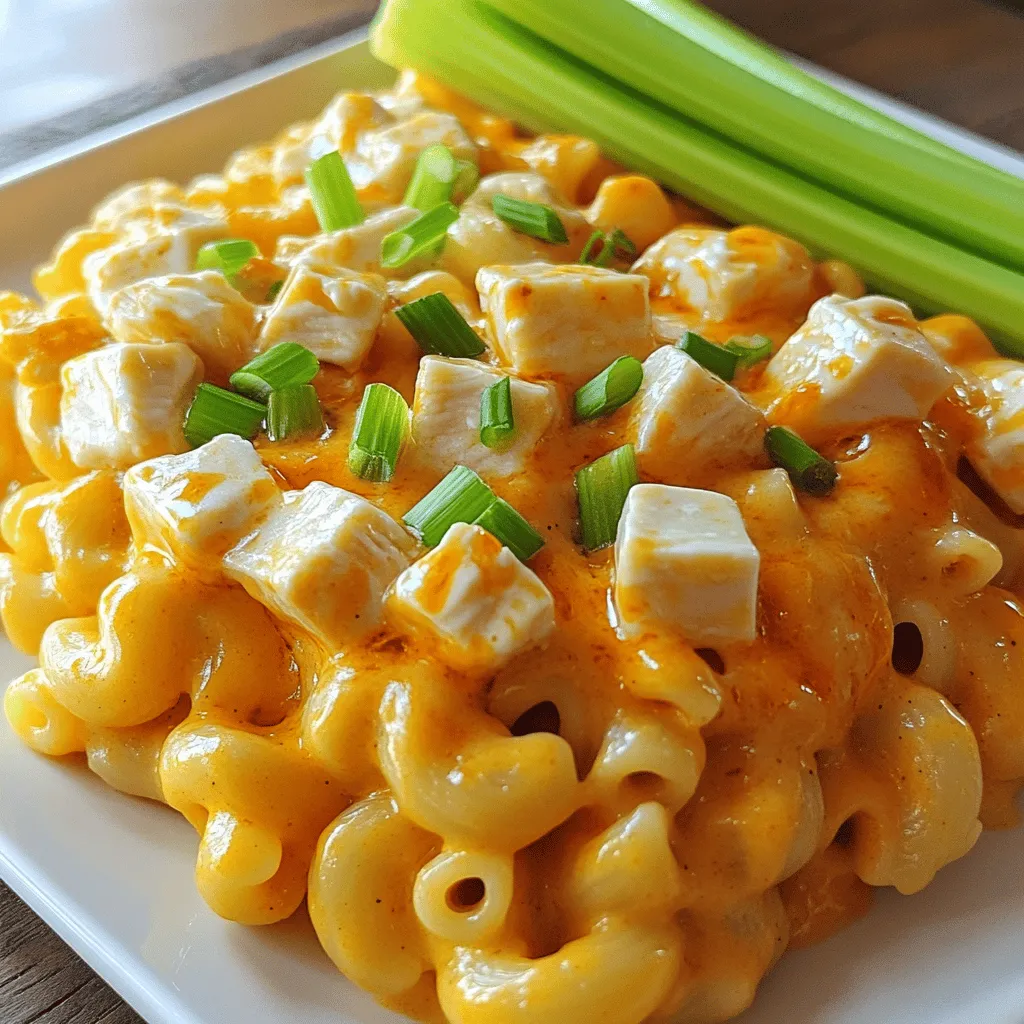
Are you ready for a dish that will make your taste buds dance? This Buffalo Chicken Mac and Cheese Slow

- 2 large apples (Honeycrisp or Fuji) - 1 teaspoon ground cinnamon - 1 tablespoon coconut sugar (or brown sugar) - 1 teaspoon lemon juice - Pinch of salt Gather all your ingredients before you start. Choose large apples like Honeycrisp or Fuji for the best flavor. They have a nice sweetness that pairs well with cinnamon. You’ll need ground cinnamon to add warmth and spice. Coconut sugar or brown sugar gives a subtle caramel flavor. A bit of lemon juice brightens the apples and helps stop browning. Lastly, a pinch of salt enhances all the flavors. With these simple ingredients, you’ll create a crunchy snack that’s both healthy and delicious. This recipe is easy and quick, perfect for any time of day! Start by washing and drying your apples. This step is key to getting rid of dirt. Next, slice the apples very thinly. You can use a mandoline slicer for even cuts or a sharp knife if you prefer. Aim for about 1/8 inch thick slices. To remove the cores, use a core remover or simply leave them in for a rustic look. In a small bowl, combine 1 teaspoon of ground cinnamon, 1 tablespoon of coconut sugar, and a pinch of salt. This mix brings out the apple's natural sweetness. Stir well to ensure the flavors blend. Place the apple slices in a large mixing bowl. Drizzle 1 teaspoon of lemon juice over them. This step helps keep the apples fresh and adds a nice zing. Toss the slices gently to coat them. Sprinkle the cinnamon sugar mix over the apples and toss again. Make sure every slice gets a good coating. Preheating your air fryer is important. Set it to 300°F (150°C) and let it warm up for about 5 minutes. This step ensures even cooking from the start. Lightly spray the air fryer basket with cooking spray. Lay out the apple slices in a single layer. Avoid overcrowding; this helps them cook evenly. If you have many slices, do this in batches. Cook the apple slices in the air fryer for about 15 to 20 minutes. Shake the basket halfway through to ensure they cook evenly. Keep an eye on them in the last few minutes. You want them crisp but not burnt. Once done, take the chips out of the air fryer. Let them cool for a few minutes. This cooling step helps them get extra crispy. Enjoy them right away or store in an airtight container for a crunchy snack later! For the best apple chips, use Honeycrisp or Fuji apples. These apples are sweet and crisp. Their texture holds up well during cooking. You can also try Granny Smith apples for a tart kick. Mix different types for fun flavors. Watch your chips closely. They should be crisp but not burnt. Signs of overcooking include dark edges or a strong burnt smell. If you see these signs, remove them right away. Shake the basket halfway through cooking to help them cook evenly. Get creative with your apple chips! Try adding nutmeg or vanilla for extra flavor. You can also sprinkle a bit of sea salt to balance sweetness. For a spicy kick, add a dash of cayenne pepper. These simple changes can make your chips even tastier! {{image_2}} You can change the sweetener in this recipe. Instead of coconut sugar or brown sugar, try using honey or maple syrup. Both add a nice touch of sweetness. Just keep in mind that honey will make the chips stickier. You might need to adjust the cooking time a bit. If you want a sugar-free option, consider using stevia or monk fruit sweetener. These choices keep your snack tasty without extra sugar. Want to add more flavor? You can mix in nutmeg or vanilla. Nutmeg gives a warm, spicy taste. Just a pinch will do. If you use vanilla, a few drops of extract will enhance the sweetness. You can even combine both for a unique twist. These flavors work well with the apples and cinnamon. They make your chips even more special and fun to eat. Don’t stop at apples! You can try pears or even bananas. Slice them thin, just like the apples. Pears have a soft texture and sweet taste. Bananas will turn crispy, too, but watch them closely. They can cook faster than apples. Experiment with your favorite fruits. Each one adds a new flavor to your crunchy snack. To keep your apple chips fresh, use an airtight container. A glass jar or a plastic container works well. Make sure to let the chips cool completely before sealing them up. This helps prevent moisture buildup, which can make them soft. When stored properly, your apple chips can last about one week. You can keep them on the counter or in a cool, dry place. Always check for any signs of moisture or softness before eating. If they seem off, it’s best to toss them. If your apple chips lose their crunch, don’t worry! You can re-crisp them in the air fryer. Just preheat it to 300°F (150°C) and place the chips inside for about 3-5 minutes. This quick warming will help bring back their crunch. Enjoy your snack! Yes, you can use many apple types. Honeycrisp and Fuji work great. Other good choices include Granny Smith for tartness or Gala for sweetness. Each apple gives a unique flavor and texture. For the best crunch, slice apples very thin. Use a mandoline slicer for even cuts. A sharp knife also works but may vary thickness. Aim for about 1/8 inch thick slices. This thickness helps them crisp up well in the air fryer. Watch for a crisp texture. When the chips feel dry to the touch, they are ready. They should not look burnt. A light golden color is a good sign. Check them often in the last few minutes for perfect results. Yes, you can! Use an oven instead. Set it to 200°F (93°C). Place apple slices on a baking sheet. Bake for 1 to 2 hours, flipping halfway through. This method takes longer but gives you tasty chips too. Making air fryer apple chips is simple and fun. We covered everything from choosing the right apples to storing the finished chips. Remember to slice evenly and monitor cooking time for best results. Feel free to mix flavors or try different fruits. In the end, these snacks are healthy and tasty. Enjoy your crispy treats right away or save some for later. With these tips, you can master apple chips and impress family and friends!

Air Fryer Cinnamon Apple Chips Crunchy and Easy Snack

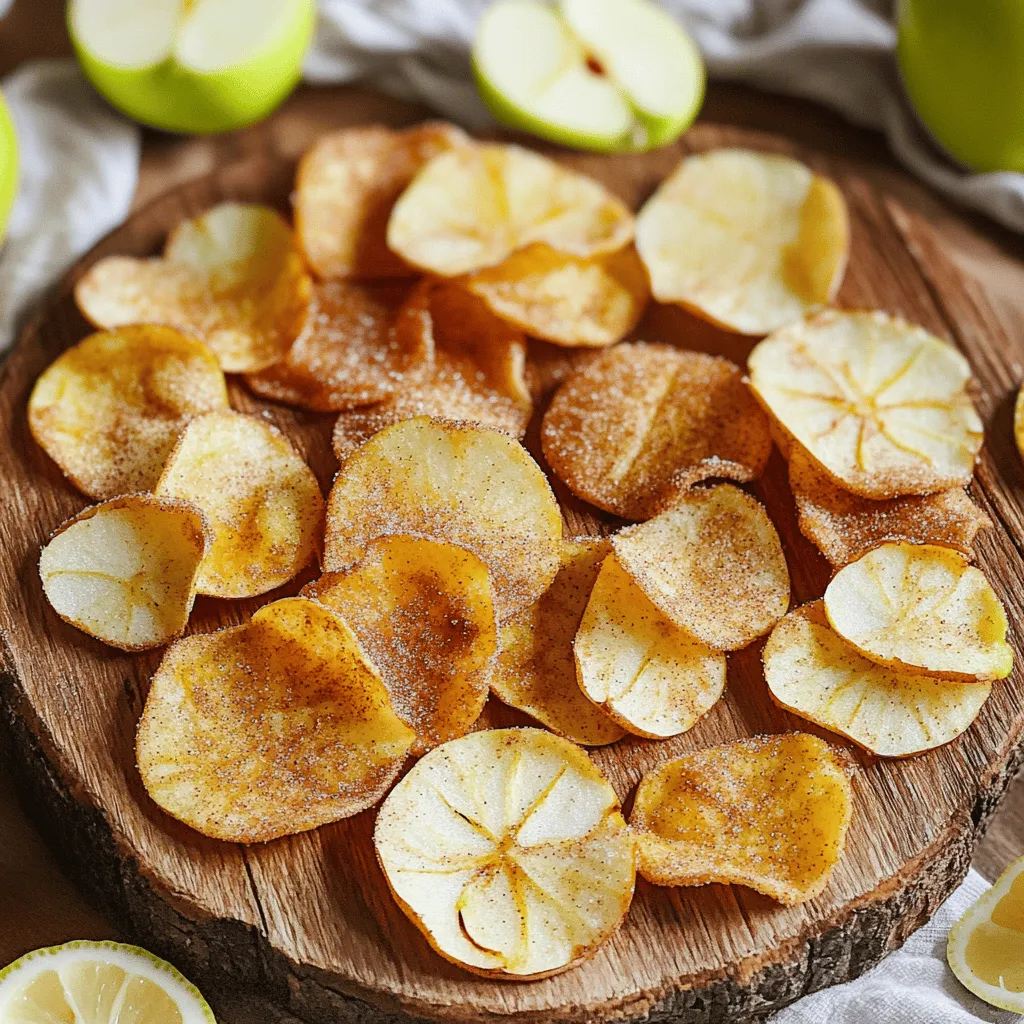
Are you on the hunt for a simple, healthy snack? Look no further! Air fryer cinnamon apple chips are easy

- 1 lb large shrimp, peeled and deveined - 1 red bell pepper, sliced - 1 yellow bell pepper, sliced - 1 red onion, sliced - 4 cloves garlic, minced - 3 tablespoons olive oil - 2 tablespoons fresh lemon juice - Zest of 1 lemon - 1 teaspoon ground cumin - 1 teaspoon smoked paprika - 1/2 teaspoon chili powder - Salt and pepper to taste The main ingredients for this dish are fresh and vibrant. The shrimp gives a nice protein boost. Bell peppers add color and crunch. The red onion brings a slight sweetness. Garlic enhances the aroma and flavor. The olive oil helps everything cook nicely and adds richness. Lemon juice and zest bring brightness. Spices like cumin and smoked paprika add depth. Salt and pepper round out the taste. - Fresh cilantro for topping - Lime wedges for serving For garnishes, fresh cilantro adds a burst of flavor. It looks great on top of the fajitas. Lime wedges give a zesty kick when squeezed over the dish. These garnishes make each bite more exciting. - Different types of tortillas for serving Tortillas are the perfect base for your fajitas. You can use flour or corn tortillas, depending on your taste. Flour tortillas are soft and chewy. Corn tortillas are gluten-free and have a nice texture. Choosing your favorite makes the meal more enjoyable. 1. Preheat your oven to 400°F (200°C). This hot oven helps cook the shrimp fast. 2. Line a large baking sheet with parchment paper. This keeps everything from sticking. 1. In a big bowl, combine the shrimp, sliced bell peppers, and sliced onion. Make sure they mix well. 2. In a small bowl, whisk together the minced garlic, olive oil, lemon juice, lemon zest, cumin, smoked paprika, chili powder, salt, and pepper. This creates a tasty marinade. 1. Pour the marinade over the shrimp and veggies. Toss everything together until each piece is coated. 2. Spread the shrimp and vegetables evenly on the lined baking sheet. Make sure they are in a single layer. 3. Bake in the preheated oven for 10-12 minutes. Check if the shrimp are pink and opaque, and the veggies are tender. Enjoy the smell! To make your shrimp taste great, start with the marinade. Use fresh lemon juice and zest to bring a bright flavor. Let the shrimp and veggies soak in the marinade for at least 15 minutes. If you have time, marinate them for up to an hour. This will deepen the flavor. Adjust the cooking time based on your oven. Check the shrimp after 10 minutes. If they are not pink and opaque, give them a few more minutes. Keep a close eye to avoid overcooking. For a stunning serve, arrange shrimp and veggies in a colorful way. Place the shrimp in the center and pile the veggies around them. This makes the dish look inviting. Warm tortillas add to the meal. Wrap them in a clean towel when serving. This keeps them soft and warm. Serve lime wedges on the side for extra zest. Use a large, heavy-duty sheet pan for even cooking. This helps the shrimp and veggies cook well without sticking. A good spatula is key for serving. Use it to scoop the fajitas onto plates. A mixing bowl for the marinade is also essential. It makes mixing easy and mess-free. {{image_2}} You can easily swap shrimp for chicken or tofu. Chicken thighs work well and stay juicy. Just cut the chicken into bite-sized pieces. For tofu lovers, use firm or extra-firm tofu. Press it to remove water, then cut it into cubes. Both options will absorb the flavors nicely. You can also try other seafood options. Fish like cod or tilapia can be great. Just make sure to adjust the cooking time. Fish cooks faster than shrimp, so keep an eye on it. Feel free to add more veggies! Zucchini, mushrooms, or corn can make the dish colorful and tasty. Slice them thin so they cook evenly. You can also use your favorite veggies. Don't be afraid to get creative based on what you have at home. If you prefer a bit of crunch, try adding snap peas or broccoli. These veggies add a fun texture. Mix and match to find your perfect blend. Want more heat? Add jalapeños or crushed red pepper flakes. This will spice up your fajitas quickly. If you like a milder taste, just skip the chili powder. For a unique twist, consider adding lime zest or fresh herbs like oregano. These will bring a fresh taste to the dish. You can also experiment with different spices, like curry powder or coriander, for new flavors. After making shrimp fajitas, store leftovers in an airtight container. This helps keep them fresh. Cool the fajitas to room temperature before sealing. Place them in the fridge for up to three days. To keep tortillas fresh, wrap them in foil or plastic wrap. Store them in the fridge, and they will stay soft and tasty. To reheat shrimp fajitas, use the oven or a skillet. Preheat the oven to 350°F (175°C). Spread the fajitas on a baking sheet. Heat for about 10 minutes. If using a skillet, warm it over medium heat. Add a splash of oil and sauté until hot. This method keeps the shrimp juicy and the veggies crisp. Yes, you can freeze shrimp fajitas. To do this, let them cool completely. Place them in a freezer-safe bag or container. Remove as much air as possible to prevent freezer burn. They can last for up to three months. To thaw, move them to the fridge overnight. For quick thawing, use the microwave on low power, then reheat as mentioned. This recipe takes just 25 minutes total. Here’s the breakdown: - Prep time: 10 minutes - Cooking time: 10-12 minutes You can quickly chop the veggies and mix the marinade. In no time, your shrimp fajitas will be ready. Yes, you can prep the shrimp and veggies ahead of time. - Store the chopped veggies and shrimp in the fridge for up to 24 hours. - Keep the marinade separate until you're ready to cook. This way, you save time and have fresh flavors when you’re ready to bake. There are many tasty sides to pair with your shrimp fajitas: - Rice: Cilantro lime rice adds a nice touch. - Beans: Black beans or refried beans work well. - Guacamole: Creamy guacamole enhances the flavors. - Salsa: Fresh salsa brings brightness to your meal. Feel free to mix and match to create a fun, delicious spread! To sum up, this article guides you through making delicious shrimp fajitas. You learned about key ingredients like shrimp, peppers, and spices, plus optional garnishes like cilantro and lime. I shared step-by-step instructions for cooking and tips for flavor and presentation. You can also explore variations like using chicken or extra veggies. With proper storage and reheating advice, you’ll enjoy your fajitas later. Embrace these ideas, and make your fajitas exciting and tasty every time you cook!

Sheet Pan Lemon Garlic Shrimp Fajitas Delight

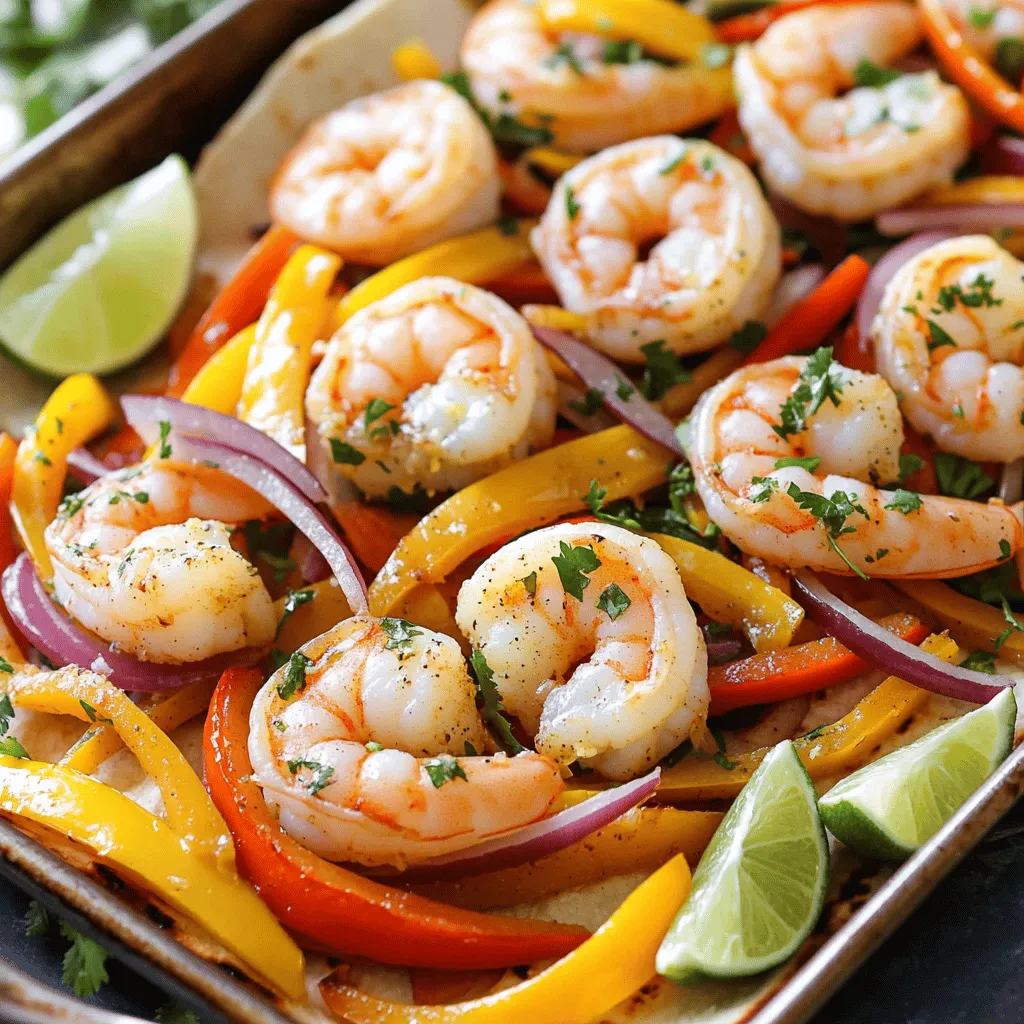
Are you ready for a meal that’s easy, tasty, and full of zest? My Sheet Pan Lemon Garlic Shrimp Fajitas

- 1 cup quinoa, rinsed - 2 cups vegetable broth Quinoa is the star of this salad. It is a protein-rich grain that cooks up fluffy. Rinsing it helps remove any bitter taste. For the cooking liquid, I like using vegetable broth. It adds depth and flavor to the quinoa. - 1 cup cherry tomatoes, halved - 1 cucumber, diced - 1 bell pepper (red or yellow), diced - 1/2 red onion, finely chopped - 1/2 cup Kalamata olives, pitted and halved - 1/4 cup fresh parsley, chopped Fresh veggies are key in this salad. They bring color, crunch, and nutrition. The cherry tomatoes burst with flavor. The cucumber adds crispness. Bell peppers and red onion give it a sweet and tangy kick. Kalamata olives provide a briny taste, while parsley adds freshness. - 3 tablespoons olive oil - 2 tablespoons lemon juice - 1 teaspoon dried oregano - Salt and pepper to taste The dressing ties everything together. Olive oil gives it richness, while lemon juice adds brightness. Dried oregano brings a classic Mediterranean flavor. Adjust salt and pepper to fit your taste buds. This simple blend makes the salad come alive. Start by rinsing 1 cup of quinoa under cold water. This step helps remove its bitter outer coating. Next, place the rinsed quinoa in a medium saucepan. Add 2 cups of vegetable broth to the pan. Bring this mixture to a boil over medium heat. Once it boils, reduce the heat to low. Cover the pan and let it simmer for about 15 minutes. The liquid will absorb during this time. After 15 minutes, remove it from heat. Let it sit, covered, for 5 more minutes. Finally, fluff the quinoa with a fork and let it cool. While the quinoa cooks, grab a small bowl to prepare the dressing. Combine 3 tablespoons of olive oil with 2 tablespoons of lemon juice. Then, add 1 teaspoon of dried oregano, salt, and pepper to taste. Whisk these ingredients together until smooth. This dressing will add a refreshing flavor to the salad. In a large mixing bowl, combine the cooled quinoa, 1 cup of halved cherry tomatoes, 1 diced cucumber, 1 diced bell pepper, and 1/2 finely chopped red onion. Add in 1/2 cup of pitted and halved Kalamata olives and 1/4 cup of chopped fresh parsley. Pour the dressing over the salad mix and toss gently. To assemble the jars, scoop the quinoa salad into jars. Start with the quinoa salad mix, then layer 1/2 cup of crumbled feta cheese on top. Repeat this process until the jars are full. Secure the lids and refrigerate the jars until you’re ready to serve. Shake gently before enjoying. One common mistake is overcooking the quinoa. You want it fluffy, not mushy. Always rinse the quinoa before cooking to remove any bitter taste. If you skip this step, your salad may not taste as fresh. Another mistake is adding too much dressing. It can make the salad soggy. Start with a little dressing and add more if needed. Layering is key for a great salad jar. Start with the quinoa mix at the bottom. This keeps moisture away from the toppings. Next, add the feta cheese. It adds flavor and looks nice. Follow with the chopped veggies. Keep the salad colorful by using red and yellow bell peppers. Finish with olives and parsley on top. This order keeps everything fresh. To boost flavor, use fresh herbs like parsley. Fresh herbs add a punch that dried herbs can't match. You can also add a pinch of red pepper flakes for heat. If you prefer a tangy kick, add more lemon juice. Another tip is to marinate the veggies in the dressing for an hour before mixing. This extra time lets the flavors blend well. {{image_2}} You can easily add protein to your Mediterranean quinoa salad jars. Chicken works great. Simply grill or bake it first. Then, chop it into bite-sized pieces. Toss it in with the salad mix. If you prefer plant-based protein, add canned chickpeas. Drain and rinse them well before mixing. They add texture and a lovely taste. You can also use tuna or shrimp for a seafood twist. If you're watching carbs, swap quinoa for cauliflower rice. It’s light and still provides a nice base. You can grate cauliflower or buy it pre-riced. Use it just like quinoa. You can also skip the bell pepper for fewer carbs. Add more greens instead, like spinach or arugula. These changes keep the salad fresh without losing flavor. To make your salad dairy-free, simply leave out the feta cheese. Instead, try using avocado for creaminess. You can also add nuts or seeds for texture. Almonds or sunflower seeds work well. These will help you keep the salad filling and flavorful. A sprinkle of nutritional yeast can also give a cheesy taste without dairy. To keep your Mediterranean quinoa salad fresh, use airtight jars. This helps seal in flavors. Store the jars in the fridge. Always shake the jars gently before serving. This mixes the dressing evenly. When prepping these salad jars, layer ingredients wisely. Start with the quinoa at the bottom. This keeps it moist. Next, add the veggies, olives, and cheese. Keep the dressing separate until serving. This keeps everything crunchy and fresh. The salad jars last about four days in the fridge. Quinoa and veggies stay fresh for this time. However, tomatoes can get soft sooner. Feta cheese may also lose its texture. For the best taste, eat within three days. You can serve Mediterranean quinoa salad jars straight from the fridge. Just shake the jar to mix the layers. For a pop of color, add a sprig of parsley or a lemon wedge on the side. This makes the dish look fresh and inviting. Yes, you can make these jars ahead of time. They save well in the fridge for up to four days. Just be sure to seal the jars tightly. This helps keep the flavors fresh and vibrant. You can pair the salad jars with grilled chicken for extra protein. They also go well with pita bread or hummus. For a light meal, enjoy them with a cup of soup. The salad jars are versatile and fit many meal plans. You learned how to make tasty Mediterranean quinoa salad jars. We covered the best ingredients, cooking tips, and ways to store your jars. Avoid common mistakes for great results. There are many ways to change the recipe to fit your needs. You can add protein, use low-carb swaps, or go dairy-free. Enjoy these fresh salads for lunch or dinner. Keep the jars ready, and enjoy a healthy meal anytime. With these tips, you can make meal prep easy and fun.

Mediterranean Quinoa Salad Jars Fresh and Flavorful Meal

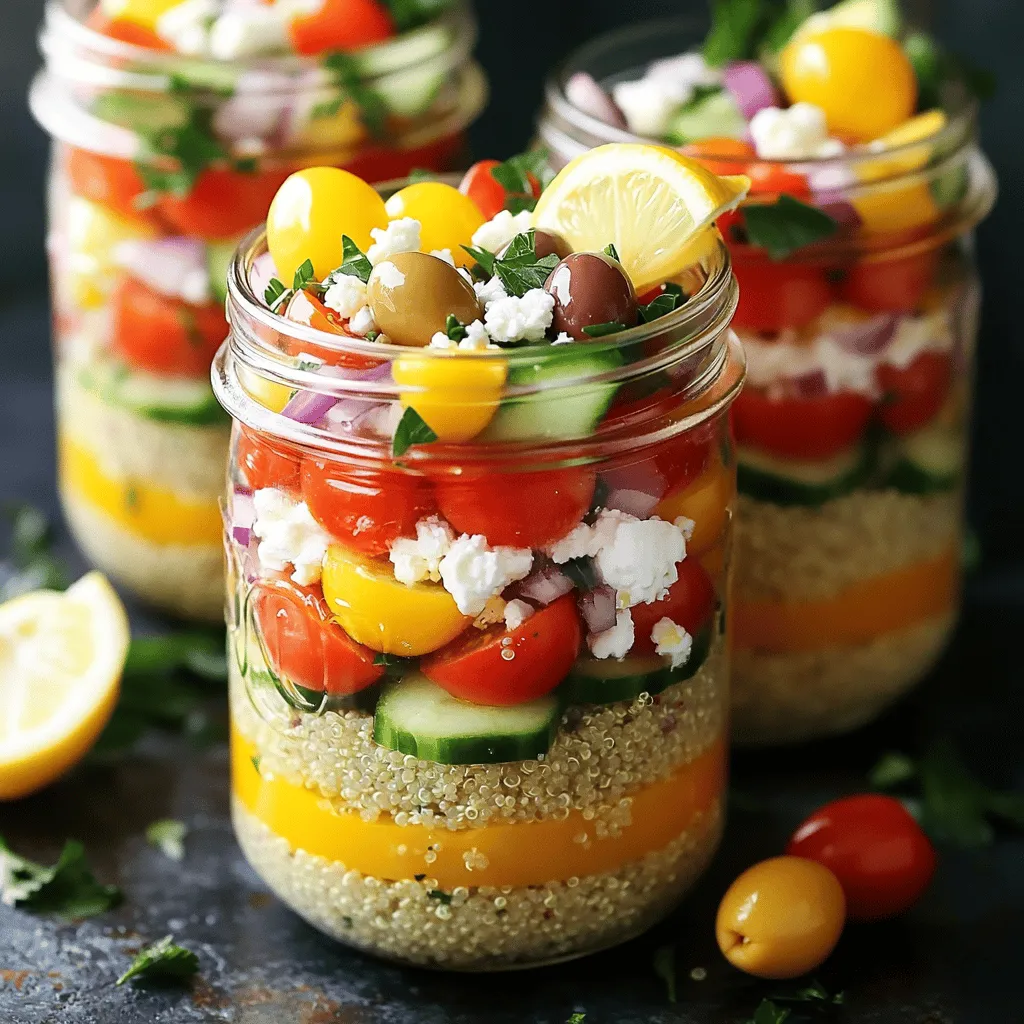
Are you ready to enjoy a fresh and tasty meal? Mediterranean Quinoa Salad Jars are your answer! Packed with colorful

To make the savory air fryer teriyaki salmon bites, gather these simple ingredients: - 1 lb salmon fillet, skinless, cut into bite-sized cubes - 1/4 cup soy sauce (or tamari for gluten-free) - 2 tablespoons honey or maple syrup - 1 tablespoon rice vinegar - 1 tablespoon sesame oil - 2 cloves garlic, minced - 1 teaspoon fresh ginger, grated - Sesame seeds, for garnish - Chopped green onions, for garnish These ingredients work together to create a tasty marinade. The soy sauce adds saltiness. Honey or maple syrup gives a sweet touch. Rice vinegar adds tang, while sesame oil brings in rich flavor. Garlic and ginger enhance the dish with their bold aromas. Make sure to use fresh salmon for the best taste. The garnishes of sesame seeds and green onions add a nice crunch and fresh flavor. You can find everything you need at your local store or farmer's market. Enjoy the process of gathering these wholesome ingredients! - Mixing Ingredients In a medium bowl, whisk together the soy sauce, honey, rice vinegar, sesame oil, minced garlic, and grated ginger. This mix creates a tasty marinade. - Importance of Marinating Time After mixing, add the salmon cubes. Toss them gently to coat. Let them sit for at least 15-30 minutes. This helps the salmon soak up all the great flavors. - Preheating the Air Fryer Start by preheating your air fryer to 400°F (200°C). This takes about 5 minutes. A hot fryer cooks the salmon evenly and gives it a nice crisp. - Arranging Salmon in the Basket Lightly grease the air fryer basket with cooking spray. Place the marinated salmon cubes in a single layer. They should not overlap. This ensures they cook well. - Cooking Time and Temperature Air fry the salmon bites for 8-10 minutes. Shake the basket halfway through cooking. This helps them cook evenly. The salmon should look crispy and cooked through. - How to Garnish Once cooked, take the salmon bites out and let them rest for a minute. Garnish with sesame seeds and chopped green onions for added flavor and crunch. - Ideal Pairings These teriyaki salmon bites pair well with rice, quinoa, or a fresh salad. You can also serve them with steamed veggies for a colorful plate. Timing and Temperature Cook your salmon bites at 400°F (200°C). This high heat helps the salmon get crispy. Air fry for 8 to 10 minutes. Check them halfway through to shake the basket. This step ensures even cooking. How to Check for Doneness Salmon is done when it flakes easily with a fork. It should also be opaque. If you have a meat thermometer, aim for an internal temperature of 145°F (63°C). Additional Spices or Marinades While the teriyaki marinade is tasty, you can add more flavor. Try adding red pepper flakes for heat or lime juice for a zesty twist. Fresh herbs like cilantro can also brighten the dish. Tips for Meal Prep Make your salmon bites ahead of time. Marinate the salmon in the morning and air fry it for dinner. You can also cook a big batch and store them in the fridge. They are great for quick lunches or snacks. Gluten-Free Options Use tamari instead of soy sauce. This swap makes the dish safe for those who need gluten-free meals. Always check the label on your ingredients to be sure. Substitutes for Common Ingredients If you don’t have sesame oil, try olive oil. It will change the flavor but still taste good. Maple syrup can replace honey if you want a vegan option. {{image_2}} To switch things up, you can add different flavors. Here are some great ideas: - Adding Citrus: Try adding fresh lemon or lime juice to the marinade. This adds a bright, tangy taste. The citrus cuts through the richness of the salmon. Just a tablespoon will do! - Spicy Teriyaki: If you like heat, add red pepper flakes or sriracha to the marinade. This gives your salmon a spicy kick. Adjust the amount based on your taste preference. - Herb-Infused Variations: Add fresh herbs like cilantro or basil to the marinade for a fresh twist. These herbs can make your salmon taste vibrant and aromatic. Just a sprinkle will enhance the dish. You can serve these salmon bites in different ways: - Salad Toppings: Place the salmon bites on a bed of greens. Add some crunchy veggies like cucumbers and carrots. Drizzle with extra teriyaki sauce for a tasty salad. - Bowl Meals: Create a rice bowl with the salmon bites. Add cooked rice, steamed broccoli, and a drizzle of teriyaki sauce. This makes a filling meal that is easy to prepare. Not a fan of salmon? Here are some alternatives: - Chicken Alternatives: You can easily swap salmon for chicken. Use boneless, skinless chicken thighs or breasts. Cut them into bite-sized pieces and follow the same marinade and cooking steps. - Tofu Options: For a plant-based choice, try firm tofu. Press it to remove excess moisture, then cut it into cubes. Marinate and cook it just like the salmon for a tasty vegan option. To store leftovers, let the salmon bites cool first. Place them in an airtight container. You can keep them in the fridge for up to 3 days. Make sure to seal the container well to keep the flavors fresh. For the best freezing results, place the cooled salmon bites in a freezer-safe bag. Remove as much air as possible before sealing. These bites can last up to 2 months in the freezer. When you're ready to enjoy them again, thaw the salmon in the fridge overnight. This slow method keeps the texture nice. You can also use the microwave on a low setting if you need them quickly. To reheat, I suggest using the air fryer again. Preheat it to 350°F (175°C). Place the salmon bites in the basket for about 5 minutes. This method keeps them crispy and tasty. You can also use a regular oven if you prefer. Just heat them at 350°F (175°C) for about 10 minutes. Yes, you can use frozen salmon. Just make sure to thaw it first. Thaw the salmon in the fridge overnight or use the defrost setting on your microwave. Once thawed, cut it into bite-sized pieces and follow the recipe as usual. Using fresh salmon is great, but frozen works well too! Teriyaki salmon bites pair well with many sides. You can serve them with: - Steamed rice - Quinoa - Stir-fried vegetables - A fresh salad - Noodles These options complement the savory flavors of the salmon. Leftover teriyaki salmon lasts about 3-4 days in the fridge. Store it in an airtight container to keep it fresh. When you're ready to eat, simply reheat it in the microwave or air fryer. Yes, this recipe is great for meal prep! You can make a big batch and store it in individual containers. It keeps well and tastes great even after reheating. Just make sure to let it cool before sealing the container. Absolutely! You can adjust the marinade easily. For a gluten-free version, use tamari instead of soy sauce. If you're vegan, swap honey for maple syrup. Feel free to add or remove spices to suit your taste and dietary needs. In this article, I covered how to make delicious teriyaki salmon bites. We discussed the ingredients needed, like salmon and key sauces. I shared step-by-step directions for marinating and air frying the salmon. You learned tips for perfect cooking and flavor enhancement. I also explored variations and ways to store leftovers. These bites are versatile, tasty, and easy to prepare. Try them for a quick meal or snack! Your taste buds will thank you for it.

Savory Air Fryer Teriyaki Salmon Bites Recipe

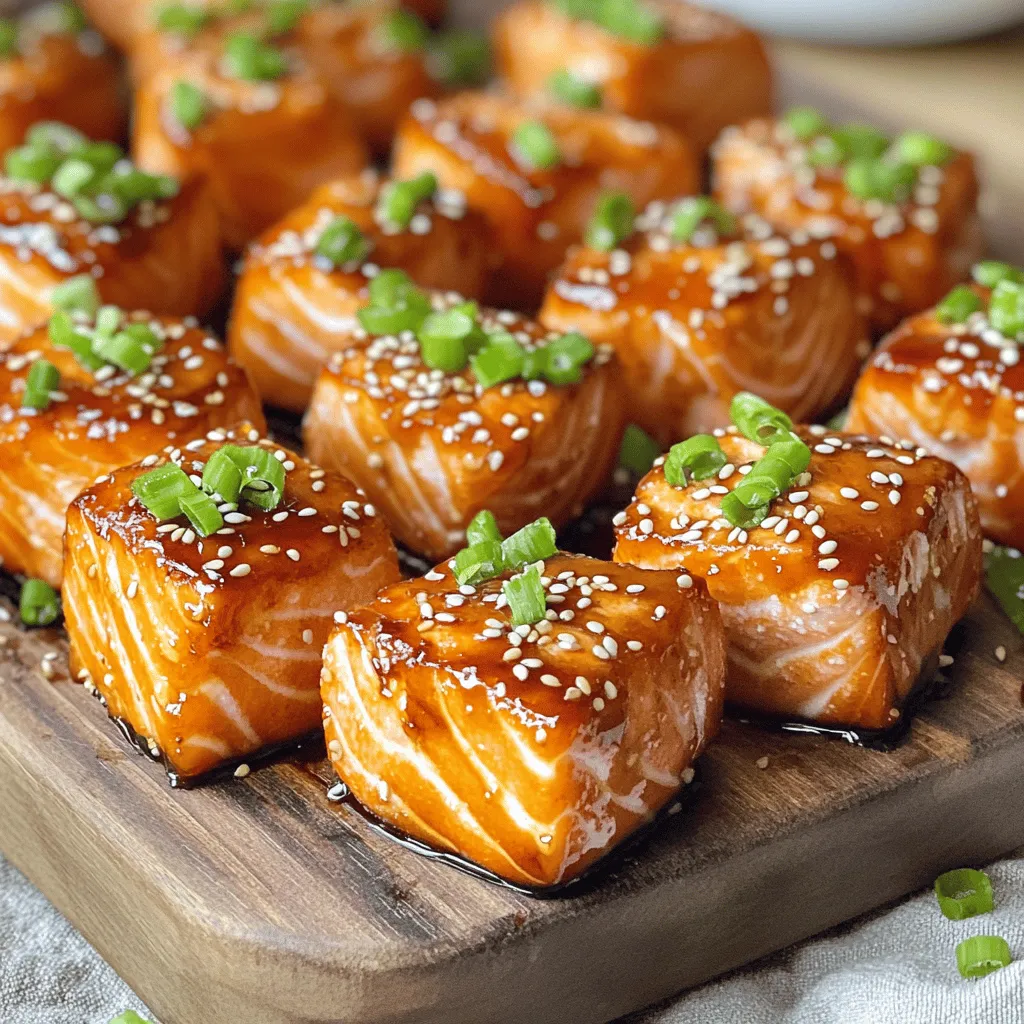
If you love quick, tasty meals, you’ll adore these Air Fryer Teriyaki Salmon Bites! This recipe packs a flavor punch

- 2 boneless, skinless chicken breasts - 1 teaspoon olive oil - 1 teaspoon cumin - 1 teaspoon paprika - Salt and pepper to taste - 1 ripe mango, diced - 2 ripe avocados, diced - 1 small red onion, finely chopped - 1 jalapeño, deseeded and minced - 2 tablespoons lime juice - Fresh cilantro, chopped (for garnish) - Cooked brown rice or quinoa (for serving) The main ingredients of this dish create a perfect balance of flavors. The chicken provides protein, while the mango and avocados offer creaminess and sweetness. Olive oil, cumin, and paprika add depth to the chicken. Fresh lime juice brightens the salsa, while cilantro gives a fresh kick. - Alternatives for chicken: You can use shrimp or tofu if you want to switch proteins. Both options work well with the salsa. - Options for grains: Try quinoa or cauliflower rice as a base. Quinoa adds more protein, while cauliflower rice keeps it low-carb. - Variations in vegetables and spices: Feel free to add bell peppers or corn to the salsa. You can also use chili powder instead of paprika for a different flavor. Substituting ingredients allows you to customize this meal. It stays fresh and tasty, no matter what you choose! 1. Preheat the grill or skillet. Set your grill or skillet to medium heat. This gives the chicken a nice sear. 2. Season the chicken. In a small bowl, mix one teaspoon of olive oil, cumin, paprika, salt, and pepper. Rub this blend all over the chicken breasts. 3. Cook the chicken. Grill or cook the chicken for 6-7 minutes on each side. It should be cooked through, with clear juices. Once done, remove it from heat and let it rest for a few minutes. 1. Combine salsa ingredients. In a medium bowl, mix the diced mango, avocados, chopped red onion, minced jalapeño, and lime juice. 2. Tips for cutting avocados and mangoes. To cut avocados, slice them in half and remove the pit. Use a spoon to scoop out the flesh. For mangoes, peel them, then slice around the pit. 3. Seasoning tips for perfect flavor. After mixing, taste the salsa. Add salt if needed. This will enhance the flavors and balance the sweetness of the mango. 1. Serving suggestions. Start with a base of cooked brown rice or quinoa. This will soak up all the tasty juices. 2. Presentation tips. Arrange sliced chicken on top of the grains. Add a generous scoop of mango avocado salsa. 3. Garnishing for aesthetic appeal. Sprinkle fresh cilantro on top for a bright touch. This adds flavor and makes the dish look beautiful. For the best flavor, I recommend grilling your chicken. Preheat your grill or skillet to medium heat. This helps cook the chicken evenly and gives it a nice char. Rub olive oil, cumin, and paprika on the chicken. This blend adds a tasty kick. Cook the chicken for about 6-7 minutes on each side. Make sure the juices run clear when done. This shows the chicken is cooked through. Let the chicken rest after cooking. This keeps it juicy and tender. To deepen the taste of your dish, add spices and herbs. A pinch of garlic powder or onion powder can elevate the flavor. Fresh cilantro adds a bright touch, too. Adjust the lime juice based on your taste. A little more lime juice can enhance the salsa's freshness. Taste as you go for the best flavor balance. Preparing ingredients ahead of time makes cooking easier. Dice the mango, avocados, and onion the night before. Store them in the fridge to keep them fresh. Make the salsa a few hours in advance. This allows the flavors to blend well. For leftovers, store in airtight containers. This keeps your meal fresh for up to three days in the fridge. {{image_2}} You can switch chicken for shrimp or tofu. Shrimp cooks quickly and adds a nice taste. Just grill or sauté shrimp for 3-4 minutes on each side. Tofu is a great choice for a meatless meal. Press it to remove water, then cut it into cubes. Grill or pan-fry until golden brown. Both options keep the dish tasty and satisfying. Try adding other fruits like pineapple or bell peppers. Pineapple gives a sweet and tangy flavor. Bell peppers add crunch and color. You can also use seasonal veggies like zucchini or corn. They bring freshness and variety. Mix and match to find your favorite combo. If you want a change from brown rice, try quinoa. Quinoa cooks fast and adds protein. It has a nutty flavor that pairs well with the salsa. For a low-carb option, use cauliflower rice. Just pulse cauliflower in a food processor, then sauté it briefly. Both options keep your meal light and healthy. To keep your mango avocado salsa chicken bowls fresh, store leftovers in an airtight container. This helps maintain flavor and prevents spills. Place the chicken and salsa in separate containers. This way, the salsa won't make the chicken soggy. Leftover chicken can last in the fridge for up to four days. Salsa should be eaten within two days for the best taste. When reheating chicken, use the microwave or oven. For the microwave, heat the chicken for about 1-2 minutes. Check the temperature to ensure it is hot throughout. If using the oven, preheat it to 350°F (175°C) and heat for about 10 minutes. Salsa should not be reheated; serve it cold for a fresh taste. This keeps the flavors bright and enjoyable. You can freeze the chicken if you have leftovers. Make sure it cools completely before wrapping it tightly in plastic wrap and foil. This prevents freezer burn. The chicken can last in the freezer for up to three months. Salsa does not freeze well due to the avocado. If you want to freeze the salsa, consider leaving out the avocados. When ready to use, thaw the chicken in the fridge overnight. To make this dish healthier, consider these tips: - Use skinless chicken breasts for lean protein. - Swap olive oil for a cooking spray to cut calories. - Choose low-sodium spices like garlic powder or onion powder. - Add more veggies like bell peppers or corn to boost nutrients. These changes keep the flavor while making it lighter. Yes, you can prepare the salsa ahead. - Aim to make it about 1-2 hours before serving for best taste. - Store it in an airtight container in the fridge. - To keep it fresh, add the lime juice just before serving. This helps prevent browning of the avocados. You can serve many delightful sides with this meal: - A mixed green salad adds crunch and freshness. - Black beans or corn provide great fiber and protein. - For drinks, pair with iced tea or a light beer. These choices balance the meal and enhance the flavors. In this article, we explored making a delicious chicken bowl with mango avocado salsa. We covered the main ingredients and suggested substitutes, ensuring variety for all tastes. I shared helpful cooking tips and tricks to keep your chicken juicy and full of flavor. We also discussed variations like different proteins and grains. Finally, I provided storage information for leftovers and answers to common questions. This dish is versatile, tasty, and easy to prepare. You'll enjoy each bite while customizing it to fit your needs!

Mango Avocado Salsa Chicken Bowls Tasty and Fresh Meal

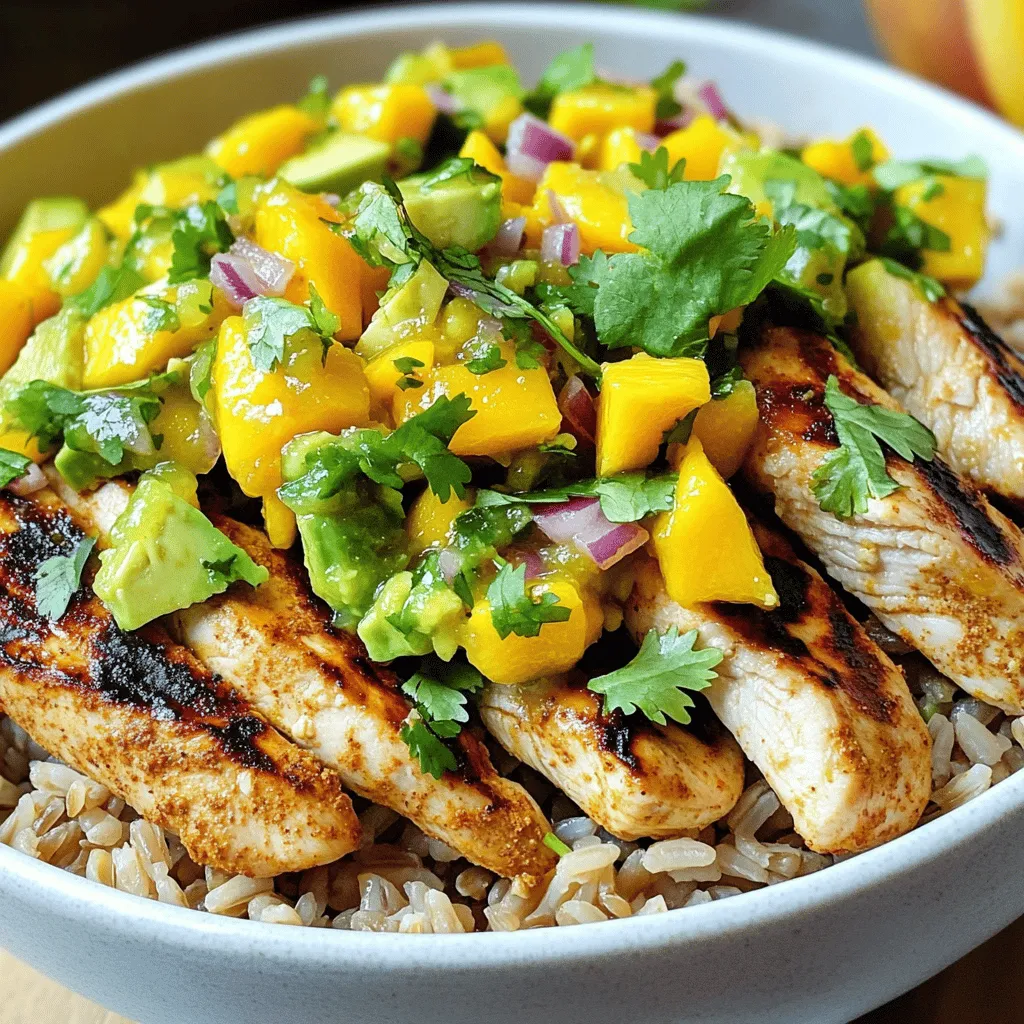
Looking for a fresh and tasty meal that delights the senses? You’ve found it! These Mango Avocado Salsa Chicken Bowls

- 2 cups all-purpose flour - 1 tablespoon instant yeast - 1 teaspoon sugar - 1 teaspoon salt - 1 tablespoon olive oil - 3/4 cup warm water (about 110°F/45°C) - 1 teaspoon garlic powder - 1/2 teaspoon dried oregano - 1/2 teaspoon dried basil - 1/2 cup grated Parmesan cheese - 2 tablespoons unsalted butter, melted - 1 tablespoon fresh parsley, chopped (for garnish) You can swap all-purpose flour with whole wheat flour for a healthier choice. For the instant yeast, use active dry yeast, but let it bloom first. Olive oil can be replaced with melted coconut oil or vegetable oil. If you don't have garlic powder, fresh minced garlic works too. Use any dried herbs you prefer, like thyme or rosemary. You can replace Parmesan with another cheese, like mozzarella or cheddar. Be precise with your measurements for the best results. Use a kitchen scale for the flour if you can. For liquid ingredients, measuring cups work just fine. Remember, baking is a science. The right amounts ensure that your breadsticks are fluffy and tasty. Use a thermometer to check the water temperature. It should be warm, not hot. This helps the yeast to wake up and rise the dough properly. Start by mixing warm water, sugar, and instant yeast in a bowl. Let it sit for 5-10 minutes until it bubbles. This means your yeast is alive and ready. In another bowl, whisk together the flour, salt, garlic powder, oregano, and basil. This mix brings great flavor. Once your yeast is frothy, add olive oil. Slowly add the dry mix until a dough forms. Knead the dough on a floured surface for 5-7 minutes until it feels smooth. Place the dough in a greased bowl. Cover it with a damp cloth and let it rise in a warm spot for 30-45 minutes. It should double in size. After the dough has risen, punch it down gently. Roll it out into a rectangle about 1/2 inch thick. Cut the dough into strips that are 1 inch wide and 6 inches long. Now comes the fun part! Twist each strip a couple of times to make a nice spiral shape. Arrange your twisted breadsticks on a lined baking sheet. Make sure to leave space between them for baking. Preheat your oven to 400°F (200°C). Brush melted butter over the tops of the breadsticks. Sprinkle grated Parmesan cheese on top for extra flavor. Bake in the oven for 15-18 minutes. Keep an eye on them until they turn golden brown. When they come out, sprinkle with fresh chopped parsley to make them look great. Enjoy your warm, tasty breadsticks! To keep your breadsticks fresh, store them in a paper bag. This allows air to flow and keeps them from getting soggy. If you want to keep them longer, wrap them tightly in plastic wrap. You can also freeze them for up to three months. Just let them cool completely before wrapping. One mistake is not letting the dough rise enough. You want it to double in size. If it doesn’t rise, your breadsticks will be dense. Another mistake is cutting the strips too thick. Aim for one inch wide for the best results. Lastly, don’t skip the butter and cheese topping. It adds great flavor. You can make these breadsticks even better with fun add-ins. Try adding more herbs like rosemary or thyme for a fresh twist. If you like spice, sprinkle in some red pepper flakes. You can even mix in different cheeses like mozzarella or cheddar for a cheesy kick. Get creative and make them your own! {{image_2}} You can switch up the cheese in your breadsticks. While Parmesan is rich and flavorful, you can try other cheeses too. Mozzarella gives a nice stretch and gooey texture. Just sprinkle some shredded mozzarella before baking. Cheddar adds a sharp flavor. Mix it in the dough or sprinkle it on top. Each cheese gives a unique twist to the breadsticks. Herbs can change the whole vibe of your breadsticks. You can add rosemary for a woodsy flavor. Just chop it finely and mix it into the dough. Thyme adds a light, fresh taste. Dried herbs work too! Just remember to adjust the amounts. Fresh herbs are more intense, so use less. Feel free to experiment with your favorite herbs! If you need a gluten-free option, you can use gluten-free flour. Make sure it’s a one-to-one blend for best results. Follow the same steps as the original recipe. The texture may vary, but the taste will still shine. Add a bit of extra olive oil to help with moisture. Enjoy the same great flavors without the gluten! To keep your leftover breadsticks fresh, place them in a paper bag. This helps them stay crispy. Avoid plastic bags, as they trap moisture and make them soggy. If you want to keep them longer, wrap them in foil. Store them at room temperature for up to two days. When you want to enjoy your leftover breadsticks, preheat your oven to 350°F (175°C). Place the breadsticks on a baking sheet. Heat them for about 5 to 10 minutes. This will warm them up and restore their crispy outside. You can also use a toaster oven for the same effect. If you want to save some breadsticks for later, freezing is a great option. Wrap each breadstick in plastic wrap or foil. Place them in a freezer bag. They can last up to three months in the freezer. When you're ready to eat, thaw them in the fridge overnight. Reheat in the oven for a fresh taste. Homemade breadsticks stay fresh for 2-3 days at room temperature. Store them in a bag or an airtight container. If you want to keep them longer, freeze them. They can last up to 3 months in the freezer. Yes, you can make these breadsticks ahead of time. Prepare the dough and let it rise. After that, shape the breadsticks and place them on a baking sheet. Cover and refrigerate for up to 24 hours. When you are ready, bake them straight from the fridge. Just add a few extra minutes to the baking time. These breadsticks pair well with many dishes. You can serve them with marinara sauce, garlic butter, or a creamy dip. They also go great with soups and salads. Try them alongside pasta or as a side for your favorite Italian meal. Enjoy experimenting with different pairings! In this post, we covered all the steps to make tasty breadsticks. We explored ingredients, substitutes, and measurements to help you prepare dough. You learned how to shape and bake them perfectly. We shared tips for storage, common mistakes, and flavor boosters. Variations like cheese and herbs let you get creative. Extra info on storage and reheating keeps them fresh. Now, you are ready to enjoy delicious, homemade breadsticks anytime!

Herb Garlic Parmesan Breadsticks Quick and Tasty Snack

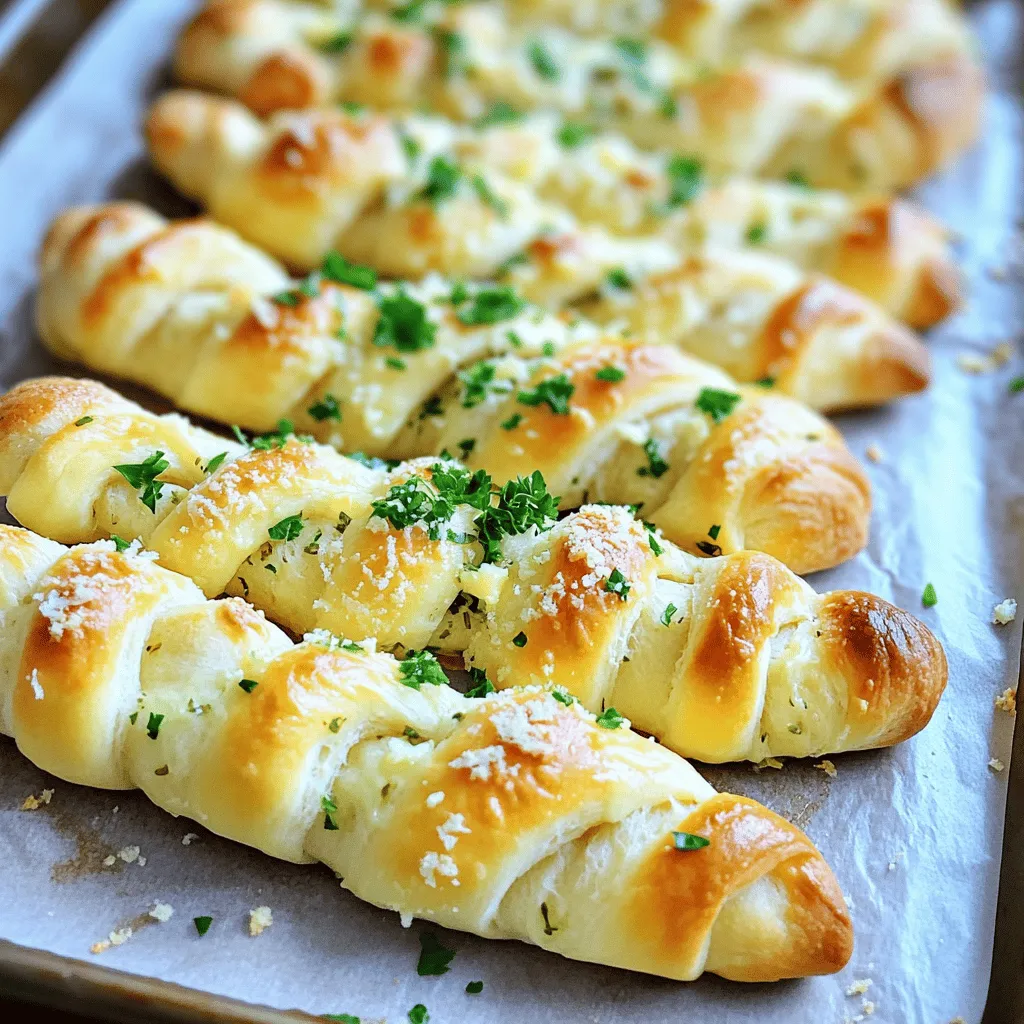
Looking for a quick and tasty snack? You’re in the right place! My Herb Garlic Parmesan Breadsticks are simple to

- 2 cups all-purpose flour - 1 teaspoon baking powder - 1 teaspoon baking soda - 1 teaspoon pumpkin spice - ½ teaspoon salt - ¾ cup granulated sugar - ½ cup brown sugar, packed - ½ cup unsalted butter, softened - 2 large eggs - 1 cup canned pumpkin puree - 1 teaspoon vanilla extract - 8 oz cream cheese, softened - ¼ cup granulated sugar - 1 egg - 1 teaspoon vanilla extract To make this Pumpkin Cream Cheese Coffee Cake, you need simple ingredients. The dry ingredients form the base of the cake. Flour, baking powder, and baking soda help the cake rise. Pumpkin spice gives it that warm, cozy flavor you crave in fall. Salt enhances all these flavors. Next, we prepare the wet ingredients. The mix of granulated sugar and brown sugar adds sweetness and moisture. The butter makes the cake rich and soft. Eggs provide structure and help it rise. Canned pumpkin puree is key; it adds flavor and keeps the cake tender. Vanilla extract brightens the taste. The cream cheese swirl is the star. Cream cheese brings a tangy flavor that pairs well with pumpkin. Sugar sweetens it, and the egg helps set it as it bakes. Finally, more vanilla extract ties it all together. Gather these ingredients, and you're ready to create a delightful treat. This cake is perfect for sharing or enjoying with your morning coffee. It’s a sweet way to celebrate the flavors of fall! - Preheat your oven to 350°F (175°C). - Grease a 9x13 inch baking pan or line it with parchment paper. - In a medium bowl, whisk together: - 2 cups all-purpose flour - 1 teaspoon baking powder - 1 teaspoon baking soda - 1 teaspoon pumpkin spice - ½ teaspoon salt - In a large bowl, beat together: - ½ cup unsalted butter, softened - ¾ cup granulated sugar - ½ cup brown sugar, packed - Mix until fluffy, about 3-5 minutes. - Add 2 large eggs one at a time. Mix well after each. - Gradually add 1 cup canned pumpkin puree and 1 teaspoon vanilla extract. Mix until smooth. - Slowly add the dry mixture to the wet mix. - Mix until just combined. Do not overmix. - In a separate bowl, prepare the cream cheese swirl by beating: - 8 oz cream cheese, softened - ¼ cup granulated sugar - 1 egg - 1 teaspoon vanilla extract - Beat until smooth and creamy. - Pour half of the pumpkin batter into the prepared pan. - Spread it evenly. - Drop spoonfuls of the cream cheese mixture over the pumpkin batter. - Use a knife to gently swirl the cream cheese into the batter. - Pour the remaining pumpkin batter on top. Swirl again lightly to create a marbled effect. - Bake in the preheated oven for about 30-35 minutes. - A toothpick inserted into the center should come out clean. - Allow the cake to cool in the pan for about 10-15 minutes. - Slice and serve warm. Enjoy! - Always use room temperature ingredients. This helps the batter mix well. - Avoid overmixing your batter. This keeps your cake light and fluffy. - Dust the top with powdered sugar for a nice look. - Drizzle with caramel sauce to add extra sweetness. - Use a high-quality electric mixer. It makes mixing easy and quick. - Line your pan with parchment paper. This helps the cake come out easily. {{image_2}} You can make this cake healthier with a few simple swaps. - Substitute with whole wheat flour: This option adds fiber and nutrients. Use the same amount as all-purpose flour. - Use a sugar substitute: Try a natural sweetener like stevia or monk fruit. These can cut calories while keeping the taste sweet. Want to add some fun to your cake? These tweaks can make it even better. - Add chocolate chips or nuts: Fold in ½ cup of chocolate chips for a sweet burst. If you like crunch, add chopped walnuts or pecans. - Experiment with different spices: Try adding cinnamon or nutmeg for a warm flavor twist. A pinch of ginger can also brighten the taste. You can easily make this cake vegan with some swaps. - Substitute eggs with flaxseed meal: Mix 1 tablespoon of flaxseed meal with 3 tablespoons of water. Let it sit for 5 minutes to thicken. This will replace one egg. - Use plant-based cream cheese: Many brands offer great vegan cream cheese options. This keeps the swirl creamy and delicious. These variations let you customize the Pumpkin Cream Cheese Coffee Cake. Enjoy it your way! To keep your coffee cake fresh, store it in an airtight container. Place it at room temperature. It will stay tasty for about 3 days. This method helps maintain its moist texture. If you want to save some for later, you can freeze it. Wrap the coffee cake tightly in plastic wrap. Then, put it in a freezer-safe bag. It can last up to 3 months in the freezer. When you're ready to enjoy it, simply thaw it before serving. Let it sit at room temperature for a few hours or overnight in the fridge. Reheating is easy and quick. Just take a slice and pop it in the microwave. Heat it for about 20-30 seconds. This will warm it up nicely. I recommend serving it warm for the best taste. Enjoy it with a cup of coffee for a perfect treat! Pumpkin Cream Cheese Coffee Cake can last for about three days at room temperature. Store it in an airtight container to keep it fresh. If you want it to last longer, you can refrigerate it. In the fridge, it can stay good for up to a week. Yes, you can freeze this cake! Wrap it tightly in plastic wrap or foil. Place it in a freezer-safe bag or container. It can last for up to three months in the freezer. When you are ready to enjoy it, let it thaw in the fridge overnight. If you don’t have pumpkin spice, you can make your own mix. Combine cinnamon, nutmeg, and ginger in equal parts. You can also use just cinnamon for a simpler flavor. This will still give your cake a nice warm taste. To keep the cream cheese from sinking, make sure it is thick. Use a spoon to drop it on top of the batter. Also, try to swirl it gently without mixing it too much. This way, it will stay near the top while baking. Absolutely! You can prepare the batter and cream cheese mix a day before. Just cover them well and store them in the fridge. When you are ready, just assemble and bake your cake. This will save you time on the day you want to serve it. This Pumpkin Cream Cheese Coffee Cake combines rich flavor with easy steps. You mix dry and wet ingredients, then swirl in cream cheese. Follow the tips for the best texture and serving options. Remember, this cake is great for sharing or freezing. Enjoy it warm, or try some fun variations. Whether you make it healthy or choose different flavors, this cake will please everyone. Baking can be fun, and with this recipe, you'll impress your friends and family. Happy baking!

Pumpkin Cream Cheese Coffee Cake Irresistible Delight

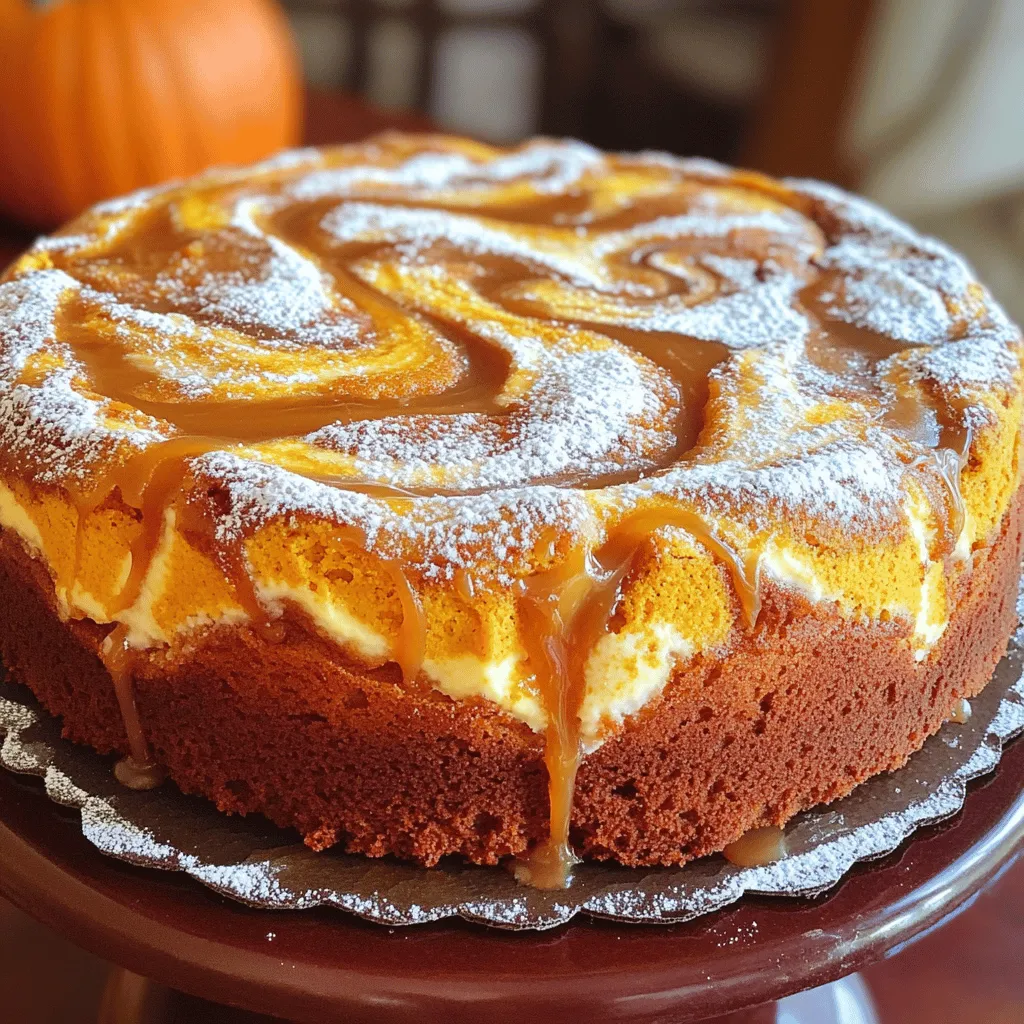
Are you ready to indulge in a warm slice of heaven? This Pumpkin Cream Cheese Coffee Cake is the fall

- 2 large chicken breasts - 1 tablespoon olive oil - 1 onion, thinly sliced The base of this dish is simple yet flavorful. You will need two large chicken breasts. They provide the perfect meat for pulling. The olive oil helps to sauté the onion, adding great flavor. Slice one onion thinly. This will cook down nicely, adding sweetness to the dish. - 2 tablespoons chili powder - 1 tablespoon smoked paprika - 1 teaspoon ground cumin - 1 teaspoon cayenne pepper Spices transform plain chicken into something special. Use two tablespoons of chili powder for heat. Add one tablespoon of smoked paprika for a rich flavor. Ground cumin brings depth, so use one teaspoon. If you like it spicy, add one teaspoon of cayenne pepper. Adjust this to fit your taste. - 1 cup shredded lettuce - 1 avocado, sliced - ½ cup fresh cilantro, chopped - Lime wedges for serving Toppings make your tacos fresh and bright. Shred one cup of lettuce for crunch. Slice one avocado for creaminess. Chop half a cup of fresh cilantro for a burst of flavor. Don't forget lime wedges! They add a zesty finish to each bite. Enjoy these tacos with a mix of textures and flavors. 1. Start by heating 1 tablespoon of olive oil in a large skillet over medium heat. 2. Add 1 thinly sliced onion. Sauté it for about 5 minutes. The onion should turn soft and clear. 3. Next, stir in 4 minced garlic cloves. Cook for another 30 seconds until you smell the garlic. 4. In a small bowl, mix together the spices. Combine 2 tablespoons of chili powder, 1 tablespoon of smoked paprika, 1 teaspoon of ground cumin, and 1 teaspoon of cayenne pepper. Add salt and pepper to taste. 1. Place 2 large chicken breasts into the skillet with the onions and garlic. 2. Sprinkle the mixed spices evenly over the chicken. 3. Pour in a 14 oz can of diced tomatoes with green chilies and 1 cup of chicken broth. Stir it all together. 4. Bring the mixture to a simmer. Cover the skillet and let it cook for 25 to 30 minutes. The chicken should be fully cooked. It should shred easily with a fork. 1. Once the chicken is cooked, remove it from the skillet. Use two forks to shred it well. 2. Return the shredded chicken to the skillet. Mix it with the tomato sauce. 3. Warm 8 small corn tortillas in a separate pan or microwave until soft. 4. To build each taco, place a generous amount of the pulled chicken mix on a tortilla. 5. Top the chicken with 1 cup of shredded lettuce, slices of 1 avocado, and ½ cup of fresh cilantro. 6. Serve your tacos with lime wedges on the side. Enjoy the burst of flavor! - Best practices for shredding chicken: After cooking, let the chicken cool for a few minutes. Use two forks to pull the chicken apart. Shred it into bite-sized pieces for easy filling in your tacos. This method makes shredding quick and simple. - Adjusting spice levels for heat preference: If you like spicy food, add more cayenne pepper. For milder tacos, cut back on the cayenne or skip it altogether. Taste the chicken mixture before serving so you can adjust the heat to your liking. - Pairing with sides or beverages: These spicy tacos pair well with rice or beans. You can also serve them with a side of salsa and tortilla chips. For drinks, try a light beer or a refreshing limeade to cool off the heat. - Garnishing options for presentation: Make your tacos pop with color by adding toppings. Fresh cilantro, avocado slices, and lime wedges make great garnishes. They not only add flavor but also look nice on the plate. - Recommended skillets and tools: Use a large skillet for cooking the chicken. A non-stick pan helps prevent sticking and makes cleanup easier. A set of good forks is also handy for shredding the chicken. - Essential kitchen gadgets for ease: A sharp knife is key for slicing onions and avocados. A measuring spoon set helps you get the spice amounts just right. If you have a slow cooker, it’s great for making pulled chicken with little effort. {{image_2}} You can easily change the recipe to fit your needs. If you want gluten-free options, use corn tortillas. They are tasty and safe for those with gluten issues. You can also go vegetarian! Use jackfruit or mushrooms instead of chicken. Both options absorb flavors well and give a great texture. Want to kick up the flavor? Try adding different cheeses like cheddar or queso fresco. These cheeses melt well and add creaminess. You can also add fruits like pineapple or mango. Their sweetness balances the spice and adds a fresh touch. Taco style can change your meal. Choose between soft shell or hard shell tacos. Soft shells are pliable, while hard shells are crunchy. Both have their charm! If you want something bigger, go for a burrito-style taco. Just wrap everything up in a large tortilla for a hearty meal. Store your leftover pulled chicken in an airtight container. It keeps well in the fridge for up to four days. Make sure it cools down before sealing. You can freeze the pulled chicken for later meals. Place it in a freezer-safe bag or container. It stays good for up to three months. When you're ready to eat, thaw it in the fridge overnight. Reheat it in a skillet over low heat. Stir in a splash of broth to keep it moist. Leftover chicken can make great meals. Toss it in a salad or use it in a wrap. You can also add it to soups for extra flavor. For toppings, keep your lettuce and avocado stored separately. This keeps them fresh and crunchy when you reuse them. You can swap chicken for many other proteins. Here are some options: - Turkey breast: A lean choice with similar texture. - Pulled pork: Adds a rich flavor with a smoky taste. - Jackfruit: Great for a vegan option; it shreds like meat. - Tofu: Firm tofu can be marinated and shredded for a plant-based taco. - Tempeh: Offers a nutty flavor and a good protein source. Each of these options brings its own unique taste. Feel free to use what you like best! The spice level can be adjusted easily. The recipe includes cayenne pepper, which adds heat. Here are some tips to control the spice: - Reduce cayenne: Start with less and taste as you cook. - Add dairy: Toppings like sour cream or yogurt can cool the heat. - Use mild spices: Substitute with smoked paprika or mild chili powder. - Fresh toppings: Lettuce and avocado help balance spiciness. You can make these tacos as mild or as hot as you want! Yes, you can prepare the chicken ahead of time. Here’s how to do it: - Cook the chicken: Follow the recipe and let it cool. - Store it: Keep it in an airtight container in the fridge for up to 3 days. - Freeze for later: Place it in a freezer bag for up to 3 months. - Reheat: When ready to serve, just warm it up in a pan or microwave. Doing this saves time on busy weeknights, making meal prep a breeze! Spicy pulled chicken tacos combine simple ingredients with bold flavors. Start with chicken and spices, sauté onions, and simmer everything together. You can customize with toppings and adjust heat to taste. These tacos are not only tasty but also versatile. Store leftovers well and enjoy them in different meals. Embrace creativity by trying new ingredients and styles. Enjoy making your next taco night a hit!

Spicy Pulled Chicken Tacos Flavorful and Simple Meal

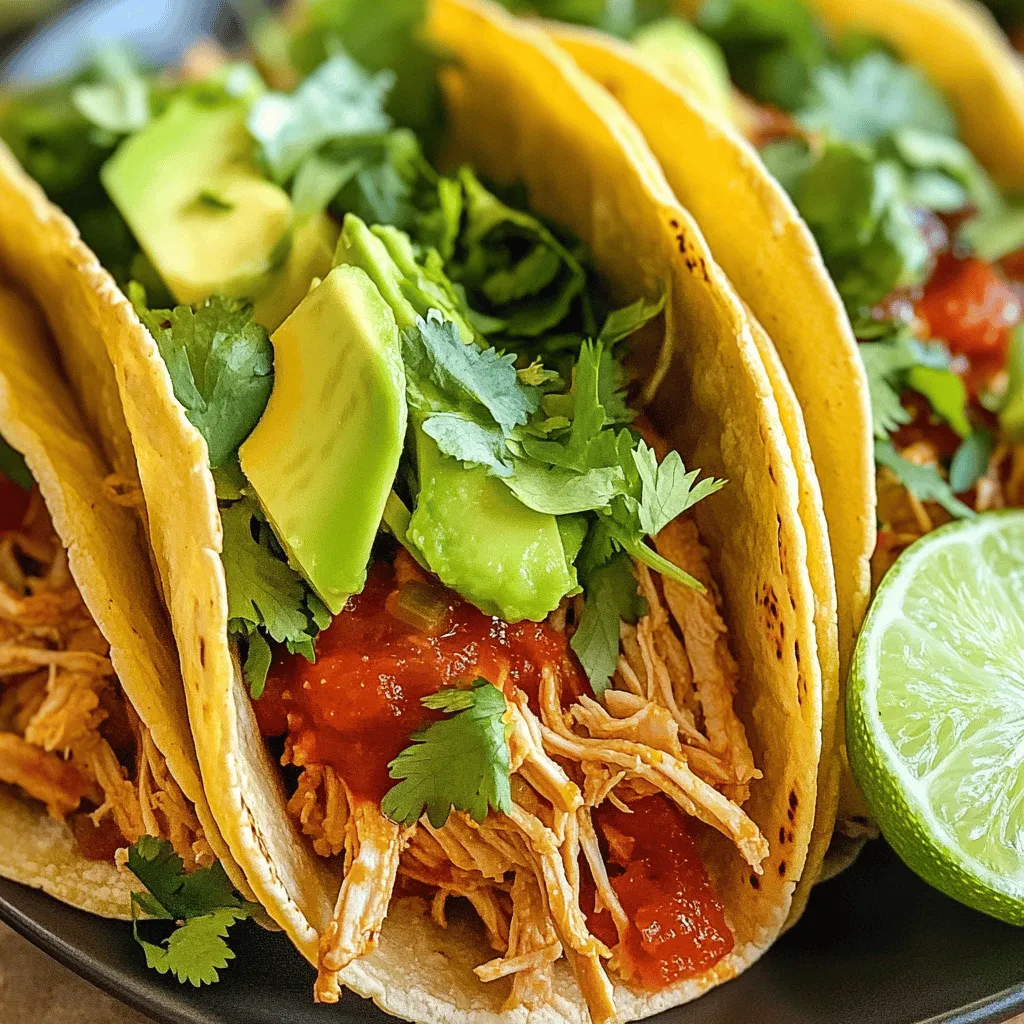
Craving something bold and delicious? These Spicy Pulled Chicken Tacos hit the spot! With just a few simple ingredients, you

To make Parmesan garlic sweet potato chips, you need a few simple items. Here’s what you'll gather: - 2 large sweet potatoes, thinly sliced - 3 tablespoons olive oil - 3 cloves garlic, minced - 1 teaspoon smoked paprika - ½ teaspoon salt - ¼ teaspoon black pepper - ½ cup grated Parmesan cheese - Fresh parsley, chopped (for garnish) Each ingredient plays a key role. The sweet potatoes add natural sweetness and a lovely texture. Olive oil helps the chips crisp up nicely. Fresh garlic gives a bold flavor that pairs well with the Parmesan. Smoked paprika adds a hint of smokiness, while salt and black pepper enhance all the flavors. Finally, the Parmesan cheese brings a rich, savory taste. Fresh parsley adds color and freshness when you serve the chips. Gather these items, and you are ready to create a tasty snack! Start by preheating your oven to 400°F (200°C). This heat makes the chips crispy. Next, line two baking sheets with parchment paper. This helps the chips not stick. You want them to bake evenly and get nice and crunchy. In a large bowl, mix together the olive oil, minced garlic, smoked paprika, salt, and black pepper. Stir it well until all the ingredients blend together. Then, add the thinly sliced sweet potatoes to the bowl. Toss the sweet potatoes in the oil mixture. Make sure every slice gets coated well. This adds flavor to each chip. Place the sweet potato slices on the prepared baking sheets. Spread them out in a single layer. Avoid overlapping so they cook evenly. Now, sprinkle the grated Parmesan cheese over the slices. This adds a rich, cheesy flavor. Bake the sheets in the oven for about 20-25 minutes. Flip the chips halfway through to ensure they crisp up on both sides. Keep an eye on them. You want them golden brown and crispy. Once the chips are done, take them out of the oven. Let them cool for a few minutes. This helps them crisp up even more. Before serving, garnish with chopped fresh parsley. This adds a burst of color and flavor. Serve these chips warm as a snack or side dish. Enjoy their delicious taste! To get your sweet potato chips extra crispy, follow these steps: - Use a mandoline: This tool helps you slice sweet potatoes thinly and evenly. - Soak in water: Soaking slices in cold water for 30 minutes removes starch. This helps them crisp up better. - Dry the slices: Pat them dry with a towel after soaking. This step removes excess moisture. - Spread them out: Make sure the chips don’t touch when you lay them on the baking sheet. This allows hot air to circulate. - Bake in batches: If you have many slices, bake them in two or more batches. This keeps them from steaming. Even slices make a big difference. When slices are the same thickness, they cook evenly. Some chips get burnt while others stay soft if they are uneven. Use a mandoline for more uniform cuts. If you don’t have one, use a sharp knife and try to keep your slices about 1/8 inch thick. This simple step helps you achieve perfect chips every time. While Parmesan and garlic are great, you can mix things up with different flavors. Here are some ideas: - Herbs: Try rosemary or thyme for a fresh taste. - Cheese: Use cheddar or feta for a different cheese kick. - Spices: Add chili powder or cayenne pepper for some heat. - Sweeten it up: Try a sprinkle of cinnamon and sugar for a sweet treat. Experiment with these options to find your favorite flavor combination! {{image_2}} If you want to change the cheese, try using a mix of cheddar and Parmesan. You can also use vegan cheese if you prefer a plant-based option. Nutritional yeast is a great choice too. It adds a cheesy flavor without dairy. Each option will give your chips a different taste, so feel free to experiment. To boost the flavor, consider adding herbs like thyme or rosemary. You can sprinkle them on before baking. For a tangy twist, try adding lemon zest. If you love heat, toss in some crushed red pepper flakes. Each add-in can change the flavor profile of your chips. If you enjoy spiciness, increase the smoked paprika or add cayenne pepper. Start with a pinch and taste. You can always add more heat later. For a milder version, skip the smoked paprika altogether. Adjusting the spice level makes your chips fit your taste perfectly. To keep your leftover chips fresh, place them in an airtight container. Make sure the container is completely dry. Add a piece of paper towel inside to absorb any moisture. This will help keep them crispy. Store them at room temperature for up to two days. Avoid the fridge, as this can make them soggy. To reheat your chips and regain that crunch, use the oven. Preheat it to 350°F (175°C). Spread the chips on a baking sheet in a single layer. Heat for about 5-10 minutes. Keep an eye on them to avoid burning. This method will help restore their crispiness. If you want to save your chips for later, freezing is a good option. First, let the chips cool completely. Then, spread them out on a baking sheet. Freeze them for 1-2 hours until solid. After that, transfer them to a freezer-safe bag. Remove as much air as possible before sealing. They can last up to three months in the freezer. Yes, you can use regular potatoes. However, sweet potatoes add a natural sweetness. This sweetness pairs well with garlic and Parmesan. Regular potatoes will work but may taste different. They will also have a different texture. If your chips are not crispy, check a few things. First, ensure you sliced the sweet potatoes thinly. Thicker slices won’t crisp up well. Second, make sure to coat them evenly in oil. Finally, bake them long enough and flip halfway. If they still lack crunch, try baking them a bit longer. These chips are best fresh. You can store them in an airtight container for about 2-3 days. After this, they may get soft. To keep them crispy, reheat in the oven or air fryer for a few minutes. Yes, you can make these in an air fryer! Preheat the air fryer to 375°F (190°C). Place the sweet potato slices in a single layer. Cook for 15-20 minutes, shaking the basket halfway. This method gives a nice crisp without much oil. You now have a clear plan for making sweet potato chips. We covered the key ingredients, step-by-step instructions, and helpful tips. You learned about variations and storage methods too. Remember, the secret to great chips is in even slicing and seasoning. Whether serving for a snack or side dish, you can enjoy tasty, crispy chips at home. Go ahead and try this easy recipe. Enjoy your cooking adventure!

Parmesan Garlic Sweet Potato Chips Crispy and Tasty

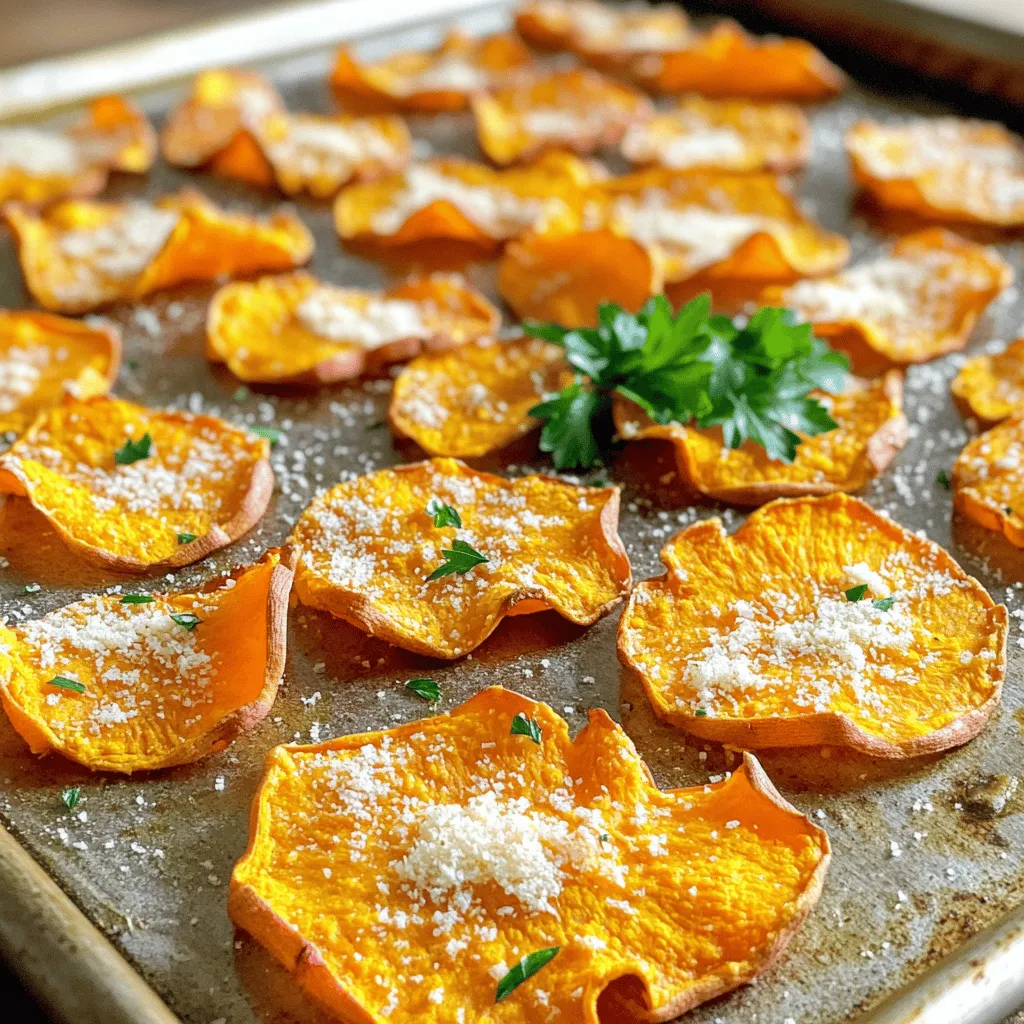
If you crave a crunchy snack that’s both tasty and healthy, then you’ve come to the right place! These Parmesan

Older posts
Newer posts
← Previous Page1 … Page19 Page20 Page21 … Page84 Next →

dsad

© 2026 Lisa Dishes • Built with GeneratePress

Our Policies

  • Copyright Policy
  • Cookie Policy
  • GDPR Policy
  • Privacy Policy
  • Disclaimer
  • Terms Of Use

More Information

  • Home
  • About
  • Contact
  • Appetizers
  • Dessert
  • Dinner
  • Drinks
©2026, Lisa Dishes About Back To Top