Skip to content
DisclaimerTerms Of UseGDPR PolicyCookie Policy

Lisa Dishes

  • Home
  • Drinks
  • Appetizers
  • Dinner
  • Dessert
  • About
  • Contact
  • Privacy Policy
DisclaimerTerms Of UseGDPR PolicyCookie Policy

NO-ING-IMG

- 2 medium sweet potatoes, peeled and diced - 1 can (15 oz) black beans, drained and rinsed - 1 can (14 oz) diced tomatoes with green chilies - 1 medium onion, chopped - 2 cloves garlic, minced - 1 bell pepper (any color), chopped - 1 cup vegetable broth - 1 tablespoon chili powder - 1 teaspoon ground cumin - 1 teaspoon smoked paprika - Salt and pepper to taste - 1 tablespoon olive oil - Fresh cilantro for garnish - Avocado slices for serving (optional) I love using sweet potatoes for their sweet taste and soft texture. You can swap them with butternut squash for a similar vibe. Canned black beans save time, but you can use dried beans if you soak them first. If you want more heat, try using fire-roasted tomatoes instead. You can also skip the bell pepper or use a different color based on your taste. Each serving of this chili offers a great balance of nutrients. Here’s a quick look: - Calories: 250 - Protein: 10g - Carbohydrates: 45g - Fiber: 12g - Fat: 5g This chili is not only hearty but also packs a punch of flavor and nutrition. It’s a great choice for a filling meal without any guilt! Start by peeling and dicing the sweet potatoes into small cubes. This helps them cook evenly. Next, chop the onion and bell pepper. Mince the garlic cloves for flavor. Gather all your ingredients since this makes cooking easier. Heat the olive oil in a large pot over medium heat. Add the chopped onion and bell pepper. Sauté them for about 5 minutes until the onion is soft and clear. Stir in the minced garlic and cook for 1-2 more minutes. This brings out the garlic's great smell. Now, add the diced sweet potatoes to the pot. Sprinkle in the chili powder, ground cumin, smoked paprika, and a pinch of salt and pepper. Stir well to coat the sweet potatoes in the spices. Next, pour in the vegetable broth and the diced tomatoes with their juices. Stir everything together. Bring the mixture to a simmer. Cover the pot and cook for 25-30 minutes. This allows the sweet potatoes to become tender. After that, add the drained black beans to the pot. Cook for another 5 minutes to warm them through. Taste the chili and add more salt, pepper, or spices if you wish. Check the sweet potatoes with a fork. They should be soft and easy to pierce. Make sure the chili is hot all the way through before serving. If you want, let it sit for a few minutes off the heat. This helps the flavors blend together even more. To boost the flavor of your sweet potato black bean chili, use fresh spices. Always use fresh garlic and onion. This makes a big difference. You can also toast your spices. Just heat them in the pot for a minute. This helps release their oils and flavors. If you like a kick, add a pinch of cayenne pepper. You can also squeeze fresh lime juice on top before serving. It brightens up the dish and adds freshness. You’ll need a few basic tools to make this chili. A large pot or Dutch oven works best for even cooking. A good chef's knife helps chop your veggies. A cutting board is a must-have for safety. You might want a wooden spoon for stirring. For easy serving, use deep bowls. If you have measuring spoons, they can help with precise spice amounts. Serve your chili in deep bowls. Top it with fresh cilantro for a pop of color. Avocado slices add creaminess and taste great too. For a crunchy side, serve with crusty bread or tortilla chips. You can also pair it with a simple salad. A side of cornbread complements the chili well, making it a hearty meal. {{image_2}} This chili is already vegetarian and vegan. It uses sweet potatoes and black beans as the main ingredients. You can enjoy it with no meat at all. It is rich in flavor and nutrients. If you want to add protein, consider using lentils. They cook quickly and blend well with the chili. You can change up some ingredients to fit your taste. Here are a few ideas: - Use butternut squash instead of sweet potatoes for a different taste. - Swap black beans for kidney beans or pinto beans. - Add corn for sweetness and crunch. - Toss in some spinach or kale for extra greens. These swaps can keep your chili exciting and fresh. If you love heat, you can spice things up! Here’s how: - Add jalapeños or serrano peppers when cooking. - Mix in some cayenne pepper or hot sauce to the pot. - For a milder chili, skip the chili powder. Use smoked paprika instead. Adjust the spices to make the chili just right for you. After enjoying your sweet potato black bean chili, let it cool down. Transfer the chili to an airtight container. Store it in the fridge. It stays fresh for about 3 to 5 days. Ensure the lid is tight to keep the flavors locked in. You can freeze the chili for later. Pour it into freezer-safe containers. Leave some space at the top because it expands. It freezes well for up to 3 months. When you want to eat it, thaw it in the fridge overnight. Reheat it on the stove or in the microwave. Make sure it heats through to a safe temperature. Store the chili in the fridge within two hours of cooking. This helps keep bacteria away. If you notice any strange smells or colors, it’s best to toss it. Always label your containers with the date. This way, you know how long it’s been stored. Following these tips helps you enjoy your chili at its best! To adjust the spice level, start by adding chili powder. If you want more heat, add cayenne pepper or crushed red pepper flakes. Mix these in slowly, tasting as you go. This helps you find the right balance. For milder chili, use less chili powder or skip the spicy peppers. You can also serve with sour cream or yogurt. This cools down the heat. Yes, you can make this chili in a slow cooker. Just prepare the veggies as usual. Sauté the onion and bell pepper first, then add them to the slow cooker. Add all other ingredients, including sweet potatoes and black beans. Cook on low for 6-8 hours or high for 3-4 hours. This method allows the flavors to mix well and gives a nice texture. You can use other beans in this recipe. Great options are pinto beans, kidney beans, or chickpeas. Just make sure to drain and rinse them as you do with black beans. Each bean brings a different flavor and texture. Experiment with what you have at home. It keeps the recipe fresh and exciting! In this blog post, I covered the key elements to create a great Sweet Potato Black Bean Chili. We looked at the ingredients, their measurements, and helpful substitutions. I shared step-by-step cooking instructions and tips for checking doneness. We also explored variations, storage tips, and common questions. You can easily adapt the recipe to suit your taste. With these insights, I hope you feel ready to cook a delicious and healthy meal. Enjoy your culinary journey!

Sweet Potato Black Bean Chili Hearty and Healthy Meal

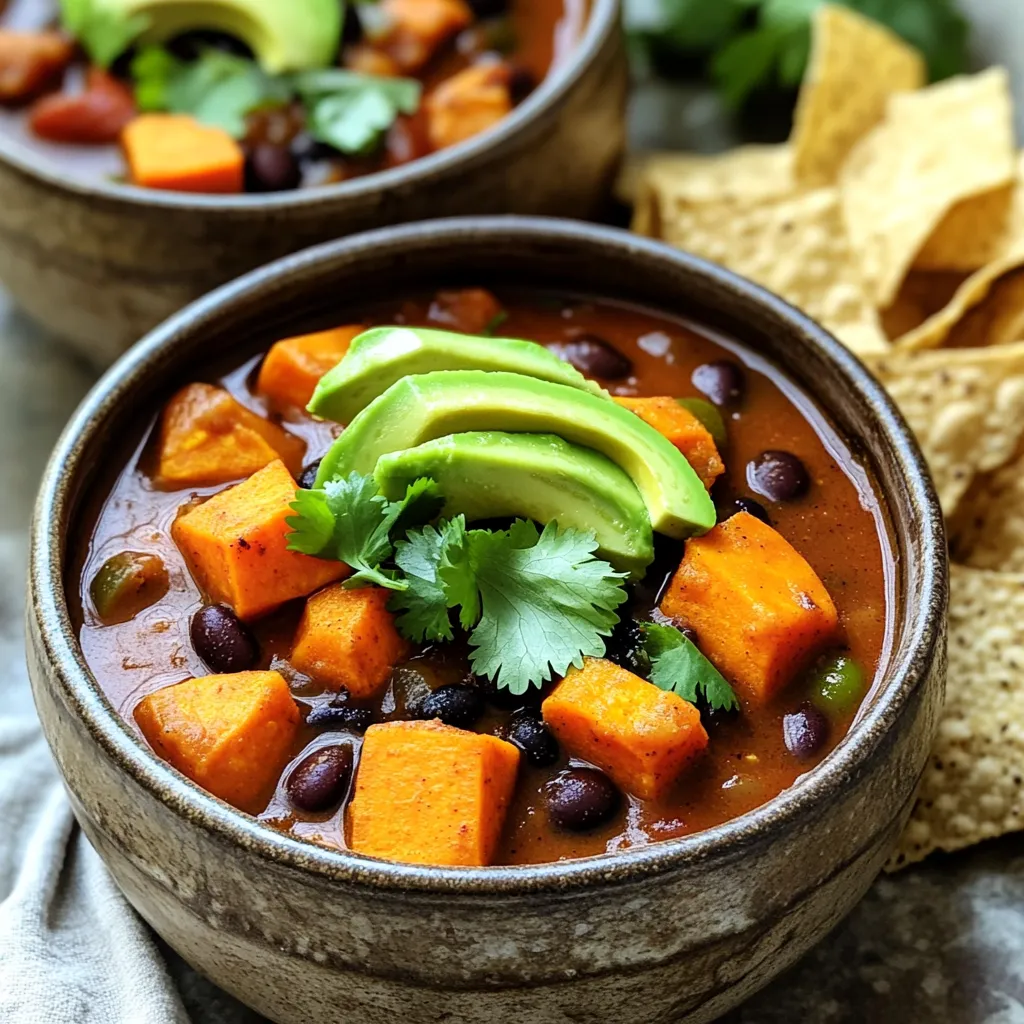
Looking for a hearty and healthy meal? Sweet Potato Black Bean Chili is your answer! Packed with flavor, this dish

To make this dish, you need a few key items: - 4 bone-in chicken thighs (skin on) - 1 pound baby Yukon gold potatoes, halved - 1/4 cup unsalted butter, melted - 6 cloves garlic, minced These main ingredients create a great base for our meal. The chicken thighs provide rich flavor, while the potatoes add heartiness. Seasonings really enhance the taste of the dish. Here are the must-have seasonings: - 1 teaspoon dried Italian herbs (oregano, thyme, rosemary) - 1 teaspoon paprika - Salt and pepper to taste The dried herbs and paprika bring warmth and depth. Make sure to season the chicken and potatoes well. Adding garnishes makes your dish look even better. Here are some tasty options: - Fresh parsley, chopped (for garnish) - Lemon wedges (for serving) Chopped parsley gives a fresh touch. Lemon wedges add a bright zing to your meal. These are simple ways to elevate your dish. First, we need to get everything ready. Preheat your oven to 400°F (200°C). This step is key for crispiness. Next, line a large baking sheet with parchment paper. This helps with cleanup later. Now, grab a small bowl. In it, mix together melted butter, minced garlic, dried Italian herbs, paprika, salt, and pepper. This mix is what makes the chicken and potatoes so tasty. Now, let’s assemble the dish. Place the halved baby potatoes on one side of the baking sheet. Drizzle half of your garlic butter mixture over the potatoes. Toss them well so they get coated. Next, take the chicken thighs and season them with salt and pepper on both sides. Place the chicken on the baking sheet next to the potatoes. Brush the remaining garlic butter over the chicken. Spread everything out in a single layer. This ensures even cooking. Now, pop the baking sheet into the oven. Bake for about 35-45 minutes. The chicken is done when it reaches 165°F (75°C) inside. The potatoes should be tender and crispy. If you want extra crispy skin on the chicken, broil for the last 2-3 minutes. Keep an eye on it to avoid burning. Once done, remove the sheet from the oven. Let it rest for 5 minutes before serving. To ensure juicy chicken, always start with bone-in thighs. They cook more evenly and stay moist. Use a meat thermometer to check the chicken’s internal temperature. For crispy potatoes, make sure they are in a single layer. If they overlap, they won’t get crispy. Toss the potatoes halfway through cooking for even browning. Finally, don’t skip the resting time. It lets the juices settle, making every bite delicious. To boost the flavor of your dish, add fresh herbs. Fresh thyme, rosemary, or basil work well. Chop them finely and sprinkle them on both the chicken and potatoes. This adds bright, vibrant notes. You can also mix in lemon zest for a zesty kick. If you prefer a stronger flavor, try adding some crushed red pepper flakes. When baking chicken, space is key. Make sure the chicken thighs do not touch. This helps them cook evenly and get crispy. Use a rimmed sheet pan to catch drippings and keep your oven clean. Pre-heating the oven is a must. This ensures even cooking and browning. Always check the internal temperature with a meat thermometer. It should read 165°F (75°C) for safe eating. To get that perfect crispy skin, follow a few simple steps. First, pat the chicken dry with paper towels. This removes excess moisture. Next, season the skin with salt and pepper. Salt helps draw out moisture and promotes browning. During the last few minutes of baking, switch to broil. Keep an eye on it to prevent burning. This will give you that beautiful, golden finish. Enjoy the crunch with every bite! {{image_2}} You can swap out the potatoes for other veggies. Carrots, broccoli, or green beans work well. Just cut them into bite-sized pieces. Toss them in the garlic butter mix too. This change adds color and variety to your meal. Each vegetable brings its own flavor. Be creative and use what you have on hand. If you like heat, add some crushed red pepper flakes. A teaspoon or two gives a nice kick. You can also use spicy paprika instead of regular. For extra flavor, mix in some chopped jalapeños. These changes make the dish exciting. Adjust the spice level to fit your taste. You can use boneless chicken thighs or breasts in this recipe. They cook faster than bone-in thighs. Keep an eye on the cooking time. You may need only 25-30 minutes. Brush the garlic butter on generously for flavor. This option is great for a quick weeknight meal. After a tasty meal, store leftovers in an airtight container. Let the chicken and potatoes cool to room temperature. This helps keep the food safe. Place them in the fridge. They will last up to three days. Always label your container with the date. This way, you know when to eat them. To reheat your chicken and potatoes, you have a few good options. The oven is best for even heating. Preheat it to 350°F (175°C). Place your leftovers on a baking sheet. Warm them for about 15 to 20 minutes. You can also use the microwave. Heat in short bursts. Check after every minute to avoid overcooking. Freezing is a great way to save extra food. First, cool the chicken and potatoes completely. Then, wrap them tightly in plastic wrap or foil. Place them in a freezer bag and remove as much air as possible. Label the bag with the date. Chicken and potatoes can stay fresh for up to three months. When you're ready to eat, thaw them in the fridge overnight. Reheat properly before serving. It takes about 35 to 45 minutes to cook chicken thighs in the oven. You want to reach an internal temperature of 165°F (75°C) to ensure they are safe to eat. The time may vary based on your oven and the size of the thighs. Always check them with a meat thermometer for the best results. Yes, you can use other types of potatoes. Red potatoes or fingerling potatoes work well. Just cut them to a similar size as Yukon gold potatoes. This way, they cook evenly. The flavor might change a bit, but they will still taste great with the garlic butter. You can pair this dish with a simple green salad. A side of steamed vegetables, like broccoli or green beans, adds color and nutrients. You could also serve some crusty bread to soak up the yummy garlic butter. This meal is versatile and fits many sides. This blog post covered everything you need for Sheet-Pan Garlic Butter Chicken. You learned about the right ingredients, essential seasonings, and some tasty garnishes. I shared step-by-step cooking tips to help you get juicy chicken and crisp potatoes. Don't forget about the different variations, like spicy options or using boneless chicken. Proper storage and reheating tips will help keep your leftovers fresh. Try these ideas, and make a meal that will impress everyone! Enjoy cooking and eating this simple, delicious dish.

Savory Sheet-Pan Garlic Butter Chicken and Potatoes

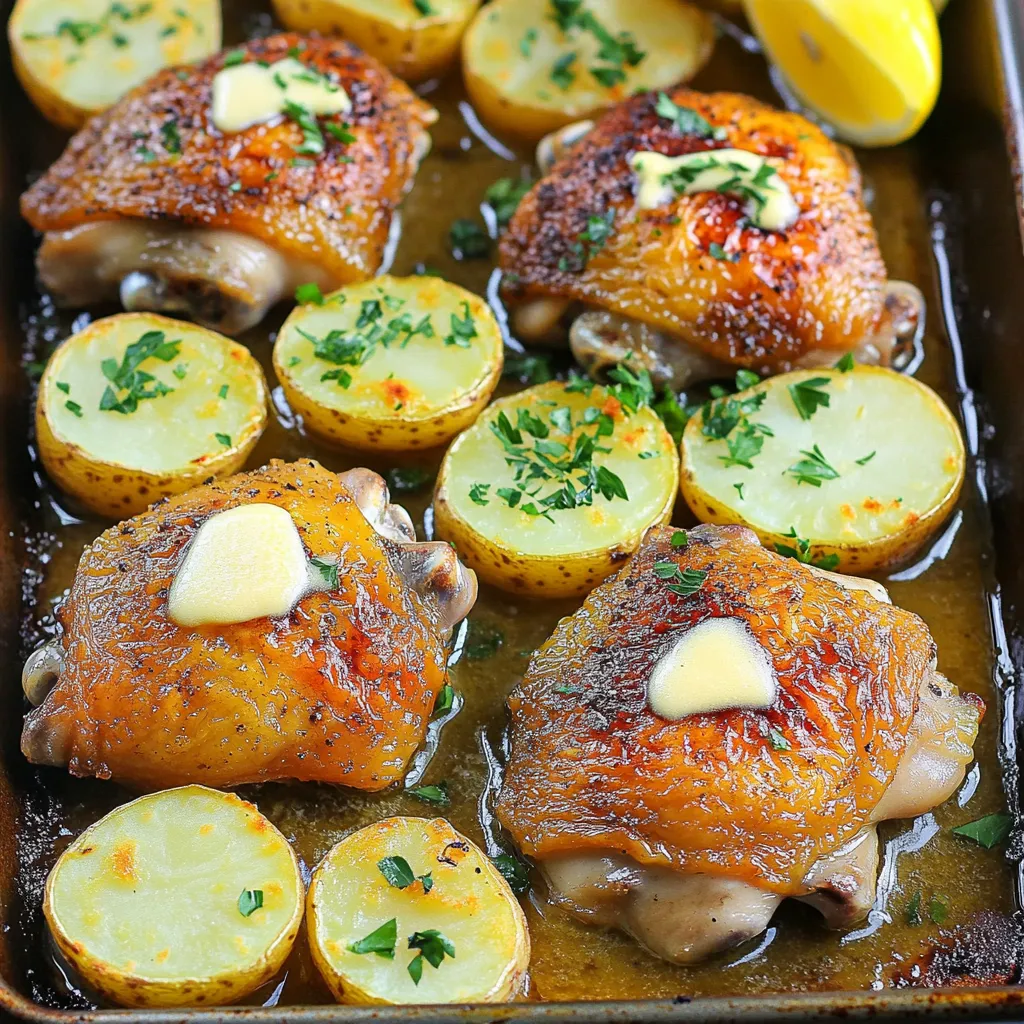
Are you ready for a quick and tasty dinner? This savory sheet-pan garlic butter chicken and potatoes dish is just

- 250g Biscoff cookies (crushed) - 100g unsalted butter (melted) - 400g cream cheese (room temperature) - 200ml heavy cream - 100g powdered sugar - 100g Biscoff spread - 1 teaspoon vanilla extract - Pinch of salt - Additional Biscoff cookies for garnish (whole and crushed) The key to a great no-bake Biscoff cheesecake cup lies in your ingredients. First, you need Biscoff cookies. They provide a sweet, spiced flavor that makes these cups unique. Next, unsalted butter helps bind the crushed cookies together into a delightful crust. For the creamy filling, you will want room temperature cream cheese. This makes it easier to mix and gives a smooth texture. Heavy cream is important too. Whipping it creates a light and airy filling. Powdered sugar adds sweetness without any graininess, while Biscoff spread enhances that beloved flavor. A touch of vanilla extract brings warmth, and a pinch of salt balances everything perfectly. Don’t forget the extra Biscoff cookies for garnish! They not only look pretty but also add a nice crunch. With these ingredients, you are all set to create a delightful treat that everyone will love. Start by crushing 250g of Biscoff cookies in a bowl. You want them to be fine, like sand. Next, melt 100g of unsalted butter in the microwave. Combine the crushed cookies with the melted butter. Mix until you see a wet sand texture. Take 4-6 serving cups and divide the cookie mix evenly. Press it down firmly in each cup to create a crust. This will hold all the yummy filling later. Place the cups in the fridge while you make the cheesecake filling. In a large bowl, pour 200ml of heavy cream. Whip it until you see soft peaks. This makes the filling light and fluffy. In another bowl, mix 400g of cream cheese, 100g of powdered sugar, and 100g of Biscoff spread. Add 1 teaspoon of vanilla extract and a pinch of salt. Blend until it is smooth and creamy. Now, gently fold the whipped cream into the cheese mix. Be careful! You want to keep it fluffy. Take the cups out of the fridge. Spoon or pipe the cheesecake mixture over the cookie crusts. Fill each cup to the top. This will make them look and taste amazing. You can use a piping bag for a fancy touch. Chilling is very important for the texture. Cover each cup with plastic wrap. Chill them in the fridge for at least 4 hours. For the best results, leave them overnight. This helps the flavors blend and the filling to set perfectly. To get a light and fluffy cheesecake, whip the heavy cream until it forms soft peaks. This means the cream should hold its shape but still be soft. Be careful not to whip it too long; it can turn into butter. When you mix the whipped cream into the cream cheese, fold gently. Use a spatula to lift the cream from the bottom of the bowl. This method keeps the air in the whipped cream, making the cheesecake airy and smooth. For a lovely presentation, serve your cheesecake cups on a wooden board or a nice plate. You can drizzle extra Biscoff spread on top for added flair. This not only looks good but adds extra flavor too. Consider garnishing with whole Biscoff cookies and a sprinkle of crushed cookies. This adds texture and makes the dessert pop visually. One common mistake is overmixing the filling. This can make the cheesecake dense. Mix just until everything is combined and smooth. Another mistake is skipping the chilling step. Chilling lets the cheesecake set up nicely. Aim for at least four hours in the fridge, or overnight if you can wait. This step is key for the best texture. {{image_2}} You can easily change the flavor of your cheesecake cups. Try adding different extracts for fun twists. Almond or hazelnut extracts can enhance the taste. You can also mix in fruit toppings. Fresh berries, sliced bananas, or mango chunks add color and flavor. They make the dessert look great and taste even better. If you need gluten-free options, use gluten-free Biscoff cookies. Many brands make tasty gluten-free cookies that work well. For a vegan version, swap cream cheese for a plant-based cream cheese. Use coconut cream in place of heavy cream. You can also find dairy-free Biscoff spread, which keeps the flavors intact. You can adjust this recipe for more or fewer servings. To make larger portions, use bigger cups. For smaller bites, divide the mixture into mini cups. These mini cheesecake bites are perfect for parties. They are easy to grab and eat while mingling. Enjoy experimenting with different sizes and flavors! To keep your no-bake Biscoff cheesecake cups fresh, store them in the refrigerator. Use an airtight container or cover each cup tightly with plastic wrap. This helps prevent any odors from the fridge from affecting your dessert. Make sure to chill the cheesecake cups for at least four hours before serving. If you want to freeze them, place the cups in a freezer-safe container. They can stay fresh in the freezer for up to three months. When you are ready to enjoy them, let them thaw in the fridge overnight. For the best taste, consume your cheesecake cups within five days when stored in the fridge. The freshness may change based on how well you seal them and the temperature of your fridge. If you freeze them, they will keep their taste and texture for about three months. After that, they may lose some quality, but they will still be safe to eat. Always check for any signs of spoilage before enjoying your dessert. Yes, you can! If you cannot find Biscoff cookies, you can use other cookies. Here are some great options: - Digestive biscuits - Graham crackers - Oreos (for a chocolate twist) - Vanilla wafers Make sure to crush them finely and mix with melted butter just like in the recipe. Each cookie type gives a unique taste. These cheesecake cups last for about 3 to 5 days in the fridge. To keep them fresh, cover them tightly with plastic wrap or a lid. If you see any water on top, it’s just from the cream. It’s still safe to eat! Absolutely! These cheesecake cups are perfect for making ahead. You can prepare them a day in advance. Just follow these tips: - Make the cookie base and filling. - Layer them in the cups. - Chill overnight for the best flavor and texture. When you are ready to serve, just add your toppings! These cheesecake cups are a simple and tasty treat. You start with crushed Biscoff cookies and butter for the base. Then, you whip cream and mix it with cream cheese and Biscoff spread. After chilling, you get a creamy, delicious dessert. Remember to avoid overmixing and skip the chilling at your own risk. Try variations and adjust for dietary needs to make it yours. With these tips, you can impress everyone with your skills in the kitchen. Enjoy making and sharing these yummy cups!

No-Bake Biscoff Cheesecake Cups Delightful and Easy

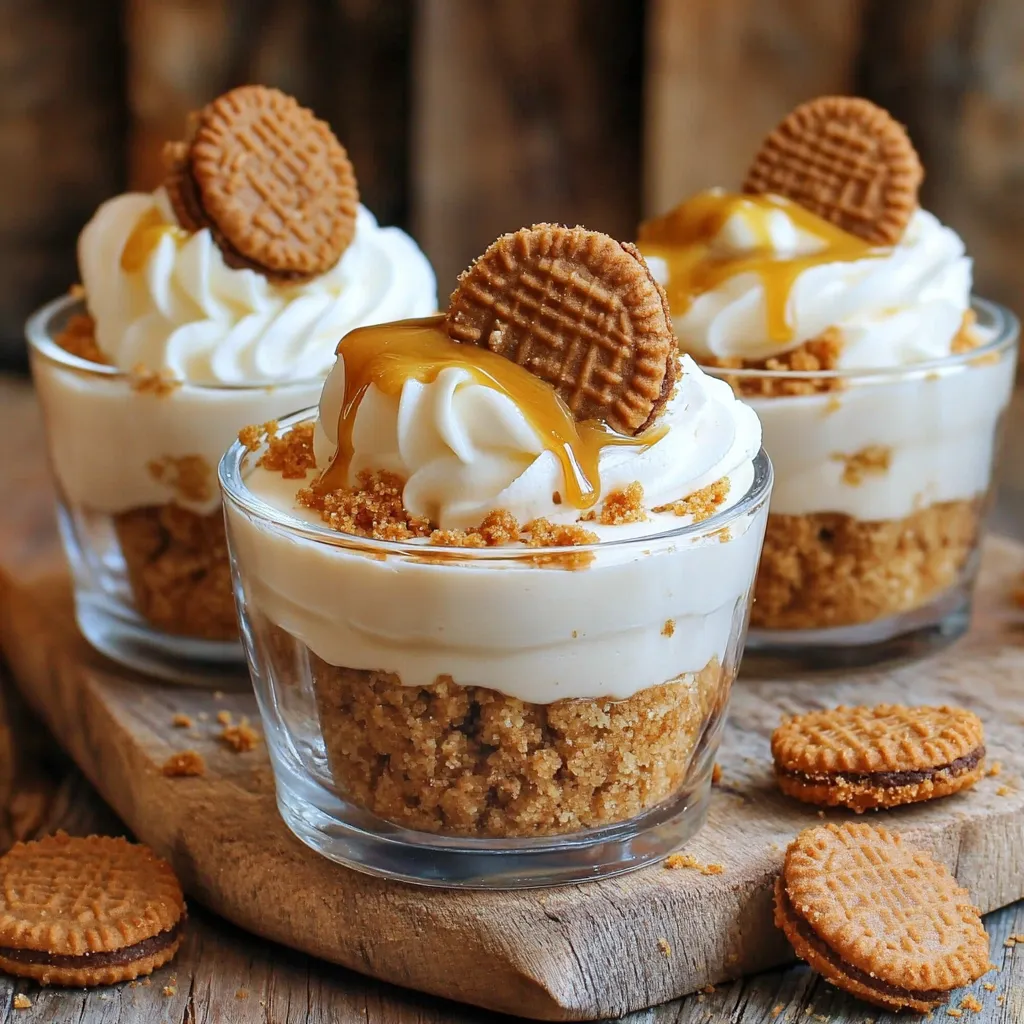
Get ready to indulge in a sweet treat that’s both simple and scrumptious! These No-Bake Biscoff Cheesecake Cups are perfect

To make One-Pot Creamy Cajun Sausage Pasta, you will need: - 12 oz penne pasta - 1 lb smoked sausage, sliced - 1 tablespoon olive oil - 1 small onion, diced - 2 cloves garlic, minced - 1 bell pepper (red or green), diced - 1 cup cherry tomatoes, halved - 2 cups chicken broth - 1 cup heavy cream - 1 tablespoon Cajun seasoning - 1 cup shredded cheddar cheese - Salt and pepper to taste - Chopped fresh parsley for garnish If you need alternatives for some ingredients, here are a few options: - Penne pasta: You can use rotini or fusilli if you prefer. - Smoked sausage: Try turkey sausage or chicken sausage for a lighter version. - Heavy cream: Substitute with half-and-half or coconut milk for a dairy-free option. - Cajun seasoning: Make your own with paprika, cayenne, garlic powder, and oregano. - Cheddar cheese: Use mozzarella or pepper jack for different flavors. To prepare this dish, gather these essential tools: - Large pot or Dutch oven - Cutting board and sharp knife - Wooden spoon or spatula - Measuring cups and spoons - Ladle for serving These tools will help you create this delicious meal with ease. Enjoy the process of making this creamy delight! Start by heating the olive oil in a large pot over medium heat. Add the sliced smoked sausage. Cook for about 5 minutes, stirring often. You want it browned and tasty. Once done, remove the sausage and set it aside. This step adds depth to your dish. In the same pot, toss in the diced onion and bell pepper. Sauté for 3 to 4 minutes. You’re looking for them to soften up a bit. Then, mix in the minced garlic. Cook for another minute. You should smell a wonderful aroma! Now, add the penne pasta to the pot. Pour in the chicken broth, add the Cajun seasoning, and mix in the halved cherry tomatoes. Stir well to combine everything. Bring it to a boil, then lower the heat to medium-low. Cover the pot and cook according to the pasta package, usually about 12 to 14 minutes. Stir occasionally so it doesn’t stick. Once the pasta is cooked and most of the broth is absorbed, stir in the heavy cream and shredded cheddar cheese. Mix until the cheese melts and the sauce looks creamy. If it's too thick, add a splash of chicken broth to thin it out a bit. This is where the magic happens! Return the browned sausage to the pot. Stir until everything is heated through. Taste and season with salt and pepper as needed. For a nice touch, serve in bowls and top with freshly chopped parsley. You can even sprinkle more cheese on top for extra flavor! To make your dish pop, use fresh herbs. Chopped parsley adds brightness. You can also try fresh basil or thyme. They bring extra depth. Don't forget to taste as you cook. Adjust salt and pepper to suit your taste. A splash of lemon juice can brighten the dish too! For the best creaminess, use full-fat heavy cream. It blends well with the cheese. If you want more creaminess, add a bit of cream cheese. Stir it in when you add the heavy cream. This will give you an even richer sauce. Always mix well to combine everything smoothly. One common mistake is overcooking the pasta. Follow the package time, but check it a minute early. You want it al dente, not mushy. Another error is adding cheese too soon. Wait until the pasta absorbs most of the broth. This helps achieve a creamy texture without clumps. Lastly, don’t skip the seasoning. It’s key to a tasty dish! {{image_2}} To make a vegetarian version of this dish, swap the sausage for plant-based sausage. You can also add more veggies like mushrooms, zucchini, or spinach. Use vegetable broth instead of chicken broth. This keeps the creamy texture while adding great flavor. If you like heat, add some diced jalapeños or red pepper flakes. You can use a spicier Cajun seasoning as well. This twist gives the dish an exciting kick. Adjust the heat to suit your taste. While penne works well, feel free to try other pasta shapes. Fusilli or farfalle are great options. Each shape holds the sauce differently, which can change your dish's texture. Experiment to find your favorite. After enjoying your One-Pot Creamy Cajun Sausage Pasta, let it cool. Transfer leftovers to an airtight container. Store in the fridge for up to three days. This helps keep the flavors fresh and tasty. To reheat, place the pasta in a pot over medium heat. Add a splash of chicken broth to help it warm up. Stir regularly to prevent sticking. You can also use a microwave. Heat in short bursts, stirring in between. If you want to freeze your pasta, let it cool completely. Place it in a freezer-safe container. It will last up to three months in the freezer. When ready to eat, thaw in the fridge overnight. Reheat as mentioned above for best results. Yes, you can use different sausages. Chicken sausage, turkey sausage, or even vegetarian sausage work well. Each type adds its own flavor. Just make sure to adjust cooking times if needed. Yes, you can make this dish gluten-free. Use gluten-free penne pasta. It cooks similarly to regular pasta. Check the package for cooking times. The rest of the ingredients are naturally gluten-free. To add heat, increase the Cajun seasoning. You can also add red pepper flakes. Another option is to include diced jalapeños or a splash of hot sauce. Adjust the spice to your taste. Feel free to add any veggies you like! Spinach, zucchini, or mushrooms fit well. Just sauté them with the onions and peppers. This boosts flavor and adds nutrition. Yes, half-and-half can replace heavy cream. Your sauce will be less rich but still creamy. If you want more thickness, add a little extra cheese. This keeps the dish flavorful and satisfying. This blog covered key ingredients for easy cooking. I shared ingredient swaps and tools you need. We went through step-by-step ways to cook each dish, making it creamy and tasty. I also added tips to boost flavor and avoid mistakes. You can explore fun variations, storage methods, and answers to common questions. Cooking can be simple and fun. I hope you feel ready to try your own dishes!

One-Pot Creamy Cajun Sausage Pasta Delight

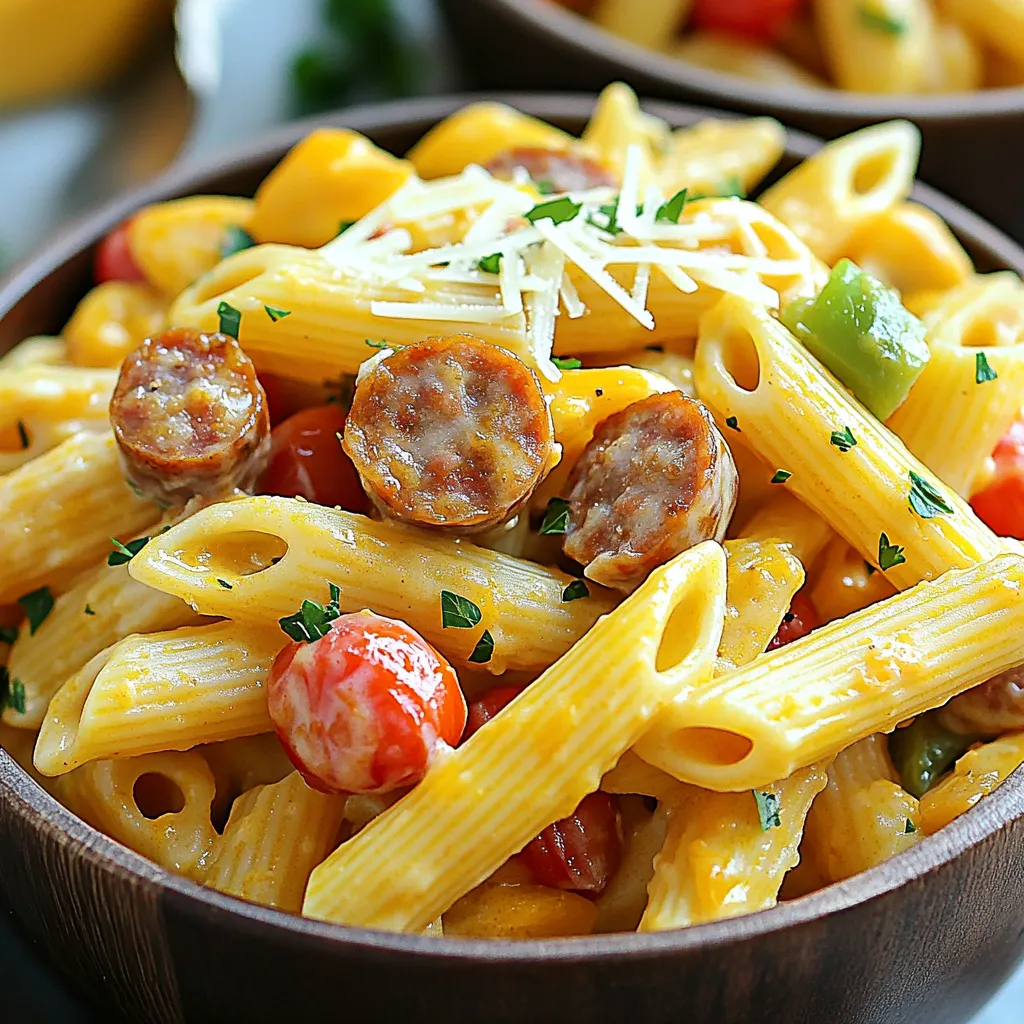
If you’re hungry for a quick, creamy meal, you’ll love this One-Pot Creamy Cajun Sausage Pasta Delight! This dish packs

- 2 cups all-purpose flour - 1 teaspoon baking powder - 1 teaspoon baking soda - 1/2 teaspoon salt - 1 tablespoon ground cinnamon - 1/2 teaspoon ground nutmeg - 1/2 teaspoon ground ginger The dry ingredients form the backbone of this cake. The all-purpose flour gives it structure. Baking powder and baking soda help it rise. Salt enhances flavor, while the spices add warmth and depth. - 1 cup granulated sugar - 1 cup packed brown sugar - 1 cup vegetable oil - 4 large eggs - 1 cup pumpkin puree (canned or fresh) - 1 teaspoon vanilla extract These wet ingredients create the cake's moist texture. The sugars add sweetness. Vegetable oil keeps it tender. Eggs bind everything together. Pumpkin puree offers flavor and moisture, while vanilla enhances the overall taste. - 8 oz cream cheese, softened - 1/2 cup powdered sugar - 1 tablespoon lemon juice The cream cheese filling makes this cake special. It adds a rich, tangy layer that pairs well with the pumpkin. The lemon juice brightens the flavor of the cream cheese. - Chopped pecans - Walnuts These toppings add a nice crunch. You can sprinkle them on top for added texture and flavor. They also make the cake look pretty. 1. Preheat your oven to 350°F (175°C). 2. Grease and flour your bundt pan well. This helps the cake come out easily. 3. In a medium bowl, whisk together the flour, baking powder, baking soda, salt, cinnamon, nutmeg, and ginger. Set this mixture aside until later. 1. In a large mixing bowl, combine granulated sugar, brown sugar, and vegetable oil. Beat these together until they mix well. 2. Add eggs one at a time, mixing well after each addition. Then mix in the pumpkin puree and vanilla extract until the batter is smooth. 3. Slowly add the dry mixture to the wet mixture. Stir gently until just combined. Be careful not to overmix. 1. In a separate small bowl, beat the softened cream cheese with powdered sugar and lemon juice. Mix until it’s creamy and smooth. 1. Pour half of the pumpkin batter into the prepared bundt pan. 2. Drop spoonfuls of the cream cheese mixture on top of the pumpkin batter. 3. Pour the remaining pumpkin batter over the cream cheese layer. Smooth the top with a spatula. 4. Bake in the preheated oven for 55-65 minutes. Check if it's done by inserting a toothpick into the center. It should come out clean. 1. Let the cake cool in the pan for about 15 minutes. 2. Carefully invert the cake onto a wire rack to cool completely. This keeps it from getting soggy. To ensure even baking, always preheat your oven. This step helps the cake rise nicely. Also, check your oven's temperature with an oven thermometer. Sometimes, ovens can be off by a few degrees. When preparing your bundt pan, grease it well. Use butter or cooking spray, then dust it with flour. This method helps to prevent sticking. After baking, let the cake cool for about 15 minutes before flipping it out. This waiting time makes removal easier. Dusting the cake with powdered sugar gives it a lovely finish. Use a fine mesh sieve to sprinkle the sugar evenly across the top. This simple step adds charm to your cake. For extra flair, garnish with chopped nuts. Pecans or walnuts add a nice crunch. Spread the nuts evenly on top after dusting with sugar. This combination makes your cake look and taste amazing. Pair your pumpkin cake with warm beverages. Spiced chai or coffee complements the flavors well. Serve slices on decorative plates for a beautiful presentation. For an added touch, place your cake on a lovely cake stand. It not only looks inviting but also draws attention. Your guests will enjoy this fluffy, tasty treat! {{image_2}} You can have fun with this pumpkin cream cheese bundt cake by adding new flavors. Here are some ideas: - Chocolate Chips: Add about 1 cup of chocolate chips to the batter. This will give your cake a rich and sweet twist that pairs well with pumpkin. - Dried Fruit: Try adding 1 cup of chopped dried fruit like cranberries or raisins. They add a nice sweetness and texture to each bite. - Experimenting with Spices: You can change the spice mix to suit your taste. Add a pinch of cloves or cardamom for a warm, aromatic flavor. This bundt cake can fit into different diets with a few changes: - Gluten-Free Options: Swap the all-purpose flour with a gluten-free flour mix. Make sure it contains xanthan gum for the best texture. - Vegan Substitutions: Replace the eggs with flax eggs. Mix 1 tablespoon of ground flaxseed with 3 tablespoons of water per egg. For the cream cheese, use a vegan cream cheese alternative. These simple swaps let everyone enjoy this tasty treat. To keep your leftover Pumpkin Cream Cheese Bundt Cake fresh, store it in an airtight container. This helps keep the cake moist. You can also wrap it tightly with plastic wrap. Store the cake at room temperature for up to three days. If you want to keep it longer, refrigerate it. Just remember, refrigerating may dry it out a bit. For the best containers, use glass or plastic with tight seals. Avoid metal containers, as they can react with the cake's ingredients. A cake dome works great too, as it allows air to flow while keeping it covered. You can freeze the Pumpkin Cream Cheese Bundt Cake for up to three months. First, let it cool completely. Then, wrap it tightly in plastic wrap. After that, place it in a freezer-safe bag or container. Label it with the date for easy tracking. When you're ready to enjoy it, take the cake out of the freezer. Let it thaw in the fridge overnight. If you're short on time, you can thaw it at room temperature for a few hours. To reheat, warm individual slices in the microwave for about 10-15 seconds. This makes the cake soft and tasty again. How do I prevent my bundt cake from sticking? To keep your bundt cake from sticking, grease and flour the pan well. Use a cooking spray with flour or apply butter and dust with flour. This helps the cake slide out easily. Can I use fresh pumpkin instead of canned? Yes, you can use fresh pumpkin. Just cook and puree it until smooth. Make sure to drain any excess water for the best texture. What can I substitute for cream cheese? If you need a substitute for cream cheese, use Greek yogurt or ricotta. Both give a nice creamy texture, but may alter the flavor a bit. How long will the cake last? The cake lasts for about 3 to 5 days at room temperature. Keep it in an airtight container to keep it fresh. Is it possible to make mini bundt cakes? Absolutely! Just use a mini bundt pan and adjust the baking time. Check for doneness after 25-30 minutes. Cake is too dense, what went wrong? A dense cake might happen due to overmixing or too much flour. Make sure to mix until just combined and measure flour correctly. How to fix an undercooked center? If your cake is undercooked, cover it with foil and bake for an extra 10-15 minutes. Check it often to avoid overcooking. This blog post covered everything you need to know to make a pumpkin bundt cake. We explored the essential ingredients, from dry to wet, and including the cream cheese filling. I provided step-by-step instructions for mixing and baking, along with useful tips for perfecting your cake. You also learned about fun flavor variations and how to store leftovers. For a delicious dessert, follow these steps closely and enjoy your creation! Happy baking!

Pumpkin Cream Cheese Bundt Cake Fluffy and Tasty Treat

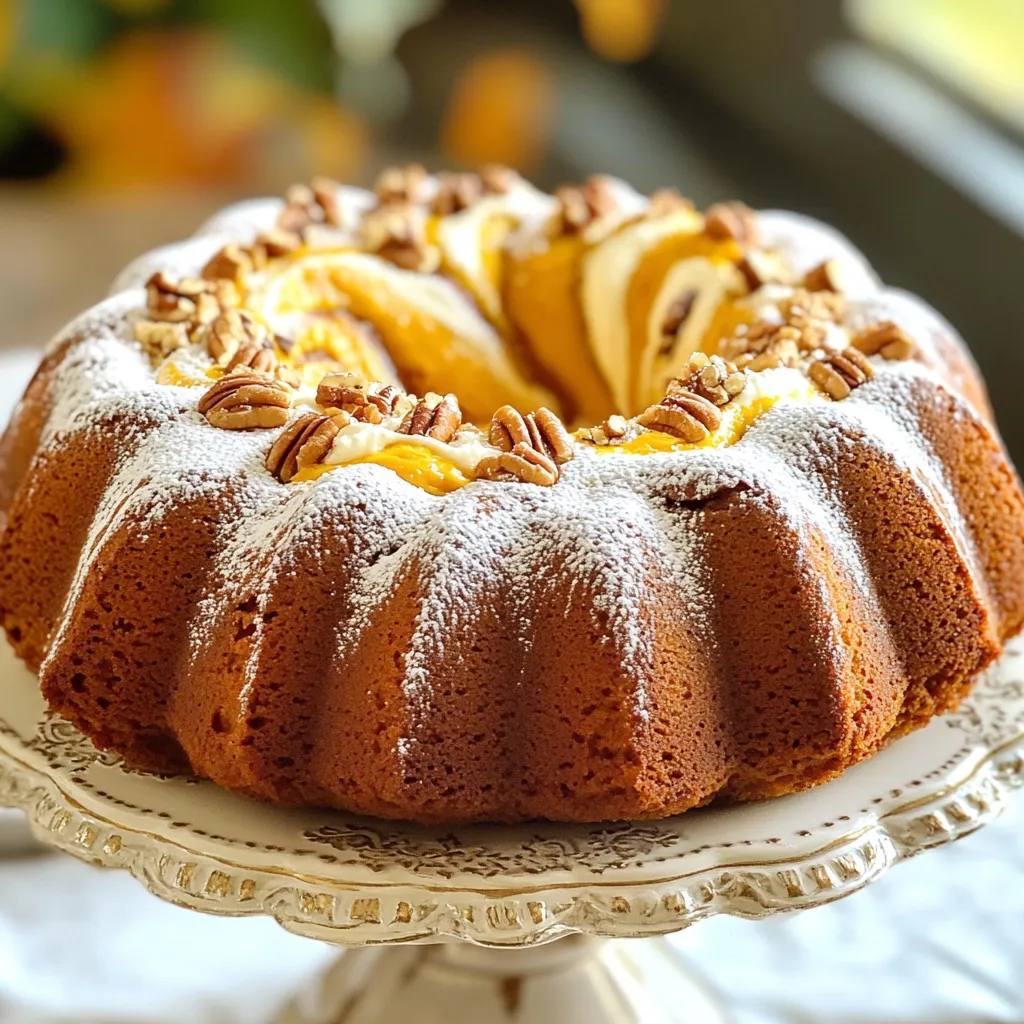
Are you ready to bake the coziest, fluffiest Pumpkin Cream Cheese Bundt Cake? This treat brings together the rich flavors

- 1 pound large shrimp, peeled and deveined - 1/4 cup honey - 3 tablespoons soy sauce (low sodium recommended) - 2 cloves garlic, minced - 1 tablespoon fresh ginger, grated - 1 tablespoon sesame oil - 1 tablespoon rice vinegar - 1/2 teaspoon red pepper flakes (optional, for spice) - 1 green onion, finely sliced (for garnish) - 1 tablespoon sesame seeds (for garnish) - Wooden skewers (soaked in water for 30 minutes) For this recipe, you need fresh, large shrimp. I like to use shrimp that are already peeled and deveined for ease. The marinade is a mix of sweet and savory. Honey, soy sauce, garlic, and ginger create a flavorful base. Sesame oil adds depth, while rice vinegar gives it a nice tang. If you like some heat, add red pepper flakes. Don’t forget the garnishes! Green onion and sesame seeds not only look nice but add extra flavor. Soak your wooden skewers in water for 30 minutes. This helps prevent them from burning in the air fryer. This simple preparation sets the stage for a tasty meal. To start, gather your mixing bowl. Add the following ingredients: - 1/4 cup honey - 3 tablespoons soy sauce - 2 cloves garlic, minced - 1 tablespoon ginger, grated - 1 tablespoon sesame oil - 1 tablespoon rice vinegar - 1/2 teaspoon red pepper flakes (optional) Stir these items together until they blend well. This mixture is your marinade. Now, take your shrimp and add them to the bowl. Make sure each shrimp gets coated in the marinade. Cover the bowl and place it in the fridge. Let it chill for at least 30 minutes. This time allows the flavors to soak into the shrimp. Soaking your wooden skewers is key to this recipe. Why? It keeps them from burning in the air fryer. Fill a bowl with water and place the skewers inside. Let them soak for 30 minutes. This small step makes a big difference. Next, preheat your air fryer to 400°F (200°C). This should take about 5 minutes. While it heats, thread the marinated shrimp onto the soaked skewers. Leave space between each shrimp for even cooking. Once ready, place the skewers in the air fryer basket. Make sure they sit in a single layer. Cook them for 8-10 minutes. Flip the skewers halfway through cooking. You’ll know they are done when the shrimp are pink and cooked through. Carefully take them out and enjoy! To get shrimp just right, look for a few signs. First, they should turn bright pink. The texture should feel firm but not tough. If the shrimp curl tightly, they are likely overcooked. Cooking time can vary based on shrimp size. For large shrimp, cook for about 8-10 minutes. If your shrimp are smaller, reduce the time to around 6-8 minutes. Always flip them halfway through cooking for even results. Adding fresh herbs can boost flavor. Consider using cilantro or parsley. These herbs add freshness and color. You can also add spices like paprika or cayenne for heat. For deeper flavors, marinate the shrimp longer. Aim for at least 30 minutes, but if you have time, marinate for 1-2 hours. This extra time allows the shrimp to soak up all the tasty marinade. {{image_2}} You can swap shrimp for chicken or tofu in this recipe. Both options work well with the honey garlic marinade. If you use chicken, cut it into small pieces for even cooking. For tofu, press it to remove excess water before marinating. Cooking times for alternative proteins: - Chicken: Cook at 400°F for 12-15 minutes, flipping halfway. - Tofu: Cook at 400°F for 10-12 minutes, flipping halfway. Adjust your cooking time based on the protein you choose. This way, you’ll get a tasty dish every time. You can get creative with the marinade flavors. Try adding some spice with chili paste or hot sauce if you like heat. For a fresh twist, mix in citrus juice like lime or orange. Customizing with seasonal ingredients: - Herbs: Add fresh cilantro or basil for an herbaceous kick. - Fruits: Include pureed mango or pineapple for sweetness. Mix and match ingredients based on what’s fresh. This gives your skewers a unique taste. Enjoy experimenting with flavors! To store leftover shrimp skewers, allow them to cool first. Place them in an airtight container. This keeps them fresh and tasty. You can store them in the fridge for up to two days. I recommend using glass or BPA-free plastic containers. These options help avoid any chemical leaching. For reheating, the air fryer is your best friend. Preheat the air fryer to 350°F (175°C). Place the skewers in the basket. Heat them for about 5 minutes. This will keep them crispy and warm. You can also use a microwave. Just place them on a plate and cover with a damp paper towel. Heat for 1-2 minutes. This method is quick but might make them a bit softer. Yes, you can use frozen shrimp. First, you need to thaw them safely. Place the shrimp in a bowl of cold water for about 15 to 20 minutes. Change the water halfway through to speed up the thawing. Once thawed, pat the shrimp dry with a paper towel. This step helps the marinade stick better. Cooked shrimp turns pink and opaque. They should also curl slightly. If you notice a tight "C" shape, they are likely overcooked. Use a meat thermometer if needed. Shrimp should reach an internal temperature of 120°F (49°C). Absolutely! You can prepare the marinade a day ahead. Store it in an airtight container in the fridge. It will keep well for about 3 days. Just remember to add the shrimp when you're ready to cook. This way, they soak up all that tasty flavor! This blog post guided you through making tasty shrimp skewers. You learned about the key ingredients, from shrimp to the marinade. The step-by-step instructions showed how to prep, soak skewers, and air fry the shrimp. Tips helped you achieve the perfect cook and enhance flavors. You explored protein alternatives and unique marinade ideas too. Remember, storing leftovers properly keeps them fresh. Enjoy experimenting and making this recipe your own! Trust the process and learn to love cooking.

Air Fryer Honey Garlic Shrimp Skewers Easy Recipe

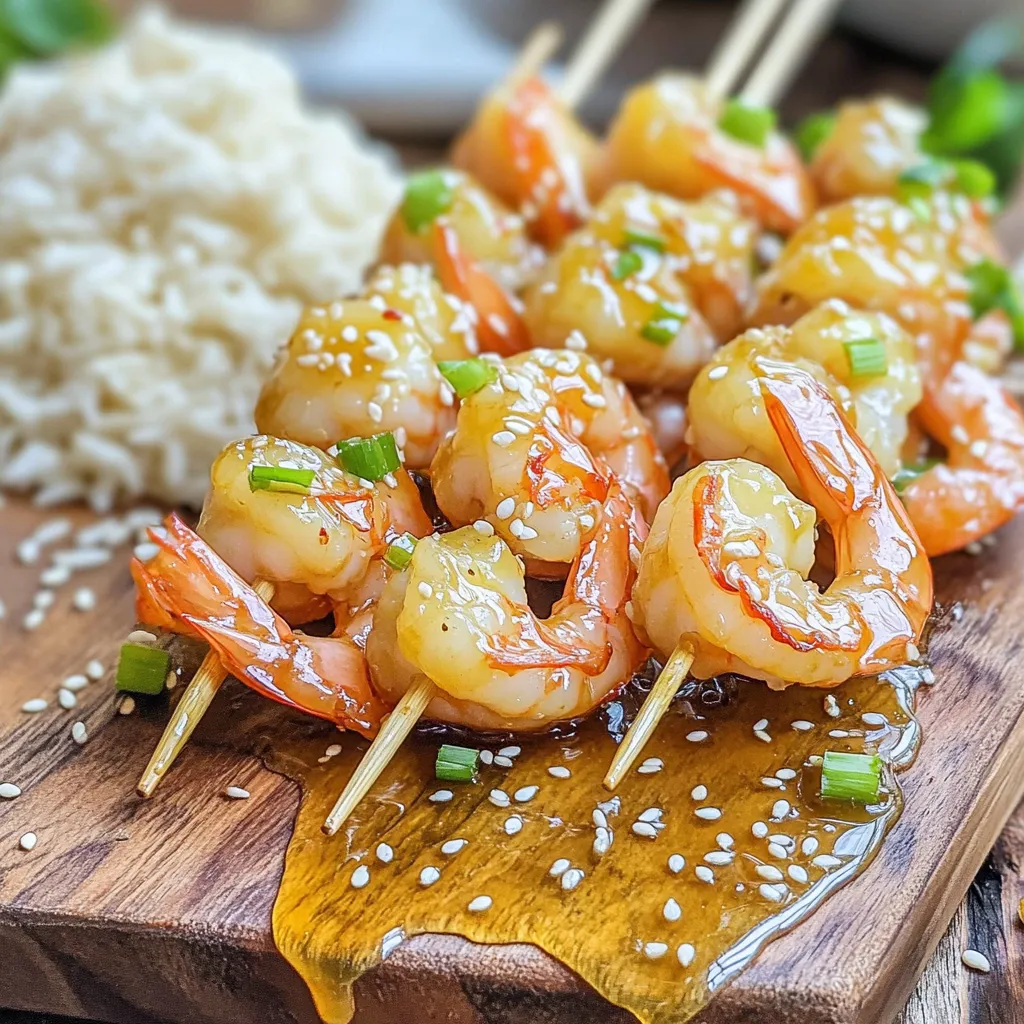
Looking for a quick and tasty meal? Try these Air Fryer Honey Garlic Shrimp Skewers! With just a few ingredients

- 1 cup rolled oats - 2 cups almond milk (or any milk of choice) - 2 tablespoons unsweetened cocoa powder - 3 tablespoons peanut butter (or almond butter) - 2 tablespoons maple syrup or honey - 1 teaspoon vanilla extract - A pinch of salt These ingredients make a rich and creamy base for your overnight oats. The rolled oats soak up the almond milk, creating a soft texture. Cocoa powder gives a deep chocolate flavor. Peanut butter adds creaminess and protein. Maple syrup or honey provides sweetness. Vanilla extract rounds out the taste, while salt enhances all the flavors. - Sliced bananas - Crushed nuts - Mini chocolate chips - Chia seeds These toppings add fun and extra nutrition. Sliced bananas bring sweetness and texture. Crushed nuts add crunch and healthy fats. Mini chocolate chips are a treat. Chia seeds offer fiber and omega-3s. Mix and match these toppings to make your oats even more delicious! In a medium bowl, add 1 cup of rolled oats. Then, add 2 tablespoons of cocoa powder. Lastly, sprinkle in a pinch of salt. Mix these ingredients well. This step builds a rich, chocolatey base. In a separate bowl, whisk together 2 cups of almond milk and 3 tablespoons of peanut butter. Add 2 tablespoons of maple syrup and 1 teaspoon of vanilla extract. Whisk until smooth and creamy. This mixture brings sweetness and flavor to your oats. Pour the wet mixture over the dry ingredients. Stir until all oats are coated evenly. Divide the mixture into two airtight containers. Seal them tightly and place in the fridge overnight. This allows the oats to soak up all the flavors and become soft. To get the best texture for your overnight oats, you can adjust the milk. If your oats seem too thick in the morning, just add a splash more milk. Stir well to mix it in. This will help create a creamy and smooth bowl. You might like your oats thicker or runnier, so feel free to adjust as needed. Try using different nut butters in this recipe. Almond butter or cashew butter can change the taste. You can also switch sweeteners. Instead of maple syrup, try honey or agave. Each choice brings a new twist to your dish. This way, you can keep your breakfast exciting and tasty. Make a larger batch to save time during the week. You can double or triple the recipe and portion it into jars. This way, you have breakfast ready to go. Just grab a jar each morning. You can also mix and match toppings based on what you have on hand. This keeps your meals fresh and fun. {{image_2}} If you want a nut-free option, use seed butter. Sunflower seed butter works great. It adds a nutty taste without any nuts. Just swap the peanut butter with the seed butter. You still get that creamy texture and rich flavor. For a vegan version, use maple syrup and your favorite plant-based milk. Almond milk or oat milk are both good choices. They keep it creamy and delicious. Maple syrup adds sweetness without any animal products. This mix is perfect for those who follow a vegan diet. Adding fruits is a fun way to boost flavor. You can mix in berries, like strawberries or blueberries. Dried fruits, like raisins or cranberries, also work well. They add natural sweetness and extra nutrients. Just toss in a handful before you serve. Enjoy your colorful and tasty oats! You can keep your chocolate peanut butter overnight oats in the fridge for five days. Store them in airtight containers. This keeps them fresh and tasty. If you notice any change in smell or texture, it’s best to throw them out. Yes, you can freeze overnight oats! Use a freezer-safe container. They can last for up to three months in the freezer. When you're ready to eat them, just thaw in the fridge overnight. This makes mornings super easy! If you want to enjoy your oats warm, simply microwave them. Heat for about 30 seconds, then stir. If they seem too thick, add a splash of milk to make them creamy again. Enjoy the warm, comforting goodness! No, you should not use steel-cut oats in this recipe. Steel-cut oats are harder and take longer to cook. They won't soften enough overnight like rolled oats do. Stick with rolled oats for the best texture. They soak up the liquid well and are creamy when ready. You can store your chocolate peanut butter overnight oats in the fridge for up to five days. Just make sure to keep them in airtight containers. The oats will stay tasty and safe to eat during this time. Check for any off smells or changes in texture before eating. Here are some great toppings you can try: - Sliced bananas - Crushed nuts - Mini chocolate chips - Chia seeds These toppings add flavor and crunch. You can mix and match based on what you like. Experiment to find your favorite! Yes, this recipe is perfect for meal prep! You can make several servings at once. Just divide the mixture into containers and store them in the fridge. Grab one in the morning for a quick, healthy breakfast. You learned how to make chocolate peanut butter overnight oats. This recipe is easy and fun. It uses simple ingredients and offers room for tweaks. You can add different toppings or substitute nut butters to match your taste. Remember, overnight oats are great for meal prep too. Store them well, and you’ll enjoy a tasty breakfast all week. Now, go and make your own delicious batch!

Chocolate Peanut Butter Overnight Oats Simple Recipe

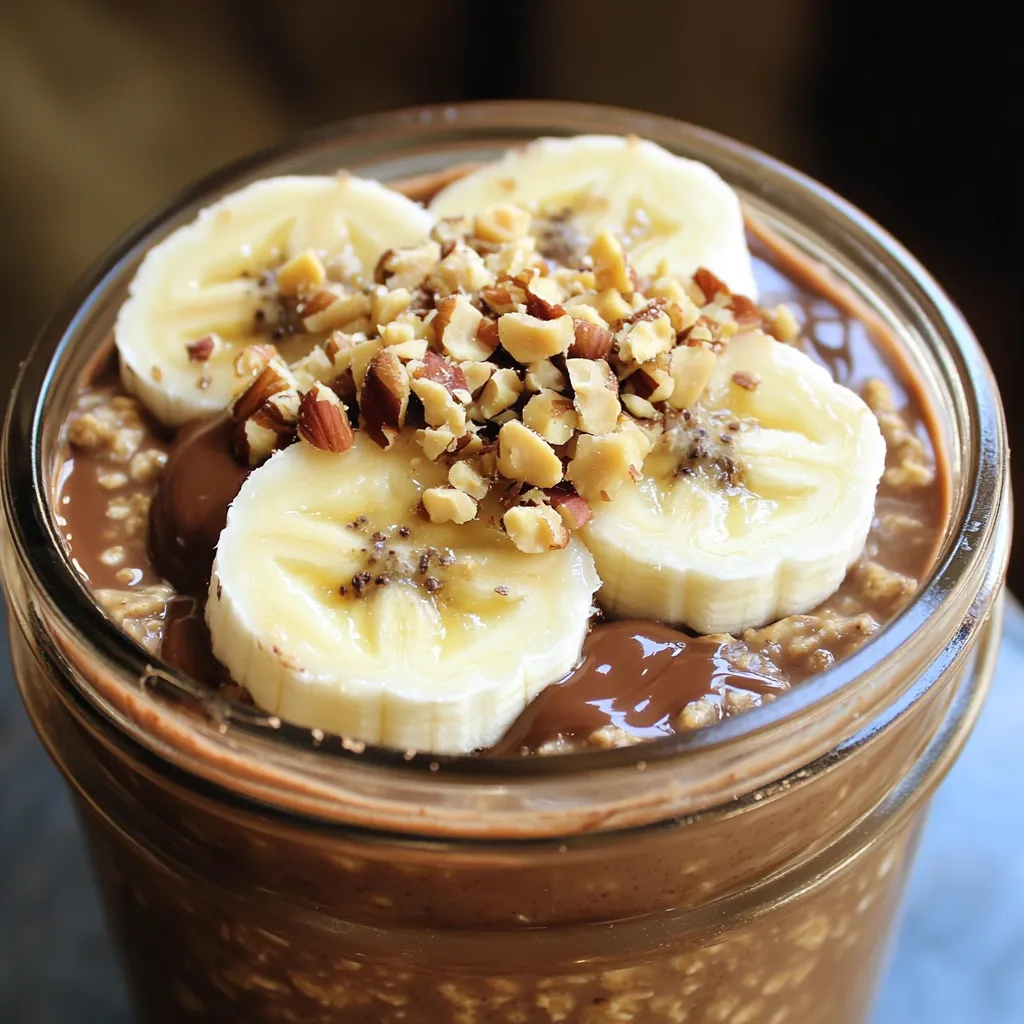
I love starting my day with a tasty and easy breakfast! If you’re craving something sweet and filling, try my

- 3 ripe bananas, mashed - 1/2 cup unsalted butter, melted - 1/2 cup granulated sugar - 1/2 cup brown sugar, packed - 2 large eggs - 1/2 cup chopped walnuts (or pecans) - 1/2 teaspoon ground cinnamon - 1/4 cup chocolate chips - Muffin tin - Mixing bowls - Whisk and spatula When I make these muffins, I always use ripe bananas. They add natural sweetness and moisture. The butter needs to be unsalted and melted. This helps the muffins stay rich and soft. I mix both granulated and brown sugar for a nice depth of flavor. Eggs are key as they bind everything together. For added crunch, I love to toss in chopped walnuts or pecans. They bring a hearty texture to each bite. If you want a warm spice, ground cinnamon works wonders. I sometimes add chocolate chips for a fun twist. Having the right tools makes baking smooth. A good muffin tin is essential. I use mixing bowls for combining the wet and dry ingredients. A whisk helps mix things well, and a spatula is great for folding in those nuts or chocolate. - Preheat the oven to 350°F (175°C). - Prepare the muffin tin with liners or cooking spray. Start by preheating your oven. This step ensures even baking. While the oven warms up, grab your muffin tin. You can use paper liners or spray it with cooking spray. This helps the muffins come out easily after baking. - Combine mashed bananas and melted butter. - Incorporate sugars and mix well. Next, in a large bowl, mash your ripe bananas. The riper, the better! Then add the melted butter. Mix them together until smooth. Now, add the granulated and brown sugars. Stir well until everything is combined. This mixture will be sweet and creamy! - Whisk together baking soda, baking powder, salt, and flour. - Gradually combine wet and dry mixtures. In another bowl, whisk together baking soda, baking powder, salt, and flour. This helps to mix the dry ingredients evenly. Once mixed, slowly add the dry ingredients to the banana mixture. Stir gently until just combined. Don’t overmix! A few lumps are okay. This keeps the muffins soft. - Gently fold in nuts and chocolate chips. - Portion batter into the muffin tin. Now, fold in the chopped walnuts and chocolate chips if you like. This adds a nice crunch and sweetness. Next, scoop the batter into the prepared muffin tin. Fill each cup about three-quarters full. This gives them room to rise. - Baking time and toothpick test. - Cooling instructions. Place the muffin tin in the oven. Bake for 18-20 minutes. To check if they are done, insert a toothpick in the middle. If it comes out clean, they are ready! Once baked, let them cool in the tin for a few minutes. Then, transfer them to a wire rack to cool completely. Enjoy the sweet aroma! To get the best texture in your banana nut muffins, do not overmix. Overmixing can make them tough. When you combine the wet and dry ingredients, stir gently. A few lumps are okay. This helps keep the muffins light and fluffy. - Use a spatula to fold in the ingredients. - Mix until just combined for the best results. To boost the flavor of your muffins, try adding spices or extracts. Ground cinnamon adds warmth and depth. Vanilla extract also enhances the sweet banana flavor. You can also mix in extras for fun tastes. - Chopped walnuts or pecans add crunch. - Chocolate chips bring sweetness and richness. If your muffins turn out too dense, this often means you overmixed the batter. To fix this, mix just until combined next time. Sometimes, oven temperatures vary. If your muffins do not bake evenly, check your oven with a thermometer. Adjust your baking time if needed. - Bake for 18-20 minutes. - Use a toothpick to test doneness. {{image_2}} You can use different nuts in your muffins. Walnuts add a rich flavor and crunch. Pecans give a sweet, buttery taste. Both work well, so choose what you like best. If you want to try more, consider almonds or hazelnuts. Each nut brings its own unique twist to the muffins. Adding flavors makes these muffins even better. You can mix in chocolate chips for a sweet surprise. Dark chocolate or milk chocolate both work great. If you want a warm spice, try adding nutmeg along with cinnamon. It gives your muffins a cozy feel. You can even use dried fruit like cranberries or raisins for extra sweetness and texture. If you need gluten-free muffins, use a gluten-free flour blend. They will still taste delicious and moist. For dairy-free muffins, replace the butter with coconut oil or a dairy-free spread. You can also use almond milk or oat milk in place of regular milk. These swaps keep the muffins tasty while meeting your dietary needs. You can store your banana nut muffins at room temperature. Keep them in an airtight container. They will stay fresh for about 2 to 3 days. If you want to store them longer, refrigeration is an option. However, this can change their texture. For best taste, stick to room temperature. To freeze muffins, first, let them cool completely. Wrap each muffin tightly in plastic wrap. Then, place them in a freezer bag. Squeeze out as much air as possible. Frozen muffins can last up to 3 months. When you want to eat one, simply take it out and let it thaw. You can also warm it up in the microwave for about 20 seconds. Muffins stay fresh for about 2 to 3 days at room temperature. If refrigerated, they last about a week. Look for signs of spoilage like mold or an off smell. If they feel hard or dry, it’s time to toss them. Always check before enjoying! To keep your muffins moist, use ripe bananas. The riper the bananas, the more moisture they bring. I also recommend using melted butter instead of oil. This adds richness and flavor. Mixing in a bit of yogurt can help too, making the texture soft. Don’t overmix; a few lumps are fine. Overmixing can make muffins tough instead of light. Yes, you can make these muffins ahead of time. Bake them and let them cool completely. Store them in an airtight container. They will stay fresh for about three days at room temperature. If you want to keep them longer, freeze the muffins. Wrap them well, and they can last up to three months. Just thaw them overnight in the fridge when ready to eat. Muffins often stick due to not greasing the pan well. Always line your muffin tin with paper liners or spray it with non-stick cooking spray. If you forget, try running a knife around the edge before removing them. Let them cool in the pan for a few minutes first to help them release better. Yes, you can use frozen bananas! Just thaw them out first. Drain any excess liquid after thawing, as too much moisture can make the batter too wet. Mashed frozen bananas work great in this recipe. They will bring the same sweet flavor and moisture as fresh bananas. You learned how to make delicious banana nut muffins. We covered the main ingredients, tools, and steps. Helpful tips for texture and flavor make a difference. You can easily change the recipe to suit your taste. Store muffins properly to keep them fresh longer. Enjoy these tasty treats with friends or family. Baking can be fun and rewarding. Now, it’s time for you to bake and share!

Bakery Style Banana Nut Muffins Tasty and Simple Treat

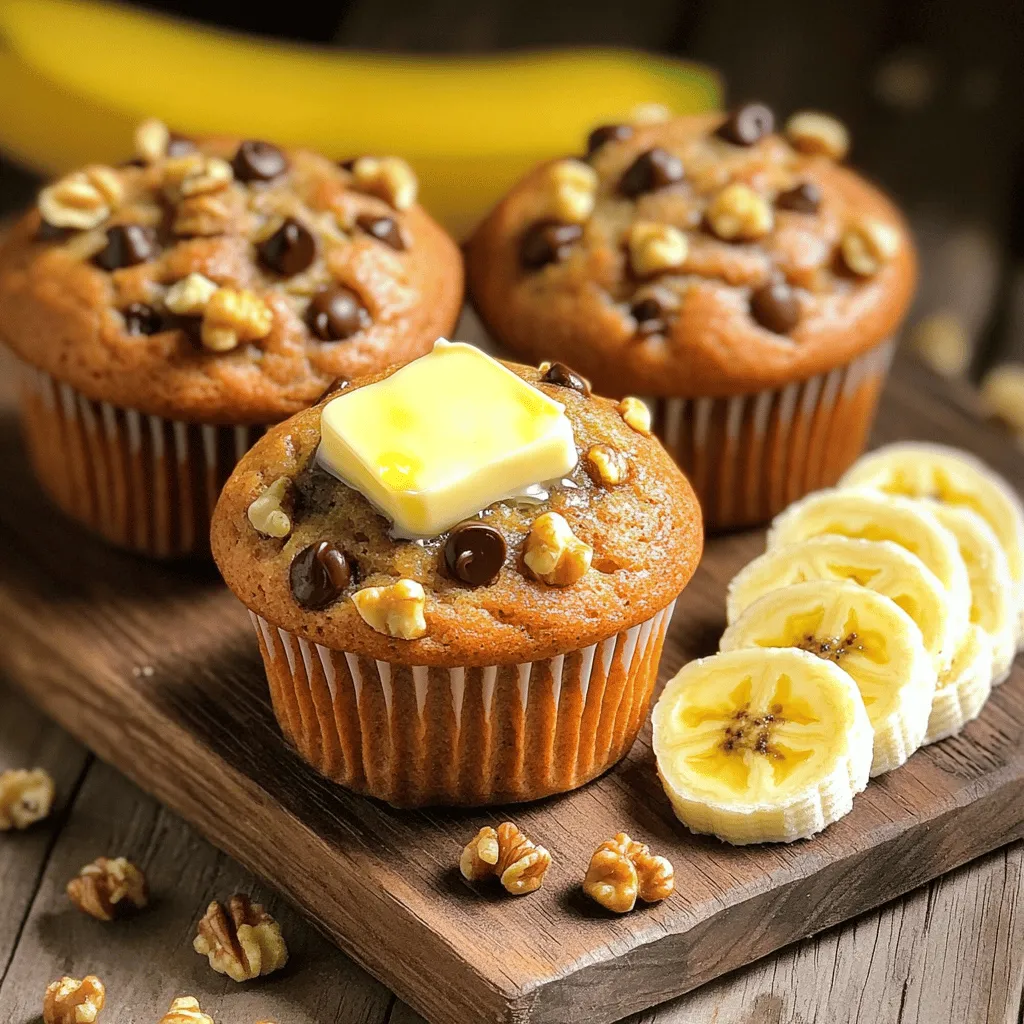
Are you ready to enjoy a warm, bakery-style treat right from your own kitchen? These Banana Nut Muffins are not

To make this delicious soup, gather these items: - 1 pound boneless, skinless chicken thighs - 1 cup uncooked brown rice - 1 medium onion, diced - 3 cloves garlic, minced - 3 carrots, diced - 2 celery stalks, diced - 4 cups chicken broth - 1 cup water - 1 teaspoon dried thyme - 1 teaspoon dried rosemary - 1 cup frozen peas - 1 cup heavy cream - Salt and pepper to taste - Fresh parsley for garnish You will need a slow cooker for this recipe. A 6-quart or larger model works best. You’ll also need measuring cups and spoons. A sharp knife helps with dicing the veggies. A cutting board is a must. Finally, have two forks ready for shredding the chicken. This soup is flexible. Here are some swaps you can try: - Chicken Thighs: Use chicken breasts if you prefer leaner meat. - Brown Rice: Quinoa or wild rice can add a unique twist. - Heavy Cream: Swap with coconut milk for a dairy-free option. - Vegetables: Add or replace veggies like peas with green beans or corn. - Chicken Broth: Use vegetable broth for a vegetarian version. These swaps help you fit the soup to your needs while keeping it tasty. Enjoy experimenting! Gather your ingredients first. You will need: - 1 pound boneless, skinless chicken thighs - 1 cup uncooked brown rice - 1 medium onion, diced - 3 cloves garlic, minced - 3 carrots, diced - 2 celery stalks, diced - 4 cups chicken broth - 1 cup water - 1 teaspoon dried thyme - 1 teaspoon dried rosemary - 1 cup frozen peas - 1 cup heavy cream - Salt and pepper to taste - Fresh parsley for garnish Start by dicing your onion, carrots, and celery. Mince the garlic. This prep makes cooking easier. You want everything ready before you begin. Place the chicken thighs at the bottom of the slow cooker. Next, layer the uncooked brown rice, diced onion, garlic, carrots, and celery on top of the chicken. Pour in the chicken broth and water. Make sure everything is covered. Sprinkle the dried thyme and rosemary over the mix. Add salt and pepper to taste. Cover the slow cooker. Cook on low for 6-8 hours or high for 3-4 hours. The chicken will become tender and juicy. Once the chicken is cooked, carefully take it out. Use two forks to shred it into bite-sized pieces. Return the shredded chicken to the pot. Now, stir in the frozen peas and heavy cream. Mix well to make everything creamy. Let the soup cook for an extra 15-20 minutes on low. This helps all the flavors blend. Taste the soup and adjust the seasoning if needed. Enjoy your soup warm. A sprinkle of fresh parsley on top adds a nice touch! To get the best creaminess in your soup, use heavy cream. Add it at the end of cooking. Let it warm through for about 15-20 minutes. This way, you keep the rich texture. If you want a lighter version, try using half-and-half. It will still be tasty and creamy. Fresh herbs can really lift your soup. I like to use parsley for garnish. It adds color and freshness. You can also add basil or thyme at the end of cooking. It gives a burst of flavor. Start with a small amount and taste as you go. One big mistake is overcooking the chicken. This can make it dry and tough. Always set your slow cooker timer. Another common mistake is not seasoning enough. Don’t be shy with salt and pepper. Taste before serving and adjust if needed. Lastly, don’t skip the cream; it makes a huge difference! {{image_2}} If you want a lighter version, consider using low-fat cream. You can swap heavy cream with half-and-half or evaporated milk. This change keeps the soup creamy but cuts down on fat. You can also add a splash of lemon juice for a bright flavor without adding calories. To make this soup vegetarian or vegan, replace the chicken with chickpeas or tofu. Use vegetable broth instead of chicken broth. For creaminess, try coconut milk or a cashew cream. These swaps keep the soup rich and satisfying while meeting dietary needs. Feel free to boost the nutrition by adding more vegetables. Spinach, kale, or bell peppers work great. Also, you can add spices like cumin or paprika for more depth. Just remember to adjust the liquid if you add a lot of veggies. This way, you keep the soup balanced and flavorful. To keep your soup fresh, let it cool down first. Place it in an airtight container. This helps prevent spills and keeps flavors intact. Store it in the fridge for up to three days. If you have a lot left, consider freezing some. Freezing is a great way to save soup for later. Use freezer-safe containers or bags. Make sure to leave some space at the top. The soup will expand when it freezes. It can last in the freezer for up to three months. When you're ready to enjoy it, just thaw it in the fridge overnight. Reheating is easy but be careful! Use a pot on low heat for best results. Stir gently while it warms up. If the soup seems thick, add a splash of chicken broth or water. This keeps it creamy and delicious. You can also microwave it, but stir every minute for even heating. Enjoy every warm bowl! Yes, you can use chicken breast. It will make the soup leaner. Chicken breast cooks faster than thighs. If you use it, check for doneness at 3 hours on high. The soup will still taste great! To make the soup dairy-free, replace heavy cream with coconut milk. You can also try almond milk or oat milk. These options will still give you a creamy texture. The soup will taste different, but still yummy! This soup pairs well with crusty bread for dipping. You can also serve it with a fresh salad. A simple green salad adds nice crunch and flavor. Rice or crackers on the side work too! This blog post covered key steps for making Slow Cooker Creamy Chicken Rice Soup. We looked at ingredients, cooking methods, and tips for a smooth texture. I shared ways to customize the dish for dietary needs, like vegetarian options. Proper storage and reheating methods help keep the soup fresh and tasty. In the end, cooking is about finding joy in the process. You can make this soup your own. Enjoy your cooking adventure!

Flavorful Slow Cooker Creamy Chicken Rice Soup Recipe

Warm up your week with my Flavorful Slow Cooker Creamy Chicken Rice Soup! This dish combines tender chicken, creamy broth,

- 1 1/2 cups graham cracker crumbs - 1/2 cup unsalted butter, melted - 1/4 cup brown sugar - 1 teaspoon cinnamon - 1/4 teaspoon salt - 8 oz cream cheese, softened - 1 cup pumpkin puree - 1/2 cup granulated sugar - 2 large eggs - 1 teaspoon vanilla extract - 1 teaspoon pumpkin pie spice For the crust and crumble, use finely crushed graham crackers. This helps form a smooth base. Melt the butter gently to avoid burning. Mix the butter with the sugar, cinnamon, and salt before adding the crumbs. This makes sure all flavors blend well. For the pumpkin cheesecake layer, soften the cream cheese first. This makes it easier to beat smoothly. When adding the pumpkin puree, ensure it is pure and not spiced. Mix all the ingredients until the batter is smooth. This avoids lumps in your cheesecake. When measuring, use a dry measuring cup for the crumbs and a liquid cup for the pumpkin. Always level off the cups for accuracy. Following these tips will help you create a great balance of flavors and textures in your bars. To start, preheat your oven to 350°F (175°C). This step is key for even baking. Line an 8x8-inch baking pan with parchment paper. Leave some paper hanging over the edges. This makes it easy to lift the bars out later. In a mixing bowl, combine 1 1/2 cups graham cracker crumbs, 1/2 cup melted unsalted butter, 1/4 cup brown sugar, 1 teaspoon cinnamon, and 1/4 teaspoon salt. Mix well until all ingredients blend smoothly. Take two-thirds of this mixture. Press it firmly into the bottom of the baking pan. This will be your crust. Set aside the last third for the crumble topping. In another bowl, beat 8 oz of softened cream cheese until it’s smooth. Then, add 1 cup of pumpkin puree, 1/2 cup granulated sugar, 2 large eggs, 1 teaspoon vanilla extract, and 1 teaspoon pumpkin pie spice. Mix everything together until smooth. The blend should be creamy and well combined. Now, pour the pumpkin cheesecake mix over the crust in the baking pan. Spread it out evenly. Next, take the reserved crumble mixture and sprinkle it over the cheesecake layer. Make sure it covers the entire surface. Place the pan in the preheated oven. Bake for 35-40 minutes. You want the edges to set while the center can still jiggle a bit. Once done, take it out and let it cool at room temperature for about 30 minutes. After that, refrigerate for at least 2 hours before slicing into bars. This cooling time helps the bars firm up nicely. For great texture, focus on the crust and filling. Press the crust firmly into the pan. This helps it hold together. The crust should feel dense. For the filling, mix the cream cheese and pumpkin well. Blend until smooth. This gives you a creamy bar. If you see lumps, keep mixing. You want a silky filling that spreads easily. One mistake is not cooling the bars enough. Letting them cool at room temperature is key. After that, chill them in the fridge. This step helps the bars set and slice neatly. Another common error is overbaking the bars. Keep an eye on them. They should jiggle slightly in the center when done. If they look too firm, they may dry out. To make these bars even tastier, serve them chilled. A sprinkle of powdered sugar adds a nice touch. You can also add whipped cream on the side. For extra flavor, sprinkle a bit of cinnamon over the top. This enhances the pumpkin spice taste. Feel free to pair these bars with a warm drink, like chai or coffee. The warmth complements the cool, creamy dessert. {{image_2}} You can switch up the spices in these bars. Try using nutmeg or ginger instead of cinnamon. Nutmeg adds warmth and depth. Ginger brings a nice zing. Each change gives a new twist. You can also mix in some chocolate chips for extra richness. If you love a nutty taste, sprinkle in some chopped pecans or walnuts. Want a lighter version? Use gluten-free graham cracker crumbs for the crust. Swap the cream cheese for a dairy-free alternative, like cashew cream. You can also use maple syrup instead of granulated sugar. This makes the bars healthier without losing flavor. For a vegan option, use flax eggs instead of regular eggs. This keeps the texture creamy and rich. To make your bars look fancy, dust them with powdered sugar. Add a dollop of whipped cream on the side for creaminess. For a festive touch, sprinkle some cinnamon on top. You can also add a few pumpkin seeds for crunch. Serve these bars on a beautiful platter to impress your guests. These little details make your treats even more special! To keep your pumpkin cheesecake crumble bars fresh, store them in the fridge. Use an airtight container. This will help maintain their creamy texture and rich flavor. If you want to keep them longer, you can freeze them. To freeze pumpkin cheesecake crumble bars, first cut them into squares. Wrap each square tightly in plastic wrap. Then, place them in a freezer-safe bag or container. Be sure to label the bag with the date. When you want to eat them, let them thaw in the fridge overnight. This keeps them tasty and prevents freezer burn. When stored properly, these bars last about 5 to 7 days in the fridge. If you freeze them, they can last up to 3 months. Check for signs of spoilage. If you see mold or an off smell, it’s best to throw them away. Enjoy your delicious treats while they’re fresh! Yes, you can make these bars ahead of time. They taste even better after sitting in the fridge. Make them a day before your event for best results. Just keep them in an airtight container. This helps keep the bars fresh and delicious. You can tell when the bars are done by looking at the edges. They should be set, while the center might jiggle a bit. A good rule is to bake for 35-40 minutes. If unsure, insert a toothpick in the center. If it comes out clean, your bars are ready! Yes, feel free to use a different crust if you like. A cookie crust or an oat crust works well too. Just make sure it is pressed firmly into the pan. This helps the bars hold their shape while baking. We covered how to make delicious pumpkin cheesecake crumble bars from start to finish. You learned about the ingredients, step-by-step instructions, tips for perfect texture, and variations to try. Remember to store them properly and watch for spoilage signs. These bars can brighten up any season. Enjoy your baking and impress your friends!

Pumpkin Cheesecake Crumble Bars Irresistible Treat

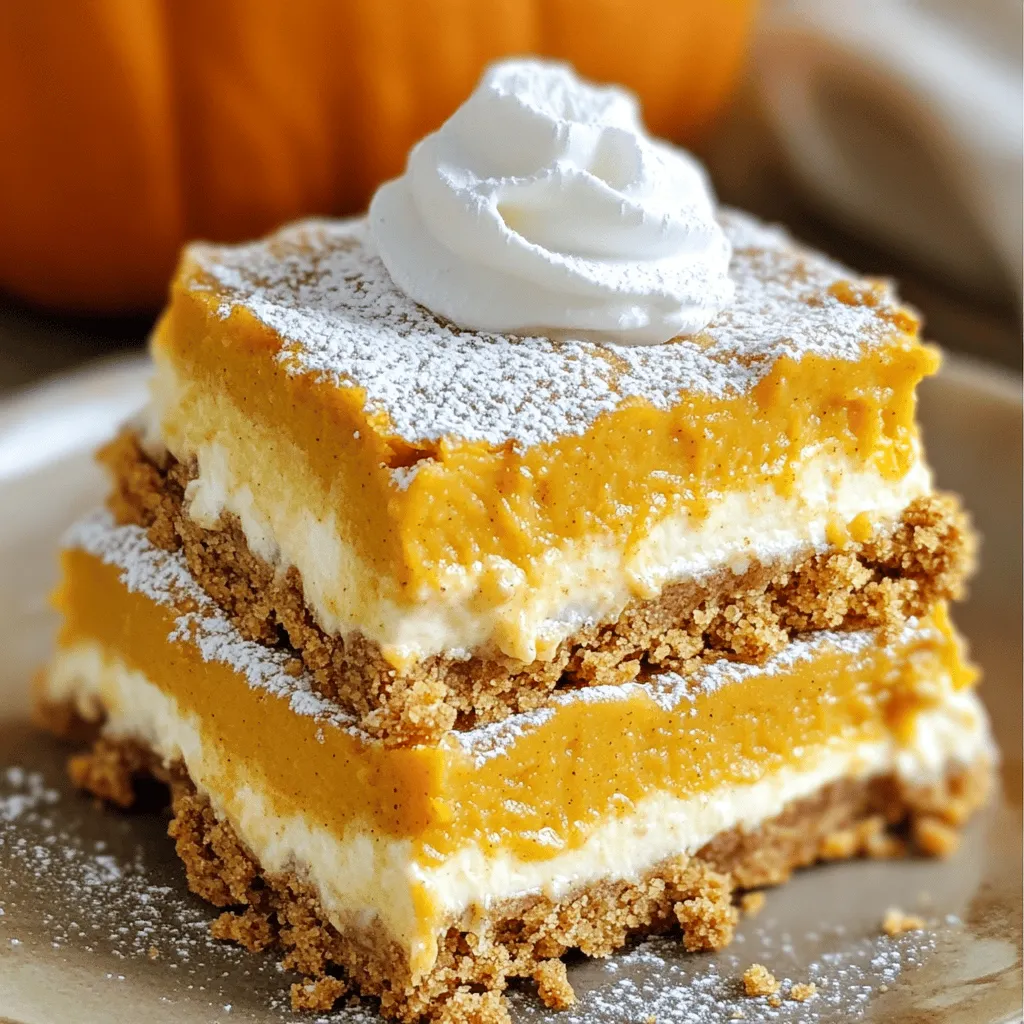
Get ready to indulge in the ultimate fall treat: Pumpkin Cheesecake Crumble Bars! These bars combine creamy cheesecake and spiced

Older posts
Newer posts
← Previous Page1 … Page16 Page17 Page18 … Page84 Next →

dsad

© 2026 Lisa Dishes • Built with GeneratePress

Our Policies

  • Copyright Policy
  • Cookie Policy
  • GDPR Policy
  • Privacy Policy
  • Disclaimer
  • Terms Of Use

More Information

  • Home
  • About
  • Contact
  • Appetizers
  • Dessert
  • Dinner
  • Drinks
©2026, Lisa Dishes About Back To Top