Skip to content
DisclaimerTerms Of UseGDPR PolicyCookie Policy

Lisa Dishes

  • Home
  • Drinks
  • Appetizers
  • Dinner
  • Dessert
  • About
  • Contact
  • Privacy Policy
DisclaimerTerms Of UseGDPR PolicyCookie Policy

NO-ING-IMG

For my Bakery-Style Pumpkin Chocolate Chip Scones, gather these key items: - 2 cups all-purpose flour - 1/4 cup granulated sugar - 1 tablespoon baking powder - 1/2 teaspoon baking soda - 1/2 teaspoon salt - 1 tablespoon pumpkin spice - 1/2 cup cold unsalted butter, cubed - 3/4 cup canned pumpkin puree - 1/4 cup heavy cream - 1 large egg - 1 teaspoon vanilla extract - 3/4 cup semi-sweet chocolate chips - Extra sugar for sprinkling on top (optional) Using quality ingredients makes a big difference in your scones. Fresh, high-quality flour leads to a better texture. Choose a good brand of baking powder to ensure proper rising. For the butter, use unsalted to control the salt levels in your bake. Canned pumpkin puree should be pure and without additives. This gives your scones a rich, true pumpkin flavor. Finally, use semi-sweet chocolate chips for a perfect balance of sweetness. If you're missing an ingredient, don’t worry! You can try these alternatives: - Flour: Use whole wheat flour for a heartier scone. - Sugar: Brown sugar adds a deeper flavor. - Butter: Coconut oil can replace butter for a dairy-free option. - Pumpkin puree: You can use homemade puree if you have access to fresh pumpkin. - Cream: Milk or a non-dairy milk can work in place of heavy cream. - Chocolate chips: Swap for white chocolate chips or add nuts for a crunchy texture. These substitutions can help you adapt the recipe to your kitchen and taste preferences! First, set your oven to 400°F (200°C). This step is key for perfect scones. While the oven heats, line a baking sheet with parchment paper. This helps prevent sticking. In a large mixing bowl, combine the dry ingredients. You need 2 cups of all-purpose flour, 1/4 cup of granulated sugar, 1 tablespoon of baking powder, and 1/2 teaspoon each of baking soda and salt. Don’t forget 1 tablespoon of pumpkin spice. Whisk them together until they blend well. This mix gives your scones flavor and rise. Take 1/2 cup of cold, cubed unsalted butter. Add it to your dry mix. Use a pastry cutter or your fingers to work it in. You want the mix to look like coarse crumbs. This step makes your scones flaky and tender. In another bowl, mix the wet ingredients. You’ll need 3/4 cup of canned pumpkin puree, 1/4 cup of heavy cream, 1 large egg, and 1 teaspoon of vanilla extract. Whisk until smooth. Then, pour this mixture into your dry ingredients. Stir gently until just combined. Avoid over-mixing to keep your scones light. Turn the dough out onto a lightly floured surface. Pat it into a circle about 1 inch thick. You can cut it into 8 wedges or use a round cutter for individual scones. This step helps shape them for even baking. Transfer the shaped scones to the prepared baking sheet. Brush the tops with a bit of extra cream. If you want, sprinkle extra sugar on top for crunch. Bake for 15-18 minutes until golden brown and firm. After baking, let them cool on a wire rack for a few minutes. Enjoy them warm for the best taste! When making pumpkin chocolate chip scones, some mistakes can ruin your batch. First, avoid over-mixing the dough. This makes scones tough instead of light. Also, be sure to use cold butter. Warm butter will change the texture. Lastly, don’t skip the chilling step. Chilling helps the scones rise and stay flaky. To get the best texture, focus on how you mix. Start by cutting in the butter until it looks like crumbs. This creates pockets of air. When mixing wet and dry, stir just until you see no dry flour. This keeps the scones tender. After cutting the dough, handle it gently. Too much handling makes the scones dense. You can boost flavor by adding fun ingredients. Try mixing in chopped nuts or different types of chocolate. A dash of cinnamon or nutmeg adds a warm spice. You can also fold in dried fruit like cranberries for a tart kick. For a sweet touch, sprinkle a bit of brown sugar on top before baking. {{image_2}} You can switch up the flavors of your scones with different mix-ins. Try adding nuts like pecans or walnuts for crunch. Dried fruits, like cranberries or raisins, add a nice chew. You can even swap the chocolate chips for white chocolate or butterscotch chips. Each mix-in gives a new twist to the scone. Want to enjoy these scones without gluten? You can use a gluten-free flour blend. Make sure the blend has a good balance of starches and proteins. This will help the scones rise and hold their shape. You can also add a bit of xanthan gum, which helps bind the ingredients together. For a different flavor profile, consider adding maple syrup to the wet ingredients. This adds a sweet, earthy taste. You can also mix in extra spices like cinnamon or nutmeg for warmth. Try replacing some of the pumpkin puree with applesauce for a fruity twist. Each flavor change makes the scones unique and fun to explore. To store your leftover scones, place them in an airtight container. They stay fresh for about two days at room temperature. If you want to keep them longer, consider refrigerating them. Just be sure to wrap them tightly in plastic wrap before placing them in the fridge. This helps prevent them from drying out. When you're ready to enjoy a scone again, reheating is simple. Preheat your oven to 350°F (175°C). Place the scones on a baking sheet and warm them for about 5 to 10 minutes. This keeps them soft and brings back their fresh-baked taste. If you’re in a hurry, you can also microwave a scone for about 15 to 20 seconds. Just be careful not to overheat it, or it may become tough. If you want to save scones for later, freezing works well. First, let them cool completely. Then, wrap each scone tightly in plastic wrap. Place the wrapped scones in a freezer-safe bag or container. They can last up to three months in the freezer. When you’re ready to eat them, thaw overnight in the fridge. You can reheat them as mentioned earlier for a warm treat. Yes, you can use fresh pumpkin! Start by roasting the pumpkin until soft. Once it cools, scoop out the flesh and mash it. Make sure to drain any excess water. This way, you get the same rich pumpkin flavor. Fresh pumpkin gives a lovely, vibrant taste. Your scones are done when they turn golden brown. Gently press the top of a scone. It should feel firm and spring back. You can also use a toothpick. Insert it into the center; it should come out clean. This means they are baked perfectly. Yes, you can make the dough ahead of time. After mixing, wrap the dough tightly in plastic wrap. Store it in the fridge for up to 24 hours. When you're ready to bake, just shape and cut the scones as normal. This saves time and keeps the scones fresh. This blog post covers how to make tasty scones. We looked at the best ingredients and why quality matters. I shared tips to avoid common mistakes and ways to enhance flavor. You learned variations for different tastes and how to store leftover scones. Remember, practice makes perfect. Try these steps and tips to bake delicious scones. Enjoy the process and share them with your friends!

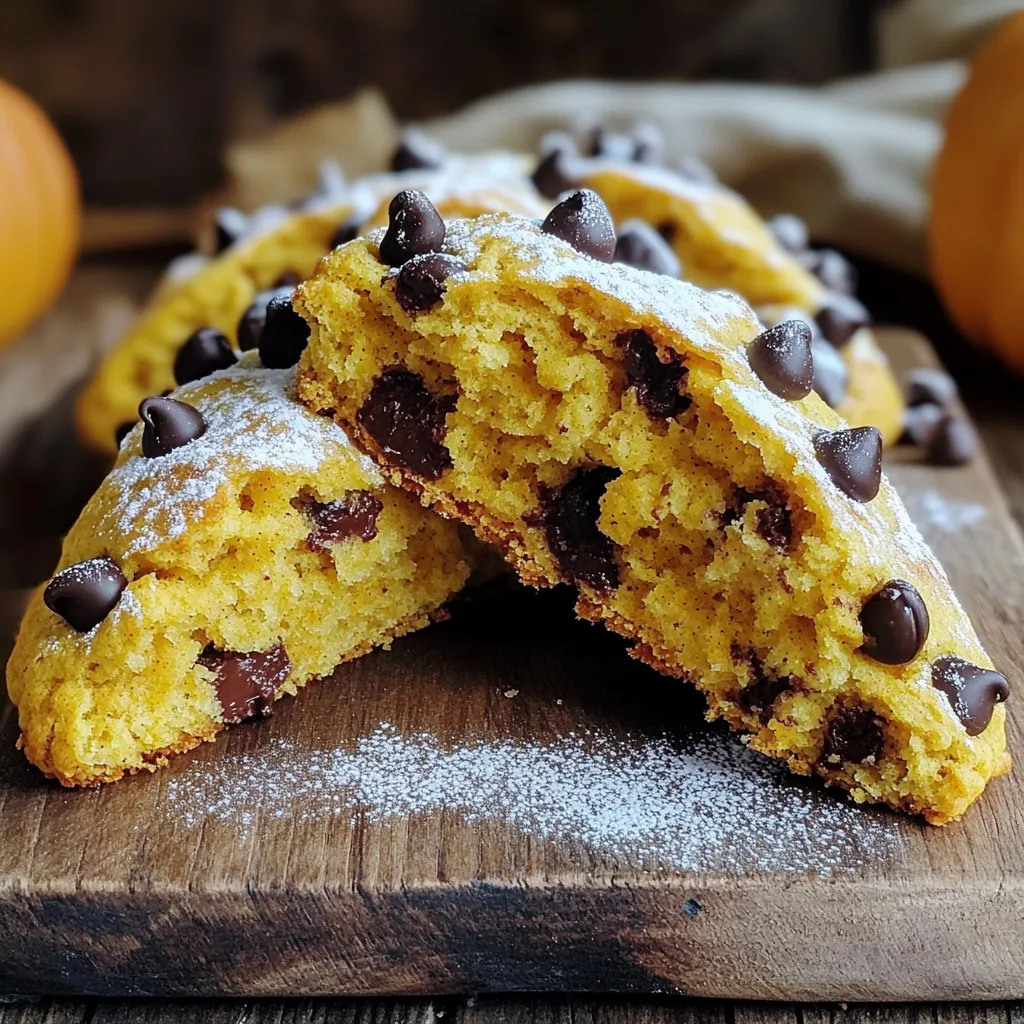
Bakery-Style Pumpkin Chocolate Chip Scones Delight

If you’re craving a warm, fall treat, my Bakery-Style Pumpkin Chocolate Chip Scones will hit the spot. These scones are

- 4 tablespoons all-purpose flour - 4 tablespoons granulated sugar - 2 tablespoons unsweetened cocoa powder - 1/8 teaspoon baking powder - 1/8 teaspoon salt - 3 tablespoons milk (or non-dairy milk) - 2 tablespoons peanut butter (creamy or crunchy) - 1 tablespoon vegetable oil - 1/4 teaspoon vanilla extract - 1 tablespoon chocolate chips (optional) To make a great chocolate peanut butter mug cake, gather your ingredients. Start with all-purpose flour. This flour gives the cake its structure. You also need granulated sugar for sweetness. Unsweetened cocoa powder adds rich chocolate flavor. Baking powder helps the cake rise. Don't forget the salt; it enhances all the flavors. For the liquid, use milk, or pick a non-dairy option like almond or oat milk. Peanut butter is key. You can use creamy or crunchy, depending on your taste. Add vegetable oil to keep the cake moist. A splash of vanilla extract brings warmth to the flavor. If you love extra chocolate, include chocolate chips for a melty treat. With these ingredients, you’re ready to create a delicious mug cake that’s quick and easy. It takes just a few minutes to prepare and cook. Enjoy the delightful mix of chocolate and peanut butter in every bite! {{ingredient_image_1}} Start by taking a microwave-safe mug. Add 4 tablespoons of all-purpose flour. Next, mix in 4 tablespoons of granulated sugar. Then, add 2 tablespoons of unsweetened cocoa powder. Sprinkle in 1/8 teaspoon of baking powder and 1/8 teaspoon of salt. Use a fork or spoon to stir everything well. Make sure there are no lumps in the mixture. This step is key for a smooth cake. Now, it’s time to add the wet ingredients. Pour in 3 tablespoons of milk or your choice of non-dairy milk. Next, add 2 tablespoons of peanut butter. You can use either creamy or crunchy peanut butter, depending on your taste. Then, add 1 tablespoon of vegetable oil and 1/4 teaspoon of vanilla extract. Stir everything together until it’s smooth. If you love chocolate, fold in 1 tablespoon of chocolate chips for extra sweetness. Place the mug in the microwave. Cook it on high for about 30 to 40 seconds. Keep an eye on it while it cooks. Every microwave is different, and cooking times can change. You want the cake to rise and be set in the middle. Be careful not to overcook it. The cake will keep cooking a bit more after you take it out. After cooking, let it cool for about a minute. Enjoy your delicious mug cake! To make your mug cake smooth, mix the dry ingredients well. Use a fork to break any lumps in the flour, sugar, and cocoa. When you add the wet ingredients, stir until the batter is even. A smooth batter gives you that perfect texture. If you find lumps, your cake may bake unevenly. You can adjust the sweetness of your cake easily. If you like it sweeter, add more sugar. You can also try different flavors. For a twist, mix in some cinnamon or swap out the peanut butter for almond butter. You might even add a splash of coffee for a rich taste. Feel free to get creative with toppings too! Microwaves are not all the same. Some cook faster than others. If your microwave is more powerful, your cake might need less time. Start with 30 seconds, then check it. If it’s not done, add 5-second bursts until it rises and sets. This will help prevent overcooking. Remember, the cake will keep cooking a little after you take it out. Pro Tips Use Room Temperature Ingredients: Make sure your milk and peanut butter are at room temperature for a smoother batter and better mixing. Microwave Power Variations: Keep an eye on your mug cake while cooking, as microwaves can vary in power. Start with 30 seconds and add more time if needed. Customize Your Toppings: Feel free to get creative with toppings! Add whipped cream, crushed nuts, or a scoop of ice cream for a delightful twist. Experiment with Flavors: Try adding a pinch of cinnamon or a splash of coffee to enhance the chocolate and peanut butter flavors. {{image_2}} If you want a nut-free treat, you can swap the peanut butter. Sunflower seed butter works well and gives a nice flavor. You can also use soy nut butter. Both options keep the cake moist and tasty without any nuts. To make this mug cake gluten-free, just change the flour. Use a gluten-free all-purpose flour blend instead. This blend often has a mix of flours and starches. It mimics regular flour well. Make sure it has a binding agent, like xanthan gum, for the best texture. You can add extra fun with flavors! Try mixing in mashed bananas for a fruity twist. Chopped nuts add crunch and taste. You can also throw in a dash of cinnamon for warmth. Each addition can change the cake's taste and make it your own. If you have leftover mug cake, you can store it easily. Let the cake cool completely. Then, cover it with plastic wrap or put it in a sealed container. It will stay fresh for up to two days at room temperature. If you want to reheat it, place it back in the microwave for 10 to 15 seconds. Be careful not to overheat it, or it may dry out. Yes, you can freeze a mug cake! To do this, first, let it cool down. After it cools, wrap the mug cake tightly in plastic wrap. Then, place it in an airtight container or a freezer bag. It can last for about a month in the freezer. When you are ready to enjoy it, thaw it in the fridge overnight. Reheat it in the microwave for a few seconds to bring back its soft texture. To serve your mug cake, I recommend adding a special touch. You can top it with a drizzle of peanut butter or a sprinkle of chocolate chips. A scoop of ice cream pairs well, too! Serve it warm for the best flavor. You can also enjoy it with a side of fresh fruit for a nice contrast. Yes, you can! Use a simple substitute to keep your mug cake moist. Try one of these options: - 1/4 cup unsweetened applesauce - 1/4 mashed banana - 1 tablespoon ground flaxseed mixed with 2.5 tablespoons water These substitutes work well and keep the cake tasty. Absolutely! If you want to make two mug cakes, just double each ingredient. Use two mugs and mix the batter in separate mugs. Microwave each mug for the same time. Check for doneness as they cook. Microwave times can change based on your machine. Most microwaves need about 30 to 40 seconds. Some might need more or less time. It is best to watch the mug cake as it cooks. If it starts to rise and set, it is almost done. This blog post outlined how to make a delicious mug cake. We covered the key ingredients, step-by-step instructions, and helpful tips. I shared variations for nut-free and gluten-free options, and gave advice on storage and reheating. Remember, you can customize flavors to fit your taste. Making mug cakes is quick and fun. Enjoy your treat and get creative with it! Your next dessert adventure starts with just a few ingredients and your microwave.

Chocolate Peanut Butter Mug Cake Delightful Treat

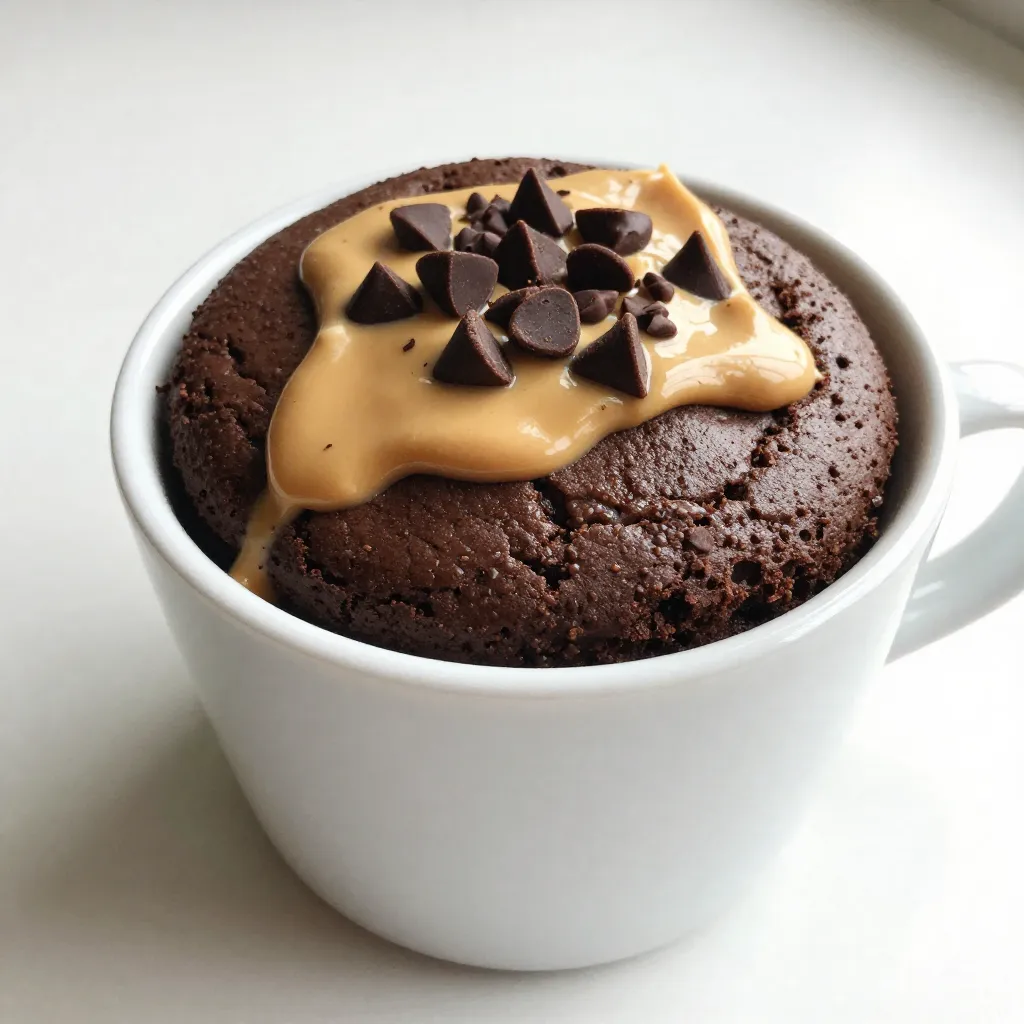
Craving a sweet fix that’s quick and easy? Then you’ll love this Chocolate Peanut Butter Mug Cake! It’s a delightful

To make caramel apple cheesecake bars, gather these ingredients: - 1 ½ cups graham cracker crumbs - ½ cup unsalted butter, melted - 2 tablespoons sugar - 16 oz cream cheese, softened - ½ cup granulated sugar - 2 large eggs - 1 teaspoon vanilla extract - 2 cups diced apples (Granny Smith or Honeycrisp) - 1 teaspoon cinnamon - ¾ cup caramel sauce (store-bought or homemade) - Optional: chopped nuts for topping You can swap ingredients based on your needs. Here are some ideas: - Graham cracker crumbs: Use crushed cookies like Digestive or Oreos for a different flavor. - Unsalted butter: Coconut oil works well for a dairy-free option. - Cream cheese: Neufchâtel cheese is a lower-fat choice. - Granulated sugar: Try using brown sugar for a richer taste. - Apples: Any sweet apples will work, like Fuji or Gala. Add fun toppings or mix-ins to enhance your dessert: - Drizzle extra caramel sauce on top for more sweetness. - Sprinkle chopped nuts like pecans or walnuts for crunch. - Add chocolate chips for a sweet twist. - Top with whipped cream for an extra creamy layer. These choices can make your caramel apple cheesecake bars even more delightful! 1. Preheat your oven to 325°F (160°C). 2. Line a 9x9-inch baking pan with parchment paper, leaving some overhang. 3. In a medium bowl, mix 1 ½ cups graham cracker crumbs, ½ cup melted butter, and 2 tablespoons sugar. 4. Stir until it looks crumbly. 5. Press this mixture into the bottom of the pan to form a crust. 1. Bake the crust in the oven for 10 minutes. 2. Remove it and let it cool slightly. 3. In a large bowl, beat 16 oz softened cream cheese until creamy. 4. Add ½ cup granulated sugar and blend until smooth. 5. Mix in 2 large eggs, one at a time. 6. Add 1 teaspoon vanilla extract and stir well. 7. In another bowl, toss 2 cups diced apples with 1 teaspoon cinnamon. 8. Gently fold the apple mixture into the cream cheese batter. 9. Pour this mixture over the cooled crust and smooth it out. 10. Bake for 30-35 minutes until the edges are set. 1. Remove the cheesecake from the oven and let it cool at room temperature for about one hour. 2. Drizzle ¾ cup caramel sauce over the top. 3. Optionally, sprinkle with chopped nuts if you like. 4. Place the bars in the refrigerator for at least 3 hours to set. 5. Once set, lift the cheesecake out using the parchment overhang. 6. Cut into squares or bars and serve. To make the best cheesecake bars, start with room temperature cream cheese. Cold cream cheese can cause lumps. Always beat the cream cheese until it is smooth. This gives the bars a nice texture. Use fresh apples for a crisp bite. Granny Smith or Honeycrisp apples work well. They add a nice tartness that balances the sweetness. One common mistake is overmixing the batter. Mixing too much can add air, leading to cracks. Make sure to fold in the apples gently. You want them evenly spread without breaking them up. Also, avoid skipping the cooling step. Letting the bars cool completely helps them set properly and makes cutting easier. To enhance the flavor, add a pinch of salt to the batter. This small addition brings out the sweetness. For extra warmth, try adding nutmeg along with the cinnamon. A touch of lemon juice can also brighten the flavors. Don't forget the caramel sauce on top. It adds a rich finish that ties everything together beautifully. {{image_2}} You can use many apples for this recipe. Granny Smith apples work great. Their tartness adds a nice contrast to the sweet caramel. Honeycrisp apples are another choice. They are sweet and juicy, which makes the bars extra yummy. Fuji or Gala apples are also good. They add a bit of sweetness and crunch. Mix and match apples for fun flavors! If you want a vegan version, swap the cream cheese for a nut-based cream cheese. You can also use silken tofu blended until smooth. For eggs, try flaxseed meal mixed with water. Use a 1:3 ratio, one tablespoon of flaxseed meal to three tablespoons of water. For butter, coconut oil or vegan butter works well. This way, you still enjoy these bars without dairy! Want to jazz up your bars? Add chocolate chips for a sweet twist. Dark, milk, or white chocolate all work well. You can also mix in chopped nuts, like pecans or walnuts. They give a nice crunch and flavor. Try adding spices like nutmeg or ginger for extra warmth. Each of these touches makes your dessert even more special! To keep your caramel apple cheesecake bars fresh, store them in the fridge. Place them in an airtight container. This keeps them moist and tasty. If you don’t have a container, cover the bars with plastic wrap. They will stay good for about a week. You can freeze these cheesecake bars for later. First, cut the bars into squares. Wrap each piece in plastic wrap. Then, put them in a freezer bag or container. They can last for about two months in the freezer. When you're ready to eat, thaw them in the fridge overnight. These bars taste best when eaten fresh. If stored properly, they stay good for up to a week in the fridge. To enjoy them at their best, serve them cold after chilling. Avoid leaving them out for too long, as they can soften and lose their great texture. You can tell the bars are done when the edges look firm. The center should still jiggle a bit. If it shakes like jelly, it needs more time. Bake them for 30 to 35 minutes at 325°F. Let them cool completely before cutting. This helps them set properly. Yes, you can! If you want a twist, try using Oreo cookies for a chocolate crust. You can also use almond flour to make a gluten-free crust. Just mix it with melted butter and a bit of sugar. Press it firmly in the pan, just like the graham cracker crust. Serving these bars is fun and easy! Place them on small plates. Drizzle extra caramel sauce over each slice. You can also top them with a thin slice of apple for a nice touch. For a crunchy bite, sprinkle chopped nuts on top. Enjoy them chilled for the best flavor! You learned about making delicious caramel apple cheesecake bars. We covered the ingredients, tips, and steps for baking. Substitutions help if you lack certain items. You can also explore fun variations and storage tips for freshness. Remember to avoid common mistakes for the best taste. Enjoy these bars with different toppings and flavors. With these tips, you can impress your friends and family. Happy baking!

Caramel Apple Cheesecake Bars Irresistible Dessert Delight

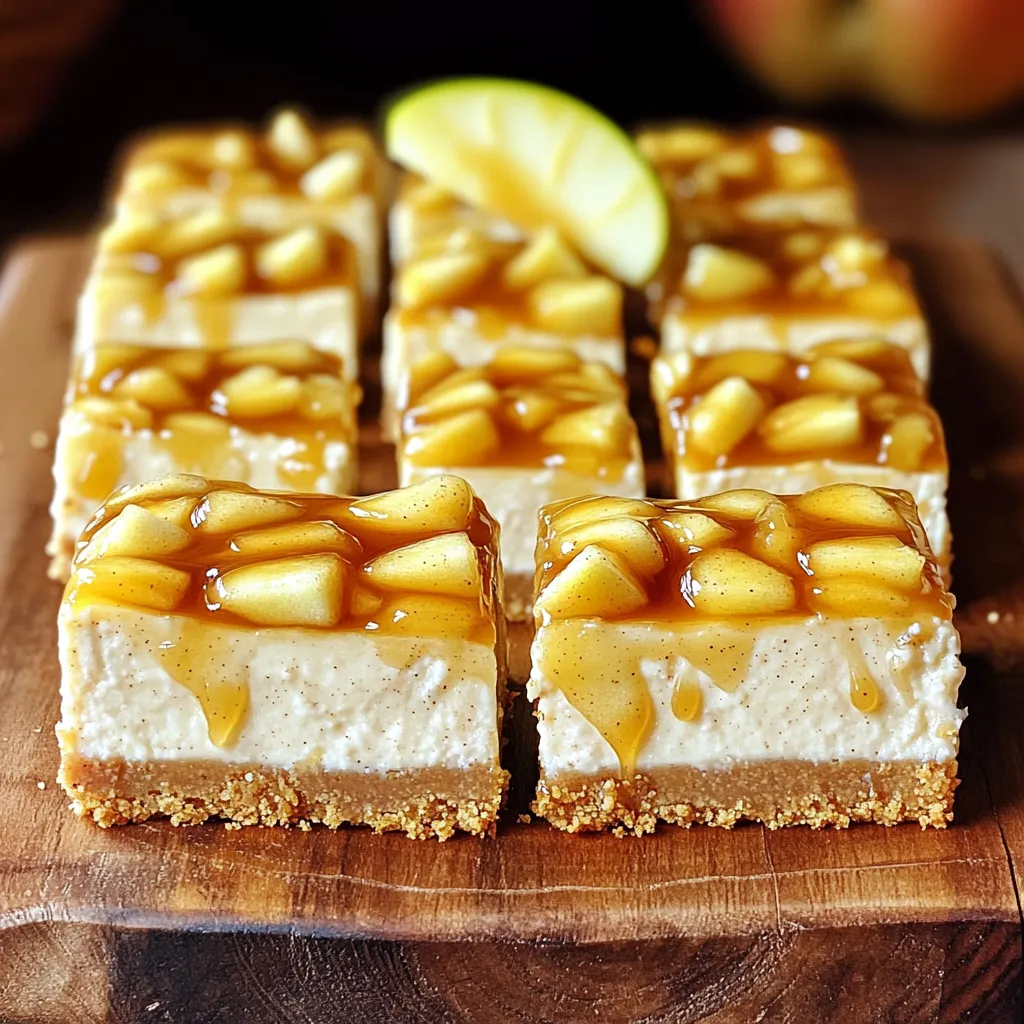
Get ready to treat your taste buds to pure bliss! Caramel Apple Cheesecake Bars combine creamy cheesecake, tart apples, and

To make Pumpkin Cinnamon Swirl Bread, you will need: - 2 cups all-purpose flour - 1 cup pumpkin puree (canned or fresh) - 1/2 cup granulated sugar - 1/2 cup brown sugar, packed - 1/2 cup unsalted butter, softened - 2 large eggs - 1/2 cup whole milk - 1 teaspoon vanilla extract - 1 teaspoon baking powder - 1 teaspoon baking soda - 1 teaspoon ground cinnamon - 1/2 teaspoon ground nutmeg - 1/2 teaspoon ground ginger - 1/2 teaspoon salt - 1/4 cup granulated sugar (for cinnamon swirl) - 1 tablespoon ground cinnamon (for cinnamon swirl) Measuring ingredients correctly is key for great bread. Here’s how to measure: - Cups: Use a dry measuring cup for flour and sugar. Scoop and level off. - Teaspoons and Tablespoons: Use measuring spoons for small amounts. - Weight: If you have a kitchen scale, use it for better accuracy. Choosing the right ingredients makes a big difference. Here are some tips: - Flour: Use all-purpose flour for the best texture. Brands may vary, so try a few to find your favorite. - Pumpkin: Fresh pumpkin gives great flavor, but canned is easy and works well. - Butter: Always use unsalted butter. It controls the salt in your recipe. - Spices: Fresh spices enhance the taste. Check their dates; old spices lose flavor. - Sugars: Use packed brown sugar for richness. Granulated sugar adds sweetness. These tips help create a soft, moist loaf with a lovely swirl. Enjoy every bite of this fall treat! First, preheat your oven to 350°F (175°C). This step warms the oven for even baking. Next, take a 9x5 inch loaf pan and grease it. You can use non-stick spray or butter. This helps the bread come out easily after baking. In a large bowl, gather your dry ingredients. Combine the flour, baking powder, baking soda, cinnamon, nutmeg, ginger, and salt. Whisk them together until well mixed. This step is key for even flavor and texture. In a separate bowl, cream the softened butter with granulated and brown sugar. Use a mixer for about 2-3 minutes. The mixture should look light and fluffy. This adds air and helps the bread rise. Now it's time to add the wet ingredients. Beat in the eggs one at a time. Then, mix in the pumpkin puree, whole milk, and vanilla extract. Stir until the mixture is smooth. This will make your bread moist and flavorful. In a small bowl, mix together the 1/4 cup of granulated sugar and 1 tablespoon of ground cinnamon. Set this mixture aside. It will create that delicious, sweet swirl in the bread. Pour half of the pumpkin batter into the greased loaf pan. Sprinkle half of the cinnamon sugar mixture evenly over the batter. Next, pour the rest of the batter on top. Finally, sprinkle the remaining cinnamon sugar on the top layer. Use a knife or skewer to swirl the mixture gently. Make sure not to overmix; you want those beautiful swirls! Now, place the loaf pan in the preheated oven. Bake for 55-65 minutes. Check it by inserting a toothpick into the center. If it comes out clean, your bread is ready. After baking, take the bread out of the oven. Let it cool in the pan for about 10 minutes. Then, transfer it to a wire rack to cool completely. Once cool, slice it up. Enjoy your Pumpkin Cinnamon Swirl Bread warm or at room temperature! To get a soft bread, use room temperature butter and eggs. This helps mix better. Be careful not to overmix the batter. Mix just until you see no dry flour. Overmixing makes the bread tough. A light hand gives you that perfect, fluffy texture. If you have extra bread, let it cool completely first. Wrap it tightly in plastic wrap. This keeps it fresh and soft. You can also store it in an airtight container. It stays good at room temperature for about three days. For longer storage, freeze it. Slice it before freezing for easy snacks later. Want to change it up? Try adding chopped nuts or chocolate chips to the batter. Walnuts or pecans add nice crunch. For more spice, swap in different spices like allspice or cardamom. You can also reduce the sugar for a less sweet bread. Each change offers a new twist on this classic treat. {{image_2}} You can make this bread gluten-free. Use a gluten-free flour blend instead of all-purpose flour. Look for blends that contain xanthan gum. This will help the bread rise and hold its shape. Follow the same steps in the recipe, and you’ll enjoy a tasty gluten-free treat. Want to make your bread fun? Add nuts or chocolate chips! Chopped pecans or walnuts add crunch and flavor. You can also sprinkle in chocolate chips for a sweet twist. Mix them in when you combine the wet and dry ingredients. This adds texture and makes each slice extra special. Feel free to play with spices! Instead of just cinnamon, try adding allspice or cardamom. You can also use pumpkin pie spice for a warm flavor. Change the nutmeg or ginger amounts to match your taste. This lets you create a unique bread that suits your mood! To keep your pumpkin cinnamon swirl bread fresh, store it in an airtight container. This helps keep moisture in and prevents it from drying out. You can also wrap the loaf in plastic wrap or aluminum foil. For best results, place it in a cool, dry place. If you want it to last longer, the fridge is a good option. Just remember to let it cool completely before storing to avoid sogginess. Freezing is an excellent way to save leftover bread. To freeze, first, slice the bread. Then, wrap each slice tightly in plastic wrap. After that, place the slices in a freezer bag. Remove as much air from the bag as possible. You can freeze the bread for up to three months. When you're ready to eat, simply thaw it in the fridge overnight or at room temperature for a few hours. To enjoy that fresh-baked taste again, reheat your slices. You can use a toaster, oven, or microwave. For the toaster, just pop in a slice and toast until warm. If you use the oven, preheat it to 350°F (175°C) and heat the slices for about 10 minutes. For the microwave, heat for 15-20 seconds. Add a pat of butter for extra flavor and warmth! Yes, you can use fresh pumpkin. First, cook the pumpkin until soft. Then, mash it well. You need about one cup of puree. It adds a bright flavor. Just make sure it's smooth. To make it dairy-free, swap the butter with coconut oil or a dairy-free spread. Use almond milk or oat milk instead of whole milk. These swaps keep the bread moist and tasty. You can use flaxseed meal or chia seeds as an egg substitute. Mix one tablespoon of flaxseed or chia with three tablespoons of water. Let it sit for five minutes to thicken. This will act like one egg. The bread lasts about four to five days at room temperature. Store it in an airtight container. You can also keep it in the fridge for up to a week. Yes, you can make the bread in advance. Bake it and let it cool completely. Wrap it tightly and store it at room temperature. You can also freeze it for up to three months. Just thaw it overnight in the fridge before serving. You learned about the key ingredients and steps to make delicious pumpkin cinnamon swirl bread. With tips for texture, storage, and variations, you can enjoy this treat in many ways. Remember, you can personalize it by adding nuts or using gluten-free options. Keep these methods in mind for the best results. Now, get baking, and enjoy every slice of your tasty creation!

Pumpkin Cinnamon Swirl Bread Irresistible Fall Treat

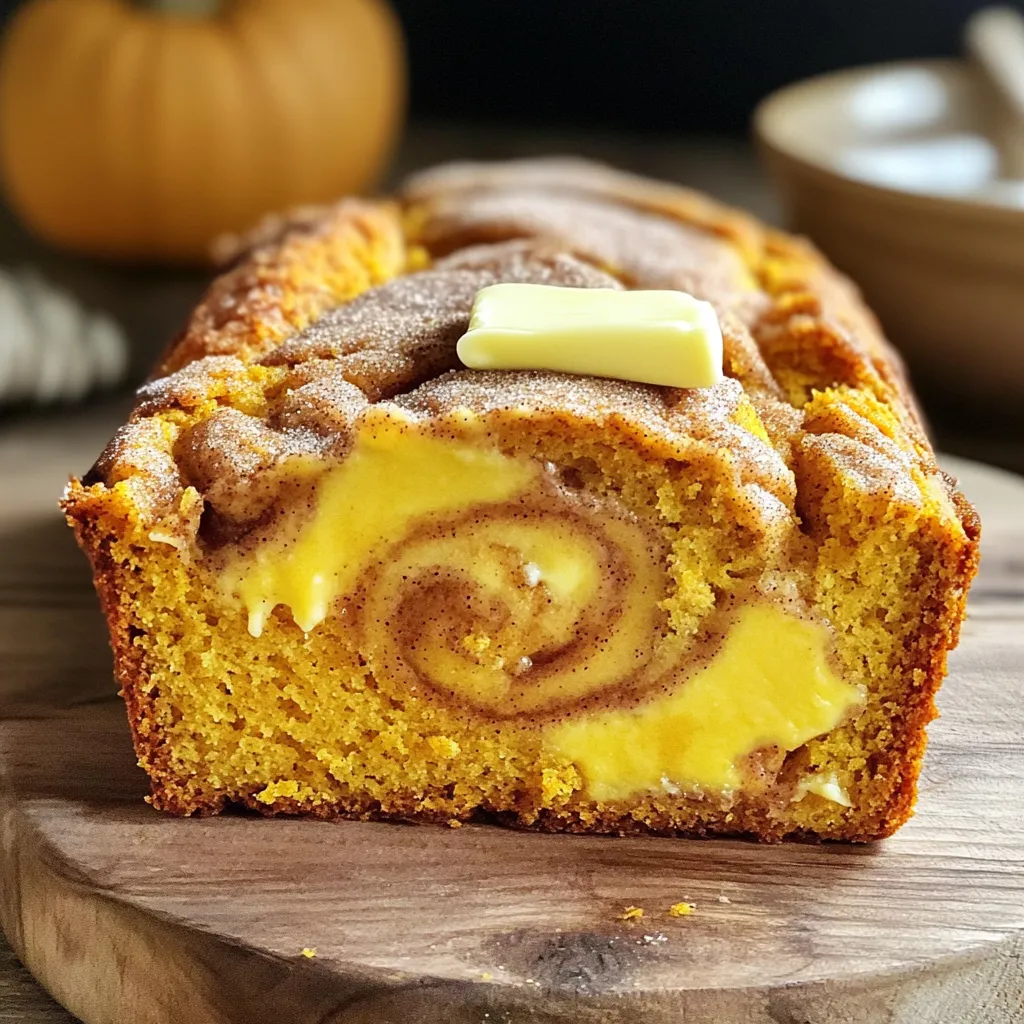
Are you ready to savor the taste of fall? My Pumpkin Cinnamon Swirl Bread is the perfect way to celebrate

- 8 oz egg noodles - 1 lb beef sirloin, thinly sliced - 1 cup bell peppers, julienned (red and green) - 1 cup broccoli florets - 1 cup carrots, julienned - 1 cup bean sprouts - 3 green onions, chopped - 2 cloves garlic, minced - 1 tablespoon ginger, minced You start with egg noodles. They hold sauce well and add a delightful chew. Then, choose beef sirloin for its tender texture. Slice it thin for quick cooking. Next, add fresh veggies like bell peppers, broccoli, and carrots. They bring color and crunch. Finally, bean sprouts add a nice bite. Green onions give a fresh flavor. - 2 tablespoons soy sauce - 1 tablespoon oyster sauce - 1 tablespoon sesame oil - Salt and pepper to taste - 2 tablespoons vegetable oil for stir-frying For sauces, use soy sauce for saltiness. Oyster sauce adds a deep umami flavor. Sesame oil gives a warm, nutty note. Don’t forget salt and pepper for taste. Vegetable oil is best for stir-frying. It can handle high heat without smoking. - Green onions - Sesame seeds Garnishes can elevate your dish. Chopped green onions add freshness. A sprinkle of sesame seeds gives a nice crunch. These small touches make your Beef Chow Mein look and taste great. How to Cook Egg Noodles To cook the egg noodles, bring a pot of water to a boil. Add the noodles and cook them until they are al dente, about 4-5 minutes. Stir occasionally to prevent sticking. Draining and Setting Aside Once cooked, drain the noodles in a colander. Rinse them under cold water to stop the cooking. Set the noodles aside for later. Ingredients for Marinade For the marinade, you need: - 1 lb beef sirloin, thinly sliced - 1 tablespoon soy sauce - 1 tablespoon oyster sauce - Salt and pepper Marination Time and Tips Combine the beef with the marinade ingredients in a bowl. Mix well and let it marinate for 15 minutes. This step makes the beef tasty and tender. Heating the Oil In a large skillet or wok, heat 1 tablespoon of vegetable oil over medium-high heat. Cooking Time for Vegetables Add 2 cloves of minced garlic and 1 tablespoon of minced ginger. Sauté for about 30 seconds until fragrant. Then, add 1 cup each of bell peppers, broccoli, and carrots. Stir-fry for 3-4 minutes. The veggies should be crisp but tender. Remove them from the skillet and set them aside. Searing Techniques In the same skillet, add 1 tablespoon of vegetable oil. Place the marinated beef in a single layer. Checking for Doneness Sear the beef for about 2-3 minutes on each side. The beef should be browned and cooked through. Tossing Noodles, Beef, and Vegetables Return the cooked vegetables to the skillet with the beef. Add the drained egg noodles next. Integrating Sauces Pour in the remaining tablespoon of soy sauce and 1 tablespoon of sesame oil. Toss everything together gently. Heat for about 2-3 minutes to blend the flavors. Adding Bean Sprouts and Green Onions Before serving, fold in 1 cup of bean sprouts and 3 chopped green onions. Presentation Tips Serve the Beef Chow Mein in bowls. Garnish with extra green onions and a sprinkle of sesame seeds for a lovely look. Choosing the Right Cuts of Beef I recommend using beef sirloin. It is tender and has great flavor. Slice it thinly for quick cooking. This will help it stay juicy and not tough. Importance of Fresh Ingredients Fresh ingredients really make a difference. Use crisp bell peppers, bright broccoli, and vibrant carrots. They add color and crunch. Fresh vegetables also boost the dish's taste. Overcooking Vegetables Avoid cooking vegetables too long. They should be tender but still crisp. This takes only a few minutes. Overcooked veggies can turn mushy and lose flavor. Incorrect Seasoning Don’t skip the seasoning. Taste as you go! Add salt and pepper to enhance the flavors. A little soy sauce goes a long way. Adjust to suit your taste. Best Skillet or Wok to Use A large non-stick skillet or a wok works best. A wok heats up quickly and cooks food evenly. It makes stir-frying easy and fun. Tools for Perfect Stir-Frying Use a spatula for stirring and tossing. Tongs are great for handling the beef. A lid can help steam vegetables if needed. Keep your tools handy for a smooth cooking process. {{image_2}} You can change up your Beef Chow Mein by using different proteins. Chicken works well and cooks quickly. If you want a vegetarian dish, try tofu. Tofu absorbs flavors well and adds a nice texture. Adding more veggies can also make your dish special. Snap peas give a nice crunch, while mushrooms add a rich taste. You can mix and match to find your favorite combo. To boost flavor, try adding spices. Five-spice powder brings warmth and depth. If you like heat, chili paste can spice things up. Just a little goes a long way! You can also swap out sauces for new tastes. Teriyaki sauce adds sweetness, and hoisin sauce gives a savory kick. Experiment and see what you love best! For gluten-free options, use rice noodles instead of egg noodles. Make sure to check labels for sauces, as some contain gluten. If you're looking to cut carbs, you can use zucchini noodles. They are light and absorb sauces well. This way, you enjoy the flavors without the extra carbs. To store your Beef Chow Mein leftovers, place them in an airtight container. Make sure to cool the dish down to room temperature before sealing. This helps prevent moisture buildup, which can make your noodles soggy. The shelf life of Beef Chow Mein in the fridge is about 3 to 4 days. Be sure to check for any off smells or changes in texture before eating. If it looks or smells strange, it's best to toss it. You can freeze Beef Chow Mein for later use. First, let it cool completely. Then, divide it into portions and place each in a freezer-safe bag or container. Squeeze out as much air as possible before sealing. This helps keep the flavors fresh. When you’re ready to eat, thaw the chow mein in the fridge overnight. For quick thawing, you can use the microwave on a low setting. After thawing, reheat in a skillet for the best texture. To avoid a soggy dish when reheating, add a splash of water or broth. This helps steam the noodles without making them mushy. Keep the heat low and stir often. To restore flavor, consider adding a little more soy sauce or sesame oil. This can brighten up the dish and make it taste fresh again. Garnish with chopped green onions before serving for an extra pop of flavor. Yes, you can make Beef Chow Mein ahead of time. To meal prep, cook the noodles and beef separately. Store them in airtight containers in the fridge. Combine them with the veggies and sauce when ready to eat. This keeps everything fresh and tasty. If you don’t have egg noodles, you can use other options. Try rice noodles or whole wheat noodles for a healthy choice. Even spaghetti works in a pinch. Just cook them according to the package instructions before adding them to your dish. Yes, you can use frozen vegetables in this recipe. They save time and are often just as healthy. When using frozen veggies, add them straight to the pan without thawing. Cook them for a bit longer until they are tender but not mushy. To make Beef Chow Mein vegetarian, swap the beef for tofu or tempeh. Use soy sauce and oyster sauce alternatives made from mushrooms for flavor. Add more veggies like bell peppers, carrots, and broccoli to make it hearty and filling. For stir-frying, vegetable oil is great. It has a high smoke point, making it perfect for quick cooking. You can also use canola oil or peanut oil. These oils help your food cook evenly and add a nice flavor. Beef Chow Mein blends tasty ingredients and easy steps for a quick meal. We explored the key ingredients, sauces, and ways to customize this dish. You now have tips to avoid mistakes and enhance flavors. With the right skills, you can make this at home. Remember, fresh ingredients bring the best taste. Try your own twists for a unique dish. Enjoy the cooking process, and savor every bite of your Beef Chow Mein!

Beef Chow Mein Better Than Takeout Simple Delight

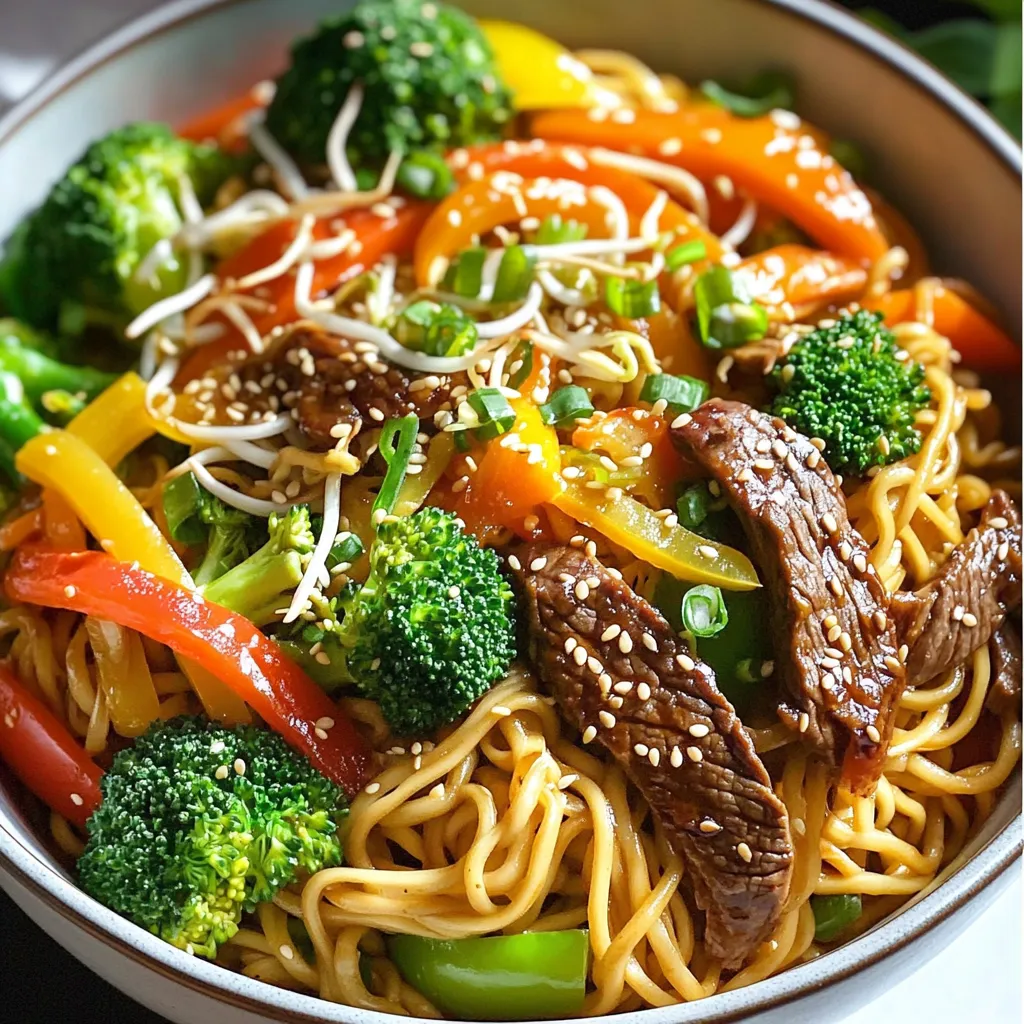
Are you tired of takeout that just doesn’t hit the spot? Let’s change that! In this guide, I’ll show you

- 1 pound gnocchi (store-bought or homemade) - 2 tablespoons olive oil - 4 cloves garlic, minced - 1 can (14 oz) diced tomatoes (with juices) - 1 cup vegetable broth These ingredients form the heart of your dish. Gnocchi gives a soft, chewy base. You can buy it or make it at home. Olive oil adds flavor and helps cook the garlic. Garlic brings a nice aroma and taste. Diced tomatoes add sweetness and acidity. Vegetable broth adds more depth to the sauce. - 1 cup heavy cream (or coconut cream for a dairy-free option) - 1 teaspoon dried basil - Salt and pepper to taste - 1 cup fresh basil leaves, chopped - ½ cup grated Parmesan cheese (optional) The creamy base makes this dish rich and comforting. Heavy cream gives a smooth texture. If you want a dairy-free option, coconut cream works well too. Dried basil adds a warm, herbal taste. Fresh basil leaves finish the dish with brightness. Add salt and pepper to enhance all the flavors. Parmesan cheese can add a salty kick if you choose to use it. - ½ teaspoon red pepper flakes (optional for heat) - Additional seasonings for customization For those who like a bit of spice, red pepper flakes can add heat. You can also play with other seasonings. Oregano, thyme, or even a dash of lemon juice can change the flavor. This gives you the freedom to make the dish your own! 1. First, heat 2 tablespoons of olive oil in a large pot over medium heat. 2. Next, add 4 minced garlic cloves. Sauté them for about 1 minute until they smell great. 3. After that, add 1 can of diced tomatoes with juices, 1 cup of vegetable broth, and 1 teaspoon of dried basil to the pot. Stir it all well. 1. Bring the mixture to a gentle simmer. This means you want small bubbles to form but not a full boil. 2. Now, add 1 pound of gnocchi to the pot. Cook it for about 2-3 minutes. The gnocchi will float when done. 3. Once the gnocchi floats, turn the heat to low. Stir in 1 cup of heavy cream or coconut cream. Let it simmer for another 2-3 minutes to thicken a bit. 1. Taste the dish and season it with salt, pepper, and red pepper flakes if you want some heat. 2. Gently fold in 1 cup of chopped fresh basil and ½ cup of grated Parmesan cheese, if using. Mix until everything is combined. 3. Serve this dish right away for the best flavor and texture. Garnish with more fresh basil and a drizzle of olive oil for a nice touch. To ensure the best texture of gnocchi, cook them until they float. This usually takes about 2-3 minutes. If the gnocchi cook too long, they can become mushy. To prevent sticking during cooking, stir gently after adding them to the pot. A bit of olive oil can help too, as it creates a non-stick layer. For an appealing plate, serve your creamy tomato basil gnocchi in shallow bowls. This allows the sauce to shine. Garnish with extra basil leaves and a drizzle of olive oil. This adds color and enhances the dish's flavor and look. A sprinkle of grated Parmesan can elevate the dish even more. I recommend using a large pot or deep skillet for one-pot cooking. This gives you enough space to stir and combine ingredients easily. Use a wooden spoon or silicone spatula for mixing. These tools are gentle on your pots and prevent scratches while ensuring even cooking. {{image_2}} You can easily adapt this gnocchi dish to fit your needs. For a dairy-free and vegan option, swap heavy cream for coconut cream. This keeps the dish rich and creamy without the dairy. If you're gluten-free, look for gluten-free gnocchi. Many brands now offer tasty choices made from rice or potatoes. This way, everyone can enjoy this creamy tomato basil gnocchi. Want to add more flavor? Try mixing in proteins like chicken or shrimp. Cook them first in the pot, then follow the recipe as usual. For a burst of freshness, add seasonal vegetables. Spinach, zucchini, or bell peppers work great. Just toss them in with the gnocchi for a colorful and tasty meal. Do you like heat? Adjust the spice by adding different peppers. Jalapeños or crushed red pepper flakes can bring a nice kick. If you want to explore new flavors, add flavor boosters. A splash of balsamic vinegar or a hint of lemon zest can brighten up the dish. Feel free to experiment and find what you love! To keep your creamy tomato basil gnocchi fresh, follow these tips: - Refrigerate promptly: Store leftovers in the fridge within two hours. - Use airtight containers: Choose containers that seal well to keep out air. - Label and date: Write the date on the container to track freshness. The dish stays good for about three days in the fridge. When you want to enjoy your gnocchi again, use these methods: - Stovetop reheating: Place the gnocchi in a pan over low heat. Add a splash of vegetable broth or cream. Stir gently until warmed. - Microwave option: Use a microwave-safe bowl. Heat for 1-2 minutes, stirring halfway through. These methods help keep the creamy texture intact. If you want to save some gnocchi for later, here’s how to freeze it: - Cool before freezing: Let the dish cool to room temperature first. - Portion it out: Freeze in single servings for easy reheating. - Use freezer-safe containers: Make sure they are airtight to prevent freezer burn. To reheat, thaw in the fridge overnight. Then, reheat using the stovetop or microwave method. Enjoy your meal at its best! How long does the dish take to make? This dish takes about 20 minutes in total. You spend 10 minutes prepping the ingredients. Cooking takes another 10 minutes. Quick and easy! Can I use fresh gnocchi instead of store-bought? Yes, you can use fresh gnocchi. Fresh gnocchi cooks faster than store-bought. Just keep an eye on it to avoid overcooking. What can I substitute for heavy cream? You can use coconut cream for a dairy-free option. Almond milk or cashew cream also works well. These options keep your dish creamy and rich. Are canned tomatoes necessary, or can I use fresh? Canned tomatoes bring a great flavor and save time. You can use fresh tomatoes if you prefer. Just chop them and add extra broth for moisture. What side dishes complement this recipe? A simple green salad pairs well with this dish. Garlic bread is also a tasty choice. These sides balance the creaminess of the gnocchi. Can I prepare this meal in advance? You can prepare the sauce ahead of time. Store it in the fridge for up to two days. Cook the gnocchi fresh before serving for the best taste. This blog post covered how to make a delicious gnocchi dish. We explored essential ingredients, creamy bases, and optional add-ins. You learned step-by-step cooking instructions while getting tips for great texture and presentation. We also discussed variations for dietary needs and flavor adjustments. Lastly, we shared storage tips to keep your meal fresh and FAQs for common questions. Cooking is all about trying new things and having fun. Enjoy making this dish your own!

Creamy Tomato Basil Gnocchi One Pot Delight

Welcome to Creamy Tomato Basil Gnocchi One Pot Delight! If you crave a rich, comforting dish that’s quick to prepare,

When making an Apple Cider Caramel Bundt Cake, you need the right ingredients. Each one adds flavor and texture. Here’s what you’ll need: - 2 cups apple cider - 2 cups all-purpose flour - 1 cup granulated sugar - 1/2 cup brown sugar, packed - 1 cup unsalted butter, softened - 4 large eggs - 1 teaspoon vanilla extract - 2 teaspoons baking powder - 1 teaspoon baking soda - 1 teaspoon ground cinnamon - 1/2 teaspoon ground nutmeg - 1/4 teaspoon salt - 1 cup packed shredded apples (about 2 medium apples) - 1 cup caramel sauce (store-bought or homemade) - Optional: chopped pecans for garnish The apple cider gives the cake a warm, rich taste. The combination of sugars makes it sweet and moist. Butter adds a creamy texture, while eggs help it rise. The spices, like cinnamon and nutmeg, bring a cozy aroma. Shredded apples keep the cake juicy. The caramel sauce on top adds a sweet finish. If you want, you can sprinkle chopped pecans for a crunchy touch. They not only taste good, but they also look pretty on the cake. With these ingredients, you’ll create a bundt cake that is rich and cozy. Each bite will remind you of fall and comfort. 1. Preheat your oven to 350°F (175°C). Grease and flour a 10-cup bundt pan. This helps the cake come out easily. 2. In a small saucepan, bring the apple cider to a boil over medium heat. Reduce the heat and simmer for about 15-20 minutes. The cider should reduce to about 1 cup. Let it cool slightly after reducing. 3. In a large mixing bowl, cream the softened butter with granulated and brown sugar. Mix until light and fluffy, about 3-4 minutes. This step adds air to your cake. 4. Add the eggs, one at a time. Beat well after each addition. Next, mix in the vanilla extract for extra flavor. 5. In a separate bowl, whisk together the flour, baking powder, baking soda, cinnamon, nutmeg, and salt. This ensures even mixing of dry ingredients. 6. Gradually add the dry ingredients to the butter-sugar mixture. Alternate this with the reduced apple cider. Start and end with the flour mix. Blend until just combined. Overmixing can make the cake tough. 7. Gently fold in the shredded apples. This adds moisture and flavor to the cake. 8. Pour the batter into the prepared bundt pan. Smooth the top if needed for even baking. 9. Bake in the preheated oven for 50-60 minutes. Check with a toothpick. It should come out clean when the cake is done. 10. Once baked, let the cake cool in the pan for about 15 minutes. Then, invert it onto a wire rack to cool completely. 11. Drizzle the cooled cake with caramel sauce. For a special touch, sprinkle chopped pecans on top, if desired. - Achieving the perfect bundt cake texture: Start with room-temperature butter and eggs. Cream the butter and sugars until light and fluffy. This step adds air and helps the cake rise. Mix the dry and wet ingredients until just combined to avoid a dense cake. - Ensuring easy release from the pan: Grease and flour your bundt pan well. This step is key to preventing the cake from sticking. You can also use a baking spray designed for bundt pans. Let the cake cool for about 15 minutes before inverting it onto a wire rack. - Testing doneness: Stick a toothpick into the center of the cake. If it comes out clean or with just a few crumbs, the cake is done. If it has wet batter on it, give it more time in the oven. - Presentation ideas for serving: Slice the bundt cake and place it on dessert plates. Drizzle caramel sauce over each slice for a lovely touch. For extra flair, add a dollop of whipped cream and sprinkle with chopped pecans. - Pairing recommendations: This cake pairs perfectly with a warm cup of coffee or spiced tea. The flavors of apple and caramel shine brighter alongside these drinks. - Overmixing the batter: Mix just until the ingredients are combined. Overmixing can lead to a tough cake. It’s okay if there are a few lumps. - Using inadequate butter or flour measurements: Always measure your ingredients correctly. Too much or too little can change the cake’s texture. Use dry measuring cups for flour and a liquid measuring cup for apple cider. {{image_2}} You can spice up your apple cider caramel bundt cake with new flavors. Try adding ground ginger or cloves for a warm kick. These spices bring a cozy feel to each bite. You can also mix in fruits like pears or cranberries. Pears add a sweet touch, while cranberries give a tart contrast. Both options enhance the cake's flavor profile. Want a lighter cake? Use gluten-free flour instead of all-purpose flour. This switch keeps the cake soft and tasty. You can also cut back on sugar. Try using less granulated sugar or replace some with a natural sweetener. This change keeps the cake sweet without being too heavy. Make your cake fit the season! In autumn, add pumpkin puree for a fall twist. This adds moisture and a lovely color. For the holidays, try a spiced version. Add nutmeg, cloves, and a hint of orange zest. This festive mix makes the cake perfect for gatherings. Each variation brings its own charm to this delightful dessert. To keep your Apple Cider Caramel Bundt Cake fresh, store it at room temperature. Use a cake dome or wrap it in plastic wrap. This keeps the cake moist. If you live in a humid area, refrigerate the cake to prevent spoilage. Place it in an airtight container to keep it fresh. You can freeze this bundt cake for later. First, let the cake cool completely. Wrap it tightly in plastic wrap, then place it in a freezer bag. This helps prevent freezer burn. When you want to eat it, thaw the cake overnight in the fridge. For the best flavor and texture, let it sit at room temperature for a few hours before serving. The cake stays fresh for about three days at room temperature. If you refrigerate it, it can last up to a week. In the freezer, this bundt cake keeps well for about three months. Always check for signs of spoilage before eating. You can use apple juice as a substitute for apple cider. It will add sweetness, but you may lose some depth of flavor. If you want a stronger taste, try using unsweetened apple juice and add a splash of vinegar. This adds tartness, balancing the sweetness. Yes, you can make this cake ahead of time. Bake it a day before your event. Let it cool completely, then wrap it tightly in plastic wrap. Store it at room temperature. You can add caramel sauce just before serving. This keeps it fresh and moist. Check for doneness by using a toothpick. Insert it into the cake's center. If it comes out clean or with a few crumbs, the cake is done. The edges should pull away slightly from the pan. You can also gently press the top; it should spring back. This blog post covered a tasty bundt cake made with simple ingredients. We listed the key items, shared step-by-step instructions, and provided tips for perfecting your bake. You also learned fun variations and storage tips to keep your cake fresh. Remember, even small changes can make a big difference in flavor. Enjoy experimenting with this recipe, and impress everyone with your delicious creation. Happy baking!

Apple Cider Caramel Bundt Cake Rich and Cozy Delight

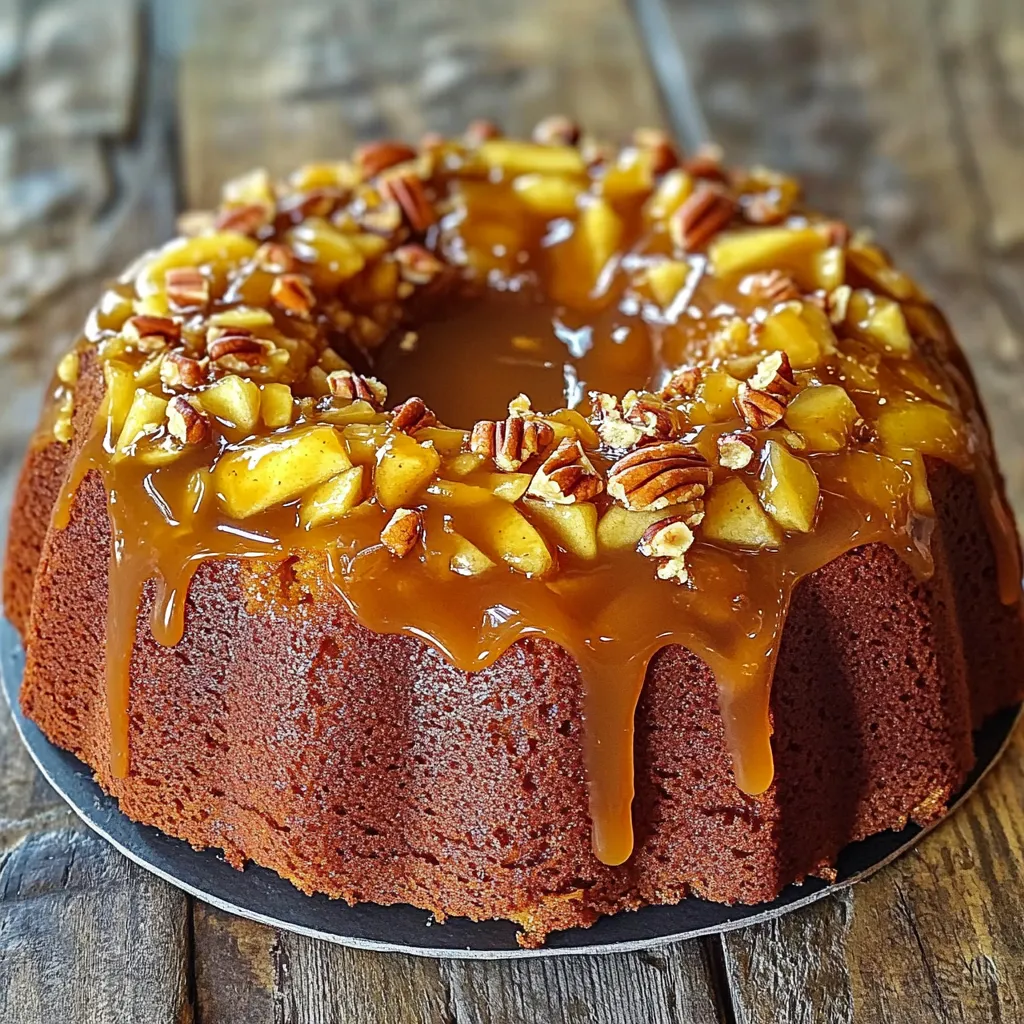
Fall is the perfect time to enjoy a slice of Apple Cider Caramel Bundt Cake. This rich, cozy delight combines

- 1 cup all-purpose flour - 1 cup whole wheat flour - 1 teaspoon baking powder - 1 teaspoon baking soda - 1 teaspoon ground cinnamon - 1/2 teaspoon ground nutmeg - 1/2 teaspoon ground ginger - 1/4 teaspoon salt - 1 cup canned pumpkin puree - 1 cup brown sugar, packed - 1/2 cup vegetable oil - 2 large eggs - 1 teaspoon vanilla extract - 1/2 cup chopped pecans (plus extra for topping) - 1/2 cup chocolate chips (optional) To create these pumpkin pecan muffins, gather your ingredients first. Start with the flours. All-purpose flour gives a light texture, while whole wheat flour adds fiber and depth. Next, you need the leavening agents. Baking powder and baking soda help the muffins rise. The spices—cinnamon, nutmeg, and ginger—bring that warm, cozy flavor. Pumpkin puree is the star of this recipe. It adds moisture and a rich taste. Brown sugar gives sweetness and a hint of caramel. Vegetable oil keeps the muffins soft. You will also need eggs to bind everything together and vanilla extract for a lovely aroma. Finally, the toppings! Chopped pecans add crunch, and chocolate chips are a sweet option if you like. This list of ingredients makes sure your muffins taste just like those from a bakery. First, preheat your oven to 375°F (190°C). This step is key for even baking. Next, prepare your muffin tin. You can use paper liners or grease it lightly with cooking spray. This helps the muffins release easily after baking. In a large bowl, combine the all-purpose flour, whole wheat flour, baking powder, and baking soda. Add in ground cinnamon, nutmeg, ginger, and salt. Whisk these dry ingredients together until they blend well. This mix gives the muffins their structure and flavor. In another bowl, mix the pumpkin puree and brown sugar. Add the vegetable oil, eggs, and vanilla extract. Stir until the mixture is smooth and creamy. This step adds moisture and sweetness to your muffins. Now, it’s time to combine the two mixtures. Gently fold the wet ingredients into the dry ingredients. Use a spatula and mix until just combined. Be careful not to overmix. This keeps your muffins soft and fluffy. Spoon the batter into the muffin cups. Fill each cup about two-thirds full. This gives the muffins room to rise. If you like, sprinkle extra chopped pecans on top for added crunch. Place the muffin tin in the oven. Bake for 20-25 minutes. They are done when a toothpick comes out clean. Once baked, let the muffins cool in the tin for about 5 minutes. Then, transfer them to a wire rack to cool completely. To make fluffy muffins, mix gently. Overmixing can make them dense. You want to combine the wet and dry ingredients just until they blend. This keeps the air in the batter. A good oven temperature is key too. Set your oven to 375°F (190°C). This heat helps the muffins rise well and bake evenly. For best storage, let muffins cool completely. Place them in an airtight container. They stay fresh for about three days at room temperature. If you want to keep them longer, freeze them. Wrap each muffin in plastic wrap, then put them in a freezer bag. They can last up to three months in the freezer. Pair your muffins with a hot drink. Coffee or tea works great. You can also serve them warm with cream cheese frosting. For a simple touch, dust with powdered sugar. This adds a nice look and flavor. Enjoy your bakery-style muffins fresh and warm! {{image_2}} You can switch up the nuts in your muffins. Try using walnuts or almonds instead of pecans. Walnuts add a rich, earthy taste. Almonds give a nice crunch. Both options work well with pumpkin. You can also substitute chocolate chips for a sweet twist. They melt and create pockets of gooey goodness. If you're gluten-free, don't worry! Use almond flour or a gluten-free blend. These flours work great in muffins. Just remember to add a binding agent like flaxseed. This helps hold everything together. Also, keep an eye on baking time. Gluten-free muffins may need a little longer to cook. Want to make these muffins vegan? Swap out the eggs for flax eggs. Mix one tablespoon of ground flaxseed with three tablespoons of water. Let it sit for a few minutes to thicken. For dairy, use almond milk or coconut milk instead of regular milk. These dairy alternatives keep the muffins moist and tasty. To find bakery-style pumpkin pecan muffins, check local bakeries. Many bakeries create special recipes that stand out. You might find places that focus on seasonal treats. Specialty shops often have unique flavors. Local cafes may also offer fresh, warm muffins. If you prefer shopping online, many bakeries ship. Look for reputable online bakeries with good reviews. Check their shipping policies to ensure freshness. To order baked goods, consider these tips: - Read customer reviews for quality. - Check for delivery times. - Ensure they package items well to avoid damage. Making muffins at home has great benefits. You control the ingredients and can adjust flavors. Homemade muffins taste fresh and warm from the oven. Store-bought options may sit on shelves longer. This can affect flavor and quality. Plus, baking at home is fun and rewarding! To keep your muffins moist, you can: - Use more oil or butter. - Add yogurt or sour cream. - Mix in applesauce for added moisture. - Don't overbake them. Check for doneness a few minutes early. Baking time matters. If you bake them too long, they dry out fast. The perfect muffin should feel soft, but not soggy. Keep an eye on them! Yes, you can use fresh pumpkin! Here’s how: 1. Start with a small sugar pumpkin. 2. Cut it in half and scoop out the seeds. 3. Roast the halves in the oven at 350°F (175°C) for 45 minutes. 4. Once soft, scoop out the flesh and mash it until smooth. This fresh pumpkin gives a vibrant flavor, but be sure to measure it out like you would canned pumpkin. Pumpkin muffins stay fresh for about 3 to 4 days at room temperature. To store them: - Keep them in an airtight container. - Place a paper towel inside to absorb extra moisture. If you want them to last longer, freeze them! They can stay good for up to 3 months in the freezer. Absolutely! To make these muffins nut-free, try these options: - Use sunflower seeds instead of pecans. - Mix in pumpkin seeds for crunch. - Omit the nuts altogether if you prefer. This way, you can still enjoy the muffins without any nuts. They will still taste great! In this article, we explored how to make delicious pumpkin pecan muffins. We detailed the key ingredients, provided easy step-by-step instructions, and shared tips for fluffy results. You learned about variations to suit different diets, from gluten-free to vegan options. Lastly, we discussed where to find these muffins locally and online, including the benefits of baking at home. Now you have all the tools to bake your perfect batch and enjoy the flavor, warmth, and comfort these muffins bring. Happy baking!

Pumpkin Pecan Muffins Bakery Style Simple Recipe

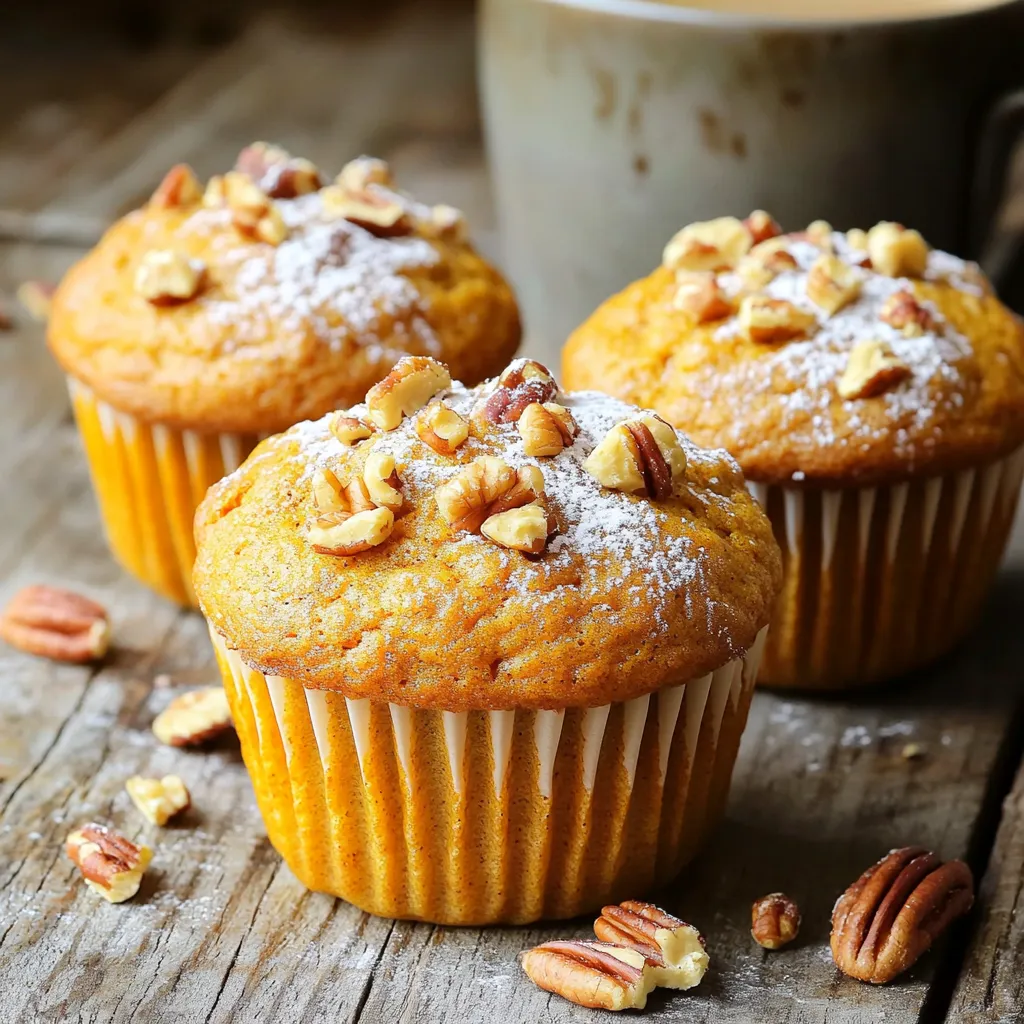
Fall brings a craving for warm, spiced treats, and these Pumpkin Pecan Muffins hit the spot! In this simple recipe,

- 4 boneless, skinless chicken breasts - 1 lb baby potatoes, halved - 1 packet ranch dressing mix - 1 cup chicken broth - 1 cup heavy cream - 1 cup green beans, trimmed - 2 tablespoons olive oil - 1 teaspoon garlic powder - Salt and pepper to taste - Fresh parsley for garnish Gathering the right ingredients sets the stage for a great meal. I always start with boneless, skinless chicken breasts. They cook evenly and stay juicy. Next, I choose baby potatoes. Halving them helps them cook faster and absorb flavors. I also grab a packet of ranch dressing mix. This adds a creamy, tangy taste. For the sauce, I need chicken broth and heavy cream. The broth adds depth, while the cream gives that rich texture. I also include some green beans. They add a nice color and crunch. For seasoning, I use olive oil to coat the potatoes. It helps them brown nicely. Garlic powder brings a warm flavor. Finally, I add salt and pepper to taste. A sprinkle of fresh parsley at the end brightens the dish and adds freshness. With these ingredients ready, you're set for a creamy, ranch-filled delight! - First, combine the ranch dressing mix, chicken broth, and heavy cream in a large bowl. Whisk them together until smooth. This mix adds a rich flavor to your dish. - Next, prepare the baby potatoes. Halve them and place them in your slow cooker. Drizzle with olive oil, then sprinkle garlic powder, salt, and pepper. Toss gently to coat each potato. - Now, layer the chicken breasts on top of the seasoned potatoes. This way, the chicken cooks in the tasty ranch mixture. - Pour the ranch mixture over the chicken and potatoes. Make sure everything is well coated. Cover the slow cooker. Cook on low for 6-7 hours or on high for 3-4 hours. Your chicken should be tender and fully cooked. - About 30 minutes before finishing, add the trimmed green beans. Stir them in gently. This adds a nice crunch to your meal. - Once cooking is done, shred the chicken using two forks. Mix everything well to combine the flavors. Taste and adjust seasoning if needed. Your creamy ranch chicken and potatoes are ready to serve! Enjoy hot and garnish with fresh parsley for a lovely touch. For the best results, set your slow cooker to low. Cooking on low for 6-7 hours makes the chicken tender and juicy. If you're short on time, you can cook on high for 3-4 hours. Tender chicken is key for this dish. Overcooked chicken can become dry and tough. Always check the chicken at the end of cooking. It should shred easily with a fork. Pair this dish with simple sides. Steamed rice or a fresh salad works great. These sides balance the creamy ranch flavors well. For garnishes, sprinkle fresh parsley on top. It adds a nice touch of color and flavor. You might also add sliced green onions for extra zing. One common mistake is overcooking the chicken. Keep an eye on the cooking time. If the chicken is dry, it won’t taste good. Another mistake is not seasoning enough. The ranch dressing mix is flavorful, but adding salt and pepper is key. Taste the dish before serving, and adjust the seasoning if needed. {{image_2}} You can change a few ingredients in this recipe to suit your taste. If you want a different protein, try using thighs or even turkey. These options cook well and stay juicy. For the potatoes, swap baby potatoes with red or yellow potatoes. Just cut them into similar sizes for even cooking. Boost the taste by adding herbs and spices. Try fresh thyme or rosemary for a nice twist. You can also add paprika or cayenne for a little kick. If you want more veggies, feel free to toss in carrots or bell peppers. They will add color and more nutrition. If you need a gluten-free meal, use a gluten-free ranch mix. This keeps the dish safe for those with gluten sensitivities. For a low-carb version, skip the potatoes and add more green beans or zucchini. This keeps the meal light while still being full of flavor. To store your creamy ranch chicken and potatoes, first let it cool down. Place the leftovers in a container that seals well. Use glass or plastic containers that are safe for the fridge. Label the container with the date. This helps you keep track of freshness. Store it in the fridge for up to three days for best flavor. When reheating, you can use a microwave or the stove. For the microwave, place a portion in a bowl and cover it with a paper towel. Heat it for one to two minutes, stirring halfway through. If using the stove, warm it in a pan over low heat. Stir often to keep it creamy. Add a splash of chicken broth or cream if it seems dry. To freeze, let the dish cool completely before packing it. Use freezer-safe containers or heavy-duty freezer bags. Remove as much air as possible to prevent freezer burn. This dish can stay fresh in the freezer for up to three months. When ready to eat, thaw it in the fridge overnight before reheating. It takes about 6 to 7 hours on low heat or 3 to 4 hours on high heat. The chicken should be fully cooked and tender. Cooking time may vary based on your slow cooker model. I suggest checking the chicken at the end of cooking. You want it to shred easily with a fork. Yes, you can use frozen chicken breasts. Just add an extra hour to the cooking time. This will ensure that the chicken cooks through safely. Using frozen chicken is a great time-saver. It’s perfect for busy days when you need a quick meal. You can serve this dish with various sides. Here are some great options: - Steamed broccoli - Mixed greens salad - Garlic bread - Rice or quinoa - Roasted carrots These sides will complement the creamy ranch flavors well. Feel free to mix and match based on what you enjoy! This blog post shared a simple and tasty recipe for Creamy Ranch Chicken and Potatoes. We covered the main ingredients like chicken, potatoes, and ranch mix. You learned how to prepare and cook the dish step-by-step. Tips helped avoid common mistakes, while variations offered options to customize flavors. In conclusion, this dish is easy to make and packed with flavor. Enjoy creating it for family meals or gatherings. Your kitchen adventure awaits!

Creamy Ranch Chicken and Potatoes Slow Cooker Delight

Looking for an easy, tasty dinner? This Creamy Ranch Chicken and Potatoes Slow Cooker Delight ticks all the boxes. Tender

- 1 cup natural peanut butter - 1/2 cup honey or maple syrup - 1 teaspoon vanilla extract - 2 cups rolled oats - 1/2 cup dark chocolate chips - 1/4 cup unsweetened cocoa powder - 1/2 teaspoon sea salt - Optional: 1/4 cup chopped nuts (such as walnuts or almonds) These ingredients come together to create a tasty cookie. Each one plays a key role. Natural peanut butter gives a rich, creamy base. Honey or maple syrup adds sweetness and binds everything. Vanilla extract brings a warm flavor. Rolled oats add texture and chewiness. Dark chocolate chips melt slightly, creating pockets of chocolate bliss. Cocoa powder gives a deep chocolate taste. Sea salt enhances all the flavors, making them pop. If you want more crunch, add chopped nuts. Walnuts or almonds work well. They give a nice contrast to the chewy oats. This mix of flavors and textures makes these cookies special. You can find these ingredients at your local store. Always choose high-quality items for the best taste. Fresh ingredients make a big difference in your cookies. Enjoy mixing these simple yet delicious ingredients! 1. Melt peanut butter mixture In a medium saucepan, add 1 cup of natural peanut butter, 1/2 cup of honey or maple syrup, and 1 teaspoon of vanilla extract. Heat this over low heat. Stir it well until it melts, which takes about 2-3 minutes. Remove it from the heat once it’s smooth. 2. Combine oat mixture Grab a large bowl and mix 2 cups of rolled oats, 1/2 cup of dark chocolate chips, 1/4 cup of cocoa powder, and 1/2 teaspoon of sea salt. Stir until all the dry ingredients blend together. 3. Mix wet and dry ingredients Pour the warm peanut butter mixture over the oat mixture. Stir this well until everything combines. If you want a crunch, fold in 1/4 cup of chopped nuts like walnuts or almonds. 4. Form cookies on baking sheet Line a baking sheet with parchment paper. Use a cookie scoop or a spoon to drop heaping tablespoons of the mix onto the sheet. Shape them into cookie mounds. 5. Refrigerate to set Flatten each mound slightly with a fork or your fingers. Then place the baking sheet in the refrigerator for at least 30 minutes. This will help the cookies set. - For each step, take clear images. This helps you see how the mixture should look. - Consider adding a video tutorial link that shows the whole process. Watching can make it easier to follow along. - Alternatives for sweeteners: If you want a different sweet taste, try agave syrup or brown sugar. Both options work well in this recipe. They add sweetness without changing the flavor much. - Nut-free options: If you need nut-free cookies, use sun butter instead of peanut butter. It gives a similar creamy texture and taste. You can also skip the nuts entirely for a simpler cookie. - Adjusting oats and cocoa ratio: You can tweak the oats and cocoa powder to get your favorite texture. If you want a chewier cookie, add more oats. For a richer chocolate taste, increase the cocoa powder. Just remember to keep the balance right. - Ensuring proper cooling time: Let the cookies chill in the fridge for at least 30 minutes. This step is key for the cookies to hold their shape. If you skip this, they may turn out too soft and crumbly. {{image_2}} You can make these cookies even more tasty. Try adding spices like cinnamon. Just a pinch gives warm flavor. It pairs well with chocolate and peanut butter. You can also switch up the chocolate types. Use milk chocolate or white chocolate chips. This changes the taste and look of the cookies. Each chocolate adds its own sweet touch. These cookies can fit many diets. If you want a vegan option, swap honey for maple syrup. This makes them sweet and still yummy. For a gluten-free version, choose gluten-free oats. This way, everyone can enjoy them. Just make sure the oats are certified gluten-free. To keep your Chocolate Peanut Butter Oatmeal Cookies fresh, use an airtight container. This helps maintain their taste and texture. A glass or plastic container with a tight seal works well. Make sure to place a piece of parchment paper between layers if stacking. Store the cookies in the refrigerator to keep them firm and tasty. These cookies last up to one week in the fridge. After that, they may lose their great taste. Look for signs of spoilage, like an off smell or a change in texture. If they feel too soft or have a strange taste, it’s time to toss them out. Enjoy these cookies fresh for the best flavor! Can I freeze no-bake cookies? Yes, you can freeze no-bake cookies. Place them in an airtight container. Layer parchment paper between cookies to prevent sticking. They will stay fresh for up to three months. Just thaw them in the fridge before enjoying. What can I use instead of peanut butter? If you need a substitute for peanut butter, try almond butter or sunflower seed butter. Both options work well and bring their unique flavors. You can also use tahini for a nut-free choice. How do I know when the cookies are set? You can tell the cookies are set when they feel firm to touch. They should not be sticky or soft. After chilling for 30 minutes, check them in the fridge. If they hold shape, they're ready to eat! No-bake cookies are simple to make with just a few ingredients. We covered natural peanut butter, oats, and dark chocolate chips. You now know how to combine and shape the cookies, plus tips for texture and storage. For a personal touch, try different flavors or dietary options. Enjoy your cookies fresh or stored, and remember to check for spoilage. No-bake cookies are easy and fun to create, making them a great treat anytime.

Chocolate Peanut Butter Oatmeal Cookies No Bake Delight

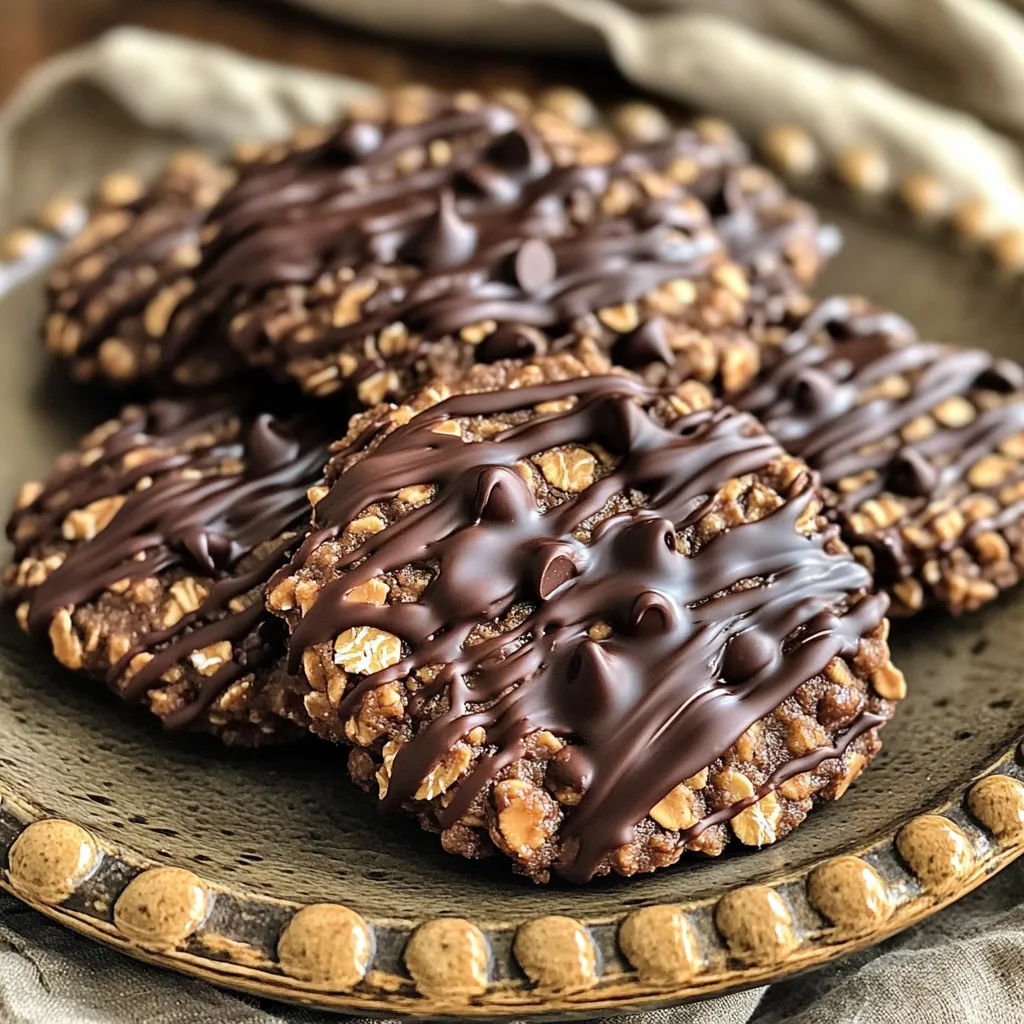
Are you ready to whip up something sweet, easy, and satisfying? My Chocolate Peanut Butter Oatmeal Cookies No Bake Delight

Older posts
Newer posts
← Previous Page1 … Page13 Page14 Page15 … Page84 Next →

dsad

© 2026 Lisa Dishes • Built with GeneratePress

Our Policies

  • Copyright Policy
  • Cookie Policy
  • GDPR Policy
  • Privacy Policy
  • Disclaimer
  • Terms Of Use

More Information

  • Home
  • About
  • Contact
  • Appetizers
  • Dessert
  • Dinner
  • Drinks
©2026, Lisa Dishes About Back To Top