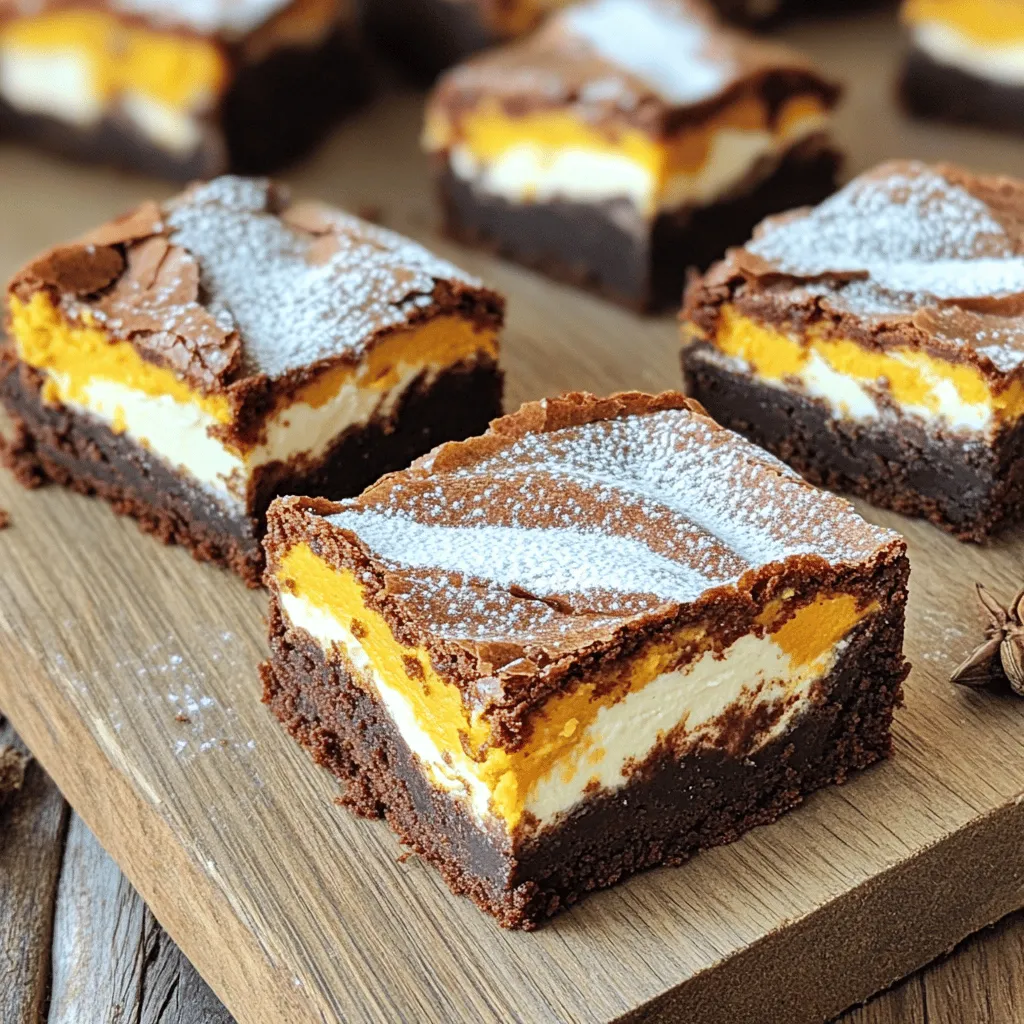
Are you ready to treat yourself? These Pumpkin Cream Cheese Brownies are rich, fudgy, and simply irresistible. With the warmth of pumpkin spice and a creamy layer of cheesecake, each bite is a perfect fall delight. Plus, they’re easy to make! Follow along to discover the ingredients you’ll need, step-by-step instructions, and tips for perfect brownies every time. Let’s dive into the fall flavors you crave!
Ingredients
To make these tasty Pumpkin Cream Cheese Brownies, you’ll need a few key ingredients. Here’s what you should gather before starting:
– 1 cup canned pumpkin puree
– 1/2 cup granulated sugar
– 1/2 cup brown sugar, packed
– 1/2 cup vegetable oil
– 2 large eggs
– 1 teaspoon vanilla extract
– 1 cup all-purpose flour
– 1/2 cup unsweetened cocoa powder
– 1 teaspoon baking powder
– 1/2 teaspoon baking soda
– 1/2 teaspoon salt
– 1 teaspoon ground cinnamon
– 1/2 teaspoon ground nutmeg
– 1/4 teaspoon ground ginger
– 4 oz cream cheese, softened
– 1/4 cup powdered sugar
Each ingredient has its own role in creating the perfect balance of flavors. The pumpkin puree gives moisture and a slight earthiness. The sugars add sweetness and help achieve the right texture. Vegetable oil keeps the brownies soft and fudgy. The eggs bind everything together.
Cocoa powder provides rich chocolate flavor. The spices—cinnamon, nutmeg, and ginger—bring warmth and depth. The cream cheese adds a creamy swirl that makes each bite special.
Make sure to gather all your ingredients before you start. This makes the process smooth and fun!
Step-by-Step Instructions
Preheat and Prepare the Pan
First, preheat your oven to 350°F (175°C). This step ensures your brownies bake evenly. Next, take a 9×9-inch baking pan. You can grease it or line it with parchment paper. Using parchment paper helps the brownies come out easily after baking.
Mixing Wet Ingredients
In a medium bowl, combine the pumpkin puree, granulated sugar, brown sugar, vegetable oil, eggs, and vanilla extract. Whisk these ingredients together until they blend well. Make sure there are no lumps. This mixture gives your brownies a rich and moist texture.
Mixing Dry Ingredients
In a separate bowl, sift together the all-purpose flour, cocoa powder, baking powder, baking soda, salt, cinnamon, nutmeg, and ginger. Sifting helps remove clumps and mixes the dry ingredients evenly. This step also adds air, making your brownies light and fluffy.
Combining Mixtures
Gradually add the dry ingredients into the wet mixture. Stir gently until just combined. You want to see no flour streaks. Be careful not to overmix, as that can make your brownies tough.
Cream Cheese Mixture
In a small bowl, beat the softened cream cheese with powdered sugar. Mix until it is smooth and creamy. This mixture adds a lovely tang to the brownies, balancing the sweetness from the sugar.
Layering and Baking
Pour half of the brownie batter into the prepared pan and spread it evenly. Next, drop spoonfuls of the cream cheese mixture over the brownie base. Pour the rest of the brownie batter on top, spreading it gently.
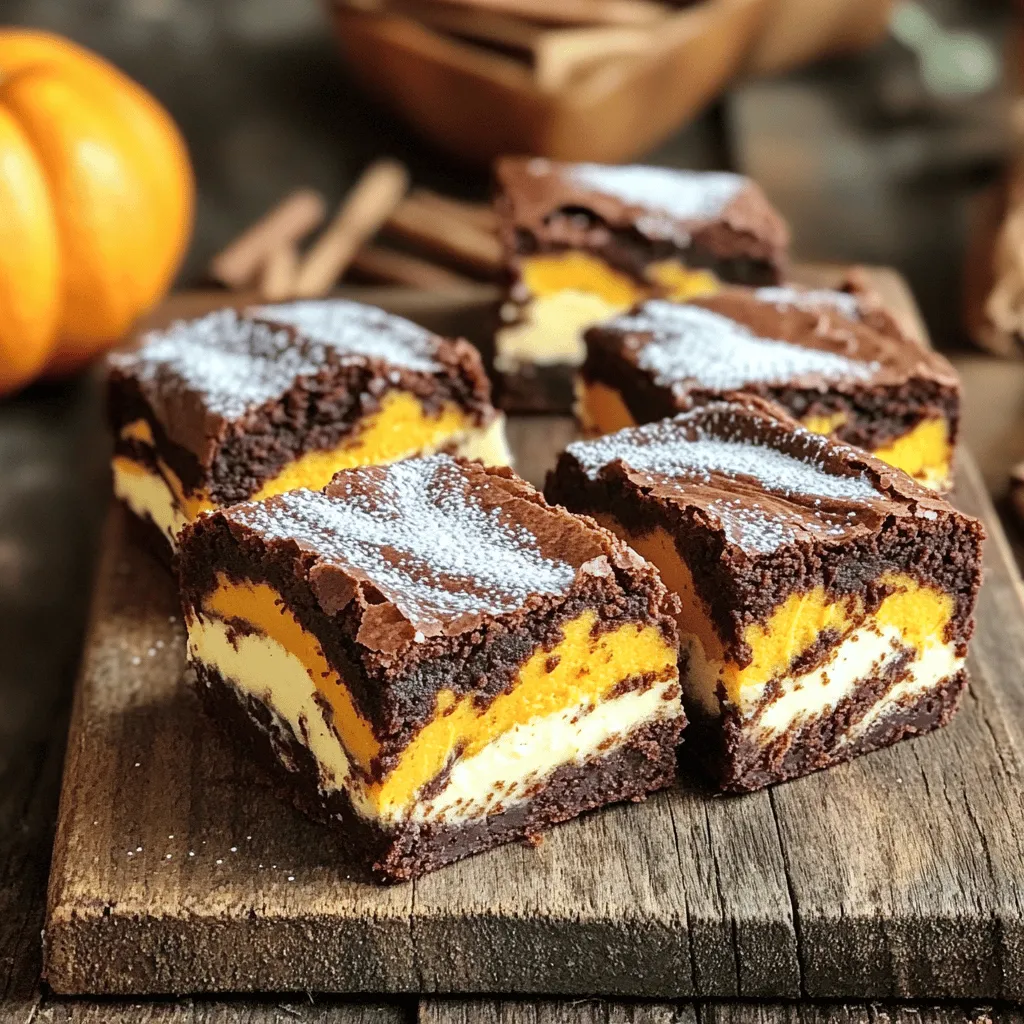
Now, take a knife or skewer and swirl the cream cheese into the brownie batter. This creates a beautiful marbled effect. Bake the brownies in the oven for 25 to 30 minutes. To check for doneness, insert a toothpick into the center. It should come out with a few moist crumbs, not wet batter. Once done, let them cool in the pan on a wire rack before cutting into squares.
Tips & Tricks
Perfecting the Brownies
To get the best texture, avoid overmixing the batter. When you mix the dry and wet ingredients, stir just until you see no more flour. This keeps your brownies fudgy and moist.
To bake evenly, use an oven thermometer. Ovens can be off by a few degrees. Preheat to 350°F (175°C) and place the pan in the center. This helps the brownies cook evenly.
Presentation Ideas
When it comes to serving, dust the top with powdered sugar. This gives a nice, sweet touch that looks great. You can also sprinkle cinnamon for extra flavor.
For a special treat, add a dollop of whipped cream on top. It makes the brownies feel fancy and adds creaminess.
Common Mistakes to Avoid
One big mistake is not checking the brownies while baking. Avoid burning them by setting a timer for 25 minutes. Use a toothpick to test doneness. If it comes out with a few moist crumbs, they are ready.
Another mistake is undercooking. If you see wet batter on the toothpick, bake for a few more minutes. Always cool the brownies in the pan before cutting. This helps them set properly.
Variations
Gluten-Free Pumpkin Cream Cheese Brownies
To make these brownies gluten-free, swap all-purpose flour for a gluten-free blend. Look for blends that include xanthan gum. This will help your brownies stay tender. You can also check labels to ensure other ingredients are gluten-free.
Vegan Version
For a vegan twist, replace eggs with flaxseed meal. Mix 1 tablespoon of flaxseed with 2.5 tablespoons of water. Let it sit for a few minutes to thicken. For cream cheese, use a plant-based option made from nuts or tofu. This keeps your brownies creamy and delicious without animal products.
Flavor Variations
Want to change things up? Add chocolate chips or nuts to the batter. I love using dark chocolate chips for a rich taste. Chopped walnuts or pecans add a nice crunch too. These extras bring new flavors and textures to your brownies, making them even more delightful.
Storage Info
Best Storage Practices
To keep your brownies fresh, store them in an airtight container. Line the container with parchment paper for easy removal. This helps keep the brownies moist and prevents them from getting hard. Place a piece of bread in the container too. The bread helps maintain moisture. Ensure the brownies cool completely before storing to avoid sogginess.
Freezing Instructions
To freeze brownies, first cut them into squares. Wrap each square tightly in plastic wrap. Then, place the wrapped brownies in a freezer-safe bag. Push out as much air as you can before sealing. Label the bag with the date. When you want to enjoy them, take out a square and let it thaw at room temperature for about 30 minutes. For a warm treat, you can heat it in the microwave for a few seconds.
Shelf Life
Brownies can stay fresh at room temperature for up to 3 days. If you store them in the fridge, they can last about a week. Just remember, the colder they get, the firmer they may become. So, warming them slightly before eating can bring back their soft, fudgy texture.
FAQs
Can I make these brownies ahead of time?
Yes, you can make these brownies ahead of time. Bake them and let them cool completely. Then, wrap them tightly in plastic wrap or foil. Store them in the fridge for up to a week. For longer storage, freeze them in an airtight container. Just remember to thaw them in the fridge before serving. This way, you can enjoy these tasty treats whenever you want!
What can I use if I don’t have canned pumpkin?
If you don’t have canned pumpkin, you can use fresh pumpkin. Cook and puree it until smooth. Another option is butternut squash puree, which works well, too. Both will give you that great pumpkin flavor. You can also try sweet potato puree, but it will change the taste slightly. Just make sure your substitute is smooth and not watery.
How do I know when the brownies are done?
To check if the brownies are done, insert a toothpick into the center. If it comes out with a few moist crumbs, they are ready. If you see wet batter, bake for a few more minutes. Keep an eye on them; overbaking will make them dry. The edges should look set, while the center may be slightly soft.
Can I adjust the sweetness of the brownies?
Yes, you can adjust the sweetness! If you want them less sweet, reduce the granulated and brown sugar by a quarter cup. If you prefer them sweeter, add an extra couple of tablespoons of sugar. Taste the batter before baking to find your perfect balance. Just remember that sweetness will change the final flavor a bit.
These pumpkin cream cheese brownies are a treat anyone can enjoy. We started with easy-to-find ingredients, mixed them well, and added tips to ensure perfect results. I shared ways to store your brownies and variations to suit different diets. Remember, you can adjust sweetness and even freeze leftovers. Enjoy these treats fresh or save for later!