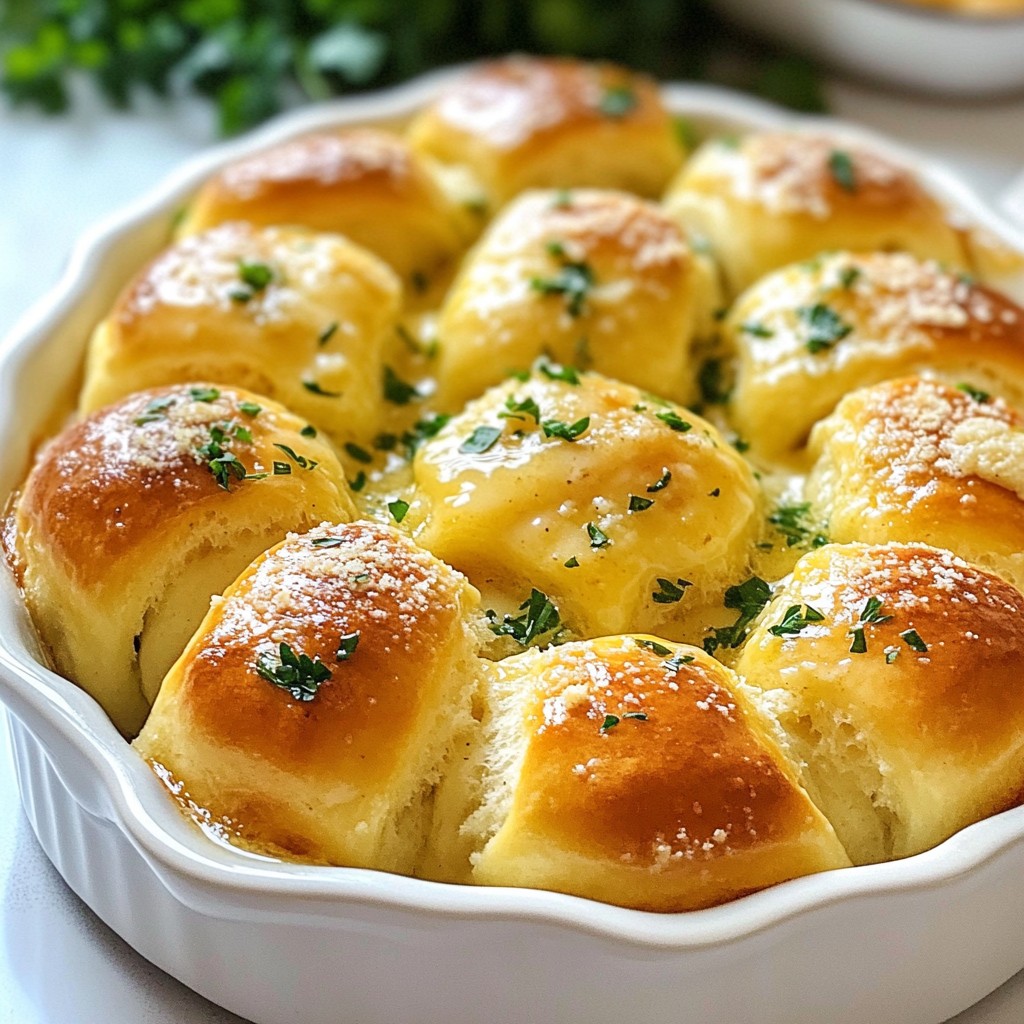
Are you ready to elevate your dinner table? Garlic Parmesan Pull Apart Rolls are not just delicious; they’re easy to make! In this post, I’ll guide you step-by-step through the process. You’ll find helpful tips, ingredient ideas, and even ways to store your tasty rolls. Whether you're baking for family or friends, these rolls will impress everyone. Let's get started with this flavorful recipe!
Why I Love This Recipe
- Irresistible Flavor: The combination of garlic and Parmesan creates a mouthwatering aroma that fills the kitchen and makes these rolls hard to resist.
- Easy to Make: With simple ingredients and straightforward steps, even beginner bakers can create these delightful rolls with confidence.
- Perfect for Sharing: These pull-apart rolls are great for gatherings or family dinners, making it easy for everyone to enjoy them together.
- Customizable: You can easily adjust the fillings or add your favorite herbs and cheeses to make these rolls uniquely yours.
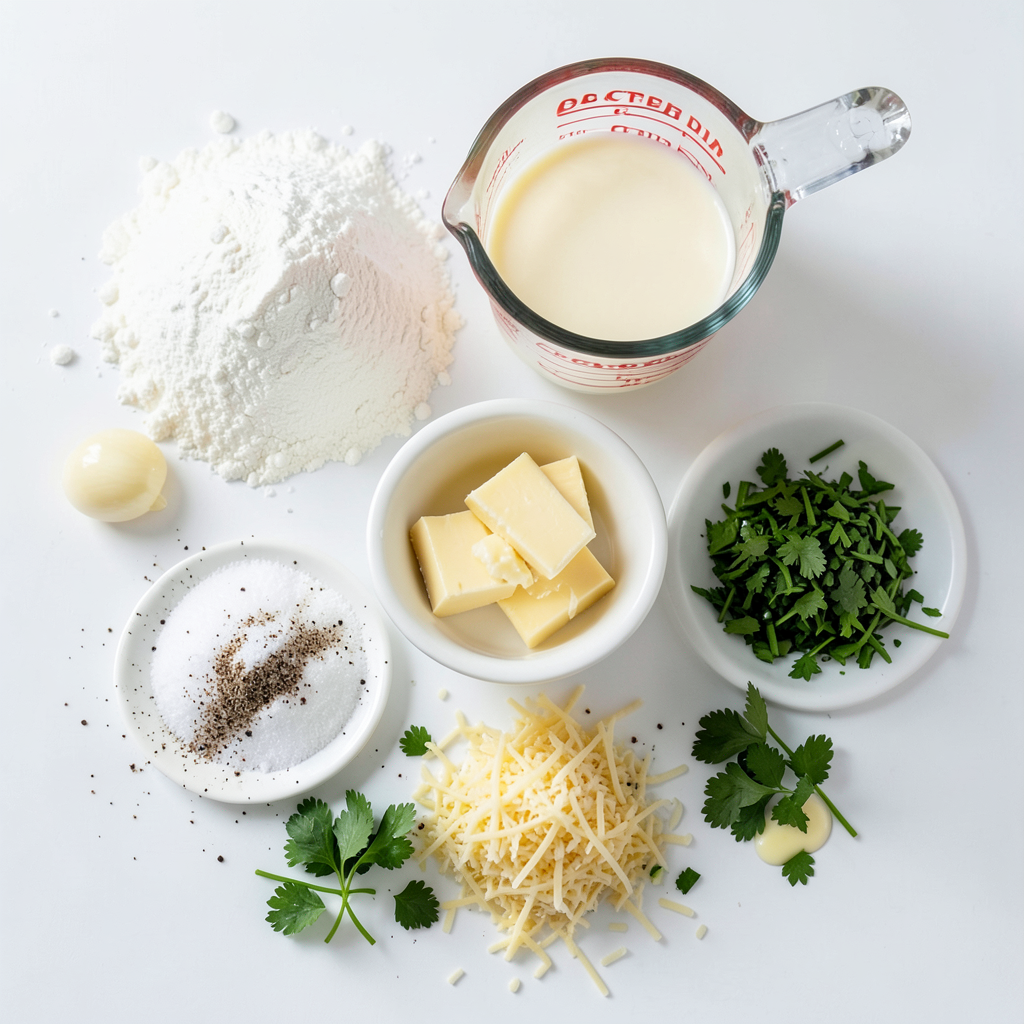
Ingredients
To make Garlic Parmesan Pull Apart Rolls, you need the following ingredients:
- 3 cups all-purpose flour
- 1 packet (2 1/4 teaspoons) active dry yeast
- 1 teaspoon sugar
- 1 teaspoon salt
- 1 cup warm milk (110°F)
- 2 tablespoons unsalted butter, melted
- 4 tablespoons garlic, minced
- 1/2 cup grated Parmesan cheese
- 1 tablespoon fresh parsley, chopped
- 1/4 teaspoon black pepper
- Extra melted butter for brushing
These ingredients work together to create soft, flavorful rolls. The all-purpose flour forms the base. Yeast helps the rolls rise, while sugar and warm milk feed the yeast, making it frothy. Salt adds flavor and helps with the dough structure.
Melted butter gives the rolls a rich taste. Garlic, Parmesan cheese, parsley, and black pepper bring a burst of flavor. The extra melted butter at the end adds a nice shine and richness. This mix of ingredients results in rolls that are cheesy, garlicky, and just irresistible.
Step-by-Step Instructions
Preparation Steps
Activating the yeast Start with warm milk. It should be around 110°F. Mix in sugar and yeast. Let it sit for 5 to 10 minutes. You want it frothy, which shows the yeast is alive.
Mixing the dough In a large bowl, whisk together flour and salt. Make a well in the middle. Pour in the yeast mix and melted butter. Stir it until a dough forms.
Kneading Move the dough to a floured surface. Knead for about 5 minutes. You want the dough to be smooth and elastic.
First rise Place the dough in a greased bowl. Cover it with a cloth. Let it rise in a warm place for about 1 hour. It should double in size.
Filling and Shaping Rolls
Dividing the dough Once the dough has risen, punch it down. Divide it into 12 equal pieces. This helps ensure even rolls.
Adding filling ingredients Flatten each piece into a small disc. In the center, sprinkle garlic, Parmesan cheese, parsley, and black pepper. You can adjust these amounts to your taste.
Shaping the rolls Fold the dough around the filling. Make sure to seal each roll tightly. This keeps the delicious filling inside.
Final Preparation and Baking
Second rise Place the filled rolls in a greased round baking dish. Arrange them so they touch. Cover with a cloth and let them rise for another 30 minutes.
Preheating the oven While the rolls rise, preheat your oven to 375°F. This ensures even baking.
Baking Brush the tops of the rolls with extra melted butter. Bake for about 20 to 25 minutes. They should be golden brown and sound hollow when tapped. Enjoy the aroma that fills your kitchen!
Tips & Tricks
Perfecting the Rolls
For the best Garlic Parmesan Pull Apart Rolls, you need to pay attention to yeast. The ideal temperature for activating yeast is 110°F. This warm milk wakes the yeast and helps it grow. If the milk is too hot, it can kill the yeast. If too cool, it won't activate.
Kneading the dough is key to a soft roll. I knead it for about five minutes. You want it smooth and elastic. If the dough feels sticky, add a little flour. If it seems dry, add a bit of milk.
Watch for signs of proper rising. After the first rise, the dough should double in size. This usually takes about an hour in a warm spot. When you punch it down, it should feel light and airy.
Flavor Enhancements
To enhance the flavor, you can add herbs like oregano or thyme. These give your rolls a unique touch. You can also mix in some crushed red pepper for heat.
For cheese options, try using mozzarella for a gooey center. Mixing different cheeses can also add depth.
When serving, brush the tops with garlic butter. This adds a shiny finish and extra flavor. Pair these rolls with marinara sauce for dipping. It makes for a delightful combo that everyone will love.
Pro Tips
- Use Fresh Ingredients: Always opt for fresh garlic and quality Parmesan cheese for the best flavor in your rolls.
- Perfect Rising Conditions: Make sure your dough rises in a warm, draft-free environment to ensure it doubles in size effectively.
- Adjust Baking Time: Keep an eye on the rolls as ovens can vary; look for a golden-brown color and a hollow sound when tapped.
- Experiment with Fillings: Feel free to add other herbs or cheeses to the filling for a unique twist on the classic recipe.
Variations
Alternative Ingredients
You can make Garlic Parmesan Pull Apart Rolls with different diets in mind. For gluten-free rolls, use a gluten-free flour blend. Look for one that works well in baking. This option keeps the taste delightful while meeting gluten-free needs.
For a dairy-free version, swap the unsalted butter with a plant-based butter. Use nutritional yeast in place of Parmesan cheese. This keeps the rolls tasty without dairy.
Flavor and Filling Variations
You can change up the cheese for fun new flavors. Try a blend of mozzarella and cheddar for a melty twist. Feta adds a tangy taste, while gouda offers a smoky flavor.
Want to add more fillings? Try adding sautéed spinach or crispy bacon bits. These add-ins will give your rolls a savory kick. You can mix and match these ideas to create your perfect pull-apart rolls.
Storage Info
Storing Leftovers
To keep your Garlic Parmesan Pull Apart Rolls fresh, store them in an airtight container. This helps lock in moisture and flavor. Place a paper towel inside to absorb any excess moisture. You can keep them at room temperature for up to two days.
To reheat the rolls, preheat your oven to 350°F (175°C). Place the rolls on a baking sheet and cover them with aluminum foil. Heat for about 10 minutes until warm. You can also use a microwave. Just warm them for 15-20 seconds.
Freezing Options
You can freeze these rolls before or after baking. If you freeze them before baking, shape the rolls and place them in a greased dish. Cover the dish with plastic wrap and freeze. When ready to bake, let them thaw in the fridge overnight. Then, let them rise for 30 minutes before baking.
If you freeze after baking, let the rolls cool completely. Then, wrap them tightly in plastic wrap and place them in a freezer bag. They can stay good for up to three months.
To defrost, take them out of the freezer and let them sit at room temperature for a few hours. Reheat in the oven, just like with leftovers. Enjoy the taste of fresh rolls anytime!
FAQs
Common Questions About Garlic Parmesan Pull Apart Rolls
Can I use instant yeast instead of active dry yeast? Yes, you can use instant yeast in place of active dry yeast. Instant yeast does not need to be activated. Just mix it with your dry ingredients. This saves time and makes the process easier.
How do I know when the rolls are done baking? You will know the rolls are done when they are golden brown and sound hollow when tapped. This means the dough cooked through. A good tip is to check them around 20 minutes into baking.
Can I make the dough the night before? Yes, you can make the dough the night before. After kneading, place it in the fridge instead of letting it rise. In the morning, let it warm up before shaping into rolls. This helps the dough rise well and saves you time.
You learned about making Garlic Parmesan Pull Apart Rolls, from ingredients to baking. We covered critical steps like yeast activation and shaping the rolls. I shared tips for perfecting texture and flavor. You can try variations to suit your taste, including gluten-free or dairy-free options. Remember to store leftovers properly for later enjoyment. Now, embrace your baking skills and enjoy delicious rolls with family and friends. Happy baking!