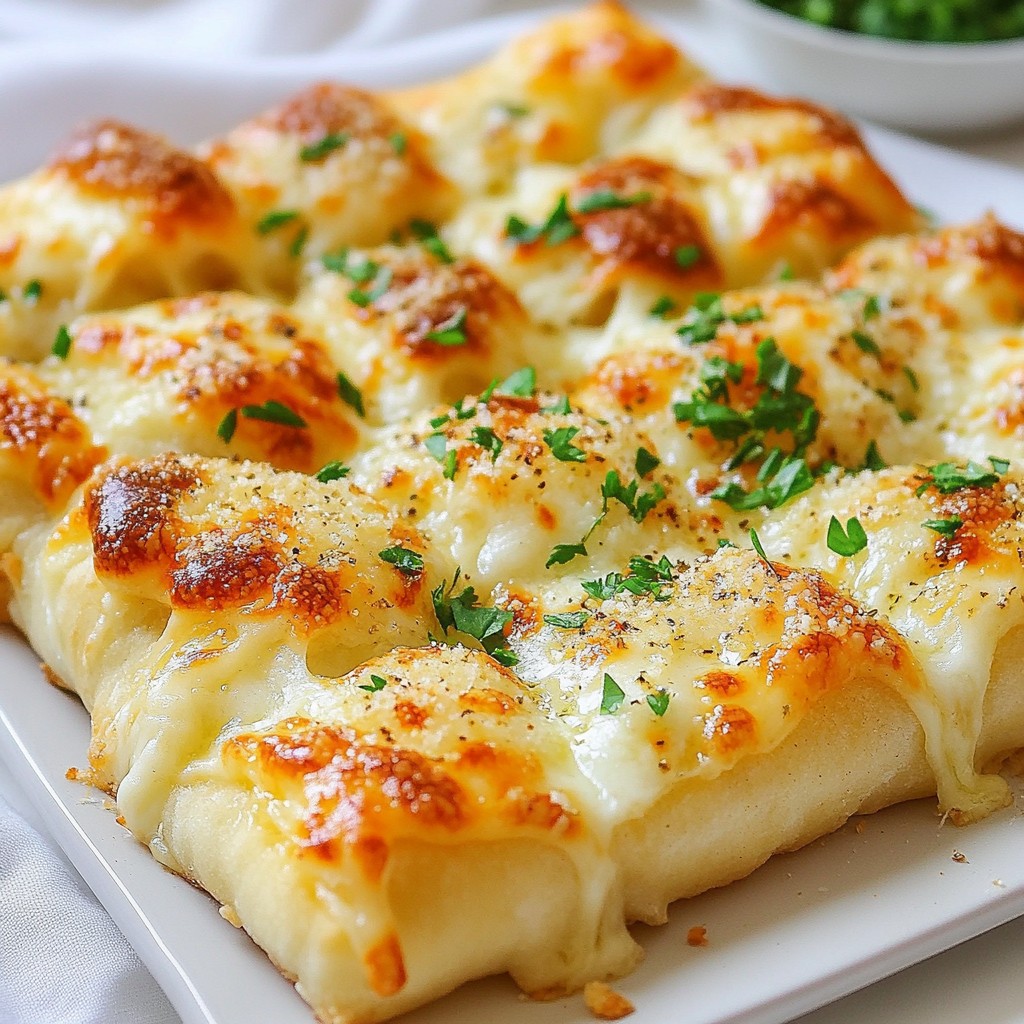
Are you craving a quick and tasty treat? Look no further! In this post, I’ll guide you step-by-step to make delicious Cheesy Garlic Breadsticks from scratch. With easy ingredients and simple instructions, you’ll have warm, cheesy goodness ready in no time. Whether you're cooking for family or hosting friends, these breadsticks are a must-try. Let’s dive into the cheesy bliss of homemade garlic breadsticks!
Why I Love This Recipe
- Cheesy Goodness: These breadsticks are loaded with gooey mozzarella and savory Parmesan, making every bite a cheesy delight.
- Easy to Make: The dough comes together quickly, and with just a few steps, you can have fresh breadsticks ready in no time.
- Perfect for Sharing: Cut into strips, these breadsticks are ideal for parties, game nights, or family dinners where everyone can enjoy them together.
- Customizable: You can easily add your favorite herbs and spices to the dough or top them with different cheeses for a unique twist.
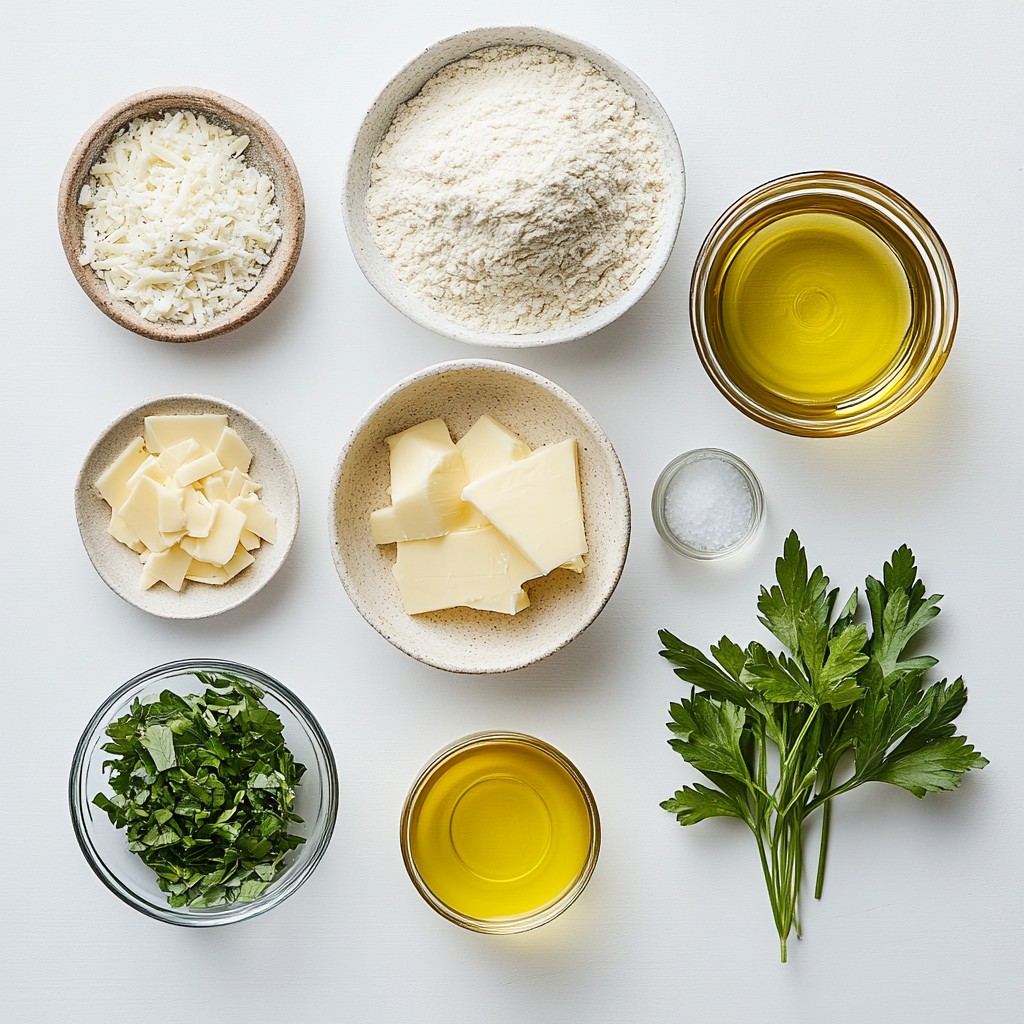
Ingredients
Main Ingredients
- 2 cups all-purpose flour
- 1 teaspoon instant yeast
- 1 teaspoon garlic powder
- 1 teaspoon salt
- 1 tablespoon olive oil
- 3/4 cup warm water (about 110°F)
- 1 cup shredded mozzarella cheese
- 1/2 cup grated Parmesan cheese
The base of these cheesy garlic breadsticks starts with all-purpose flour. This gives the bread its soft and chewy texture. Instant yeast helps the dough rise quickly, while garlic powder adds that rich garlic flavor we all love. Salt enhances the taste and balances the flavors.
You will also need olive oil to keep the dough moist and tasty. Warm water activates the yeast, creating a light dough.
For the cheesy goodness, I use mozzarella for its melting quality and Parmesan for a sharp bite. These two cheeses work together to create a flavor explosion!
Optional Ingredients
- 2 tablespoons fresh parsley, chopped
- 2 tablespoons unsalted butter, melted
Adding fresh parsley gives the breadsticks a pop of color and freshness. You can also use other spices if you like.
Variations for Dietary Restrictions
If you want a gluten-free option, try using a gluten-free flour blend. For a vegan twist, swap the cheeses for dairy-free cheese and use plant-based butter. These changes ensure everyone can enjoy these tasty breadsticks.
Step-by-Step Instructions
Preparing the Dough
Start by mixing the dry ingredients. In a large bowl, combine 2 cups of all-purpose flour, 1 teaspoon of instant yeast, 1 teaspoon of garlic powder, and 1 teaspoon of salt. Stir them together until they are mixed well.
Next, create a well in the center of your mix. Pour in 1 tablespoon of olive oil and 3/4 cup of warm water. Make sure the water is about 110°F. Mix until the dough starts to form.
Kneading and Rising
Now, let's knead the dough. Place it on a lightly floured surface. Knead the dough for about 5 minutes. You want it to feel smooth and elastic. This helps develop a nice texture.
Once you knead the dough, it’s time for it to rise. Place it in a greased bowl and cover it with a kitchen towel. Find a warm spot in your home. Let it rise for about 30-40 minutes, or until it doubles in size. This step is key for fluffy breadsticks.
Shaping and Baking
After the dough has risen, punch it down gently. Roll it out into a rectangle that is about 1/2 inch thick. Try to keep the shape even.
Next, transfer the dough to a lined baking sheet. Cut it into strips that are about 1 inch wide. This makes the perfect size for breadsticks.
Before baking, brush the top with melted butter. Then, sprinkle 1 cup of shredded mozzarella cheese and 1/2 cup of grated Parmesan cheese evenly on top. For extra flavor, add some chopped parsley and a sprinkle of garlic powder.
Now, preheat your oven to 425°F (220°C). Bake the breadsticks for about 12-15 minutes. Look for bubbly cheese and golden edges. Let them cool slightly before you serve. Enjoy your cheesy garlic breadsticks!
Tips & Tricks
Ingredient Substitutions
- Best cheese alternatives: If you want a twist, try cheddar or gouda. Both melt well and add rich flavors. If you need a dairy-free option, use cashew cheese or vegan mozzarella.
- Oil types for different flavors: Olive oil gives a nice taste. For a nutty flavor, use sesame oil. You can also use garlic-infused oil for an extra kick.
Cooking Techniques
- How to achieve that perfect golden crust: A hot oven is key. Preheat to 425°F (220°C). Brush melted butter on top before baking. This adds shine and helps with browning.
- Tips on cheese melting: Use freshly shredded cheese. It melts better than pre-packaged cheese. For a stringy result, mix mozzarella with a bit of provolone.
Serving Suggestions
- Ideal dips and pairings: Marinara sauce pairs well. Garlic butter is another great choice. For a zesty touch, try ranch dressing or a spicy aioli.
- Serving temperature guidelines: Serve warm for the best taste. Let them cool for a few minutes after baking. This keeps the cheese from burning your mouth.
Pro Tips
- Use Fresh Ingredients: Always opt for fresh garlic and parsley to enhance the flavor of your breadsticks.
- Monitor Baking Time: Keep an eye on your breadsticks during the last few minutes of baking to prevent over-browning.
- Experiment with Cheeses: Feel free to mix different types of cheese like cheddar or gouda for a unique flavor profile.
- Serve Warm: These breadsticks are best enjoyed warm, so serve them right out of the oven for optimal taste.
Variations
Gluten-Free Options
For a gluten-free version of cheesy garlic breadsticks, I recommend using gluten-free all-purpose flour. This flour often contains a blend of rice flour, potato starch, and tapioca flour. You may need to add a binding agent like xanthan gum to help the dough hold together. The taste may differ slightly, so consider adding a little extra garlic powder or herbs to boost flavor.
Vegan Cheesy Garlic Breadsticks
If you prefer a vegan option, substitute regular cheese with dairy-free cheese. Brands like Daiya or Violife offer tasty alternatives. For butter, use coconut oil or a plant-based spread. These swaps will give you a similar taste without any animal products.
Flavor Enhancements
To make your breadsticks even tastier, try adding fresh herbs like rosemary or thyme. A pinch of chili flakes can give them a nice kick. You can also experiment with sweet variations. Adding cinnamon and sugar can transform your breadsticks into a dessert treat. Just brush them with melted butter and sprinkle the mix on top before baking.
Storage Info
Storing Leftovers
To keep your cheesy garlic breadsticks fresh, store them in an airtight container. This will prevent them from drying out. Place a paper towel at the bottom of the container to absorb moisture. You can also wrap them in plastic wrap for extra protection.
Cheesy breadsticks can last in the fridge for about 3 to 4 days. After that, they may lose their great taste and texture. If you want to keep them longer, consider freezing them.
Reheating Tips
To reheat your breadsticks, the oven is the best choice. Preheat your oven to 350°F (175°C). Place the breadsticks on a baking sheet. Heat for about 10 to 15 minutes. This method helps keep them crunchy on the outside and soft on the inside.
If you're in a hurry, you can use the microwave. However, this may make them a bit soggy. To avoid this, heat them for just 15 to 30 seconds. If you can, cover them with a damp paper towel. This keeps the cheese gooey and tasty while reheating.
FAQs
How do I make cheesy garlic breadsticks from scratch?
To make cheesy garlic breadsticks, follow these steps:
1. Mix Dry Ingredients: In a large bowl, combine 2 cups of all-purpose flour, 1 teaspoon of instant yeast, 1 teaspoon of garlic powder, and 1 teaspoon of salt.
2. Add Wet Ingredients: Make a well in the mix. Pour in 1 tablespoon of olive oil and 3/4 cup of warm water. Stir until a dough forms.
3. Knead the Dough: Knead the dough on a floured surface for about 5 minutes. It should feel smooth and elastic.
4. Let It Rise: Place the dough in a greased bowl. Cover it and let it rise in a warm spot for 30-40 minutes, until it doubles in size.
5. Preheat the Oven: While the dough rises, preheat your oven to 425°F (220°C) and prepare a baking sheet with parchment paper.
6. Shape the Dough: Once risen, punch down the dough and roll it out into a rectangle, about 1/2 inch thick.
7. Cut the Breadsticks: Place the dough on the baking sheet and cut it into strips, about 1 inch wide.
8. Add Cheese and Butter: Brush melted butter over the top. Sprinkle 1 cup of shredded mozzarella and 1/2 cup of grated Parmesan cheese on top.
9. Garnish: Add 2 tablespoons of freshly chopped parsley and a sprinkle of garlic powder.
10. Bake: Bake for 12-15 minutes until the cheese bubbles and the edges turn golden.
11. Serve: Let them cool slightly before enjoying.
What can I serve with cheesy garlic breadsticks?
Cheesy garlic breadsticks pair well with many dishes. Here are some popular options:
- Marinara Sauce: A classic dip with rich tomato flavor.
- Pizza: Serve alongside your favorite pizza for a fun meal.
- Salad: A fresh green salad adds balance to the meal.
- Soup: Great with hearty soups like tomato or minestrone.
- Pasta: Enjoy them with pasta dishes for extra flavor.
Can I freeze cheesy garlic breadsticks?
Yes, you can freeze cheesy garlic breadsticks! Here’s how to do it:
1. Cool Completely: Let the baked breadsticks cool down to room temperature.
2. Wrap Them: Wrap each breadstick in plastic wrap tightly. This helps keep them fresh.
3. Store in a Bag: Place the wrapped breadsticks in a freezer bag. Squeeze out as much air as you can.
4. Freeze: Label the bag with the date and store it in the freezer for up to 3 months.
5. Reheat: To use, thaw in the fridge overnight, then reheat in the oven at 350°F (175°C) for about 10 minutes. Enjoy!
In this blog post, I shared how to make cheesy garlic breadsticks. We covered key ingredients, step-by-step instructions, and tips for the best results. Don't forget the options for gluten-free and vegan diets.
These breadsticks are easy to make and tasty. With the right techniques, you can impress anyone. Now, go ahead and try making them yourself. Enjoy the deliciousness that comes from your own kitchen!