Skip to content
DisclaimerTerms Of UseGDPR PolicyCookie Policy

Lisa Dishes

  • Home
  • Drinks
  • Appetizers
  • Dinner
  • Dessert
  • About
  • Contact
  • Privacy Policy
DisclaimerTerms Of UseGDPR PolicyCookie Policy

lisa

To make Honey Garlic Shrimp and Broccoli, gather these simple items: - 1 lb large shrimp, peeled and deveined - 2 cups fresh broccoli florets - 1/4 cup honey - 3 tablespoons soy sauce (low sodium recommended) - 3 cloves garlic, minced - 1 teaspoon fresh ginger, grated - 2 tablespoons vegetable oil - 1 teaspoon sesame oil - 1 tablespoon cornstarch - 2 tablespoons water - Salt and pepper to taste - Sesame seeds for garnish - Green onions, chopped for garnish You can swap some ingredients for variety or preference: - Shrimp: Use chicken or firm tofu if you desire. - Broccoli: Try snap peas or bell peppers for a colorful twist. - Honey: Maple syrup or agave can be good alternatives. - Soy sauce: Coconut aminos work for a gluten-free option. - Cornstarch: Arrowroot powder can replace it for thickening. Each serving of this dish offers a balanced meal. Here’s what you can expect: - Calories: Approximately 250 - Protein: 20g - Carbohydrates: 30g - Fat: 8g - Fiber: 3g This recipe is not only tasty but also packed with nutrients. Enjoy the mix of flavors and health benefits! For the complete recipe, check out the [Full Recipe]. First, you need to prepare the marinade. In a mixing bowl, combine: - 1/4 cup honey - 3 tablespoons soy sauce - 3 cloves garlic, minced - 1 teaspoon fresh ginger, grated - Salt and pepper to taste Whisk these ingredients together until they mix well. Next, add 1 pound of peeled and deveined shrimp to the bowl. Make sure each shrimp gets coated in the marinade. Let the shrimp sit for at least 15 minutes. This helps them soak up all the flavors. Now, heat 1 tablespoon of vegetable oil in a large skillet over medium-high heat. When the oil is hot, add the marinated shrimp, but save the marinade for later. Cook the shrimp for about 3-4 minutes. They will turn pink and opaque when they are done. Once cooked, remove the shrimp from the pan and set them aside. In the same skillet, add another tablespoon of vegetable oil. Toss in 2 cups of fresh broccoli florets. Stir-fry the broccoli for 3-5 minutes. You want it bright green and still crisp. Next, pour in the reserved marinade and bring it to a simmer. In a small bowl, mix 1 tablespoon of cornstarch with 2 tablespoons of water to make a slurry. Add this slurry to the simmering sauce, stirring until it thickens. Return the cooked shrimp to the skillet. Gently mix everything together and heat for another 1-2 minutes. Drizzle 1 teaspoon of sesame oil over the dish just before serving. For a great presentation, serve the shrimp and broccoli over steamed jasmine rice or quinoa. Garnish with sesame seeds and chopped green onions. This adds freshness and a pop of color. For the full recipe, check out the detailed instructions above. Enjoy your meal! To get that perfect sauce, you need the right balance. Start with your honey and soy sauce mix. Whisk them well until they blend smoothly. After you add the cornstarch slurry, keep stirring. This helps the sauce thicken evenly. Cook it on low heat for a minute. If it’s too thick, add a little water. If it’s too thin, let it simmer longer. Cooking shrimp is easy when you know a few tricks. Always use fresh shrimp that are pink and firm. They cook quickly, so watch them closely. When they turn pink and opaque, they are done. Avoid overcooking, as this makes them tough. If you use frozen shrimp, thaw them first. Pat them dry to remove extra moisture before cooking. You can boost flavor without adding calories. Fresh herbs like cilantro or basil add brightness. A squeeze of lime juice at the end enhances the taste too. Use a bit of chili paste for heat without calories. You can also add mushrooms or bell peppers to the mix for more texture and flavor. These tricks keep your dish delicious and light. For the full recipe, check out the Honey Garlic Shrimp & Broccoli Delight. {{image_2}} You can switch shrimp for other proteins. Chicken breast works well here. Just chop it into bite-sized pieces. Cook it until it's no longer pink. Tofu is a great choice for a vegetarian option. Use firm tofu and cube it. Sauté it until golden brown for added flavor. Both options pair nicely with the honey garlic sauce. Feel free to mix up the veggies. Bell peppers, snap peas, or carrots add great color and taste. You can even use frozen mixed vegetables for convenience. Just remember to adjust cooking times based on what you choose. The key is to keep the veggies crisp and vibrant. You can easily make this dish gluten-free. Swap regular soy sauce for a gluten-free version. Tamari is a nice alternative and tastes great too. If you're avoiding sugar, try using agave or a sugar substitute. Adjust these ingredients to fit your dietary needs while keeping the flavors intact. For more details, check out the Full Recipe. To store leftover Honey Garlic Shrimp and Broccoli, let it cool first. Place the shrimp and broccoli in an airtight container. This keeps moisture in and helps keep the meal fresh. You can store it in the fridge for up to three days. Make sure to avoid letting it sit out for too long. When it's time to eat your leftovers, you have a few options. You can use the microwave for quick reheating. Place the shrimp and broccoli in a microwave-safe dish. Cover it with a lid or a damp paper towel to keep it moist. Heat it for about one to two minutes, or until warm. You can also reheat it on the stove. Just warm a skillet over medium heat. Add a splash of water or oil to prevent sticking. Stir gently until the dish is hot. Freezing Honey Garlic Shrimp and Broccoli works, but with a few tips. First, let the dish cool completely. Then, place it in a freezer-safe container. It can last up to three months in the freezer. However, shrimp can change texture when frozen, so it may not taste as fresh. Broccoli may also lose some crunch. If you plan to freeze it, consider just freezing the shrimp separately. This way, you can keep the best texture for later use. Yes, you can use frozen shrimp. Just make sure to thaw them first. Place the shrimp in cold water for about 15-20 minutes. This way, they will cook evenly. Frozen shrimp are convenient and save time. They also work well in the marinade. To add spice, try using red pepper flakes. Start with a pinch and add more if needed. You can also add sliced fresh chili peppers to the stir-fry. Another option is to use a spicy soy sauce. This boosts the flavor without overpowering the dish. This dish pairs well with several sides. Steamed jasmine rice is a classic choice. Quinoa is also a great option for added protein. You can serve it with a light salad for a refreshing contrast. Try a simple cucumber salad with lime and sesame oil. For a heartier meal, add some fried rice. This blog post covered all you need to know about Honey Garlic Shrimp and Broccoli. We explored the key ingredients, including substitutions, and shared the nutrition per serving. You learned step-by-step instructions for preparation and cooking, along with helpful tips to enhance flavor and texture. We also discussed variations for different proteins and dietary needs. Finally, I provided guidance on storage and reheating leftovers. Enjoy making this dish! It’s simple, healthy, and packed with flavor. You can customize it to suit your taste and dietary needs.

Honey Garlic Shrimp and Broccoli Tasty Dinner Recipe

Are you ready for a quick, tasty dinner that impresses? My Honey Garlic Shrimp and Broccoli recipe is just what

To make this delightful cake, gather these simple ingredients: - 2 (3.4 oz) boxes vanilla instant pudding mix - 4 cups milk - 1 (8 oz) tub whipped topping (e.g. Cool Whip) - 1 package (14 oz) graham crackers - 1 cup semi-sweet chocolate chips - 3 tablespoons unsweetened cocoa powder - 1 tablespoon butter - 2 tablespoons milk - 1 teaspoon vanilla extract - A pinch of salt You will need a few basic tools to create this cake: - Large mixing bowl - Whisk - Rectangular baking dish (9x13 inches) - Microwave-safe bowl - Plastic wrap - Spatula For the best taste, I suggest these brands: - For pudding mix, use Jell-O Vanilla Instant Pudding. - Cool Whip is great for whipped topping. - Choose Nabisco Graham Crackers for a classic flavor. - Ghirardelli semi-sweet chocolate chips work well for the glaze. Follow these suggestions to ensure your No-Bake Chocolate Éclair Cake is a hit! For the full recipe, check the section above. To start, grab a large mixing bowl. Add two boxes of vanilla instant pudding mix. Pour in four cups of milk. Whisk this mix for about two minutes. You want it to thicken nicely. Next, gently fold in the whipped topping. This creates a creamy filling that is light and fluffy. Make sure it is well combined. This mixture is the heart of your cake. Now, take a 9x13-inch rectangular baking dish. Place a layer of graham crackers at the bottom. Spread half of the pudding mixture over the crackers. This is where the magic begins! Next, add another layer of graham crackers on top of the pudding. Repeat the process. Spread the rest of the pudding over this second layer. Finally, add one more layer of graham crackers on top. This creates a lovely structure for your cake. For the chocolate topping, gather a microwave-safe bowl. Combine the chocolate chips, cocoa powder, butter, milk, vanilla extract, and a pinch of salt. Microwave this mixture in 30-second intervals. Stir it in between until it is smooth and glossy. Once done, pour the chocolate glaze over the top layer of graham crackers. Spread it evenly for that perfect finish. Cover the cake with plastic wrap. Refrigerate it for at least four hours or overnight. This step is key for the best texture. Now you have a no-bake chocolate éclair cake that is easy and delightful! For the complete recipe, check out the Full Recipe. When making No-Bake Chocolate Éclair Cake, some mistakes can ruin your fun. First, don’t skip chilling time. If you cut too soon, the layers may fall apart. Second, ensure you mix the pudding well. A lumpy pudding will not blend nicely with the whipped topping. Lastly, use enough milk when making the chocolate glaze. A thick glaze may not spread well over the cake. To elevate your cake, try adding a splash of almond extract to the pudding mix. This small change adds a lovely depth. You can also mix in some finely chopped nuts for crunch. Toasted almonds or walnuts work great. If you want a fruity twist, add fresh berries between the layers. Strawberries or raspberries pair wonderfully with chocolate. If you’re short on time, here are some quick tips. Use store-bought whipped topping instead of making your own. This saves time and effort. You can also prepare the pudding mixture the night before. Just cover it with plastic wrap and chill. Lastly, consider using chocolate graham crackers. They add extra flavor without any extra work. For the full recipe, check out the complete instructions above. {{image_2}} You can switch up the flavor of your No-Bake Chocolate Éclair Cake with ease. Try using butterscotch or chocolate pudding instead of vanilla. Each flavor gives it a new twist. You can also experiment with different milk types. Almond milk or coconut milk can add extra taste. The topping can change the whole look and taste of your cake. Instead of chocolate glaze, try a creamy caramel sauce. You can also use fresh fruits like strawberries or bananas on top. For a fun crunch, sprinkle some crushed nuts or toffee bits. Each topping makes your dessert unique. Making this dessert vegan or gluten-free is simple. Use plant-based whipped topping and almond milk for a vegan option. For gluten-free, swap graham crackers for gluten-free cookies. Ensure the pudding mix is also gluten-free. These changes let everyone enjoy this delightful treat! For more details, check out the Full Recipe. To keep your No-Bake Chocolate Éclair Cake fresh, cover it tightly. Use plastic wrap or aluminum foil. This helps prevent it from drying out. Store it in the fridge for the best flavor. Avoid placing it near strong-smelling foods. When stored properly, this dessert lasts about 3 to 5 days in the fridge. The graham crackers will soften over time, so enjoy it sooner for the best texture. If you see any signs of spoilage, toss it out for safety. You can freeze this cake if you need to keep it longer. Wrap it well in plastic wrap and then in foil. This prevents freezer burn. It will last in the freezer for up to 2 months. To serve, just thaw it in the fridge overnight before enjoying. Yes, you can use homemade pudding. Just make sure it is thick. Instant pudding saves time and is easy. If you use homemade, let it cool completely before adding it to the cake. This will keep the layers from getting too mushy. You have some tasty options! Try vanilla wafers or digestive biscuits. These add a nice flavor and texture. If you want a gluten-free option, use gluten-free graham crackers. They work just as well in this recipe. Yes, it is very important. Refrigerating the cake helps it set. This makes the layers firm and easy to slice. I recommend chilling it for at least four hours. Overnight is even better for the best taste. To make it dairy-free, choose plant-based milk and whipped topping. Almond milk or coconut milk works great. For the pudding, look for a dairy-free version. This way, you can enjoy the dessert without dairy. Absolutely! In fact, making it a day ahead enhances the flavor. The layers will meld together, making each bite even better. Just cover it well and store it in the fridge until you’re ready to serve. Check out the Full Recipe for all the details! In this article, we explored how to make a delicious no-bake chocolate éclair cake. We covered the ingredients you'll need, easy steps to prepare, and helpful tips to avoid common mistakes. We also discussed tasty variations and how to store your leftovers. With these points in mind, you can create a dessert that impresses everyone. Enjoy making this treat, and have fun experimenting with different flavors and toppings! Your no-bake dessert journey starts now!

No-Bake Chocolate Eclair Cake Easy Dessert Delight

Looking for an easy dessert that impresses? I’ve got just the thing: No-Bake Chocolate Éclair Cake! This delightful treat layers

- 12 large sea scallops, patted dry - 2 tablespoons olive oil - 1 tablespoon unsalted butter - 2 cloves garlic, minced - Zest of 1 lemon - 2 tablespoons fresh parsley, finely chopped - 1 tablespoon capers, rinsed and drained The key to great scallops is to start with fresh, high-quality seafood. Make sure your scallops are very dry. This helps them cook well. If they are wet, they won't sear properly. Olive oil and butter add rich flavor and help with browning. Garlic, lemon zest, and capers bring a fresh taste that lifts the dish. - Salt and black pepper, to taste - Lemon wedges for garnish Seasoning is crucial for scallops. Use salt and black pepper to enhance their natural taste. Lemon wedges add a nice touch when serving. They give your dish a bright finish. This simple seasoning makes the scallops shine. You can serve them with fresh herbs on top for extra color and flavor. For the full recipe, check out the complete guide to gourmet pan-seared scallops. To start, you need to dry the scallops well. This step is important. Use paper towels to pat them dry. If there is moisture, they won't sear properly. Next, season both sides with salt and black pepper. Seasoning brings out the flavor. A good amount of salt and pepper makes a big difference. Now, let’s cook. Heat your skillet over medium-high heat. Add two tablespoons of olive oil. Wait until the oil shimmers but does not smoke. This shows it's hot enough. Place the scallops in the skillet. Do not overcrowd them. Leave space between each scallop. This helps them brown nicely. Sear the scallops for 2-3 minutes on one side. Don't move them around. You want a golden crust. After that, flip them over. Sear for another 1-2 minutes. When done, transfer them to a plate and cover them to keep warm. In the same skillet, lower the heat to medium. Add one tablespoon of unsalted butter and two cloves of minced garlic. Sauté for about 30 seconds. The garlic should smell great but not brown. Next, add the zest of one lemon, rinsed capers, and finely chopped parsley. Stir to blend the flavors. Return the scallops to the pan. Gently toss them in the sauce for about 30 seconds. This heats them through. Finally, plate your scallops. Spoon the garlic-caper sauce over them. Garnish with lemon wedges for a fresh touch. For the full recipe, check the complete instructions. To get that perfect sear, start by heating your skillet properly. Use medium-high heat for best results. The pan should be hot when you add the scallops. You can test the heat by adding a drop of water. If it sizzles, you're ready. Avoid overcrowding the pan. If you add too many scallops, they will steam instead of sear. This can ruin the crust you want. Cook in batches if needed. Season your scallops with salt and black pepper. This simple step boosts the natural flavor. You can also experiment with other seasonings like paprika or cayenne for a kick. Adding fresh herbs can elevate the dish. Try thyme, basil, or even dill. They pair well with scallops. You can also mix in some lemon zest for brightness. This adds layers of flavor and makes the dish pop. For more details, check the Full Recipe to see how you can make these scallops shine on your plate. {{image_2}} You can spice up your scallops with easy additions. Try using smoked paprika for a warm flavor. A dash of cayenne pepper can add a nice kick. If you like sweetness, drizzle honey or maple syrup over the scallops before cooking. For sauce lovers, a splash of soy sauce or a squeeze of orange juice can create a unique taste. When it comes to oils, olive oil works great, but you can also use avocado oil for a buttery taste. If you're in the mood for herbs, try adding fresh thyme or basil. These herbs will brighten the dish and add freshness. Pair your scallops with tasty sides for a full meal. Rice, especially lemon or herb rice, goes well with scallops. You can also serve them with a crisp salad for a light touch. Roasted vegetables, like asparagus or zucchini, create a colorful plate. For plating ideas, stack the scallops on a bed of greens. Drizzle the garlic-caper sauce artfully around the plate. Add a few lemon wedges for color. You can even sprinkle some extra parsley on top for a touch of elegance. This makes your dish not just tasty but beautiful too! To store leftover scallops, first let them cool. Place them in an airtight container. This keeps out air and moisture, which can spoil the scallops. Make sure to use a container that fits well. Glass containers work great. You can also use plastic containers. Store the scallops in the fridge for up to two days. For longer storage, consider freezing them. But keep in mind, freezing can change the texture. When reheating scallops, do it gently. Use a skillet over low heat. This helps keep the scallops tender. You can also use the microwave, but do it carefully. Heat for short bursts to avoid cooking them too much. Check often to prevent overcooking. Scallops should be warm, not hot. This keeps them soft and tasty. Enjoy them with the garlic-caper sauce from the full recipe for extra flavor. How do I know when scallops are cooked? Scallops cook quickly. They should turn opaque and firm to the touch. A nice golden crust forms on the outside. If you cut one, it should be white or slightly translucent in the center. Overcooking makes them tough, so watch closely. Can I use frozen scallops for this recipe? Yes, you can use frozen scallops. Just thaw them properly first. Place them in the fridge overnight or run them under cold water. Make sure to pat them dry before cooking. This step helps to get that perfect sear. What tips does Gordon Ramsay recommend for perfect scallops? Gordon Ramsay stresses the need for dry scallops. Pat them dry with paper towels. Use high heat for cooking, and don’t crowd the pan. This lets each scallop sear well. He also recommends using good quality olive oil and butter for flavor. Are there alternative cooking methods for scallops? Yes, you can grill or bake scallops. Grilling adds a nice smoky flavor. Baking is another easy option; just place them in a hot oven. You can also try poaching them in butter or broth for a different taste. Each method gives scallops a unique flavor. In this post, we explored how to make Gordon Ramsay's pan-seared scallops. We covered the essential ingredients, step-by-step cooking instructions, and tips for a perfect finish. You learned about flavor variations and how to store leftovers properly. Remember, drying and seasoning your scallops is key for the best flavor. Follow these steps, and you will impress anyone with your cooking skills. Enjoy your next meal with these delicious scallops!

Gordon Ramsay’s Pan-Seared Scallops Easy Cooking Guide

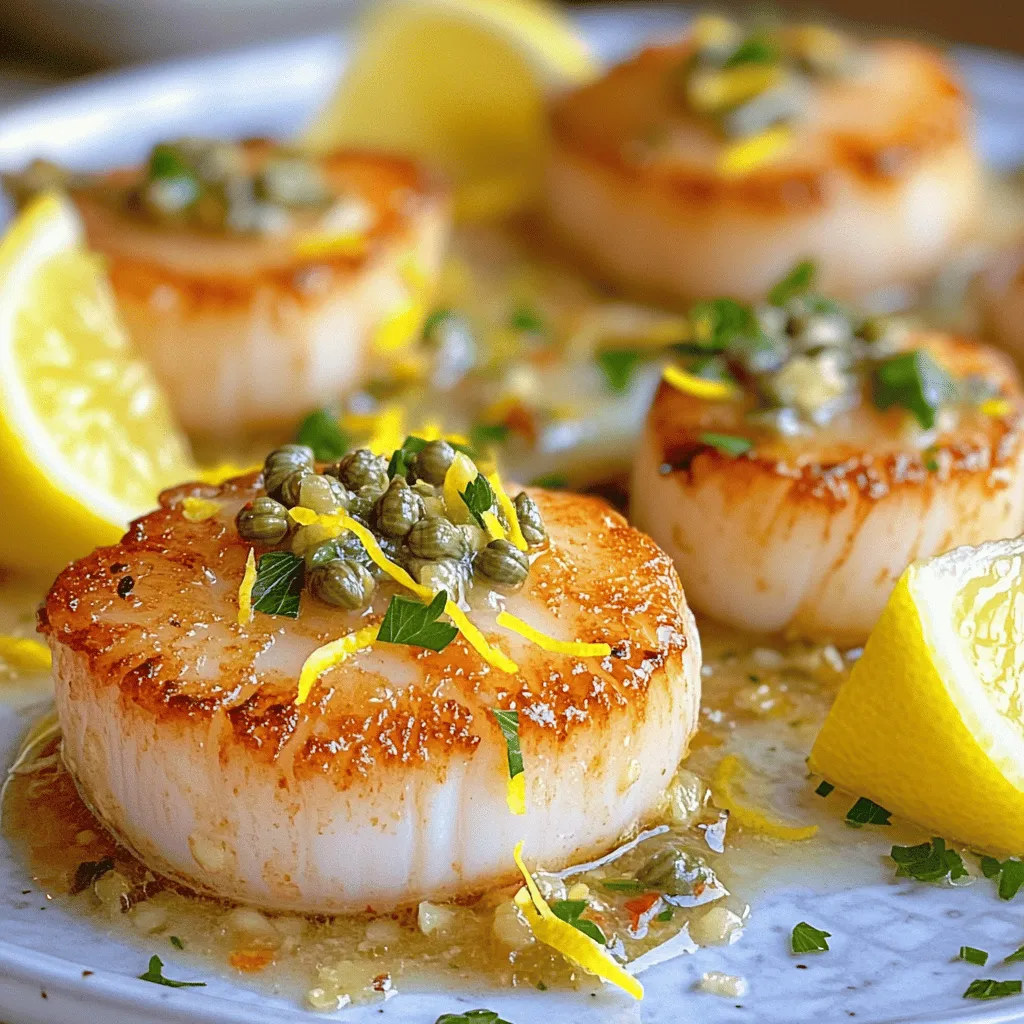
If you want to impress at your next dinner, look no further than Gordon Ramsay’s Pan-Seared Scallops. This easy cooking

To make Huli Huli Chicken, you need a few key items. Here’s the list: - 4 chicken thighs, boneless and skinless - 1/2 cup soy sauce - 1/4 cup brown sugar - 1/4 cup pineapple juice - 2 tablespoons rice vinegar - 2 tablespoons sesame oil - 4 cloves garlic, minced - 1 inch ginger, grated These ingredients blend for a sweet and savory taste. The soy sauce gives it depth. Pineapple juice adds a tropical twist. The brown sugar balances the saltiness. You can add extra elements to amp up the flavor. Consider these options: - 1 teaspoon red pepper flakes (optional) - 1/4 cup green onions, chopped (for garnish) - Pineapple slices for grilling (optional) Red pepper flakes add heat. Grilled pineapple gives a nice caramelized touch. Green onions add freshness and color to your dish. Huli Huli Chicken pairs well with various sides. Here are some tasty ideas: - Steamed rice - Coconut rice - Grilled veggies - Fresh salad - Macaroni salad These sides complement the chicken's flavors. They add texture and balance to your meal. For a complete feast, serve it all together! Check the Full Recipe for more details on making this delicious dish. To start, gather your ingredients. You will need soy sauce, brown sugar, pineapple juice, rice vinegar, sesame oil, garlic, ginger, and optional red pepper flakes. In a mixing bowl, combine 1/2 cup of soy sauce with 1/4 cup of brown sugar. Then, add 1/4 cup of pineapple juice, 2 tablespoons of rice vinegar, and 2 tablespoons of sesame oil. Next, mix in 4 cloves of minced garlic and 1 inch of grated ginger. If you like heat, add 1 teaspoon of red pepper flakes. Whisk until the sugar dissolves. This marinade packs a flavor punch! Now, take 4 boneless, skinless chicken thighs. Place them in a large resealable bag or shallow dish. Pour the marinade over the chicken, ensuring they are fully coated. Seal the bag or cover the dish tightly. Let the chicken marinate in the fridge for at least 1 hour, or up to 4 hours for a richer flavor. The longer you marinate, the better the taste! When you're ready to grill, preheat your grill to medium-high heat, around 375°F. Remove the chicken from the marinade and let the excess drip off. Save the marinade for basting later. Grill the chicken thighs for about 6-7 minutes on one side. Flip them over, then baste with the reserved marinade. Grill for another 5-6 minutes, or until fully cooked. For added fun, grill pineapple slices during the last few minutes. Once cooked, let the chicken rest for 5 minutes before slicing. This resting time keeps it juicy. Check out the Full Recipe for more details! To get those perfect grill marks, start with a hot grill. Preheat it to medium-high heat. When you place the chicken on the grill, do not move it for the first few minutes. This helps create those beautiful sear lines. After about 3-4 minutes, you can flip it. The chicken should lift easily if it has formed a good crust. To really infuse flavor, marinate the chicken for at least an hour. For more flavor, let it sit for up to four hours. Use a resealable bag or shallow dish for the marinade. Make sure the chicken is fully covered. The soy sauce, brown sugar, and pineapple juice work together to create a sweet and salty taste that soaks in nicely. To keep the chicken juicy, avoid overcooking it. Use a meat thermometer. The chicken is done at 165°F (75°C). Let the chicken rest for five minutes after grilling. This helps the juices redistribute. You can also baste the chicken with reserved marinade while it cooks. This adds extra flavor and keeps it moist. For the full experience, check the Full Recipe for detailed steps. {{image_2}} You can switch up the flavors in Huli Huli chicken easily. Here are some ideas: - Coconut Milk: Use coconut milk instead of soy sauce for a creamier taste. - Honey: Swap brown sugar for honey for a different sweetness. - Spices: Add cumin or paprika for a smoky touch. - Citrus Juices: Try orange or lime juice for a zesty kick. These changes let you explore new flavor paths while keeping the essence of Huli Huli chicken. You can bake Huli Huli chicken if you don’t have a grill. Here’s how: 1. Preheat your oven to 400°F (200°C). 2. Place marinated chicken thighs on a baking sheet. 3. Bake for 25-30 minutes or until the chicken reaches 165°F (74°C). 4. Baste the chicken halfway through with the reserved marinade for extra flavor. Baking gives you a juicy chicken with a nice glaze. You can still enjoy the flavors of Huli Huli chicken without meat. Try these options: - Tofu: Use firm tofu, marinated and grilled for a great texture. - Tempeh: Marinate tempeh for a nutty flavor that soaks up the sauce well. - Mushrooms: Grill portobello mushrooms for a hearty, meaty bite. These options let everyone enjoy this Hawaiian delight. For the full recipe, check out the earlier section on ingredients and instructions. To keep your Huli Huli Chicken fresh, store it in an airtight container. Let it cool before sealing. Place it in the fridge within two hours of cooking. Properly stored, it can last for up to three days. Use a marker to note the date you stored it. This helps you remember when to eat it. When you're ready to enjoy leftovers, use the oven or microwave. For the oven, preheat it to 350°F (175°C). Place the chicken on a baking sheet and cover it with foil. Heat for about 15-20 minutes until warm. If using a microwave, place the chicken on a plate and cover it with a damp paper towel. Heat for 1-2 minutes, checking often to avoid overcooking. Freezing is a great way to save Huli Huli Chicken for later. Wrap each piece tightly in plastic wrap. Then, place them in a freezer bag and squeeze out extra air. Label the bag with the date. Frozen, it can last for up to three months. To thaw, move it to the fridge overnight before reheating. Enjoy your delicious Hawaiian dish anytime! "Huli Huli" means "turn, turn" in Hawaiian. It refers to the method of turning the chicken while grilling. This technique helps the chicken cook evenly. The name reflects the fun of cooking outdoors in Hawaii. The dish brings together sweet and savory flavors. Yes, you can use different cuts for Huli Huli Chicken. Chicken thighs work best because they stay moist. You can also use drumsticks or wings. Just adjust the cooking time for smaller pieces. Make sure all pieces marinate well for the best flavor. Huli Huli Chicken is not very spicy. The red pepper flakes add a mild heat. You can leave them out for a milder taste. If you want more heat, add more red pepper flakes or a hot sauce. The sweetness of the marinade balances the heat nicely. Huli Huli Chicken is a tasty dish loaded with flavor. You learned about key ingredients, marinating tips, and cooking secrets. Exploring various ways to enjoy Huli Huli Chicken lets you customize it to your taste. Remember to store leftovers properly and try the recipe with different cuts of chicken. Enjoy this delicious dish with friends and family. It’s sure to impress everyone around your table. Happy grilling!

Huli Huli Chicken Hawaiian Delicacy Flavor Burst

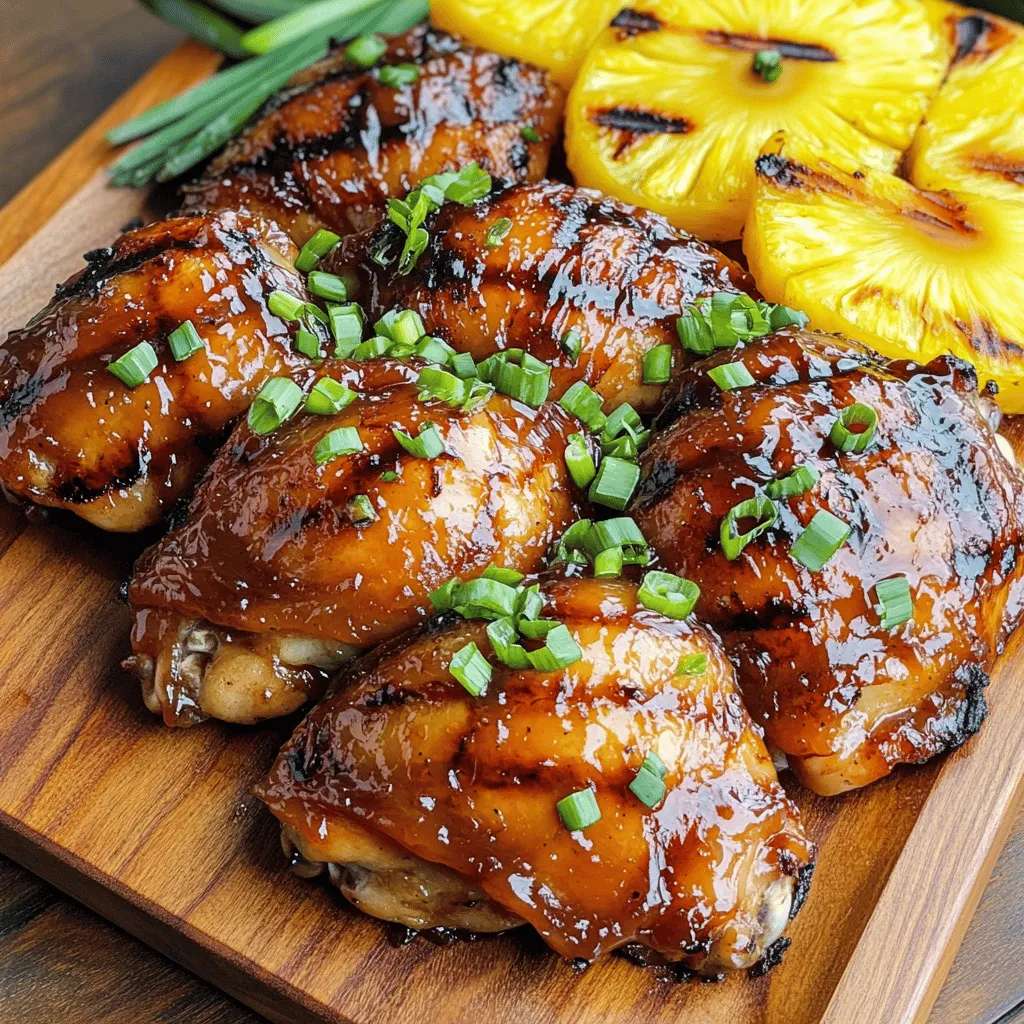
Ever tasted the sweet, smoky goodness of Huli Huli Chicken? This Hawaiian dish combines juicy chicken with a mouthwatering marinade,

Gather these simple ingredients for a delicious meal: - 1 pound peeled and deveined shrimp - 4 medium zucchinis, spiralized - 3 cloves minced garlic - 1 tablespoon olive oil - 1/4 teaspoon red pepper flakes - Juice of 1 lemon - Zest of 1 lemon - Salt and pepper to taste - Fresh parsley for garnish - 1/4 cup low-sodium vegetable broth - 1 tablespoon unsalted butter (optional) This list keeps your dish light but full of flavor. Each ingredient plays a key role. The shrimp gives protein, while zucchini adds fiber. Garlic brings a rich aroma. Lemon juice brightens the dish, making it fresh. Red pepper flakes add a hint of spice, but you can adjust them. Using fresh ingredients ensures the best taste. When you spiralize the zucchini, it mimics pasta without the carbs. This makes your meal healthier and lighter. For a complete guide, check the Full Recipe. It provides all the steps to make this tasty dish. Enjoy cooking! - Start by rinsing the shrimp under cold water. Make sure they are peeled and deveined. - Next, wash the zucchinis and spiralize them into noodles. You can use a spiralizer for this. - In a large skillet, heat 1 tablespoon of olive oil over medium heat. - Add 3 cloves of minced garlic and 1/4 teaspoon of red pepper flakes to the skillet. Sauté for about 1 minute until you smell the garlic. - Increase the heat to medium-high. Add the shrimp to the skillet. Season with salt and pepper. Cook the shrimp until they turn pink, about 3-4 minutes. - Pour in 1/4 cup of low-sodium vegetable broth and the juice of 1 lemon. Stir everything together. - Toss in the spiralized zucchini noodles and the zest of 1 lemon. Cook for another 2-3 minutes. You want the noodles to soften but stay firm. - Finally, remove the skillet from heat. Sprinkle with fresh chopped parsley. Adjust the seasoning if needed. - Serve immediately for the best taste. Garnish with extra lemon zest and parsley if you like. For the full recipe, you can refer to the section above. Enjoy your meal! To get the best flavor from garlic, always use fresh cloves. Mince them finely to release their oils. Sauté the garlic in olive oil over medium heat for just one minute. This will give your dish a warm, rich aroma. For cooking shrimp, use medium-high heat. Cook them until they turn pink and opaque, which takes about 3-4 minutes. Avoid overcooking, as shrimp can become tough. Adjust the spice level with red pepper flakes. Start with a small amount, like 1/4 teaspoon. You can always add more if you want extra heat. Add a tablespoon of unsalted butter for extra richness. The butter blends well with the lemon juice and shrimp, making the sauce creamy and lush. If you want variety, substitute spiralized zucchini with other vegetables, like yellow squash or carrots. These options will still give you a tasty, healthy meal. Using fresh herbs can boost the flavor even more. Try adding basil or cilantro for a fresh twist. These herbs elevate the dish and make it more vibrant. For the full recipe, check out the details above. {{image_2}} You can switch out shrimp for different proteins. Try chicken or scallops for a tasty twist. You can also use tofu or chickpeas for a vegetarian option. They add great flavor without meat. If you're looking for gluten-free options, check your broth and seasoning. Many brands offer gluten-free choices. This dish pairs well with a light side salad. A simple mixed greens salad adds freshness. You can also serve it with crusty bread to soak up the tasty sauce. For a complete meal, add a fruit dessert. Leftovers can be stored easily and reheated. You can enjoy them the next day for lunch or dinner. Just add a little olive oil to revive the flavors. Enjoy exploring these variations to make Skinny Shrimp Scampi with Zucchini Noodles even more delightful! For the full recipe, check out the link above. To keep your Skinny Shrimp Scampi fresh, store it in an airtight container. Make sure it cools down before sealing. This helps prevent moisture build-up, which can make the dish soggy. You can keep it in the fridge for up to three days. Yes, you can freeze Skinny Shrimp Scampi! Just place the cooled dish in a freezer-safe container. It will last for up to three months in the freezer. When you are ready to eat, thaw it overnight in the fridge. To reheat, place it in a skillet over low heat. Add a splash of vegetable broth or water to help revive the dish. Stir gently until heated through. This keeps the shrimp tender and the zucchini noodles from getting mushy. Enjoy your meal again! Can I use frozen shrimp for this recipe? Yes, you can use frozen shrimp. Just thaw them first. Place them in cold water for about 15 minutes. Drain and pat dry before cooking. This keeps the shrimp juicy and tender. What can I use instead of zucchini noodles? You can use spaghetti squash or whole wheat pasta. Both options add different flavors and textures. If you want a low-carb meal, continue with zucchini noodles. They soak up the flavors well. How can I make this recipe dairy-free? To make it dairy-free, simply skip the butter. The olive oil and broth will keep it rich. You may also add a splash of coconut milk if you want a creamy texture. What’s the nutritional information for Skinny Shrimp Scampi? This dish is low in calories and high in protein. A serving has about 250 calories, 30g of protein, and 10g of carbs. It’s a healthy choice for a filling meal. Can I prepare this ahead of time? You can prep the shrimp and zucchini in advance. Store them in the fridge until you are ready to cook. However, it’s best to cook it fresh for the best taste and texture. What are the best herbs to use for shrimp scampi? Fresh parsley is a classic choice. You can also use basil or oregano for a different twist. These herbs add fresh flavors and brighten the dish. This blog post covered how to make a delicious Skinny Shrimp Scampi. We explored key ingredients like shrimp, zucchini, and garlic. I explained step-by-step cooking methods, shared helpful tips, and offered dish variations. Finally, I provided storage advice for your leftovers. Cooking should be fun and easy. Try this quick recipe and enjoy fresh flavors. Your meals can be tasty and healthy. Don't hesitate to add your twist to make it yours!

Skinny Shrimp Scampi with Zucchini Noodles Delight

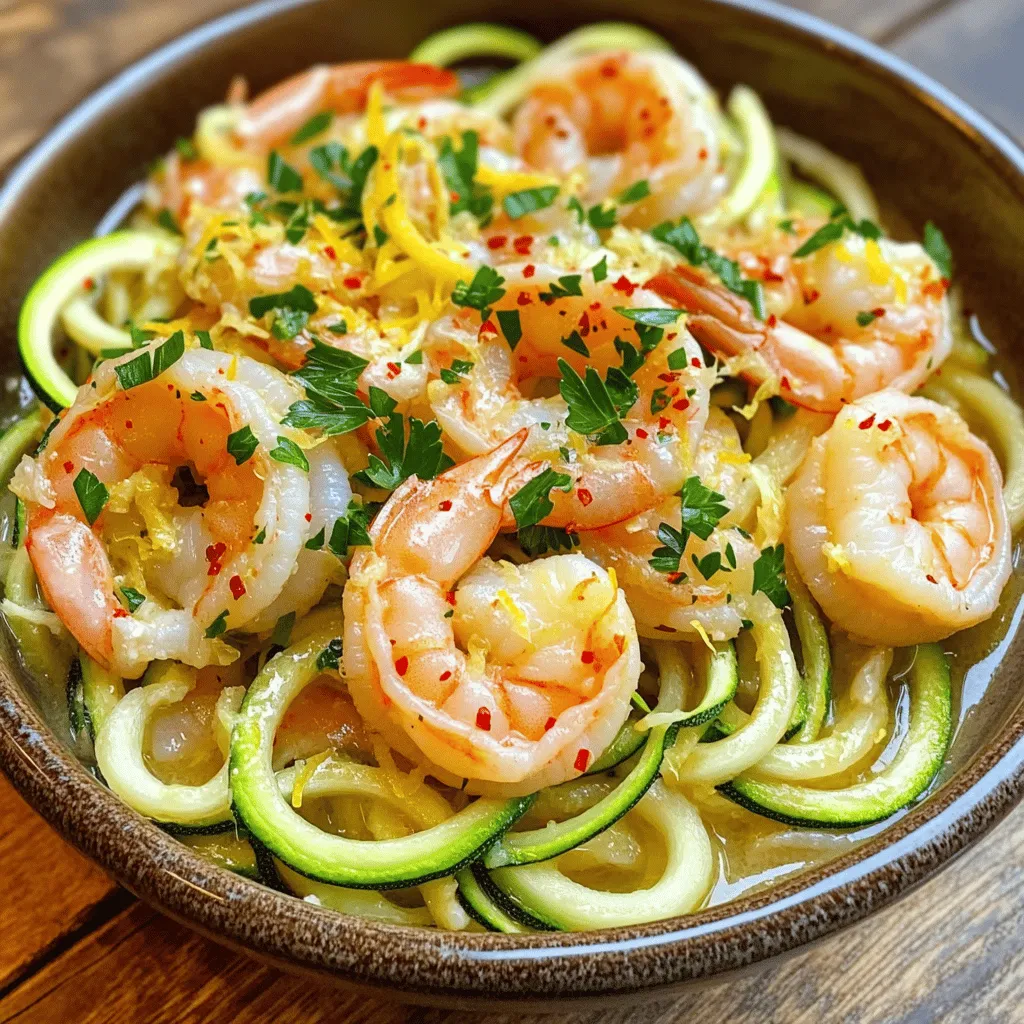
If you’re craving a tasty and light dish, you’re in the right place! Skinny Shrimp Scampi with Zucchini Noodles combines

- 1 pound boneless, skinless chicken thighs - 3 tablespoons olive oil - 2 teaspoons smoked paprika - Salt and pepper to taste - 1/2 cup Greek yogurt - 2 cloves garlic, minced - 1 tablespoon fresh dill, chopped - 1 tablespoon lemon juice - Lemon juice for marinating - Wooden skewers (if grilling) To make these grilled chicken bites, you start with simple yet tasty ingredients. The chicken thighs give a juicy bite. Olive oil helps the spices stick. Smoked paprika adds a rich flavor. Finally, salt and pepper balance everything. For the garlic sauce, Greek yogurt keeps it creamy. Minced garlic gives a strong taste. Fresh dill adds a nice touch. Lemon juice brightens the sauce. You can even marinate the chicken in lemon juice for extra flavor. If you want to grill, wooden skewers work well. Just soak them in water first to prevent burning. You can find the full recipe for a step-by-step guide to create these delicious bites. To start, you need to marinate the chicken. Take a bowl and add: - 1 pound boneless, skinless chicken thighs, cut into bite-sized pieces - 3 tablespoons olive oil - 2 teaspoons smoked paprika - 1 teaspoon garlic powder - 1 teaspoon onion powder - Salt and pepper to taste - 1 tablespoon fresh lemon juice Mix all these ingredients well. Ensure every piece is coated. Let the chicken sit for at least 30 minutes. This step adds flavor and helps keep the chicken juicy. While the chicken is marinating, you can make the garlic sauce. In a small bowl, combine: - 1/2 cup Greek yogurt - 2 cloves garlic, minced - 1 tablespoon fresh dill, chopped - 1 tablespoon lemon juice - Salt and pepper to taste Stir everything together until smooth. You can adjust the seasoning to your liking. Then, refrigerate it until you're ready to serve. This will let the flavors blend. Next, it’s time to cook the chicken. Preheat your grill or grill pan over medium-high heat. It’s also good to oil the grill to stop sticking. Now, skewer the marinated chicken bites. Leave a little space between each piece for even cooking. Place the skewers on the grill. Cook for about 4-5 minutes on each side. You want nice grill marks, and the chicken should reach an internal temperature of 165°F (75°C). Once cooked, remove the skewers from the grill. Let them rest for a couple of minutes. Serve the chicken bites with the creamy garlic sauce on the side for dipping. For the full recipe, check out the details above. To get the best grilled chicken bites, follow these tips: - Grilling Time and Temperature: Grill chicken bites for about 4-5 minutes on each side. The grill should be medium-high, around 400°F (200°C). This ensures a nice sear and juicy inside. - Importance of Marination: Marinating is key. It adds flavor and keeps the chicken moist. Let the chicken sit in the marinade for at least 30 minutes. For the best taste, marinate for up to 2 hours. Serve your grilled chicken bites in a way that impresses. Here are some ideas: - Plating Ideas: Arrange the chicken bites on a large platter. Garnish with fresh dill or parsley for a pop of color. - Pairing Options: Serve with fresh veggies, rice, or a light salad. A glass of lemonade or iced tea pairs nicely with this dish. Want to make your garlic sauce even better? Try these tips: - Additions for Extra Flavor: You can mix in a pinch of cayenne pepper for heat or add some chopped fresh herbs like basil or parsley. - Adjusting the Consistency: If your sauce is too thick, add a splash of water or extra lemon juice. This will make it easier to dip and more refreshing. For the full recipe, check out the detailed instructions above. {{image_2}} You can swap chicken for shrimp or beef in this recipe. Shrimp cooks quickly and adds a nice flavor. Use the same marinade for best results. Beef gives a heartier taste. Choose tender cuts like sirloin or flank steak. For a vegetarian option, try tofu or mushrooms. Tofu absorbs flavors well, so marinate it just like the chicken. Mushrooms add a rich, earthy taste. Use portobello or cremini for a meaty texture. Feel free to spice things up in the marinade. Add herbs like rosemary or thyme for a fragrant twist. You can also try smoked paprika for a deeper flavor. If you like heat, create a spicy garlic sauce. Add red pepper flakes or hot sauce to the garlic sauce. This version will give your bites an exciting kick. You can bake or grill the chicken bites. Baking works well if you want an easier method. Just spread the bites on a lined baking sheet. Bake at 400°F (200°C) for 15-20 minutes, flipping halfway. Grilling gives you those lovely char marks and smoky flavor. If you want a healthier option, try an air fryer. Set it to 400°F (200°C) and cook for about 10-12 minutes. This method keeps the chicken juicy while cutting down on oil. For the full recipe, check the main article above. To keep your leftover chicken bites fresh, place them in an airtight container. Make sure the container is clean before use. Store the chicken in the fridge for up to three days. For the garlic sauce, keep it in a separate container. Use a lid to seal it tightly. The sauce will stay fresh for about five days in the fridge. When reheating chicken bites, aim for the oven or stovetop. Both methods help keep the chicken juicy. If using the oven, set it to 350°F (175°C). Heat for about 10 minutes. On the stovetop, use medium heat. Stir gently for about 5 minutes. Always check that the center is hot before serving. You can freeze grilled chicken bites if you have leftovers. Place them in a freezer-safe bag. Squeeze out as much air as possible. Label the bag with the date. They will last up to three months in the freezer. To thaw, move the bag to the fridge overnight. When ready to eat, reheat them in the oven or stovetop. This way, you keep them moist and tasty. Yes, you can use chicken breast. Chicken thighs are juicier and more flavorful. They stay tender when grilled. Chicken breast tends to dry out if overcooked. If you choose breast, watch the cooking time closely. To make this dish gluten-free, use gluten-free soy sauce in the marinade. Check that the garlic sauce ingredients are also gluten-free. Most Greek yogurt is gluten-free, but always check the label. Serve with gluten-free sides, like rice or salad. Yes, you can make the garlic sauce ahead of time. Mix the garlic sauce and store it in the fridge. It will stay fresh for up to three days. Making it early lets the flavors meld nicely. Serve grilled chicken bites with fresh veggies or a light salad. You can add rice or grilled corn for a hearty side. Lemonade or iced tea pairs well as a refreshing drink. For a tasty twist, try dipping them in the garlic sauce. Grilled chicken bites are easy and tasty. You learned about main and optional ingredients. I shared steps for cooking and making garlic sauce. Tips helped you grill perfectly, and I gave ways to vary the dish. Storing and reheating options ensure you enjoy leftovers. Try these ideas to impress your family and friends. You can make this dish your own. Enjoy every bite!

Grilled Chicken Bites with Garlic Sauce Delight

If you’re craving a quick, tasty meal, these Grilled Chicken Bites with Garlic Sauce are a must-try. They’re juicy, packed

- 500g chicken thighs - 1/2 cup honey - 3 tablespoons soy sauce - 1 tablespoon apple cider vinegar - 2 cloves garlic, minced - 1 teaspoon fresh ginger, grated - 1 tablespoon sesame oil - 1/4 teaspoon crushed red pepper flakes - Salt and pepper to taste - Green onions and sesame seeds for garnish For this sticky honey chicken, I use chicken thighs. They are juicy and tender. The honey gives a sweet flavor that makes this dish shine. Soy sauce adds saltiness, while apple cider vinegar adds a nice tang. Garlic and ginger bring warmth and depth. Don't skip the sesame oil; it gives a nutty taste. If you like spice, crushed red pepper flakes are perfect. You can add salt and pepper to taste. For garnish, chopped green onions and sesame seeds look great and add crunch. These simple ingredients come together for a quick, tasty dish. You can get the full recipe to see how they blend perfectly. To start, grab a bowl. Combine these ingredients: - 1/2 cup honey - 3 tablespoons soy sauce - 1 tablespoon apple cider vinegar - 2 cloves garlic, minced - 1 teaspoon fresh ginger, grated - 1 tablespoon sesame oil - 1/4 teaspoon crushed red pepper flakes Mix everything well to create a tasty marinade. Next, add your 500g of chicken thighs, cut into bite-sized pieces. Make sure each piece gets a good coat of marinade. Cover the bowl and pop it in the fridge. Let it sit for at least 30 minutes. If you have time, marinate for up to 2 hours. This step boosts the flavor. Now, it’s time to cook. Heat a large skillet over medium-high heat. Once hot, add the marinated chicken pieces to the skillet. Discard any leftover marinade. Cook the chicken for about 5-6 minutes. Stir often to make sure it cooks evenly. You want it to be browned and cooked through. After cooking, reduce the heat to low. Pour the remaining marinade into the skillet with the chicken. Let it simmer for 2-3 minutes. Stir occasionally until the sauce thickens and becomes sticky. Taste your chicken and season with salt and pepper if needed. Cook for one more minute to coat everything in that delicious glaze. Serve your sticky honey chicken over warm rice. Garnish with chopped green onions and sesame seeds for a nice touch. You can find the complete instructions in the Full Recipe. Enjoy! For sticky honey chicken, marinating is key. I recommend marinating for at least 30 minutes. If you have more time, let it sit for up to 2 hours. This helps the chicken soak up all the tasty flavors. When choosing chicken, I suggest using thighs over breasts. Thighs are juicier and more tender. They also hold the glaze better, giving you a stickier result. If you prefer breast, just watch the cooking time to avoid drying it out. You can cook this dish in a skillet or braise it in the oven. I prefer skillet cooking for quick meals. It gives you that nice caramelization. Just heat your skillet to medium-high. For the perfect glaze, adjust the heat after cooking the chicken. Lower the heat to let the sauce simmer. This thickens the glaze and makes it sticky. Stir often to coat every piece of chicken. Sticky honey chicken pairs well with warm rice. Jasmine or brown rice are both great choices. The rice soaks up the sauce and balances the sweetness. For garnishes, I love using chopped green onions and sesame seeds. They add color and a nice crunch. You can also serve with steamed veggies for a fresh touch. {{image_2}} You can switch some ingredients for fun. Try using maple syrup or agave instead of honey. These options give a different but tasty flavor. If you want a lighter meal, use tofu or shrimp instead of chicken. Both options soak up the sauce well. Want to mix it up? Add colorful veggies like bell peppers or broccoli. They add crunch and nutrition. You can also spice it up! Add more crushed red pepper or a splash of chili sauce for extra heat. This makes your sticky honey chicken even more exciting. If you need it gluten-free, use tamari instead of soy sauce. This keeps the flavor rich without gluten. For a dairy-free meal, skip creamy sides. Instead, serve with rice or a fresh salad. These sides keep it light and healthy, fitting many diets. For the full recipe, check out the Sticky Honey Chicken section above. To keep your sticky honey chicken fresh, cool it down first. Let it sit at room temperature for no more than two hours. Once cooled, place it in an airtight container. Store it in the fridge, and it will last for up to three days. If you want to keep it longer, consider freezing it. When it's time to eat leftovers, I suggest reheating in a skillet. Heat the skillet on medium-low and add the chicken. This method helps keep the chicken moist. You can add a splash of water or broth to avoid dryness. Stir it often until warmed through, which usually takes about 5 to 7 minutes. To freeze sticky honey chicken, make sure it's completely cooled. Place it in a freezer-safe container or bag. Press out as much air as possible to prevent freezer burn. It can stay frozen for up to three months. When ready to eat, defrost it overnight in the fridge. Reheat it following the tips above for the best taste and texture. Yes, you can use chicken breast. Chicken thighs have more fat, which makes them juicy. They also have a richer flavor. Chicken breast is leaner and can dry out if overcooked. If you choose breast, cook it carefully and adjust the time. To add spice, increase the crushed red pepper flakes. You can also add hot sauce. Try sriracha for a nice kick. If you like fresh heat, add sliced jalapeños or a dash of cayenne pepper. Taste as you go to find the right heat for you. Yes, you can prep ahead. Marinate the chicken the night before for better flavor. Cook and cool the chicken, then store in the fridge. It lasts up to three days. Reheat in a skillet to keep it moist. Cover it to trap steam while reheating. Sticky honey chicken pairs well with rice. Jasmine or brown rice works great. You can also serve it with steamed broccoli or sautéed green beans. For a fresh twist, make a simple salad with crisp greens. This adds crunch and flavor to your meal. To use a slow cooker, place marinated chicken in the pot. Cook on low for 4-5 hours or on high for 2-3 hours. You can add veggies like bell peppers or carrots for added flavor. Once done, remove the chicken and thicken the sauce on the stove if desired. For the full recipe, check the earlier section! Sticky honey chicken brings great taste to your table with simple steps. You learned how to marinate chicken for deep flavor, cook it perfectly, and achieve that delightful glaze. I shared tips for enhancing taste and alternatives for different needs. Remember, leftovers can be stored and reheated with care. Whether you use chicken thighs or other proteins, this dish is adaptable and fun. Enjoy the cooking journey and impress your guests with this easy recipe!

Sticky Honey Chicken Quick Recipe for Busy Nights

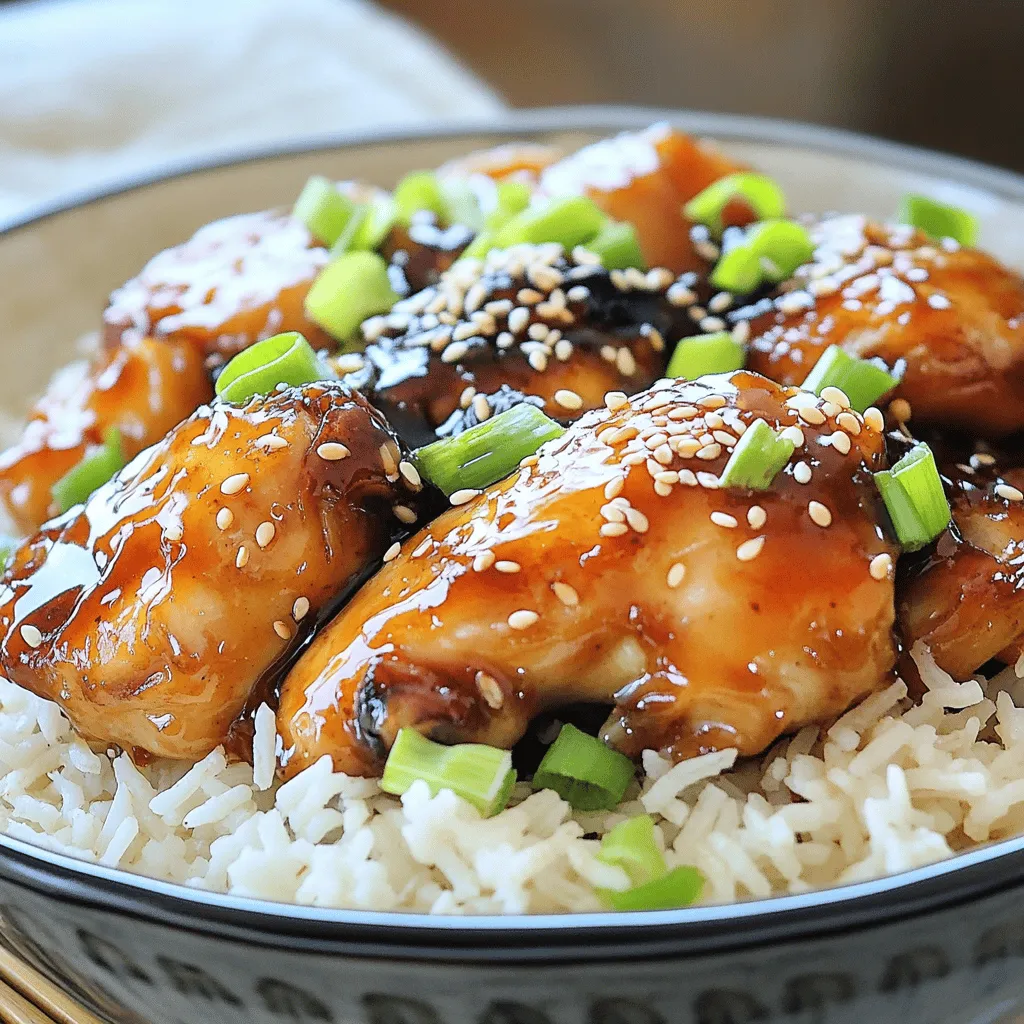
Looking for a quick dinner that packs a punch? My Sticky Honey Chicken recipe is your answer! With just a

- 1 cup Arborio rice - 1 can (13.5 oz) coconut milk - 2 cups almond milk (or any milk of choice) - 1/2 cup sugar - 1/4 teaspoon salt - Fresh mango - Berries - Additional shredded coconut - Medium saucepan - Mixing spoon - Measuring cups and spoons When you gather your ingredients, start with Arborio rice. This special rice gives the pudding its creamy texture. Next, you'll need coconut milk, which adds rich flavor. Almond milk or your favorite milk works well too. Sugar sweetens the dish, while a pinch of salt enhances all the flavors. For garnishes, I love to top my pudding with fresh mango or berries. They add color and freshness. You can also sprinkle more shredded coconut on top for extra texture. In terms of tools, a medium saucepan is essential for cooking. You’ll need a mixing spoon to stir the pudding. Measuring cups and spoons help ensure you use the right amounts. For the full recipe, follow the steps closely to create this delicious coconut rice pudding. Enjoy every creamy bite! First, grab a medium saucepan. Add 1 cup of Arborio rice. Next, pour in 1 can of coconut milk and 2 cups of almond milk. Sprinkle in 1/2 cup of sugar and 1/4 teaspoon of salt. Stir all the ingredients well. This mix forms the base of your pudding. Now, turn on the heat to medium. Bring the mixture to a gentle boil. Keep stirring it to avoid any sticking. Once it starts to boil, reduce the heat to low. Cover the pan and let it simmer for about 25-30 minutes. Stir occasionally. You want the rice to be tender and creamy. When the rice is cooked, take off the heat. Stir in 1 teaspoon of vanilla extract, 1/2 teaspoon of cinnamon, and 1/2 cup of shredded coconut. Mix everything well. Let it cool a bit. You can serve it warm or chill it in the fridge. Portion the pudding into bowls. Top with fresh mango or berries for a nice touch. For an extra treat, sprinkle more shredded coconut on top. For the full recipe, check out the details above. To get the best texture, use Arborio rice. This rice has a high starch content. It makes the pudding creamy and rich. If the pudding is too thick, add a bit more milk. Stir well and let it cook for a few more minutes. You can boost coconut flavor by adding coconut extract. Try different brands to find your favorite. If you like it sweeter, add more sugar. Just remember to taste as you go. This way, you can get the perfect balance. Serving in clear dessert cups looks great. It shows off the creamy pudding and any toppings. For garnish, add fresh mango or berries on top. You can also sprinkle some shredded coconut for a nice touch. This makes your dish look fancy and inviting. {{image_2}} You can easily make this pudding dairy-free. Almond milk works great in this recipe. You can also use oat milk if you prefer. Both options keep the pudding creamy. Vegans can enjoy this dish without worry. Just follow the full recipe and swap the milk. Want to jazz up your pudding? Adding spices like cardamom gives a warm flavor. You can also stir in chocolate for a fun twist. It melts into the pudding and makes it rich. Try different spices to find your favorite version. This pudding is fun all year! In summer, add tropical fruits like mango or pineapple. They brighten up the dish and make it fresh. In fall, try adding spiced fruits. Think apples or pears with cinnamon. Each season brings new flavors to explore! To keep your coconut rice pudding fresh, use airtight containers. Glass jars or plastic containers work well. Make sure they seal tightly. This helps prevent any odors from other foods. You want to enjoy every bite, not taste the fridge! When it comes to reheating, the stovetop is best. Place the pudding in a saucepan. Add a splash of milk to help restore creaminess. Heat it on low, stirring often. You want it warm, not hot. This keeps the texture smooth and delicious. In the fridge, your pudding lasts about 3 to 5 days. If you want to store it longer, try freezing. You can freeze it for up to 2 months. Just remember to use freezer-safe containers. When you want to enjoy it, thaw it in the fridge overnight. Then reheat as needed for a tasty treat! To make coconut rice pudding creamy, add more liquid. You can increase the coconut milk or almond milk. This helps the rice absorb more moisture and become softer. You can also stir in a bit of extra milk towards the end. This will give you a nice, smooth texture. Yes, you can use other rice types. Arborio rice is best for creaminess. It has a high starch content, which creates a rich texture. You can try jasmine or basmati rice, but they will give a different feel. Jasmine rice adds a lovely floral note, while basmati offers a light, nutty flavor. Coconut rice pudding can be healthy. It offers good fats from coconut milk and energy from rice. Almond milk adds a low-calorie option if you choose that. Just watch the sugar amount. You can cut down on sugar for a healthier treat. Fresh fruits like mango or berries add vitamins and flavor too. You now have a clear guide to making coconut rice pudding. We covered essential ingredients and kitchen tools you’ll need. You learned how to prepare, cook, and serve this delicious dessert. Tips for texture and flavor made it easier to personalize your pudding. Plus, we explored variations to suit different tastes and diets. With proper storage, your pudding stays fresh, and reheating is a breeze. Enjoy the process and make this comforting treat your own!

Coconut Rice Pudding Disney Copycat Delightful Recipe

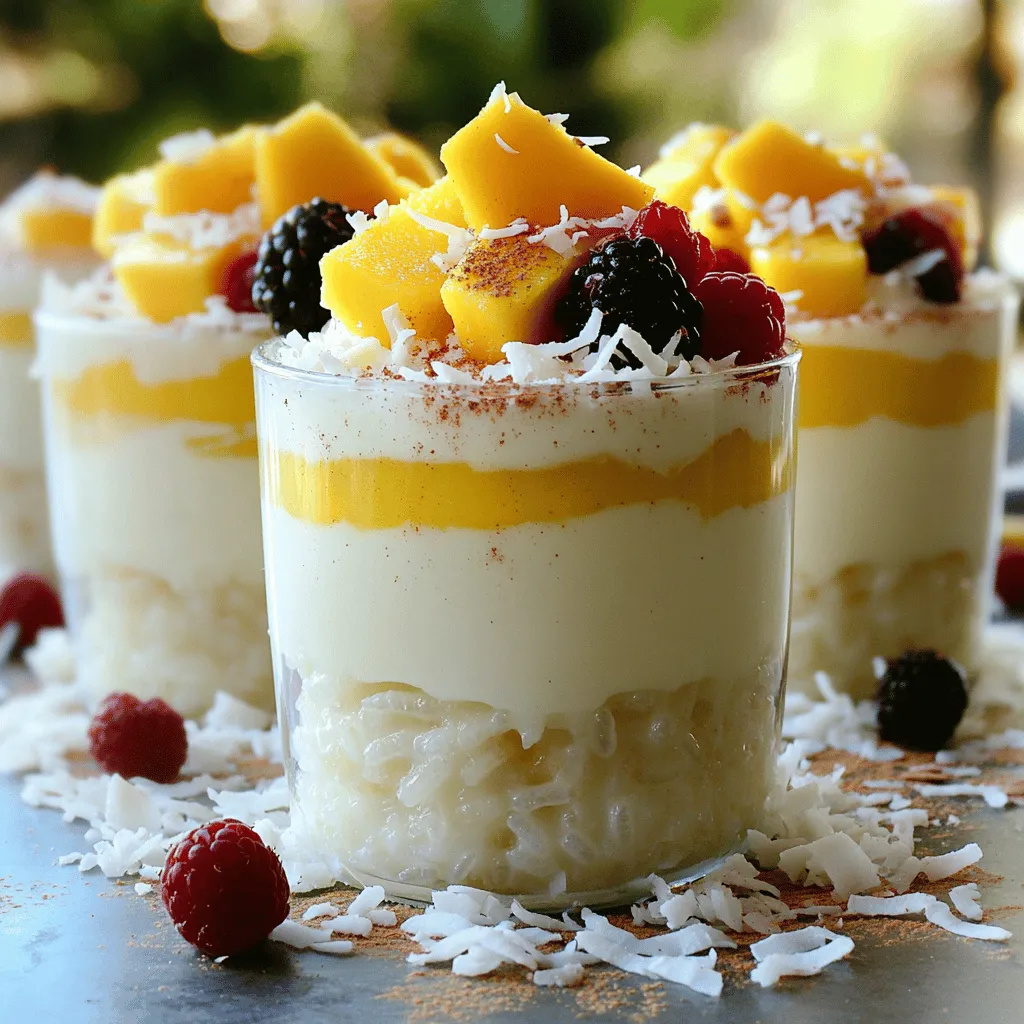
Dive into the sweet world of Coconut Rice Pudding, inspired by Disney’s delightful treat! This creamy, coconut-infused dish is easy

To make this Super Easy Crab Pasta Salad, gather these simple ingredients: - 8 ounces small pasta (like shells or elbows) - 1 cup crab meat (canned or fresh) - 1/2 cup mayonnaise - 1/4 cup Greek yogurt - 1 tablespoon Dijon mustard - 1 tablespoon lemon juice - 1 cup cherry tomatoes, halved - 1/2 cup celery, diced - 1/4 cup red onion, finely chopped - 1/4 teaspoon garlic powder - Salt and pepper to taste - Fresh parsley, chopped for garnish You can swap some ingredients for different flavors. For pasta, use fusilli or rotini. If you prefer, use shrimp instead of crab. For a lighter dressing, swap mayonnaise with more yogurt. You can also add chopped bell peppers for extra crunch. If you run out of an ingredient, don’t worry! Here are some easy swaps: - Replace crab with tuna for a different taste. - Use sour cream instead of Greek yogurt for creaminess. - If you don’t have Dijon mustard, yellow mustard works too. - For a gluten-free option, choose gluten-free pasta. These options keep the dish tasty and fun. Use what you have! Follow the Full Recipe for a complete guide to making this salad. To start, you need to cook the pasta. Use 8 ounces of small pasta, like shells or elbows. Bring a pot of water to a boil. Add a pinch of salt to the water. Then, add the pasta. Cook it according to the package instructions until it's al dente. This usually takes about 8 to 10 minutes. Once done, drain the pasta. Rinse it under cold water to stop the cooking. This also cools it down for the salad. Next, let's make the dressing. In a large mixing bowl, add 1/2 cup of mayonnaise and 1/4 cup of Greek yogurt. These give the salad a creamy base. Now, stir in 1 tablespoon of Dijon mustard and 1 tablespoon of lemon juice. This adds a nice zing. Then, sprinkle in 1/4 teaspoon of garlic powder, salt, and pepper to taste. Whisk everything together until it's smooth. Now, it's time to combine all the ingredients. Add the cooled pasta to the bowl with the dressing. Then, add 1 cup of crab meat, 1 cup of halved cherry tomatoes, 1/2 cup of diced celery, and 1/4 cup of finely chopped red onion. Gently fold everything together. Make sure all the pasta and veggies are coated in the dressing. Taste it and adjust the seasoning if needed. If it feels too thick, add a splash of water or more lemon juice. Chill the pasta salad in the fridge for at least 30 minutes. This helps the flavors blend well. After chilling, serve in bowls and sprinkle fresh parsley on top for a lovely touch. You can find the full recipe in the earlier section. You can serve crab pasta salad in many ways. Try it in a bowl or on a plate. For a fun twist, serve it in avocado halves. This adds flavor and looks nice. You can also pair it with crackers or fresh bread. A side of mixed greens makes a great addition. This adds crunch and freshness to your meal. To boost flavor, consider adding fresh herbs. Dill or chives work well. You can also add a dash of hot sauce for a kick. If you love citrus, try adding more lemon juice or zest. This brightens the dish and makes it zing. For a creamier texture, mix in a bit more mayonnaise or yogurt. Just remember to taste as you go. Don’t skip rinsing the pasta after cooking. This helps cool it down and stops cooking. Over-mixing the salad can make it mushy. Gently fold the ingredients instead. Make sure to chill the salad long enough. This allows the flavors to blend well. Taste for seasoning before serving. You can always add a little more salt or pepper. {{image_2}} You can boost the nutrition by adding veggies. Think of bell peppers, cucumbers, or spinach. These add color and crunch. Chop them small so they blend well with the pasta. You can mix in about 1 cup of veggies for a fresh twist. Not a fan of crab? No problem! You can try shrimp, chicken, or even chickpeas. Just cook the protein first. For shrimp, boil them until pink. For chicken, grill or bake it. Use about 1 cup of your chosen protein for a tasty change. Switching up the dressing can change the whole salad. Try adding some sriracha for heat or honey for sweetness. You can also use ranch or vinaigrette. Just keep the base of mayo and yogurt for creaminess. Adjust the flavors to fit your taste! For more ideas, check out the Full Recipe, where you can find all the steps! To keep your crab pasta salad fresh, store it in an airtight container. This helps prevent it from drying out. Place the container in the fridge. It will stay good for about three days. When you want to eat it again, check for any changes in smell or texture. I don't recommend freezing this salad. The pasta and dressing can change in texture. If you freeze it, the salad might become mushy when thawed. It’s best enjoyed fresh. If you have leftovers, you don’t need to reheat them. This salad tastes great cold. Just take it out of the fridge and serve. If you prefer warm pasta flavors, you can briefly warm it in the microwave. Heat gently to avoid cooking the crab meat. I like to use small pasta shapes like shells or elbows. They hold the dressing well and mix nicely with the crab. Shells add a fun look, and elbows are easy to eat. You can even try rotini for a twist. The key is to pick a pasta that cooks quickly and is easy to bite. Yes, you can! This salad is great for making ahead. If you prepare it, the flavors blend better over time. Just cover it and chill in the fridge. You can make it up to a day in advance. Just remember to stir it well before serving. The crab pasta salad stays fresh for about three to four days in the fridge. Make sure to store it in a sealed container. Always check for any off smells or changes in color before eating. If you notice anything odd, it’s best to toss it out. Enjoy it while it’s fresh for the best taste! For the full recipe, check out the detailed steps above. This blog post covered all key steps for making crab pasta salad. We explored the necessary ingredients, tasty variations, and helpful tips. Remember to choose pasta wisely and not skip the dressing, as it boosts flavor. With this guide, you can create a delicious dish that impresses. Enjoy experimenting with ingredients and serving options. Your crab pasta salad will surely be a hit!

Super Easy Crab Pasta Salad Quick and Tasty Recipe

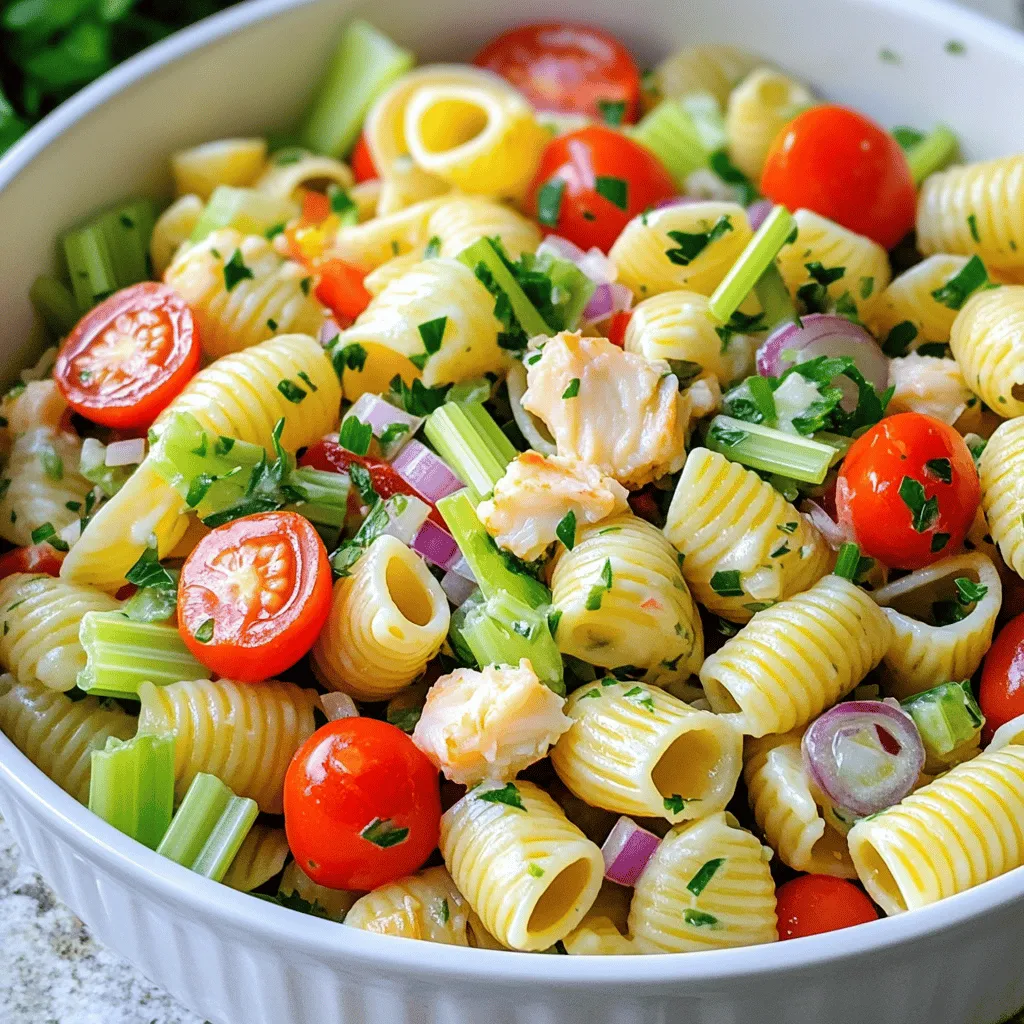
If you’re craving a quick and delicious meal, look no further! This Super Easy Crab Pasta Salad is the perfect

To make this creamy banana dessert, you’ll need some simple yet tasty ingredients. Here’s what you’ll gather: - 2 ripe bananas, sliced - 1 cup Greek yogurt (vanilla or plain) - 1/2 cup coconut cream - 2 tablespoons honey or maple syrup - 1 teaspoon vanilla extract - 1/4 teaspoon ground cinnamon - 1/2 cup granola - 1/4 cup dark chocolate shavings (optional) - Fresh mint leaves for garnish These ingredients create a smooth and sweet treat. You can adjust the honey or maple syrup based on how sweet you like it. I love using ripe bananas because they add natural sweetness. The Greek yogurt and coconut cream make the dessert creamy and rich. Feel free to get creative! You can use different types of granola or even add some nuts for extra crunch. Remember, the key to a great creamy banana dessert is having fun with the flavors. For the full recipe, check out the details above and start creating your own delicious treat! - Step 1: Mix the creamy base Start by grabbing a medium bowl. Add the Greek yogurt and coconut cream. Pour in the honey or maple syrup, then the vanilla extract. Sprinkle in the ground cinnamon. Mix until it is smooth and creamy. This base is what makes your dessert rich and tasty. - Step 2: Layer the ingredients in serving glasses Take your serving glasses or bowls. Put a spoonful of the creamy mix at the bottom. This is your first layer. Next, add a layer of sliced bananas. The bananas give a nice, sweet flavor. Then, sprinkle some granola on top for a crunchy bite. - Step 3: Repeat layers until filled Keep layering! Add more of the creamy mix, followed by more bananas and granola. You can do this 2 to 3 times. Make sure the top layer is the creamy mix. This makes it look nice and inviting. - Step 4: Garnish before serving To finish, sprinkle dark chocolate shavings on top if you like. Add a fresh mint leaf for a pop of color. This makes your dessert look fancy. You can serve it right away or chill it in the fridge for up to an hour. This helps the flavors mix even better. Feel free to check the Full Recipe for more details and tips. Enjoy your creamy banana dessert! - Use ripe bananas for maximum sweetness Ripe bananas have more natural sugar. They taste sweeter and creamier. Look for bananas with brown spots. This shows they are ripe and ready to use. - Opt for full-fat coconut cream for creaminess Full-fat coconut cream gives your dessert a rich texture. It adds a lovely creaminess that blends well with the other ingredients. You can find it in cans at most stores. - Adjust sweetness to taste Everyone has different preferences for sweetness. Start with two tablespoons of honey or maple syrup. Taste the mixture and add more if you like it sweeter. This way, you can make it just right for you. These tips will help you make the best creamy banana dessert. Enjoy the process and get creative! {{image_2}} You can make this creamy banana dessert even more fun with a few twists. Here are some ideas: - Substitute Greek yogurt with dairy-free alternatives: If you want a dairy-free option, use coconut yogurt or almond yogurt. These options keep the texture creamy and add a nice flavor. - Add nuts for extra crunch: Chopped walnuts or almonds can make the dessert crunchy. Just sprinkle them between layers. They also add healthy fats and protein. - Explore different flavorings: Want to change the flavor? Try mixing in peanut butter or almond butter into the yogurt. This adds a rich taste and pairs well with bananas. These variations can make your creamy banana dessert unique, and you can enjoy it in new ways. For the full recipe, check out the Banana Bliss Parfait. To keep your creamy banana dessert fresh, store any leftovers in an airtight container. This helps prevent the dessert from drying out. If you have made the Banana Bliss Parfait, place it in the fridge right away. It will stay fresh for up to three days. If you want to freeze the components, freeze the sliced bananas separately. Use a freezer bag to avoid freezer burn. You can freeze the creamy mixture, too. Just make sure to leave some space in the container for expansion. Thaw it in the fridge before serving. These storage tips ensure every bite tastes great, even days later. Enjoy your dessert anytime! Can I make this dessert ahead of time? Yes, you can make this dessert ahead. Just prepare it and chill in the fridge. It keeps well for up to one hour. If you want to make it a day before, store the layers separately. This helps keep the granola crunchy. How do I ripen bananas quickly? To ripen bananas fast, place them in a paper bag. Close the bag loosely and leave it at room temperature. The ethylene gas will speed up the ripening. You can also use an oven. Bake unpeeled bananas at 300°F for about 15-20 minutes. Watch them closely, as they can get too soft. What can I use instead of granola? If you don’t have granola, try crushed nuts or seeds. You can also use cookie crumbles or crushed cereal. These options add crunch and flavor. Just make sure to pick something you love! For a healthier twist, use toasted oats or puffed rice. For the full recipe, you can refer to the Banana Bliss Parfait. You learned how to make a tasty creamy banana dessert. We covered the ingredients, instructions, and ways to add your own twist. Remember to use ripe bananas for the best flavor and creaminess. You can also play with different toppings and storage methods. This dish is easy to prepare and a great treat for any occasion. Enjoy making it your own and sharing it with friends and family!

Creamy Banana Dessert Easy and Delicious Treat

Craving a sweet treat that’s both easy to make and delicious? Look no further! This creamy banana dessert blends ripe

Older posts
Newer posts
← Previous Page1 … Page38 Page39 Page40 … Page55 Next →

dsad

© 2025 Lisa Dishes • Built with GeneratePress

Our Policies

  • Copyright Policy
  • Cookie Policy
  • GDPR Policy
  • Privacy Policy
  • Disclaimer
  • Terms Of Use

More Information

  • Home
  • About
  • Contact
  • Appetizers
  • Dessert
  • Dinner
  • Drinks
©2025, Lisa Dishes About Back To Top