Skip to content
DisclaimerTerms Of UseGDPR PolicyCookie Policy

Lisa Dishes

  • Home
  • Drinks
  • Appetizers
  • Dinner
  • Dessert
  • About
  • Contact
  • Privacy Policy
DisclaimerTerms Of UseGDPR PolicyCookie Policy

lisa

- 1 lb chicken breast, sliced into thin strips - 1 cup jasmine rice - 1/4 cup low-sodium soy sauce - 1 cup broccoli florets - 1 carrot, julienned - 2 green onions, chopped - 2 tablespoons honey or maple syrup - 2 tablespoons rice vinegar - 2 cloves garlic, minced - 1 teaspoon fresh ginger, grated When I make teriyaki chicken rice bowls, I focus on fresh, simple ingredients. The chicken breast is the star here. I slice it thinly so it cooks fast and soaks up the sauce. Jasmine rice is my go-to because it’s fragrant and pairs well with the dish. For the vegetables, I love adding broccoli florets and julienned carrots. They add color and crunch. Green onions on top bring a fresh bite that balances the sweet sauce. Now, let’s talk about the sauce. I mix honey or maple syrup with rice vinegar, garlic, and ginger. This gives the dish its signature sweet and savory taste. I use low-sodium soy sauce to keep the salt level just right. You can find the full recipe at the end of this article. - Rinsing the rice: Start by rinsing 1 cup of jasmine rice under cold water. Keep rinsing until the water runs clear. This step removes excess starch and helps the rice cook better. - Cooking instructions: In a pot, add the rinsed rice and 2 cups of water or chicken broth. Bring it to a boil. Once it boils, lower the heat, cover the pot, and let it simmer for 15 minutes. When done, fluff the rice with a fork and set it aside. - Mixing ingredients: In a small bowl, whisk together 1/4 cup low-sodium soy sauce, 2 tablespoons honey or maple syrup, 2 tablespoons rice vinegar, 2 cloves minced garlic, and 1 teaspoon grated ginger. - Setting aside: Once mixed, set the sauce aside for later use. This sauce adds a sweet and savory touch to your dish. - Pan preparation: In a large pan, heat a drizzle of olive oil over medium-high heat. - Cooking chicken: Add 1 lb of sliced chicken breast to the pan. Season with salt and pepper. Cook it for about 5 to 7 minutes until it turns golden brown and is fully cooked. - Adding vegetables: Once the chicken is cooked, toss in 1 cup of broccoli florets and 1 julienned carrot. Stir-fry these for about 3 to 4 minutes until they are tender-crisp. - Adding sauce: Pour the prepared teriyaki sauce over the chicken and vegetables. Stir well to coat everything. - Thickening with cornstarch slurry: Let it simmer for 2 minutes. Then, add 1 tablespoon of cornstarch mixed with 2 tablespoons of water to the pan. Stir continuously until the sauce thickens, which takes about 1 to 2 minutes. - Assembly of bowls: In serving bowls, place a scoop of jasmine rice. Top it with the teriyaki chicken and vegetable mixture. Garnish with chopped green onions and sesame seeds. Enjoy your meal! For the complete recipe, check the Full Recipe section. To make a great teriyaki sauce, balance sweetness and saltiness. Use low-sodium soy sauce to control salt. Add honey or maple syrup for sweetness. You can also try coconut sugar or agave syrup as alternatives. These options give a unique flavor while keeping it healthy. Cook your chicken until it is juicy and tender. Use a meat thermometer; 165°F (75°C) is the safe zone. Marinating the chicken for at least 30 minutes makes it even better. For a simple marinade, use soy sauce, ginger, and garlic. This adds flavor and helps keep the meat moist. Fresh ingredients always shine in your dish. Choose bright, crisp vegetables for color and crunch. Broccoli, carrots, and green onions work well together. Garnish with chopped green onions and sesame seeds for a nice touch. This not only adds flavor but makes your dish look amazing. Enjoy your creation and impress your friends! {{image_2}} You can switch up the main protein in your teriyaki chicken rice bowl. - Tofu: Tofu is a great choice for a plant-based option. It soaks up flavors well. Use firm tofu for a nice texture. Cut it into cubes and sauté until golden. Follow the same steps as chicken for cooking. - Shrimp: Shrimp cooks quickly and adds a tasty twist. Use peeled and deveined shrimp. Sauté in olive oil for about 3-5 minutes, until pink. Mix in the teriyaki sauce, just like with chicken. If you want to try different grains, here are two great substitutes. - Brown rice: Brown rice has more fiber and a nutty flavor. It takes longer to cook, so plan for about 45 minutes. Rinse it well before cooking for the best texture. - Quinoa: Quinoa is quick and packed with protein. Cook it in water or broth for about 15 minutes. It's light and fluffy, making it a perfect base for your teriyaki dish. You can make your teriyaki chicken rice bowl even better by adding more veggies. - Bell peppers: Slice bell peppers into strips. They add a sweet crunch and colorful touch. Sauté them with the chicken for a few minutes until tender. - Snap peas: Snap peas are sweet and crunchy. Add them in the last minute of cooking. This keeps them crisp and bright in color. You can find the Full Recipe to create this dish with all these fun variations! - Refrigeration: After enjoying your teriyaki chicken rice bowls, let them cool down. Store the leftovers in an airtight container. They can stay fresh in the fridge for up to four days. - Freezing: For longer storage, you can freeze the chicken and rice. Place them in freezer-safe bags or containers. They will keep well for about three months in the freezer. - Microwave instructions: To reheat, simply place the rice bowl in the microwave. Heat it on high for about 2-3 minutes. Stir halfway through for even warmth. - Pan reheat tips: If you prefer the stove, heat a pan over medium heat. Add a splash of water to create steam. Place your bowl in the pan and cover it. Heat for about 5-7 minutes, stirring occasionally. - How long it lasts in the fridge: Teriyaki chicken rice bowls last in the fridge for four days. Be sure to check the dates and enjoy them while fresh. - Signs of spoilage: If you notice any off smells or changes in color, it’s best to toss it. Always trust your senses when it comes to food safety. You can make simple ingredient swaps. Use skinless chicken thighs instead of breasts for more flavor. Switch to brown rice for more fiber. Add more veggies like bell peppers, snap peas, or spinach for extra nutrients. Try low-sugar alternatives to honey, like agave syrup or mashed banana. These swaps keep taste while boosting health. Yes, you can meal prep these bowls. Cook the chicken and veggies ahead of time. Store them in airtight containers in the fridge. You can keep the rice separate to avoid sogginess. Reheat everything before serving. This makes it quick to enjoy a tasty meal on busy days. Several sides complement these rice bowls. Steamed edamame adds protein and a nice crunch. A simple cucumber salad gives a fresh contrast. You can also serve pickled vegetables for a tangy kick. These sides enhance your meal and bring out the teriyaki flavor. For a detailed recipe, check out the Full Recipe. It includes all the steps to create your Teriyaki Chicken Rice Bowls. You’ve learned how to make tasty Teriyaki Chicken Rice Bowls. We covered every step, from choosing fresh ingredients to cooking and assembling your dish. I shared tips on enhancing flavors and offered fun variations. Remember, you can always adjust ingredients for a healthier meal or try different proteins. Enjoy this dish on busy days or impress friends at dinner. Keep these tips in mind for delicious bowls every time. Happy cooking!

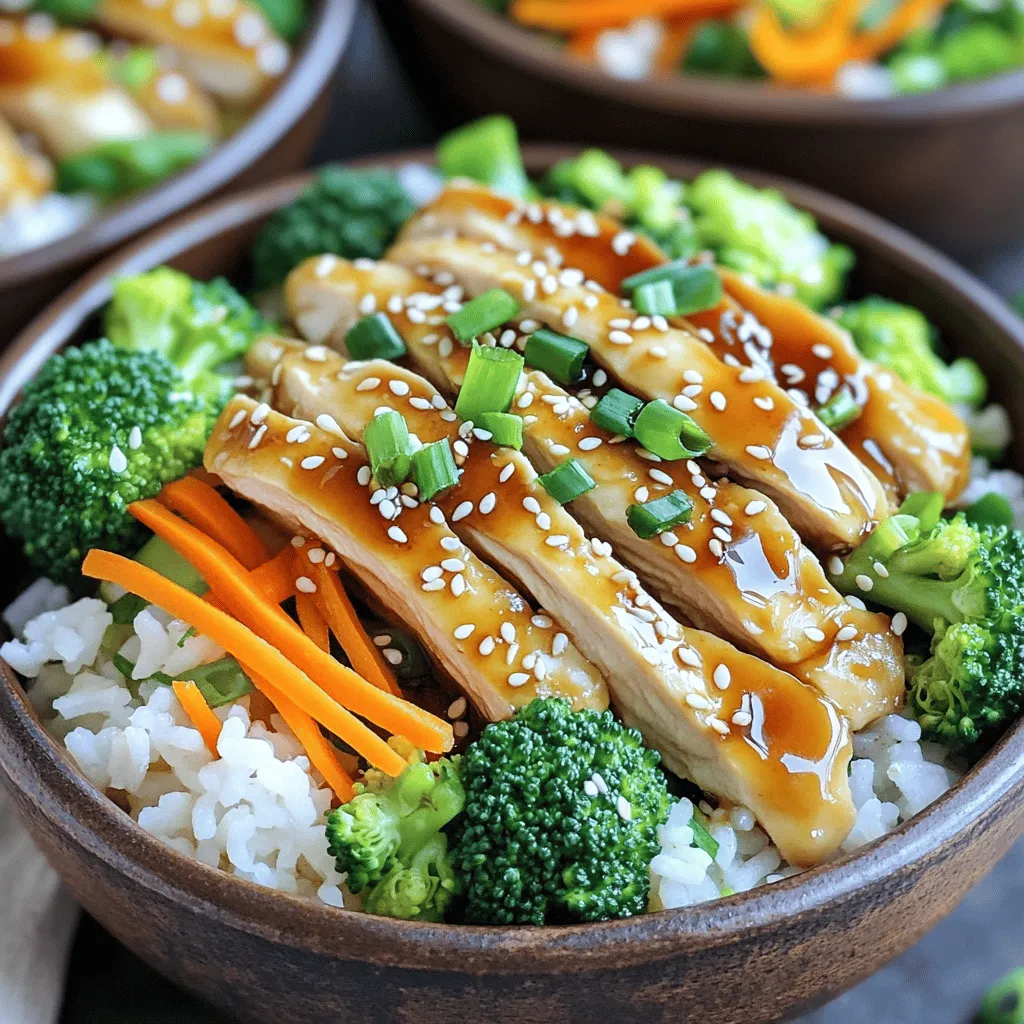
Teriyaki Chicken Rice Bowls Easy and Tasty Delight

Craving a delicious meal that’s easy to make? Look no further! Teriyaki Chicken Rice Bowls offer a perfect mix of

- 1 lb large shrimp, peeled and deveined - 4 tablespoons unsalted butter - 4 cloves garlic, minced - 1 teaspoon red pepper flakes - Salt and pepper to taste - 1 lemon, juiced and zest grated - 1/4 cup chicken or vegetable broth - 1/4 cup fresh parsley, chopped - Optional: 1 cup cherry tomatoes, halved - Optional: 1 cup asparagus, cut into 2-inch pieces When I prepare One Pan Garlic Butter Shrimp, I focus on using fresh ingredients. Fresh shrimp offers the best taste. I always peel and devein them for a clean bite. Unsalted butter is my go-to. It melts beautifully and lets the garlic shine. For flavor, I add garlic. Minced garlic gives a strong taste, and I always use four cloves. Red pepper flakes add heat. You can adjust the amount to fit your spice level. A squeeze of lemon juice brightens the dish. I use one whole lemon for the best flavor. The broth adds moisture and depth. I prefer chicken broth, but vegetable broth works too. Fresh parsley adds color and freshness. If I want to make the dish colorful, I add halved cherry tomatoes and asparagus. Gather these ingredients before you start cooking. This makes the process smooth and easy. Each ingredient plays a role in making this dish quick and flavorful. You can find the full recipe for more details. - Rinse and pat dry shrimp. - Season shrimp with salt and pepper. Start by rinsing 1 pound of shrimp under cold water. This helps clean them and removes any excess salt. Next, pat them dry with paper towels. This step is key to getting a nice sear later. Now, sprinkle salt and pepper on the shrimp. This simple seasoning enhances their natural flavor. - Melt butter in a skillet. - Sauté garlic and red pepper flakes. - Cook shrimp until pink and opaque. Now, heat a large skillet over medium heat. Add 4 tablespoons of unsalted butter. Watch as it melts and starts to froth. This is when you add 4 cloves of minced garlic and 1 teaspoon of red pepper flakes. Stir for about a minute. You want the garlic fragrant but not brown. Next, add your seasoned shrimp to the skillet. Cook them for 2-3 minutes on each side. They should turn pink and opaque when done. This is a sure sign of perfectly cooked shrimp. - Add lemon juice and broth. - Incorporate optional ingredients if desired. - Simmer and finish with parsley. Once the shrimp are ready, it’s time to add flavor. Squeeze in the juice of 1 lemon and pour in 1/4 cup of chicken broth. This adds moisture and depth. If you like, toss in some cherry tomatoes and asparagus. Cook everything for an extra 3-4 minutes. You want the veggies tender and warmed through. Finally, remove the skillet from heat. Sprinkle with 1/4 cup of chopped fresh parsley for a burst of color. Adjust the seasoning with more salt and pepper if needed. You now have a delicious One Pan Garlic Butter Shrimp ready to enjoy! For the full recipe, check out the previous section. - Ensure shrimp are fully thawed for even cooking. - Use fresh garlic for better flavor. When cooking shrimp, thaw them before you start. This ensures they cook evenly. Place frozen shrimp in cold water for a quick thaw. Fresh garlic makes a big difference. It adds a stronger taste than jarred garlic. Just mince the cloves right before cooking. - Adjust red pepper flakes for spice preference. - Experiment with herbs like thyme or basil. Red pepper flakes can change the heat level. Add more for a spicier dish or less for a milder taste. Try fresh herbs, too. Thyme brings an earthy flavor, while basil adds sweetness. Both can enhance the dish in their own way. - Serve directly from the skillet for a casual presentation. - Plate individually with lemon wedges. Serving from the skillet feels relaxed and fun. It invites everyone to dig in. If you want a fancier look, plate each serving. Add lemon wedges for a pop of color and fresh flavor. This makes the dish look inviting and bright. For the full recipe, check out the complete guide! {{image_2}} You can easily change the main protein in this dish. Substitute shrimp with chicken or tofu for a different twist. Chicken cooks well in the same garlic butter, while tofu absorbs those rich flavors. Try adding different vegetables too. Bell peppers or spinach add color and nutrients. You can mix and match to suit your taste. To switch up the taste, try using lime juice instead of lemon. It gives a fresh zest that's fun and bright. You can also experiment with different spices. Paprika adds a smoky warmth, while cumin brings an earthy flavor. Feel free to play with spices to create your perfect dish. This dish is versatile when it comes to serving. Serve the shrimp over pasta or rice for a heartier meal. The sauce clings beautifully to these bases. Another great option is to pair it with crusty bread. The bread will soak up all that delicious garlic butter sauce, making every bite a delight. After cooking, store leftovers in an airtight container. This helps keep them fresh. I find that it’s best to eat them within 2-3 days. Shrimp can lose their flavor over time, so enjoy them soon. When you're ready to eat leftovers, reheat them gently on the stovetop. Use low heat to warm them up. If you heat them too fast, the shrimp can turn rubbery. You want them tender and juicy, just like when they were fresh. You can freeze this dish, but fresh is always best. If you decide to freeze, omit the vegetables before freezing. This keeps the texture right when you thaw and cook them later. Enjoy your One Pan Garlic Butter Shrimp at its finest! Typically, it takes 2-3 minutes per side until they turn pink and opaque. This quick cooking time helps keep the shrimp tender and juicy. Overcooking can make them tough, so keep an eye on them. Yes, you can use frozen shrimp for this recipe. Just make sure they are fully thawed and dried before you start cooking. Thawing helps them cook evenly. Patting them dry prevents excess water from splattering in the pan. This dish is great served with pasta, rice, or crusty bread. Pasta soaks up the garlic butter nicely. Rice adds a nice base, while crusty bread is perfect for dipping. Each option enhances the meal and makes it more filling. You can also add a side salad for freshness. For the full recipe, check out the section above. This blog post covers everything you need to know about making One Pan Garlic Butter Shrimp. You learned the key ingredients, cooking steps, and tips for the best flavor. With options for variations and serving ideas, you can personalize this dish. Remember, fresh ingredients and proper cooking will make your meal shine. I encourage you to try this recipe and enjoy the tasty results! Cooking should be fun and easy, so dive in and savor every bite.

One Pan Garlic Butter Shrimp Quick and Flavorful Dish

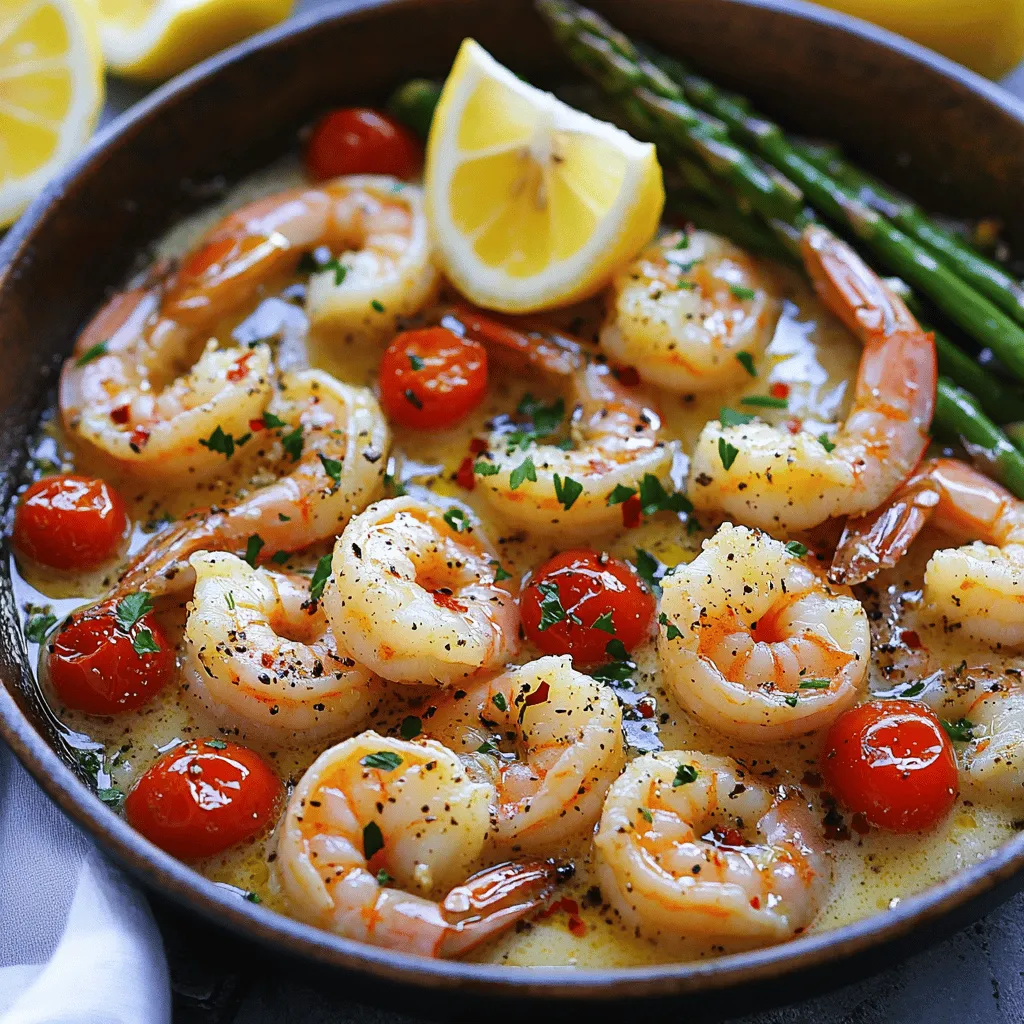
Looking for a quick and tasty dinner? My One Pan Garlic Butter Shrimp is the answer! This dish packs bold

- Fresh strawberries - Heavy whipping cream - Cream cheese Fresh ingredients make this cake special. Use ripe strawberries for the best flavor. The heavy whipping cream adds a rich texture. Cream cheese gives a creamy base that holds everything together. - Powdered sugar - Vanilla extract - Graham crackers Pantry ingredients are easy to find. Powdered sugar sweetens the cream and helps it stay thick. Vanilla extract adds a lovely aroma. Graham crackers form the cake's base, giving a nice crunch. - Lemon zest - Fresh mint leaves for garnish Optional ingredients can enhance the cake. Lemon zest adds brightness and a fresh twist. Mint leaves provide a pop of color and a nice flavor when you serve the cake. You can skip these, but they add a nice touch. For the full recipe, check out the details above. To make the whipped cream, start with cold heavy cream. Pour it into a large bowl. Use a hand mixer or stand mixer to beat the cream. Beat it until soft peaks form. This means the cream will hold its shape but still be smooth. Be careful not to overbeat it. Overbeating will turn it into butter! In a separate bowl, add softened cream cheese. Mix in powdered sugar and vanilla extract. Use a spatula or mixer to blend until smooth. The mixture should be creamy and lump-free. You may also add lemon zest here for a fresh taste. This step adds a nice touch to the cream cheese. Grab a rectangular dish for the cake. Start by laying down a layer of graham crackers. Make sure to cover the bottom completely. Next, spread half of the cream mixture over the crackers. Then, layer half of the sliced strawberries on top. Repeat these layers with more graham crackers, the remaining cream, and the rest of the strawberries. Cover the dish with plastic wrap. Refrigerate it for at least four hours or overnight. This helps the flavors mix and the graham crackers soften. Enjoy this easy and creamy delight! For the full recipe, check out the No Bake Strawberry Icebox Cake. To make your icebox cake shine, start with clean layers. Use a flat dish for even stacking. Place a layer of graham crackers at the bottom first. Spread your cream mixture evenly on top. This helps flavors blend well. Next, layer half of your strawberries on the cream. Repeat this process for the second layer. This method ensures every bite is rich in flavor. The right consistency is key for a perfect dessert. When whipping your cream, stop when soft peaks form. This keeps the cream light and airy. Mix the cream cheese until smooth before adding sugar and vanilla. Gently fold the whipped cream into the cream cheese mix. This keeps it fluffy. For extra zing, add lemon zest. It brightens the flavor without overpowering it. Presentation matters for this beautiful cake. Cut it into neat squares for easy serving. You can add fresh mint leaves on top for a pop of color. Consider serving it on a colorful plate to make it stand out. Pair it with a scoop of vanilla ice cream for extra delight. For a fun twist, drizzle some chocolate sauce over the top. These small touches make your dessert memorable. For the full recipe, check the section above. {{image_2}} You can change up the flavors in your icebox cake. Try using different fruits like blueberries, raspberries, or peaches. You can even mix in some chocolate or caramel. Each fruit gives a new taste. It’s fun to get creative. Add a splash of juice or extract for extra flavor. For example, almond or coconut extracts can add a lovely twist. This will keep your dessert fresh and exciting. If you need a gluten-free version, it’s easy to swap out the graham crackers. Use gluten-free cookies or crackers instead. Many options are available at the store. Just make sure to check the labels. You can also use crushed gluten-free oats for a great base. This way, everyone can enjoy the cake without worry. For a dairy-free icebox cake, use non-dairy cream cheese and whipped cream. Almond, coconut, or soy-based options work well. Make sure to choose brands that whip well. You can still achieve that creamy texture. This means all your friends can enjoy a slice too! With these options, everyone can enjoy this easy and creamy delight. If you want to try the classic version, check out the Full Recipe for more details. To keep your no bake strawberry icebox cake fresh, wrap it well. Use plastic wrap or aluminum foil. This helps prevent the cake from drying out. Store it in the fridge. Make sure it is in an airtight container if possible. This keeps the flavors intact. Yes, you can freeze this cake! First, let the cake set in the fridge for at least 4 hours. Then, slice it into squares. Wrap each piece in plastic wrap. Place the wrapped pieces in a freezer-safe bag. This helps save space. When ready to enjoy, thaw in the fridge overnight before serving. In the fridge, your no bake strawberry icebox cake lasts about 3 to 4 days. The graham crackers will soften over time, which is normal. If frozen, it can last for up to 2 months. Just remember, the sooner you eat it, the fresher it will taste. Enjoy every bite! A No Bake Strawberry Icebox Cake is a chilled dessert made with layers of graham crackers, cream, and strawberries. It is light, creamy, and full of sweet fruit flavor. You build it in a dish and let it chill in the fridge. The graham crackers soften and blend with the creamy mix. The dessert is easy to make and does not require any baking, making it perfect for hot days. To get the best results, chill the cake for at least 4 hours. If you can, let it set overnight. This time helps the flavors mix and the texture become creamy. You want the graham crackers to soften well, so they melt in your mouth. Yes, you can use frozen strawberries. They can save time and are often cheaper. However, they may not taste as fresh. Frozen strawberries release more juice when thawed, which can make the cake a bit watery. If you use them, be sure to drain any excess juice. Fresh strawberries give a brighter flavor and firmer texture, which I prefer. For the full recipe and more tips, check out the [Full Recipe]. This blog post outlined how to make a delicious No Bake Strawberry Icebox Cake. We covered fresh and pantry ingredients, plus some optional ones for extra flavor. You learned the step-by-step process, from whipping cream to layering the cake. We shared tips for perfect layers and consistency, along with creative serving ideas. Variations included gluten-free and dairy-free options. Don't forget about smart storage methods to keep your cake fresh! I hope you feel ready to create this easy dessert. It’s a fun treat for any occasion.

No Bake Strawberry Icebox Cake Easy and Creamy Delight

If you’re craving a sweet and creamy dessert without turning on the oven, you’re in the right place! This No

To make Easy Philly Cheesesteak Sliders, you need a few key ingredients. Here’s a list of what you will need: - 12 slider rolls - 1 pound thinly sliced beef (ribeye or sirloin) - 1 medium onion, thinly sliced - 1 green bell pepper, thinly sliced - 2 cups shredded provolone cheese - 3 tablespoons olive oil - 2 tablespoons Worcestershire sauce - 1 teaspoon garlic powder - Salt and pepper to taste - Optional: Fresh parsley for garnish Gathering the right ingredients is crucial for great flavor. Choose fresh items for the best results. The beef can make or break your sliders, so opt for ribeye or sirloin. These cuts are tender and full of flavor. Onions and bell peppers give a sweet and savory mix. Provolone cheese melts beautifully, adding creaminess to each bite. Olive oil adds richness, while Worcestershire sauce brings depth to the beef. You can adjust seasonings to suit your taste. If you love a little kick, add some black pepper. And don’t forget about the garnish! Fresh parsley can brighten up your dish. With these essential ingredients, you're ready to create a delicious meal. For the full recipe, follow the instructions to make these sliders come to life! - Preheat the oven to 350°F (175°C). - Prepare the baking dish by greasing it lightly. - In a large skillet, heat the olive oil on medium-high. - Add the sliced onion and bell peppers. Sauté for 5-7 minutes until soft. - Push the veggies to the side and add the thinly sliced beef. - Season with salt, pepper, and garlic powder. Cook for 3-4 minutes. - Break up the meat with a spatula until browned. - Stir in the Worcestershire sauce and mix well. Remove from heat. - Slice the slider rolls in half. Place the bottom halves in the greased dish. - Evenly spread the beef and veggie mix on the bottom rolls. - Layer the shredded provolone cheese on top of the beef. - Place the top halves of the rolls over the cheese. - Lightly brush the tops with olive oil or melted butter. - Cover the dish with aluminum foil. Bake for 15 minutes. - Remove the foil and bake for an additional 5-10 minutes. - Look for melted cheese and golden brown tops. - Let cool for a couple of minutes before slicing. - Serve warm and enjoy your sliders! For the complete details, check the Full Recipe. To make the best Philly cheesesteak sliders, start with the right beef. I recommend using ribeye or sirloin. These cuts have great flavor and tenderness. Slicing the beef thinly helps it cook quickly and stay juicy. For melting cheese, use provolone. It melts smoothly and adds a creamy touch. Layer the cheese on top of the beef while it’s hot. This helps it melt evenly and gives that classic cheesesteak vibe. Want some heat? Add jalapeños to your filling. They bring a nice kick to the dish. Also, try different cheeses. Swiss and Cheddar can add unique flavors that stand out. Mixing cheese types can create a fun taste experience. Serve your sliders with tasty dips. Marinara or ranch dressing works really well. They add extra flavor and fun when eating. Pair the sliders with sides like fries or coleslaw. These add crunch and balance the meal. For the full recipe, check out the complete guide above. {{image_2}} For a tasty twist, you can make vegetarian sliders. Use mushrooms as the main filling. They add a meaty texture and rich flavor. You can also add other vegetables, like zucchini or spinach. This option keeps all the fun without meat. You can switch up the bread. Try using hoagie rolls instead of slider rolls. They hold more filling and can add a new taste. If you want a lighter dish, you can use chicken. Thinly sliced chicken breast works well. Just season it like you would the beef. To make your sliders even better, think about new seasonings. Add spices like paprika or cumin for a kick. You can also try different sauces. A bit of hot sauce or barbecue sauce can change the flavor. For gourmet toppings, sautéed mushrooms or caramelized onions are great choices. They add depth and richness to your sliders. To store leftovers in the fridge, let the sliders cool first. Place them in an airtight container. You can also use plastic wrap for single sliders. This keeps them fresh and prevents drying out. I recommend using glass containers for the best results. They help keep the flavors strong. Freezing sliders is easy. Wrap each slider in plastic wrap. Then, place them in a freezer bag. Make sure to squeeze out the air before sealing. For reheating frozen sliders, let them thaw in the fridge overnight. You can then heat them in the oven at 350°F (175°C) for about 10-15 minutes. This warms the sliders evenly without making them soggy. In the fridge, sliders last about 3 to 4 days. Always check for signs of spoilage. If the sliders smell bad, or if they look off, it’s best to throw them away. Keeping an eye out for mold is also important. Trust your senses to keep your meals safe! Philly cheesesteak sliders are small sandwiches. They usually have thinly sliced beef, onions, and bell peppers. Provolone cheese melts over the top, making them rich and tasty. These sliders are a fun, easy twist on the classic Philly cheesesteak. To reheat leftover sliders, use the oven. Preheat it to 350°F (175°C). Wrap the sliders in foil to keep them moist. Bake for about 10-15 minutes. You can also use a microwave, but this may make the bread chewy. Yes, you can make these sliders ahead of time. Prepare the beef and veggie mix earlier in the day. Store it in the fridge. When ready to serve, assemble the sliders and bake them fresh. This keeps them warm and tasty. Yes, there are gluten-free options. Look for gluten-free slider rolls in stores. You can also use lettuce wraps if you want a low-carb choice. These alternatives keep the sliders delicious and friendly for everyone. Many dips pair well with Philly cheesesteak sliders. Popular options include marinara sauce and ranch dressing. You can also serve them with creamy cheese sauce. Each dip adds a new layer of flavor to your sliders. Check out the Full Recipe for more serving ideas! These sliders are easy to make and delicious to eat. You learned about the key ingredients and how to prepare them step by step. I shared tips to make your sliders perfect and even offered variations to try. Remember, you can store leftovers easily or make them ahead of time for guests. Enjoy customizing and sharing these tasty treats! With simple steps and fun twists, these Philly Cheesesteak Sliders will impress everyone. Happy cooking!

Easy Philly Cheesesteak Sliders Savory and Quick Treat

Craving a savory, crowd-pleasing treat? These Easy Philly Cheesesteak Sliders are your answer. Packed with tender beef, melty cheese, and

- 2 cups cooked brown rice - 1 pound boneless, skinless chicken breasts, diced - 2 cups fresh broccoli florets - 1 cup shredded cheddar cheese - 1/2 cup cream cheese, softened - 1 cup chicken broth - 1 cup milk - 1 teaspoon garlic powder - 1 teaspoon onion powder - 1/2 teaspoon paprika - Salt and pepper to taste - 1/2 cup breadcrumbs (optional for topping) To make this Cheesy Chicken Broccoli Rice Bake, you need some key ingredients. First, use cooked brown rice as your base. It adds great texture and is healthy. Next, add diced chicken breasts. They are the star of the dish. You want them tender and juicy. Now, let’s talk about the broccoli. Fresh florets add color and crunch. They also boost the nutrition of this dish. For the creamy part, you will need cheddar and cream cheese. The cheddar cheese melts beautifully, while the cream cheese makes it rich and smooth. Don’t forget the chicken broth and milk. They help blend all the flavors. Spices like garlic powder, onion powder, and paprika give the dish great taste. Adjust salt and pepper to your liking. Finally, if you want a crunchy topping, breadcrumbs are a nice option. They add a lovely texture contrast. All these ingredients create a warm and cozy dish. Make sure to check the Full Recipe for detailed steps! - Preheat your oven to 350°F (175°C). Grease a 9x13 inch baking dish with cooking spray or butter. - In a large skillet over medium heat, cook 1 pound of diced, boneless, skinless chicken breasts until golden brown, about 5-7 minutes. Season it with 1 teaspoon garlic powder, 1 teaspoon onion powder, 1/2 teaspoon paprika, and salt and pepper to taste. - In a large bowl, mix 2 cups of cooked brown rice, the cooked chicken, 2 cups of fresh broccoli florets, 1/2 cup of softened cream cheese, 1 cup of chicken broth, and 1 cup of milk. Stir until everything is evenly combined. - Once mixed, add 1/2 cup of shredded cheddar cheese and adjust the seasoning if needed. You want it to taste just right. - Pour the mixture into your prepared baking dish and spread it evenly. - Top with the remaining 1/2 cup of shredded cheddar cheese. If you like a crunch, sprinkle 1/2 cup of breadcrumbs on top. - Bake in the preheated oven for 25-30 minutes. You want the cheese to melt and bubble. The top should turn golden brown. - To check for doneness, look for a bubbly surface and a golden color. Let it cool for a few minutes before serving. For the full recipe, check the [Full Recipe]. To keep your chicken moist, cook it just until golden. Overcooking makes it dry. Use a meat thermometer to check for doneness at 165°F (74°C). This will help you serve juicy chicken every time. For perfect broccoli, steam it for just a few minutes. You want it bright green and tender-crisp. If you cook it too long, it gets mushy. You can also sauté broccoli in a pan with a bit of oil. This adds extra flavor. For a rich and creamy bake, I love using cheddar cheese. It melts well and provides a great flavor. You can also mix in mozzarella for extra stretchiness. If you want a sharp taste, try a bit of Gruyère. When melting cheese, add it near the end of cooking. This keeps it from clumping. Stir gently as it melts to create a smooth texture. You can also mix in a little milk for a creamier result. Pair your Cheesy Chicken Broccoli Rice Bake with a fresh salad. A simple green salad with a light vinaigrette works well. You can also serve it with garlic bread for a comforting meal. For garnishing, add fresh parsley on top right before serving. It adds color and freshness. You can also sprinkle more cheese on top once it comes out of the oven for that extra cheesy touch. For the full recipe, check the earlier section. {{image_2}} You can switch chicken for turkey or tofu. Turkey gives a leaner taste, while tofu suits plant lovers. Cooked sausage or ham also adds great flavor. Simply mix them in with the rice and broccoli. Feel free to add other vegetables. Carrots, peas, or bell peppers work well. Fresh veggies are tasty, but frozen ones save time and still taste good. Just toss them in without thawing. For a low-carb option, use cauliflower rice instead of brown rice. It’s light and still filling. If you need a gluten-free choice, skip the breadcrumbs or find gluten-free ones. Enjoy the same cheesy goodness without worry. To keep your Cheesy Chicken Broccoli Rice Bake fresh, store leftovers in the fridge. Use airtight containers to prevent drying out. I recommend glass or plastic containers with tight-fitting lids. These containers can help keep flavors intact and avoid spills. If you want to save some for later, freezing is easy. First, let the bake cool completely. Then, transfer it into freezer-safe containers or heavy-duty freezer bags. Label them with the date. When you want to eat it, thaw overnight in the fridge. Reheat in the oven at 350°F until hot. You can also use the microwave, but the oven keeps it crispy. In the fridge, your bake will stay good for about 3 to 4 days. If you freeze it, it can last up to 3 months. However, for best taste, try to eat it sooner. Always check for any signs of spoilage before eating. It takes about 15 minutes to prep. Baking takes 25-30 minutes. So, you can enjoy this dish in about 45 minutes. Yes, you can prep everything a day ahead. Just mix all the ingredients and store them in the fridge. When ready, bake it straight from the fridge. This way, you save time on busy days. You can use Greek yogurt for a lighter option. Sour cream works too, adding creaminess. Both will give a nice texture without changing the taste much. Absolutely! Swap out the chicken for chickpeas or tofu. Use vegetable broth instead of chicken broth. Add more veggies like bell peppers or carrots for a heartier meal. Yes, you can reheat leftovers easily. Use the oven at 350°F for about 15-20 minutes. This helps keep the dish moist. Microwaving works too, but it may dry out the rice. Enjoy your delicious Cheesy Chicken Broccoli Rice Bake! For the Full Recipe, check out the earlier sections. This blog post covered a delicious Cheesy Chicken Broccoli Rice Bake. We explored ingredients, step-by-step instructions, and useful tips. You learned about optional toppings and variations for different diets. We also discussed storage and reheating methods to keep your meals tasty. In summary, this dish is simple, versatile, and perfect for any occasion. Ready to make your own? Enjoy cooking!

Cheesy Chicken Broccoli Rice Bake Comfort Food Recipe

If you’re craving a warm, hearty dish that brings family together, you’ve found it! My Cheesy Chicken Broccoli Rice Bake

- 4 salmon fillets (6 oz each) - 2 tablespoons olive oil - 4 cloves garlic, minced - 1 cup cherry tomatoes, halved - 1 cup spinach, roughly chopped - 1 cup heavy cream - ½ cup Parmesan cheese, grated - 1 teaspoon Italian seasoning - Salt and pepper to taste - Fresh basil for garnish These ingredients make Creamy Garlic Tuscan Salmon a delight. The salmon fillets shine with their rich flavor and texture. Olive oil adds a nice touch, making the dish smooth. Garlic brings a strong, aromatic note to the plate. Cherry tomatoes add sweetness and color, while spinach offers a nutritious boost. The heavy cream creates a luscious sauce, coating the salmon perfectly. Parmesan cheese gives a savory depth that ties everything together. Italian seasoning rounds out the flavors, adding warmth and earthiness. Don't forget to season with salt and pepper for balance. Fresh basil not only looks great but also adds a fresh touch. Each serving of Creamy Garlic Tuscan Salmon packs in about 500 calories. Here's a quick look at the macronutrient breakdown: - Fats: 35g - Proteins: 40g - Carbohydrates: 10g This dish is rich in healthy fats and proteins, making it a filling option. The balance of flavors and nutrients makes it a smart choice for dinner. Enjoy this meal knowing it fuels your body well! You can find the full recipe in the section above. To make the salmon shine, start by seasoning it. Use salt and pepper on both sides. This keeps the taste bright and fresh. Next, chop your veggies. For the tomatoes, cut them in half. For the spinach, just roughly chop it. This helps them cook evenly and blend well in the dish. Heat a large skillet over medium heat. Add two tablespoons of olive oil. Place the salmon fillets skin-side down in the skillet. Cook for 4-5 minutes until they turn golden brown. Then, flip them and cook for another 4-5 minutes. When the salmon is cooked through, take it out and place it on a plate. In the same skillet, add minced garlic. Sauté for about one minute until it smells great. Next, toss in the cherry tomatoes. Cook them for 3-4 minutes until they soften. Add the chopped spinach and stir until it wilts, which takes about 2 minutes. Now it’s time for the creamy sauce. Lower the heat and pour in one cup of heavy cream. Stir it well. Then, add half a cup of grated Parmesan cheese and one teaspoon of Italian seasoning. Mix until the cheese melts and the sauce becomes creamy. Taste it and adjust the salt and pepper as needed. Return the salmon to the skillet, spooning the sauce over each fillet. Let it simmer for another 2 minutes. Now, your creamy garlic Tuscan salmon is ready to enjoy! For the full recipe, check out the detailed instructions above. To get a great sear on your salmon, heat your skillet first. Use medium heat and add olive oil. Once the oil shimmers, place the salmon in the pan skin-side down. This lets the skin crisp up nicely. Cook for 4-5 minutes without moving it. Flip it gently using a spatula. Cook for another 4-5 minutes until golden brown. To check if your salmon is done, use a fork. Flake the thickest part of the fish. If it flakes easily, it’s ready. Be careful not to overcook it. Overcooked salmon can become dry and tough. To add more flavor to your sauce, try adding lemon juice or zest. A splash of white wine can also brighten it up. Fresh herbs like parsley or dill can make it taste fresh and vibrant. For a thicker sauce, let it simmer a bit longer. If it’s too thick, you can add a splash of chicken stock or more cream. Stir well to keep the sauce smooth and creamy. For serving, use a white plate to highlight the colors of the dish. Place the salmon in the center and pour the creamy sauce over it. Add a sprinkle of extra Parmesan cheese on top for extra flavor. To make it visually appealing, garnish with a few fresh basil leaves. You can also add a side of garlic bread or risotto for a complete meal. Enjoy your beautifully plated dish! {{image_2}} You can swap heavy cream for a few options. Use coconut milk for a lighter feel. Greek yogurt adds creaminess and a tangy kick. Silken tofu blended until smooth also works well. For the salmon, think about using trout or halibut. Both provide a nice flavor and texture. You can even try chicken breast for a twist. Just adjust cooking times to ensure everything cooks well. Don't hesitate to add more veggies! Zucchini, bell peppers, or asparagus all pair nicely. Just chop them into small pieces for quick cooking. If you add harder veggies like carrots, cook them longer. Soft veggies like spinach will need less time. Adjust cooking times to ensure all your veggies are tender and tasty. Feel free to get creative with herbs and spices! Fresh dill or parsley can brighten the dish. A pinch of red pepper flakes adds a spicy kick. You can also switch up the cheese. Try goat cheese for a tangy flavor or mozzarella for a milder taste. Experiment with different bases for the sauce. A splash of white wine can add depth to your sauce, making it even more delicious. For more detailed cooking steps, check the Full Recipe. To store leftovers, let the salmon cool to room temperature. Place the salmon in an airtight container. This keeps it fresh for up to three days. If you use the creamy sauce, store it separately to avoid sogginess. For best results, I recommend glass containers. They prevent odors and are easy to clean. You can also use plastic containers, but make sure they are BPA-free. If you want to freeze cooked salmon, wait for it to cool. Wrap each fillet tightly in plastic wrap. Then, place them in a freezer bag, squeezing out as much air as possible. This method can keep your salmon fresh for up to two months. When you are ready to eat, let the salmon thaw in the fridge overnight. This helps to keep the texture nice and firm. Avoid thawing at room temperature to prevent bacteria growth. To reheat salmon, I suggest using the oven or stovetop. Preheat the oven to 275°F (135°C). Place the salmon on a baking sheet. Heat for about 15 minutes, or until warmed through. This method keeps the salmon moist. If you prefer the stovetop, use a skillet over low heat. Add a splash of water or broth to prevent sticking. Heat for about 5-7 minutes. This way, you maintain the creamy sauce’s texture. For more details, check out the Full Recipe. Cooking salmon depends on its thickness. A general rule is 4 to 6 minutes per half-inch of thickness. For a standard 6-ounce fillet, plan for about 8 to 10 minutes total. The salmon should be opaque and flake easily with a fork. Always check with a food thermometer. It should reach 145°F for safe consumption. Yes, you can make this recipe dairy-free! Use coconut cream or cashew cream as a substitute for heavy cream. For cheese, try nutritional yeast or a dairy-free cheese option. These alternatives keep the dish creamy and add great flavor. For a balanced meal, consider these side dishes: - Garlic bread for a crunchy texture - Steamed asparagus for a fresh taste - A light salad with lemon vinaigrette for brightness - Mashed potatoes to soak up the creamy sauce - Quinoa or rice for a wholesome grain option These sides enhance the flavors of the salmon and add variety to your meal. This blog post covered a tasty Creamy Garlic Tuscan Salmon recipe. You learned about the key ingredients, cooking steps, and nutritional details. Tips for perfecting the salmon and enhancing the sauce will help you impress anyone at your table. Consider variations for different tastes and storage solutions for leftovers. The FAQs answered common questions, making cooking easier for you. Now, you can enjoy a delicious meal that is simple and fun to make!

Creamy Garlic Tuscan Salmon Flavorful and Quick Recipe

Looking to impress at dinner with minimal fuss? This Creamy Garlic Tuscan Salmon recipe is your answer! In just a

- Thick bread options: Texas toast, brioche - Liquid mixture components: eggs, milk - Flavor enhancers: vanilla extract, ground cinnamon, brown sugar, salt - Frying necessities: butter or oil - Serving suggestions: maple syrup, powdered sugar When making homemade French toast sticks, start with the right bread. Thick bread like Texas toast or brioche works best. These choices help create a soft inside and a crispy outside. Next, you need a liquid mixture. Combine eggs and milk to form the base. This mix adds richness and flavor. Now, let’s talk about flavor enhancers. I add vanilla extract for sweetness and ground cinnamon for warmth. A tablespoon of brown sugar adds extra sweetness, while a pinch of salt balances everything. For frying, you will need either butter or oil. Butter gives a rich flavor, while oil can help achieve a crispier texture. Finally, think about how you will serve these sticks. Maple syrup is a classic choice, but a dusting of powdered sugar can make them look fancy. You can find the full recipe for these delicious treats that will impress your family and friends. First, grab a mixing bowl. In it, add the eggs, milk, vanilla extract, ground cinnamon, brown sugar, and a pinch of salt. Use a whisk to mix everything together. Whisk until you see a smooth blend with no lumps. This ensures a good flavor and texture. Your batter should be slightly thick but pourable. Next, take your thick bread. I prefer Texas toast or brioche for this recipe. Cut each slice into three equal strips. You should now have twelve French toast sticks. Try to keep the size uniform. This helps them cook evenly. If the pieces are all the same size, they will brown at the same rate. Now, heat a skillet over medium heat. Add a small amount of butter or oil to coat the bottom. Wait until the butter melts or the oil shimmers. Then, dip each bread stick into the egg mixture. Make sure to coat all sides. Let any extra batter drip off before cooking. Place the coated bread sticks in the skillet. Fry them for about 2–3 minutes on each side. You want them golden brown and crispy. It’s best to cook in batches, so you don’t crowd the pan. This keeps each stick hot and crunchy. After frying, place them on paper towels to absorb excess oil. Enjoy them warm with maple syrup or a dusting of powdered sugar! For the full recipe, check the earlier section. To get that great crisp, manage your skillet's temperature. Start with medium heat. If it's too hot, your sticks might burn. If it's too low, they will soak up oil. You want that nice golden brown color. Choosing the right frying fat is also key. I like to use butter for its rich flavor. But, if you want a lighter option, use a high smoke point oil like canola. This choice can help achieve that perfect crunch. You can make your French toast even better with spices. Try adding nutmeg or a touch of cardamom for a unique twist. You can also mix in some cocoa powder for a chocolatey flavor. When it comes to sweetness, you can swap brown sugar for maple sugar or honey. Each option brings a different taste. Adjust the sweetness based on your preference. For fun serving options, make a dipping bar! Serve maple syrup, fruit compote, or chocolate sauce. Kids love to dip their sticks in a variety of sauces. It makes breakfast fun! For a family-friendly presentation, stack the sticks on a plate. Dust them with powdered sugar for a nice touch. Add some fresh berries or banana slices on the side. These simple ideas make your meal look appealing and inviting. For the full recipe, check out the complete guide above! {{image_2}} You can easily change some ingredients to fit your needs. If you need gluten-free options, try using gluten-free bread. This will keep the taste good while making it safe for those with gluten issues. Many brands offer gluten-free bread that works well for French toast sticks. For dairy-free choices, swap regular milk for almond milk or oat milk. You can also use coconut milk for a fun twist. These alternatives still give a nice flavor to the batter. It’s great to know you can adapt the recipe for everyone. You can play with flavors to make your French toast sticks unique. Sweet adaptations like adding chocolate chips or sprinkles can be fun, especially for kids. If you want something savory, try adding herbs like thyme or rosemary to the batter. This gives a tasty twist that’s different from the usual. Seasonal twists can also enhance your dish. In fall, add pumpkin spice for a cozy flavor. In summer, toss in fresh berries or peaches. These fruits add sweetness and color to your breakfast. French toast sticks can serve as breakfast or a snack. For breakfast, stack them high on a plate with syrup on the side. For a snack, serve with yogurt or fruit. This makes them easy to grab and enjoy anytime. For brunch, present them on a colorful platter. Dust with powdered sugar and add a few berries for a pop of color. This makes your dish look fancy and inviting. No matter how you serve them, these sticks are sure to impress. For the complete recipe, check the Full Recipe section. After making your crispy cinnamon French toast sticks, you want to store them right. To keep them fresh, place leftovers in an airtight container. This helps prevent them from drying out in the fridge. You can store them in the refrigerator for up to three days. If you want to save them for later, freezing is a great option. Just wrap each stick in plastic wrap and then place them in a freezer bag. They can last up to three months in the freezer. When it comes time to enjoy your French toast sticks again, reheating them correctly is key. The best way to keep them crispy is to use an oven. Preheat your oven to 350°F (175°C). Place the sticks on a baking sheet lined with parchment paper. Heat for about 10-12 minutes. Flip them halfway through for even crispiness. If you are in a hurry, you can use a microwave, but this method may make them less crispy. Heat them for about 30 seconds, then check if they are warm enough. French toast sticks can stay fresh for a good time. In the fridge, they last for about three days. If you freeze them, they can last up to three months. However, for the best taste and texture, eat them within a month. This way, you can enjoy their crispy goodness at its best. Yes, you can prepare French toast sticks ahead of time. Here are some tips for pre-preparation and storage: - Prep the batter: Mix your egg and milk mixture a day before. Store it in the fridge. - Slice the bread: Cut the bread into sticks ahead of time. Keep them in a sealed container. - Cook and store: You can cook the sticks and store them. Place them in an airtight container in the fridge. - Reheat with care: When ready to eat, reheat in a toaster or oven. This keeps them crisp. The best types of bread for French toast sticks are thick and sturdy. Here are my recommendations: - Texas toast: It’s soft and holds up well. - Brioche: This bread is rich and adds a nice flavor. - Challah: It’s slightly sweet and very fluffy. - Sourdough: This adds a tangy taste and a great texture. Yes, you can bake French toast sticks. Here’s how to do it: 1. Preheat the oven: Set your oven to 400°F (200°C). 2. Prepare a baking sheet: Line it with parchment paper for easy cleanup. 3. Arrange the sticks: Place the coated bread strips on the sheet, leaving space between each. 4. Bake: Bake for about 15-20 minutes. Flip them halfway through for even crispiness. To prevent sogginess, follow these tips during cooking: - Don’t soak too long: Quickly dip each stick in the batter. Let excess drip off. - Use medium heat: Cooking at the right temperature helps to crisp them up. - Cook in batches: Don’t overcrowd the pan. This helps them brown evenly. If you want a vegan or egg-free option, try these alternatives for the batter: - Flaxseed meal: Mix 1 tablespoon of flaxseed meal with 2.5 tablespoons of water. Let it sit for 5 minutes. - Chia seeds: Use the same method as flaxseed meal. - Silken tofu: Blend 1/4 cup of silken tofu until smooth. - Banana: Mash 1/4 cup of ripe banana for a sweet twist. For the full recipe, check out the Crispy Cinnamon French Toast Sticks. In this blog post, we explored how to make French toast sticks step by step. We covered the best ingredients, cooking tips, and creative serving ideas. Remember, choosing the right bread and enhancing flavors can make a big difference. Whether you prefer sweet or savory, there’s a version for everyone. Don't forget to store leftovers properly and reheat them for that perfect crisp. Enjoy making these treats for breakfast, snacks, or brunch. With practice, you’ll master the art of French toast sticks!

Homemade French Toast Sticks Crisp and Delicious Treat

If you’re craving a sweet and crispy treat, my homemade French toast sticks are just what you need! Made with

- 12 oz spaghetti - 1 lb ground beef or turkey - 1 medium onion, diced - 3 cloves garlic, minced - 2 cups marinara sauce - 1 cup ricotta cheese - 2 cups shredded mozzarella cheese - 1 cup grated Parmesan cheese - 1 egg - 2 teaspoons Italian seasoning - Salt and pepper to taste - Fresh basil for garnish When making Million Dollar Spaghetti Casserole, the right ingredients matter. The blend of rich flavors creates a tasty dish. I enjoy using fresh items for the best taste. - Substitute ground meat with plant-based protein - Use gluten-free spaghetti for dietary restrictions If you want to change things up, consider these options. Plant-based protein is great for vegetarians. Gluten-free spaghetti works well for those with allergies. These swaps help everyone enjoy this dish. - Preheat the oven to 350°F (175°C). - Cook spaghetti until al dente and drain. - Brown the ground meat with diced onions and minced garlic. - Add marinara sauce and let it simmer for a few minutes. - Mix ricotta cheese, egg, and half of the mozzarella and Parmesan. - Layer half of the cooked spaghetti in a casserole dish. - Spread half of the meat sauce over the spaghetti. - Dollop half of the ricotta mixture on top. - Repeat the layers with the remaining spaghetti, meat sauce, and ricotta. - Top with the remaining cheeses and cover with foil. - Bake for 30 minutes covered, then 15 minutes uncovered. - Remove from the oven and let it cool for a short time. For the full recipe, check the recipe section above. - Ensure spaghetti is not overcooked for the best texture. - Let the casserole sit before serving for easier slicing. Cooking spaghetti just right matters. If you cook it too long, it turns mushy. Al dente spaghetti gives the dish a nice bite. After baking, let the casserole rest. This helps the layers set. When you cut it, each slice will hold together. - Add crushed red pepper for a spicy kick. - Include chopped vegetables like bell peppers or mushrooms. Want to jazz up your casserole? Try adding crushed red pepper. It gives a nice heat without being too intense. You can also mix in chopped vegetables. Bell peppers and mushrooms add color and taste. They make your meal even more nutritious. - Serve with garlic bread or a side salad. - Pair with a light red wine for a complete meal. When it's time to eat, think about sides. Garlic bread is a classic choice. It soaks up the sauce and tastes great. A fresh side salad balances the meal nicely. For drinks, a light red wine pairs well. It enhances the flavors and makes dinner feel special. {{image_2}} For a tasty vegetarian option, swap the ground meat for lentils or mushrooms. Lentils add protein and fiber while keeping the dish hearty. You can also use chopped mushrooms for a meaty texture. Simply sauté the lentils or mushrooms with onions and garlic before adding the marinara sauce. This way, you keep the rich flavor and add a healthy twist. Cheese lovers, rejoice! You can make this dish extra cheesy by adding layers of different cheeses. Try using Gouda or cheddar alongside the mozzarella and Parmesan. Each cheese brings its own unique flavor. Mix in these extra cheeses in between the layers or sprinkle them on top for a gooey finish. This variation elevates your casserole to a whole new level. If you like a little heat, consider adding jalapeños or spicy Italian sausage. For jalapeños, slice them thinly and mix them into the meat sauce. If you choose sausage, cook it with the ground meat for a spicy kick. Both options will warm up your casserole and make it exciting. Adjust the amount to suit your heat preference, and enjoy the extra flavor! Store leftovers in an airtight container for up to 3 days. This keeps the dish fresh and tasty. Make sure to let the casserole cool first. If you cover it too soon, moisture will form. This can make the dish soggy. Freeze individual portions for up to 3 months. This is great for quick meals later on. Use freezer-safe containers or bags. Label them with the date. To thaw, move the casserole to the fridge overnight before reheating. Reheat in the oven for even heating or in the microwave. If using the oven, cover it with foil to prevent drying out. Heat at 350°F for about 20 minutes. In the microwave, heat in 1-minute intervals until hot. Enjoy your Million Dollar Spaghetti Casserole again! Overcooked spaghetti can become mushy and affect the casserole texture. It may lose its shape and blend into the sauce. For best results, cook the spaghetti until al dente. This means it should be firm to the bite. It will hold its shape better in the casserole. Yes, you can assemble it a day in advance and bake when ready. This makes it perfect for busy weeknights or gatherings. Just store it in the fridge covered with foil. When you are ready, bake it directly from the fridge. You may need to add a few extra minutes to the baking time. The casserole is done when the cheese is bubbly and lightly golden brown. You can check this by looking at the top layer of cheese. It should be a nice golden color. If you want to be sure, you can use a food thermometer. The internal temperature should reach 165°F (74°C). Yes, feel free to experiment with your favorite cheeses. You can try cheddar, Gouda, or even feta for a twist. Each cheese will add its own flavor to the dish. Mixing a few different cheeses can make it even tastier! This blog post shared a simple recipe for Million Dollar Spaghetti Casserole. We covered the core ingredients, step-by-step instructions, and tips for success. You learned about storage options and variations to suit different diets. Remember, cooking should be fun and creative. Don’t hesitate to make this dish your own. Enjoy the process and share it with loved ones for a satisfying meal!

Million Dollar Spaghetti Casserole Simple and Tasty

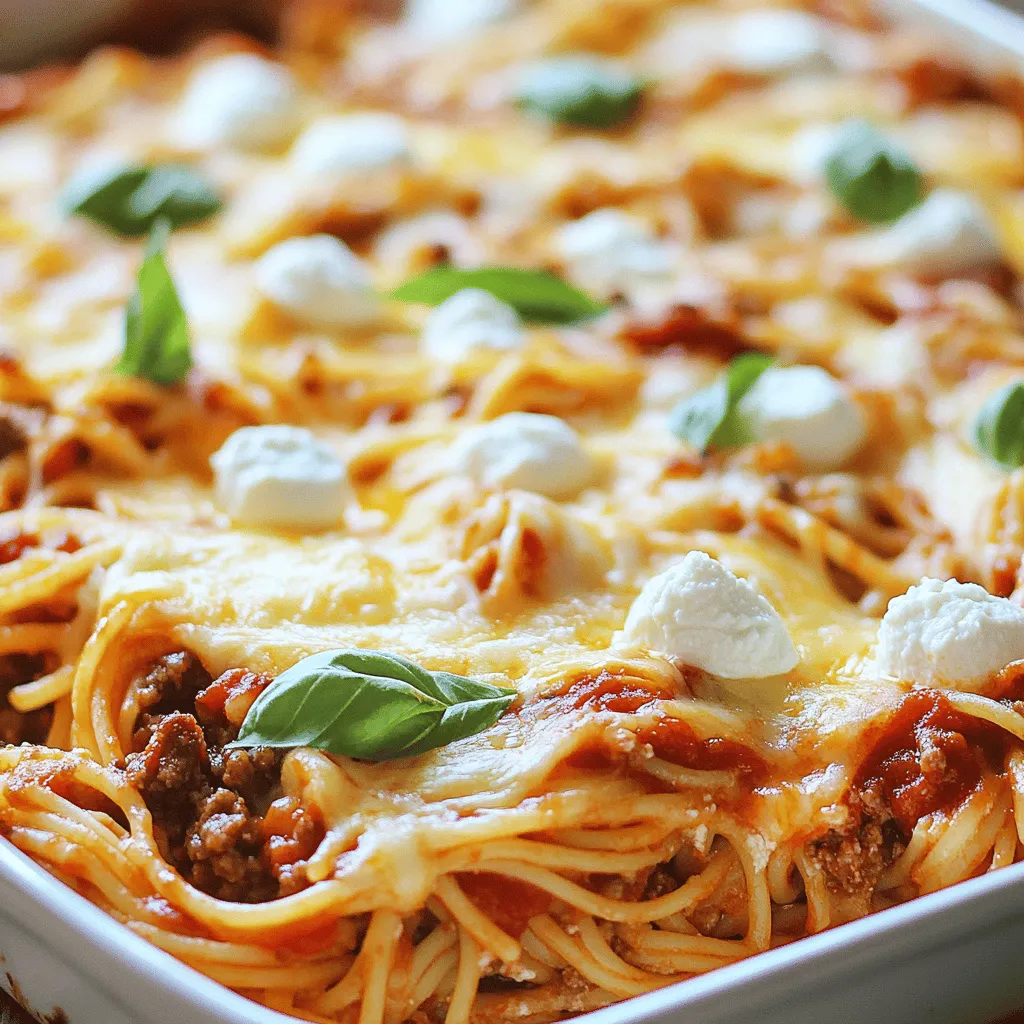
Looking for a simple and tasty dinner idea? Million Dollar Spaghetti Casserole is the perfect choice! This hearty dish combines

- 8 oz rice noodles - 1 cup shredded carrots - 1 red bell pepper, thinly sliced - 1 cucumber, julienned - 1 cup red cabbage, thinly sliced - 1/2 cup fresh cilantro, chopped - 1/4 cup chopped green onions - 1/2 cup peanuts, crushed (plus extra for garnish) For the Peanut Dressing: - 1/4 cup creamy peanut butter - 2 tablespoons soy sauce (or tamari for gluten-free) - 1 tablespoon lime juice - 1 tablespoon maple syrup (or honey) - 1 teaspoon sesame oil - 1 garlic clove, minced - 1 teaspoon grated ginger - 2-3 tablespoons warm water (to thin) Fresh produce makes this dish vibrant. When you use fresh veggies, you taste the difference. They add crunch and color. Look for bright bell peppers and crisp cucumbers. These ingredients shine. Choosing the right peanut butter matters too. I recommend creamy peanut butter for smoothness. Check for natural options. You want pure peanuts without extra sugars or oils. This gives your dressing a rich flavor. Want to add protein? Tofu, chicken, or shrimp work well. They boost the dish's heartiness. Just cook them separately and toss them in. Feeling spicy? Add chili sauce or sliced jalapeños. They bring heat and excitement. Adjust based on your taste. You control the spice level! For the full recipe, check out the cooking instructions. Preparing Water Start by filling a pot with water. Bring it to a rolling boil. You want enough water to cook the noodles well. Cooking Time and Techniques Add the rice noodles to the boiling water. Cook them for about 4-5 minutes. Check the package for exact times. Once they are soft, drain the noodles. Rinse them under cold water to stop cooking. Set them aside to cool. Mixing Technique Grab a medium bowl. In it, whisk together the creamy peanut butter and soy sauce. Add lime juice, maple syrup, sesame oil, minced garlic, and grated ginger. Adjusting Consistency Now, add warm water, one tablespoon at a time. Mix well until the dressing is smooth. You want it thick but pourable. Adjust to your taste as needed. Tossing the Salad In a large bowl, combine the shredded carrots, sliced red bell pepper, julienned cucumber, red cabbage, chopped cilantro, and green onions. Now, add the noodles. Pour the peanut dressing over the top. Toss everything gently until well coated. Presentation Tips Transfer the salad to plates or a big bowl. For a nice touch, sprinkle crushed peanuts on top. Add more cilantro for color. Enjoy your fresh and flavorful Thai Peanut Noodle Salad! For the complete details, check the Full Recipe. To make the best Thai Peanut Noodle Salad, you need to focus on two main things: cooking the noodles and balancing the dressing. - Cooking Noodles Al Dente: Cook the rice noodles until just firm. This will help them keep their shape and texture. Follow the package instructions, usually around 4-5 minutes. Rinse them in cold water when done. This stops the cooking and keeps them from getting mushy. - Balancing Dressing Flavor: The dressing should taste rich but not overpowering. Combine peanut butter, soy sauce, lime juice, maple syrup, sesame oil, garlic, and ginger. Adjust the thickness with warm water to get the right consistency. Taste it and tweak the flavors until it feels just right for you. When serving your salad, think about what goes well with it. - Best Pairings and Sides: This salad is great on its own, but you can add grilled chicken or tofu for more protein. Serve it with spring rolls or a light soup for a full meal. - Serving Temperature: This salad tastes best chilled. Make sure to refrigerate it for a bit before serving. Enjoying it cold enhances the fresh flavors. If you want to make this salad quicker, here are some tricks. - Make-Ahead Components: Prepare the dressing and chop the vegetables ahead of time. Store them in the fridge. This will save you time when you’re ready to eat. - Quick Prep Strategies: Use pre-cooked noodles or buy shredded veggies. This can cut down on your prep time, making it easier to whip up a fresh meal. For the complete recipe, check out the Full Recipe section! {{image_2}} Gluten-Free Options You can make this salad gluten-free. Use rice noodles and tamari instead of soy sauce. Check labels to ensure all ingredients are gluten-free. This keeps the dish safe for those with gluten allergies. Vegan Substitutions For a vegan version, simply use maple syrup instead of honey. All other ingredients are already vegan-friendly. This makes it a great choice for plant-based diets. Adding Heat If you like spice, consider adding chili sauce or jalapeños. This adds a nice kick to the dish. Adjust the amount based on your heat preference. Different Nut Butters Try using almond or cashew butter instead of peanut butter. Each nut butter will change the flavor a bit. This gives you new tastes to explore with each batch. Incorporating Seasonal Vegetables You can mix in seasonal vegetables. In summer, add fresh corn or zucchini. In fall, consider roasted butternut squash or sweet potatoes. Seasonal veggies keep the salad fresh and interesting. Dressing Adjustments by Season In warmer months, lighten the dressing with more lime juice. In winter, add a touch more peanut butter for richness. Adjusting the dressing keeps the meal vibrant all year round. For the complete recipe, check out the [Full Recipe]. For the best storage, use airtight containers. Glass or BPA-free plastic work well. I find that these containers keep the salad fresh longer. Store the salad in the fridge. It should last about 3 to 4 days. Beyond that, the veggies may lose their crunch and flavor. You can enjoy this salad cold or warm. If you prefer it warm, use a microwave. Place the salad in a bowl and heat it for 30 seconds. Stir and check the heat. If you want to keep it cold, serve it straight from the fridge. This salad tastes great cold and helps keep the veggies crisp. To keep your salad crunchy, store the dressing separately. Mix it with the salad just before serving. This simple step helps the veggies stay fresh. If you have extra noodles, store them apart too. The noodles can soak up the dressing and get soggy. Following these tips will keep your Thai Peanut Noodle Salad bright and enjoyable. Thai Peanut Noodle Salad is a vibrant dish full of fresh flavors. It combines rice noodles with crunchy vegetables and a creamy peanut dressing. The main ingredients include: - 8 oz rice noodles - 1 cup shredded carrots - 1 red bell pepper, thinly sliced - 1 cucumber, julienned - 1 cup red cabbage, thinly sliced - 1/2 cup fresh cilantro, chopped - 1/4 cup chopped green onions - 1/2 cup peanuts, crushed To make it, you cook the noodles, mix the veggies, and whip up the dressing. Then, toss it all together for a colorful meal! Yes, you can! Making Thai Peanut Noodle Salad ahead of time saves effort. Here are some tips for prepping in advance: - Cook the noodles: You can cook the rice noodles a day before. Store them in the fridge, covered. - Prep the veggies: Chop the vegetables and keep them in an airtight container. - Make the dressing: You can whisk the peanut dressing and store it in the fridge. Just combine everything when you are ready to eat. The flavors will blend nicely. If you have allergies or dislike peanut butter, don't worry! You can try these alternatives: - Almond butter: This gives a nutty flavor similar to peanut butter. - Sunflower seed butter: A great option for nut allergies. - Tahini: This sesame paste adds a rich, creamy texture. Each option will change the taste slightly, but they'll still create a creamy dressing for your salad. This blog post covered how to make a delicious Thai peanut noodle salad. We discussed key ingredients like rice noodles, fresh veggies, and peanut dressing. I shared tips to enhance flavor and how to create variations based on your needs. Finally, we talked about storage and reheating methods to keep your dish fresh. Remember, using quality ingredients is key to unlock great taste, while adjustments will make it your own. Enjoy making this salad and impress your friends and family with your culinary skills!

Thai Peanut Noodle Salad Flavorful and Fresh Meal

Are you looking for a dish that’s both tasty and easy to make? Dive into my Thai Peanut Noodle Salad!

For this easy vegetable stir fry, you'll need: - 1 tablespoon sesame oil - 1 cup broccoli florets - 1 bell pepper (any color), sliced - 1 carrot, julienned - 1 zucchini, sliced - 1 cup snap peas - 3 cloves garlic, minced - 1 inch ginger, grated - 3 tablespoons soy sauce - 1 tablespoon honey or maple syrup - 1 teaspoon chili flakes (optional) - 2 green onions, sliced (for garnish) - Sesame seeds (for garnish) These ingredients create a colorful and healthy dish. Each veggie adds its own flavor and texture. You can swap some veggies for what you have. Use asparagus or bok choy instead of broccoli. If you don’t like snap peas, try green beans. You can also switch soy sauce for tamari if you're gluten-free. For a sweeter taste, use agave syrup instead of honey. Or, add a splash of rice vinegar for a tangy kick. To make this stir fry, you need a few tools: - A large skillet or wok - A cutting board - A sharp knife - A spatula for stirring - A small bowl for mixing the sauce Having these tools ready makes cooking much easier. You can find all the items in your kitchen! Enjoy making this quick meal! For the full recipe, check out the link above. First, gather all your ingredients. This makes cooking easier. You'll need sesame oil, broccoli, bell pepper, carrot, zucchini, snap peas, garlic, ginger, soy sauce, honey, chili flakes, green onions, and sesame seeds. Wash and chop the veggies as needed. 1. Heat the sesame oil in a large skillet or wok over medium-high heat. 2. Add minced garlic and grated ginger. Sauté for 30 seconds until fragrant. 3. Add broccoli florets and sliced bell pepper. Stir-fry for 3-4 minutes until they soften. 4. Now, add julienned carrot, sliced zucchini, and snap peas. Stir-fry for another 3-4 minutes. Keep the veggies crisp. 5. In a small bowl, mix soy sauce, honey (or maple syrup), and chili flakes if you like heat. 6. Pour this sauce over the stir-fried veggies. 7. Toss everything for one minute. This allows the sauce to coat the veggies. 8. Remove from heat. Garnish with sliced green onions and sesame seeds before serving. Serve the stir-fry hot over rice or noodles for a filling meal. You can also enjoy it on its own as a light dish. Feel free to add your favorite protein. This approach makes it more filling and adds extra flavor. For the full recipe, check out the detailed instructions above. To get the best stir fry, heat is key. Use a large skillet or wok to give your veggies space. This helps them cook evenly. Always use high heat. This keeps the vegetables crisp. Cut your veggies into similar sizes for even cooking. Prep all your ingredients before you start. This saves time and keeps things smooth. Avoid cooking too many veggies at once. This can lead to steaming instead of frying. Don’t overcook your vegetables. They should stay bright and crisp. Skipping the garlic and ginger can also dull the flavor. Lastly, watch your sauce. Adding too much can make your stir fry soggy. You can change this recipe easily. Try different vegetables like asparagus or mushrooms. Add your favorite protein like chicken, tofu, or shrimp. Change the sauce to fit your taste. You can swap soy sauce for tamari for a gluten-free option. For a spicy kick, add more chili flakes or fresh peppers. Check out the Full Recipe for more ideas! {{image_2}} You can add protein to make your stir fry filling. Chicken, shrimp, or tofu work well. For chicken, slice it thin. Cook it first, then add veggies. Shrimp cooks fast, so toss it in for just a few minutes. Tofu is great for a hearty option. Press it to remove water, then cube it. Sauté it until golden before adding your veggies. These simple swaps can turn a light dish into a full meal. Feel free to mix and match veggies. Green beans, mushrooms, or spinach can all add flavor. Try adding spinach last to keep it bright and fresh. You can also use asparagus or cauliflower for crunch. Experiment with seasonal vegetables for the best taste. Each combo offers new flavors and colors, making each stir fry special. This stir fry can easily be both vegan and gluten-free. Use tamari instead of soy sauce for gluten-free. For a vegan option, skip honey and use maple syrup. Adding nuts like cashews or peanuts can add texture and flavor. You can also toss in your favorite plant-based protein. With these easy swaps, you can enjoy this dish while sticking to your dietary needs. For the full recipe, check out the vibrant vegetable stir fry. After enjoying your vibrant vegetable stir fry, you might have some left. To store it, let it cool first. Place the stir fry in an airtight container. This keeps it fresh. You can keep it in the fridge for up to three days. Make sure the lid is tight to avoid any odors. When ready to eat, reheating is easy. You can use a microwave or a skillet. If using a microwave, place the stir fry in a bowl. Cover it with a microwave-safe lid or wrap. Heat for one to two minutes, stirring halfway. If you prefer a skillet, add a splash of water and heat over medium until warm. Stir often to prevent sticking. Want to save some for later? Freezing works well! First, let the stir fry cool completely. Then, transfer it to a freezer-safe bag. Remove as much air as possible before sealing. You can freeze it for up to two months. When ready to eat, thaw it in the fridge overnight before reheating. Enjoy your easy vegetable stir fry anytime! For the full recipe, check out the earlier section. The best oil for stir frying is sesame oil. It has a nice flavor and a high smoke point. You can also use oils like canola or peanut oil. These oils can handle high heat well. They help cook the veggies quickly while keeping them crisp. Yes, you can use frozen vegetables for this recipe. They save time and are easy to find. Just remember to thaw them first. Pat them dry to remove extra water. This helps keep your stir fry from getting soggy. To make your stir fry less soggy, avoid overcooking the veggies. Stir fry them on high heat for a short time. Use fresh veggies when possible, as they hold their crunch better. If you use frozen, thaw and dry them well. Keeping the pan hot is key to crisp veggies. For a full recipe, check out the vibrant vegetable stir fry. We covered all you need for a great stir fry. You learned about ingredients, tools, and cooking steps. Expert tips helped point out common mistakes. We also shared tasty variations and storage info. Remember, customizing flavors makes every dish better. Using the right oil can enhance taste. Now you have the tools to stir fry like a pro. Enjoy creating quick meals that please your palate!

Easy Vegetable Stir Fry Simple and Healthy Recipe

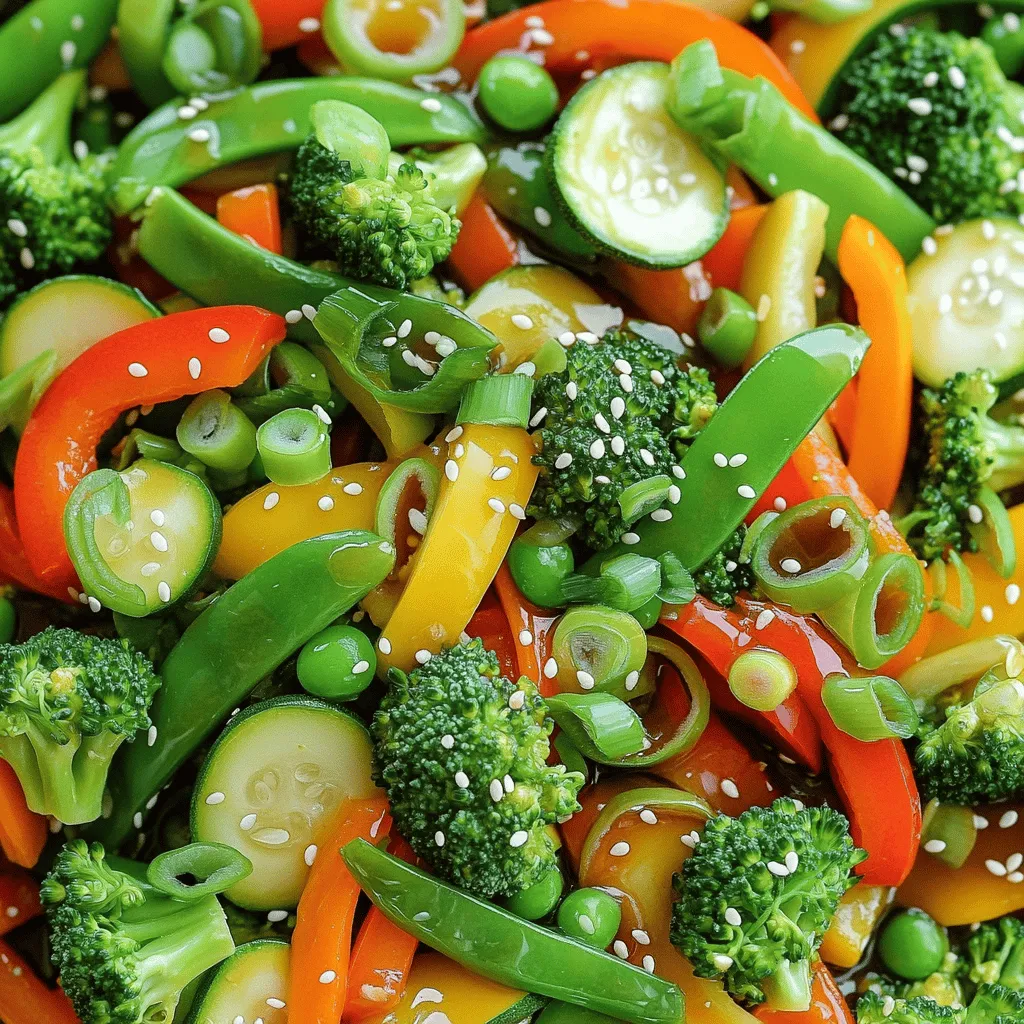
Looking for a quick and healthy meal? Try my Easy Vegetable Stir Fry! Packed with colorful veggies and bold flavors,

Older posts
Newer posts
← Previous Page1 … Page20 Page21 Page22 … Page56 Next →

dsad

© 2025 Lisa Dishes • Built with GeneratePress

Our Policies

  • Copyright Policy
  • Cookie Policy
  • GDPR Policy
  • Privacy Policy
  • Disclaimer
  • Terms Of Use

More Information

  • Home
  • About
  • Contact
  • Appetizers
  • Dessert
  • Dinner
  • Drinks
©2025, Lisa Dishes About Back To Top