Skip to content
DisclaimerTerms Of UseGDPR PolicyCookie Policy

Lisa Dishes

  • Home
  • Drinks
  • Appetizers
  • Dinner
  • Dessert
  • About
  • Contact
  • Privacy Policy
DisclaimerTerms Of UseGDPR PolicyCookie Policy

lisa

- 1 cup coconut milk (canned or carton) - 1/4 cup chia seeds - 2 tablespoons maple syrup or honey - 1 ripe mango, diced - 1/2 teaspoon vanilla extract - A pinch of salt Coconut milk adds a creamy base. You can use canned or carton coconut milk. Both work well. Chia seeds are the star here. They soak up liquid and create that pudding texture. Choose your sweetener: maple syrup or honey. Both make it delicious! Use a ripe mango for the best flavor. The mango adds freshness and sweetness. A little vanilla extract enhances the taste. Don't forget a pinch of salt. It balances the sweetness nicely. - Toasted coconut flakes - Fresh mint leaves Garnishes take your pudding to the next level. Toasted coconut flakes add crunch and flavor. Fresh mint leaves give a pop of color and freshness. These toppings make your dish look pretty and taste great! For the full recipe, check out the detailed instructions. To start, you need to gather your ingredients. In a medium bowl, combine the following: - 1 cup coconut milk (canned or carton) - 1/4 cup chia seeds - 2 tablespoons maple syrup or honey - 1/2 teaspoon vanilla extract - A pinch of salt Stir these ingredients well until they blend. You want a smooth mix without clumps. This step is key to a creamy texture. Next, cover the bowl with plastic wrap or a lid. Place it in your fridge for at least four hours. For the best results, let it sit overnight. This waiting time lets the chia seeds absorb the liquid. They will swell and create a pudding-like texture that makes this dish delightful. When ready to serve, take the pudding from the fridge. Give it a good stir to break up any clumps. Now, it’s time to layer your dish! Use serving glasses or bowls and start with a layer of chia pudding. Then, add a layer of diced mango. Repeat this layering until the glasses are filled. For the final touches, sprinkle toasted coconut flakes on top. Add a few fresh mint leaves for color and flavor. This adds a lovely crunch and a fresh touch to your Mango Coconut Chia Pudding. Enjoy every spoonful! To get the best texture, refrigerate your pudding for at least four hours. I often let it sit overnight. This lets the chia seeds soak up the coconut milk. You want each seed to swell and create a smooth pudding. To avoid clumps, stir the mix well before it sets. After refrigeration, give it another good stir. This will break up any clumps that may have formed. You can adjust the sweetness to fit your taste. If you like it sweeter, add more maple syrup or honey. Sometimes, I use ripe mashed bananas as a sweetener. They blend in well and add flavor. For a sugar-free option, try stevia or agave syrup. These alternatives work great without adding extra calories. Mango Coconut Chia Pudding is great with other fruits. Try adding berries or sliced bananas for more flavors. This pudding shines as a breakfast option or a tasty dessert. Serve it in pretty glasses for a nice touch. It also makes a fun snack for kids. {{image_2}} You can change the flavor of your Mango Coconut Chia Pudding easily. Adding cocoa powder or chocolate gives it a rich taste. Just mix in a tablespoon of cocoa powder when you blend the base. This twist makes it a fun dessert. You can also use other fruits to spice things up. Try adding berries or bananas for new tastes. Berries add a tart flavor, while bananas bring sweetness. Just chop them and layer them with the pudding. It makes every bite exciting! If you follow a vegan diet, this pudding is perfect. All the ingredients are plant-based. You can use maple syrup as a sweetener, so no worries there. Also, this recipe is gluten-free. Chia seeds and coconut milk do not contain gluten. You can enjoy this treat without any dietary concerns. The way you serve your pudding can make a big impact. Using different glassware can add style. Try mason jars or clear cups for a fun look. You can also layer the pudding with different colors. For example, add a layer of diced mango between pudding layers. It makes the dish look bright and inviting. You can impress your guests with these simple changes! Mango Coconut Chia Pudding will last in the fridge for about 5 days. It’s best to eat it fresh, but you can store it if needed. Just make sure to keep it in a sealed container. This helps keep it fresh and tasty. Using glass jars or airtight containers works best for storage. These keep the pudding safe from air and moisture. If you want to freeze it, pour the pudding into ice cube trays. This way, you can defrost small portions later. Just remember to eat it within a month for the best taste. You don’t need to heat chia pudding before eating. It tastes great cold. If the texture seems thick, you can stir in a splash of coconut milk. This will make it smooth again. Enjoy your pudding as a quick snack or a healthy breakfast! Chia seeds are tiny seeds from the Salvia hispanica plant. They come from Mexico and Guatemala. These seeds are packed with nutrients. They are rich in fiber, protein, and omega-3 fatty acids. Chia seeds can absorb water and swell, making them great for puddings. They help you feel full, making them perfect for a healthy snack. Yes, you can use different types of milk. Almond milk, soy milk, or oat milk work well too. Each milk adds its own flavor. If you're dairy-free, these options are great. Just remember to check if the milk is unsweetened, especially if you want less sugar. This way, your pudding stays healthy and tasty. Absolutely! Mango coconut chia pudding is perfect for meal prep. You can make it ahead of time and store it in the fridge. It stays fresh for about five days. This makes it an easy grab-and-go breakfast or snack. Just layer it in jars for easy serving. You can also switch up the flavors each time for variety. For the full recipe, check out the [Full Recipe]. This article covered the essential ingredients and steps for making a delicious mango coconut chia pudding. You learned about key ingredients like coconut milk and chia seeds, along with tasty variations and tips for serving. Remember to let your pudding chill for the best texture. This dish is perfect for meal prep, healthy snacking, or a satisfying dessert. Enjoy experimenting with flavors and garnishes to make it your own. With all the ideas presented, you can easily create a delightful experience for yourself and others.

Mango Coconut Chia Pudding Healthy and Easy Recipe

Are you ready to indulge in a delicious, healthy treat? Mango Coconut Chia Pudding is simple to make and packed

To make the best baked teriyaki chicken, you need some key items. Here’s what you’ll gather: - 4 boneless, skinless chicken thighs - 1/4 cup soy sauce (low sodium if preferred) - 1/4 cup honey or maple syrup - 2 tablespoons rice vinegar - 2 tablespoons sesame oil - 2 cloves garlic, minced - 1 teaspoon fresh ginger, grated - 1 tablespoon cornstarch - 2 tablespoons water Garnishes can make your dish look great and add flavor. Here are some fun options: - Sesame seeds - Sliced green onions Each ingredient plays an important part in the recipe. Here’s how they work together: - Chicken thighs: They stay juicy and tender when baked. - Soy sauce: It adds salty depth and umami taste. - Honey or maple syrup: This gives a sweet touch to balance the salt. - Rice vinegar: It adds brightness and cuts through the richness. - Sesame oil: This provides a nutty flavor that enhances the dish. - Garlic and ginger: These fresh ingredients add warmth and spice. - Cornstarch: It helps thicken the sauce, making it nice and sticky. - Water: This is used to mix with cornstarch for the sauce. This recipe is simple yet packed with flavor. For the full recipe, check the details above. Start by gathering all your ingredients. This makes cooking easier. You need boneless, skinless chicken thighs. They stay juicy and tender. Next, measure out your soy sauce, honey, rice vinegar, sesame oil, garlic, and ginger. Have cornstarch and water ready for the sauce later. Preheat your oven to 400°F (200°C). This ensures even cooking. In a medium bowl, whisk together the soy sauce, honey, rice vinegar, sesame oil, garlic, and ginger until smooth. This mix is your teriyaki marinade. Place the chicken thighs in a baking dish. Pour the marinade over the chicken. Make sure all pieces get coated well. Cover the dish with plastic wrap. Let it sit in the fridge for at least 30 minutes. If you have time, marinate for up to 2 hours. This step adds a lot of flavor. After marinating, take the chicken out of the fridge. Arrange the thighs in a single layer in the baking dish. Reserve the marinade for later. Bake the chicken in the preheated oven for 25-30 minutes. Use a meat thermometer to check if it’s done. The chicken should reach 165°F (75°C). While the chicken bakes, pour the reserved marinade into a small saucepan. In a separate bowl, mix the cornstarch and water until smooth. Stir this into the marinade. Heat the mixture over medium heat. Bring it to a boil, stirring all the time. This should take about 2-3 minutes. Once thickened, remove it from heat. After baking, drizzle the thickened sauce over the chicken. Garnish with sesame seeds and sliced green onions. Enjoy your delicious meal! Check out the Full Recipe for all the details. To get the best flavor, use fresh ingredients. Fresh garlic and ginger make a big difference. They add a bright taste to your teriyaki chicken. I also recommend marinating the chicken for at least 30 minutes. If you have time, let it sit longer, even up to 2 hours. This lets the flavors soak in. Always taste your marinade before using it. Adjust the sweetness with more honey or syrup, if needed. You can also add a splash of lime juice for extra zing. Cooking time can change based on your oven. Every oven works a bit differently. A good rule is to check the chicken after 25 minutes. If it reaches 165°F in the thickest part, it's done. If you use chicken breasts instead of thighs, they may need less time. Always use a meat thermometer for accuracy. It helps ensure your chicken is safe to eat and not overcooked. To keep your chicken juicy, don’t overcook it. Use a meat thermometer to check for doneness. Another tip is to baste the chicken with the marinade while it cooks. This adds moisture and flavor. Lastly, let the chicken rest for a few minutes after baking. This keeps the juices inside. When you slice it, the chicken will be tender and juicy. Follow these steps, and your dish will shine with flavor. For the complete Baked Teriyaki Chicken recipe, check out the [Full Recipe]. {{image_2}} You can swap chicken for tofu or pork. Tofu is a great choice for a meatless meal. Use firm tofu and press it to remove extra water. Marinade it just like chicken. For pork, use pork tenderloin or chops. The cooking time may change, so check the internal temp. You can change the flavor of your teriyaki sauce easily. Try adding orange juice or pineapple juice for a fruity twist. You can also add spicy elements like sriracha or chili flakes. This adds heat and depth to your dish. Experimenting with different ingredients keeps your meal fresh. Baked teriyaki chicken pairs well with many sides. Serve it with steamed rice or quinoa for a hearty meal. You can also add veggies, like broccoli or snap peas, for color and nutrition. A fresh salad with a light dressing complements the dish as well. Don't forget to drizzle extra teriyaki sauce over your sides for added flavor. Store your leftover baked teriyaki chicken in an airtight container. This keeps the chicken fresh. Make sure to cool the chicken first before sealing it. Leftovers can last about 3 to 4 days in the fridge. If you want to keep it longer, consider freezing it. To reheat, place the chicken in a baking dish. Preheat your oven to 350°F (175°C). Cover the dish with foil to avoid drying out the chicken. Heat for about 20 minutes or until warm. You can also use a microwave. Heat for 1 to 2 minutes, checking often. If you freeze the chicken, wrap it well to avoid freezer burn. Use freezer-safe bags or containers. It can last up to 3 months in the freezer. To thaw, move it to the fridge overnight. If you’re in a hurry, you can use the microwave. Just be careful not to cook it while thawing. For best results, reheat it after thawing. Enjoy your meal! For the full recipe, refer to the beginning of this article. I recommend marinating the chicken for at least 30 minutes. This allows the flavors to soak in well. For a richer taste, you can marinate it for up to 2 hours. Just keep it in the fridge while it soaks. Yes, you can easily make teriyaki sauce at home. Combine soy sauce, honey or maple syrup, rice vinegar, sesame oil, garlic, and ginger. Whisk them together until smooth. You can adjust the sweetness by adding more honey or syrup if needed. Absolutely! You can use chicken breasts if you prefer. Just remember that breasts cook faster than thighs. Check the internal temperature to ensure they reach 165°F. This way, you’ll have juicy chicken every time. For the [Full Recipe], follow the steps to make it delicious. This article covered all you need for baked teriyaki chicken. We explored main ingredients and how they work together. I shared steps for marinating, baking, and making the sauce thick. You learned useful tips for good flavor and moist chicken. I also included variations with different proteins and sides. Lastly, I provided storage advice to help keep leftovers fresh. With this guide, you can make a delicious meal anytime. Enjoy your cooking!

Baked Teriyaki Chicken Simple and Tasty Recipe

Are you ready to whip up a dish that’s simple and packed with flavor? My Baked Teriyaki Chicken recipe is

To make these cozy muffins, gather the main ingredients. They are: - 1 cup pumpkin puree - 2/3 cup brown sugar - 1/3 cup granulated sugar - 1/2 cup vegetable oil - 2 large eggs - 1 teaspoon vanilla extract - 1 1/2 cups all-purpose flour - 1 teaspoon baking soda - 1 teaspoon baking powder - 1 tablespoon pumpkin pie spice - 1/2 teaspoon salt These ingredients combine to create a rich, warm flavor. The pumpkin gives moisture and a nice texture. The sugars add sweetness, while the spices bring fall vibes. You can make these muffins even better with some add-ins. Here are a few ideas: - 1/2 cup chopped walnuts or pecans - 1/2 cup chocolate chips These add-ins add crunch and a sweet surprise. You can mix them in when you fold in the dry ingredients. If you run out of something, don’t worry! Here are some easy swaps: - Use applesauce instead of vegetable oil for a lighter muffin. - Swap out the all-purpose flour for whole wheat flour for more fiber. - Use maple syrup in place of granulated sugar for a unique flavor. Feel free to get creative! The recipe is flexible, allowing you to adjust to your taste or what you have on hand. For the full recipe, check the link above. Start by preheating your oven to 350°F (175°C). While it heats, prepare your muffin tin. Use paper liners or grease it with non-stick spray. This step helps the muffins come out easily and keeps them soft. In a large bowl, add the pumpkin puree, brown sugar, granulated sugar, vegetable oil, eggs, and vanilla extract. Whisk these ingredients together until smooth. This mix brings out the cozy pumpkin flavor. Make sure everything blends well to avoid lumps. In another bowl, mix the all-purpose flour, baking soda, baking powder, pumpkin pie spice, and salt. Stir until all the dry ingredients are evenly combined. This step ensures that your muffins rise well and have great flavor. Carefully fold the dry mix into the wet ingredients. Use a spatula to combine them gently. Be cautious not to overmix; this keeps the muffins light and fluffy. If you want, now is the time to add in the chopped nuts or chocolate chips. Scoop the batter into your prepared muffin tin, filling each cup about 3/4 full. Place the tin in your preheated oven and bake for 18-22 minutes. Check for doneness by inserting a toothpick in the center. It should come out clean. Once done, cool the muffins in the tin for 5 minutes before transferring them to a wire rack. Enjoy these cozy pumpkin spice muffins as a warm fall treat! For the full recipe, check the earlier section. To get a soft and moist muffin, use fresh pumpkin puree. Canned pumpkin works, too. Make sure it is pure and not pumpkin pie filling. Use the right flour for the best results. All-purpose flour gives a good rise. If you want a gluten-free option, use a blend made for baking. Mixing too much can make muffins tough. When you combine wet and dry ingredients, stir gently. Use a spatula to fold them together. Stop as soon as you see no dry flour. This will keep your muffins light and fluffy. If you add nuts or chocolate chips, fold them in lightly. Bake your muffins for 18-22 minutes at 350°F. Check for doneness with a toothpick. Insert it in the center; it should come out clean. If it has batter on it, bake a little longer. Once they are done, let them cool for five minutes in the pan. Then, move them to a wire rack. This helps them cool evenly and stay soft. For the full recipe, you can refer to the Cozy Pumpkin Spice Muffins section. {{image_2}} To make gluten-free pumpkin spice muffins, swap the all-purpose flour for a gluten-free blend. Many blends work well. Look for one that has xanthan gum in it. This helps the muffins rise and stay soft. Check the package for proper measurements. Follow the same recipe steps, and you'll have tasty muffins that everyone can enjoy. For vegan pumpkin spice muffins, replace the eggs with flax eggs. To make a flax egg, mix one tablespoon of ground flaxseed with three tablespoons of water. Let it sit for five minutes until it thickens. Also, substitute the vegetable oil with applesauce or a neutral oil. These swaps keep the muffins moist and delicious while being plant-based. You can change the flavor of your muffins easily. If you love chocolate, add half a cup of chocolate chips to the batter. They melt and mix well with the pumpkin spice taste. If you're nut-free, just skip the nuts. The muffins will still taste great. You can also add dried fruits like cranberries or raisins for a sweet twist. Don't be afraid to experiment with flavors that you enjoy! For the complete recipe, check out the Full Recipe section. To keep your pumpkin spice muffins fresh, store them in an airtight container. Place parchment paper between layers to prevent sticking. If you plan to eat them within a few days, they can stay on the counter. Just keep them out of direct sunlight. For longer storage, move them to the fridge. This will help keep them moist and tasty for about a week. Freezing is a great option for these muffins. Cool them completely before freezing. Wrap each muffin tightly in plastic wrap and then place them in a freezer bag. Make sure to remove as much air as possible. This method keeps them fresh for up to three months. When you want to enjoy them, just take out the muffins and let them thaw at room temperature. To reheat your muffins, preheat the oven to 350°F (175°C). Place the muffins on a baking sheet and warm them for about 10 minutes. You can also use the microwave. Heat each muffin for about 15-20 seconds. This gives you that warm, fresh-baked taste. If you want, add a pat of butter on top before serving for extra flavor. Enjoy your cozy treat! For the full recipe, check out Cozy Pumpkin Spice Muffins. You can replace eggs with applesauce. Use 1/4 cup of applesauce for each egg. This keeps your muffins moist. You can also use flaxseed meal. Mix 1 tablespoon of flaxseed with 2.5 tablespoons of water. Let it sit for a few minutes to thicken. Both options work great! Yes, you can use fresh pumpkin. Start by roasting a small pumpkin. Cut it in half, remove seeds, and bake it at 350°F (175°C) for about an hour. Once soft, scoop out the flesh and mash it until smooth. Fresh pumpkin adds a nice flavor. Just make sure it is well pureed to match the texture of canned puree. Great toppings include a dusting of powdered sugar or cinnamon. You might also try a simple glaze. Mix powdered sugar with a little milk for a sweet touch. Chopped nuts or chocolate chips can add extra crunch and flavor. Enjoy these muffins warm with a topping of your choice for a cozy treat! For the full recipe, check out the Cozy Pumpkin Spice Muffins section. You now know how to make delicious pumpkin spice muffins. We covered the main ingredients and options for add-ins. You learned the steps from prepping the tin to baking. Key tips helped ensure a great texture and doneness. We also explored fun variations, plus storage and reheating methods. Enjoy these muffins fresh or save some for later. Let your creativity shine as you customize these treats. Happy baking!

Pumpkin Spice Muffins Warm and Cozy Fall Treat

Fall is the perfect time for warm and cozy treats, and nothing says autumn like pumpkin spice muffins. These fluffy

To make a veggie packed frittata, gather these items: - 6 large eggs - 1/4 cup milk - 1 cup spinach, chopped - 1/2 cup bell peppers, diced (red and yellow for color) - 1/2 cup cherry tomatoes, halved - 1/4 cup red onion, finely chopped - 1/2 cup zucchini, grated - 1/2 teaspoon garlic powder - 1/2 teaspoon dried oregano - Salt and pepper to taste - 1/2 cup shredded cheese (cheddar or mozzarella) - 2 tablespoons olive oil These ingredients create a colorful and tasty dish. You get protein from eggs and vitamins from the veggies. You can swap some ingredients based on what you have. Here are a few options: - Use almond milk instead of regular milk for a dairy-free option. - Kale or arugula can replace spinach. - Any firm vegetable works for zucchini, like mushrooms or asparagus. - Use any cheese you enjoy, such as feta or goat cheese. These swaps keep the dish fresh and fun. When picking vegetables, look for these signs of freshness: - Spinach: It should be bright green, with no yellow spots. - Bell Peppers: Choose firm peppers with smooth skin. - Tomatoes: Look for shiny, plump tomatoes without blemishes. - Zucchini: Pick ones that are small to medium in size and firm. Fresh ingredients make your frittata taste even better. Enjoy your cooking! Start by gathering all your ingredients. This makes cooking smooth and easy. Here’s what you need: - 6 large eggs - 1/4 cup milk - 1 cup spinach, chopped - 1/2 cup bell peppers, diced (red and yellow for color) - 1/2 cup cherry tomatoes, halved - 1/4 cup red onion, finely chopped - 1/2 cup zucchini, grated - 1/2 teaspoon garlic powder - 1/2 teaspoon dried oregano - Salt and pepper to taste - 1/2 cup shredded cheese (cheddar or mozzarella) - 2 tablespoons olive oil Chop the spinach, bell peppers, and red onion. Grate the zucchini, and halve the cherry tomatoes. This helps the veggies cook evenly. Heat the olive oil in an oven-safe skillet over medium heat. Add the red onion and bell peppers first. Sauté for about 3-4 minutes. You want them to soften a bit. Next, add the grated zucchini and chopped spinach. Cook for another 2-3 minutes until the spinach wilts. This adds great flavor and color to the dish. Now, mix in the halved cherry tomatoes. Stir everything well in the skillet. In a large bowl, whisk the eggs, milk, garlic powder, oregano, salt, and pepper. Pour this egg mixture over the veggies in the skillet. Make sure it spreads evenly. Sprinkle the shredded cheese on top. This adds a nice, melty layer. Cook the frittata on the stovetop for about 3-4 minutes. You’ll notice the edges start to set. Now it's time to bake! Transfer the skillet to your preheated oven at 400°F (200°C). Bake for 12-15 minutes. The frittata should puff up, and the center needs to be fully set. You can test it with a toothpick. If it comes out clean, it’s ready. When done, allow it to cool for a few minutes. Slice it into wedges and serve warm. For a lovely touch, add fresh herbs on top and a side of mixed greens. For complete steps, check the Full Recipe. To bring out the best in your frittata, use fresh herbs. Fresh basil or parsley adds a bright taste. You can also try thyme or dill for a different kick. Dried herbs like oregano and rosemary work well too. Mix in spices like paprika or cumin for extra depth. Remember, start with small amounts. You can add more if needed. For fluffy eggs, whisk them well with milk. The milk adds creaminess and helps the frittata rise. Make sure not to overcook it. Keep an eye on the edges as they set. The center should still be a bit soft when you take it out of the oven. It will continue to cook as it cools. One common mistake is not using enough oil in the skillet. This can make the frittata stick. Also, avoid overcrowding with too many veggies. Stick to the amounts in the Full Recipe for best results. Lastly, don’t skip preheating the oven. A hot oven helps the frittata puff up nicely. {{image_2}} You can mix and match your veggies in the frittata. Try using kale, mushrooms, or broccoli. Each adds a unique taste and texture. Use what you like or what you have. For a sweeter touch, add roasted carrots or butternut squash. You could also try artichoke hearts for a fun twist. The options are endless and can fit any season. To make your frittata heartier, consider adding protein. You can use cooked sausage, ham, or bacon for a savory kick. If you prefer plant-based options, tofu works great. Just crumble firm tofu and sauté it with your veggies. This boosts protein without meat. You can also try adding beans for extra fiber and texture. Each choice enhances the meal's flavor and nutrition. Cheese can change the whole vibe of your frittata. Cheddar adds sharpness, while mozzarella brings a creamy feel. Try feta for a tangy twist or goat cheese for richness. If you like spice, pepper jack cheese can heat things up. Mix different cheeses for a unique flavor combo. It’s all about what you enjoy and want to taste. For the full recipe, check the Veggie Packed Frittata section. Store leftover frittata in an airtight container. Make sure it is cool before sealing. Place it in the fridge. It can last for 3 to 4 days. If you want to enjoy it later, slice it into wedges. This makes it easier to grab for breakfast. To reheat your frittata, use the oven or microwave. For the oven, preheat to 350°F (175°C). Place the frittata on a baking sheet and heat for about 10 to 15 minutes. This keeps it warm and tasty. If using a microwave, heat one slice at a time for about 1 minute. Check if it's warm enough before serving. You can freeze frittata for up to 2 months. First, let it cool completely. Wrap each slice tightly in plastic wrap. Then, place the wrapped slices in a freezer bag. Label the bag with the date. To thaw, place it in the fridge overnight before reheating. Enjoy this veggie-packed delight even when fresh ingredients are not available. For the full recipe, check the earlier sections. Yes, you can make this frittata ahead of time. Just prepare it as usual and let it cool. Once cool, slice it into wedges. Store the slices in an airtight container in the fridge. It will stay fresh for up to three days. When you are ready to eat, reheat in the oven or microwave. This makes it easy for busy mornings. If you don't have an oven-safe skillet, don't worry! You can use any regular skillet. Just cook the frittata on the stovetop until the edges set. Then, transfer the mixture to a greased baking dish. Bake it in the oven until it is fully cooked. This method works well and gives you a tasty frittata. To check if the frittata is fully cooked, look for a few signs. The edges should be firm, and the center should not jiggle. You can insert a toothpick into the center. If it comes out clean, the frittata is done. Let it cool for a few minutes before slicing. Enjoy it warm with your favorite sides! In this post, we covered the key elements to make a great frittata. We discussed ingredients, preparation, cooking, and variations. I shared tips for enhancing flavor and avoiding common mistakes. You learned how to store leftovers and answered frequently asked questions. A delicious frittata is easy to make and adaptable. Don’t be afraid to try new flavors and ingredients. Experiment, and enjoy your cooking journey!

Veggie Packed Frittata Healthy Breakfast Delight

Start your day with a Veggie Packed Frittata, a healthy breakfast delight that’s easy to make and bursting with flavor.

- 2 cups cooked brown rice - 1 lb boneless, skinless chicken breasts, diced - 1 can (15 oz) black beans, rinsed and drained - 1 cup corn kernels (fresh, frozen, or canned) - 1 cup cherry tomatoes, halved - 1 avocado, diced - 1 lime, juiced - 1/4 cup fresh cilantro, chopped - 1 cup shredded cheese (cheddar or Mexican blend) - Optional toppings: sour cream or Greek yogurt, tortilla chips - 1 tablespoon olive oil - 1 teaspoon garlic powder - 1 teaspoon cumin - 1 teaspoon smoked paprika - Salt and pepper to taste Each serving has about 500 calories. You get around 40 grams of protein. The fiber content is high, thanks to beans and rice. This meal is balanced with carbs, proteins, and healthy fats. It's not just tasty but also nutritious. You can enjoy this meal while knowing it's good for you. For more details, check the Full Recipe. Start by heating one tablespoon of olive oil in a large skillet over medium heat. Once the oil is hot, add one pound of diced chicken. Sprinkle garlic powder, cumin, smoked paprika, salt, and pepper over the chicken. Cook the chicken for about 7-10 minutes, stirring often. You want the chicken to be browned and cooked through. This step fills your kitchen with a wonderful aroma! If you do not have cooked brown rice, now is the time to make it. Use two cups of water for every cup of rice. Bring the water to a boil, add the rice, and lower the heat. Cover it and let it cook for about 30-35 minutes. When done, fluff it with a fork. Perfect rice is key to a great burrito bowl! In a large bowl, combine one can of rinsed black beans, one cup of corn, one cup of halved cherry tomatoes, and one diced avocado. Squeeze the juice of one lime into this mix and add fresh chopped cilantro. Season with salt and pepper to taste. This veggie medley adds color and freshness to your bowl! Now comes the fun part! Grab your bowls and layer the components. Start with a base of brown rice. Next, add the spiced chicken. Follow this with the black bean and corn mix. For a finishing touch, top with shredded cheese. If you want to be extra, add a dollop of sour cream or Greek yogurt. You can even crunch up some tortilla chips on top or serve them on the side. Enjoy your colorful Chicken Burrito Bowls! - How to know when chicken is perfectly cooked: The chicken is done when it reaches 165°F. Use a meat thermometer for best results. The chicken should be white and juicy, not pink. - Tips for cooking rice for the best texture: Rinse the rice before cooking. This removes excess starch, helping it stay fluffy. Use a 2:1 water-to-rice ratio. Bring it to a boil, then cover and simmer on low heat. - Suggestions for additional spices or toppings: Add chili powder for heat or oregano for earthiness. Squeeze lime juice over the top for a fresh kick. Fresh jalapeños or pickled onions add crunch and zing. - How to balance flavors: Mix sweet and savory by adding corn or mango. Use lime juice to cut through richness. Taste as you go, adjusting salt and acid for a balanced dish. - Making it dairy-free or vegetarian: Swap chicken for black beans or grilled veggies. Use avocado or cashew cream instead of cheese or sour cream. You can still enjoy all the flavors without dairy. - Spice level adjustments: If you like it mild, skip the jalapeños and use sweet corn. For more heat, add diced serrano peppers or a dash of hot sauce. Adjust to match your taste. Feel free to explore the Full Recipe for more details and instructions! {{image_2}} You can swap the chicken for many proteins. Ground beef or turkey works well. Tofu is a great choice for plant lovers. Cook them just like the chicken for best taste. Each option brings its own flavor and texture. You can mix and match to keep meals exciting. Try different bases for your burrito bowls. Instead of brown rice, you can use quinoa. Cauliflower rice is a low-carb choice. A fresh salad adds crunch and color. Each base changes the dish's vibe and health benefits. Explore these options to find your favorite. Toppings can elevate your chicken burrito bowls. Add bell peppers, corn, or zucchini for more veggies. Different salsas, like mango or pico de gallo, bring new flavors. A drizzle of spicy sauce can wake up the taste. You can even sprinkle some nuts for crunch. The more toppings, the better the meal! To keep your chicken burrito bowls fresh, store them in airtight containers. If you have extra chicken, rice, or veggies, separate them into different containers. This helps maintain their taste and texture. Place the containers in the fridge. They can stay fresh for a few days. For longer storage, use the freezer. Just make sure to label the containers with the date. When you want to enjoy your burrito bowl again, heat it gently. Use the microwave or the stove. If you use a microwave, cover the bowl to keep moisture in. Heat in short bursts to avoid overcooking. If using the stove, add a splash of water to the pan. Stir often until everything is warm. This keeps the flavor and texture just right. In the fridge, your chicken burrito bowls last about 3-4 days. If you've frozen them, they can stay fresh for up to 3 months. After that, they may lose flavor and quality. For the best taste, try to eat them within these time frames. Enjoying them fresh always gives the best flavor! To make Chicken Burrito Bowls vegetarian, swap the chicken for plant-based proteins. You can use: - 1 lb firm tofu, diced and sautéed - 1 can (15 oz) chickpeas, rinsed and drained - 1 cup tempeh, crumbled and cooked Also, add more veggies to keep it filling. Consider bell peppers, zucchini, or mushrooms. Ensure your seasonings still add great flavor. Yes, you can prepare Chicken Burrito Bowls ahead of time. Meal prep makes weeknight cooking easy. Here are some tips: - Cook the rice and chicken in advance. Store them in separate containers in the fridge. - Mix the black beans, corn, tomatoes, and avocados. Keep this mix in a bowl. - Assemble the bowls right before serving. This keeps everything fresh and tasty. You can store leftovers in the fridge for up to 3 days. Chicken Burrito Bowls pair well with many sides and drinks. Here are some ideas: - Tortilla chips with salsa or guacamole - A crisp green salad with lime vinaigrette - Corn on the cob, grilled or boiled - A refreshing drink like lemonade or iced tea These sides add color and flavor to your meal. The spice level of Chicken Burrito Bowls can be adjusted easily. The recipe uses cumin and smoked paprika for flavor. If you want more heat: - Add diced jalapeños or a dash of hot sauce. - Use a spicy cheese for topping. - Consider adding cayenne pepper to the chicken seasoning. For milder flavors, skip the spicy additions and focus on the fresh toppings. You can create delicious Chicken Burrito Bowls with simple ingredients and steps. We covered everything from cooking chicken and rice to mixing the fresh veggies. Each bowl offers great flavor and nutrition. The options for customization and storage make it even better. This dish is fun to make and share, plus it suits many tastes. Enjoy experimenting with different proteins and toppings to find your favorite version. You’ll love how easy and tasty this meal can be!

Chicken Burrito Bowls Flavorful and Easy Recipe

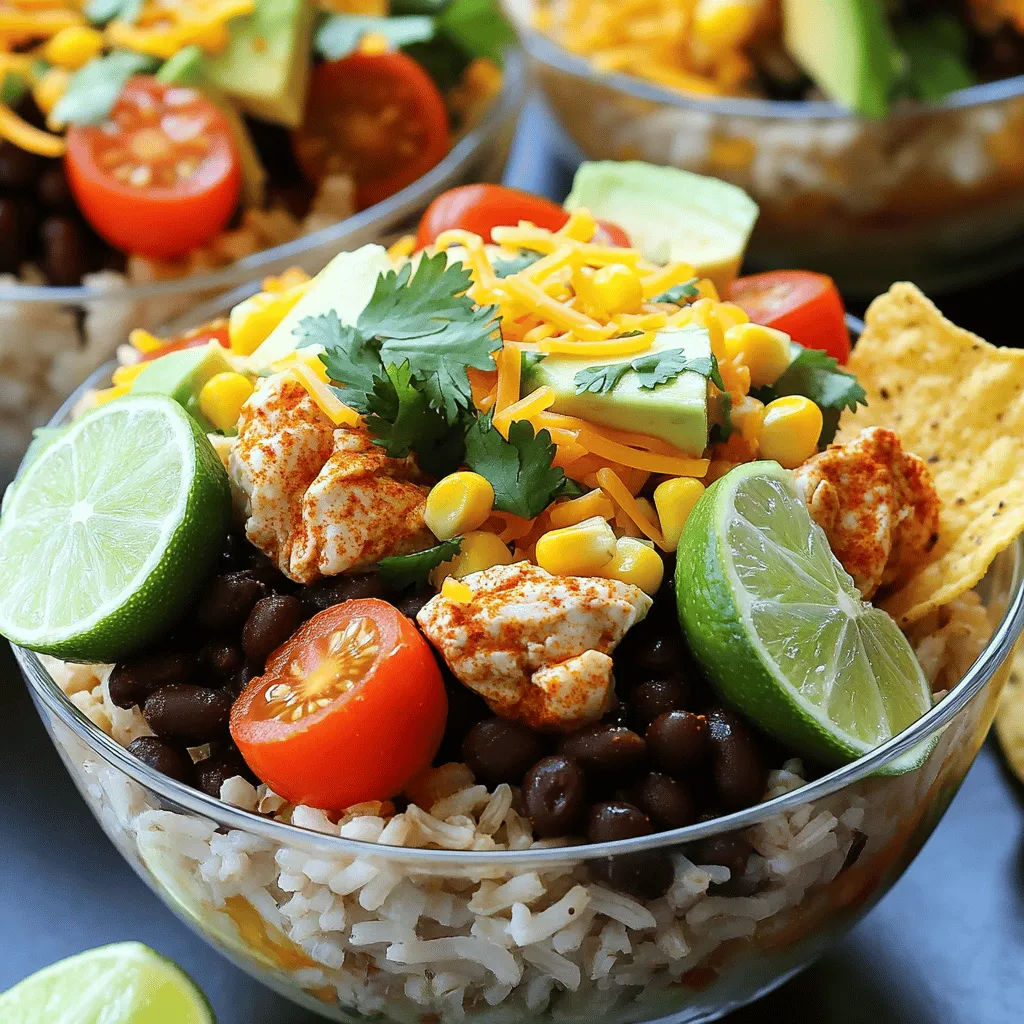
Are you ready to dive into a bowl of deliciousness? My Chicken Burrito Bowls are easy to make and packed

To make easy chicken quesadillas, you need these key items: - 2 cups cooked chicken, shredded - 1 cup shredded cheese (cheddar or Monterey Jack) - 1 bell pepper, diced - 1 small onion, finely chopped - 1 teaspoon cumin - 1 teaspoon paprika - 1 tablespoon olive oil - 4 large flour tortillas - Salt and pepper to taste - Salsa or guacamole (for serving) These ingredients create a tasty blend of flavors. The chicken provides protein, while cheese adds creaminess. Bell peppers and onions give crunch and freshness. Cumin and paprika add a warm, earthy taste. Using fresh ingredients can improve your quesadillas' taste. Fresh veggies like bell peppers and onions are crisp and vibrant. You can also use frozen items for quick meals. Frozen chicken works well if you are short on time. Just be sure to thaw it first. You can adjust the recipe for different diets. For a vegetarian option, swap chicken for black beans or mushrooms. If you want a gluten-free version, use corn tortillas. You can also try different cheeses, like feta or pepper jack, for unique flavors. To make chicken quesadillas, you first need to prepare your ingredients. Start with cooked chicken. Shred it into small pieces. Next, dice one bell pepper and chop one small onion finely. This adds flavor and color to your dish. Measure out one cup of cheese and your spices. You will need cumin and paprika. Don't forget salt and pepper! Heat a medium skillet over medium heat and add one tablespoon of olive oil. Once hot, toss in the chopped onion and diced bell pepper. Sauté these for about five minutes. The goal is to soften them and bring out their sweetness. Then, mix in the shredded chicken, cumin, paprika, salt, and pepper. Stir well and heat for another three to four minutes. This step packs your quesadillas with flavor! Slice each quesadilla into wedges. Serve them warm with salsa or guacamole on the side. For added zest, try a squeeze of lime juice over the top. You can also pair them with a fresh salad or rice for a full meal. This makes the dish not only tasty but also fun to share! For the full recipe, check out the earlier section. To make the best quesadillas, use medium heat. This helps the tortillas cook evenly. Make sure to add enough cheese; it holds the filling together. Always let the skillet get hot before adding the quesadilla. This step helps create a crispy outside. Flip the quesadilla gently to avoid spilling the filling. Don’t overfill your quesadillas. Too much filling makes them hard to cook and flip. Avoid using cold ingredients straight from the fridge. They can make the quesadilla soggy. Also, don’t rush the cooking time. Letting them cook for the right amount of time is key to melting the cheese. You can mix and match fillings to fit your taste. Try adding black beans or corn for added texture. You can also use different meats, like shrimp or beef. If you want a fresh twist, add spinach or kale. For a fun kick, toss in some jalapeños or hot sauce. The possibilities are endless! For more ideas, check the Full Recipe. {{image_2}} You can make tasty vegetarian quesadillas easily. Use the same tortillas and add your favorite veggies. Try using: - 1 cup black beans, rinsed - 1 cup corn, frozen or fresh - 1 cup spinach, chopped - 1 cup mushrooms, sliced These options are healthy and full of flavor. Mix and match ingredients to suit your taste. Cheese is still a great addition for creaminess. Want some heat? Add jalapeños or hot sauce to your chicken mix. Use these ideas for a spicy kick: - 1 small can of diced green chilies - 1 teaspoon chili powder - 1 teaspoon cayenne pepper These spices will elevate the flavor. Adjust the heat to match your preference. Pair with sour cream to cool things down. Get creative with flavors in your quesadillas. Here are some fun combinations: - BBQ chicken with red onion and cheddar cheese - Pesto chicken with spinach and mozzarella - Taco-seasoned chicken with refried beans and cheese These unique mixes keep the meal exciting. Don't be afraid to experiment. Delicious results await! For full instructions, check the Full Recipe. Store leftover quesadillas in an airtight container. Let them cool first. This keeps them fresh. You can keep them in the fridge for up to three days. If you want to keep them longer, consider freezing. To freeze, wrap each quesadilla in plastic wrap. Then, place them in a freezer bag. Make sure to squeeze out as much air as possible. This helps prevent freezer burn. You can freeze quesadillas for up to three months. When you're ready to eat them, just thaw in the fridge overnight. Reheat quesadillas in a skillet for the best taste. Heat over medium-low heat. Cook for about 3-4 minutes on each side. This keeps the outside crispy and the inside warm. You can also use the oven. Preheat to 350°F and bake for 10-15 minutes. Enjoy your quesadillas with salsa or guacamole from the Full Recipe. You can add your favorite veggies. Try mushrooms, corn, or spinach. You can also swap the chicken for beef or beans for a vegetarian option. Don't forget to change up the spices too! A little bit of taco seasoning can give a nice kick. Experiment with flavors that you love. I recommend using cheddar or Monterey Jack cheese. They melt nicely and give great flavor. You can also mix different cheeses for a unique taste. Pepper Jack adds some heat if you like spice. Just use whatever cheese you enjoy. Yes, you can prepare them ahead of time! Make the filling, then store it in the fridge. When you're ready to eat, assemble and cook the quesadillas. This saves time for busy days. You can also assemble them and keep them in the fridge for a few hours before cooking. Cook them in a hot skillet with a little oil. This helps the outside get crunchy while the inside melts. Make sure not to overload them with filling, as that can make them soggy. Flip them gently to keep them intact. Absolutely! Whole wheat tortillas add fiber and nutrients. They also taste great. Just use the same method for cooking and assembling. Enjoy the health benefits without losing flavor. Salsa, guacamole, or sour cream work well as dips. A fresh salad or rice also makes a nice side. You can even serve them with beans for added protein. Get creative with sides that you enjoy. Look for a golden-brown color on both sides. The cheese inside should be melted and gooey. You can also check by cutting one in half to see if the cheese is melted. If it is, you’re ready to enjoy! In this blog post, we explored easy chicken quesadilla recipes. We covered key ingredients, cooking steps, and tips for success. You learned about alternatives for dietary needs and how to store leftovers. By using these ideas and methods, you can make your quesadillas taste great every time. Don’t be afraid to get creative with flavors. Enjoy your cooking journey, and make delicious meals for you and your loved ones!

Easy Chicken Quesadillas Quick and Tasty Recipe

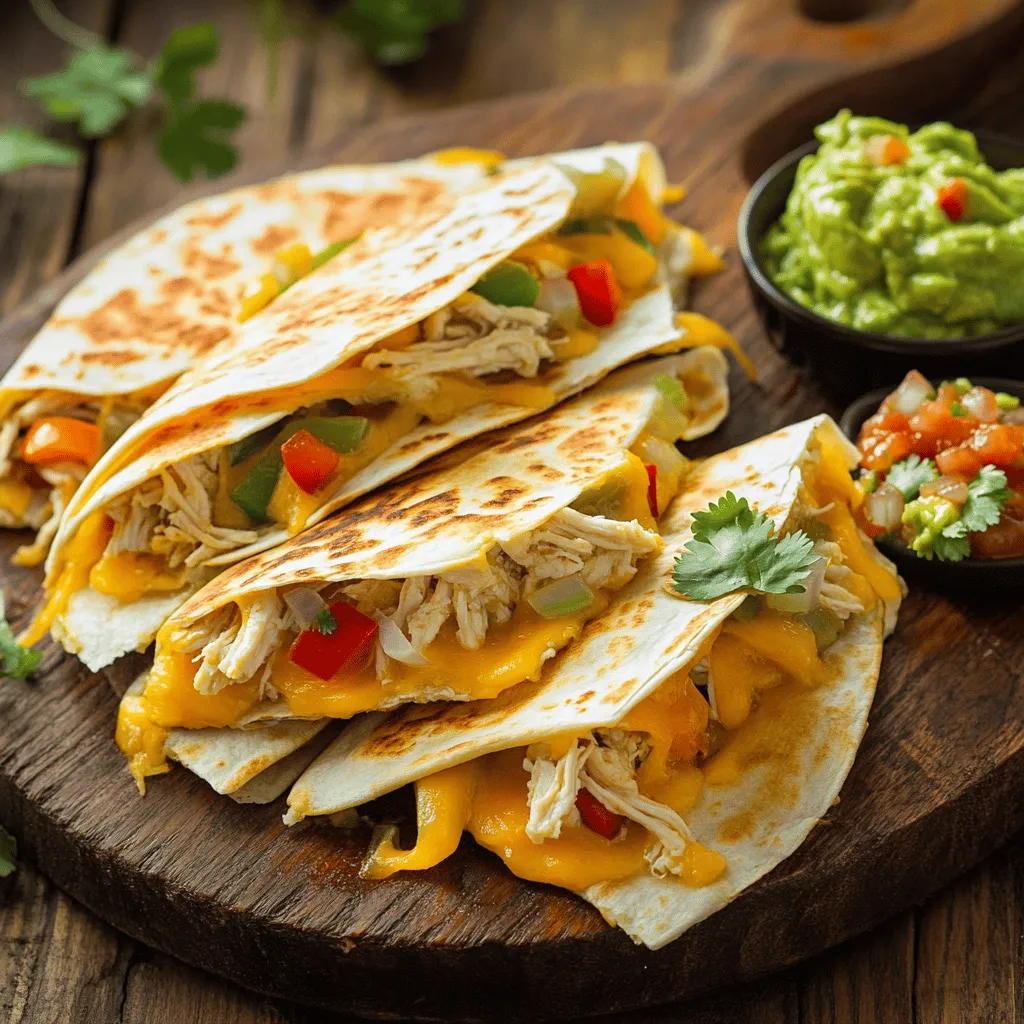
Looking for a quick and tasty meal? Easy chicken quesadillas are the answer! With simple ingredients and fast cooking, you

- Red bell pepper chunks - Yellow bell pepper chunks - Zucchini slices - Red onion wedges - Cherry tomatoes - Halved mushrooms - Olive oil - Balsamic vinegar - Minced garlic - Dried oregano - Smoked paprika - Salt and pepper to taste I love choosing colorful veggies for skewers. Red and yellow bell peppers add sweetness. Zucchini gives a nice texture. Red onions add a sharp taste. Cherry tomatoes burst with flavor when grilled. Mushrooms soak up the marinade well. For the marinade, I mix olive oil and balsamic vinegar. This combo adds a tangy taste. I then add minced garlic for a punch of flavor. Dried oregano gives it an Italian twist. Smoked paprika adds a warm, smoky note. Always remember to season with salt and pepper. This makes a big difference. - Fresh basil leaves - Additional seasoning suggestions Garnishing can elevate your skewers. I like to add fresh basil leaves for a bright touch. You can also sprinkle more seasoning on top. Try a dash of chili flakes for some heat. A squeeze of lemon juice adds freshness too. For the full recipe, check the details above. Happy grilling! First, preheat your grill to medium-high heat. This helps to get those nice grill marks. While the grill heats, soak your wooden skewers in water for about 10 to 15 minutes. Soaking prevents them from burning while cooking. Next, grab a large bowl to make the marinade. Combine these ingredients: - 3 tablespoons olive oil - 2 tablespoons balsamic vinegar - 2 cloves garlic, minced - 1 teaspoon dried oregano - 1 teaspoon smoked paprika - Salt and pepper to taste Whisk these together until mixed well. Now, add your chopped vegetables: - 1 red bell pepper, cut into chunks - 1 yellow bell pepper, cut into chunks - 1 zucchini, sliced into thick rounds - 1 red onion, cut into wedges - 8 cherry tomatoes - 1 cup mushrooms, halved Toss the vegetables in the marinade until well coated. Let them sit for about 15 minutes. This step allows the veggies to soak up the flavors. Now it's time to build your skewers. Thread the marinated vegetables onto the soaked skewers. Alternate colors and shapes for a pretty look. Once your grill is ready, place the skewers on it. Close the lid and grill for about 8 to 10 minutes. Turn them occasionally. You want the veggies tender with nice grill marks. When done, take the skewers off the grill and let them sit for a minute. If you like, add fresh basil leaves as a garnish before serving. Enjoy your tasty grilled veggie skewers! For the full recipe, check out the details provided above. To grill veggies just right, keep an eye on the temperature. Aim for medium-high heat. This ensures your veggies cook evenly. If the grill is too hot, they may burn outside while staying raw inside. Overcooking can ruin your skewers. Watch the clock! Grill them for about 8-10 minutes. Turn them often for even cooking. They should be tender but still firm. Want to boost the taste? Try a few different marinades! You can add lemon juice or soy sauce for a new twist. Honey can give a hint of sweetness too. Explore spices and herbs! Fresh thyme or rosemary can add depth. Try chili flakes for some heat. Mix it up based on your mood or what you have at home. Feel free to switch up the veggies! Asparagus, eggplant, or even corn can make great additions. Use seasonal veggies for the freshest taste. You can also add protein! Chicken, shrimp, or tofu can fit right in. Just adjust the grilling time based on the protein. This way, you create a heartier meal. For the full recipe, check the details above. {{image_2}} For a great meal, pair your grilled veggie skewers with tasty sides. Here are some ideas: - Quinoa salad with lemon - Creamy potato salad - Grilled corn on the cob - Flatbreads with herbs You can also serve them with dips and sauces. Some good choices include: - Tzatziki sauce for a cool bite - Hummus for a creamy touch - Chimichurri for a fresh kick Make your skewers shine when you serve them. Try these tips: - Use a large platter to show off the colors. - Place fresh herbs around the skewers for a pop of green. - Drizzle some balsamic glaze over the top for a shiny finish. You can also add lemon wedges for a touch of zest. It adds color and a hint of flavor. If you have leftovers, store them right. Place the skewers in an airtight container. Keep them in the fridge for up to three days. When you want to eat them again, reheating is easy. Simply place the skewers on a grill or in a pan over medium heat. Heat them for about 5 minutes until warm. This keeps them tasty and prevents them from drying out. For more details and tips, check the Full Recipe for Grilled Veggie Skewers. Using seasonal vegetables can make your skewers fresh and tasty. Think of bright summer zucchini or hearty winter squash. These veggies taste great when grilled. You can even mix in fruits for added sweetness. Pineapple and peaches caramelize nicely on the grill. This makes for a fun twist and adds flavor. You can create themed skewers for fun meals. For Mediterranean-inspired skewers, use veggies like eggplant, cherry tomatoes, and olives. Add some feta cheese for extra flavor. For Asian-inspired mixes, try bell peppers, mushrooms, and green onions. Toss them with a little soy sauce or sesame oil. This gives a different taste and style to your skewers. If you want vegan options, skip any cheese and focus on the veggies and fruits. You can grill tofu or tempeh for protein. For gluten-free needs, check your marinade. Use gluten-free soy sauce or tamari for flavor. This way, everyone can enjoy these delicious skewers. You can find the full recipe for grilled veggie skewers to get started on your next meal! Grill veggie skewers for about 8 to 10 minutes. Turn them every few minutes. The goal is to get nice grill marks and a tender texture. If they start to brown, that's a good sign! Yes, you can use frozen vegetables. Make sure to thaw them first. Pat them dry to avoid excess moisture. This helps them grill better and prevents steaming. Great options include: - Red bell pepper chunks - Yellow bell pepper chunks - Zucchini slices - Red onion wedges - Cherry tomatoes - Halved mushrooms These veggies hold up well on the grill and taste amazing! Check for signs like: - Tenderness when pierced with a fork - Nice grill marks on the outside - A slight char without burning These signs show that your veggies are perfectly grilled. Grilled veggie skewers are easy and fun to make. We covered the right vegetables, marinade, and grilling steps. Remember to control the grill’s heat and choose your favorite flavors for the marinade. You can try seasonal or themed skewers to keep meals exciting. Serve with tasty sides, and you’ll impress everyone. Enjoy your cooking adventure!

Grilled Veggie Skewers Flavorful and Easy Recipe

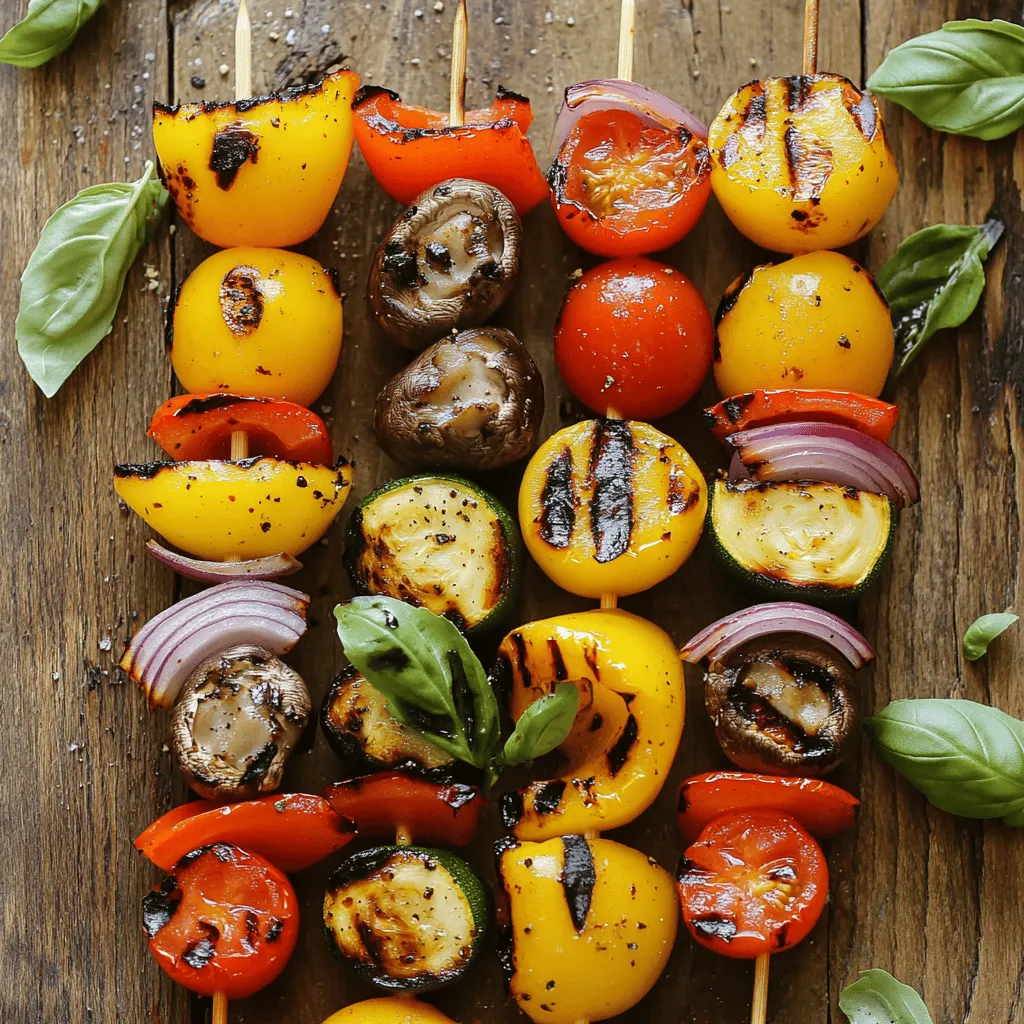
Are you ready to create a colorful dish that’s packed with flavor? Grilled veggie skewers are not only easy to

To make tasty Apple Cinnamon Overnight Oats, you will need: - 1 cup rolled oats - 1 ½ cups almond milk (or any milk of choice) - 1 medium apple, diced (keep the skin on for added texture) - 1 teaspoon ground cinnamon - 2 tablespoons maple syrup (or honey) - 1 tablespoon chia seeds (optional, for added texture) - ¼ cup walnuts or pecans, chopped (for crunch) - A pinch of salt These ingredients create a great balance of flavors. The oats give a creamy base, while apples add sweetness. Cinnamon brings warmth, and nuts add crunch. You can easily swap some ingredients to fit your taste. For example: - Use coconut milk or oat milk instead of almond milk. - Try any seasonal fruit, like pears or berries, in place of apples. - Use agave syrup if you prefer a different sweetener. - For a nut-free option, skip the nuts or use seeds like sunflower seeds. These swaps keep the recipe fun and fresh. Feel free to experiment with what you have at home. Apple Cinnamon Overnight Oats are a smart choice for breakfast. Here’s a quick look at their nutritional benefits: - Good source of fiber from oats and chia seeds. - Healthy fats from nuts help keep you full. - Apples provide vitamins and antioxidants. - Maple syrup adds natural sweetness without refined sugars. This meal is not only filling but also supports your health and energy levels. You can find the full recipe in the earlier sections. To make apple cinnamon overnight oats, start by gathering your ingredients. You will need: - 1 cup rolled oats - 1 ½ cups almond milk (or any milk of choice) - 1 medium apple, diced (keep the skin on for added texture) - 1 teaspoon ground cinnamon - 2 tablespoons maple syrup (or honey) - 1 tablespoon chia seeds (optional, for added texture) - ¼ cup walnuts or pecans, chopped (for crunch) - A pinch of salt Begin by mixing the oats, almond milk, cinnamon, maple syrup, and salt in a bowl. Stir until everything blends well. Next, add the diced apple and chia seeds if you chose to use them. Stir again until evenly mixed. Cover your bowl with plastic wrap or move the mixture into jars with lids. This makes it easy to grab in the morning. Place the bowl or jars in the fridge overnight. This lets the oats soak up the milk and flavors. To get the right texture, pay attention to the milk-to-oats ratio. If you want thicker oats, use less milk. For creamier oats, add a bit more. In the morning, stir your oats. If they seem too thick, add a splash of milk. This will help loosen them up. When serving, consider using clear jars. This shows off the colors and layers nicely. Top your oats with chopped walnuts or pecans for a crunchy bite. You can also sprinkle extra cinnamon on top for added flavor. A few apple slices make a great garnish too. This adds a fresh look and taste to your dish. Enjoy your delicious apple cinnamon overnight oats! One common mistake is not using enough liquid. Oats need liquid to soak up flavors. If you skimp, they'll be dry. Also, avoid using overly ripe apples. They can turn mushy and lose their crunch. Lastly, don’t forget to stir the mix before serving. This helps blend flavors evenly. You can easily change this recipe to fit your taste. Try adding nuts, seeds, or different fruits. For a spice kick, add nutmeg or ginger. Want it sweeter? Add more maple syrup or honey. You can even switch the milk. Use oat, soy, or coconut milk based on your preference. Store leftover oats in the fridge for up to five days. Use airtight containers to keep them fresh. When reheating, add a splash of milk to loosen the texture. Warm them for about 30 seconds in the microwave. You can also enjoy them cold if you prefer! For the best flavor, eat them within three days for optimal freshness. Remember to check out the Full Recipe for step-by-step guidance! {{image_2}} You can easily switch up the flavor of your overnight oats. Try adding cocoa powder for a chocolate twist. You can also mix in peanut butter for a nutty taste. Swap the diced apple for banana or berries to change the base fruit. Each option gives a new taste to your meal. Seasonal ingredients can elevate your oats. In fall, add pumpkin puree and pumpkin spice. In winter, try dried fruit like cranberries or figs. Fresh strawberries or blueberries work great in spring and summer. Each season offers fresh choices to keep your breakfast exciting. You can easily make these oats vegan. Use maple syrup instead of honey. For a gluten-free version, ensure your oats are labeled gluten-free. You can also swap almond milk for oat milk or coconut milk. These changes keep the recipe tasty and friendly for all diets. For the full recipe, check out the details above. Storing your apple cinnamon overnight oats is simple. Use airtight containers or jars with lids. This keeps the oats fresh and prevents odors from other foods. Make sure to store them in the fridge. If you layer your jars, add toppings like nuts just before eating. Prepared overnight oats last about 3 to 5 days in the fridge. After that, they may lose taste and texture. Always check for any signs of spoilage, like off-smells or changes in color. If they seem fine, they are good to eat. You can freeze overnight oats for longer storage. Divide your oats into single servings in freezer-safe containers. They can last up to three months in the freezer. When you’re ready to eat, thaw them in the fridge overnight. Then, stir well and enjoy! This way, you can have a delicious breakfast ready anytime. Overnight oats can last up to five days in the fridge. Store them in sealed jars. The oats stay fresh and tasty this way. After a few days, the texture might change. They may become a bit mushy. You can use instant oats, but the texture will differ. Instant oats absorb liquid faster and get mushy quickly. Rolled oats give a chewier bite. If you prefer a softer mix, instant oats work fine. Just remember to adjust the liquid. You can use any milk you like. Dairy milk, soy milk, or oat milk are great choices. Each type of milk adds its own flavor. Coconut milk will give a nice tropical twist, if you like. To change the sweetness, add more or less maple syrup. You can also add mashed banana or applesauce for natural sweetness. Taste your mixture before it sits overnight. This way, you can adjust it to your liking. Yes, you can make several servings at once. Just prepare them in separate jars. Store them in the fridge. Each morning, grab a jar for a quick breakfast. It makes mornings easy and tasty! For the full recipe, check the earlier section. You learned how to make tasty apple cinnamon overnight oats. We covered ingredients, step-by-step prep, and tips. You can customize your oats to your taste and make them vegan or gluten-free. Storing and reheating them is easy too. Now, you're ready to enjoy this healthy breakfast every day. Making these oats is fun and simple. You can impress yourself and others with this dish, and it can be a great way to start your day right.

Apple Cinnamon Overnight Oats Healthy Breakfast Option

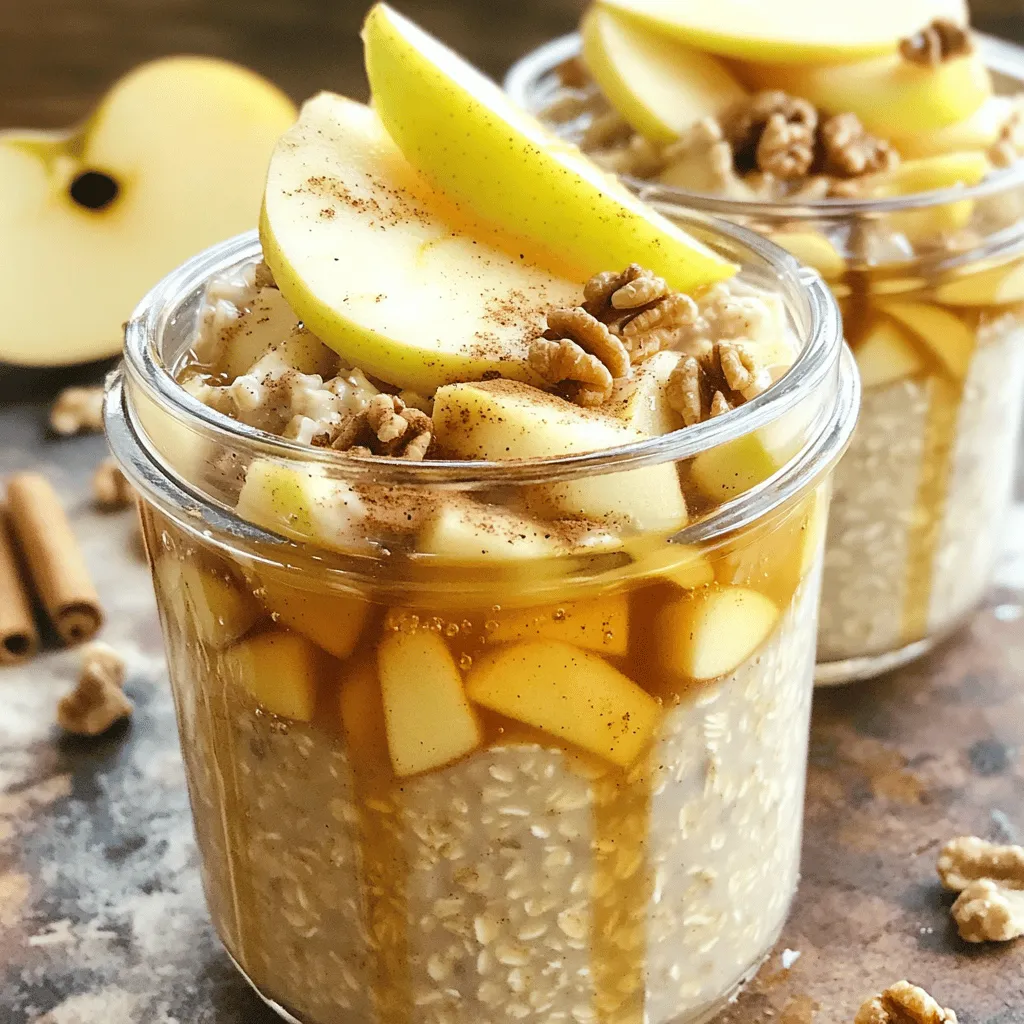
Looking for a quick and healthy breakfast? You’ve found it! Apple Cinnamon Overnight Oats are the perfect choice for busy

These bars need a few main ingredients to shine. Here’s what you’ll need: - 1 cup unsalted butter, softened - 3/4 cup powdered sugar - 1 teaspoon vanilla extract - 2 cups all-purpose flour - 1/4 teaspoon salt - 1 cup almond meal (finely ground almonds) - 1 cup fresh raspberries (or frozen, thawed and drained) - 1/4 cup sliced almonds (for topping) These key ingredients create a rich, buttery base and a fruity filling. The almond meal adds a nice texture and flavor. You can enhance your bars with a couple of optional ingredients. Consider adding: - 1 tablespoon granulated sugar (for sprinkling) This sugar gives a sweet crunch on top of the berries. It’s a small touch that can make a big difference. If you need to swap ingredients, here are some ideas: - Butter: Use coconut oil for a dairy-free option. - Powdered Sugar: Blend granulated sugar until fine if you run out. - Almond Meal: Try ground walnuts or hazelnuts for a different flavor. - Raspberries: Any berry works great here, like blueberries or strawberries. These substitutes let you customize the recipe based on what you have at home. For the complete guide, check the Full Recipe. First, gather your ingredients. You will need butter, powdered sugar, vanilla, flour, salt, almond meal, and raspberries. 1. Preheat your oven to 350°F (175°C). 2. Line a 9x9-inch baking pan with parchment paper. Leave some paper hanging over the edges. This helps with easy removal later. 3. In a bowl, cream the softened butter and powdered sugar. Mix until it looks light and fluffy. 4. Add in the vanilla extract and stir well. 5. Gradually mix in the all-purpose flour, almond meal, and salt. Stir until the dough forms. Now, let’s bake the bars. 1. Take two-thirds of the dough and press it into the bottom of the pan. This is your shortbread base. 2. Evenly spread your fresh raspberries over the base. If you want, sprinkle some granulated sugar on top for extra sweetness. 3. Crumble the leftover dough over the raspberries. Let some berries peek through for a pretty look. 4. Sprinkle sliced almonds on top for crunch. 5. Bake in the oven for 30-35 minutes. The top should turn golden brown. The edges will feel a bit firm. Once the bars are baked, it’s time to cool and serve them. 1. Remove the pan from the oven and let the bars cool completely in the pan. 2. When cool, lift the bars out using the parchment paper overhang. 3. Cut them into squares. 4. For a nice touch, dust the finished bars with powdered sugar before serving. You can also add fresh raspberries on the side. Enjoy these delicious Raspberry Almond Shortbread Bars! For the full recipe, refer to the earlier section. For the best Raspberry Almond Shortbread Bars, use softened butter. This helps create a creamy texture. Make sure to measure your flour correctly. Too much flour can make the bars dry. Use a spoon to scoop it into your measuring cup, then level it off. When mixing the batter, don’t overwork it. Mix until just combined for a tender shortbread. Also, bake the bars until golden brown for the best flavor and texture. Check them around 30 minutes in. These bars taste great warm or at room temperature. Cut them into squares and serve on a nice plate. They go well with tea or coffee. You can also add a scoop of vanilla ice cream on the side for a sweet treat. If you want some crunch, add crushed almonds on top when serving. You can even layer your bars with a dollop of whipped cream for extra creaminess. Make your bars look special by dusting them with powdered sugar. This adds a nice touch. Place fresh raspberries around the bars on the plate for a pop of color. Use a beautiful platter to serve, as it makes everything look more appealing. If you want to impress your guests, consider adding mint leaves as a garnish. They add a fresh look and aroma. For an elegant finish, drizzle a bit of melted chocolate over the bars before serving. For the full recipe, check out the detailed instructions above. {{image_2}} You can change the raspberries to other fruits. Try blueberries, strawberries, or blackberries. Each fruit brings its own taste. Blueberries add a sweet burst. Strawberries offer a fresh flavor. Blackberries give a tart kick. You can mix and match fruits too. This keeps the recipe fun. If you want a nut-free version, use sunflower seed meal. This keeps the texture smooth. You can also use coconut flour for a tropical twist. Almonds offer a great crunch, but walnuts or pecans work well too. They bring different flavors to the bars. Choose what you like best. For a lighter treat, use less butter. Substitute half the butter with unsweetened applesauce. This cuts calories but keeps moisture. You can use whole wheat flour for added fiber. If you prefer less sugar, try using honey or maple syrup. Adjust the sweetness to your taste. To keep your Raspberry Almond Shortbread Bars fresh, store them in an airtight container. This keeps moisture out and flavor in. Place parchment paper between layers if stacking. This prevents sticking and keeps them neat. You can also wrap each bar in plastic wrap for added protection. Freezing is a great option for longer storage. First, let the bars cool completely. Once cool, cut them into squares. Wrap each square in plastic wrap and place them in a freezer-safe bag. Squeeze out the air before sealing the bag. You can freeze them for up to three months. When ready to eat, let them thaw in the fridge overnight. When stored properly, the Raspberry Almond Shortbread Bars last about one week at room temperature. They stay fresh in the fridge for up to two weeks. If you freeze them, remember to enjoy them within three months for the best taste. For the full recipe, check out the earlier section. Yes, you can use frozen raspberries. Just thaw and drain them first. Frozen berries work well and still taste great in these bars. They might be a bit softer than fresh ones, but they will add that lovely tart flavor. I recommend using sliced almonds for topping. They add a nice crunch and flavor. You can also use whole almonds, but slice them for better texture. If you want a deeper almond taste, use almond meal in the dough. Look for a golden-brown top. The edges should feel a bit firm. You can also insert a toothpick in the center. If it comes out clean, the bars are done. Make sure not to overbake them to keep them soft. Yes, you can! Just swap the all-purpose flour for a gluten-free blend. Make sure the blend you choose works for baking. Also, check that your almond meal is gluten-free to keep everything safe for those with gluten allergies. Absolutely! Doubling the recipe is easy. Just use a larger baking pan, like a 9x13-inch one. Keep an eye on the baking time. It may take a little longer to cook through, so check for that golden-brown color. For the full recipe, check the earlier section! You learned about making delicious Raspberry Almond Shortbread Bars. We covered the main ingredients, baking steps, tips for success, tasty variations, and storage advice. Baking becomes easier when you know these details. Feel free to mix ingredients to match your taste. These bars are simple, fun, and great for sharing. Enjoy your baking and share your tasty results! Happy cooking!

Raspberry Almond Shortbread Bars Simple and Tasty Treat

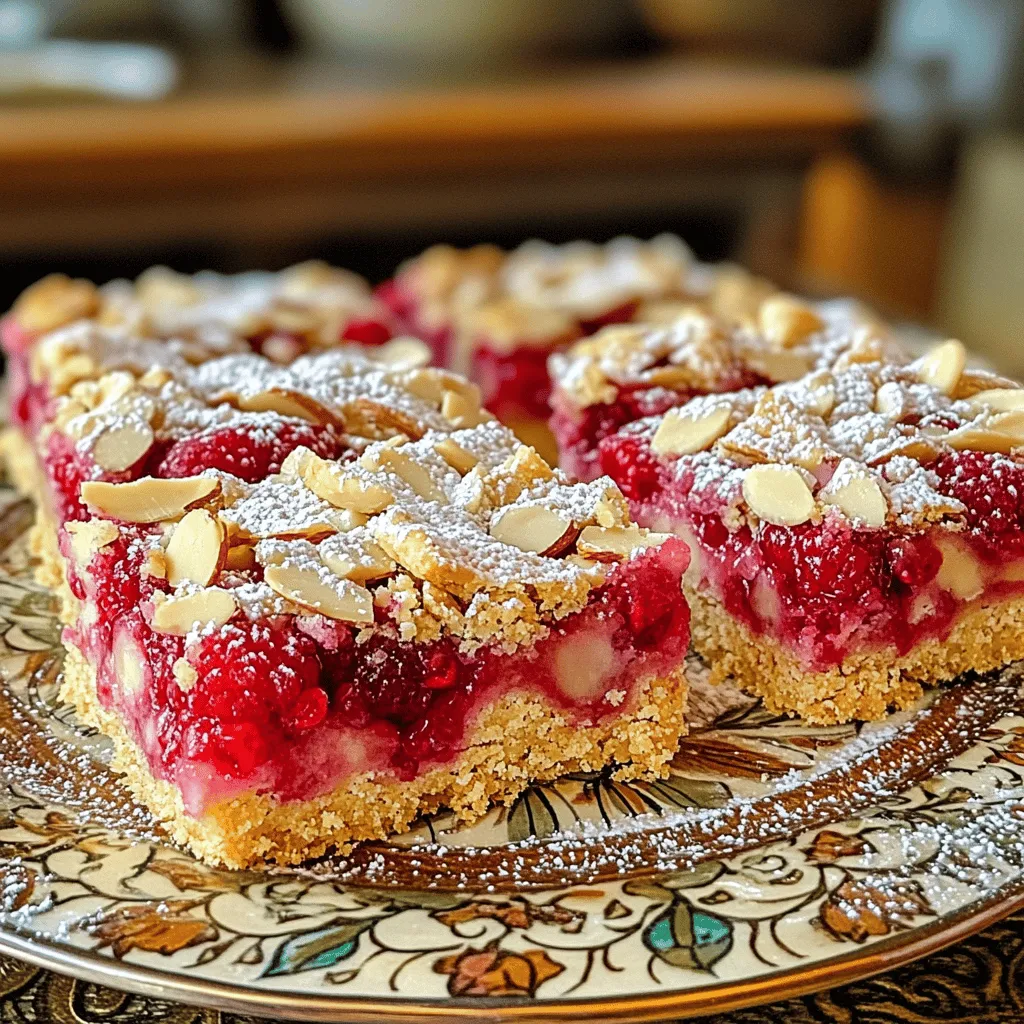
Looking for a sweet treat that’s easy to make and perfect for any occasion? Raspberry Almond Shortbread Bars are your

- 1 cup orzo pasta - 2 cups vegetable broth - 1 cup cherry tomatoes, halved - 1 cucumber, diced - 1 cup Kalamata olives, pitted and sliced - 1 bell pepper (any color), diced - ½ red onion, finely chopped - 1 cup feta cheese, crumbled - ¼ cup fresh parsley, chopped I love using orzo pasta in this salad. It cooks quickly and adds a nice texture. The fresh veggies bring color and crunch. Cherry tomatoes add sweetness, while cucumbers keep it cool. Kalamata olives add briny flavor, and bell peppers give a pop of color. Red onion adds a slight bite, and feta cheese brings creaminess and saltiness to the mix. Fresh parsley adds a burst of green and freshness. - 2 tablespoons olive oil - 2 tablespoons red wine vinegar (or lemon juice) - 1 teaspoon dried oregano - Salt and pepper to taste The dressing is simple but full of flavor. Olive oil gives richness, while vinegar or lemon juice adds tang. Dried oregano brings that classic Greek taste. I always season with salt and pepper for balance. - Fresh herbs - Extra feta cheese You can make this salad even better with garnishes. Fresh herbs like dill or more parsley brighten up the dish. Extra feta cheese adds more creaminess and flavor. To start, bring 2 cups of vegetable broth to a boil in a medium saucepan. This broth adds great flavor to the orzo. Once boiling, add 1 cup of orzo pasta. Cook it for about 9 to 10 minutes. I like to check the pasta for al dente texture. When done, drain the orzo and rinse it under cold water. This stops the cooking process and keeps it nice and firm. While the orzo cooks, chop your fresh vegetables. Use 1 cup of halved cherry tomatoes, 1 diced cucumber, 1 diced bell pepper, and ½ finely chopped red onion. Place all the chopped veggies in a large mixing bowl. Once the orzo cools, add it to the bowl with the veggies. Now, stir in 1 cup of sliced Kalamata olives and 1 cup of crumbled feta cheese. This mix is colorful and full of flavor! Next, we’ll make the dressing. In a small bowl, whisk together 2 tablespoons of olive oil, 2 tablespoons of red wine vinegar (or lemon juice if you prefer), 1 teaspoon of dried oregano, and some salt and pepper to taste. Pour this dressing over the salad mixture. Toss gently to combine everything well. Finally, fold in ¼ cup of chopped fresh parsley for an extra burst of flavor. For the best taste, chill the salad for at least 30 minutes before serving. If you want the full recipe, check out Mediterranean Orzo Delight . To cook orzo perfectly, always aim for al dente. This means the pasta should be firm but not hard. Follow the package instructions carefully, usually around 9-10 minutes in boiling vegetable broth. After cooking, drain the orzo. Rinse it under cold water to stop the cooking process. This step keeps the orzo from getting mushy. For the best flavor, use fresh herbs like parsley and oregano. They add brightness to the dish. When mixing ingredients, do it gently. This way, the orzo stays intact, and the veggies remain crisp. Tossing the salad with the dressing is key. It helps each bite burst with flavor. Add salt and pepper to taste for balance. For presentation, serve the salad in a large, shallow bowl. Garnish with extra parsley and a sprinkle of feta on top. This makes it look fresh and inviting. You can pair the orzo salad with grilled chicken or fish. It complements the main dish and adds a colorful touch to your meal. Enjoy! {{image_2}} You can easily switch out some veggies in this salad. If you don’t have cherry tomatoes, try diced bell peppers. They add crunch and color. Zucchini or radishes can also work well. If you want more greens, add spinach or arugula. For cheese, feta is classic, but you can try goat cheese or mozzarella. Both options give a nice creamy touch. If you need a dairy-free choice, look for vegan feta. It’s tasty and keeps the salad fresh. Adding proteins can make this salad more filling. Grilled chicken or shrimp works great. If you want a plant-based option, add chickpeas or black beans. They add protein and flavor. For dressings, use a lemon vinaigrette for a zesty kick. A balsamic glaze can add a sweet touch. You can also mix in herbs like basil or dill for more depth. If you’re looking for gluten-free options, use gluten-free orzo. There are great brands that taste just like regular pasta. You can also use quinoa or rice instead. For vegan adaptations, skip the feta cheese and choose a plant-based dressing. Add extra veggies or nuts for crunch. This way, everyone can enjoy a tasty meal. To keep your Greek orzo salad fresh, use airtight containers. Glass or plastic containers work well. Make sure the lid seals tightly. This helps block air and moisture. Store the salad in the fridge. Keep it there for the best taste. When you store it, layer the salad. Start with the orzo, then add the veggies, olives, and feta on top. This keeps the flavors separate until you eat. Doing this prevents sogginess. You can eat Greek orzo salad cold or warm. Cold is great for a refreshing snack. If you want to reheat it, use a pan on low heat. Stir gently to warm it without cooking the veggies. This keeps the salad's crunch. If you decide to heat it, add a little olive oil. This helps keep the texture nice and smooth. The salad lasts about 3 to 5 days in the fridge. Check for signs of spoilage. If it smells sour or looks slimy, it’s best to toss it. The veggies should stay crisp and colorful. If they start to brown or wilt, it’s time to say goodbye. Enjoy your Greek orzo salad while it’s fresh! You can find the Full Recipe and other tips in the content above. To cook orzo pasta, follow these steps: 1. Bring 2 cups of vegetable broth to a boil in a medium saucepan. 2. Add 1 cup of orzo pasta to the boiling broth. 3. Cook according to the package instructions, usually about 9-10 minutes. 4. Once cooked, drain the orzo and rinse it under cold water. 5. This stops the cooking and cools it down for your salad. Cooking orzo is simple. It becomes soft but still firm, known as al dente. This texture works best in salads. Yes, you can make Greek orzo salad in advance. Here are some tips: - Prepare the salad up to a day ahead. - Store it in an airtight container in the fridge. - This allows the flavors to meld and improve. If you do this, dress the salad only before serving. It keeps the veggies crisp and fresh. You can add many tasty ingredients to your Greek orzo salad. Here are some ideas: - Grilled chicken or shrimp for protein. - Roasted red peppers for a sweet flavor. - Spinach or arugula for extra greens. - Artichoke hearts for a unique touch. Other common questions include using different types of cheese. You can try goat cheese or mozzarella instead of feta. You can find the Full Recipe for this dish at Mediterranean Orzo Delight . This recipe gives you all the details you need! In this blog post, we explored how to make a delicious Greek orzo salad. We covered essential ingredients like orzo, fresh veggies, and feta cheese. You learned how to cook orzo, prepare the salad, and mix the perfect dressing. Remember, you can adjust flavors and add proteins for variety. Store leftovers properly to enjoy later, and always check for freshness. This salad is a tasty and healthy option that can fit any meal plan. Now, go ahead and create your Mediterranean masterpiece!

Easy Greek Orzo Salad Fresh and Flavorful Delight

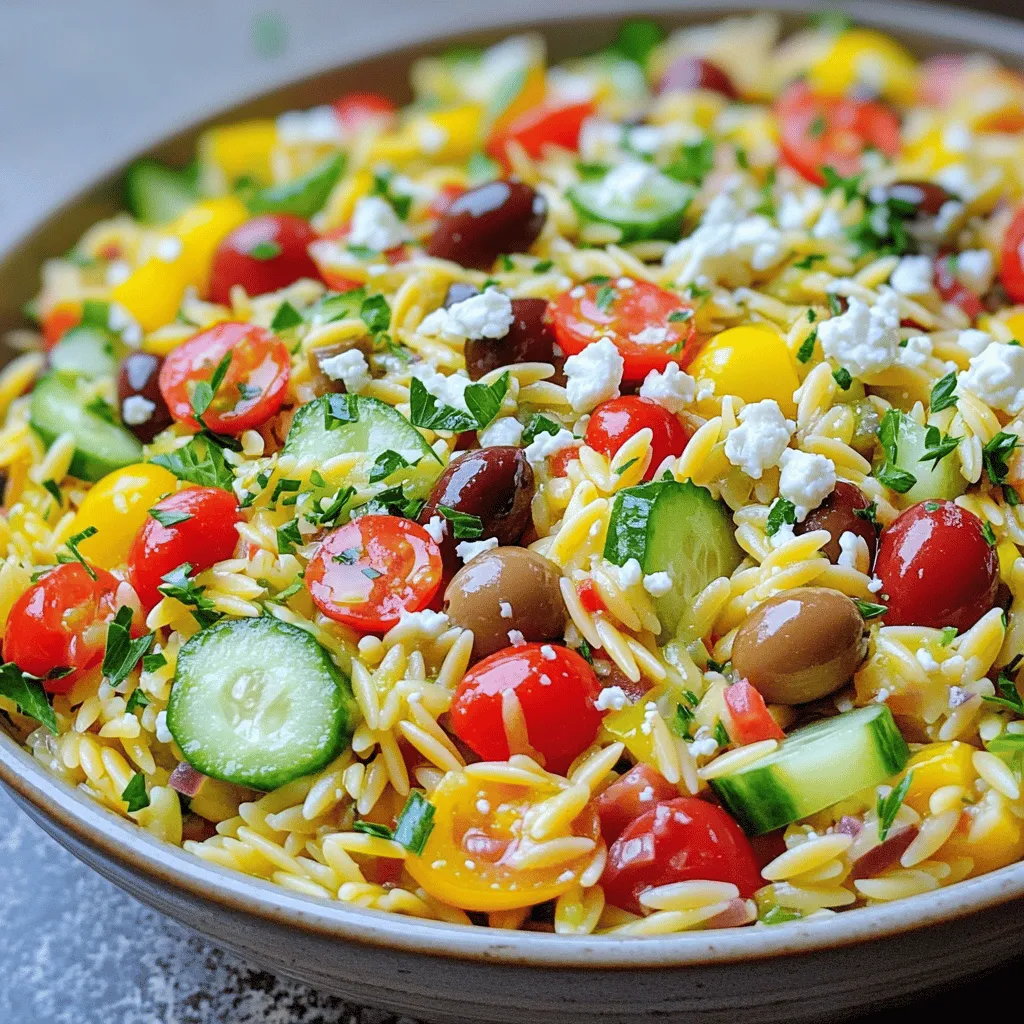
Looking for a fresh and tasty dish that’s quick to make? My Easy Greek Orzo Salad is just what you

Older posts
Newer posts
← Previous Page1 Page2 Page3 … Page53 Next →

dsad

© 2025 Lisa Dishes • Built with GeneratePress

Our Policies

  • Copyright Policy
  • Cookie Policy
  • GDPR Policy
  • Privacy Policy
  • Disclaimer
  • Terms Of Use

More Information

  • Home
  • About
  • Contact
  • Appetizers
  • Dessert
  • Dinner
  • Drinks
©2025, Lisa Dishes About Back To Top