No-Bake Pumpkin Pie Cheesecake Cups Delightful Treat

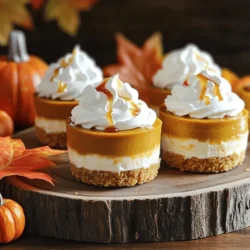
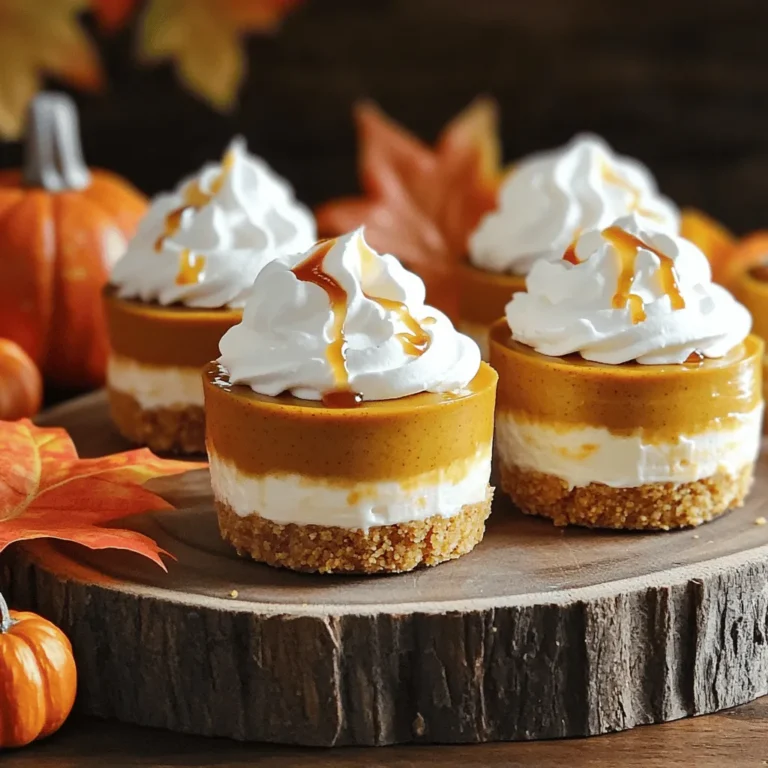
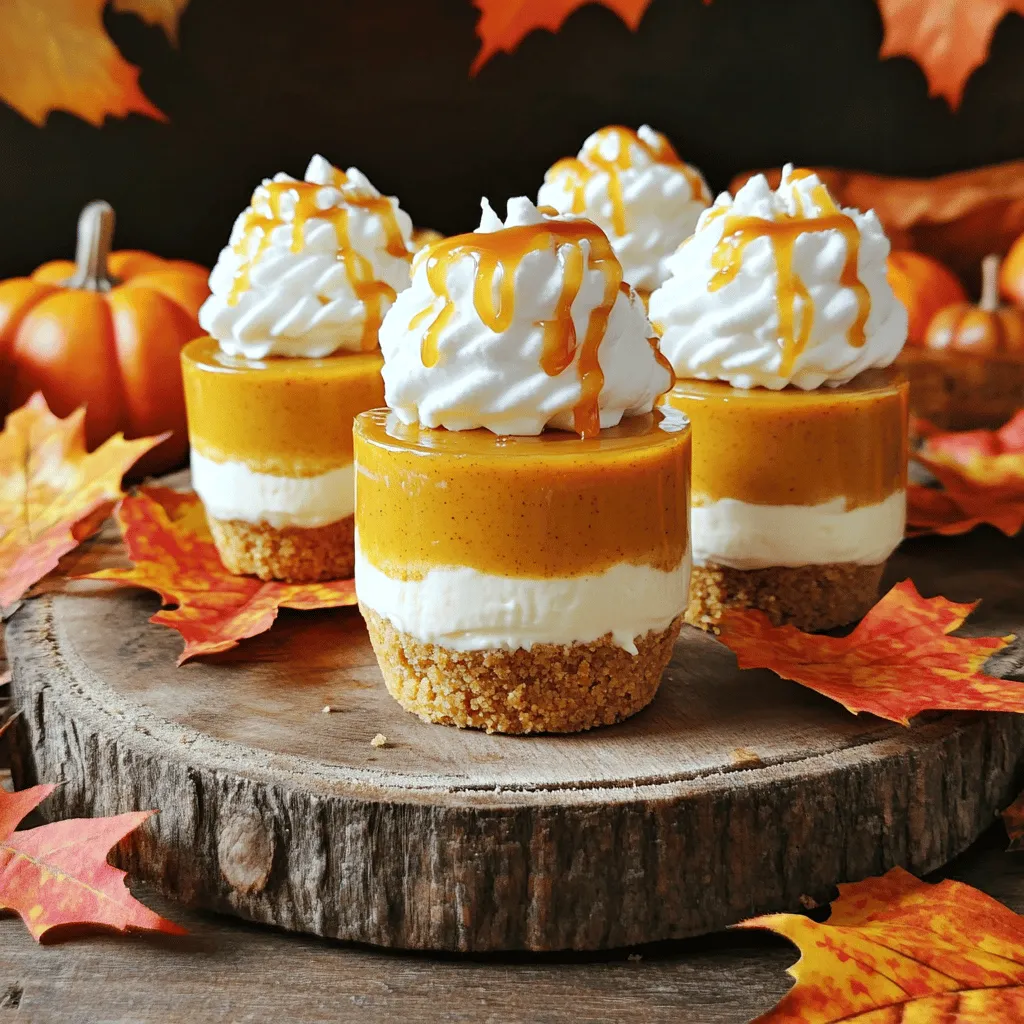
Looking for a sweet treat that’s easy and delicious? You’ve found it! My No-Bake Pumpkin Pie Cheesecake Cups are perfect for any fall gathering or cozy evening at home. With creamy layers of pumpkin cheesecake and a buttery crust, these treats are simple to make and loved by all. Get ready to impress your friends and family with this fun dessert! Let’s dive into the tasty details.

Ingredients

List of Ingredients

– 1 cup crushed graham crackers

– 4 tablespoons unsalted butter, melted

– 2 (8 oz) packages cream cheese, softened

– 1 cup pumpkin puree

– 1/2 cup powdered sugar

– 1 teaspoon vanilla extract

– 1 teaspoon ground cinnamon

– 1/2 teaspoon ground nutmeg

– 1/4 teaspoon ground ginger

– 1 cup whipped cream, plus extra for topping

– Caramel sauce for drizzling (optional)

Measurements and Substitutions

To make this treat, use exact measurements. For a gluten-free option, swap graham crackers with gluten-free cookies. You can also use dairy-free cream cheese for a vegan twist. If you prefer less sweetness, cut the powdered sugar to 1/3 cup or use a sugar substitute.

Key Ingredients Explained

Graham Crackers: These form the crust. They give a nice crunch and a sweet flavor.

Cream Cheese: This softens the mix and adds richness. It makes the cheesecake smooth.

Pumpkin Puree: This gives the pie its classic fall flavor. It’s healthy and adds moisture.

Spices (Cinnamon, Nutmeg, Ginger): These spices bring warmth and depth to the dish. They are key for that pumpkin pie taste.

Whipped Cream: This lightens the filling. It adds air and makes the cheesecake fluffy.

This dessert is easy to make and full of flavor. The mix of sweet and spice makes it a must-try!

Step-by-Step Instructions

Preparation of the Crust

To start, gather your ingredients for the crust. You will need:

– 1 cup crushed graham crackers

– 4 tablespoons unsalted butter, melted

In a mixing bowl, combine the crushed graham crackers with the melted butter. Mix it well until the crumbs are coated. This step is key for a tasty base. Next, divide the crumb mixture among 6 to 8 small dessert cups or jars. Press it down firmly to form a solid crust at the bottom. It should feel compact and stable.

Making the Pumpkin Cheesecake Filling

Now, let’s move on to the filling. Here’s what you will need:

– 2 (8 oz) packages cream cheese, softened

– 1 cup pumpkin puree

– 1/2 cup powdered sugar

– 1 teaspoon vanilla extract

– 1 teaspoon ground cinnamon

– 1/2 teaspoon ground nutmeg

– 1/4 teaspoon ground ginger

– 1 cup whipped cream

In a separate bowl, beat the softened cream cheese until creamy and smooth. This makes the base of your cheesecake filling. Then, add in the pumpkin puree, powdered sugar, vanilla extract, cinnamon, nutmeg, and ginger. Beat this mixture until everything is well mixed and smooth.

Next, gently fold in 1 cup of whipped cream. Be careful not to deflate it. This step adds lightness to your filling.

Assembling and Refrigerating the Cups

Now it’s time to put it all together. Spoon the pumpkin cheesecake mixture over the graham cracker crust in each cup. Use a spatula to smooth the tops. This helps to make them look nice and neat.

After filling each cup, cover them with plastic wrap. Refrigerate for at least 4 hours, or overnight if you can wait. This chilling time allows the cups to set properly.

When ready to serve, top each cup with a dollop of extra whipped cream. You can also drizzle caramel sauce on top for a sweet touch. Enjoy your delicious no-bake pumpkin pie cheesecake cups!

Tips & Tricks

Achieving the Perfect Consistency

To get the right texture for your cheesecake cups, soften the cream cheese well. I let it sit out for about an hour before mixing. This helps it blend smoothly with the pumpkin puree. When combining these ingredients, beat them until creamy and free of lumps. Folding in whipped cream gently keeps it light and fluffy.

How to Prevent Soggy Crusts

A soggy crust can ruin your dessert. To prevent this, ensure your graham cracker mixture is well mixed with melted butter. Press the crumb mix firmly into the bottom of each cup. After you layer in the cheesecake mixture, refrigerate the cups for at least four hours. This time allows the crust to firm up and hold its shape.

Serving Suggestions and Garnishes

When serving, add a dollop of whipped cream on top of each cup. It adds a nice touch and extra creaminess. Drizzling caramel sauce over the whipped cream gives a sweet finish. For a festive look, place the cups on a wooden platter with mini pumpkins or autumn leaves. This not only looks great but also enhances the seasonal vibe. Enjoy your delightful treats!

Variations

Different Flavor Profiles (e.g., Chocolate, Maple)

You can switch up the flavors in these cheesecake cups. For a chocolate twist, add cocoa powder to the cream cheese mix. Use about 1/4 cup for a rich taste. Melted chocolate drizzled on top also adds a nice touch. If you prefer maple, swap the vanilla extract for maple syrup. This gives a warm, cozy flavor that pairs well with pumpkin.

Dietary Substitutions (e.g., Vegan, Gluten-Free)

Making these cups fit different diets is easy. For a vegan option, use plant-based cream cheese. You can also use coconut whipped cream instead of regular whipped cream. For a gluten-free version, just use gluten-free graham crackers. Check the labels to ensure they meet your needs. These swaps keep the dessert just as tasty.

Seasonal and Themed Variations

You can change these cups for different holidays and seasons. Add peppermint extract for a festive treat during winter. For Halloween, use spooky decorations like edible eyes or black sprinkles. In spring, try mixing in fresh fruit like strawberries or blueberries. These small changes make your dessert fun and fitting for any occasion.

Storage Information

How to Properly Store the Cheesecake Cups

To keep your no-bake pumpkin pie cheesecake cups fresh, cover them tightly. Use plastic wrap or a lid. Store them in the fridge for the best taste and texture. They will stay good for about 3 to 5 days. Make sure they stay cold to keep the cream cheese from spoiling.

Freezing Tips for Long-Term Storage

If you want to save these delicious cups for later, freezing works well. First, let the cups set in the fridge for a few hours. After they firm up, cover each cup with plastic wrap and then with foil. This double wrap helps prevent freezer burn. You can keep them in the freezer for up to 2 months. When ready to eat, move them to the fridge overnight to thaw.

Shelf Life and Best Practices

These cheesecake cups taste best when fresh, but they last well in storage. If you store them in the fridge, eat them within 5 days. If frozen, consume them within 2 months for the best flavor. Always check for signs of spoilage, like off smells or changes in texture. Enjoy your treats while they are at their best!

FAQs

Can I make these cups ahead of time?

Yes, you can make these cups ahead of time. In fact, I recommend it! The flavors blend well when they sit in the fridge. Just prepare them up to two days in advance. Store them in the fridge until you are ready to serve. This makes them a great option for parties and gatherings.

What can I use instead of cream cheese?

If you want to swap out cream cheese, you have options. You can use Greek yogurt for a tangy flavor. Silken tofu is another choice for a dairy-free option. Both will give you a creamy texture. Adjust the sweetness if you need to, as yogurt can be a bit tart.

How can I enhance the pumpkin flavor?

To boost the pumpkin flavor, try using fresh pumpkin puree instead of canned. You can also add a bit more pumpkin spice. A pinch of allspice or cloves can deepen the flavor too. If you like, mix in a little maple syrup for a sweet twist.

We explored the key ingredients, step-by-step instructions, helpful tips, and variations for pumpkin cheesecake cups. I shared ways to achieve the right texture and prevent soggy crusts. You learned about storage practices and answers to common questions. These cheesecake cups are simple to make, delicious, and fun to customize. Enjoy creating your own unique versions and sharing them with friends and family. Your journey into pumpkin cheesecake starts now. Happy baking!

- 1 cup crushed graham crackers - 4 tablespoons unsalted butter, melted - 2 (8 oz) packages cream cheese, softened - 1 cup pumpkin puree - 1/2 cup powdered sugar - 1 teaspoon vanilla extract - 1 teaspoon ground cinnamon - 1/2 teaspoon ground nutmeg - 1/4 teaspoon ground ginger - 1 cup whipped cream, plus extra for topping - Caramel sauce for drizzling (optional) To make this treat, use exact measurements. For a gluten-free option, swap graham crackers with gluten-free cookies. You can also use dairy-free cream cheese for a vegan twist. If you prefer less sweetness, cut the powdered sugar to 1/3 cup or use a sugar substitute. - Graham Crackers: These form the crust. They give a nice crunch and a sweet flavor. - Cream Cheese: This softens the mix and adds richness. It makes the cheesecake smooth. - Pumpkin Puree: This gives the pie its classic fall flavor. It’s healthy and adds moisture. - Spices (Cinnamon, Nutmeg, Ginger): These spices bring warmth and depth to the dish. They are key for that pumpkin pie taste. - Whipped Cream: This lightens the filling. It adds air and makes the cheesecake fluffy. This dessert is easy to make and full of flavor. The mix of sweet and spice makes it a must-try! To start, gather your ingredients for the crust. You will need: - 1 cup crushed graham crackers - 4 tablespoons unsalted butter, melted In a mixing bowl, combine the crushed graham crackers with the melted butter. Mix it well until the crumbs are coated. This step is key for a tasty base. Next, divide the crumb mixture among 6 to 8 small dessert cups or jars. Press it down firmly to form a solid crust at the bottom. It should feel compact and stable. Now, let’s move on to the filling. Here’s what you will need: - 2 (8 oz) packages cream cheese, softened - 1 cup pumpkin puree - 1/2 cup powdered sugar - 1 teaspoon vanilla extract - 1 teaspoon ground cinnamon - 1/2 teaspoon ground nutmeg - 1/4 teaspoon ground ginger - 1 cup whipped cream In a separate bowl, beat the softened cream cheese until creamy and smooth. This makes the base of your cheesecake filling. Then, add in the pumpkin puree, powdered sugar, vanilla extract, cinnamon, nutmeg, and ginger. Beat this mixture until everything is well mixed and smooth. Next, gently fold in 1 cup of whipped cream. Be careful not to deflate it. This step adds lightness to your filling. Now it’s time to put it all together. Spoon the pumpkin cheesecake mixture over the graham cracker crust in each cup. Use a spatula to smooth the tops. This helps to make them look nice and neat. After filling each cup, cover them with plastic wrap. Refrigerate for at least 4 hours, or overnight if you can wait. This chilling time allows the cups to set properly. When ready to serve, top each cup with a dollop of extra whipped cream. You can also drizzle caramel sauce on top for a sweet touch. Enjoy your delicious no-bake pumpkin pie cheesecake cups! To get the right texture for your cheesecake cups, soften the cream cheese well. I let it sit out for about an hour before mixing. This helps it blend smoothly with the pumpkin puree. When combining these ingredients, beat them until creamy and free of lumps. Folding in whipped cream gently keeps it light and fluffy. A soggy crust can ruin your dessert. To prevent this, ensure your graham cracker mixture is well mixed with melted butter. Press the crumb mix firmly into the bottom of each cup. After you layer in the cheesecake mixture, refrigerate the cups for at least four hours. This time allows the crust to firm up and hold its shape. When serving, add a dollop of whipped cream on top of each cup. It adds a nice touch and extra creaminess. Drizzling caramel sauce over the whipped cream gives a sweet finish. For a festive look, place the cups on a wooden platter with mini pumpkins or autumn leaves. This not only looks great but also enhances the seasonal vibe. Enjoy your delightful treats! {{image_2}} You can switch up the flavors in these cheesecake cups. For a chocolate twist, add cocoa powder to the cream cheese mix. Use about 1/4 cup for a rich taste. Melted chocolate drizzled on top also adds a nice touch. If you prefer maple, swap the vanilla extract for maple syrup. This gives a warm, cozy flavor that pairs well with pumpkin. Making these cups fit different diets is easy. For a vegan option, use plant-based cream cheese. You can also use coconut whipped cream instead of regular whipped cream. For a gluten-free version, just use gluten-free graham crackers. Check the labels to ensure they meet your needs. These swaps keep the dessert just as tasty. You can change these cups for different holidays and seasons. Add peppermint extract for a festive treat during winter. For Halloween, use spooky decorations like edible eyes or black sprinkles. In spring, try mixing in fresh fruit like strawberries or blueberries. These small changes make your dessert fun and fitting for any occasion. To keep your no-bake pumpkin pie cheesecake cups fresh, cover them tightly. Use plastic wrap or a lid. Store them in the fridge for the best taste and texture. They will stay good for about 3 to 5 days. Make sure they stay cold to keep the cream cheese from spoiling. If you want to save these delicious cups for later, freezing works well. First, let the cups set in the fridge for a few hours. After they firm up, cover each cup with plastic wrap and then with foil. This double wrap helps prevent freezer burn. You can keep them in the freezer for up to 2 months. When ready to eat, move them to the fridge overnight to thaw. These cheesecake cups taste best when fresh, but they last well in storage. If you store them in the fridge, eat them within 5 days. If frozen, consume them within 2 months for the best flavor. Always check for signs of spoilage, like off smells or changes in texture. Enjoy your treats while they are at their best! Yes, you can make these cups ahead of time. In fact, I recommend it! The flavors blend well when they sit in the fridge. Just prepare them up to two days in advance. Store them in the fridge until you are ready to serve. This makes them a great option for parties and gatherings. If you want to swap out cream cheese, you have options. You can use Greek yogurt for a tangy flavor. Silken tofu is another choice for a dairy-free option. Both will give you a creamy texture. Adjust the sweetness if you need to, as yogurt can be a bit tart. To boost the pumpkin flavor, try using fresh pumpkin puree instead of canned. You can also add a bit more pumpkin spice. A pinch of allspice or cloves can deepen the flavor too. If you like, mix in a little maple syrup for a sweet twist. We explored the key ingredients, step-by-step instructions, helpful tips, and variations for pumpkin cheesecake cups. I shared ways to achieve the right texture and prevent soggy crusts. You learned about storage practices and answers to common questions. These cheesecake cups are simple to make, delicious, and fun to customize. Enjoy creating your own unique versions and sharing them with friends and family. Your journey into pumpkin cheesecake starts now. Happy baking!

No-Bake Pumpkin Pie Cheesecake Cups

Indulge in the flavors of fall with these delightful no-bake pumpkin pie cheesecake cups! Perfect for any gathering or a cozy night in, this easy recipe combines a buttery graham cracker crust, creamy pumpkin filling, and fluffy whipped cream. Ready in just 20 minutes plus chilling time, these cups are a delicious treat that everyone will love. Click to explore the full recipe and impress your guests with this seasonal dessert!

Ingredients
  

1 cup crushed graham crackers

4 tablespoons unsalted butter, melted

2 (8 oz) packages cream cheese, softened

1 cup pumpkin puree

1/2 cup powdered sugar

1 teaspoon vanilla extract

1 teaspoon ground cinnamon

1/2 teaspoon ground nutmeg

1/4 teaspoon ground ginger

1 cup whipped cream, plus extra for topping

Caramel sauce for drizzling (optional)

Instructions
 

In a mixing bowl, combine the crushed graham crackers and melted butter. Mix until the crumbs are well-coated.

    Divide the crumb mixture evenly among 6 to 8 small dessert cups or jars, pressing it down firmly to create a crust layer at the bottom.

      In a separate bowl, beat the softened cream cheese until smooth and creamy.

        Add the pumpkin puree, powdered sugar, vanilla extract, ground cinnamon, nutmeg, and ginger to the cream cheese. Beat until everything is well incorporated and smooth.

          Gently fold in 1 cup of whipped cream until just combined, being careful not to deflate the mixture.

            Spoon the pumpkin cheesecake mixture over the graham cracker crust in each cup, smoothing the tops with a spatula.

              Cover the cups with plastic wrap and refrigerate for at least 4 hours, or overnight, to allow them to set properly.

                Before serving, top each cup with a dollop of extra whipped cream and drizzle with caramel sauce if desired.

                  Prep Time: 20 minutes | Total Time: 4 hours 20 minutes | Servings: 6-8

                    - Presentation Tips: Serve the cups on a rustic wooden platter with autumn leaves or mini pumpkins to enhance the seasonal theme.

                      Leave a Comment

                      Recipe Rating