Skip to content
DisclaimerTerms Of UseGDPR PolicyCookie Policy

Lisa Dishes

  • Home
  • Drinks
  • Appetizers
  • Dinner
  • Dessert
  • About
  • Contact
  • Privacy Policy
DisclaimerTerms Of UseGDPR PolicyCookie Policy

NO-ING-IMG

- 1 cup pure pumpkin puree - 1 cup fresh or dried cranberries - 1/2 cup granulated sugar - 1/2 cup brown sugar - 1/2 cup vegetable oil - 2 large eggs - 1 teaspoon vanilla extract - 1 1/2 cups all-purpose flour - 1 teaspoon baking soda - 1/2 teaspoon baking powder - 1 teaspoon ground cinnamon - 1/2 teaspoon ground nutmeg - 1/4 teaspoon ground ginger - 1/2 teaspoon salt - 1/2 cup walnuts or pecans (optional) To make pumpkin cranberry bread, gather these simple ingredients. You can find pure pumpkin puree in cans at most stores. Use fresh cranberries for a tart bite or dried ones for sweetness. The sugars add a nice balance. Granulated sugar gives sweetness, while brown sugar adds depth. Vegetable oil keeps the bread moist. Two large eggs help bind the mix. Vanilla extract brings warmth. For the dry side, all-purpose flour is key. Baking soda and baking powder help it rise. Spices like cinnamon, nutmeg, and ginger create that cozy fall taste. Salt enhances the flavors. If you like nuts, toss in walnuts or pecans for crunch. These ingredients combine to make a delicious loaf that’s perfect for fall. 1. Preheat your oven to 350°F (175°C). Grease a 9x5-inch loaf pan or line it with parchment paper for easy removal. 2. In a large bowl, mix together the pumpkin puree, granulated sugar, brown sugar, vegetable oil, eggs, and vanilla extract. Whisk until it is well combined and smooth. 3. In another bowl, combine all-purpose flour, baking soda, baking powder, ground cinnamon, nutmeg, ginger, and salt. Mix well to ensure the dry ingredients are evenly distributed. 1. Gradually add the dry mixture to the wet mixture. Stir gently until just combined. Do not overmix; it's okay if there are a few lumps. 2. Fold in the chopped cranberries and walnuts, if you are using them. Make sure they are evenly mixed throughout the batter. 3. Pour the batter into your prepared loaf pan. Smooth the top with a spatula. Bake in the preheated oven for 50-60 minutes. Check for doneness by inserting a toothpick in the center. It should come out clean. 1. After baking, remove the bread from the oven. Let it cool in the pan for about 10 minutes. 2. Then, transfer the bread to a wire rack to cool completely. 3. Once cooled, slice the bread and serve. Enjoy the warm, fragrant slices with a cup of tea or coffee. To avoid overmixing the batter, combine wet and dry ingredients gently. Mix until you see no dry flour. A few lumps are fine; this keeps your bread soft. Overmixing makes the bread dense and tough. For the perfect loaf texture, use room temperature eggs. This helps the batter blend smoothly. Also, don’t open the oven door while baking. This can cause your bread to sink. For extra flavor, try adding spices like allspice or cloves. These spices pair well with pumpkin and cranberries. You can also mix in a bit of orange zest for a citrusy twist. If you want to switch things up, substitute the walnuts with pecans or almonds. You can also use maple syrup instead of sugar for a deeper flavor. {{image_2}} You can change the fruits or nuts in this recipe. For instance, try using apples or pears instead of cranberries. Both give a sweet touch. You can also add raisins or dried cherries for a twist. If you want a gluten-free option, swap all-purpose flour with a gluten-free blend. Make sure the blend has a binding agent. For vegan adaptations, replace eggs with flaxseed meal or applesauce. Use a plant-based oil for the fat. You can change the flavors based on seasons or events. In winter, add a bit of orange zest for a bright, fresh taste. In spring, mix in lemon juice for a lighter flavor. Adjust the sweetness to match your taste. If you prefer a less sweet bread, cut back on the sugar. You can also add more spices like allspice or cardamom for extra warmth. Enjoy experimenting with your own twists! To keep your pumpkin cranberry bread fresh, store it in an airtight container. This helps prevent moisture loss. Wrap the bread in plastic wrap first, then place it in the container. If you skip this step, the bread may dry out. You can also use aluminum foil as a wrap. If you have a whole loaf, slice it only when you are ready to eat. This keeps the inside moist longer. Storing it at room temperature is best for short-term storage. If you need to keep it for more than a few days, consider freezing. To freeze your pumpkin cranberry bread, first let it cool completely. Once cool, wrap each slice or the whole loaf tightly in plastic wrap. Then, place the wrapped bread in a freezer bag. Be sure to remove as much air as you can before sealing. This helps prevent freezer burn. When you want to enjoy a slice, take it out and let it thaw at room temperature. For the best texture, you can also warm it up in the oven set at 350°F for about 10 minutes. This makes it soft and tasty again. How long does pumpkin cranberry bread last? Pumpkin cranberry bread lasts about 3 to 5 days at room temperature. To keep it fresh, store it in an airtight container. If you want it to last longer, place it in the fridge. It can keep for up to a week this way. Can I use canned cranberry sauce instead of fresh/dried cranberries? Yes, you can use canned cranberry sauce. However, the bread will be sweeter and wetter. If you choose this option, reduce the sugar by about 1/4 cup. This keeps the flavor balanced and the texture right. What can I serve with pumpkin cranberry bread? Pumpkin cranberry bread pairs well with many things. Spread some cream cheese for a rich treat. You can also enjoy it with butter or honey. It tastes great with a cup of tea or coffee, too. Is pumpkin bread healthy? Pumpkin bread can be healthy, especially when made with whole ingredients. Pumpkin is low in calories and high in vitamins. Adding nuts boosts healthy fats and protein. Just be mindful of the sugar content. We’ve covered the key ingredients and steps to create delicious pumpkin cranberry bread. You learned how to mix the ingredients, bake effectively, and store it properly. Remember, this recipe is flexible; you can adjust flavors or try new ingredients. With a few simple tips, you can perfect your loaf every time. Enjoy slices fresh from the oven or share with loved ones. This healthy, festive treat is sure to brighten any gathering. Happy baking!

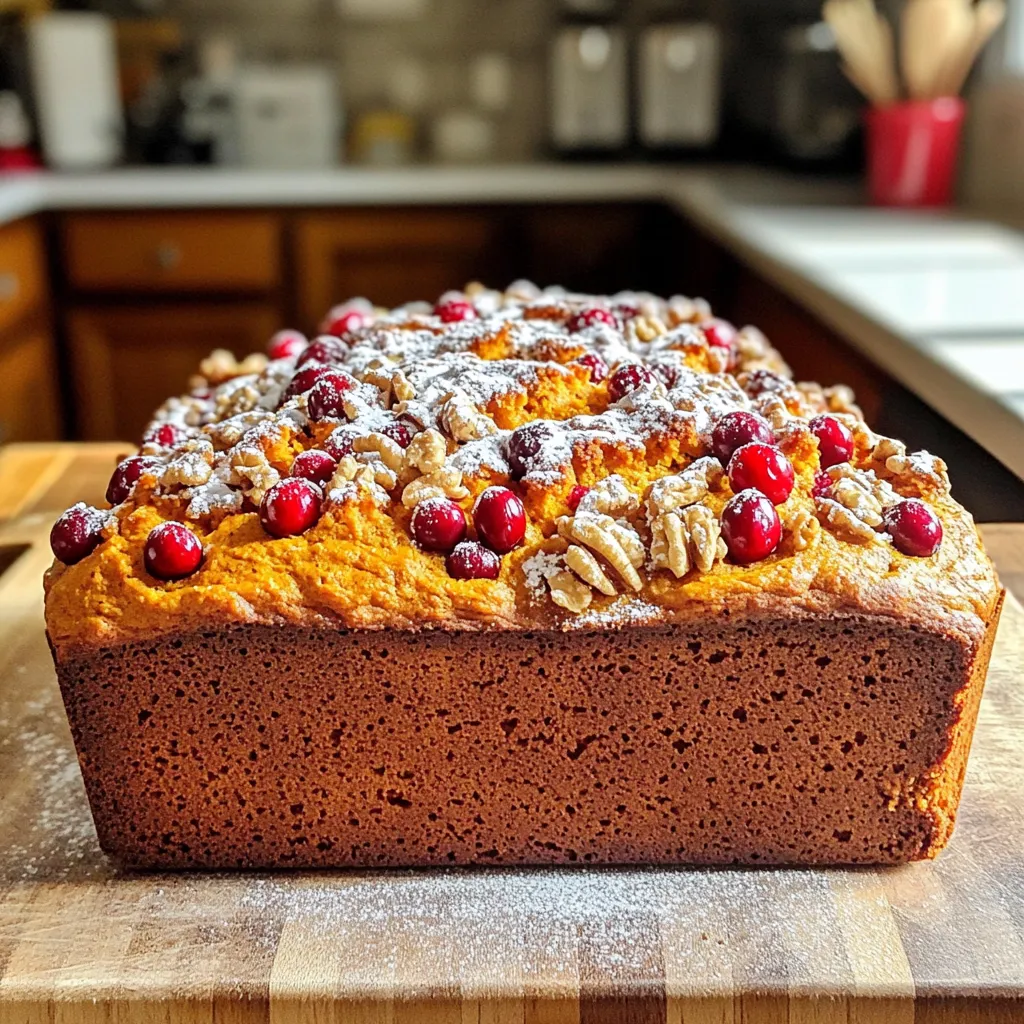
Pumpkin Cranberry Bread Flavorful Fall Delight

Fall is here, and there’s no better way to celebrate than with Pumpkin Cranberry Bread! This delightful recipe blends warm

- 9 lasagna noodles (no-boil) - 2 cups ricotta cheese - 2 cups shredded mozzarella cheese - 2 cups fresh spinach, chopped - 2 cups mushrooms, sliced - 2 teaspoons minced garlic - 1 teaspoon dried oregano - 1 teaspoon dried basil - 1 jar (24 oz) marinara sauce - Salt and pepper to taste - Olive oil for sautéing Gather all these ingredients before you start. The no-boil noodles save time, and the cheeses give a rich texture. I love the fresh taste of spinach and mushrooms in this dish. The garlic, oregano, and basil add a nice touch. When you sauté the mushrooms, the flavor deepens. The marinara sauce ties everything together. Always season your ricotta mix with salt and pepper. This adds depth to your lasagna. Make sure to use good quality cheese. It really makes a big difference. The combination of these ingredients creates a layered delight that everyone will enjoy. Sautéing the Mushrooms Start by heating a drizzle of olive oil in your skillet. Add the sliced mushrooms and cook them over medium heat. Stir them often. Cook until they turn soft and golden brown, about 5 to 7 minutes. After that, add the minced garlic. Cook for another 1 to 2 minutes until you smell that lovely garlic aroma. Once done, take the skillet off the heat and let the mushrooms cool a bit. Mixing the Ricotta and Spinach In a mixing bowl, combine the ricotta cheese, chopped spinach, and half of the grated Parmesan cheese. Add the dried oregano and dried basil for flavor. Don’t forget to sprinkle in some salt and pepper. Mix everything well until you have a creamy filling that smells amazing. Preparing the Slow Cooker Grab your slow cooker and spread a thin layer of marinara sauce on the bottom. This keeps the noodles from sticking. You want a nice base to build your lasagna on. Creating the First Layer Now, it’s time to layer. Place 3 lasagna noodles on top of the sauce. Spread half of your ricotta and spinach mixture over the noodles. Then add half of the sautéed mushrooms. Top that with a sprinkle of mozzarella cheese. Finish this layer with another layer of marinara sauce. Adding Final Layers Repeat the layering. Start with more noodles, then add the remaining ricotta mixture, mushrooms, and mozzarella cheese. Top it all off with a final layer of noodles. Spread the last of the marinara sauce on top. Finally, sprinkle on the remaining mozzarella and Parmesan cheese to make it cheesy and delicious. Cooking Time and Tips Cover your slow cooker and cook the lasagna on low for 4 to 6 hours. You know it’s done when the cheese is bubbly and the noodles feel tender. Once it’s cooked, turn off the slow cooker and let it sit for about 15 minutes. This helps it set, making it easier to slice. Enjoy your tasty lasagna! - Ensuring Cheese is Bubbling To get that perfect bubbly cheese, keep the lid on while cooking. This keeps the heat and moisture in. When time is up, remove the lid for the last 15 minutes. This helps the cheese brown slightly. - Optimal Slow Cooker Settings Use the low setting for 4 to 6 hours. This slow cooking method lets the flavors blend well. If you are short on time, the high setting can cook it in about 2 to 3 hours. Just check for doneness. - Presentation Ideas Cut the lasagna into neat squares. Place them on a colorful plate. Garnish with fresh basil or parsley for a nice touch. This adds color and makes it look fancy. - Complementary Side Dishes Pair your lasagna with a simple side salad. A crisp green salad with a light vinaigrette works great. Crusty bread is also a lovely side. It can soak up any extra sauce. - Adding Spices Want to boost the flavor? Add a pinch of red pepper flakes for heat. A little nutmeg can also add depth to the ricotta mix. Experiment with spices to find what you like best. - Customizing Ingredients Feel free to switch up the veggies. Zucchini or bell peppers can add a new taste. If you love meat, add cooked sausage or ground beef. This makes the dish heartier and gives more flavor. {{image_2}} Alternative Cheese Options You can swap cheeses to fit your taste. Try using cottage cheese for a lighter option. Cream cheese adds a rich flavor. For a sharper taste, use aged cheddar instead of mozzarella. Mix and match to find your favorite blend. Protein Additions Want to add protein? Ground turkey or chicken works well. You can also use cooked sausage for a heartier dish. For a vegetarian option, try adding white beans for extra fiber and protein. Gluten-Free Alternatives If you're gluten-free, use gluten-free lasagna noodles. Make sure to check the sauce label for hidden gluten. You can also layer your lasagna without noodles, using thinly sliced zucchini instead. Vegan Version Ideas For a vegan twist, replace ricotta with blended tofu or cashews. Use vegan mozzarella or skip the cheese entirely. Check the marinara sauce to ensure it’s dairy-free. This way, everyone can enjoy this dish. Different Vegetable Combinations Feel free to mix in other veggies! Bell peppers, zucchini, or eggplant can add great taste. Carrots or broccoli can enhance the dish's nutrition. Get creative and use what you love. Sauces You Can Use Try different sauces for unique flavors. Pesto adds a fresh twist. Alfredo sauce gives a creamy touch. You can even mix marinara with a bit of spicy chili sauce for a kick! - Refrigeration Guidelines: After you finish your meal, let the lasagna cool. Place any leftovers in an airtight container. Store them in the fridge for up to three days. This keeps the flavors fresh and tasty. - Freezing Instructions: For longer storage, freeze the lasagna. Cut it into portions for easy serving. Wrap each piece in plastic wrap, then place in a freezer-safe bag. It can last up to three months in the freezer. - Best Methods for Reheating: The oven works best for reheating. Preheat it to 350°F (175°C). Place the lasagna in a baking dish, cover it with foil, and heat for 30-40 minutes. This method keeps it moist and delicious. - Maintaining Texture and Flavor: To avoid dry lasagna, add a splash of water or marinara sauce before covering. This helps keep everything moist while it warms up. - Shelf Life in the Fridge: If stored properly, your lasagna will stay good for about three days in the fridge. Keep an eye on it to avoid spoilage. - Freezer Longevity: When frozen, the lasagna can hold its quality for around three months. Just remember to label your bags with the date for easy tracking. Can I use regular lasagna noodles? Yes, you can use regular lasagna noodles. Just cook them before adding to the slow cooker. This may change the cooking time. How do I make this recipe ahead of time? You can prepare the layers in advance. Just keep them in the fridge overnight. Then, cook in the slow cooker the next day. What should I serve with Slow Cooker Spinach Mushroom Lasagna? I recommend a side salad or some crusty bread. Garlic bread also pairs nicely. It adds a nice crunch to the meal. Can I make this recipe without mushrooms? Absolutely! You can replace mushrooms with other veggies. Zucchini or bell peppers work great too. Adjust the flavors to suit your taste. Can I adjust the cooking time in the slow cooker? Yes, you can adjust the cooking time. If you want it done faster, use a higher setting. Just keep an eye on the cheese and noodles. What is the best slow cooker for lasagna? A slow cooker with a 6-quart capacity works well. Look for a model with a removable insert for easy cleaning. In this blog, we explored a delicious slow cooker spinach mushroom lasagna. We covered key ingredients like ricotta and mozzarella, and added fresh veggies. You learned step-by-step instructions for preparing and layering your dish. Tips for serving and storage give you extra help. Lastly, we discussed variations and answered common questions. With these insights, you can create a tasty lasagna that fits your needs. Enjoy every bite of your meal and share it with others!

Slow Cooker Spinach Mushroom Lasagna Flavorful Delight

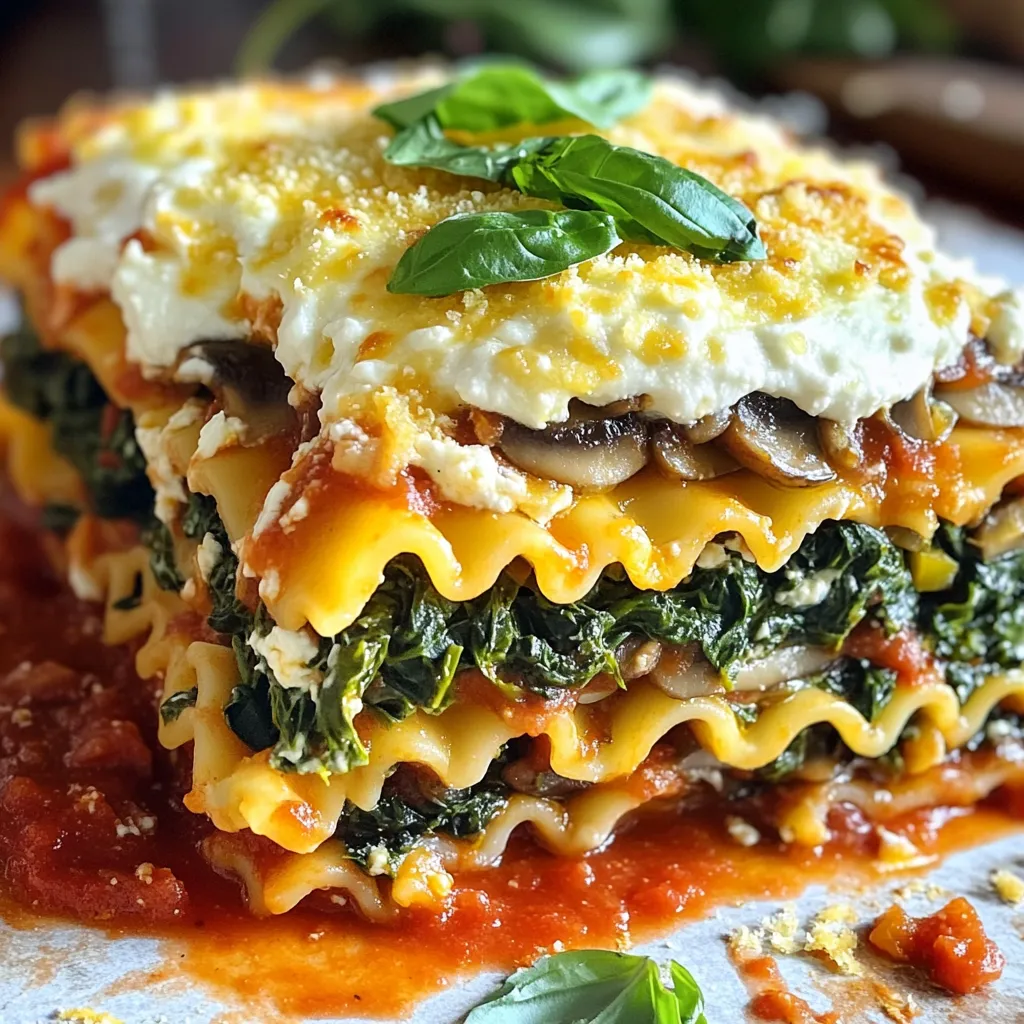
Are you ready to make a mouthwatering Slow Cooker Spinach Mushroom Lasagna? This dish packs layers of flavor with rich

- 1 lb chicken breast, cut into bite-sized pieces - 1/2 cup cornstarch - 1/2 cup sweet and sour sauce (store-bought or homemade) For our sweet and sour chicken bites, chicken breast is the star. It is lean and takes on flavors well. Cornstarch gives the chicken a nice crunch. The sweet and sour sauce adds tangy sweetness to each bite, bringing everything together. - 1 cup pineapple chunks (fresh or canned, drained) - 1 bell pepper (red or yellow), chopped into small pieces - 2 green onions, finely sliced - Sesame seeds for garnish Pineapple chunks add a juicy burst of flavor. Bell pepper brings a crisp texture and color. Green onions give a fresh taste, while sesame seeds add a nutty finish. These vegetables and garnishes make the dish colorful and fun. - 1/2 teaspoon salt - 1/2 teaspoon black pepper - 1 tablespoon olive oil Salt and black pepper enhance the chicken's flavor. Olive oil helps the cornstarch stick and adds richness. Proper seasoning makes a big difference in taste, so don’t skip these simple steps. Start by cutting your chicken breast into bite-sized pieces. In a large bowl, mix cornstarch, salt, and black pepper. Toss the chicken in this mix until it is fully coated. This step helps to create a crispy outer layer. After that, drizzle olive oil over the chicken. Mix well to ensure every piece gets a light coat of oil. This will help it crisp up nicely in the air fryer. Next, set your air fryer to 400°F (200°C). Let it preheat for about 5 minutes. Preheating is key for getting that nice golden color and crunch on your chicken bites. Now it's time to cook. Place the chicken in a single layer in the air fryer basket. If you have a lot of chicken, do this in batches. Cook for 10-12 minutes. Halfway through, shake the basket to ensure even cooking. The chicken is done when it turns golden brown and reaches an internal temperature of 165°F (74°C). While the chicken cooks, get a large skillet ready. Over medium heat, sauté pineapple chunks and chopped bell pepper for about 3-4 minutes. You want them to caramelize a bit. After that, pour in the sweet and sour sauce. Stir it all together and cook for another 2 minutes until it’s heated through. Once the chicken is done, add it to the skillet. Toss everything together until the chicken is well coated in the sauce. This step adds flavor and makes your dish shine! To get that crispy texture, coat the chicken with oil. Oil helps the chicken brown and stay juicy. Just drizzle a tablespoon over the chicken and mix well. This small step makes a big difference! Avoid crowding the air fryer. If you add too many chicken bites at once, they won’t cook evenly. Make sure to leave space between each piece. You can cook in batches if needed. This way, every bite will be crispy and delicious. You can switch up the meat in this recipe. Try using shrimp or tofu for a fun twist. Both options taste great and add unique flavors. If you want more veggies, add carrots or snap peas. These will add color and crunch to your dish. Making your sweet and sour sauce at home is easy. Use equal parts sugar and vinegar for a simple base. You can add soy sauce for depth. This will create a richer flavor compared to store-bought sauce. For garnishes, you can’t go wrong with sliced green onions and sesame seeds. They add a nice touch to the dish. You might also sprinkle some crushed peanuts for extra crunch. These small details make your meal look and taste gourmet! {{image_2}} You can switch things up by using shrimp or tofu instead of chicken. Shrimp cooks fast in the air fryer, taking only about 6-8 minutes. Just season and coat them like the chicken. For tofu, use firm tofu. Cut it into bite-sized pieces and press it to remove excess moisture. Coat the tofu with cornstarch and seasonings, then air fry until crispy. If you want a vegetarian version, simply use tofu as the main protein. Pair it with the sweet and sour sauce for a great flavor match. Both options keep the dish light but tasty. Adding spices or marinades can make this dish unique. Try garlic powder or ginger for an extra kick. You can also marinate the chicken, shrimp, or tofu in a mix of soy sauce and sesame oil before cooking. This adds depth and flavor. For sauce variation, try mango chutney or chili sauce instead of sweet and sour. Each sauce gives a different taste. You can mix sauces too! Combine sweet and sour with teriyaki for a fun twist. Serve your sweet and sour chicken bites over rice or noodles. Jasmine rice or egg noodles work well. They soak up the sauce and add a nice base. You can also serve these bites as an appetizer. They’re perfect for parties! Just place them on a platter and offer toothpicks. Everyone will love the crispy bites with the sweet sauce. To keep your Air Fryer Sweet & Sour Chicken Bites fresh, use airtight containers. Glass or plastic containers with tight lids work well. Place the chicken bites in a single layer to avoid sticking. You can store them in the fridge for quick access or freeze for later use. In the fridge, they stay good for about three to four days. If you choose to freeze them, they'll last for about two months. When it's time to enjoy your leftovers, you have a few options. You can use the air fryer, oven, or microwave. For the air fryer, set it to 350°F (175°C) and cook for about 5-7 minutes. This method helps keep them crispy. If you use the oven, preheat it to 350°F (175°C) and heat for about 10 minutes. If you're in a hurry, the microwave works too, but they may lose some crispiness. To keep them crispy in the microwave, place a paper towel under the chicken bites. Leftovers of Air Fryer Sweet & Sour Chicken Bites can stay fresh for up to four days in the fridge. If you freeze them, they can last for about two months. After that, they may lose flavor and texture. Always check for signs of spoilage before eating. Yes, you can prepare them ahead of time. Here are a few options for meal prepping: - Coat the chicken: You can coat the chicken pieces with cornstarch and seasonings a few hours in advance. Keep them in the fridge until you’re ready to cook. - Make the sauce: Prepare your sweet and sour sauce a day ahead. Store it in an airtight container in the fridge. - Cook in batches: If you want to eat some now and save some for later, cook only part of the chicken. Store the rest to heat up later. The best temperature for cooking chicken in an air fryer is 400°F (200°C). This high heat cooks the chicken quickly while giving it a nice, crispy outside. Always check the chicken's internal temperature; it should reach 165°F (74°C) to ensure it is safe to eat. Yes, you can use frozen chicken, but it will take longer to cook. Here are some tips for cooking from frozen: - Increase cooking time: Add about 5 to 10 extra minutes to the cooking time. - No need to thaw: You can cook the chicken directly from frozen. Just make sure to cut the pieces small enough so they cook evenly. - Check doneness: Use a meat thermometer to ensure the chicken reaches 165°F (74°C) before serving. This recipe offers a tasty way to enjoy air fryer sweet and sour chicken. You learned about main ingredients, seasonings, and how to achieve crispiness. The tips on variations and storage will help you customize and keep your dish fresh. Experimenting with flavors and adjusting ingredients keeps your meals exciting. Enjoy this simple, delicious dish that works for any meal!

Air Fryer Sweet & Sour Chicken Bites Tasty Treat

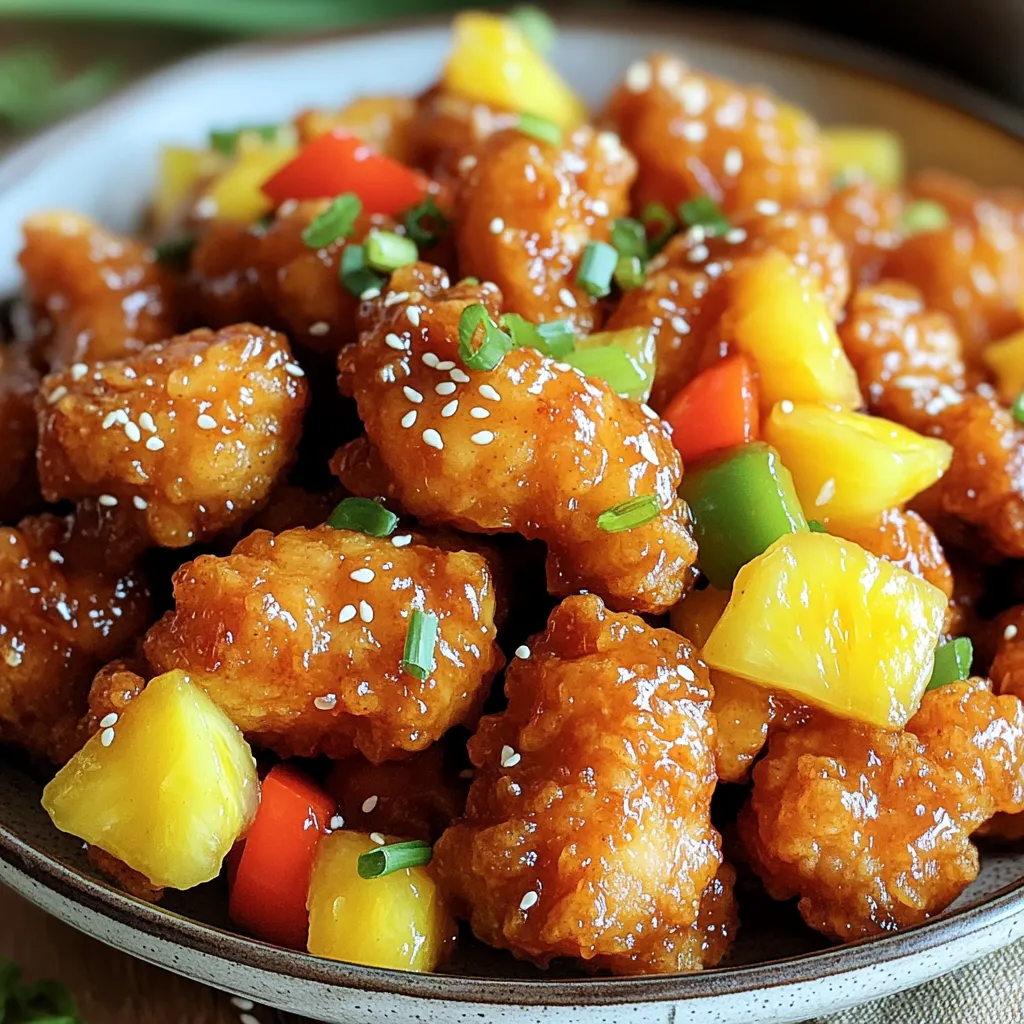
Get ready for a delicious twist on dinner with Air Fryer Sweet & Sour Chicken Bites! This recipe combines crispy

- 1 ½ cups graham cracker crumbs - ⅓ cup granulated sugar - ½ cup unsalted butter, melted - 16 oz cream cheese, softened - ½ cup granulated sugar - ½ cup pumpkin puree - 2 large eggs - 1 teaspoon vanilla extract - 1 teaspoon pumpkin pie spice - ½ cup caramel sauce (store-bought or homemade) - ¼ cup chopped pecans (optional) I love how the ingredients come together to create this fall treat. The crust starts with graham cracker crumbs, which give a sweet and crunchy base. Mixing in sugar and melted butter holds everything together. This crust is easy and so satisfying! Next comes the cheesecake layer. Cream cheese is the star here, providing that rich and creamy texture. I add pumpkin puree, which gives a lovely color and flavor. The eggs help bind it all, while vanilla and pumpkin pie spice add warmth and sweetness. Each ingredient plays a role in making these bars rich and delightful. Finally, the caramel topping ties it all together. Drizzling caramel sauce on top adds a sweet finish. If you like nuts, sprinkle on some chopped pecans for a crunchy bite. These ingredients create a perfect blend of flavors and textures. Each bite offers a taste of fall that you can’t resist! - Preheat the oven to 350°F (175°C). - In a bowl, mix graham cracker crumbs, sugar, and melted butter until crumbly. To get a great crust, give it a good mix. You want it to feel like wet sand. This helps it hold together when baked. - Press the mixture into the baking dish and bake for 8-10 minutes. When baking, keep an eye on it. You want it to be lightly golden. This step gives your crust a nice crunch. - Beat cream cheese until smooth, then add sugar, pumpkin puree, eggs, vanilla extract, and pumpkin pie spice. Start with softened cream cheese for the best texture. Mix until it’s creamy and smooth. Take your time here; it makes a big difference. - Pour the mixture over the crust and bake for 25-30 minutes. Spread the mix evenly with a spatula. This helps it bake evenly. You’ll know it’s done when the center is set but still slightly jiggly. - Cool, chill, and top with caramel sauce and pecans. Let the bars cool at room temperature first. Then chill them for at least two hours. Drizzle warm caramel sauce on top before serving. Sprinkle with pecans for a nice crunch. Enjoy your fall treat! To make the crust just right, use fresh graham cracker crumbs. They give a better crunch and flavor. Melt the butter completely before mixing. This helps the crumbs stick together evenly. You can adjust the pumpkin pie spice to fit your taste. If you like a bolder flavor, add a bit more. A pinch of salt can also help balance the sweetness. It brings out the rich flavors in the cheesecake. For a smooth caramel drizzle, heat the caramel sauce slightly. This makes it easier to pour over the cheesecake. Don’t be afraid to try flavored sauces, like chocolate or vanilla. These can add a fun twist to your bars. {{image_2}} You can switch things up with fun flavors. Try making chocolate pumpkin cheesecake bars. Just add melted chocolate to the cheesecake mix. It gives a rich taste that many love. You can also use a spiced apple topping instead of caramel. Cook apples with cinnamon and sugar for a warm, cozy flavor. It adds a nice touch to the pumpkin base. If you need a gluten-free version, use gluten-free graham crackers. They work just as well in the crust. For those who want vegan options, substitute butter and cream cheese with plant-based versions. Vegan cream cheese and coconut oil can create a creamy texture. These changes make the dessert friendly for many diets. Serve these bars with a dollop of whipped cream or a scoop of vanilla ice cream. The creaminess complements the pumpkin flavor perfectly. You can also pair them with a fall-spiced latte or hot apple cider. These drinks enhance the cozy feelings of fall. To keep your caramel pumpkin cheesecake bars fresh, place them in an airtight container. Store them in the refrigerator. This way, they stay moist and tasty. Enjoy them for up to five days. If you want to save some for later, freeze the bars. Wrap them tightly in plastic wrap or foil. You can freeze them for up to two months. This is great for making treats ahead of time! When you're ready to eat the frozen bars, thaw them in the refrigerator. Leave them overnight for the best results. This method keeps the texture just right. You can enjoy them chilled or at room temperature! Yes, these bars can be made a day or two in advance. I often prepare them the night before a gathering. This gives the flavors more time to develop. Plus, it saves time on the day of the event. Use a sharp knife and wipe it clean between cuts for cleaner edges. I find that a straight edge makes a big difference. It helps keep the bars looking neat and tidy. You want each piece to look as good as it tastes! The center should be set but still slightly jiggly; it will firm up as it cools. I usually check it after 25 minutes. If it seems too soft, give it a few more minutes. Remember, it will continue to cook a little while cooling. This blog post explained how to make delicious pumpkin cheesecake bars. We covered crust, cheesecake layer, and caramel topping ingredients, plus easy steps to assemble them. You can also try fun variations and tips to make them even better. Making these bars can be a joy. They’re perfect for any occasion. With simple ingredients and steps, anyone can enjoy this tasty treat. Remember to store leftovers properly or even freeze some for later. Enjoy your baking!

Caramel Pumpkin Cheesecake Bars Irresistible Fall Treat

Fall is here, and it’s time to indulge in the cozy flavors of the season. If you’re craving something sweet,

- 2 boneless, skinless chicken breasts - 1 cup buffalo sauce (mild, medium, or hot) - 4 large whole wheat tortillas - 1 tablespoon olive oil - 1 teaspoon garlic powder - 1 teaspoon onion powder - Salt and pepper to taste - 1 cup shredded lettuce - 1 cup diced tomatoes - 1/4 cup chopped green onions - 1 cup shredded cheddar cheese - 1/2 cup ranch dressing To create tasty buffalo chicken wraps, you need a mix of fresh and flavorful ingredients. Start with chicken breasts. Boneless and skinless works best for easy cooking. Choose buffalo sauce based on your heat preference. Mild suits many tastes, while hot adds a bold kick. Next, pick whole wheat tortillas. They add a nice texture and are healthier too. For the extra flavor, you’ll need olive oil, garlic powder, and onion powder. These spices will enhance the chicken. Don’t forget salt and pepper to boost all the flavors. Fresh produce makes your wraps crunchy and vibrant. Use shredded lettuce, diced tomatoes, and green onions for a fresh taste. For a creamy finish, add ranch dressing and shredded cheddar cheese. They balance the heat from the buffalo sauce. - First, preheat your oven to 375°F (190°C). This makes sure your chicken cooks evenly. - In a bowl, mix 1 tablespoon of olive oil, 1 teaspoon of garlic powder, 1 teaspoon of onion powder, salt, and pepper. This forms a tasty marinade. - Coat the chicken breasts with this mixture. Make sure every part is covered well. - Place the seasoned chicken in a baking dish. Pour 1 cup of buffalo sauce over the top. Ensure the chicken is fully coated in sauce. - Bake for about 25-30 minutes. Check that the chicken reaches 165°F (74°C) inside. This ensures it’s safe to eat. - After baking, let the chicken rest for 5 minutes. This helps keep it juicy. Slice it into thin strips when it cools enough to handle. - Warm the tortillas in a dry pan or microwave for a few seconds. This makes them easy to roll. - On each tortilla, layer 1 cup of shredded lettuce, 1 cup of diced tomatoes, and the sliced chicken. Add 1 cup of shredded cheddar cheese on top. - Drizzle 1/2 cup of ranch dressing over the layers. Sprinkle with 1/4 cup of chopped green onions for extra flavor. - To wrap, fold in the edges and roll from the bottom tightly. - For a crispy finish, grill the wraps in the pan for 1-2 minutes on each side. - Cut the wraps in half diagonally. Serve with extra ranch dressing on the side for dipping. To get the chicken just right, aim for an internal temperature of 165°F (74°C). This ensures that your chicken is safe to eat and juicy. Use a meat thermometer for an accurate reading. After baking, let the chicken rest for 5 minutes. This resting time helps the juices settle, making it easier to slice. Warming the tortillas makes them soft and easy to wrap. You can warm them in a dry pan for about 30 seconds on each side. A microwave also works well; just heat them for 10-15 seconds. If you want a crispy finish, grill the wraps for 1-2 minutes on each side after assembling. This adds a nice crunch that contrasts with the soft fillings. To amp up the flavor, consider adding extra spices like smoked paprika or cayenne pepper. You can also mix in some diced jalapeños for extra heat. If you're feeling adventurous, try other sauces too. BBQ sauce or Sriracha can give your wraps a unique twist. These small changes can take your buffalo chicken wraps to a whole new level! {{image_2}} You can make your Buffalo chicken wraps healthier. One way is to swap out regular tortillas for low-carb versions. These wraps still taste great but help cut down on carbs. Look for options made from cauliflower or almond flour. They work well with the spicy chicken! Another option is to use grilled or air-fried chicken instead of baked. Grilling adds a nice char and keeps the chicken juicy. Air-frying gives you that crispy texture without extra oil. Both methods keep the flavor intense and satisfying. Buffalo chicken wraps don’t have to stick to just buffalo sauce. You can mix it up with other sauces, like BBQ or Sriracha. BBQ adds a sweet touch, while Sriracha brings heat. Try them out and see what you like best! Mediterranean-inspired wraps are also a fun twist. Use tzatziki sauce instead of ranch. Add roasted red peppers and olives for extra flavor. These wraps can bring a whole new taste to your meal! If you want a meatless option, consider using chickpeas or grilled vegetables. Chickpeas add protein and a creamy texture. Grilled veggies bring a burst of flavor and color. Both options will keep the wrap satisfying. For dressing, look for plant-based ranch options. Many brands offer tasty vegan versions. You can even make your own with cashews, herbs, and lemon juice. This way, you can enjoy all the flavor without the dairy! To store your leftover wraps, wrap them tightly in plastic wrap. This keeps them fresh and delicious. Place them in an airtight container in the fridge. Wraps stay good for up to three days. For toppings, keep them separate. Store shredded lettuce and diced tomatoes in small containers. This way, they stay crunchy and fresh. You can add them back to the wrap when ready to eat. When you’re ready to enjoy your leftover wraps, reheat them gently. The best method is using a skillet on low heat. This keeps the wrap from getting soggy. Heat each side for about two to three minutes. If you prefer the microwave, use a damp paper towel. Wrap it around the wrap to keep moisture in. Heat for about 30 seconds, checking to avoid overheating. You can freeze both cooked and uncooked wraps. For uncooked wraps, assemble them without toppings. Wrap each tightly in plastic wrap and then in foil. They can freeze for up to three months. For cooked wraps, let them cool first. Then, wrap them in plastic wrap and foil. Thaw in the fridge overnight before reheating. This keeps the wrap safe and tasty. Yes, you can prep buffalo chicken wraps ahead. This saves time and makes meals easier. Here are some tips for meal prep and storage: - Cook the chicken: Bake the chicken and slice it. Store it in the fridge for up to 3 days. - Prepare the veggies: Chop lettuce, tomatoes, and green onions in advance. Keep them in airtight containers. - Tortillas: Warm them just before serving. This helps keep them soft. - Assemble before serving: For the best taste, wrap them just before eating. This keeps the tortillas fresh and the filling juicy. The best buffalo sauce depends on your spice preference. Here are some options: - Mild: If you prefer a gentle kick, choose a mild sauce. Look for Frank’s RedHot or Sweet Baby Ray’s. - Medium: For a balanced heat, try medium options like Crystal or Texas Pete. - Hot: If you love heat, go for sauces like Hooters or El Yucateco. - Homemade: You can mix hot sauce with melted butter for a fresh taste. Yes, you can swap ranch with other dressings. Here are some tasty options: - Blue cheese dressing: This adds a rich flavor and pairs well with buffalo chicken. - Greek yogurt: A healthier option that gives a creamy texture. - Chipotle sauce: For a spicy twist, this gives a nice smoky flavor. - Caesar dressing: This adds a unique taste and pairs well with chicken. Feel free to experiment and find what you enjoy most! This article covered how to make delicious buffalo chicken wraps. We discussed main ingredients like chicken and buffalo sauce, along with tips for prepping and baking the chicken. I shared easy steps to assemble the wraps and gave ideas for variations, including healthy and vegetarian options. You can adapt the recipe to fit your tastes. Remember, the right tools and ingredients make a big difference. Enjoy your buffalo wraps!

Buffalo Chicken Wraps with Ranch Flavorful Delight

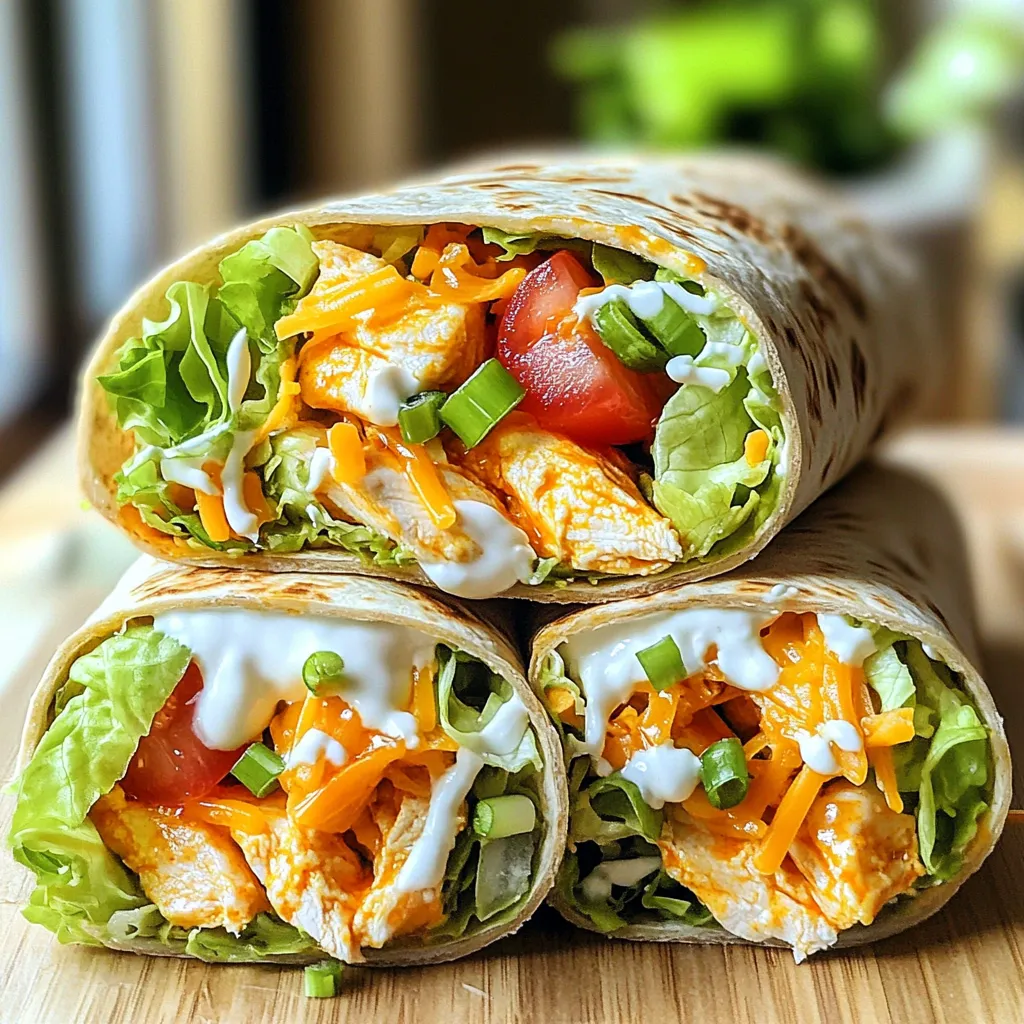
Are you ready to spice up your mealtime with a tasty twist? Buffalo Chicken Wraps with Ranch combine tender chicken,

To make No-Bake Salted Caramel Pecan Pie Bars, you will need: - 1 ½ cups graham cracker crumbs - ½ cup unsweetened cocoa powder - ½ cup unsalted butter, melted - ¼ cup brown sugar - 1 cup pecans, roughly chopped - 1 cup medjool dates, pitted and blended into a paste - 1 cup coconut cream - ½ cup maple syrup - 1 teaspoon vanilla extract - ¼ teaspoon sea salt - Extra pecans and a pinch of sea salt for garnish You can swap some ingredients to fit your taste. For example: - Graham cracker crumbs can be replaced with crushed cookies or nuts. - Cocoa powder can be skipped for a lighter flavor. - Unsalted butter can be switched with coconut oil for a dairy-free option. - Medjool dates can be replaced with other dried fruits like figs or prunes. - If you want a nut-free version, use seeds instead of pecans. Using high-quality ingredients makes a big difference in flavor and texture. Choose fresh pecans for crunch and richness. Medjool dates should be soft and sticky, as they blend better. For the coconut cream, pick a brand that has a thick consistency. It helps create a creamy caramel layer. The better your ingredients, the more delicious your bars will be. Start by gathering your ingredients. You need graham cracker crumbs, cocoa powder, melted butter, and brown sugar. In a mixing bowl, combine the graham cracker crumbs, cocoa powder, melted butter, and brown sugar. Mix everything well until it forms a crumbly texture. This will be the base of your bars. Next, take a lined 9x9-inch baking dish. Press the crumb mixture firmly into the bottom. Use the back of a measuring cup to make it even and compact. This step is key for a sturdy crust. Now, let’s create the salted caramel layer. In a separate bowl, combine pitted medjool dates, coconut cream, maple syrup, vanilla extract, and sea salt. Blend these ingredients until smooth and creamy. This mixture will bring a rich flavor to your bars. Once your caramel is ready, pour it over the crust. Use a spatula to spread it evenly. Make sure to cover the crust completely for the best taste. Next, sprinkle the chopped pecans over the caramel layer. Press them in slightly to help them stick. This adds a nice crunch and flavor. Now, place the dish in the fridge for at least 4 hours or overnight. This will let the bars set completely. When they are firm, remove them from the baking dish. Slice them into squares or rectangles. Before serving, drizzle some extra coconut cream on top, and sprinkle more pecans along with a light pinch of sea salt. This step adds flair and flavor to your delicious no-bake salted caramel pecan pie bars. To make smooth caramel, use fresh medjool dates. Blend them until they form a paste. If the mix is too thick, add a bit more coconut cream. This helps create a nice, creamy texture. Mix until there are no lumps. A smooth caramel makes each bite delightful. For the crust, press the graham cracker mix firmly. Use the back of a measuring cup to flatten it. This gives a strong base for the bars. Make sure the crust is even across the bottom. If it's too loose, the bars can fall apart when cut. When ready to serve, slice the bars into neat squares. Drizzle some extra coconut cream on top. This adds a nice touch and looks pretty. Sprinkle additional pecans and a pinch of sea salt for flair. These small details make your bars look gourmet and inviting. {{image_2}} If you want to skip nuts, you have options. Seeds like sunflower or pumpkin work well. They add crunch without the nut flavor. You can also try toasted coconut for a tropical twist. Just swap the pecans in the recipe for your chosen alternative. To boost the flavor, consider adding spices. A dash of cinnamon or nutmeg can warm the taste. You might also add a bit of espresso powder for a coffee kick. If you love chocolate, mix in some mini chocolate chips. These small changes can elevate your bars. Not a fan of graham crackers? You can use crushed cookies like Oreos or gingersnaps. They add unique flavors and textures. Another option is using oats for a healthier crust. Just blend oats with cocoa powder and butter for a new base. Each choice gives your bars a fresh feel. To keep your No-Bake Salted Caramel Pecan Pie Bars fresh, store them in the fridge. Use an airtight container to prevent them from drying out. They will stay good for about one week. Make sure to separate layers with parchment paper to avoid sticking. You can also freeze these delicious bars. First, slice them into squares. Wrap each piece in plastic wrap, then place them in a freezer-safe bag. They will last up to three months in the freezer. When you're ready to enjoy, simply thaw them in the fridge overnight. These bars are best served cold. No need to reheat them since they are no-bake. Just take them out of the fridge or freezer, let them sit for a few minutes, and then serve. For extra flair, drizzle a bit of coconut cream on top and sprinkle with more pecans and sea salt. This makes them look fresh and inviting! To make the bars vegan, replace the butter with a plant-based option. Use coconut oil or a vegan butter substitute. Ensure the chocolate used in the cocoa powder is dairy-free. The rest of the ingredients, like pecans and dates, are already vegan-friendly. This change keeps the bars rich and creamy without any animal products. Yes, you can use other sweeteners. Agave syrup or date syrup works well as a substitute. Honey is not vegan but can be used if you are not concerned about that. Adjust the amount based on your taste. Keep in mind that different sweeteners may alter the flavor slightly, so taste as you go. To cut the bars neatly, first chill them well. This allows the layers to firm up. Use a sharp knife for clean edges. Warm the knife slightly under hot water, then dry it before cutting. This technique helps create smooth slices. Aim for squares or rectangles based on your serving preference. In this blog post, we explored the essential ingredients, step-by-step instructions, and helpful tips for delicious caramel bars. I shared ways to customize your bars and offered storage methods for keeping them fresh. Remember, using quality ingredients enhances flavor. Don’t hesitate to try different variations to find your perfect match. With these steps and tips, you can create tasty treats that impress. Enjoy making your caramel bars and have fun with the process!

No-Bake Salted Caramel Pecan Pie Bars Delightful Treat

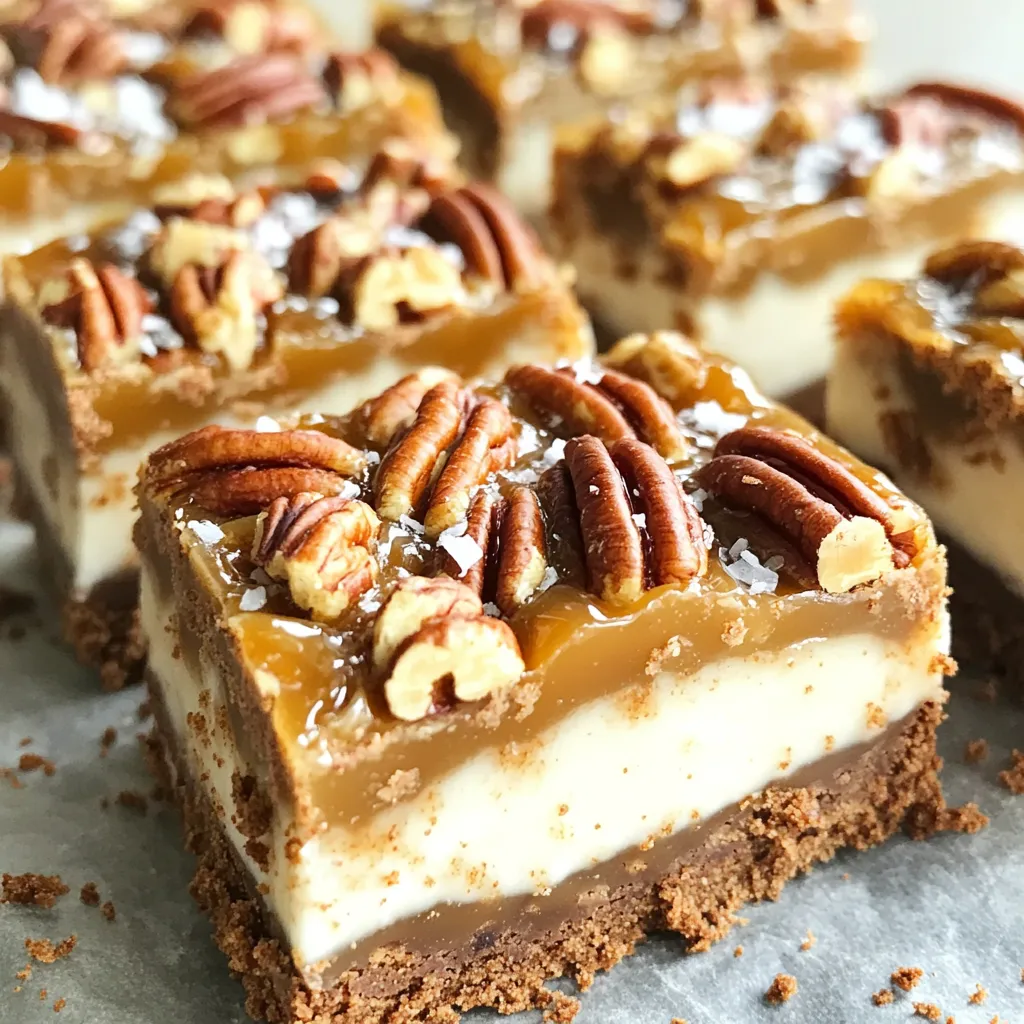
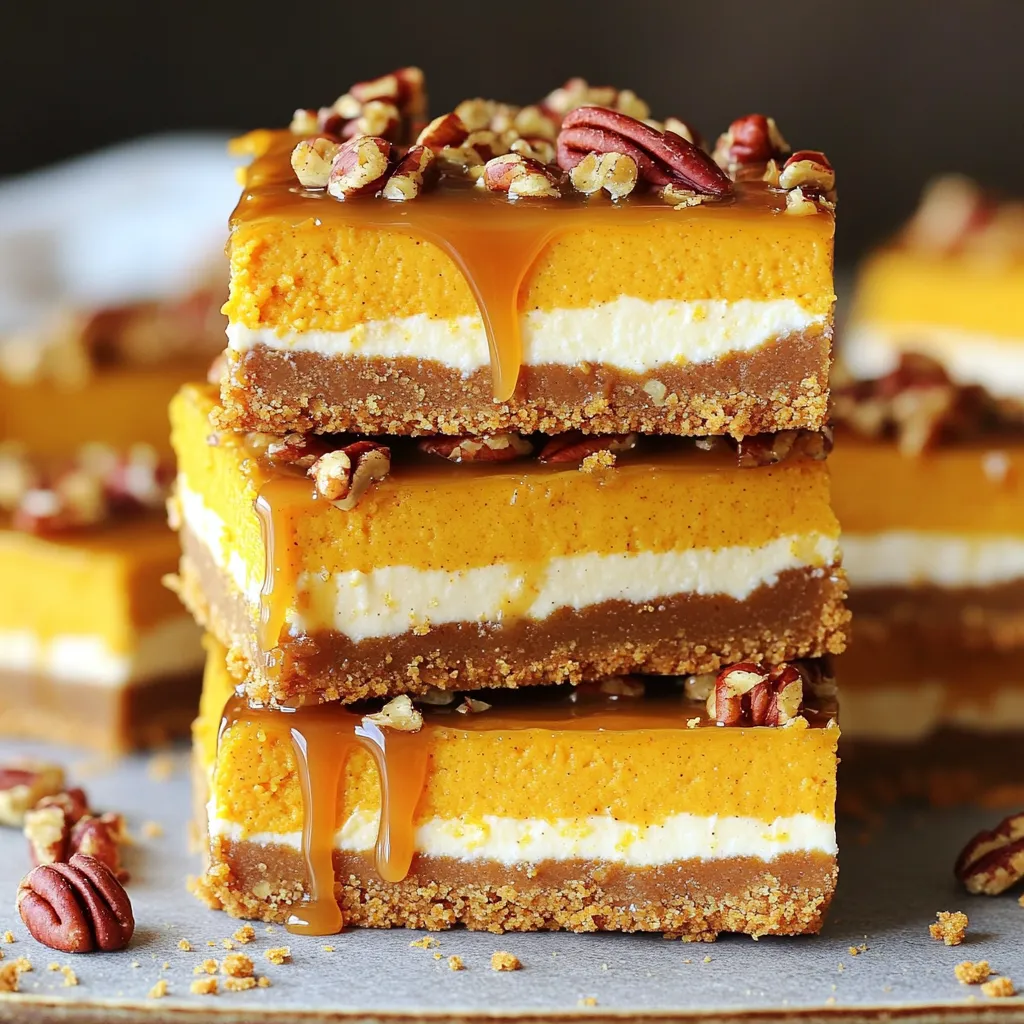
Craving a sweet treat that’s easy to make? You’ll love these No-Bake Salted Caramel Pecan Pie Bars! They combine rich

To make Cottage Cheese Brownie Batter Dip, you will need: - 1 cup cottage cheese (preferably low-fat) - 1/2 cup unsweetened cocoa powder - 1/4 cup honey or maple syrup - 1/4 cup almond butter or peanut butter - 1 teaspoon vanilla extract - 1/2 teaspoon salt - 1/2 cup chocolate chips (dark or semi-sweet) These ingredients create a rich and creamy dip that tastes like real brownie batter. The cottage cheese adds protein, while the cocoa powder gives it a deep chocolate flavor. The nut butter adds creaminess, and the honey or maple syrup sweetens it just right. For a fun dipping experience, consider these options: - Apple slices - Graham crackers - Pretzels - Celery sticks These items are perfect for scooping up the dip. Each adds a nice crunch and different flavor, making the snack more enjoyable. You can mix and match for variety. If you want to make this dip even healthier, try these substitutes: - Use Greek yogurt instead of cottage cheese for a tangy taste. - Swap honey or maple syrup for a sugar-free sweetener like stevia. - Choose natural almond butter or peanut butter without added sugars. These changes can help lower calories and sugar while keeping the dip tasty. Cooking is all about making it work for you! To make Cottage Cheese Brownie Batter Dip, gather your ingredients first. You will need: - 1 cup cottage cheese (preferably low-fat) - 1/2 cup unsweetened cocoa powder - 1/4 cup honey or maple syrup - 1/4 cup almond butter or peanut butter - 1 teaspoon vanilla extract - 1/2 teaspoon salt - 1/2 cup chocolate chips (dark or semi-sweet) - Optional dippers: apple slices, graham crackers, pretzels, or celery sticks This dip takes just ten minutes to make. It is easy and fun to prepare. Start by placing the cottage cheese into a food processor or blender. Next, add the unsweetened cocoa powder, honey or maple syrup, and almond or peanut butter. Pour in the vanilla extract and sprinkle the salt. Blend all these ingredients on high until smooth and creamy. You may need to scrape down the sides to mix well. Once smooth, gently fold in the chocolate chips with a spatula. This keeps the chips whole for a nice texture. Finally, transfer your dip to a serving bowl. For a touch of sweetness, drizzle a bit of extra honey on top. You can also sprinkle more chocolate chips if you like. Arrange your dippers around the bowl for a pretty display. You can use apple slices, graham crackers, pretzels, or celery sticks. This dip is great for parties or as a snack at home. Enjoy the creamy goodness! To get the creamiest texture, use fresh cottage cheese. Low-fat works best, but full-fat can be richer. Blend the cottage cheese well in a food processor. This helps break down lumps. Add cocoa powder, honey or maple syrup, almond butter, vanilla, and salt. Blend until it’s smooth. Don’t rush this step; a creamy dip needs time. If it’s too thick, add a splash of milk or water. This will help reach the perfect consistency. Store your dip in an airtight container. It keeps well in the fridge for about three days. When you’re ready to enjoy it again, stir it well. If it thickens, add a little milk to loosen it. I don’t recommend reheating this dip. The texture may change, and it might not taste as good. Enjoy it cold for the best flavor! You can easily enhance the flavor of your dip. Try adding a pinch of cinnamon for warmth. A dash of sea salt can bring out the sweetness, too. If you love peanut butter, add an extra spoonful. You can even mix in some chopped nuts for crunch. For a fun twist, consider adding mini marshmallows or dried fruit. These add-ins can make your dip more exciting and tasty! {{image_2}} You can change the flavor of your dip easily. For a minty twist, add 1/2 teaspoon of mint extract. This gives a fresh taste that many love. If you want a nutty flavor, use crunchy peanut butter instead of smooth. You could also mix in a tablespoon of almond extract for a rich taste. Each of these flavors can make your dip even more fun and tasty! If you need a dairy-free option, use silken tofu instead of cottage cheese. Blend it well to keep a smooth texture. You can also use a plant-based yogurt. Choose unsweetened varieties for the best flavor. This way, you keep your dip creamy without dairy while still enjoying all the fun! How you serve your dip can change the vibe. For a dessert platter, use graham crackers and chocolate-covered pretzels. This makes for a sweet treat everyone will love. For a healthy snack, pair it with apple slices and celery sticks. This adds crunch and freshness. Arrange your dippers around the bowl for an eye-catching display. The colors and textures will invite everyone to dig in! To keep your Cottage Cheese Brownie Batter Dip fresh, store it in an airtight container. This helps prevent air from spoiling the dip. Make sure to keep it in the fridge. Always use a clean spoon when scooping out the dip. This keeps germs away and helps it last longer. In the fridge, your dip will stay good for about 3 to 5 days. If you see any changes in color or smell, it's best to throw it away. When reusing, always check for freshness first. If it seems off, don’t take the chance. You can freeze this dip for up to 2 months. To freeze, put the dip in a freezer-safe container. Leave some space at the top since the dip may expand. When you’re ready to eat it, thaw it in the fridge overnight. Once thawed, mix it well before serving. If it seems too thick, add a little extra cottage cheese to smooth it out. The best way to make Cottage Cheese Brownie Batter Dip is simple. First, gather all your ingredients. You need cottage cheese, cocoa powder, honey or maple syrup, almond or peanut butter, vanilla extract, salt, and chocolate chips. Next, add the cottage cheese, cocoa powder, honey, almond butter, vanilla, and salt to a food processor. Blend until the mix is smooth. This step is key for a creamy dip. Scrape down the sides if needed. Finally, gently fold in the chocolate chips. This keeps them whole and adds great texture. Serve it in a bowl with dippers like apple slices or pretzels. Enjoy! Yes, you can make this dip ahead of time. It stores well in the fridge. Just prepare the dip and transfer it to an airtight container. Keep it in the fridge for up to three days. Before serving, give it a quick stir. If it seems thick, add a splash of milk or a touch of honey. This keeps it creamy and delicious. If you want to switch up the chocolate chips, you have options. You can use chopped nuts for a crunch. Try walnuts or pecans for a nice flavor. For a sweeter twist, use dried fruit like raisins or cranberries. You can also try white chocolate chips or butterscotch chips. Each option gives a unique taste to your dip. Choose what you like best! In this post, we explored making a delicious Cottage Cheese Brownie Batter Dip. We covered the required and optional ingredients, offering healthier substitutes when needed. The step-by-step instructions guided you through preparation, blending, and serving tips. You learned helpful tricks for the creamiest texture and storing methods. Lastly, we discussed variations in flavor and serving style. Enjoy making this tasty dip and feel free to get creative!

Cottage Cheese Brownie Batter Dip Easy and Creamy Snack

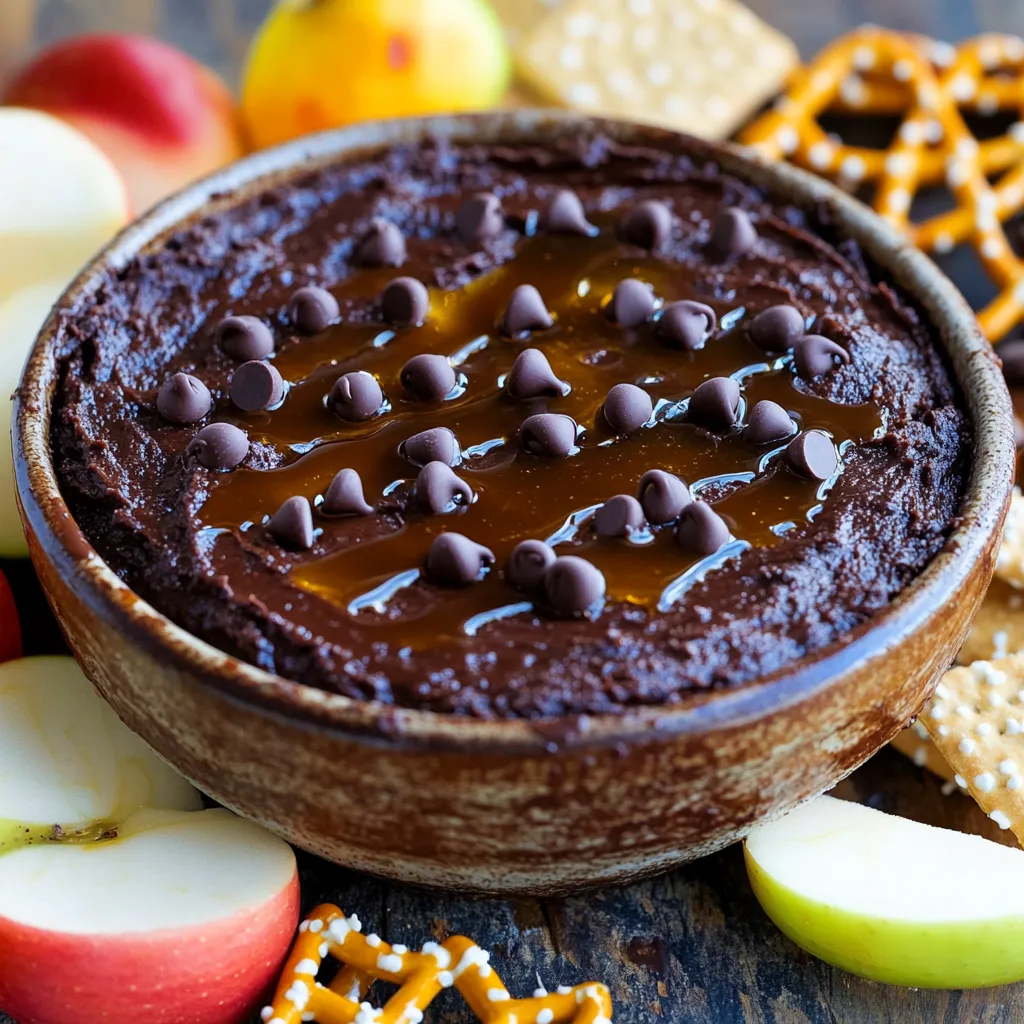
Looking for a fun and healthy snack? You’ll love this Cottage Cheese Brownie Batter Dip! It’s easy to make and

- 12 oz (340 g) pasta (penne or fusilli work well) - 2 large red bell peppers, roasted and peeled - 1 small onion, diced - 3 cloves garlic, minced - 1 cup vegetable broth - 1 cup heavy cream or coconut cream for a dairy-free option - 1 teaspoon smoked paprika - 1/2 teaspoon red pepper flakes (adjust for heat preference) - Salt and black pepper, to taste - 1/2 cup freshly grated Parmesan cheese (or nutritional yeast for a vegan option) - Fresh basil leaves, for garnish You can swap ingredients based on what you have. Try these ideas: - Use any pasta shape you like. Spaghetti or rotini will work great too. - Swap red bell peppers for jarred roasted red peppers for ease. - For the cream, almond milk or cashew cream can replace heavy cream. - If you want a spicy kick, add more red pepper flakes or use a hot sauce. - Nutritional yeast is a great dairy-free cheese swap. When you buy fresh ingredients, look for these tips: - Choose bright red bell peppers. They should feel firm and heavy. - Select an onion that feels solid with a smooth skin. - Pick garlic bulbs that are dry and firm. Avoid any soft spots. - When buying pasta, check the date. Select one that is fresh. - Fresh basil should be vibrant green with no brown spots. Using fresh ingredients makes your dish taste better! They add color, flavor, and nutrition. Enjoy making your One-Pot Creamy Roasted Red Pepper Pasta with these tips! To make this dish, start with the red bell peppers. You can roast them over an open flame or in the oven. Cook them until the skin is charred and blistered. After roasting, place them in a bowl and cover it with plastic wrap. Let them steam for about 10 minutes. This makes peeling easier. Once cooled, peel off the skin and remove the seeds. You’ll have sweet, smoky peppers ready to blend. Next, we blend the roasted peppers into a sauce. In a blender, add the peeled peppers, minced garlic, smoked paprika, and red pepper flakes. Pour in the vegetable broth too. Blend this mix until it’s smooth and creamy. This sauce is the heart of your dish. It adds flavor and richness to the pasta. Now, let’s cook the aromatics. In a large pot, heat a drizzle of olive oil over medium heat. Add the diced onion and sauté for about 5 minutes. Cook until the onion is soft and translucent. This step builds a great flavor base for the dish. Once the onions are ready, pour in the blended red pepper sauce. Add the heavy cream or coconut cream, and stir until well mixed. Bring this mixture to a gentle simmer. Now, add the pasta directly into the sauce, making sure it’s fully submerged. Cook according to the package instructions, stirring often. This usually takes about 10 to 12 minutes. If the pasta seems to stick, add a splash of water. When the pasta is al dente, turn off the heat. Stir in the grated Parmesan cheese and season with salt and black pepper. This adds depth and creaminess to the dish. To serve, use tongs to twirl the pasta into bowls. Finish with fresh basil leaves and an extra sprinkle of cheese if you like. Enjoy your creamy roasted red pepper pasta! To get a creamy sauce, blend the roasted peppers well. You want a smooth texture. If the sauce seems too thick, add a bit more vegetable broth. This will help it coat the pasta nicely. For a silkier finish, use heavy cream or coconut cream. The right cream adds richness and helps your sauce cling to the pasta. If you like heat, use more red pepper flakes. A half teaspoon gives a mild kick. For extra spice, try a full teaspoon or more. If you want a milder dish, skip the flakes altogether. You can also balance the heat with a pinch of sugar. This trick can enhance the sauce’s flavor without making it too spicy. To save time, roast the red peppers ahead. You can store them in the fridge. This way, they are ready to use. Also, chop your onion and garlic in advance. Use a food processor to speed up the chopping. Lastly, cook the pasta right in the sauce. This saves a pot and makes cleanup easier! {{image_2}} To make this dish vegan and dairy-free, swap heavy cream for coconut cream. This gives a rich, creamy texture without dairy. You can also replace Parmesan cheese with nutritional yeast. It adds a cheesy flavor and is great for vegans. With these swaps, you keep all the taste without any animal products. Adding proteins can make your pasta more filling. For chicken, cook bite-sized pieces in the pot before adding onions. For shrimp, toss them in during the last few minutes of cooking. This way, they cook through without becoming tough. You can also use cooked sausage or tofu for a nice touch. Each protein adds its own flavor and texture. Boost nutrition by adding veggies. Spinach or kale can be stirred in right before serving. They wilt down nicely and add color. Cherry tomatoes can be halved and cooked with the pasta for a sweet burst. Zucchini or bell peppers can be diced and sautéed with onions. These add flavor and make the dish even healthier. After enjoying your One-Pot Creamy Roasted Red Pepper Pasta, store any leftovers in an airtight container. This helps keep the flavors fresh. Place the container in the refrigerator. Your pasta will stay good for up to three days. When you're ready to eat the leftovers, reheat them gently. Use a pot over low heat. Add a splash of water or broth to loosen the sauce. Stir often until it's warm. You can also use a microwave. Heat in short bursts, stirring in between, until it’s hot. If you want to keep your pasta longer, freezing is a great option. First, let the pasta cool completely. Then, portion it into freezer-safe containers. Seal them tightly to prevent freezer burn. Your pasta can last up to three months in the freezer. To enjoy, thaw it overnight in the fridge, then reheat as mentioned above. It takes about 30 minutes to make this dish. You spend 10 minutes preparing the ingredients and 20 minutes cooking. This quick time makes it perfect for busy nights. Yes, you can use any pasta you like. Penne and fusilli work best, but spaghetti or farfalle also taste great. Just make sure to adjust the cooking time based on the pasta you choose. You can use coconut cream for a dairy-free option. Other choices include almond milk or cashew cream, but they will change the sauce's richness. If you want a lighter option, use half-and-half or whole milk. In this blog post, we covered how to make One-Pot Creamy Roasted Red Pepper Pasta. You learned about key ingredients and substitutions, plus tips for selecting fresh items. I shared step-by-step instructions to prepare, blend, sauté, and cook this dish easily. We explored useful tips to perfect the sauce and variations to suit your taste. Lastly, I provided storage info to keep leftovers fresh. Enjoy making this recipe and feel free to experiment with flavors! Your kitchen adventure awaits.

One-Pot Creamy Roasted Red Pepper Pasta Delight

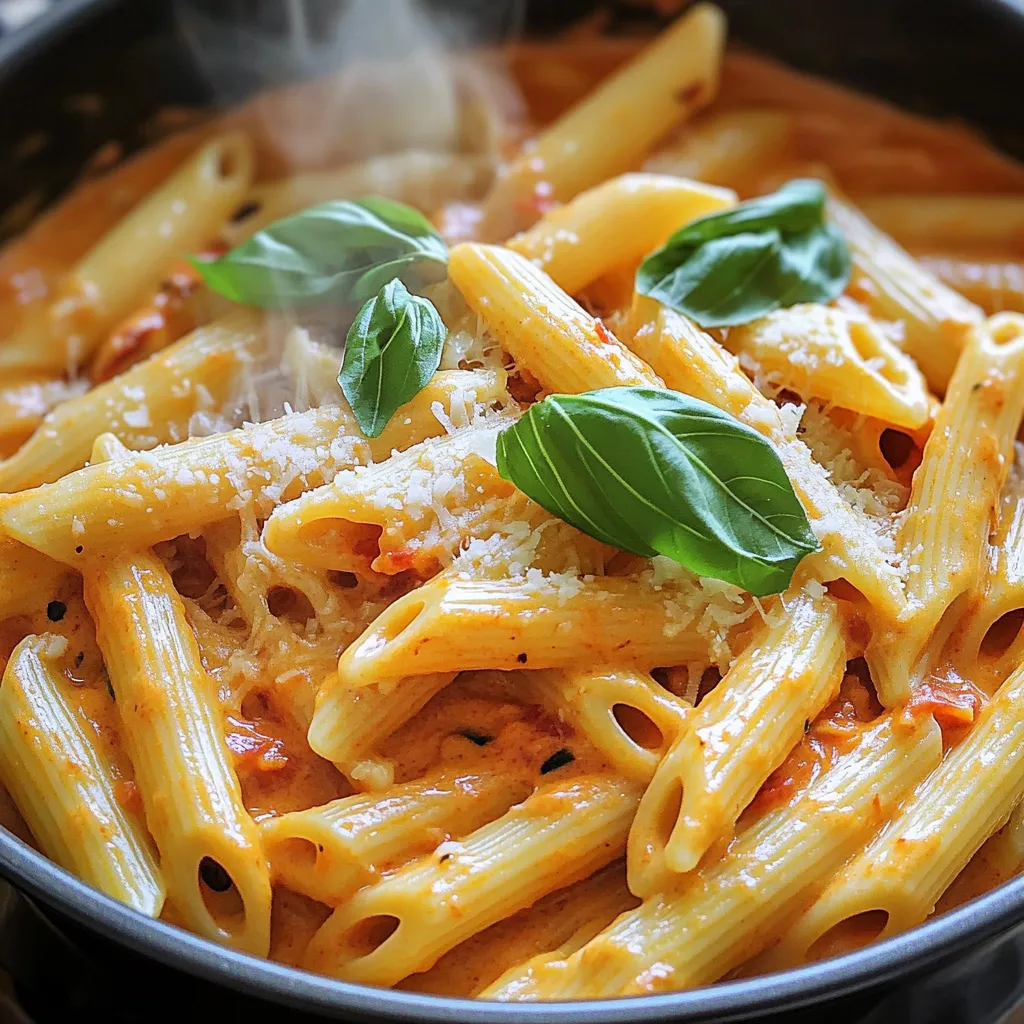
Looking for a quick and delicious meal? Try my One-Pot Creamy Roasted Red Pepper Pasta Delight! This dish is a

- 4 boneless, skinless chicken breasts - 2 cups Brussels sprouts, halved - 1 red bell pepper, sliced - 1 yellow bell pepper, sliced - 1 small red onion, sliced - 1/4 cup balsamic vinegar - 3 tablespoons olive oil - 2 tablespoons honey - 2 cloves garlic, minced You need chicken breasts for the main protein in this dish. They cook quickly and stay juicy. For veggies, I use Brussels sprouts, red bell pepper, yellow bell pepper, and red onion. They add color and flavor. The balsamic mixture gives the dish a tangy-sweet taste that everyone loves. - 1 teaspoon dried Italian herbs (oregano & basil) - Salt and pepper to taste - Fresh basil for garnish Dried Italian herbs bring depth to the dish. Salt and pepper enhance all the flavors. Fresh basil adds a lovely touch when you serve it. - Baking sheet - Parchment paper - Mixing bowls Using a baking sheet helps cook everything at once. Parchment paper makes cleanup easy. You will need mixing bowls to combine the balsamic mixture and coat the chicken and veggies. Preheating the oven First, set your oven to 400°F (200°C). This heat helps cook the chicken and veggies well. Marinating the chicken In a small bowl, whisk together 1/4 cup balsamic vinegar, 3 tablespoons olive oil, 2 tablespoons honey, and 2 minced garlic cloves. Add 1 teaspoon dried Italian herbs, salt, and pepper. Place 4 chicken breasts in a large bowl or zip-top bag. Pour half the marinade over the chicken. Coat it well. Let it marinate for at least 20 minutes. If you have time, marinate it for up to 2 hours in the fridge. Coating the vegetables While the chicken marinates, prepare the vegetables. In another bowl, combine 2 cups halved Brussels sprouts, 1 sliced red bell pepper, 1 sliced yellow bell pepper, and 1 sliced red onion. Drizzle the rest of the balsamic mixture over the veggies. Toss them until they are coated evenly. Arranging on the sheet pan Line a baking sheet with parchment paper for easy cleanup. Place the marinated chicken in the center of the sheet pan. Arrange the balsamic-coated vegetables around the chicken. Baking time specifics Bake everything in the preheated oven for 25-30 minutes. The chicken should be cooked through and the veggies tender. Checking chicken doneness Ensure the chicken reaches an internal temperature of 165°F. Use a meat thermometer if you have one. When done, remove the sheet pan from the oven. Let it rest for 5 minutes. Garnish with fresh basil before serving. To make your chicken extra tasty, marinate it well. This means letting it soak in the balsamic mixture for flavor. The best time to marinate is at least 20 minutes. If you have more time, marinate for up to 2 hours. This helps the chicken soak up all those yummy flavors. For even cooking of veggies, cut them into similar sizes. This way, they cook at the same rate. Use bell peppers and Brussels sprouts for a nice mix. To reduce cleanup, line your baking sheet with parchment paper. This makes it easy to clean up after cooking. This dish goes well with a simple side. Try serving it with rice or quinoa. You can also add a fresh salad for crunch. If you like sauces, drizzle some extra balsamic on top. A yogurt dip also makes a great pairing. Enjoy your meal with these tasty sides! {{image_2}} If you want to switch things up, consider alternative proteins. You can use turkey breasts or even tofu for a meatless option. Both work well with the balsamic glaze. When it comes to veggies, the options are endless. You can add carrots, zucchini, or asparagus. Just make sure to cut them into similar sizes for even cooking. Changing the vinegar can change the dish drastically. Try apple cider vinegar for a fruity twist or red wine vinegar for a richer flavor. Both will give a unique taste to your meal. You can also play with herbs and spices. Try adding rosemary or thyme for a different aroma. A pinch of red pepper flakes can add a nice kick too. For gluten-free versions, simply check your balsamic vinegar. Most are gluten-free, but it’s good to verify. You can also use tamari instead of soy sauce if you want a gluten-free option. If you're aiming for low-carb, swap out the honey for a sugar-free sweetener. You can also use more low-carb veggies like spinach or cauliflower. These changes keep the dish tasty while meeting your dietary needs. To keep your Sheet Pan Balsamic Chicken and veggies fresh, store them in the fridge. Place the leftovers in an airtight container. They will stay good for up to four days. For longer storage, you can freeze them. Just make sure to use freezer-safe bags. Squeeze out any air before sealing. Label the bags with the date. You can freeze the dish for up to three months. When it's time to eat the leftovers, reheating is key. The best method for chicken is using the oven. Preheat your oven to 350°F (175°C). Place the chicken on a baking sheet and cover it with foil. This helps keep it moist. Heat for about 15-20 minutes. For the veggies, you can use the microwave. Heat them in short bursts, checking often. This helps maintain their texture. You want them warm, not mushy. Leftovers from this dish last about four days in the fridge. If you freeze them, they last up to three months. Always check for spoilage before eating. Signs of spoilage include an off smell or discoloration. If you see any mold, discard the food. Keeping food safe is important for good health. You can prep the chicken and veggies a day early. Here are some tips: - Marinate the chicken: Mix the balsamic ingredients. Coat the chicken and let it sit in the fridge for up to 2 hours or overnight. - Cut the veggies: Slice the Brussels sprouts, bell peppers, and onions. Store them in an airtight container. - Combine flavors: Add the balsamic mixture to the veggies right before baking. This keeps them fresh. Yes, you can use bone-in chicken. Here are some things to consider: - Cooking time: Bone-in chicken takes longer to cook. You may need to bake it for 10-15 minutes more. - Flavor: Bone-in chicken can add more flavor. Just be sure to check the internal temperature; it should reach 165°F. - Skin: If you leave the skin on, it can get crispy and add texture. Just be careful of extra grease. This dish pairs well with many sides. Here are some ideas: - Rice: A simple white or brown rice complements the balsamic flavor. - Potatoes: Mashed or roasted potatoes add heartiness to the meal. - Salad: A fresh green salad can lighten the dish and add crunch. - Bread: Crusty bread is perfect for soaking up the balsamic sauce. This blog guided you through making a tasty Sheet Pan Balsamic Chicken & Veggies. We covered the main ingredients, suggested seasonings, and the equipment needed. I shared tips for marinating and cooking, along with variations for your taste. Remember, storing leftovers properly helps keep your meal fresh. With these easy steps, you’ll create a delicious dish your family will love. Enjoy trying it out and feel free to experiment!

Delicious Sheet Pan Balsamic Chicken Veggies Recipe

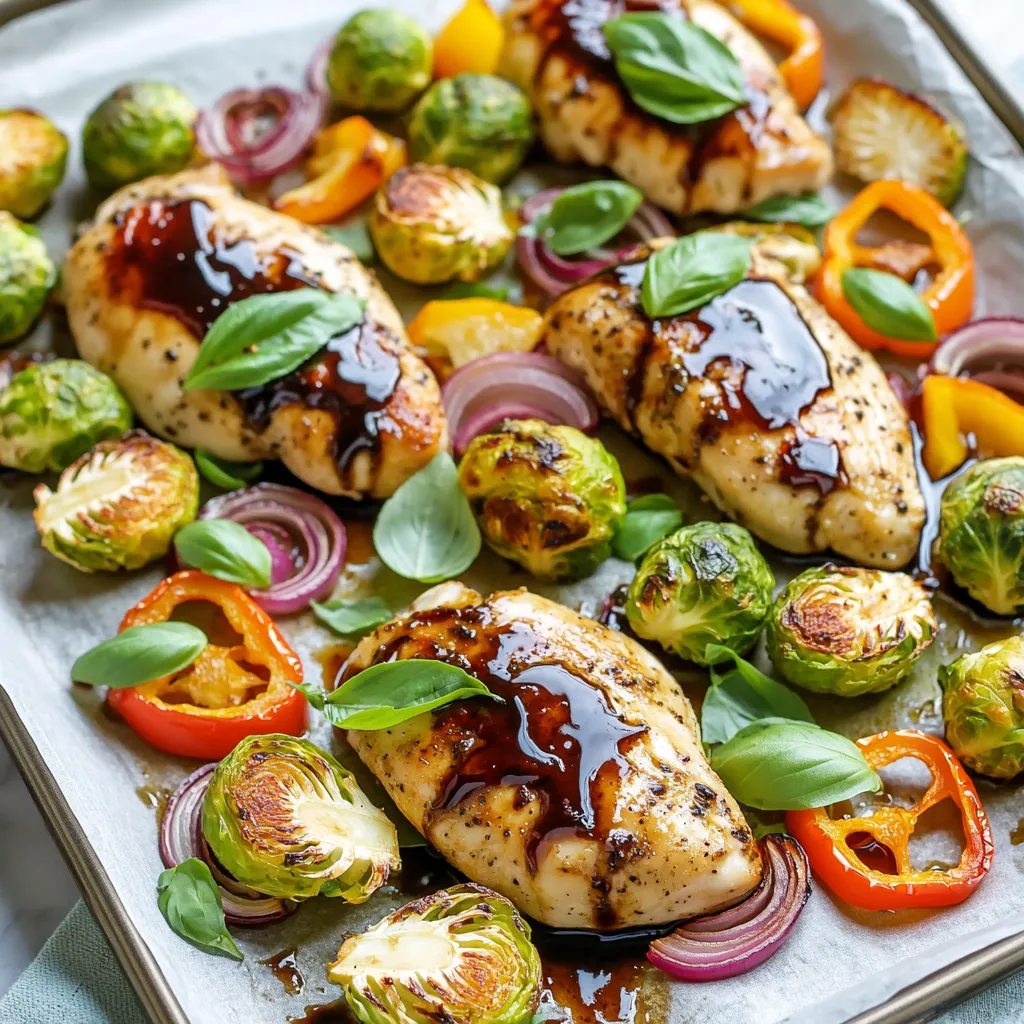
Looking for a simple, tasty meal? This Delicious Sheet Pan Balsamic Chicken Veggies Recipe is just what you need! It

To make this tasty Greek Orzo Pasta Salad, you will need: - 1 cup orzo pasta - 2 cups vegetable broth - 1 cup cherry tomatoes, halved - 1 cucumber, diced - 1/2 red onion, finely chopped - 1/2 cup Kalamata olives, pitted and sliced - 1/2 cup feta cheese, crumbled - 1/4 cup fresh parsley, chopped - 3 tablespoons extra virgin olive oil - 2 tablespoons lemon juice - 1 teaspoon dried oregano - Salt and pepper to taste Fresh ingredients make this salad shine. They add bright colors and bold flavors. The cherry tomatoes should be ripe and juicy. A crisp cucumber enhances the crunch. Fresh parsley gives a nice herbal note. High-quality feta cheese adds creaminess. Using these fresh items makes the salad more inviting and tasty. If you have dietary needs, you can make swaps. For a gluten-free version, try quinoa or rice instead of orzo. If you need a vegan option, skip the feta and use avocado for creaminess. You can also use olives of your choice. For low-sodium diets, use low-sodium vegetable broth. These changes keep the salad delicious and enjoyable for everyone. To cook the orzo, start by boiling vegetable broth in a pot over medium heat. This broth gives the orzo a great taste. When the broth boils, add 1 cup of orzo pasta. Stir it gently to keep it from sticking. Cook the orzo for 8-10 minutes. You want it al dente, meaning it should still have a little bite. After cooking, drain the orzo in a colander. Rinse it under cold water. This stops the cooking and cools it down quickly. Set the cooled orzo aside for later. Next, let’s prepare the veggies and feta. In a large mixing bowl, combine the halved cherry tomatoes, diced cucumber, finely chopped red onion, and sliced Kalamata olives. These fresh veggies add crunch and flavor. Now, crumble the feta cheese over the top. Feta adds creaminess to the salad. Mix these ingredients gently. You want them combined but not crushed. Now, it’s time to make the dressing. In a small bowl, whisk together 3 tablespoons of extra virgin olive oil and 2 tablespoons of lemon juice. This combo gives the salad a bright taste. Add 1 teaspoon of dried oregano, salt, and pepper. Whisk until well mixed. Pour the dressing over the veggie mixture. Then, add the cooled orzo. Gently toss everything together. You want the dressing to coat all the ingredients well. Finally, top with chopped fresh parsley. Give it one last gentle toss before chilling the salad in the refrigerator for at least 30 minutes. This helps all the flavors blend beautifully. To make your orzo perfect, cook it al dente. This keeps the pasta firm. Bring your vegetable broth to a boil first. Stir the orzo in gently and cook for 8-10 minutes. After cooking, drain the orzo and rinse it with cold water. This halts the cooking and keeps it from getting mushy. Want to boost flavor? Use fresh herbs like basil or dill. You can swap Kalamata olives for green olives if you prefer. For a tangy twist, add a splash more lemon juice. If you don’t like feta, try goat cheese or even a vegan cheese. Each change can create a new taste. Serve your salad in a large bowl or in mason jars. This makes it look cute and fun. Top with extra parsley for a bright touch. Add lemon wedges on the side for a splash of color. A colorful presentation makes the salad more appetizing and appealing. {{image_2}} You can make Greek orzo pasta salad even more exciting with fun add-ins. Artichokes add a nice tang. They give a great texture that contrasts with the soft orzo. Sun-dried tomatoes bring a sweet and chewy burst of flavor. Try adding roasted red peppers for a smoky touch. You can even toss in some capers for that salty pop. These flavors all mix well with the classic ingredients. If you want your salad to fill you up, add some protein. Grilled chicken is a great choice. It is juicy and adds a nice grill flavor. Chickpeas are a wonderful plant-based option. They make the salad hearty and bring extra fiber. You can also use shrimp for a seafood twist. Just make sure to cook it well and add it warm to the salad. Each of these proteins enhances the dish while keeping it fresh. While the olive oil and lemon dressing is tasty, don’t be afraid to mix it up. Try a balsamic vinaigrette for a sweeter option. It pairs well with the salty feta and olives. A yogurt-based dressing can also work, adding creaminess and tang. For a spicy kick, add some chili flakes to the dressing. You can even use tahini for a nutty flavor. Experiment with these different dressings to find your favorite! To store your Greek Orzo Pasta Salad, place it in an airtight container. Make sure the lid seals tightly to keep the salad fresh. You can keep it in the fridge for up to three days. This way, you can enjoy those tasty flavors again! Freezing is not the best option for this salad. The texture of the orzo and veggies can change when frozen. If you must freeze it, only freeze the orzo by itself. Store it in a freezer-safe bag. When ready to eat, thaw it and mix with fresh veggies and dressing. You can serve the salad cold right from the fridge. It tastes great that way! If you prefer it warm, heat the orzo gently on the stove. Add a splash of olive oil to keep it moist. Mix in fresh veggies and dressing just before serving. Enjoy your delicious Greek Orzo Pasta Salad! Yes, you can make this salad ahead of time. In fact, it tastes better after chilling. The flavors mix well when it sits. I suggest making it a few hours before serving. Just cover it and place it in the fridge. This salad can stay fresh for up to three days. If you cannot find orzo, you can use other small pasta shapes. Some good options are ditalini, fregola, or even couscous. Quinoa can also work if you want a gluten-free option. These alternatives will give you a similar texture and taste. Traditional orzo pasta is not gluten-free. If you want a gluten-free version, choose gluten-free orzo or another gluten-free pasta. You can also use grains like quinoa or brown rice. Ensure all other ingredients are gluten-free as well. In this article, we explored how to make Greek Orzo Pasta Salad. We discussed key ingredients, stressing the need for fresh ones. I shared steps for cooking orzo and making a tasty dressing. You learned tips for texture, flavor, and presentation. We also looked at variations and storage advice. You can easily customize this dish for your taste. Enjoy making it with fresh ingredients, and share it with friends for a delightful meal.

Greek Orzo Pasta Salad Flavorful and Fresh Recipe

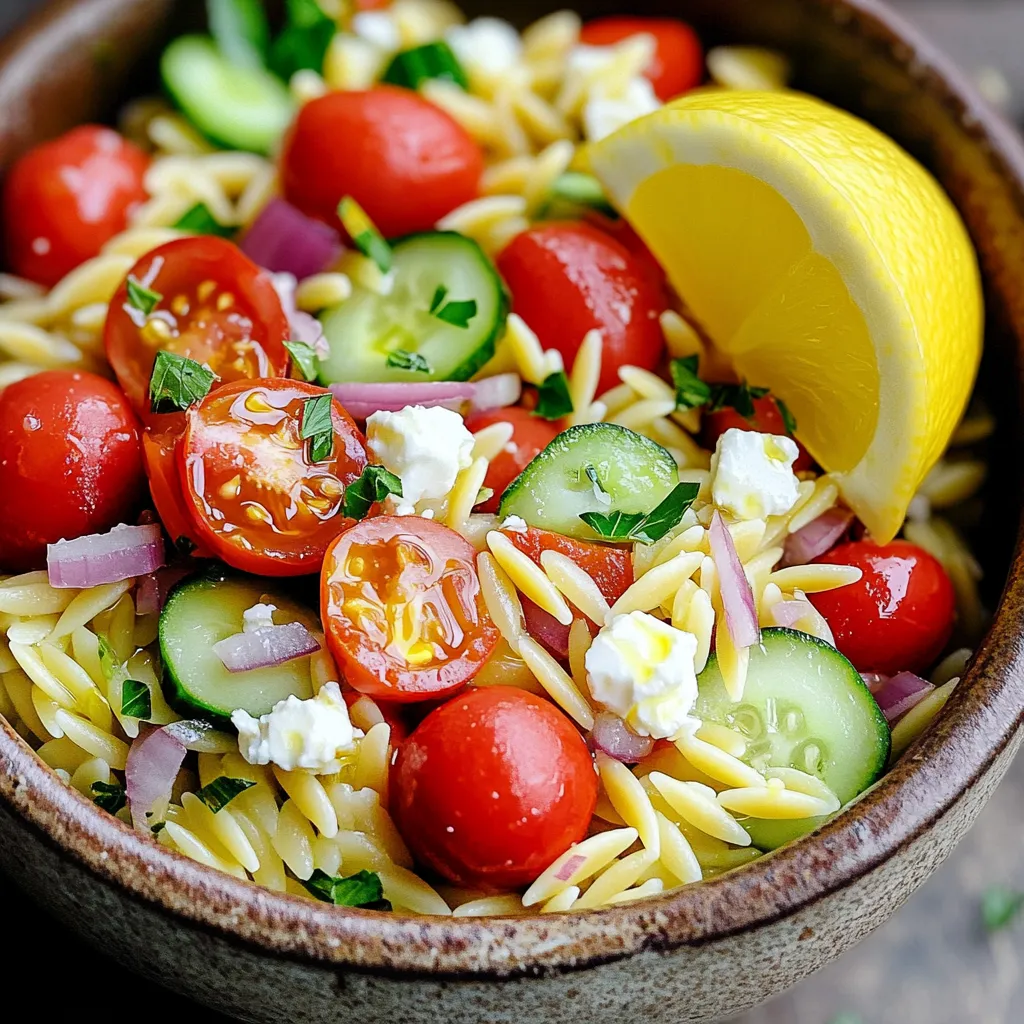
Looking to jazz up your lunch with something fresh and tasty? You’ve come to the right place! My Greek Orzo

Older posts
Newer posts
← Previous Page1 … Page8 Page9 Page10 … Page84 Next →

dsad

© 2026 Lisa Dishes • Built with GeneratePress

Our Policies

  • Copyright Policy
  • Cookie Policy
  • GDPR Policy
  • Privacy Policy
  • Disclaimer
  • Terms Of Use

More Information

  • Home
  • About
  • Contact
  • Appetizers
  • Dessert
  • Dinner
  • Drinks
©2026, Lisa Dishes About Back To Top