Skip to content
DisclaimerTerms Of UseGDPR PolicyCookie Policy

Lisa Dishes

  • Home
  • Drinks
  • Appetizers
  • Dinner
  • Dessert
  • About
  • Contact
  • Privacy Policy
DisclaimerTerms Of UseGDPR PolicyCookie Policy

NO-ING-IMG

- 4 large bell peppers (any color) - 2 cups cooked chicken, shredded - 1/2 cup buffalo sauce - 1 cup cream cheese, softened - 1/2 cup shredded cheddar cheese - 1/4 cup diced green onions - 1/4 cup ranch dressing - Salt and pepper to taste - Olive oil spray for baking Selecting fresh bell peppers: Look for peppers with bright skin. They should feel firm and heavy. If they have soft spots, skip them. Choosing the right buffalo sauce: Pick a sauce that matches your heat level. Some sauces pack a punch, while others are milder. Taste a bit before using it. Recommended types of chicken: Use rotisserie chicken for ease. You can also boil or bake your chicken. Just make sure it is fully cooked and shredded for the best texture. For the Full Recipe, check the details above. First, preheat your oven to 375°F (190°C). This makes sure the peppers cook well. Next, take four large bell peppers and cut off their tops. Remove the seeds and any white parts inside. Rinse them under water to clean. Lightly spray the outside of each pepper with olive oil. This helps them brown nicely. Place them upright in a baking dish. In a large bowl, mix two cups of shredded chicken with half a cup of buffalo sauce. You can adjust the amount of sauce to your taste. Then, add one cup of softened cream cheese and half a cup of shredded cheddar cheese. Don’t forget to include a quarter cup of diced green onions and a quarter cup of ranch dressing. Mix everything together until all the chicken is coated well. Season with salt and pepper to taste. Now, it’s time to stuff the peppers. Use a spoon to fill each pepper with the chicken mixture. Pack it in firmly so they hold together. Cover the baking dish with aluminum foil. Bake for 25 minutes. After that, take off the foil and bake for another 10 to 15 minutes. This lets the filling get bubbly and the peppers tender. Let the stuffed peppers cool for a few minutes before serving. Enjoy your meal! For more details, check the Full Recipe. Adjusting the spiciness of your buffalo chicken stuffed peppers is key. You can control heat by changing the amount of buffalo sauce. If you want a milder dish, use less sauce. If you love heat, add more! You can also try different brands of buffalo sauce. Some are hotter than others. For extra flavor, think about add-ins. You can mix in black beans, corn, or even diced celery. These ingredients add texture and taste. Another great idea is to sprinkle in some spices. Garlic powder or smoked paprika can elevate the flavor. You can use different cooking methods for these stuffed peppers. If you own an air fryer, it can cook them quickly and keep them crispy. Set it to 375°F (190°C) and cook for about 15-20 minutes. A slow cooker is another option. It takes longer, around 4 hours on low, but makes the peppers soft and full of flavor. For even cooking, make sure to cut the peppers to the same size. This helps them cook at the same rate. If you want a nice texture, consider roasting the peppers briefly before stuffing them. This gives them a charred, smoky flavor. Garnishing your stuffed peppers makes them look great! Use fresh green onions and a drizzle of ranch dressing on top. This adds color and flavor. You can also serve them with a side of celery sticks and carrot sticks. They’re crunchy and refreshing. For side dishes, think about a light salad or some crispy sweet potato fries. These pair well with the rich flavors of the peppers. If you want a heartier side, try serving them with rice or quinoa. They balance the meal and add more filling options. {{image_2}} You can easily make these stuffed peppers vegetarian! First, substitute chicken with plant-based protein. Options like shredded jackfruit or tofu work well. Next, adjust the sauces. Use a spicy buffalo sauce without animal products. You can also add some vegan cream cheese for creaminess. Want to mix it up? You can add more ingredients. Try black beans or cooked quinoa for extra texture. For flavor, switch to BBQ sauce or taco seasoning. Both options give a fun twist. They add a new taste to each bite. Not all peppers are the same. Explore different types for your dish. Jalapeños add heat, while poblanos offer a rich flavor. Remember that pepper size matters. Larger peppers take longer to cook. Smaller ones need less time. Choose based on your preference! To keep your stuffed peppers fresh, store them in the fridge. Place them in an airtight container. This helps keep the flavors intact and prevents drying. You can also wrap them tightly in plastic wrap. Make sure to eat them within three to four days for the best taste. When you reheat stuffed peppers, avoid the microwave if possible. Instead, use the oven. Preheat it to 350°F (175°C). Place the peppers in a baking dish and cover with foil. This keeps them moist. Heat for about 15-20 minutes. You can also serve with extra ranch dressing or green onions for a fresh touch. If you want to freeze your stuffed peppers, do it before cooking. Wrap each pepper in plastic wrap and place them in a freezer bag. This way, they stay fresh for up to three months. When you’re ready to eat, take them out and thaw overnight in the fridge. Bake them at 375°F (190°C) until hot and bubbly, about 30-35 minutes. This process keeps the flavors strong and the peppers tender. For the complete recipe, check the Full Recipe above. Can I make Buffalo Chicken Stuffed Peppers ahead of time? Yes, you can prepare these stuffed peppers a day in advance. Just stuff the peppers, cover them, and store them in the fridge. Bake them when you are ready to eat. This makes dinner easy! What can I substitute for cream cheese? If you don’t have cream cheese, try using Greek yogurt or sour cream. These give a creamy texture with fewer calories. You could also use a dairy-free cream cheese for a vegan option. How do I make them gluten-free? This recipe is already gluten-free! Just make sure the buffalo sauce and ranch dressing you use are gluten-free. Always check labels to be sure. Caloric breakdown and serving size Each stuffed pepper has around 400 calories. This is a hearty meal that fills you up without being too heavy. A serving size is one pepper, perfect for lunch or dinner! Health benefits of key ingredients - Bell Peppers: High in vitamins A and C, great for skin health. - Chicken: A lean protein that helps build muscle. - Buffalo Sauce: Adds flavor without many calories. - Green Onions: Offer antioxidants and add a nice crunch. Where to find video tutorials YouTube has many great cooking channels. Search for “Buffalo Chicken Stuffed Peppers” to find step-by-step guides. Watching someone else can help you feel more confident! Recommended cooking blogs for similar recipes Check out blogs like "The Pioneer Woman" or "Half Baked Harvest." They have many fun and easy recipes that you will love making at home. In this blog post, we covered making buffalo chicken stuffed peppers from start to finish. You learned about ingredients, prepping, cooking, and storing them. Plus, we shared tips for variations and FAQs to help you experiment. Remember, using fresh ingredients makes a big difference in flavor. Don’t hesitate to adjust the spice level to suit your taste. Enjoy these tasty stuffed peppers at your next meal; they’re sure to impress! Your kitchen adventures await, and this dish is a great place to start.

Buffalo Chicken Stuffed Peppers Tasty and Easy Recipe

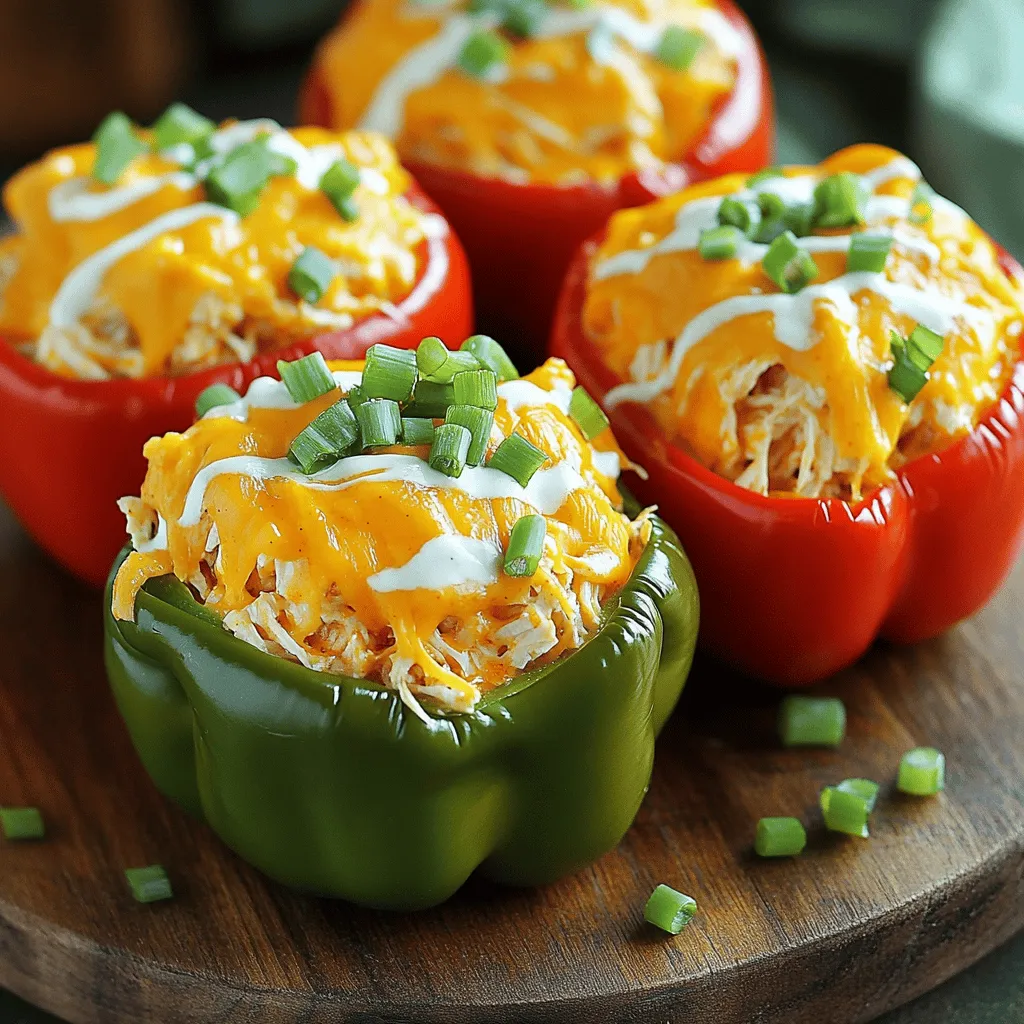
Are you craving a meal that’s both tasty and easy to make? Look no further! This Buffalo Chicken Stuffed Peppers

To make Roasted Brussels Sprouts with Balsamic Glaze, gather these ingredients: - 1 lb Brussels sprouts, trimmed and halved - 2 tablespoons olive oil - 1 teaspoon salt - 1/2 teaspoon black pepper - 2 tablespoons balsamic vinegar - 1 tablespoon honey - 1 clove garlic, minced - 1/4 cup toasted pecans, chopped (optional) - 1/4 cup crumbled feta cheese (optional) You can swap out some ingredients to fit your taste. If you don't have Brussels sprouts, try green beans or broccoli. For the olive oil, use avocado oil or melted butter. If you want a vegan dish, replace honey with maple syrup or agave nectar. If you can't find feta, goat cheese works well too. You can also skip nuts if you have nut allergies. Using fresh ingredients makes a big difference in flavor. Fresh Brussels sprouts are bright and crisp, while old ones can taste bitter. Fresh garlic brings a punch that dried garlic can't match. When you use good-quality balsamic vinegar, it adds a rich sweetness. Always choose fresh over canned or frozen for the best taste. Fresh ingredients not only enhance flavor but also provide more nutrients. So, when you shop, pick the freshest items you can find for the best results in this recipe. To start, gather your ingredients. You need Brussels sprouts, olive oil, salt, pepper, balsamic vinegar, honey, and garlic. If you want, add pecans or feta cheese for extra flavor. Preheat your oven to 400°F (200°C). 1. Mix the Sprouts: In a large bowl, combine the halved Brussels sprouts with olive oil, salt, and black pepper. Toss them well to coat. 2. Spread on Baking Sheet: Place the sprouts cut side down on a baking sheet. This helps them get crispy. 3. Roast: Put the baking sheet in the oven. Roast for 20 to 25 minutes. Stir halfway through for even cooking. Look for a golden brown color. 4. Make Balsamic Glaze: In a small saucepan, mix balsamic vinegar, honey, and minced garlic. Cook over medium heat. Simmer for 5 to 7 minutes until it thickens. Stir often to keep it from burning. 5. Combine and Serve: Once the sprouts are done, take them out of the oven. Drizzle the balsamic glaze over the top and toss to coat. If you like, add toasted pecans and crumbled feta cheese. - Cut Size: Make sure to cut your Brussels sprouts evenly. This helps them cook at the same rate. - Space Them Out: Don't crowd the baking sheet. Space the sprouts apart for crispiness. - Check for Doneness: Look for a nice golden brown color. That’s when they taste best. - Use Fresh Ingredients: Always opt for fresh Brussels sprouts. They have better flavor and texture. For the full recipe, check out [Full Recipe]. Enjoy cooking! To boost the taste of your roasted Brussels sprouts, use fresh ingredients. Fresh sprouts give better flavor than older ones. I also like to add a sprinkle of lemon zest for brightness. Toss the sprouts in olive oil evenly for a good roast. Don’t skip on the salt and pepper; they enhance natural flavors. Drizzling the balsamic glaze right after roasting adds sweetness and tang. Feel free to play with herbs like thyme or rosemary for extra depth. One common mistake is overcrowding the baking sheet. This can steam the sprouts instead of roasting them. Make sure they are in a single layer for a crispy finish. Another mistake is not preheating the oven properly. A hot oven helps get that nice caramelization. Lastly, avoid drenching the sprouts in too much oil. Just enough will do to coat them nicely. Roasted Brussels sprouts pair well with many dishes. They make a great side for roasted chicken or grilled fish. You can also serve them with a hearty grain, like quinoa or farro, for a filling meal. For a vegetarian option, enjoy them with a chickpea salad. If you want to impress, serve these sprouts with a nice steak. The savory taste complements the meat beautifully. Check out the Full Recipe for more ideas! {{image_2}} You can change the flavor of your Brussels sprouts by switching up the glaze. Try a maple syrup and soy sauce mix for a sweet and salty taste. Or use citrus juice like orange for a bright twist. You can even add herbs like rosemary or thyme for extra depth. Each glaze creates a unique taste that can surprise your guests. To make your roasted Brussels sprouts a full meal, add protein. Grilled chicken or shrimp pairs well with this dish. You can also use chickpeas for a veggie option. Adding protein makes this dish more filling and satisfying. It’s a simple way to turn a side into a main course. Seasonal flavors can make your dish special. In the fall, try adding cinnamon or nutmeg for warmth. You can toss in dried cranberries for a sweet touch. During winter, use ginger and cinnamon for a festive taste. These spices can add a cozy feel to your meal. Adjusting the flavors can help you enjoy this dish all year round. For the full recipe, check out the Sweet & Savory Roasted Brussels Sprouts with Balsamic Glaze 🥦. To keep your roasted Brussels sprouts fresh, store them in an airtight container. Let them cool down first. Avoid stacking them too tightly to keep them from getting soggy. You can also use a zip-top bag. Just squeeze out as much air as possible before sealing. Reheat your Brussels sprouts in the oven for the best texture. Preheat your oven to 350°F (175°C). Spread the sprouts on a baking sheet. Heat for 10-15 minutes, or until warm. You can also use a microwave, but this may make them soft. If you use a microwave, heat in short bursts and check often. Roasted Brussels sprouts last about 3 to 5 days in the fridge. If you want them to stay fresh, eat them within this time. After that, they may lose their taste and crunch. Enjoy them as a side dish or a healthy snack. You can find the Full Recipe on our site for more details on making this dish. Yes, you can prepare the Brussels sprouts ahead of time. Trim and halve them. Toss them in olive oil, salt, and pepper. Store them in a sealed container in the fridge for up to two days. When you're ready, roast them for a quick side dish. You can add many vegetables to this dish. Try carrots for sweetness or sweet potatoes for heartiness. Cauliflower or broccoli also work well. Just cut them into similar sizes so they cook evenly. For extra crispy Brussels sprouts, follow a few tips: - Use high heat (400°F works great). - Make sure they’re cut side down on the baking sheet. - Avoid crowding the pan; give them space to roast. - Toss them halfway to ensure all sides get crispy. Yes, balsamic glaze is thicker and sweeter than balsamic vinegar. It cooks down with sugar or honey, which gives it a rich flavor. Balsamic vinegar is more acidic and used as a dressing or marinade. Roasted Brussels sprouts pair well with many dishes. Serve them alongside grilled chicken or steak. They also complement pasta or risotto. For a vegetarian option, try them with quinoa or a salad. For the full recipe, check out the Sweet & Savory Roasted Brussels Sprouts with Balsamic Glaze. This blog post shared key steps to prepare roasted Brussels sprouts with a balsamic glaze. You learned about essential ingredients, how to cook them, and tips to enhance flavor. We covered common mistakes to avoid and how to store the dish. Plus, we explored delicious variations and answered your FAQs. Remember, fresh ingredients can truly elevate your dish. With these insights, you can create a delightful meal. Enjoy your cooking journey and impress everyone with your next dish!

Roasted Brussels Sprouts with Balsamic Glaze Delight

Are you ready to elevate your veggie game? Roasted Brussels Sprouts with Balsamic Glaze Delight will transform this often-overlooked vegetable

- 1 lb boneless, skinless chicken thighs - 3 tablespoons olive oil - 2 teaspoons dried oregano - 2 teaspoons garlic powder - 1 teaspoon onion powder - 1 teaspoon smoked paprika - Salt and pepper to taste - 4 pita bread - 1 cup Tzatziki sauce (store-bought or homemade) - 1 cup cucumber, diced - 1 cup tomatoes, diced - ½ red onion, thinly sliced - Fresh parsley, chopped for garnish - Grill or skillet - Mixing bowl - Knife and cutting board When you make Easy Chicken Gyros, start with quality ingredients. The chicken thighs give a juicy bite. Add olive oil for a rich flavor. Dried oregano gives that Greek touch. You’ll want garlic powder for warmth and onion powder for sweetness. Smoked paprika adds a hint of spice. Season with salt and pepper to bring it all together. For toppings, Tzatziki sauce is a must. It cools and flavors each bite. Fresh cucumber and tomatoes add crunch and freshness. Red onion gives a slight zing, while parsley brightens the dish. You can use store-bought items or make your own for a personal touch. Gather your kitchen tools before you start. A grill or skillet will help cook the chicken evenly. Use a mixing bowl to prepare your marinade. A sharp knife and cutting board make chopping easy and safe. This recipe is easy and fun to make. Check out the Full Recipe to help you along the way. To start, you will want to make a tasty marinade. In a bowl, combine: - 3 tablespoons olive oil - 2 teaspoons dried oregano - 2 teaspoons garlic powder - 1 teaspoon onion powder - 1 teaspoon smoked paprika - Salt and pepper to taste Mix these ingredients well. This blend will help add flavor to the chicken. Next, take 1 pound of boneless, skinless chicken thighs. Coat them evenly with the marinade. Cover the bowl and place it in the fridge. Let the chicken marinate for at least 30 minutes. If you have time, marinating for up to 2 hours gives it even more flavor. When you're ready to cook, preheat your grill or skillet over medium-high heat. This step is key to getting a nice char on the chicken. Once it’s hot, place the marinated chicken thighs on the grill. Cook them for about 5-7 minutes on each side. You want them to be charred and cooked through. After cooking, remove the chicken from heat and let it rest for a few minutes. This helps keep it juicy. Slice the chicken into strips when it's cool enough to handle. Now it’s time to assemble your gyros! First, warm your pita bread on the grill or in a skillet. Heat it for about 30 seconds on each side. This will make it soft and pliable. Next, take a warm pita and add a generous amount of sliced chicken in the center. Top it with: - 1 cup diced cucumber - 1 cup diced tomatoes - ½ red onion, thinly sliced - A dollop of Tzatziki sauce For a fresh touch, garnish with chopped parsley. Finally, fold the pita gently and serve while warm. Enjoy your homemade chicken gyros! For the full recipe, check the previous section. Marinating your chicken is key for great flavor. I suggest marinating for at least 30 minutes. For a deeper flavor, let it sit for up to 2 hours. This allows the spices to mix well with the meat. Using fresh herbs can truly enhance your dish. Try adding fresh oregano or parsley to the marinade. Fresh herbs bring brightness and vibrancy. They make your gyros taste even better. To get the perfect char, preheat your grill well. This helps create a nice sear on the chicken. Cook the chicken for about 5-7 minutes on each side. Look for golden-brown edges. This means they are done and full of flavor. If grilling isn’t an option, you can cook the chicken on the stovetop or in the oven. Use a skillet on medium-high heat or bake at 400°F. Both methods will still give you tasty chicken gyros. When it comes to serving, how you arrange toppings matters. Place diced cucumbers, tomatoes, and red onions neatly in the pita. This makes your gyros eye-catching and inviting. You can serve gyros with a side of Greek salad or crispy fries. These options add color and texture to your meal. For a fun twist, wrap the gyros in parchment for easy handling. For the full recipe, check out the Delicious Greek Chicken Gyros. {{image_2}} You can easily switch up the protein in your gyros. Instead of chicken thighs, try using chicken breast. It cooks faster and can be just as tasty. You can also swap chicken for beef or lamb for a heartier flavor. If you prefer a meat-free meal, grill up some veggies. Bell peppers, zucchini, and eggplant work great. They add color and taste to your dish. Take the flavor of your gyros up a notch. Add spices like cumin or coriander to your marinade. Fresh herbs like mint or dill can also bring new life to your dish. For the Tzatziki sauce, try different styles. You can make it with Greek yogurt, or use sour cream for a creamier texture. Add garlic or lemon juice for a zesty kick. You can serve your gyros in many ways. Wrap them in pita bread for a fun, handheld meal. Or you can place everything on a platter for a family-style feast. If you want to change it up, try using lavash or tortillas instead of pita. Each type of bread adds a unique twist to your meal. For the full recipe, check out the Delicious Greek Chicken Gyros. Enjoy crafting your tasty variations! To keep your chicken gyros fresh, store them in the fridge. Place leftovers in an airtight container. They will stay good for up to three days. If you want to keep them longer, consider freezing. Wrap each gyro tightly in plastic wrap. Then, place them in a freezer bag. They can last for up to three months in the freezer. When it's time to enjoy your gyros again, you have options. You can reheat them in the oven or microwave. For the oven, preheat it to 350°F. Wrap the gyros in foil to keep them moist. Heat for about 15 minutes. If using the microwave, place the gyro on a plate. Heat it for 1-2 minutes. Be careful not to overheat; you want the toppings fresh. In the fridge, your chicken gyros will last for about three days. Look for signs of spoilage, like an off smell or changes in texture. If the chicken looks slimy or the veggies are wilting, it's best to toss them. Always trust your senses when checking for freshness! For the best taste, enjoy your gyros soon after making them. For the full recipe, check the earlier sections. Gyros and souvlaki are both Greek dishes, but they differ in how they are served. Gyros uses meat cooked on a vertical rotisserie, while souvlaki features skewered meat, grilled over an open flame. Gyros meat is usually sliced thin and served in pita bread with toppings. Souvlaki can be served on skewers or in pita as well. Yes, you can prepare chicken gyros ahead of time. Marinate the chicken and store it in the fridge for up to two hours. You can also cook the chicken in advance and store it in the fridge. When you are ready to eat, just warm the chicken and assemble your gyros. Making homemade Tzatziki sauce is easy. You need: - 1 cup plain Greek yogurt - 1 cucumber, grated and drained - 2 cloves garlic, minced - 1 tablespoon olive oil - 1 tablespoon fresh lemon juice - Salt and pepper to taste Mix all the ingredients in a bowl. Chill for at least 30 minutes before serving. You can serve many tasty sides with chicken gyros! Consider these options: - Greek salad - Roasted vegetables - Rice pilaf - Potato wedges These sides pair well and create a complete meal. Absolutely! This chicken gyros recipe is perfect for meal prep. You can cook the chicken and store it in the fridge. Pack the pitas and toppings separately to keep them fresh. This way, you can enjoy a delicious meal throughout the week. For the full recipe, check out the detailed instructions above. This article has covered how to make delicious chicken gyros at home. You learned about the main ingredients, cooking steps, and tips for the best taste. We explored variations and storage methods, so your gyros stay fresh longer. Remember, you can customize the recipe to fit your tastes. Enjoy the process, and have fun serving these tasty gyros to friends and family. With a little practice, you’ll impress everyone with your skills!

Easy Chicken Gyros Flavorful Homemade Delight

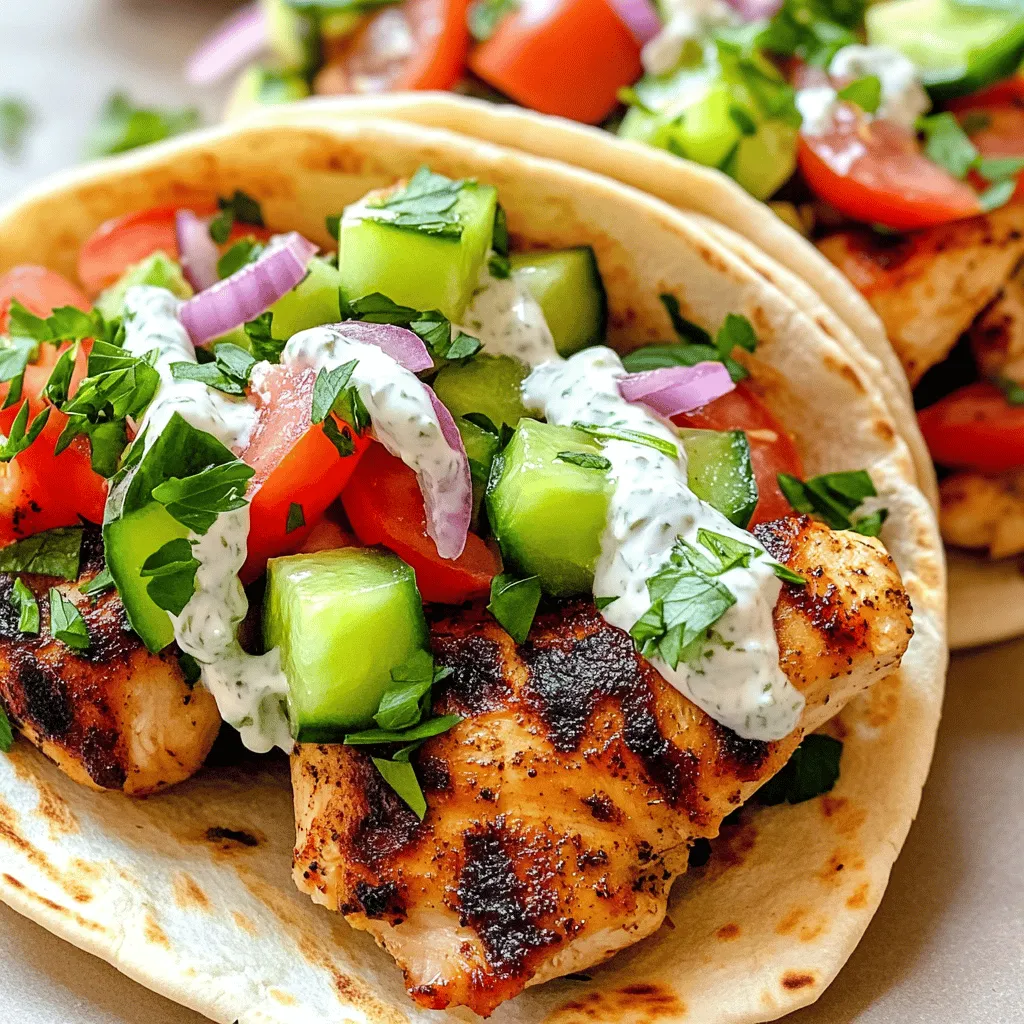
Are you craving a quick and tasty meal? Look no further than these Easy Chicken Gyros! With juicy chicken marinated

- 1 can (15 oz) chickpeas, drained and rinsed - 2 ripe avocados, diced - 1 cup cherry tomatoes, halved - 1 small red onion, finely chopped - 1 medium cucumber, diced The heart of this Avocado Chickpea Salad shines with chickpeas and avocados. Chickpeas pack protein and fiber. They fill you up and keep you satisfied. Avocados add creaminess and healthy fats. Their rich taste balances the salad perfectly. Cherry tomatoes bring a burst of sweetness. Their freshness brightens every bite. Red onion adds a sharp crunch. It gives depth to the salad. Cucumber contributes a cool, crisp texture. It keeps each mouthful refreshing. - 2 tablespoons olive oil - 1 tablespoon fresh lime juice - 1 teaspoon cumin - Salt and pepper to taste The dressing ties the salad together. Olive oil acts as a smooth base. It adds richness without overpowering. Fresh lime juice brightens the flavors. Its tangy taste complements the creamy avocado. Cumin gives a warm, earthy note. It enhances the overall flavor profile. Salt and pepper bring everything together. They add just the right amount of seasoning. - Additional herbs (e.g., parsley, basil) - Feta cheese - Bell peppers You can customize your salad further. Fresh herbs like parsley or basil add extra flavor. They enhance the freshness of the dish. Feta cheese brings a salty bite. It pairs well with the creamy avocado. Bell peppers add color and crunch. Their sweetness balances the salad's flavors. You can mix and match these add-ins to create your perfect bowl of goodness. For the full recipe, check out the detailed instructions. To start, gather your main ingredients. In a large bowl, combine: - 1 can (15 oz) chickpeas, drained and rinsed - 2 ripe avocados, diced - 1 cup cherry tomatoes, halved - 1 small red onion, finely chopped - 1 medium cucumber, diced - 1/4 cup fresh cilantro, chopped This mix brings a colorful and fresh vibe to your salad. Next, in a small bowl, whisk together your dressing. You’ll need: - 2 tablespoons olive oil - 1 tablespoon fresh lime juice - 1 teaspoon cumin - Salt and pepper to taste Make sure the dressing is smooth and well mixed. Now, it’s time to bring everything together. Drizzle the dressing over your salad mixture. Toss gently, but be careful not to mash the avocados. You want all the ingredients coated in that zesty dressing. Taste your salad. If it needs more flavor, adjust with extra lime juice, salt, or pepper. Let your salad sit for about 10 minutes. This resting time allows the flavors to meld perfectly. The longer it sits, the better it tastes! Serve chilled or at room temperature. This Avocado Chickpea Salad is a fresh and healthy delight that you’ll love. For the full recipe, check out the detailed steps above! Choosing ripe avocados is key for this salad. Look for avocados that yield slightly when you press them. This means they are soft but not mushy. If they are too firm, give them a few days to ripen at room temperature. When it comes to chickpeas, fresh is great, but canned chickpeas work well too. Canned chickpeas save time and are still tasty. Just be sure to rinse them well to remove excess salt. This salad shines when served with warm pita or crusty bread. You can also enjoy it as a dip. Pair it with crunchy veggies for a great snack. Add some feta cheese for extra creaminess and flavor. For a full meal, serve the salad alongside grilled chicken or fish. The fresh ingredients add a nice balance to hearty meats. If you want a vegan option, this salad is already perfect! Just skip the feta cheese. For gluten-free diets, enjoy this dish as is. It’s naturally gluten-free, so you can serve it safely to anyone avoiding gluten. Explore these tips to make your Avocado Chickpea Salad even better. For detailed steps, check the Full Recipe. {{image_2}} You can easily change the taste of your avocado chickpea salad. Try a spicy version! Add chopped jalapeños or a dash of hot sauce. This adds a kick of flavor that warms the palate. Another great option is a Mediterranean twist. Mix in some olives, feta cheese, and artichoke hearts. This gives your salad a unique and savory taste. Don't have chickpeas? Use quinoa or rice instead. These grains add a nice texture and make the salad filling. Just cook them first, then let them cool before mixing. You can also swap out chickpeas for other beans. Black beans or kidney beans work well too. They each bring their own flavor and nutrition to the dish. Add seasonal vegetables to keep things fresh. In spring, try peas or asparagus. In summer, bell peppers or zucchini shine. These veggies not only taste great, but they also add color and crunch. Adjust ingredients based on what’s available. This helps you use what’s fresh and in-season. Your salad can be new and exciting each time you make it! For the full recipe, check the details above. After you make your avocado chickpea salad, store any leftovers in the fridge. Use an airtight container to keep the salad fresh. Glass containers work best, as they do not stain or hold odors. You can also use plastic containers, but make sure they seal tightly. You can freeze avocado chickpea salad, but it may change texture. To freeze, place the salad in a freezer-safe bag. Remove as much air as possible before sealing. This helps prevent freezer burn. When you're ready to eat, thaw it in the fridge overnight. Note that the avocado may become mushy after freezing. To keep your ingredients fresh, buy them just before you plan to make the salad. Store avocados at room temperature. For long-term storage, place avocados in the fridge once they ripen. To avoid browning, squeeze fresh lime juice on the avocado pieces. This adds flavor and keeps them looking vibrant. To make this salad, follow these simple steps: 1. Start with a large bowl. Add 1 can of drained and rinsed chickpeas. 2. Next, add 2 diced ripe avocados. 3. Toss in 1 cup of halved cherry tomatoes. 4. Add 1 finely chopped small red onion and 1 diced medium cucumber. 5. For a fresh taste, include 1/4 cup of chopped cilantro. 6. In a smaller bowl, whisk 2 tablespoons of olive oil, 1 tablespoon of fresh lime juice, and 1 teaspoon of cumin. 7. Sprinkle salt and pepper to taste. 8. Drizzle the dressing over the salad mix. 9. Toss gently to combine without mashing the avocados. 10. Let it sit for about 10 minutes to let the flavors blend. 11. Serve chilled or at room temperature. You can find the Full Recipe for a detailed guide. If you want a different base, you have options. Try black beans for a rich flavor. White beans, like cannellini, work well too. For a gluten-free option, use quinoa. Lentils can add protein and texture. Just cook them first, then mix them in. Each choice will give a unique taste to your salad. This salad is best fresh but can last in the fridge for about 2 days. Store it in an airtight container. To keep it fresh, avoid mixing in dressing until ready to serve. If the avocados brown, add lime juice to slow this down. But for the best taste, enjoy it soon after making! This blog post guides you through making a tasty avocado chickpea salad. You learned about key ingredients, steps to prepare it, and helpful tips. I shared variations and storage info to keep your salad fresh. This salad is easy to make and fun to customize. Whether you add herbs or swap ingredients, it’s all about your taste. Enjoy your delicious creation and share it with friends and family!

Avocado Chickpea Salad Fresh and Healthy Delight

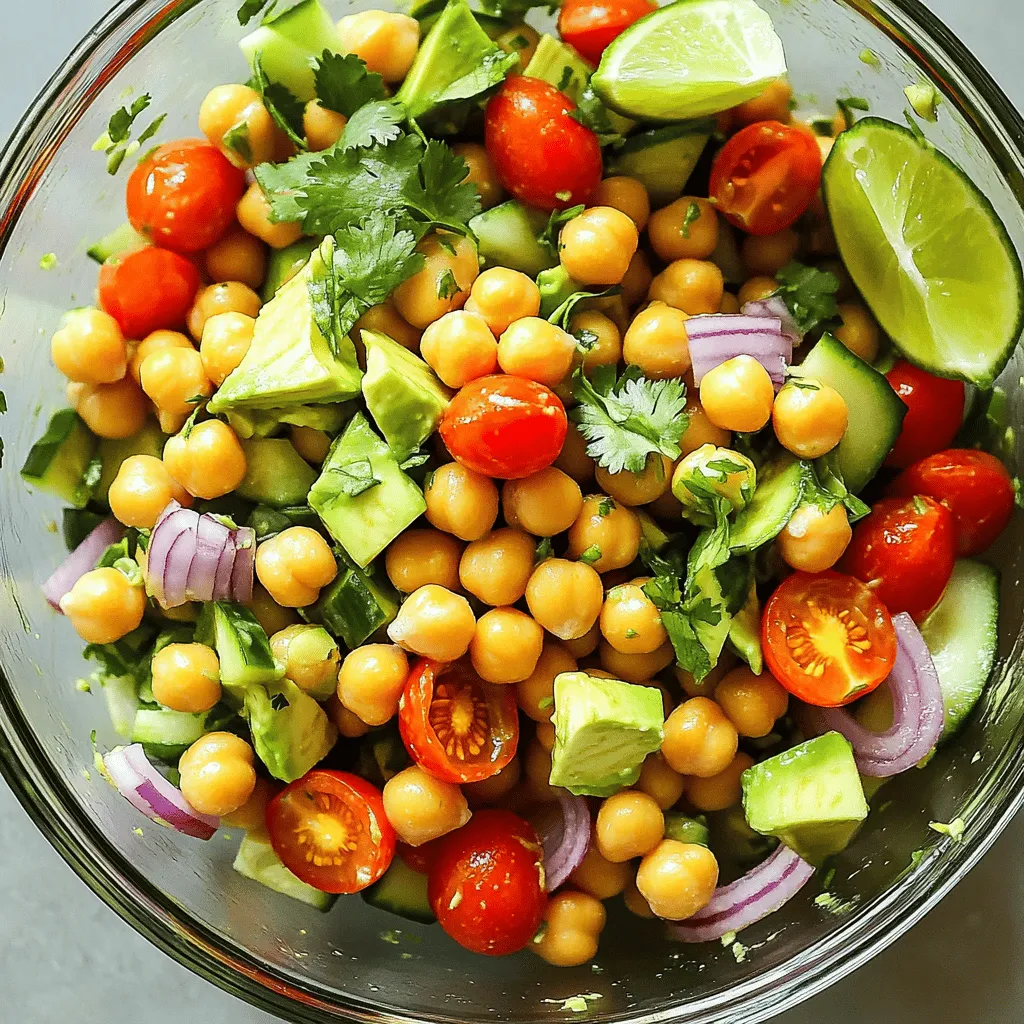
Looking for a fresh and healthy delight? You’ve found it! This Avocado Chickpea Salad is packed with flavor and nutrients.

- 12 oz (340 g) pasta (fusilli or penne recommended) - 2 tablespoons olive oil - 3 cloves garlic, minced - 4 cups vegetable broth - 1 cup ricotta cheese - Zest of 1 lemon - Juice of 1 lemon - 1 cup cherry tomatoes, halved - 1 cup fresh spinach - 1/2 cup grated Parmesan cheese (optional) - Salt and pepper to taste - Fresh basil leaves for garnish Using the right ingredients is key. I love using fusilli or penne pasta because they hold the sauce well. Olive oil adds richness, while garlic gives a nice kick. Vegetable broth adds flavor without being heavy. Ricotta cheese makes the dish creamy, while lemon zest and juice brighten everything up. Cherry tomatoes add sweetness and color, and spinach brings freshness. You can skip the Parmesan if you want a lighter dish, but it does add depth. A pinch of salt and pepper enhances all the flavors. Don't forget fresh basil for a lovely touch! - Large pot - Wooden spoon - Measuring cups and spoons - Knife and cutting board Having the right tools makes cooking easier. A large pot is best for this dish since it holds all the ingredients. A wooden spoon helps mix everything without scratching your pot. Measuring cups and spoons ensure you get the right amounts, and a good knife with a cutting board makes chopping easy. With these ingredients and tools, you're all set to make One-Pot Lemon Ricotta Pasta. Check out the Full Recipe for detailed steps! - Sauté garlic in olive oil - Add pasta and vegetable broth Start by taking a large pot. Heat 2 tablespoons of olive oil over medium heat. Add 3 minced garlic cloves. Sauté them for about 1-2 minutes. You want them fragrant but not browned. Next, add 12 ounces of your favorite pasta, like fusilli or penne. Pour in 4 cups of vegetable broth. Stir well to make sure the pasta is fully submerged. - Bring to boil and simmer - Mix in ricotta cheese, lemon zest, and juice Now, bring the pot to a boil. Once boiling, reduce the heat to low and cover. Let it simmer for about 10-12 minutes. Stir occasionally to prevent sticking. When the pasta is al dente, remove the pot from heat. Stir in 1 cup of ricotta cheese, the zest of 1 lemon, and the juice of 1 lemon. Mix until it becomes creamy and smooth. - Incorporate cherry tomatoes and spinach - Season and serve Now, add 1 cup of halved cherry tomatoes and 1 cup of fresh spinach. Gently fold them in and let them heat for 2-3 minutes. Season with salt and pepper to taste. If you like, stir in 1/2 cup of grated Parmesan cheese for extra creaminess. Serve the pasta hot, garnished with fresh basil leaves. You can find the Full Recipe for more details. Choosing the right pasta type is key. Fusilli or penne works best here. They hold the sauce well and cook evenly. The water-to-pasta ratio is also important. Use enough broth so the pasta cooks fully without drying out. A good rule is four cups of broth for every 12 oz of pasta. You can add herbs and spices to boost flavor. Fresh basil is a must for this dish. It gives a bright taste. You can also add a pinch of red pepper flakes for some heat. Adjust the lemon intensity to your liking. If you prefer a stronger lemon flavor, add more zest and juice. Taste as you go to find the perfect balance. Pair this pasta with a fresh salad or crusty bread. A side salad made of mixed greens works well. It adds crunch and freshness. For presentation, serve the pasta in bowls, topped with extra lemon zest and a sprinkle of fresh basil. A drizzle of olive oil on top can enhance the dish's look and flavor. Enjoy your meal! {{image_2}} You can change the cheese in this dish. Feta or goat cheese works well. These cheeses add a tangy flavor. You can also add vegetables for more color and taste. Asparagus or peas are great choices. They give a nice crunch and pair well with lemon. If you need gluten-free pasta, that is easy. Just swap regular pasta for gluten-free options. Look for corn or rice pasta. You can also make this dish vegan. Use plant-based ricotta or cashew cream instead. This way, you keep the creaminess without dairy. Changing the vegetables with the seasons is fun. In spring, add fresh peas or fava beans. In summer, toss in zucchini or bell peppers. For fall, try butternut squash or mushrooms. Each season brings new flavors. Adjusting the lemon flavor also helps. Use less lemon in the winter for warmth. In summer, a bit more lemon brightens the dish. To keep your leftover One-Pot Lemon Ricotta Pasta fresh, store it in the fridge. Use an airtight container to prevent drying out. Let the pasta cool down before sealing. This helps keep the flavors intact. Reheat your pasta on the stove for the best results. Add a splash of vegetable broth or water to keep it moist. Stir gently over low heat until warm. You can also use the microwave, but cover it to trap steam. This helps avoid dryness when reheating. Yes, you can freeze One-Pot Lemon Ricotta Pasta! For best results, let it cool completely first. Then, portion it into freezer-safe bags or containers. Remove as much air as possible. Label them with the date and use within three months for best quality. Yes, you can use other cheeses. Feta or goat cheese work well. They add a nice tangy flavor. You can also try cream cheese for a smooth texture. Just remember, each cheese will change the taste a bit. If you want a creamy texture without ricotta, use cream cheese. You can also blend silken tofu. This gives a smooth feel without the dairy. For a lighter option, try using cashew cream. Just soak cashews in water, then blend until smooth. Yes, you can make a vegan version! Swap ricotta for blended silken tofu or cashew cream. Use vegetable broth for cooking the pasta. Add fresh veggies like spinach and tomatoes for color and flavor. This way, you keep it tasty and plant-based. You now know how to make a quick and tasty One-Pot Lemon Ricotta Pasta. From gathering simple ingredients to cooking it in one pot, this dish is easy. Use different cheeses or veggies to make it your own. Remember to follow storage tips so you can enjoy leftovers. Cooking should be fun and stress-free. With this guide, you can prepare a meal that not only tastes great but also brings joy. Enjoy your cooking adventure!

One-Pot Lemon Ricotta Pasta Easy Weeknight Meal

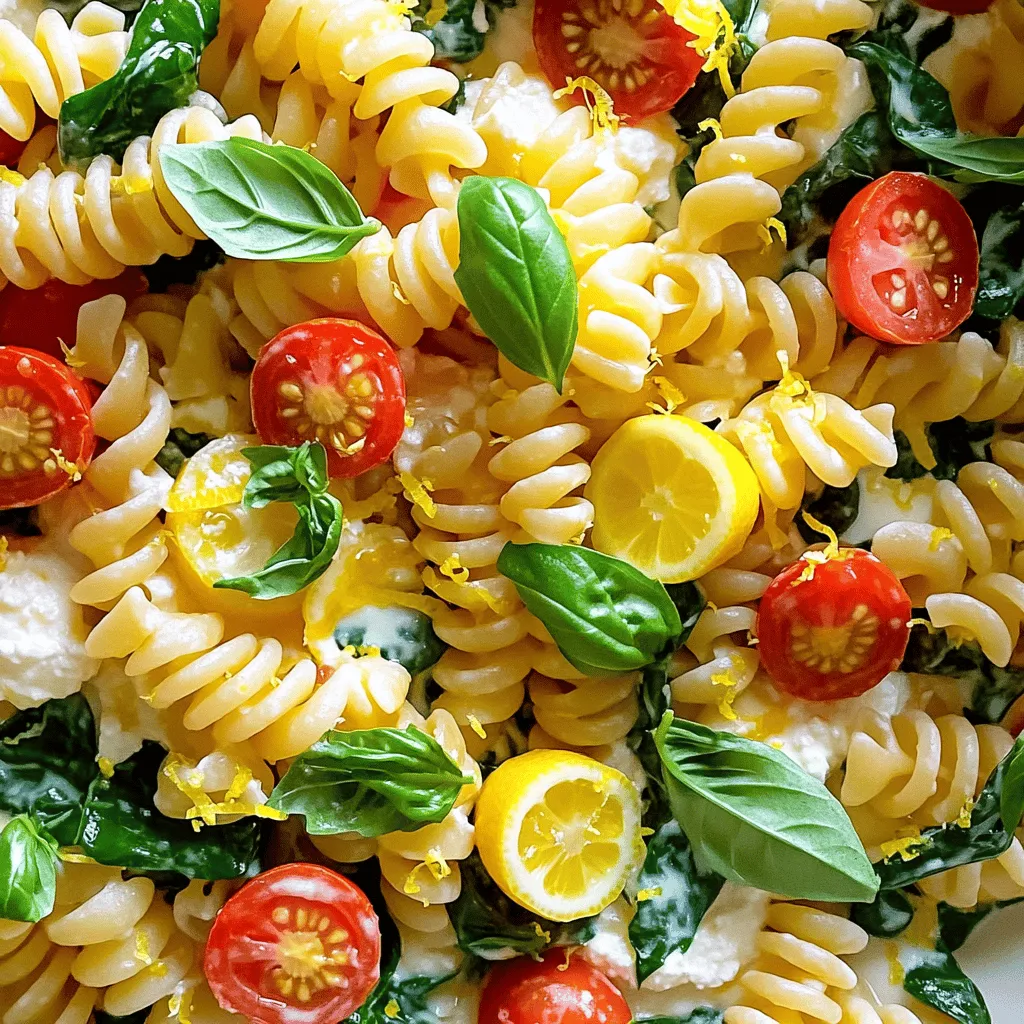
Are you looking for a quick, tasty meal? This One-Pot Lemon Ricotta Pasta is just what you need. With fresh

For a tasty barbecue chicken pizza, gather the following items: - Pre-made pizza crust - 1 cup cooked chicken, shredded - 1/2 cup barbecue sauce (your favorite brand) - 1 cup shredded mozzarella cheese - 1/2 red onion, thinly sliced - 1/2 cup cheddar cheese, shredded - 1/4 cup fresh cilantro, chopped - 1/2 teaspoon smoked paprika - 1/4 teaspoon black pepper - Olive oil for brushing Each ingredient plays a key role. The pre-made pizza crust saves time. Shredded chicken gives it a hearty base. Choose a barbecue sauce that you love, as it adds the main flavor. Mozzarella provides creaminess, while cheddar adds a sharp bite. The red onion brings a bit of crunch, and cilantro adds freshness. Spices like smoked paprika and black pepper enhance the taste. Olive oil helps the crust crisp up nicely. This combination makes the pizza a delight! For the full recipe, check out the detailed steps. To start, take your cooked chicken and shred it into small pieces. I use a fork for this. Next, put the shredded chicken into a mixing bowl. Pour in your favorite barbecue sauce. I recommend about half a cup for great flavor. Mix the chicken and sauce well. Every piece should get coated evenly. Now, let’s add some spices. Sprinkle in the smoked paprika and black pepper. These spices give the chicken an extra kick. Stir everything together one more time. This mixture is key for a tasty pizza. Grab your pre-made pizza crust. First, brush the crust lightly with olive oil. This step helps the base get crispy. Now, take the chicken mixture and spread it evenly over the crust. Leave a small border for the crust. Next, sprinkle a cup of mozzarella cheese on top of the chicken. Follow this with the sliced red onions. Finally, add half a cup of shredded cheddar cheese. Make sure to cover the chicken well. This cheese blend melts perfectly. Preheat your oven to 450°F (230°C). This temperature helps the pizza cook evenly and get that nice golden color. Once your oven is hot, place the pizza inside. Bake it for 12 to 15 minutes. You’ll know it’s ready when the crust looks golden and the cheese is bubbling. After baking, let it cool for a couple of minutes. Then, top it with fresh cilantro for a burst of flavor. Enjoy your barbecue chicken pizza! For more details, check the Full Recipe. To get a crispy pizza crust, I always preheat my oven to a high temperature. A hot oven makes a big difference. I brush the crust lightly with olive oil. This adds flavor and helps it crisp up. You can also use melted butter if you want a richer taste. For a great flavor, I suggest adding spices like smoked paprika and black pepper. These spices boost the taste of the chicken. You can also try adding garlic powder or onion powder for more depth. The barbecue sauce is sweet, so I balance it with savory toppings like red onion. This mix of sweet and savory makes each bite exciting. I often see people undercook the chicken. Make sure your chicken is fully cooked before adding it to the pizza. This keeps everyone safe and tastes better. Also, avoid adding too many toppings. When you overload a pizza, it can get soggy. Less is often more here, so keep it simple with just the right amount of ingredients. {{image_2}} You can choose from sweet or spicy barbecue sauces. Sweet sauces add a nice glaze, while spicy sauces bring heat. Each option changes the taste of your pizza. I love mixing different sauces for a unique flavor. You can also make your own sauce at home. Combine ketchup, honey, and a touch of vinegar for a quick mix. If you want a vegetarian option, use grilled vegetables or tofu. Both add great flavor and texture. You can also try other meats, like pulled pork or beef brisket. These options create a hearty meal that everyone will enjoy. Get creative with your toppings! Fruits like pineapple can add sweetness. The mix of sweet and savory works well on pizza. You might also like adding jalapeños for some heat. They give the pizza an exciting kick. Feel free to experiment with other toppings to find your favorite combination. To keep your barbecue chicken pizza fresh, store leftovers properly. First, let the pizza cool down. Then, place the slices in an airtight container. You can also use plastic wrap to cover the pizza. If you have a lot of pizza, you can stack slices with parchment paper in between. This helps prevent them from sticking together. If you want to keep the pizza longer, freeze it. Wrap each slice tightly in plastic wrap, then place them in a freezer bag. Make sure to remove as much air as possible. Leftover pizza can last in the freezer for up to three months. When it comes to reheating, the oven is your best friend. Preheat your oven to 375°F (190°C). Place the pizza on a baking sheet and heat it for about 10 minutes. This method keeps the crust crispy and the cheese nice and gooey. If you're in a hurry, the microwave works too, but it can make the crust soft. To avoid this, place a cup of water in the microwave with the pizza. The steam helps keep the crust from getting too chewy. Heat it for only 30 to 60 seconds. Enjoy your pizza just like it was fresh from the oven! For the full recipe of Barbecue Chicken Pizza, check the earlier sections. To make barbecue chicken pizza from scratch, you start with dough. Mix flour, yeast, salt, and water. Knead the dough until smooth, then let it rise for about an hour. Once it's doubled in size, roll it out to your desired shape. Preheat your oven to 450°F (230°C). Next, brush the rolled dough with olive oil. Spread your favorite barbecue sauce evenly on top. Then, add shredded cooked chicken mixed with more barbecue sauce. Top it with mozzarella and cheddar cheese. Bake for 12-15 minutes until the crust is golden. The best cheeses for barbecue chicken pizza are mozzarella and cheddar. Mozzarella melts well and gives a great stretch. Cheddar adds a sharp, rich flavor that balances the sweetness of the barbecue sauce. You can also mix in a bit of gouda for a smoky taste. Yes, you can make barbecue chicken pizza ahead of time. Prepare the chicken mixture and store it in the fridge. You can also prepare the dough a day in advance and keep it in the fridge. Just remember to let it rise before baking. This way, you save time when you are ready to bake. Barbecue chicken pizza pairs well with fresh sides. A simple garden salad with a light vinaigrette is great. You can also serve it with a creamy coleslaw for crunch. Dips like ranch or blue cheese add a nice touch too. Enjoy these sides for a complete meal. You learned how to make a delicious barbecue chicken pizza. We covered easy ingredients, step-by-step instructions, and helpful tips. Remember to avoid common mistakes for the best results. Feel free to try different sauces and toppings to make it your own. Storing and reheating the leftovers correctly keeps them tasty. Enjoy your pizza-making journey and savor each bite. Your friends and family will love this meal!

Barbecue Chicken Pizza Delightful and Easy Recipe

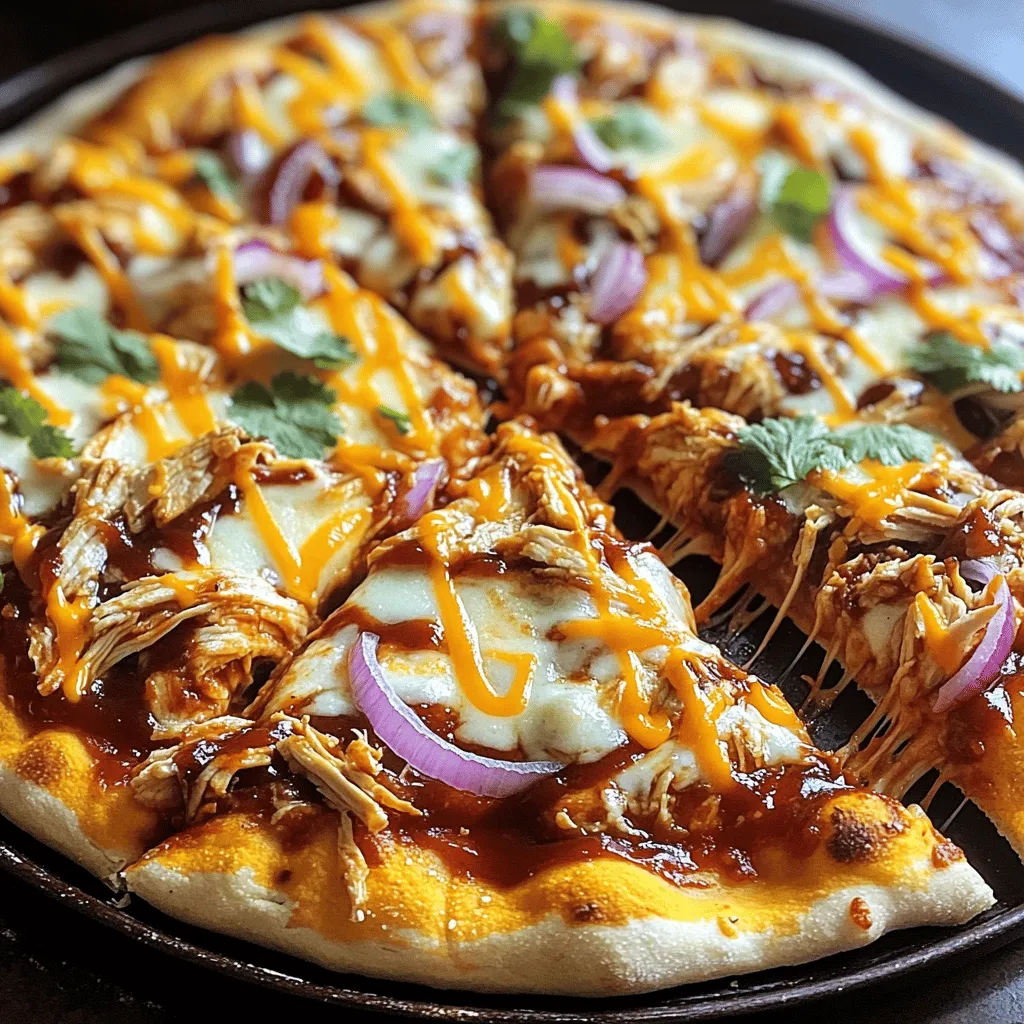
Craving a tasty and easy meal? Barbecue Chicken Pizza is the answer! This delightful dish combines tender chicken, zesty barbecue

This Easy Pad Thai recipe is simple and quick. It uses fresh ingredients for a tasty meal. You can prepare it in about 25 minutes. - 8 oz flat rice noodles - 2 tablespoons vegetable oil - 2 cloves garlic, minced - 1 cup shrimp (or tofu) - 2 eggs, lightly beaten - 1 cup bean sprouts - 1/2 cup green onions, sliced - 1/4 cup crushed peanuts - 3 tablespoons fish sauce (or soy sauce) - 2 tablespoons tamarind paste - 1 tablespoon brown sugar - Lime wedges and fresh cilantro for garnish Each ingredient plays a key role. The flat rice noodles provide a soft base. The shrimp or tofu adds protein. Garlic gives a strong flavor. The bean sprouts and green onions add crunch and freshness. Fish sauce or soy sauce brings saltiness to the dish. Tamarind paste offers a sweet and sour taste. Brown sugar balances the flavors well. Finally, crushed peanuts and lime wedges add a nice touch for serving. Use fresh vegetables and proteins for the best taste. This Pad Thai is fun to make and share! You can find the Full Recipe to start cooking today. First, boil water in a big pot. Add the flat rice noodles once the water boils. Cook them according to the package instructions. This usually takes about 5-7 minutes. Once soft, drain the noodles and set them aside. It’s important not to overcook them, as they will stick together later. Next, heat vegetable oil in a large pan or wok over medium-high heat. Add minced garlic and cook for about 30 seconds. This step makes the kitchen smell amazing! Then, add shrimp or tofu to the pan. Cook for about 2-3 minutes until they are fully cooked. If using shrimp, it will turn pink. Once cooked, push everything to one side of the pan. Then, pour the beaten eggs into the empty side of the pan. Scramble them until just set. Once they’re cooked, mix the eggs with the shrimp or tofu. This adds protein and flavor to your dish. Now, it’s time to bring it all together. Add the cooked rice noodles into the pan. Pour in the fish sauce, tamarind paste, and brown sugar. Toss everything together to coat the noodles well. The sauce gives the Pad Thai its signature taste. Then, add the bean sprouts and green onions. Stir-fry for 2-3 more minutes until everything is hot. Remove from heat and taste your dish. Adjust the seasoning if you want it saltier or sweeter. Serve your Easy Pad Thai hot. Garnish with crushed peanuts, fresh cilantro, and lime wedges. This adds a nice crunch and fresh flavor. For the full recipe, check the ingredients list above! To get the best noodles, always follow the package instructions. Soak the flat rice noodles in hot water until they are soft. This usually takes about 10 minutes. After soaking, drain them well. Do not overcook them, or they will turn mushy. A quick toss in the pan will keep them firm and chewy. Flavor is key in Pad Thai. Use fresh garlic for a great taste. Fish sauce or soy sauce adds a savory edge. Tamarind paste gives that unique sour note. Balance these flavors with a bit of brown sugar. You can taste and adjust as you cook. If you want more spice, add chili flakes or fresh peppers while cooking. You can easily make this dish fit your needs. For a vegetarian option, swap shrimp for tofu. Use soy sauce instead of fish sauce. Want it gluten-free? Choose gluten-free soy sauce. Add more veggies, like bell peppers or carrots, for extra crunch. You can make it your own while still keeping it delicious! For the full recipe, check out the Easy Pad Thai section. {{image_2}} You can make a tasty vegetarian Pad Thai easily. Just swap shrimp for tofu. Tofu soaks up flavors well. Use firm tofu for the best texture. You can also add more veggies. Try bell peppers, carrots, or broccoli. They add crunch and color. Use soy sauce instead of fish sauce. This keeps it plant-based and still tasty. Beyond shrimp and tofu, you have choices. Chicken or beef can work great too. Slice them thin for fast cooking. Keep in mind that different proteins change the taste. Each choice brings its own twist. You can even use tempeh or seitan for a unique flavor. Experiment to see what you like best. Adjusting flavors is key to a great Pad Thai. Love spice? Add chili flakes or sriracha. Want it sweeter? Toss in more brown sugar. For a zesty kick, add more lime juice. If you prefer a richer taste, use more tamarind paste. Each change can create a new dish. Don’t be afraid to get creative and make it yours! To keep your Easy Pad Thai fresh, let it cool first. Place it in an airtight container. You can store it in the fridge for up to three days. Make sure to label the container with the date. This way, you will know when to eat it. If the noodles seem dry, add a bit of water or sauce when you reheat. When you're ready to enjoy your leftovers, reheat them on the stove. Place the Pad Thai in a pan over medium heat. Add a splash of water or oil to help it heat evenly. Stir gently until hot. You can also use the microwave. Transfer the Pad Thai to a microwave-safe dish. Cover it loosely and heat in 30-second bursts, stirring in between. You can freeze Pad Thai for longer storage. First, let it cool completely. Then, portion it into freezer bags. Remove as much air as possible before sealing. Pad Thai can last for about two months in the freezer. When you're ready to eat it, thaw it overnight in the fridge. Reheat it on the stove for the best texture. Enjoy your delicious meal anytime! You can use lime juice as a substitute. Lime juice gives a nice tang. You could also try brown sugar mixed with a little vinegar. This mix can mimic the sweet and sour taste of tamarind. Yes, you can! Use soy sauce instead. It adds umami flavor, just like fish sauce. If you want a deeper taste, add a bit of miso paste. This keeps the dish rich and savory. Pad Thai stays fresh for about three days in the fridge. Make sure to store it in an airtight container. This keeps the noodles from getting too mushy. When you reheat, add a splash of water for moisture. Yes! If you cannot find flat rice noodles, use spaghetti or linguine. They work well in a pinch. Just cook them until al dente to avoid mushiness. Pad Thai can be gluten-free if you use rice noodles and gluten-free soy sauce. Always check the labels to ensure they are certified gluten-free. This way, you can enjoy the dish without worry. Absolutely! Feel free to add bell peppers, carrots, or snap peas. These veggies add color and crunch. Just toss them in during the stir-fry step to keep them crisp. If you like heat, add chili flakes or sliced fresh chili. You can also drizzle in sriracha before serving. Adjust the spice level to fit your taste. Enjoy the kick! This blog post shared a complete guide to making Pad Thai. You learned about the essential ingredients, step-by-step cooking instructions, and helpful tips for success. I also covered ways to customize the dish for different diets. In summary, you now have the tools to make a tasty meal. Enjoy your cooking and savor each bite of your Pad Thai creation!

Easy Pad Thai Simple and Flavorful Home Recipe

Craving a delicious meal that’s easy to make at home? Look no further! In this post, I’ll guide you through

To make delicious Jalapeño Popper Chicken, you will need these key items: - 4 boneless, skinless chicken breasts - 1 cup cream cheese, softened - 1 cup shredded cheddar cheese - 1/2 cup diced jalapeños (fresh or pickled) - 1/2 teaspoon garlic powder - 1/2 teaspoon onion powder - Salt and pepper to taste - 1 cup panko breadcrumbs - 1 tablespoon olive oil - Fresh cilantro or green onions for garnish You can tweak the recipe for added taste. Consider these optional ingredients: - 1/4 teaspoon smoked paprika for a smoky touch - 1/2 cup cooked bacon bits for crunch - 1 tablespoon lime juice for a fresh zing - A sprinkle of cumin for warmth If you lack some ingredients, don’t worry! Here are some good swaps: - Use Greek yogurt instead of cream cheese for a lighter option. - Swap cheddar cheese with Monterey Jack or pepper jack for more heat. - Try crushed tortilla chips instead of panko for a different crunch. - Use chicken thighs if you prefer dark meat. You can find the full recipe for this tasty dish by clicking [Full Recipe]. First, preheat your oven to 375°F (190°C). This ensures even cooking. In a bowl, mix your cream cheese, shredded cheddar cheese, diced jalapeños, garlic powder, onion powder, salt, and pepper. Stir until everything is well mixed. Next, take a sharp knife and create pockets in each chicken breast. Slice them horizontally, but don’t cut all the way through. This step allows for stuffing. Now, fill each chicken breast pocket with the cheese and jalapeño mix. If needed, use toothpicks to hold the opening closed. In a shallow dish, combine panko breadcrumbs with olive oil. Mix until the breadcrumbs are coated. Take each stuffed chicken breast and coat it in the panko mixture. Make sure to cover each piece completely. Place the coated chicken breasts on a greased baking sheet. Bake them in the preheated oven for 25 to 30 minutes. You want the chicken to be cooked through and the outside golden brown. Once done, remove them from the oven and let them rest for a few minutes. Before serving, garnish with fresh cilantro or chopped green onions. You can find the full recipe for Jalapeño Popper Chicken in the earlier section. To keep your chicken juicy, choose boneless, skinless breasts. Make sure they are fresh and not frozen. When you cut pockets in the chicken, do it gently. This helps hold in the filling. Bake at a steady temperature of 375°F (190°C). This ensures even cooking. Use a meat thermometer to check for doneness. The chicken should reach 165°F (74°C). Let the chicken rest for a few minutes before serving. This allows the juices to redistribute, making each bite tender. One common mistake is overcooking the chicken. Keep an eye on the time, and check the temperature. Another mistake is not sealing the pockets well. Use toothpicks if needed to keep the filling inside. If you skip the panko coating, the chicken may lack crunch. Make sure to coat each piece fully. Lastly, don’t forget to season well. A pinch of salt and pepper enhances the flavors of the dish. For this recipe, you will need a sharp knife to cut the chicken. A mixing bowl helps combine the filling ingredients. Use a baking sheet lined with parchment paper for easy cleanup. A meat thermometer is key to ensuring your chicken is cooked safely. Pans for mixing and dredging will make the process smoother. Lastly, have a toothpick or two handy for securing the chicken pockets. Following these tips will help you create the perfect Jalapeño Popper Chicken. You can find the full recipe above for your convenience. {{image_2}} If you love heat, try adding more jalapeños. You can use diced habaneros for a fiery kick. Another option is to mix in some spicy pepper jack cheese. This adds flavor and heat. You can also top the chicken with a drizzle of hot sauce before baking. This gives it an extra layer of spice. For a low-carb version, swap out the panko breadcrumbs. You can use crushed pork rinds instead. They add crunch without the carbs. Also, use full-fat cream cheese and cheddar cheese. This keeps the dish rich and tasty while staying keto-friendly. Serve it with a fresh salad for a complete meal. If you're looking for a vegetarian option, use stuffed peppers instead of chicken. Mix cream cheese, cheddar, and jalapeños, then fill halved bell peppers. Bake them until soft and bubbly. Another idea is to use portobello mushrooms. They provide a meaty texture and soak up flavors well. Both options are delicious and satisfying. For the full recipe, check out Jalapeño Popper Chicken Delight. After you enjoy your Jalapeño Popper Chicken, let it cool. Place any leftovers in an airtight container. Keep it in the fridge for up to three days. Make sure to store the chicken away from strong-smelling foods to avoid any flavor mix-ups. To reheat, preheat your oven to 350°F (175°C). Place the chicken on a baking sheet. Cover it with foil to keep it moist. Heat for about 15-20 minutes or until it warms through. You can also use a microwave, but the oven keeps it crispy. If you want to save some for later, you can freeze this dish. Wrap each chicken piece tightly in plastic wrap. Place the wrapped chicken in a freezer-safe bag. It can stay good for up to three months. When you are ready to eat, thaw it in the fridge overnight before reheating. Try to avoid refreezing once it's thawed. For the full recipe, check out the details above. Yes, you can swap cheeses! Cream cheese gives a smooth texture, but you can try other kinds. Mozzarella offers a great melt, while pepper jack adds more spice. Feel free to mix and match to find your favorite combo! You can prep this dish a day in advance. Follow the steps, but don’t bake it yet. Store the stuffed chicken in the fridge. When you're ready, bake it straight from the fridge. Just add a few extra minutes to the cooking time. Many sides go great with Jalapeño Popper Chicken. Here are a few ideas: - Rice: Fluffy white or brown rice works well. - Salad: A fresh green salad adds crunch. - Vegetables: Roasted or steamed veggies balance the meal. - Potatoes: Mashed or baked potatoes are always a hit. Yes, you can grill Jalapeño Popper Chicken! Use a medium heat and grill for about 6-8 minutes per side. Make sure the chicken reaches 165°F (75°C) inside. Grilling adds a nice smoky flavor that is hard to resist! For a full recipe, check out the details above. We explored how to make Jalapeño Popper Chicken, from ingredients to cooking tips. I shared key steps for juicy chicken, ingredient swaps, and flavorful variations. Remember to store leftovers properly to enjoy later. Cooking should be fun and simple, so use these guidelines to make your dish shine. With practice, you’ll impress family and friends with your cooking skills. Embrace creativity with this recipe, and have fun in the kitchen!

Jalapeño Popper Chicken Flavorful and Easy Recipe

If you crave a dish that’s packed with flavor but easy to make, you’ll love Jalapeño Popper Chicken. This recipe

Garlic Parmesan Roasted Broccoli is a tasty veggie dish. This recipe is easy and quick. You can make it in just 30 minutes. It serves about four people. You will love the mix of garlic and cheese. It makes broccoli shine on your plate. To make this dish, you need these key ingredients: - 1 large head of broccoli, cut into florets - 3 tablespoons olive oil - 4 cloves garlic, minced - 1/2 cup grated Parmesan cheese - 1 teaspoon lemon zest - Salt and pepper to taste These ingredients come together for a great flavor. The olive oil helps the broccoli roast well. Garlic adds a strong, rich taste. Parmesan gives a nice cheesy touch. You may want to add a few optional ingredients to boost the dish: - 1/2 teaspoon red pepper flakes (optional) - 2 tablespoons fresh parsley, chopped (for garnish) Red pepper flakes give a little heat. They make the dish more exciting. Fresh parsley adds color and freshness. You can use these options to match your taste. For the full recipe, check out the detailed instructions. To start, gather your ingredients. You need: - 1 large head of broccoli, cut into florets - 3 tablespoons olive oil - 4 cloves garlic, minced - 1/2 cup grated Parmesan cheese - 1 teaspoon lemon zest - 1/2 teaspoon red pepper flakes (optional) - Salt and pepper to taste - 2 tablespoons fresh parsley, chopped (for garnish) Preheat your oven to 400°F (200°C). Line a baking sheet with parchment paper. This step keeps the broccoli from sticking. In a large bowl, mix the broccoli florets, olive oil, minced garlic, lemon zest, red pepper flakes, salt, and pepper. Toss everything well. Make sure the broccoli is coated evenly. Spread the broccoli in a single layer on the prepared baking sheet. This helps it roast evenly. Place the sheet in the oven and roast for about 15 minutes. After 15 minutes, take it out. Sprinkle the grated Parmesan cheese over the broccoli. Return it to the oven and roast for another 10-12 minutes. Look for melted cheese and crispy edges. To make sure your broccoli turns out crispy, avoid overcrowding the baking sheet. If the florets are too close, they will steam instead of roast. You can also try using a convection setting on your oven if you have it. This helps circulate hot air. For an extra crunch, you can broil the broccoli for 1-2 minutes at the end. Just watch it closely to avoid burning. For the full recipe, check out the complete instructions for Garlic Parmesan Roasted Broccoli. To get the best flavor from broccoli, start by picking fresh heads. Look for deep green florets and firm stems. Cut the broccoli into even florets. This helps them cook at the same rate. Wash them well to remove any dirt. Pat them dry with a towel to ensure they roast nicely. Drizzle olive oil generously. This helps the garlic and cheese stick while adding flavor. You can easily change this dish to suit your taste. Try adding lemon juice for extra zing. If you like heat, increase the red pepper flakes. You can also swap in other cheeses. Grated Pecorino Romano or shredded mozzarella work great too. For a twist, toss in some cherry tomatoes or bell peppers with the broccoli. This adds color and nutrition to your meal. Serve Garlic Parmesan Roasted Broccoli as a side dish with grilled chicken or fish. It also pairs well with pasta dishes for a veggie boost. For a fun twist, chop it up and mix it into a salad. You could even use it as a topping on a pizza. The options are endless! Enjoy this dish warm for the best taste. Check the Full Recipe for more details. {{image_2}} You can swap out Parmesan for other cheeses. Here are some tasty options: - Pecorino Romano: This cheese is saltier and has a strong flavor. - Asiago: It melts well and adds a nutty taste. - Cheddar: Sharp cheddar gives a creamy and rich flavor. - Feta: Crumbled feta adds a tangy twist. Mixing different cheeses can surprise your taste buds and keep meals fresh. Want to make this dish heartier? Add protein! Here are some great ideas: - Chicken: Diced chicken breast cooks well with broccoli. - Shrimp: Shrimp roast quickly and pair nicely with the cheese. - Tofu: Firm tofu can soak up flavors and adds texture. - Chickpeas: Roasted chickpeas add crunch and protein. These additions turn your side dish into a full meal that satisfies. You can easily adapt this recipe for different diets. For vegetarians, simply use different cheeses. If you want it vegan, try these swaps: - Nutritional Yeast: This gives a cheesy flavor without dairy. - Vegan Cheese: Many brands offer great plant-based options. - Olive Oil: Use this as your base fat. These options ensure everyone can enjoy this tasty dish. Check the Full Recipe for more details! Once you finish your meal, allow the Garlic Parmesan roasted broccoli to cool. Place the leftovers in an airtight container. Store them in the fridge. They will stay fresh for about 3 to 4 days. This method keeps the flavors intact. To reheat, preheat your oven to 350°F (175°C). Spread the broccoli on a baking sheet. Bake for about 10 to 15 minutes. This method helps to keep the broccoli crispy. You can also use a microwave. Heat in short bursts, checking often, for about 1 to 2 minutes. If you want to freeze Garlic Parmesan roasted broccoli, let it cool completely first. Place it in a freezer-safe bag or container. It can last for up to 3 months in the freezer. When you're ready to use it, thaw in the fridge overnight before reheating. This keeps the taste and texture nice. For the best flavor, enjoy it fresh, but freezing is a great option! Want the full recipe? Check it out [here](#). Yes, you can use frozen broccoli. Just make sure to thaw it first. Pat it dry to remove extra moisture. This will help it roast better. Frozen broccoli may not get as crispy as fresh, but it still tastes great. If you don’t have Parmesan cheese, try using Pecorino Romano. It has a similar taste. Nutritional yeast is a good dairy-free option. It adds a cheesy flavor without any dairy at all. You can also use any hard cheese you like. To make this dish ahead, prepare the broccoli and coat it with oil and spices. Store it in the fridge for up to two days. When you’re ready, roast it in the oven. Just add a few extra minutes to the cooking time. Enjoy this flavorful veggie dish at your convenience. Check out the Full Recipe for more details! This blog post explored how to make Garlic Parmesan Roasted Broccoli. We discussed key ingredients, offered step-by-step instructions, and shared helpful tips for crispiness. You learned how to customize the dish with different herbs and proteins, plus variations for vegetarian and vegan diets. Storing leftovers properly keeps your meal fresh. Remember, you can always experiment with flavors to make this dish your own. Enjoy the process and keep cooking delicious meals!

Garlic Parmesan Roasted Broccoli Flavorful Veggie Dish

Looking for a tasty veggie side dish? Garlic Parmesan Roasted Broccoli is full of flavor and super easy to make!

To make a great Moroccan chickpea stew, you need some key items. Here’s what you’ll need: - 1 can (15 oz) chickpeas, drained and rinsed - 1 large onion, chopped - 3 cloves garlic, minced - 2 medium carrots, diced - 1 red bell pepper, chopped - 1 zucchini, diced - 1 can (14 oz) diced tomatoes, with juices - 2 cups vegetable broth - 1 tablespoon olive oil - 1 teaspoon ground cumin - 1 teaspoon ground coriander - 1 teaspoon ground cinnamon - 1 teaspoon smoked paprika - Salt and pepper, to taste - Fresh cilantro or parsley, for garnish These ingredients form the base of your stew. The chickpeas add protein, while the veggies provide great texture and flavor. You can boost the flavor with a few extra items. Consider adding: - 1 cup cooked quinoa or couscous This optional ingredient makes your meal more filling. It also adds a nice texture to the dish. If you don’t have certain items, don’t worry! Here are some swaps: - Use dried chickpeas instead of canned. Just cook them first. - Swap the zucchini for eggplant or spinach. - Use any broth you have on hand – chicken or vegetable works great. These substitutions allow you to customize the stew to your taste. You can still enjoy a hearty meal even if you’re missing a few ingredients. For the complete recipe, check out the Full Recipe section. Start by heating the olive oil in a large pot over medium heat. Once hot, add the chopped onion. Sauté the onion for about five minutes until it becomes soft. Next, add minced garlic and cook for one more minute. The garlic should smell great and fragrant. Now, add the diced carrots and red bell pepper to the pot. Cook these veggies for five minutes, stirring them often. This helps them soften and mix well. After the vegetables soften, stir in the diced zucchini. Now it's time to add the spices: ground cumin, coriander, cinnamon, and smoked paprika. Cook for another two to three minutes. This helps to bring out the flavor of the spices. Next, add the drained chickpeas and diced tomatoes with their juices to the pot. Pour in the vegetable broth too. Bring everything to a boil, then reduce the heat to low. Let the stew simmer for about 20 to 25 minutes. Stir it occasionally to prevent sticking. If you want a thicker stew, lightly mash some chickpeas against the pot with a fork. This adds a nice, creamy texture. When it's done cooking, season it with salt and pepper to taste. Remove the pot from the heat and let it rest for a few minutes. Serve it hot, garnished with fresh cilantro or parsley. You can enjoy it plain or over cooked quinoa or couscous for a complete meal. For more details, refer to the Full Recipe. To get the best flavor, start with good ingredients. Choose fresh, ripe vegetables. The spices are key too. Use ground cumin, coriander, cinnamon, and smoked paprika. Toast them in the pot first. This brings out their flavors and makes your stew pop. You can also add a splash of lemon juice at the end. It brightens the dish and adds a fresh taste. Adjusting spice levels is easy. If you want more heat, add red pepper flakes. Start with a pinch, then taste. You can always add more. If the stew is too spicy, add a bit of honey or sugar. This helps balance the heat. You can also add more broth to tone it down. To thicken the stew, mash some chickpeas with a fork. This adds creaminess without extra ingredients. You can also cook it longer to reduce the liquid. If you want a lighter stew, add more broth or water. This makes it soupy, which is nice too. For a heartier meal, serve it over quinoa or couscous. Check the full recipe for more tips! {{image_2}} You can customize your Moroccan chickpea stew with other vegetables. Try adding sweet potatoes for a nice texture. Spinach or kale can give a fresh taste and more nutrients. Eggplant adds richness, while butternut squash brings sweetness. Feel free to mix and match based on what you enjoy or have on hand. For added protein, you can include meat or tofu. Chicken or lamb works well with the stew’s spices. Simply brown the meat before adding other ingredients. If you prefer plant-based options, try firm tofu. Cut it into cubes and add it with the chickpeas. Both choices will make your meal more filling. Pair your stew with a side that complements its flavors. Warm, crusty bread is perfect for dipping. You can also serve it over fluffy quinoa or couscous to soak up the sauce. A dollop of yogurt adds creaminess. Fresh herbs like cilantro or parsley bring brightness to each bite. For the full recipe, check the link above. After enjoying your Moroccan chickpea stew, let it cool to room temperature. Transfer it into an airtight container. Make sure to seal it well to keep out air. Store it in the fridge for up to three days. This stew stays tasty, so you can enjoy it again! To reheat, pour the stew into a pot. Warm it on medium heat, stirring often. You can add a little water if it gets too thick. Heat until it reaches your desired warmth. You can also use the microwave. Place the stew in a microwave-safe bowl and cover it. Heat it for one to two minutes. Stir halfway for even heating. For longer storage, you can freeze the stew. Use a freezer-safe container or a zip-top bag. Leave some space at the top for expansion. Label the bag with the date so you know when you made it. Freeze for up to three months. When you're ready to eat, thaw it in the fridge overnight. Then, reheat it on the stove or in the microwave. Enjoy a warm, hearty meal any time! For the full recipe, check out the Moroccan Chickpea Stew section. Moroccan Chickpea Stew comes from Morocco, a country in North Africa. This dish reflects the rich culture and spice trade of the region. It blends spices like cumin, coriander, and cinnamon to create a warm, inviting flavor. You can find this stew in many Moroccan homes and restaurants. It is a staple dish for families and is often enjoyed during special occasions. Yes, you can use dried chickpeas! First, soak them overnight in water. This helps soften them. Then, boil them until they are tender, which takes about an hour. After that, add them to the stew as you would canned chickpeas. Just remember to adjust the cooking time. The stew may need a bit longer to cook with dried chickpeas, so keep an eye on it. To make a larger batch, simply multiply each ingredient by the number of servings you want. For example, if you need to serve eight people, double the ingredients. You can also use a bigger pot to cook everything evenly. This way, you ensure every bowl of stew is just as tasty as the last. If you're unsure about spice levels, start with less and taste as you go. I always say, it’s easier to add than to take away! For the full recipe, refer to the section above. In this post, we explored making Moroccan Chickpea Stew. We covered essential and optional ingredients, along with substitutions. I shared step-by-step instructions for cooking the stew. Then, I offered tips for flavor and texture, plus variations for creativity. We also discussed storing leftovers and answered common questions. Embrace this recipe to enjoy tasty, wholesome meals. Feel confident as you experiment. Enjoying cooking can lead to delicious results every time.

Moroccan Chickpea Stew Flavorful and Hearty Meal

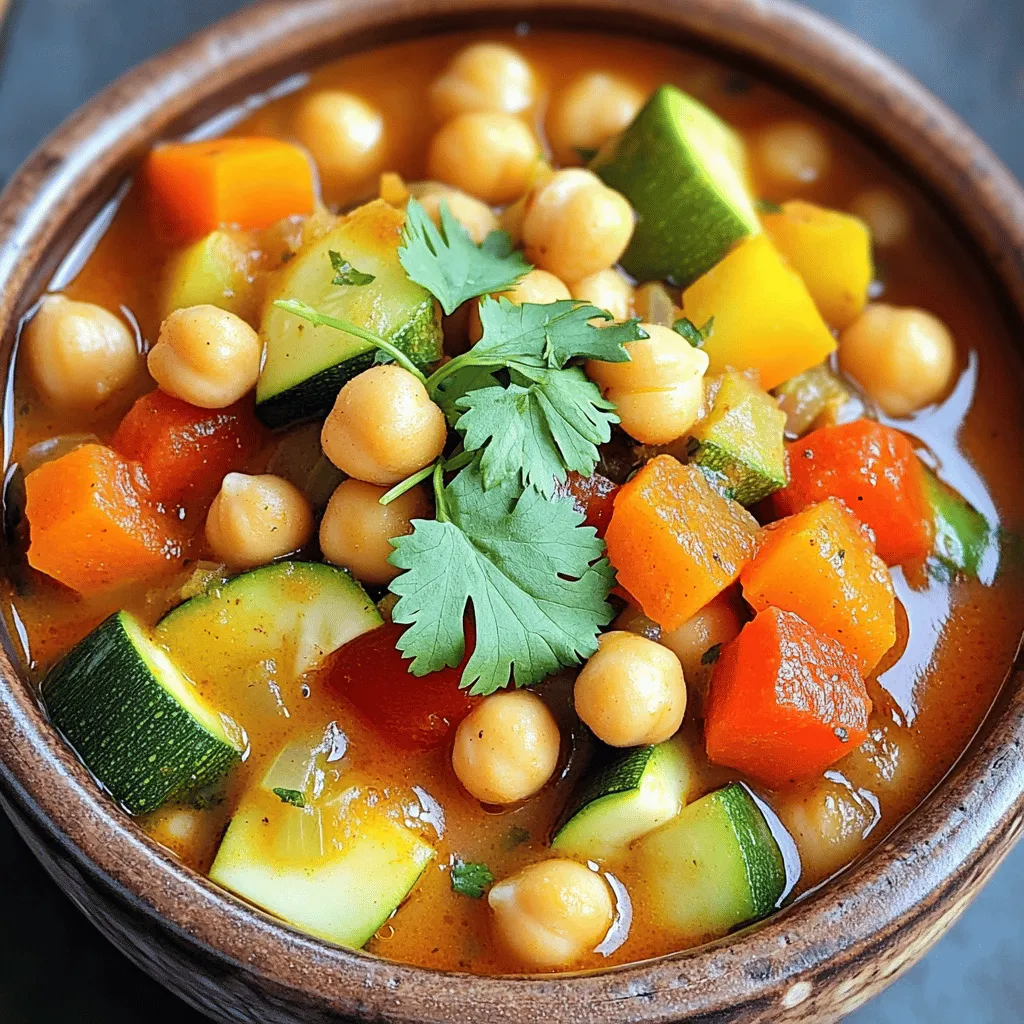
Are you ready to enjoy a hearty meal that bursts with flavor? Moroccan Chickpea Stew is a delicious blend of

Older posts
Newer posts
← Previous Page1 … Page61 Page62 Page63 … Page84 Next →

dsad

© 2026 Lisa Dishes • Built with GeneratePress

Our Policies

  • Copyright Policy
  • Cookie Policy
  • GDPR Policy
  • Privacy Policy
  • Disclaimer
  • Terms Of Use

More Information

  • Home
  • About
  • Contact
  • Appetizers
  • Dessert
  • Dinner
  • Drinks
©2026, Lisa Dishes About Back To Top