Skip to content
DisclaimerTerms Of UseGDPR PolicyCookie Policy

Lisa Dishes

  • Home
  • Drinks
  • Appetizers
  • Dinner
  • Dessert
  • About
  • Contact
  • Privacy Policy
DisclaimerTerms Of UseGDPR PolicyCookie Policy

NO-ING-IMG

To make this creamy dish, gather these items: - 1 cup orzo pasta - 2 tablespoons olive oil - 1 medium onion, finely chopped - 3 cloves garlic, minced - 8 oz (about 225g) cremini mushrooms, sliced - 4 cups vegetable broth - 1 teaspoon dried thyme - 1 teaspoon dried basil - ½ cup heavy cream - ¼ cup grated Parmesan cheese (or nutritional yeast for vegan) - Salt and pepper to taste - Fresh parsley, chopped (for garnish) When buying mushrooms, look for smooth and firm caps. Avoid any with dark spots or wrinkles. For onions, choose ones that feel heavy for their size. The skin should be dry and papery. Fresh garlic should be firm and off-white. It should not have green sprouts. Use vegetable broth that is low-sodium for better control over salt levels. If you want a dairy-free version, swap the heavy cream for coconut cream. Nutritional yeast can replace Parmesan for a cheesy flavor. For gluten-free needs, use gluten-free orzo or another small gluten-free pasta. If you prefer a protein boost, add cooked chicken or tofu. This makes the dish heartier and even more satisfying. To start your One Pot Creamy Mushroom Orzo, gather all your ingredients first. This saves time and keeps things neat. Measure out 1 cup of orzo pasta and set it aside. Chop one medium onion finely and mince three cloves of garlic. Slice about 8 ounces of cremini mushrooms. Heat 2 tablespoons of olive oil in a large pot over medium heat. Add the chopped onion and sauté it for 3-4 minutes until it turns clear. Next, stir in the garlic and mushrooms. Cook them for 5-6 minutes until the mushrooms soften and brown. Now, add the orzo to the pot and mix it with the onions and mushrooms. The key to creaminess lies in adding the right ingredients at the right time. After mixing in the orzo, pour in 4 cups of vegetable broth. This broth adds depth and flavor. Then, sprinkle in 1 teaspoon each of dried thyme and basil. Bring the pot to a boil, then lower the heat. Cover the pot and let it simmer for 10-12 minutes. Stir it occasionally to keep the orzo from sticking. Once the orzo is tender, remove the pot from the heat. Now, stir in ½ cup of heavy cream and ¼ cup of grated Parmesan cheese. This combination gives your dish a rich, creamy texture. Cooking times can vary with different stove types. If you have a gas stove, it often heats up faster than an electric one. Check the orzo a few minutes early if you are using gas. If your stove runs hot, reduce the heat a bit sooner. If it is electric, you may need a minute or two longer. Always look for the orzo to be tender and most of the broth absorbed. If it seems too thick at the end, just add a splash of broth. Your One Pot Creamy Mushroom Orzo will be a delightful meal! For the full recipe, check the detailed instructions above. To make your One Pot Creamy Mushroom Orzo wonderfully creamy, use heavy cream. This adds richness and smoothness. Stir the cream in gently after cooking the orzo. If it’s too thick, add a splash of vegetable broth. This keeps the dish moist and easy to scoop. You can also try using a dairy-free cream for a lighter option. To elevate the flavor, add fresh herbs like thyme or basil. You can also sprinkle some smoked paprika for a nice kick. Taste as you go, and adjust salt and pepper to your liking. A squeeze of lemon juice at the end brightens the dish. For a savory touch, try adding a splash of soy sauce or Worcestershire sauce. Prep your ingredients before cooking. Chop the onion and garlic in advance. Slice the mushrooms and measure out your orzo and broth. This speeds up your cooking time. You can also cook the orzo in advance. Just store it in the fridge until you're ready to mix it with the sauce. This way, you can enjoy your meal even faster. For the full recipe, check out the details above! {{image_2}} You can easily make One Pot Creamy Mushroom Orzo vegetarian or vegan. For a vegetarian dish, just use heavy cream and Parmesan cheese. If you want it vegan, swap heavy cream for coconut milk or cashew cream. Instead of Parmesan, use nutritional yeast for a cheesy taste. This keeps the dish rich and creamy while sticking to your diet. Adding protein makes this dish even better. You can use cooked chicken or tofu. If you choose chicken, sear it in the pot before adding the veggies. For tofu, sauté it until golden brown before mixing it with mushrooms and onions. Both options boost flavor and keep you full. You can change the taste by adding different herbs and spices. Try sage for an earthy flavor or red pepper flakes for heat. Fresh herbs like thyme or parsley brighten the dish. You can also add a splash of lemon juice for a zesty kick. Feel free to mix and match until you find your favorite flavor combo. For a detailed recipe, check out the Full Recipe. You can store One Pot Creamy Mushroom Orzo in an airtight container. Make sure it cools down first. This helps keep it fresh. If you want, divide it into smaller portions. This makes it easy to grab later. When reheating, use a pot on low heat. Add a splash of vegetable broth to keep it creamy. Stir often to warm it evenly. You can also use a microwave. Heat in short bursts, stirring in between. The dish lasts about 3 to 4 days in the fridge. Make sure to check for any off smells before eating. If you freeze it, it can last up to 2 months. Just thaw it overnight in the fridge before reheating. Enjoy your meal even later! Yes, you can use other types of pasta. Small shapes like ditalini or quinoa pasta work well. They will cook differently, so check the package for cook times. Adjust the broth amount based on the pasta you choose. One Pot Creamy Mushroom Orzo pairs well with a simple salad or roasted veggies. You can also serve it with crusty bread for a delightful meal. Adding grilled chicken or shrimp can turn it into a heartier dish. To make this dish gluten-free, choose gluten-free orzo or other gluten-free pasta. Check labels for any hidden gluten in broth and cheese. You can use nutritional yeast instead of Parmesan for a vegan option. Yes, you can prepare One Pot Creamy Mushroom Orzo ahead of time. Cook it and let it cool, then store it in the fridge. To serve, reheat on low heat. Add a splash of broth or cream to keep it creamy. For the Full Recipe, check the main article. This blog post covered all you need for One Pot Creamy Mushroom Orzo. We discussed ingredients, cooking steps, and tips for great flavor. I shared ways to adapt for special diets and the best ways to store leftovers. Now, you're ready to make a creamy dish that satisfies. Trust the process and enjoy these simple steps. A delicious meal is within reach!

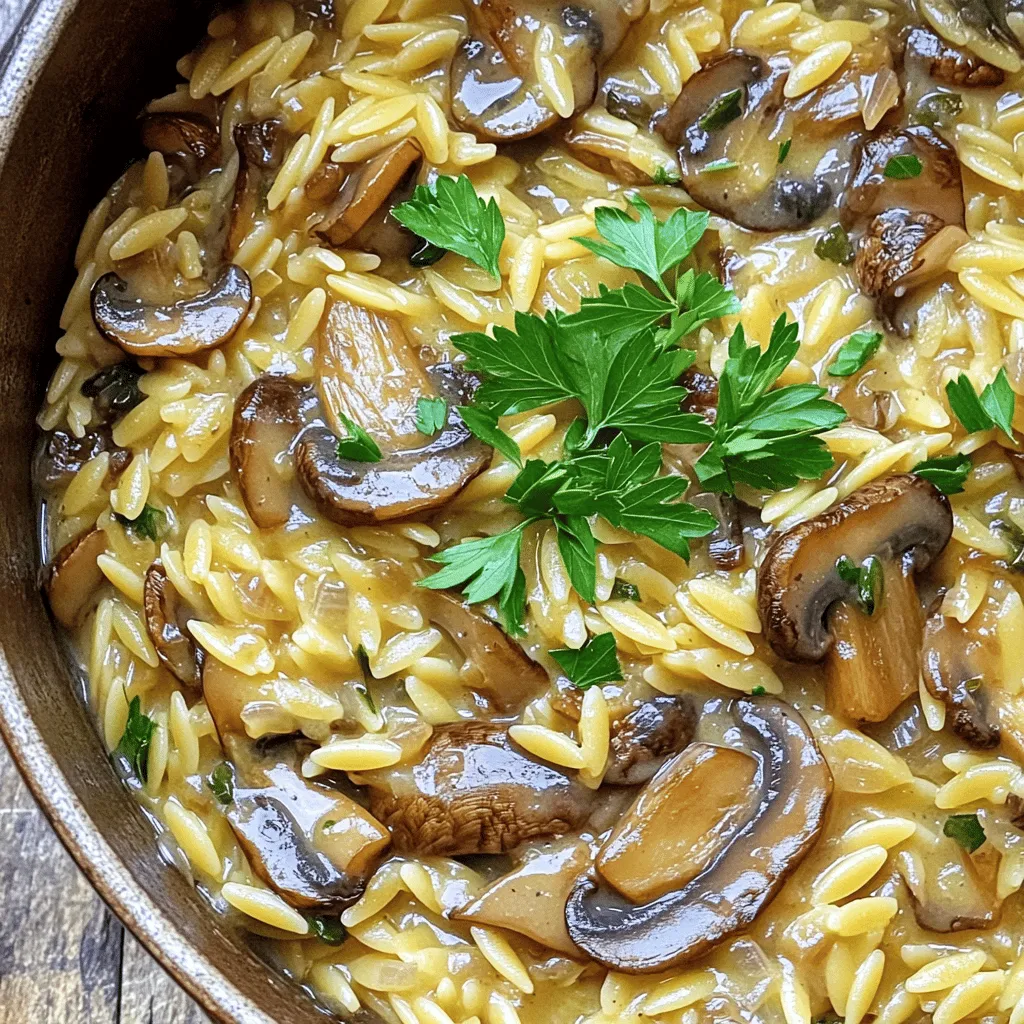
One Pot Creamy Mushroom Orzo Delightful Meal

Do you love comfort food that’s simple to make? Let me introduce you to my One Pot Creamy Mushroom Orzo.

To make satisfying Breakfast Egg and Cheese Muffins, gather these ingredients: - 6 large eggs - 1/2 cup shredded cheddar cheese - 1/4 cup milk - 1/2 teaspoon garlic powder - 1/2 teaspoon onion powder - Salt and pepper to taste - 1 cup diced vegetables (bell peppers, spinach, and tomatoes work great) - 4 whole wheat English muffins, halved - 2 tablespoons olive oil or cooking spray - Optional toppings: avocado slices, hot sauce, or fresh herbs These ingredients create a tasty, filling breakfast. The eggs and cheese give protein, while the vegetables add flavor and nutrients. I often use bell peppers, spinach, and tomatoes for a colorful mix. You can change the cheese or veggies to suit your taste. Using whole wheat English muffins boosts fiber, making your meal more satisfying. Olive oil helps prevent sticking and adds a nice flavor. You can also top your muffins with avocado or hot sauce for extra zest. For the full recipe, check out the Step-by-Step Instructions section. To make Breakfast Egg and Cheese Muffins, follow these steps closely. Each step brings you closer to a tasty breakfast. - Step 1: Preheat the oven to 350°F (175°C). Grease a muffin tin with olive oil or cooking spray. This helps the muffins pop out easily later. - Step 2: In a mixing bowl, crack the six large eggs. Add 1/4 cup of milk, 1/2 teaspoon of garlic powder, 1/2 teaspoon of onion powder, and salt and pepper to taste. Whisk everything together until mixed well. This creates a fluffy egg base. - Step 3: Stir in 1/2 cup of shredded cheddar cheese and 1 cup of diced vegetables. Bell peppers, spinach, and tomatoes taste great. This mix adds flavor and color to your muffins. - Step 4: Pour the egg and vegetable mixture into the muffin tin. Fill each cup about 3/4 full. Next, take four whole wheat English muffins and cut them in half. Place them on a baking tray, cut side up. - Step 5: Toast the muffin halves in the oven for about 5-7 minutes. This gives them a nice crunch. After toasting, remove the tray and place each muffin half on a plate. Pour the egg mixture over the toasted muffin halves. Now, you are ready for baking! - Bake everything in the oven for an additional 15-20 minutes, or until the egg is set and lightly golden on top. - Let the muffins cool for a couple of minutes before carefully removing them from the tin. You can find the full recipe for more details. Enjoy your delicious breakfast muffins! To make your eggs fluffy, whisk them well. Use a fork or a whisk. Mix them until they are light and airy. This helps add air into the eggs. It gives them a nice, soft texture. You can also add a splash of milk for extra creaminess. When greasing muffin tins, use a light coat of olive oil. This helps the muffins release easily after baking. You can also use cooking spray. Make sure to cover all the sides of each cup. This prevents sticking and keeps your muffins intact. These breakfast egg and cheese muffins pair well with fresh fruit. Try serving them with slices of orange or berries. You can also add a side of yogurt for a complete meal. For toppings, get creative! Slices of avocado add creaminess. A dash of hot sauce brings heat and flavor. Fresh herbs like parsley or chives make the dish pop with color and taste. These simple additions can elevate your muffins to a whole new level. {{image_2}} You can change the cheese type to suit your taste. Try mozzarella or pepper jack for a creamy twist. You can also mix vegetables. Spinach, mushrooms, or zucchini work well. If you need gluten-free options, use gluten-free English muffins. They hold up just as well and taste great. To elevate the taste, add spices like paprika or chili powder. Fresh herbs, such as basil or cilantro, also bring freshness. Want some protein? Add cooked bacon or sausage for a heartier meal. You can even mix in diced ham or turkey. These simple swaps can transform your muffin into something new and exciting. Store your muffins in the refrigerator for the best taste. Place them in an airtight container. This keeps them fresh and moist. You can also wrap them in plastic wrap for extra protection. When ready to eat, simply reheat them gently in the microwave or oven. For freezing, let your muffins cool completely. Then, wrap each muffin in plastic wrap and place them in a freezer bag. This way, they won’t stick together. They can stay in the freezer for up to three months. To reheat, take one muffin out and let it thaw in the fridge overnight. Then, warm it up in the microwave or oven. In the fridge, your Breakfast Egg and Cheese Muffins will stay fresh for about five days. To keep the flavor strong, heat them gently. Too much heat can make them dry. When reheating, aim for a warm center, not a hot one. Enjoying them warm helps bring back the great taste. For the best results, eat them within a few days for peak flavor. You can find the Full Recipe for your reference in the Step-by-Step Instructions section. How long do Breakfast Egg and Cheese Muffins last? These muffins can last about 3 to 5 days in the fridge. To keep them fresh, store them in an airtight container. Can I make these muffins ahead of time? Yes! You can prepare them a day or two before. Just cook and cool them, then store in the fridge. What can I substitute for eggs in this recipe? If you need an egg substitute, try using flaxseed meal or chia seeds. Mix 1 tablespoon of either with 3 tablespoons of water for each egg. Can you make Breakfast Egg and Cheese Muffins in a microwave? You can make these muffins in a microwave. Use a microwave-safe mug and mix the ingredients. Cook for about 1 to 2 minutes until set. How to make muffins without English muffins? You can use bagels, tortillas, or even bread slices instead of English muffins. Cut them to fit your muffin tin and follow the same steps. Feel free to check the Full Recipe in the Step-by-Step Instructions section for more details! You learned how to make tasty Breakfast Egg and Cheese Muffins. We covered ingredients, steps, and tips to boost flavor. You can mix it up with different veggies and cheese. Storage tips will help keep your muffins fresh. Enjoy making these muffins for breakfast or snacking. They are simple, quick, and fun to customize!

Satisfying Breakfast Egg and Cheese Muffins Recipe

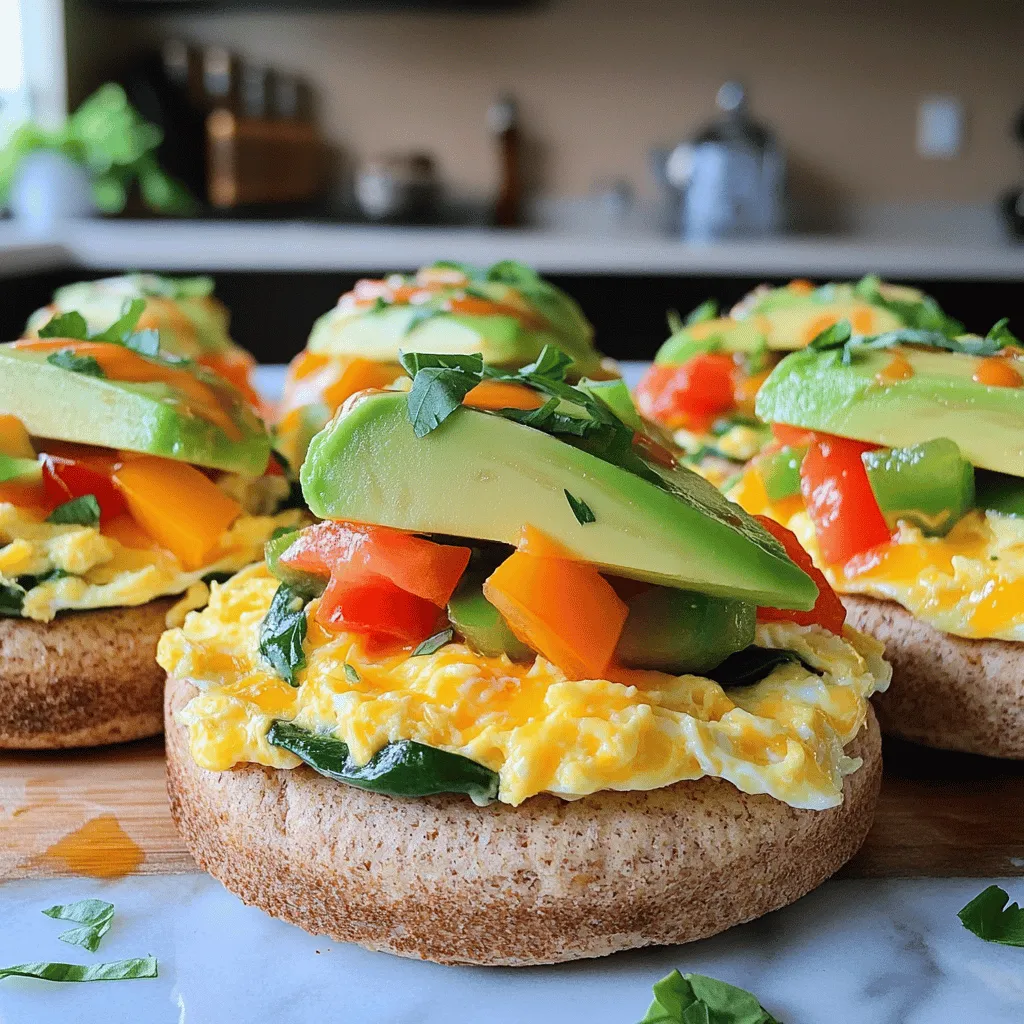
Are you craving a quick, tasty breakfast that’s easy to make? Look no further! My Satisfying Breakfast Egg and Cheese

For a great Pickle Ranch Wedge Salad, you need fresh and tasty ingredients. Here’s what you’ll need: - Iceberg lettuce - Dill pickles - Ranch dressing - Cherry tomatoes - Red onion - Blue cheese or feta - Fresh dill - Salt and pepper - Optional toppings Each ingredient plays a big role in making this salad special. The crisp iceberg lettuce forms the base. It offers a cool crunch that you will love. Dill pickles add a tangy kick that pairs well with the creamy ranch dressing. The cherry tomatoes bring a burst of sweetness and color. Sliced red onion gives it a bit of bite, while blue cheese or feta brings richness. Fresh dill enhances the flavor, making every bite delightful. You can also add crispy fried onions on top for extra crunch. This mix of flavors and textures creates a fresh dish you can enjoy anytime. Check out the Full Recipe to get the complete list and instructions. Start with a fresh head of iceberg lettuce. Cut the head into quarters. Each wedge should be thick enough to hold toppings. Place the wedges on a serving plate. This creates a nice presentation for your salad. In a medium bowl, combine the diced dill pickles, halved cherry tomatoes, and sliced red onion. Add crumbled blue cheese for a savory touch. Toss these ingredients gently to mix them well. Drizzle in the ranch dressing and add salt and pepper to taste. Stir everything together until well combined. This mixture brings all the flavors to life. Spoon the pickle and veggie mixture onto each lettuce wedge. Be generous with the toppings! For extra crunch, add crispy fried onions on top. Finish with a sprinkle of fresh dill for color and taste. This final touch makes the salad pop. Enjoy your fresh and flavorful Pickle Ranch Wedge Salad! For the complete recipe, check [Full Recipe]. Start with fresh iceberg lettuce. It should be crisp and green. Look for firm heads with no brown spots. For the pickles, use dill pickles for a tangy kick. Choose ripe cherry tomatoes, bright red and juicy. Thin red onion slices add a crunch and sharp taste. Blue cheese gives a bold flavor, but you can use feta for a milder taste. Don’t forget fresh dill! It adds a nice touch. Taste is key in this salad. Use salt and pepper to enhance the flavors. Start with a pinch of salt. Mix it in well, then taste. Adjust as needed. The ranch dressing adds creaminess and flavor. If you want a bit more zing, add a dash of hot sauce. You can also mix in some garlic powder for extra depth. Make your salad look great on the plate. Place each lettuce wedge on a nice dish. Spoon the pickle and veggie mix on top. Be generous with the toppings. For a crunch, add crispy fried onions. Finally, sprinkle fresh dill on top for color and taste. This salad is not just tasty; it’s a feast for the eyes too! You can find the Full Recipe to guide you through each step. {{image_2}} You can add protein to make the salad more filling. Grilled chicken adds a nice touch. Shrimp or bacon also work well. For a plant-based option, try chickpeas or tofu. Simply chop the protein and mix it in with the other ingredients. While ranch dressing is classic, you can switch it up. Try blue cheese dressing for a bolder flavor. A honey mustard dressing adds sweetness. For a lighter option, use a vinaigrette. Each dressing gives a different taste, so feel free to experiment. Changing ingredients with the seasons keeps the salad fresh. In summer, add fresh corn or avocado. In fall, try roasted pumpkin or apples. Use whatever is in season for great flavor and nutrition. Mixing in seasonal items makes your salad unique each time. To keep your Pickle Ranch Wedge Salad fresh, wrap it well. Use plastic wrap or a sealed container. This will help avoid any wilting. Store the salad in the fridge. It should stay good for up to two days. If you have toppings like crispy onions, store them separately. This keeps them crunchy. When storing, keep the ingredients separate. This helps maintain texture and flavor. The lettuce should stay crisp, and the pickles should stay juicy. To avoid sogginess, only add the dressing when you’re ready to eat. If you know you’ll have leftovers, dress only what you plan to serve. If your salad looks a bit sad after storage, don’t worry! You can revive it. Simply remove the lettuce from the fridge. Let it sit at room temperature for about 10 minutes. This brings back some freshness. If the toppings got soft, consider adding new ones. A sprinkle of fresh dill or some extra pickles can help. For the best taste, eat your salad cold. Just remember to enjoy it quickly after dressing! For the complete recipe, check out the full recipe. A wedge salad is a simple salad that features a big chunk of iceberg lettuce. You cut the lettuce into wedges, which gives it a fun shape. Each wedge gets topped with tasty ingredients, like dressing, cheese, and veggies. This salad is crunchy, fresh, and full of flavor. In my Pickle Ranch Wedge Salad, I add dill pickles and ranch dressing for a zesty twist. It’s a delightful way to enjoy your greens! Yes, you can prepare parts of this salad ahead of time. You can cut the iceberg lettuce and store it in the fridge. Just wrap it in a damp paper towel and put it in a bag. The veggies and dressing can also be mixed earlier. Keep them in separate containers to keep everything fresh. When you are ready to serve, just combine the ingredients and enjoy your salad! If you want to swap ranch dressing, you have options. You can try blue cheese dressing for a stronger flavor. Another choice is Greek yogurt mixed with herbs for a creamy, healthy twist. You could also use vinaigrette for a lighter taste. Each dressing will change the flavor of the salad, so feel free to explore! In this blog post, we explored the fun of making a wedge salad. You learned about the fresh ingredients and how to prepare them step by step. We shared tips for choosing the best items and enhancing flavors. I also covered variations, storage info, and answered common questions. This salad is easy to make and great for any meal. Enjoy creating your wedge salad!

Pickle Ranch Wedge Salad Fresh and Flavorful Delight

If you’re looking for a fresh and tasty twist on a classic salad, the Pickle Ranch Wedge Salad is for

- 1 ½ cups rolled oats - 1 cup pitted cherries, chopped (fresh or frozen) - 1 cup shredded unsweetened coconut - ½ cup almond butter (or any nut butter) - ½ cup honey or maple syrup - 1 teaspoon vanilla extract - ½ teaspoon cinnamon - ½ teaspoon salt - ¼ cup chopped almonds or walnuts (optional) These ingredients form the base of your Cherry Coconut Oat Bars. The oats provide a hearty texture. Cherries add a sweet and tart flavor. Coconut brings a lovely chewiness that contrasts well with the crunch of nuts. Almond butter binds everything together and adds creaminess. Honey or maple syrup sweeten the bars naturally. Using fresh or frozen cherries works well. If you pick fresh cherries, make sure to pit and chop them first. Shredded coconut must be unsweetened to keep the bars healthy. You can swap almond butter for any nut or seed butter you prefer. The vanilla extract and cinnamon add warmth and depth to the flavor. If you want extra crunch, consider adding chopped almonds or walnuts. They give a nice bite and boost the nutrition. Keep in mind that these bars are very flexible. You can adjust ingredients based on what you have at home. For the full recipe, check the earlier section. This mix of ingredients makes the bars tasty and fun to eat. They are perfect for snacks, breakfast, or a sweet treat. - Preheat your oven to 350°F (175°C). - Line an 8x8-inch baking dish with parchment paper. Start by setting your oven. This step is key for even baking. Lining the dish helps you lift the bars out easily later. - Combine rolled oats, chopped cherries, shredded coconut. - Add chopped nuts (optional), cinnamon, and salt. In a large bowl, mix rolled oats, cherries, and coconut. If you like, toss in some nuts for crunch. Sprinkle in cinnamon and salt. Stir well until everything looks even. - Warm almond butter and honey (or maple syrup). - Stir in vanilla extract. In a small bowl, warm almond butter and honey together. A quick zap in the microwave works well. Adding vanilla gives a nice flavor. Mix until it's smooth and creamy. - Pour the wet mixture into the dry mixture. - Mix until sticky and well-combined. Now, pour the warm mixture into the dry bowl. Stir it all together. You want it to be sticky and hold together well. - Transfer the mixture to the baking dish. - Press down firmly and bake for 20-25 minutes. Next, pour the mixture into the lined dish. Press it down firmly with a spatula. This step helps the bars stick together. Bake in your preheated oven for 20 to 25 minutes. Look for golden edges and a set center. - Cool for 10 minutes in baking dish. - Transfer to wire rack before cutting into bars. After baking, let the dish cool for about 10 minutes. Use the parchment paper to lift the bars out. Place them on a wire rack to cool completely before cutting. This step keeps them from getting soggy. For the full recipe, check out the ingredients listed above! To make your Cherry Coconut Oat Bars just right, the mixture needs to be sticky. If it feels dry, add a little more almond butter or honey. After mixing, press down firmly in your baking dish. This step helps the bars bake evenly. Store your bars in an airtight container. This keeps them fresh and tasty. If you stack them, use parchment paper between the layers. This way, they won’t stick together. You can boost the flavor by adding spices like nutmeg or ginger. If you want to switch things up, try swapping almond butter for another nut or seed butter. This simple change can give you new textures and tastes. {{image_2}} You can change up the taste of your Cherry Coconut Oat Bars easily. If you want a new flavor, try these ideas: - Substitute cherries with other fruits like blueberries or raspberries. These fruits add a tart taste and bright color. - Add chocolate chips for a sweet twist. This makes the bars richer and more appealing to kids. If you need to make these bars fit your diet better, here are some options: - Use agave syrup instead of honey for a vegan-friendly option. This swap keeps the sweetness without using animal products. - Replace nuts with seeds like pumpkin or sunflower seeds for a nut-free version. This keeps the crunch while avoiding allergens. Following a gluten-free diet? No problem! You can still enjoy these bars: - Verify that your oats are certified gluten-free. Some oats may have cross-contamination with gluten. - Substitute with gluten-free flour if desired. This can help with the texture while keeping it gluten-free. For more details on the recipe, check out the Full Recipe. Enjoy your tasty treats! To keep your cherry coconut oat bars fresh, store them in a cool, dry place. Use an airtight container to prevent moisture. For longer-lasting bars, place them in the fridge. The cooler temperature helps maintain their taste and texture. If you want to save some bars for later, wrap each one individually in plastic wrap or foil. This protects them from freezer burn. When you want a snack, thaw a bar at room temperature. You can also microwave it for a quick treat. At room temperature, expect your bars to last up to a week. This makes them great for snacks or lunchboxes. If stored in the fridge, they can last up to two weeks. Keeping them cold helps maintain their flavor and freshness. For the full recipe, check out the [Full Recipe]. Yes, just thaw and chop before using. Frozen cherries work well and save time. They add great flavor and texture to the bars. Just make sure to drain any excess liquid after thawing. This way, your bars remain firm and chewy. You can easily make these bars vegan. Just substitute honey with maple syrup or agave syrup. Both options add sweetness without any animal products. They blend well with the other ingredients, keeping the bars tasty and moist. I recommend using rolled oats for this recipe. They provide a better texture and chewiness. Instant oats can make the bars too soft and change how they hold together. Stick to rolled oats for the best results. Aim for a thickness of about 1 to 1.5 inches in the baking dish. This thickness ensures even baking and a nice chewy texture. If they are too thin, they may not hold together well. Keep an eye on the edges as they bake, and look for a golden color. These cherry coconut oat bars are easy to make and delicious. We covered the key ingredients, step-by-step instructions, and various tips for baking. I shared ideas for flavor changes and how to store them well. By using the right techniques, you can enjoy tasty bars that fit your diet. Remember, feel free to get creative with flavors or toppings. With just a few simple steps, you’ll have a snack to love!

Cherry Coconut Oat Bars Simple and Tasty Treat

Are you looking for a quick and tasty snack? These Cherry Coconut Oat Bars are simple to make and packed

To make Pickle Ranch Chicken Wraps, gather these simple items: - 2 cups cooked chicken breast, shredded - 1/2 cup dill pickles, finely chopped - 1/2 cup ranch dressing - 1 cup lettuce, chopped (romaine or iceberg) - 1/2 cup cherry tomatoes, halved - 1/2 red onion, thinly sliced - 4 large flour tortillas - 1/2 cup shredded cheddar cheese - Salt and pepper to taste - Optional: Fresh dill or parsley for garnish These ingredients work together to create a tasty and satisfying meal. You can easily swap some ingredients to fit your taste. - Use grilled or rotisserie chicken instead of boiled chicken. - Try a different dressing, like blue cheese or yogurt. - Replace flour tortillas with whole wheat or corn tortillas. - For a crunchier bite, add sliced bell peppers or cucumbers. - If you want a dairy-free option, skip the cheese or use a vegan alternative. These substitutions keep the recipe fun and fresh. Each serving of Pickle Ranch Chicken Wraps offers a balanced meal. - Calories: About 400 - Protein: 30g - Carbs: 34g - Fat: 20g - Fiber: 3g This meal is rich in protein and good fats while being low in carbs. It fuels your body without heavy ingredients. You can find the full recipe above for more details and cooking tips. First, grab a large mixing bowl. Take your cooked chicken breast and shred it. You want tender pieces that mix well. Next, add the finely chopped dill pickles. This gives the wrap a great crunch and tang. Pour in the ranch dressing and mix everything until the chicken is fully coated. Now, add chopped lettuce, halved cherry tomatoes, and sliced red onion. Use a spatula to fold the ingredients gently. This keeps the veggies fresh and crisp. Finally, season with salt and pepper. Taste the mixture and adjust as needed. Now, lay your flour tortillas flat. It helps to use a clean surface for this part. Take a scoop of the chicken mixture and place it in the center of each tortilla. Don't overfill; you want to roll them easily. Next, sprinkle shredded cheddar cheese over the filling. This adds a nice creaminess. Fold the sides of the tortilla inwards, then roll from the bottom up. Tuck the filling in as you roll to keep it secure. Repeat this for all the tortillas. For serving, slice each wrap in half on a diagonal. This makes them easy to eat. Arrange the wraps on a serving platter. If you want, garnish with fresh dill or parsley. This adds a pop of color and flavor. You can serve these wraps with a side of extra ranch dressing or some crunchy veggies. They are perfect for lunch or a quick dinner. Enjoy your pickle ranch chicken wraps! For the complete recipe, refer to the Full Recipe. To make the best wraps, start with fresh ingredients. Use large tortillas for easy rolling. Warm the tortillas slightly in the microwave. This makes them more flexible. Lay out all your fillings before you start. This helps with quick assembly. Always place the filling in the center. This prevents spills when you roll them up. To boost the taste, add spices to the chicken mix. A pinch of garlic powder or paprika works great. Consider adding hot sauce for a kick. Fresh herbs, like dill or parsley, can add brightness. You can also try different types of pickles. Sweet or spicy pickles can change the flavor. Experiment with different cheeses too. Feta or pepper jack can add new layers. One mistake is overfilling your wraps. This can lead to messy eating. Another is not mixing the filling well. Make sure everything is coated for even flavor. Avoid using cold tortillas straight from the fridge. They can crack and break. Lastly, don’t forget to taste your mixture. Adjust the seasoning before you wrap it up. For the full recipe, check out the Crunchy Pickle Ranch Chicken Wraps. {{image_2}} You can change the protein in these wraps easily. Use cooked turkey for a lighter meal. Shredded pork adds a smoky flavor. For a bold taste, try spicy chicken. You can even use canned tuna for a seafood twist. Each option brings a fresh taste to your wraps. You don't need meat to enjoy these wraps. Try using chickpeas or black beans for protein. Grilled veggies like peppers and zucchini work great too. You can also add tofu for a filling option. Mix in some avocado for creaminess. These swaps keep the wraps tasty and satisfying. Want to switch things up? Add some hot sauce for a kick. Mixing in some garlic powder gives a nice depth. You can also use different dressings. Try blue cheese or Caesar dressing for a new spin. Fresh herbs like basil or cilantro can brighten the flavor. There are many ways to keep these wraps exciting! For the full recipe, check out the Crunchy Pickle Ranch Chicken Wraps. After making your Pickle Ranch Chicken Wraps, you might have some left. To keep them fresh, wrap each one tightly in plastic wrap or foil. Place the wraps in an airtight container. Store them in the fridge for up to three days. This way, the flavors stay strong and the wraps remain tasty. If you want to save some wraps for later, freezing is a good option. First, let the wraps cool completely. Then, wrap each one in plastic wrap. Place them in a freezer-safe bag or container. They can stay in the freezer for up to three months. Make sure to label the bag with the date. This helps you remember when you made them. To enjoy your wraps after storing or freezing, reheating is simple. If they are in the fridge, take them out and unwrap them. Place them on a microwave-safe plate. Heat on medium for about one to two minutes. If they are frozen, thaw them in the fridge overnight first. Then, reheat as before. You can also warm them in a skillet over medium heat for a crispier texture. This keeps the wraps delicious and ready to eat. For full details, you can refer to the Full Recipe. You can serve many tasty sides with your wraps. Some great options include: - Fresh fruit salad - Veggie sticks with dip - Potato chips - A light salad with vinaigrette - Pickles for extra crunch These sides add flavor and balance to your meal. They also make your dinner more fun and colorful. Yes, you can prepare these wraps ahead of time. Just follow these steps: 1. Make the chicken mixture and store it in the fridge. 2. Assemble the wraps when you're ready to eat. If you wrap them tightly in plastic, they will stay fresh. This saves time on busy days. Just eat within 24 hours for the best taste. You can easily adjust these wraps to fit different diets. Here are some ideas: - For gluten-free, use corn tortillas or lettuce wraps. - If you need a low-fat option, use Greek yogurt instead of ranch dressing. - For a vegetarian version, swap chicken for chickpeas or tofu. Be creative and have fun making these wraps your own! This blog post covered making delicious Pickle Ranch Chicken Wraps. We discussed the key ingredients, substitutions, and their nutrition. The step-by-step instructions guide you through preparation and serving. Tips and tricks help you avoid mistakes and add flavor. We explored various protein options and storage tips for leftovers. Finally, we answered common questions about serving and customization. Now, you have everything you need to make tasty wraps. Enjoy your cooking adventure!

Pickle Ranch Chicken Wraps Simple and Tasty Meal

Looking for a meal that’s quick, tasty, and sure to impress? Pickle Ranch Chicken Wraps are your answer! Packed with

- 1 cup dark chocolate chips - 1/2 cup sweetened condensed milk - 1/4 teaspoon vanilla extract - 1/2 cup dried cherries, chopped - 1/4 cup walnuts, chopped (optional) - 1/4 teaspoon sea salt - Extra cocoa powder for dusting - Shredded coconut for dusting - Small square baking dish (approx. 8x8 inches) - Parchment paper - Medium saucepan - Spatula These ingredients come together to create a rich treat. The dark chocolate chips give a deep flavor. Sweetened condensed milk adds creaminess. Dried cherries give sweetness and a chewy texture. Walnuts add crunch, but they're optional. Sea salt balances the sweetness and enhances the taste. For a fun twist, you can dust the bites with cocoa powder or coconut. Both add a nice touch. To make these bites, you need a few tools. A small square baking dish helps shape the fudge. Parchment paper makes it easy to lift the fudge out later. A medium saucepan is perfect for melting the chocolate. Finally, a spatula helps spread the mixture evenly. For the full recipe, you can find it [here](#). Enjoy your cooking adventure! - Line the baking dish with parchment paper. - Combine chocolate chips and condensed milk in a saucepan. Start by preparing your baking dish. Place parchment paper in the bottom of an 8x8 inch square dish. This makes it easy to lift out the fudge later. Next, take a medium saucepan. Add 1 cup of dark chocolate chips and 1/2 cup of sweetened condensed milk. Stir them together over low heat. Keep stirring until the chocolate melts and becomes smooth. - Melt chocolate mixture over low heat. - Stir in vanilla extract and add dried cherries and walnuts. Once the chocolate is melted, remove the pan from the heat. Mix in 1/4 teaspoon of vanilla extract. Then add 1/2 cup of chopped dried cherries. If you like, toss in 1/4 cup of chopped walnuts. Stir well, so every bite has a mix of flavors. - Pour mixture into the baking dish and level it out. - Cool at room temperature before refrigerating. Now, pour the chocolate mixture into the prepared baking dish. Use a spatula to spread it evenly. Sprinkle 1/4 teaspoon of sea salt on top. Press it gently into the fudge. Let the fudge sit at room temperature for about 30 minutes. After that, place it in the fridge for at least 2 hours to set. When it's firm, lift the fudge out using the parchment paper. Cut it into bite-sized squares. For a special touch, dust them with cocoa powder or shredded coconut. Enjoy your sweet treat! You can find the full recipe [here](#). - Ensure chocolate is completely melted for smooth texture. - Don’t rush cooling; room temperature cooling helps set the fudge. To melt chocolate, use low heat. Stir often to avoid burning. If you rush the cooling, the fudge may not set well. Allow it to cool at room temperature first for the best results. - Use the correct measurements for ingredients. - Don’t skip using parchment paper. Using the right measurements matters. Too much or too little can ruin your fudge. Parchment paper makes it easy to lift the fudge out later. It also keeps the dish clean. - Consider adding a pinch of sea salt to intensify flavor. - Explore flavor variations, like adding orange zest or almond extract. A pinch of sea salt can make the chocolate taste richer. If you like, try adding orange zest for a fruity twist. Almond extract can add a lovely nutty flavor too. For the full recipe, check out the Cherry Chocolate Fudge Bites section. {{image_2}} You can change the flavor of your Cherry Chocolate Fudge Bites easily. Try using milk or white chocolate instead of dark chocolate. This swap gives a sweeter taste that many enjoy. You can also add dried fruits like cranberries or apricots. These fruits add a nice chewiness and a burst of flavor. Mixing flavors keeps things exciting and fun! For those who want a vegan treat, you can make this fudge without dairy. Use dairy-free condensed milk and chocolate. This option still keeps the fudge creamy and delicious. If you need a gluten-free treat, avoid any ingredients that contain gluten. This way, everyone can enjoy these tasty bites without worry. Cherry Chocolate Fudge Bites pair well with fresh fruits or nuts. Create a lovely dessert platter for your guests. You can also serve these bites with whipped cream or a scoop of ice cream. Both options add a creamy touch that complements the fudge. Enjoy the mix of flavors and textures for a delightful experience. For the full recipe, check out the details provided earlier. To keep your Cherry Chocolate Fudge Bites fresh, store them in an airtight container. This keeps moisture out and helps maintain their rich flavor. For the best taste and texture, place the container in the refrigerator. These delightful bites can last up to two weeks when stored in the fridge. If you want to enjoy them later, freeze them! They can stay good in the freezer for up to three months without losing flavor. When you're ready to enjoy your frozen fudge bites, thaw them in the refrigerator. This method helps keep their texture nice and smooth. Avoid letting them thaw at room temperature; this can make them too soft and change their lovely shape. Yes, but it will alter the flavor profile and sweetness level. Dark chocolate gives a rich taste, while milk chocolate adds more sweetness. If you prefer a sweeter treat, milk chocolate works well. Check local gourmet chocolate shops or online retailers for pre-made options. Many shops offer delicious fudge bites, especially around holidays. Look for shops that focus on quality ingredients for the best flavor. Fresh cherries may add moisture, which could affect the fudge's consistency; it's better to use dried. Dried cherries pack a punch of flavor without changing the fudge’s texture. They also blend well with the chocolate. The fudge should be firm to the touch and easily lift out of the baking dish once cooled. After chilling, it will firm up nicely. You can also check by pressing lightly on the surface; it should feel solid but not hard. This blog post covered how to make delicious cherry chocolate fudge. You learned about the key ingredients and the simple steps to prepare it. I shared tips to ensure a smooth texture and ideas to enhance flavor. Remember to experiment with different chocolate types or toppings. Store your fudge properly to keep it fresh and tasty. With these steps, you can make a treat everyone will love. Enjoy your fun time in the kitchen!

Cherry Chocolate Fudge Bites Tasty and Simple Treat

If you’re craving a sweet treat that’s both tasty and easy to make, look no further! Cherry Chocolate Fudge Bites

To make Pickle Ranch Potato Skins, you need a few simple items. Here’s the list of primary ingredients: - 4 medium russet potatoes - 1 tablespoon olive oil - Salt and pepper to taste - 1 cup shredded cheddar cheese - ½ cup sour cream - ¼ cup dill pickle relish - 2 tablespoons ranch seasoning mix - 2 green onions, chopped - ¼ cup crispy fried onions (for topping) If you can't find russet potatoes, try Yukon Gold potatoes. They hold their shape well. For olive oil, any cooking oil works in a pinch. You can swap sour cream with Greek yogurt for a lighter option. When selecting potatoes, look for firm ones with smooth skin. Avoid any with spots or wrinkles. Fresh potatoes give a better taste and texture. These ingredients come together to create a tasty dish that everyone will love. Enjoy making your Pickle Ranch Potato Skins with this full recipe! 1. Wash the Potatoes: Start by washing the potatoes under cold water. Scrub each one well to remove dirt. This step helps ensure a clean bite. 2. Bake the Potatoes: Preheat your oven to 400°F (200°C). Prick each potato several times with a fork. This allows steam to escape. Rub the potatoes with olive oil and sprinkle them with salt. Place them directly on the oven rack and bake for about 45-60 minutes. You want them soft when pierced with a fork. 3. Scoop the Flesh: Once the potatoes cool for about 10 minutes, cut them in half lengthwise. Use a spoon to scoop out some of the flesh, leaving about ¼ inch of potato around the skin. This creates a sturdy boat for your toppings. 4. Mix the Ranch Pickle Sauce: In a small bowl, mix ½ cup sour cream, ¼ cup dill pickle relish, and 2 tablespoons ranch seasoning mix. Stir until well combined. This sauce gives the potatoes a tangy kick. - Oven Settings: Keep your oven at 400°F (200°C) for baking the potatoes. This temperature works best for soft insides and crispy skins. - Timing Guidelines: Bake the potatoes for 45-60 minutes. After scooping, fill the skins with cheese and bake for an additional 10-15 minutes. You want the cheese melted and bubbly for that perfect finish. - Plating Ideas: Serve your Pickle Ranch Potato Skins on a large platter. Drizzle extra ranch pickle sauce on top for a tasty touch. Garnish with chopped green onions for a pop of color. - What to Serve With: These potato skins pair well with a fresh salad or a side of grilled veggies. They also make a great snack for game day or parties, adding fun to your table. For the complete recipe, check out the [Full Recipe]. - Best practices for seasoning: I always use salt and pepper to bring out flavor. After baking the skins, add a bit more salt inside for a flavor boost. Feel free to add more ranch seasoning for an extra kick. - How to avoid soggy potato skins: To keep the skins crisp, ensure you scoop out enough flesh. Leave about ¼ inch of potato for structure. Also, bake them on a wire rack instead of a baking sheet to allow air flow. - Pairing suggestions with drinks or appetizers: These potato skins pair well with a cold beer or a fizzy soda. For appetizers, serve them with wings or veggies and dip for a fun spread. - Creative ways to reheat leftovers: To reheat, place them in the oven at 350°F for about 10 minutes. This keeps them crispy. You can also try an air fryer for a quick and crunchy option. For the Full Recipe, refer to the previous section. {{image_2}} You can play with flavors in your Pickle Ranch Potato Skins. Start by trying different cheese types. For a smoky taste, use gouda or pepper jack cheese. These cheeses melt well and add a nice kick. You can also opt for a mix of cheeses, like mozzarella and cheddar, for extra creaminess. Adding proteins or vegetables is another fun way to switch things up. Consider crispy bacon bits for a savory crunch. If you prefer veggies, diced bell peppers or mushrooms work great. They add color and flavor without overpowering the dish. If you need gluten-free options, this recipe is easy to adapt. Just make sure your ranch seasoning mix is gluten-free. Most brands offer this option, or you can make your own at home. For those who want vegan alternatives, swap the sour cream and cheese for plant-based versions. There are many dairy-free sour creams on the market today. You can also use nutritional yeast as a cheese substitute. It adds a cheesy flavor with a healthy twist. To keep leftover Pickle Ranch Potato Skins fresh, store them in an airtight container. Make sure they cool down before you seal them up. You can keep them in the fridge for up to three days. When you're ready to eat, the best way to reheat them is in the oven. Preheat your oven to 350°F (175°C). Place the skins on a baking sheet and heat for about 10-15 minutes. This method keeps them crispy and delicious. Yes, you can freeze Pickle Ranch Potato Skins! To freeze them, let the skins cool completely. Wrap each one in plastic wrap, then place them in a freezer-safe bag. They can last in the freezer for about two months. When you're ready for a tasty snack, take them out and thaw in the fridge overnight. Reheat them in the oven at 350°F (175°C) for about 15-20 minutes. This keeps them crispy and full of flavor, just like when they were fresh. What types of potatoes are best for this recipe? I recommend using medium russet potatoes. They have a nice balance of starch and moisture. This makes them perfect for crispy skins and fluffy insides. Can I make Pickle Ranch Potato Skins in advance? Yes, you can prep the potato skins ahead of time. Bake them and store in the fridge. Just add the cheese and toppings before serving. How do I make the dish spicier? To spice things up, add jalapeños or hot sauce to the ranch pickle mixture. You can also sprinkle some cayenne pepper on top before baking. What can I use instead of dill pickle relish? If you don’t have dill pickle relish, try chopped dill pickles or sweet pickle relish. They can add a nice tang to your ranch sauce. What to do if the skins are too tough? If the skins are tough, you may not have baked them long enough. Try baking them longer next time. This will help make the skins crisp and tender. How to store the ranch pickle sauce? Store the ranch pickle sauce in an airtight container in the fridge. It should stay fresh for about a week. Pickle Ranch Potato Skins are easy to make and full of flavor. You learned about key ingredients, preparation steps, and cooking tips. These skins provide great ideas for serving and variations, ensuring everyone can enjoy them. Remember to store leftovers properly and explore different flavors or diets. Embrace these tips, get creative, and impress your guests. You now have all you need to make this tasty snack. Enjoy every bite and let your cooking shine!

Pickle Ranch Potato Skins Tasty and Simple Recipe

Are you ready to take your snack game up a notch? My Pickle Ranch Potato Skins recipe is simple, tasty,

To make Cherry Almond Energy Balls, you need simple, healthy ingredients. This recipe takes about 10 minutes to prep and gives you about 15 to 20 energy balls. You mix everything in a food processor, shape the mix into balls, and chill them. - 1 cup pitted dried cherries: They add natural sweetness and a chewy texture. - 1 cup raw almonds: Almonds provide healthy fats, protein, and crunch. - 1 cup rolled oats: Oats give structure and fiber, making these snacks filling. - 2 tablespoons almond butter: This adds creaminess and binds the mix. - 2 tablespoons honey or maple syrup: These sweeteners help bind and add flavor. - 1 teaspoon vanilla extract: It enhances the overall taste with a warm note. - 1/2 teaspoon cinnamon: This spice adds warmth and depth to the flavor. - Pinch of salt: Salt enhances sweetness and balances flavors. - 1/4 cup unsweetened shredded coconut (optional): Coconut adds a fun texture and flavor when used for coating. This recipe is easy to adjust for dietary needs. To make it vegan, simply use maple syrup instead of honey. For gluten-free options, ensure you use certified gluten-free oats. These changes keep the energy balls tasty and accessible for everyone! To make Cherry Almond Energy Balls, you start with the right ingredients. Gather everything you need first. 1. In a food processor, add: - 1 cup pitted dried cherries - 1 cup raw almonds - 1 cup rolled oats - 2 tablespoons almond butter - 2 tablespoons honey or maple syrup - 1 teaspoon vanilla extract - 1/2 teaspoon cinnamon - A pinch of salt 2. Pulse the mixture until it looks crumbly and sticks together. Check that all parts blend well. You might need to stop and scrape the sides to mix. 3. When mixed, wet your hands. This helps prevent sticking. Form small balls, about 1 inch wide. 4. If you want, roll each ball in unsweetened shredded coconut. This adds a nice touch and flavor. 5. Place the balls on a parchment-lined baking sheet. Pop them in the fridge for at least 30 minutes. This helps them firm up. 6. After they set, store the balls in an airtight container in the fridge. Using a food processor can make this recipe quick and easy. Here are some tips: - Cut larger ingredients: If your dried cherries or almonds are big, chop them first. This helps the processor blend them better. - Don’t overfill: If you add too much at once, it may not mix well. Blend in batches if needed. - Pulse, don’t blend: Pulsing helps mix your ingredients without turning them into mush. Even simple recipes can have pitfalls. Here are mistakes to watch for: - Skipping the chilling step: Chilling helps the energy balls hold their shape. Don’t skip it! - Too many wet ingredients: If you add too much honey or almond butter, the mixture can get too sticky. Adjust as needed. - Not measuring: Accurate measurements keep the flavors balanced. Use measuring cups for best results. Now that you know the steps, you can make these energy balls with confidence. Enjoy your tasty, healthy snack! To make perfect cherry almond energy balls, choose fresh, high-quality dried cherries. Look for ones without added sugar. Use raw almonds for a great crunch. Blend the mixture until it is sticky. This helps the balls hold together. Wet your hands to form the balls. This prevents the mixture from sticking to your hands. Refrigerate the balls for at least 30 minutes. This helps them firm up nicely. If they feel too soft, add more oats. This will help with the texture. Adding toppings can make your energy balls fun and tasty. You can roll them in shredded coconut for a tropical twist. Chopped nuts or seeds also work well. You might try using cocoa powder for a chocolatey taste. For a sweet touch, drizzle melted dark chocolate on top. This adds flavor and makes them look fancy. You can even sprinkle sea salt on top for a sweet-savory combo. You can boost the flavor of your energy balls with some easy additions. Try adding a tablespoon of chia seeds or flax seeds. These add nutrition and a nice crunch. For a spicy note, consider adding a pinch of nutmeg or ginger. You can also mix in a scoop of protein powder. This gives you an extra energy boost. Experiment with different flavors to find your favorite. The key is to have fun and enjoy the process. For the complete process, check the Full Recipe. {{image_2}} You can easily change the taste of cherry almond energy balls. Want chocolate? Add 1/3 cup cocoa powder to the mix. You will love how it blends with cherry! For coconut fans, mix in 1/2 cup unsweetened shredded coconut. This gives a tropical twist. You can even toss in some mini chocolate chips for a sweet surprise. Not everyone can enjoy nuts or sugar. To make these energy balls nut-free, switch almonds for sunflower seeds. This keeps the crunch while avoiding allergens. For a sugar-free option, use agave syrup or a sugar substitute like stevia. These swaps let everyone enjoy this tasty treat! You can adjust the fruits in your energy balls based on the season. In summer, mix in dried apricots or peaches. In fall, try dried apples or pumpkin spice. This adds warmth and flavor that fits the season. You can even sprinkle in some nutmeg or ginger for a fun twist. For the full recipe, feel free to check out the details! To keep your cherry almond energy balls fresh, store them in an airtight container. Place a piece of parchment paper between layers to prevent sticking. I find that a glass container works best. It keeps the flavors intact and prevents moisture. Always keep them in the fridge. This ensures they stay firm and tasty. If you wish to store them longer, freezing is a great option. To freeze, first, place the energy balls on a baking sheet. Make sure they are not touching. Freeze them for about one hour, or until firm. Then, transfer the balls into a freezer-safe bag or container. Label the bag with the date. They can last up to three months in the freezer. When ready to eat, just thaw them in the fridge overnight. These energy balls stay fresh for about one week in the fridge. After that, they may lose their flavor and texture. Check for any signs of spoilage, like a change in smell or texture. If you notice anything off, it's best to toss them. For optimal taste, enjoy them within the first few days. Keeping them in the fridge helps maintain their yummy flavor. For more details, check the Full Recipe for insights on preparing and enjoying this nutritious snack! Yes, you can use other nuts in these energy balls. If you have a nut allergy, try seeds like sunflower or pumpkin. Walnuts or cashews can also add unique flavors and textures. Just keep the same amount, so substitute one cup for another. Each nut brings a different taste, making this recipe fun to customize. These energy balls can last up to one week in the fridge. Store them in an airtight container to keep them fresh. If you want to keep them longer, you can freeze them. They can last up to three months in the freezer. Just thaw them in the fridge before enjoying. Absolutely! You can make these energy balls ahead of time. They are perfect for meal prep. Make a batch at the start of the week and grab one whenever you need a snack. Just remember to store them properly to maintain freshness. For more details, check out the Full Recipe. In this blog post, we covered how to make tasty energy balls. We explored key ingredients and dietary options. I shared step-by-step instructions and tips for a perfect finish. We looked at flavor variations and how to store them well. These energy balls are fun and easy to make. They fit many diets and taste great. You can adjust the recipe based on what you like. Enjoy creating your own mix!

Cherry Almond Energy Balls Nutritious Snack Recipe

Looking for a quick, nutritious snack? Try my Cherry Almond Energy Balls! These tasty bites are packed with energy and

- Ground chicken - Dill pickle relish - Ranch dressing The main star of this dish is ground chicken. I love using it because it is lean and cooks quickly. For the tangy kick, we add dill pickle relish, which gives a great flavor. Ranch dressing ties everything together, adding creaminess that makes each bite special. - Garlic powder - Onion powder - Black pepper To boost the flavor, we use garlic powder and onion powder. These spices add warmth and depth. Black pepper adds a nice kick without being too strong. Together, they make the sliders more exciting and tasty. - Shredded lettuce - Sliced tomato - Additional sliced pickles Toppings can make a big difference. I like to use shredded lettuce for crunch. Sliced tomato adds freshness. You can also add more sliced pickles if you want extra tang. These toppings not only taste good but also make the sliders look great. You can find the full recipe to make these flavorful sliders and enjoy a delightful meal. To start, grab a large mixing bowl. Add the ground chicken, dill pickle relish, ranch dressing, breadcrumbs, garlic powder, onion powder, black pepper, and salt. Mix all these ingredients well. Use your hands or a spoon to ensure everything blends evenly. This step is key to a tasty slider! Next, shape your mixture into 6 equal-sized patties. Make sure they are slightly larger than your slider buns. This helps because the patties may shrink while cooking. Aim for a nice, even thickness so they cook well. Now it's time to cook! Preheat your non-stick skillet or grill over medium heat. Once hot, place the chicken patties in the pan. Cook them for about 5-6 minutes on each side. You want them to be fully cooked and reach an internal temperature of 165°F (75°C). While they cook, you can also toast the slider buns in the same skillet for extra flavor. These steps keep your sliders juicy and full of flavor, making them perfect for any meal. For the full recipe, check out the details above. Enjoy cooking! To make the best Pickle Ranch Chicken Sliders, check the internal temperature. Cook the patties until they reach 165°F (75°C). This ensures they are safe to eat and remain juicy. To avoid dry patties, mix the ingredients gently. Overmixing can make them tough. Use a light hand when forming the patties too. This keeps them tender. You can also add a bit more ranch dressing to the mix for extra moisture. Toasting the buns is key for a great slider. Lightly toast them in the pan where you cooked the patties. This adds flavor and keeps the buns from getting soggy. Layer the toppings in a way that maximizes flavor. Start with the chicken patty, then add lettuce and tomato. If you like pickles, add them next. This keeps everything balanced and tasty. Drizzle a little ranch on top before closing the slider. When it comes to sides, pair your sliders with crispy fries or a fresh salad. These options add crunch and balance to the meal. For presentation, serve the sliders on a large platter. Add a small bowl of extra ranch dressing for dipping. You can also garnish with parsley or pickle slices for a pop of color. This makes your meal look as good as it tastes. {{image_2}} You can switch up the protein in these sliders. Ground turkey works well and keeps the dish light. If you want a plant-based option, try using crumbled tofu or chickpeas. These swaps can make the sliders fit different diets. You might also consider healthier ranch dressing. Look for low-fat or yogurt-based ranch. These options cut calories but keep the tangy flavor. You can even make your own ranch using Greek yogurt and fresh herbs. To add a kick, you can include spicy elements. Jalapeños or hot sauce can bring heat to each bite. If you love cheese, try adding shredded cheddar or pepper jack. Cheese adds a creamy richness that pairs well with the tangy pickle flavor. Serving sliders at a party? Create a fun slider platter. Stack the sliders on a large tray. Add dips like extra ranch or hot sauce for guests to enjoy. If you want a quick meal, make wrap versions. Use large lettuce leaves or tortillas to hold the chicken patty. This style is easy to eat and perfect for on-the-go meals. For the full recipe, check out the complete instructions on how to make these tasty sliders. After you enjoy your sliders, store any leftovers in a tight container. Make sure to seal it well. You can keep the sliders in the fridge for up to three days. If you want to keep them fresh longer, consider freezing them instead. To reheat the sliders, I suggest using an oven or a skillet. In the oven, set it to 350°F (175°C). Place the sliders on a baking sheet for about 10 minutes. If you use a skillet, heat it on medium-low. Add a splash of water and cover with a lid. This keeps them moist and tasty. You can freeze the cooked patties for later use. Just let them cool completely first. Wrap each patty in plastic wrap and then place them in a freezer bag. This way, they stay fresh for up to three months. When you want to eat them, take the patties out of the freezer. Let them thaw in the fridge overnight. After thawing, reheat them using the same methods I mentioned before. Enjoy your Pickle Ranch Chicken Sliders anytime! For the full recipe, check the beginning of the article. To make these sliders gluten-free, you can swap out regular breadcrumbs for gluten-free breadcrumbs. Many brands offer good options made from rice or nuts. For the buns, look for gluten-free slider buns at your local store. You can also use lettuce wraps for a low-carb option. Just make sure to check labels for hidden gluten in sauces or dressings. Yes, you can prepare the patties ahead of time. Just make them and store them in the fridge for up to two days. If you want to save them longer, freeze them. Lay them on a baking sheet first, freeze until solid, then transfer to a freezer bag. Thaw in the fridge when ready to cook. This makes meal prep easy and quick. Some great sides to pair with these sliders include: - Sweet potato fries - Coleslaw - Veggie sticks with ranch dip - Potato salad - Corn on the cob These sides add color and flavor to your meal. They also complement the tangy taste of the sliders. Enjoy mixing and matching! Pickle Ranch Chicken Sliders are fun and tasty. We discussed key ingredients like ground chicken, dill pickle relish, and ranch dressing. Remember to mix well for even flavors and monitor cooking times for juicy patties. Feel free to swap ingredients or try new toppings. Store any leftovers correctly to keep them fresh. You can make these sliders gluten-free or prepare them ahead. Enjoy making these sliders at your next meal or gathering!

Tasty Pickle Ranch Chicken Sliders for Any Meal

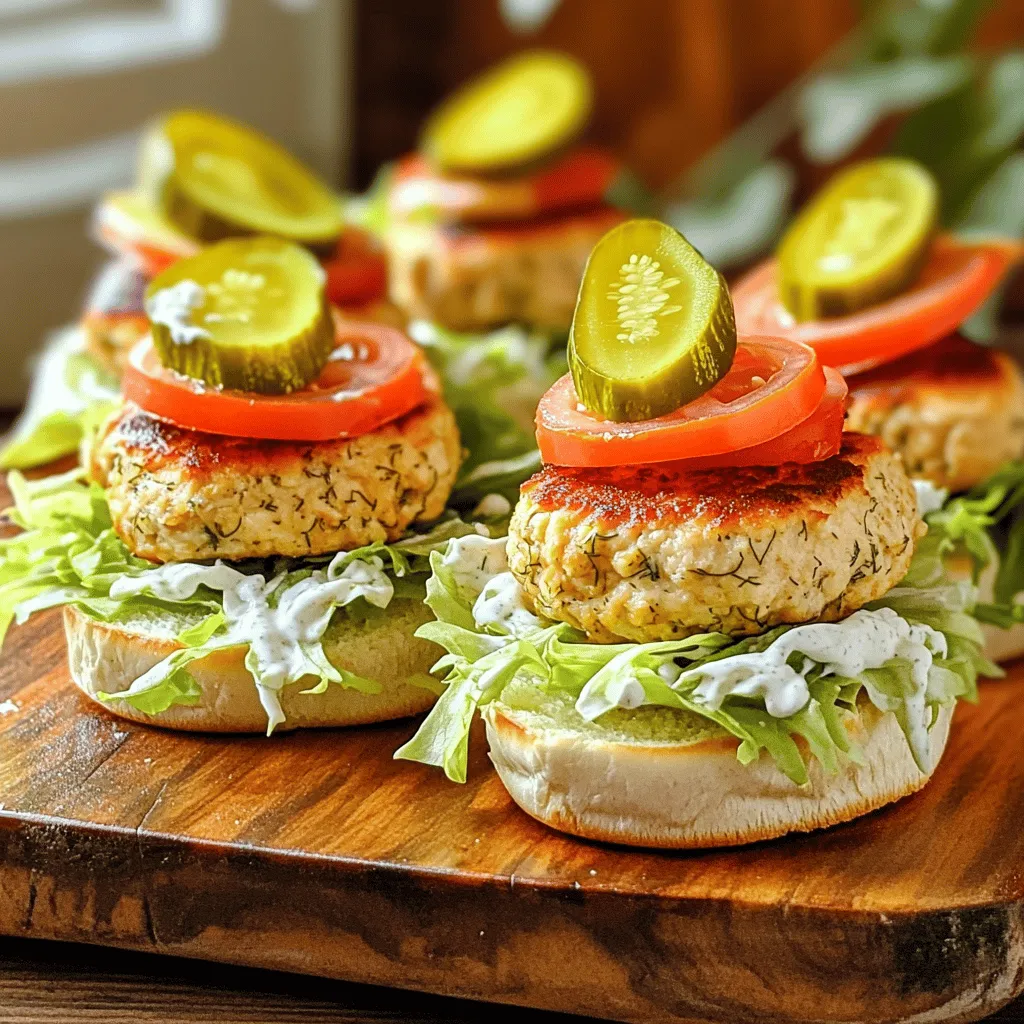
Are you ready to take your meal game up a notch? These Tasty Pickle Ranch Chicken Sliders are a crowd-pleaser

To make Cherry Chocolate Granola Bars, you need these tasty ingredients: - 2 cups rolled oats - ½ cup almond butter (or any nut/seed butter of choice) - ¼ cup honey or maple syrup - ½ cup dark chocolate chips - ½ cup dried cherries, chopped - ¼ cup sunflower seeds - ¼ cup sliced almonds - 1 teaspoon vanilla extract - ½ teaspoon cinnamon - Pinch of salt You can swap some ingredients if needed. Here are a few ideas: - If you don’t have almond butter, peanut butter works too. - Maple syrup can replace honey for a vegan option. - You can use any dried fruit instead of cherries, like cranberries or raisins. - For a nut-free version, skip the nuts and use pumpkin seeds. Choosing the best ingredients helps make better bars. Here are my tips: - Buy organic oats to avoid pesticides and chemicals. - Look for nut butters with no added sugars or oils. - Choose dark chocolate chips with at least 70% cocoa for a rich taste. - Select plump, moist dried cherries for a juicy bite. - Always check the expiration dates on all products. These tips help you create delicious Cherry Chocolate Granola Bars. You can find the full recipe above to get started! Start by preheating your oven to 350°F (175°C). Next, grab an 8x8 inch baking dish. Line it with parchment paper, leaving some paper hanging over the edges. This step makes it easy to lift out the granola bars later. In a large bowl, mix 2 cups of rolled oats, ¼ cup of sunflower seeds, and ¼ cup of sliced almonds. Add ½ cup of chopped dried cherries, ½ teaspoon of cinnamon, and a pinch of salt. Stir these dry ingredients until they are well combined. This mixture forms the base of your granola bars and gives them texture. For the wet mix, take a microwave-safe bowl. Add ½ cup of almond butter and ¼ cup of honey or maple syrup. Microwave this mix in 20-second intervals. Stir after each interval until it becomes smooth and melted. Once ready, stir in 1 teaspoon of vanilla extract. Pour this warm mixture over the dry ingredients and mix well. This helps to coat all the oats and nuts evenly. Transfer the mixture into your prepared baking dish. Press it firmly with a spatula or your hands. This step ensures the bars hold together when baked. Bake for 20-25 minutes, until the edges turn golden brown. Once baked, let it cool in the dish for about 10 minutes. Use the parchment paper to lift the granola out and place it on a wire rack. Allow it to cool completely before cutting into bars. Store your delicious bars in an airtight container. Enjoy this tasty snack! To get the best texture in your Cherry Chocolate Granola Bars, focus on the oats. Use rolled oats for the right chewiness. Press the mixture firmly into the baking dish. This step helps the bars hold together well. Bake until the edges are golden brown, but not too dark. A bit of crunch is good, but you want a soft center too. One common mistake is not measuring ingredients accurately. Use a scale for the best results. Overmixing can also ruin the bars. Gently fold in the chocolate chips to keep them whole. Lastly, don’t skip cooling the bars before cutting. This makes them easier to slice and keeps them from falling apart. You can customize your bars by adding other flavors. Try adding a sprinkle of sea salt on top for contrast. Nuts like walnuts or pecans add a nice crunch. You could also toss in some coconut flakes for extra flavor. If you love spices, a dash of nutmeg can make a big difference. Each of these adds a unique twist to the classic Cherry Chocolate Granola Bars recipe. {{image_2}} You can add a nutty twist to your Cherry Chocolate Granola Bars. By mixing in chopped nuts, you heighten the texture and flavor. Use walnuts, pecans, or hazelnuts to enhance the crunch. Simply add about ½ cup of your chosen nuts to the dry mix. This change makes the bars more filling and adds healthy fats. Want to make your bars vegan? Swap honey for maple syrup. Both sweeteners work well, but maple syrup keeps it plant-based. For a gluten-free option, ensure your oats are certified gluten-free. This small change allows everyone to enjoy your tasty snack without worry. With these swaps, your Cherry Chocolate Granola Bars will be a hit with all! You can easily customize flavors in your granola bars. For a tropical twist, add shredded coconut. About ½ cup will do the trick! You can also spice it up with 1 teaspoon of almond extract instead of vanilla. This gives your bars a unique flavor and aroma. Try adding spices like nutmeg or ginger for a warm touch. Each variation adds a new layer of taste, making your snacks even more exciting. For the full recipe, check out the details above! To keep your Cherry Chocolate Granola Bars fresh, store them in an airtight container. This protects them from air and moisture. You can place them in the pantry or the fridge. If you use the fridge, they stay fresh longer. Make sure to separate layers with parchment paper. This way, they won’t stick together. When stored correctly, these granola bars last for up to two weeks. If you keep them in the fridge, they may stay fresh for a bit longer. Check for any signs of spoilage. If they smell off or have changed color, toss them out. Always trust your senses. Freezing is a great option if you want to keep your bars for longer. To freeze, wrap each bar in plastic wrap. Then, place them in a freezer-safe bag or container. They can last for up to three months in the freezer. When you want to eat them, simply thaw them in the fridge overnight. This keeps them tasty and ready to enjoy! For the full recipe, check out the Cherry Chocolate Granola Bars section. Yes, you can use other nuts or seeds. Try walnuts, pecans, or pumpkin seeds. Each adds a unique flavor and texture. Just keep the total amount the same. You can mix and match to find your favorite combo. Definitely, these bars are a healthy snack option. They contain oats, nuts, and dried fruits. These ingredients provide fiber, protein, and essential nutrients. Using dark chocolate adds antioxidants while keeping sugar low. They are great for energy, perfect for a quick snack. You can find pre-made bars in most grocery stores. Check the health food aisle or snack section. Brands like Nature Valley or RXBAR often have similar flavors. Always read the label to ensure quality ingredients. To make gluten-free Cherry Chocolate Granola Bars, use gluten-free oats. Many brands offer certified gluten-free oats now. This simple swap ensures your bars are safe for those with gluten allergies or sensitivities. This guide walked you through making delicious Cherry Chocolate Granola Bars. We covered the key ingredients, including tips on choosing the best ones. You learned step-by-step instructions for mixing and baking. Plus, we shared useful tips to avoid common mistakes. You explored fun variations and storage methods to keep your bars fresh. Remember, baking is all about experimenting and enjoying the process. Try different flavors and ingredients to make this recipe your own. Happy baking!

Cherry Chocolate Granola Bars Tasty and Nutritious Snack

If you’re looking for a snack that’s both tasty and healthy, you’ll love these Cherry Chocolate Granola Bars! Packed with

Older posts
Newer posts
← Previous Page1 … Page54 Page55 Page56 … Page84 Next →

dsad

© 2026 Lisa Dishes • Built with GeneratePress

Our Policies

  • Copyright Policy
  • Cookie Policy
  • GDPR Policy
  • Privacy Policy
  • Disclaimer
  • Terms Of Use

More Information

  • Home
  • About
  • Contact
  • Appetizers
  • Dessert
  • Dinner
  • Drinks
©2026, Lisa Dishes About Back To Top