Skip to content
DisclaimerTerms Of UseGDPR PolicyCookie Policy

Lisa Dishes

  • Home
  • Drinks
  • Appetizers
  • Dinner
  • Dessert
  • About
  • Contact
  • Privacy Policy
DisclaimerTerms Of UseGDPR PolicyCookie Policy

NO-ING-IMG

- 1 lb large shrimp, peeled and deveined - 1 bell pepper (any color), sliced - 1 zucchini, sliced - 1 red onion, cut into wedges - 2 cups cherry tomatoes - 3 tablespoons olive oil - 2 tablespoons Cajun seasoning - 1 teaspoon garlic powder - Salt and pepper to taste - Fresh parsley, chopped (for garnish) - Shrimp: 1 lb - Bell pepper: 1 - Zucchini: 1 - Red onion: 1 - Cherry tomatoes: 2 cups - Olive oil: 3 tablespoons - Cajun seasoning: 2 tablespoons - Garlic powder: 1 teaspoon - Salt and pepper: to taste - Fresh parsley: as needed for garnish - Alternatives for shrimp: You can use chicken or firm tofu. - Vegetable swaps: Try asparagus, broccoli, or green beans instead. - Cajun seasoning options: Use store-bought blends or mix your own with paprika and cayenne. Prepping the shrimp Start by rinsing the shrimp under cold water. Make sure they are peeled and deveined. Pat them dry with a paper towel. This helps the seasoning stick better. In a large bowl, mix the shrimp with olive oil, Cajun seasoning, garlic powder, salt, and pepper. Toss until every shrimp is coated well. Chopping the vegetables Grab your bell pepper, zucchini, red onion, and cherry tomatoes. Slice the bell pepper into strips. Cut the zucchini into rounds. For the red onion, cut it into wedges. Lastly, leave the cherry tomatoes whole. This mix of colors will make your dish pop! Layering vegetables Preheat your oven to 425°F (220°C). On a large sheet pan, arrange the veggies in an even layer. Start with the bell pepper, then add zucchini, red onion, and cherry tomatoes. Spread them out so they cook evenly. Adding shrimp Once the veggies are ready, add the seasoned shrimp on top. Mix them gently with the vegetables. Make sure everything is in a single layer. This helps with even cooking and ensures the shrimp and veggies get nice and tender. Oven settings Place the sheet pan in the preheated oven. Set the timer for 12-15 minutes. This is the magic time for cooking shrimp and veggies. Cooking time and doneness indicators Check the shrimp after 12 minutes. They should turn pink and opaque. If they look good, and the veggies are tender, it’s time to take them out. Let the dish cool for a minute. Then, sprinkle fresh parsley on top for a nice touch! When you cook on a sheet pan, space matters. Leave room between the shrimp and veggies. This helps them cook evenly. If they are too close, they may steam instead of roast. Layering is also key. Spread the veggies in a single layer. This way, they get nice and crispy. When you add shrimp, mix them with the veggies. This helps all the flavors blend. Want to amp up the taste? You can add extra spices. Try some smoked paprika or cayenne for heat. A pinch of thyme or oregano can also boost flavor. Fresh herbs add a nice touch, too. Parsley is great for garnish, but you can use basil or cilantro. Just chop them fine and sprinkle on top before serving. One big mistake is overcrowding the pan. If you fill it too much, your food will not cook right. This can make the veggies soft instead of crisp. Another mistake is underseasoning. Use enough Cajun seasoning, salt, and pepper. This makes sure the dish has the full flavor it deserves. Don't be shy with your spices! {{image_2}} You can change up the protein in this dish. Try chicken or tofu for a twist. For chicken, use boneless thighs or breasts. Cut them into bite-sized pieces. Season them just like the shrimp. If you choose tofu, opt for firm or extra-firm. Cut it into cubes and press to remove excess water. Seafood can also work well. If you want a mix, add scallops or fish. Cod or tilapia pairs nicely with Cajun flavor. Just adjust cooking time based on the protein you use. Using seasonal veggies makes this dish fresh and tasty. In spring and summer, use zucchini, bell peppers, and cherry tomatoes. They add color and sweetness. You can also add asparagus or green beans for more crunch. For fall and winter, think about heartier options. Use root veggies like carrots or sweet potatoes. Brussels sprouts also add depth. They caramelize beautifully in the oven and enhance the dish. If you're looking for low-carb or keto options, skip the starchy veggies. Instead, use leafy greens like spinach or kale. They cook quickly and add great nutrients. You can still enjoy the same Cajun flavor by adjusting the spice mix. For a vegetarian version, swap the shrimp for chickpeas or lentils. They provide protein and soak up flavors well. Add more veggies like broccoli or cauliflower for a filling meal. This way, you still get a delicious dish that everyone can enjoy. Store your leftovers in an airtight container. Make sure to cool the dish first. Place it in the fridge within two hours after cooking. This keeps the food safe and fresh. Leftovers should last three to four days in the fridge. Label the container with the date to track freshness. You can reheat the Cajun shrimp and veggies in two ways: microwave or oven. For the microwave, place a serving on a plate. Heat for one to two minutes. Stir halfway to warm evenly. For the oven, preheat to 350°F (175°C). Spread the leftovers on a baking sheet. Heat for about 10 minutes or until warm. The oven keeps the texture better than the microwave. Freezing is a great option for long-term storage. First, let the dish cool completely. Then, place it in a freezer-safe container. You can also use a freezer bag. Remove as much air as possible to prevent freezer burn. Label and date the bag. The dish can last up to three months in the freezer. To use it, thaw overnight in the fridge before reheating. You can tell the shrimp are done by their color and texture. Cooked shrimp change from a gray color to a bright pink. They also curl up into a "C" shape when done. If they are still gray, they need more time. Yes, you can prepare this dish ahead of time. Chop the veggies and season the shrimp in advance. Store them in the fridge for up to a day. Just remember to keep the shrimp and veggies separate until you are ready to cook. This helps keep everything fresh. This dish pairs well with many sides. Here are some ideas: - Rice or quinoa for a filling base - A simple green salad for freshness - Crusty bread to soak up any juices - Roasted potatoes for extra flavor This blog post guided you through making a flavorful Cajun shrimp and veggie sheet pan meal. We covered ingredients, measurements, and substitutions to fit your needs. The step-by-step instructions ensure you prepare and cook with ease. I shared tips for perfect results and variations to keep things interesting. Remember to store any leftovers properly and reheat for the best taste. Enjoy making this dish, and feel free to experiment with flavors and ingredients that inspire you. Happy cooking!

Cajun Shrimp & Veggie Sheet Pan Deliciously Simple Meal

Get ready for a meal that’s both easy and bursting with flavor! My Cajun Shrimp & Veggie Sheet Pan recipe

To make your Maple Pecan Coffee Cake, gather these simple ingredients: - 2 cups all-purpose flour - 1 teaspoon baking powder - 1/2 teaspoon baking soda - 1/2 teaspoon salt - 1/2 cup unsalted butter, softened - 1 cup brown sugar, packed - 2 large eggs - 1 teaspoon vanilla extract - 1/2 cup maple syrup - 1/2 cup sour cream - 1 cup pecans, chopped - 1 teaspoon ground cinnamon Measuring ingredients correctly matters. Use dry measuring cups for flour and sugar. Level off the top with a straight edge. For liquids, use a clear cup with measurement marks. Always check your measurements at eye level. This will help you get the best results. You can swap ingredients if needed. If you don't have sour cream, use plain yogurt. For a dairy-free option, use coconut oil instead of butter. You can also replace pecans with walnuts or almonds for a different taste. If you want less sugar, try using less brown sugar or a sugar substitute. First, you need to preheat your oven to 350°F (175°C). This ensures even baking. Next, grease a 9x13 inch baking pan or line it with parchment paper. Both methods work well, but parchment makes it easier to lift the cake out later. In a large bowl, cream together the softened butter and brown sugar. Use a mixer for about 3-4 minutes until it looks light and fluffy. Then, add the eggs one by one, mixing well after each. After that, stir in the vanilla extract and maple syrup. Mix until everything is well combined. Take a medium bowl to whisk together the dry ingredients. Combine the flour, baking powder, baking soda, and salt. This step is key to help the cake rise properly. Once mixed, set this bowl aside for later. Gradually add the dry mixture to the wet bowl. Alternate with the sour cream. Start and end with the flour mixture. Stir gently until just combined. Then, fold in the chopped pecans and ground cinnamon. Pour the batter into your prepared pan and smooth the top with a spatula. Bake for 30-35 minutes. A toothpick should come out clean when inserted in the center. After baking, let the cake cool in the pan for about 10 minutes. Then, transfer it to a wire rack to cool completely. For a sweet finish, drizzle extra maple syrup over the cooled cake just before serving. This adds a lovely shine and extra flavor. Enjoy your Maple Pecan Coffee Cake! To get a light and fluffy cake, use softened butter. This helps it mix well with sugar. Cream them together until the mix is light in color. This usually takes about 3-4 minutes. Make sure to add eggs one at a time. This step helps trap air and makes the cake rise. The key to a great flavor lies in your ingredients. Use high-quality maple syrup for a rich taste. The brown sugar adds a nice depth. Don’t skip the cinnamon; it adds warmth and spice. You can adjust these ingredients to suit your taste. If you want a sweeter cake, add a bit more maple syrup or sugar. Ovens can vary in temperature. If your oven runs hot, check your cake a bit earlier. Use a toothpick to test for doneness. Insert it into the center; if it comes out clean, the cake is done. If it’s not set, give it a few more minutes. Always keep an eye on it during the last few minutes of baking. {{image_2}} You can add chocolate chips for a sweet twist. Use about 1 cup of semi-sweet or dark chocolate chips. Stir them into the batter after you fold in the pecans. The chocolate pairs well with the maple flavor. It adds a rich taste that makes the cake even more special. This mix of flavors is sure to please chocolate lovers! To make a vegan version, substitute eggs with flax eggs. Mix 1 tablespoon of ground flaxseed with 3 tablespoons of water for each egg. Replace the butter with coconut oil or vegan butter. Use almond milk instead of sour cream. This version is just as tasty and moist. You won’t miss the eggs or dairy at all! For a gluten-free cake, swap all-purpose flour for a gluten-free blend. Make sure it has a good binding agent, like xanthan gum. You can also use almond flour for a nutty flavor. Just remember, gluten-free flours can change the texture. Keep an eye on the baking time, as it might vary. Enjoy the same delicious taste without the gluten! To store leftover cake, first let it cool completely. Place the cake in an airtight container. You can also cover it tightly with plastic wrap. Store it at room temperature for up to 3 days. If you want it to last longer, the fridge is a good choice. Just be aware that the cake may dry out a bit in the fridge. To freeze your Maple Pecan Coffee Cake, cut it into slices. Wrap each slice in plastic wrap. Then place the slices in a freezer bag or container. Make sure to remove as much air as possible. This method helps prevent freezer burn. The cake will stay fresh for up to 3 months. When you’re ready to enjoy it, just thaw in the fridge overnight. To reheat your coffee cake, you have a few options. For the best taste, use the oven. Preheat it to 350°F (175°C). Place the cake on a baking sheet. Heat for about 10-15 minutes, or until warm. If you’re in a hurry, you can use the microwave. Heat a slice for about 20-30 seconds. Be careful not to overheat it, as it can become tough. Enjoy your warm cake with a drizzle of maple syrup for extra flavor! Yes, you can make this coffee cake ahead of time. Bake it, let it cool, and store it. Wrap it tightly in plastic wrap or foil. Keep it in the fridge for up to three days. For longer storage, freeze it for up to two months. Just remember to thaw it in the fridge overnight before serving. Maple Pecan Coffee Cake lasts about three days at room temperature. If you store it in the fridge, it can last up to a week. Keep it wrapped to prevent it from drying out. If you freeze it, it can last for two months. Just make sure to wrap it well. Absolutely! You can use other nuts if you prefer. Walnuts, almonds, or hazelnuts all work well. Just chop them up as you would the pecans. Each nut will add its own flavor and texture to the cake. Feel free to experiment and find your favorite combination. Serve the cake warm or at room temperature. Slice it into pieces and place them on decorative plates. For a nice touch, drizzle some extra maple syrup on top. You can also sprinkle crushed pecans as a garnish. This makes the cake look beautiful and inviting. Enjoy it with a cup of coffee or tea for a delightful treat! You learned about the key ingredients and steps to make Maple Pecan Coffee Cake. We discussed tips for a light texture and flavor balance. Variations include chocolate chips and vegan options, giving you more choices. Proper storage methods help keep your cake fresh. As you begin your baking journey, remember to experiment and enjoy the process. The right ingredients and techniques lead to a delicious treat. Happy baking!

Maple Pecan Coffee Cake Delightful and Simple Recipe

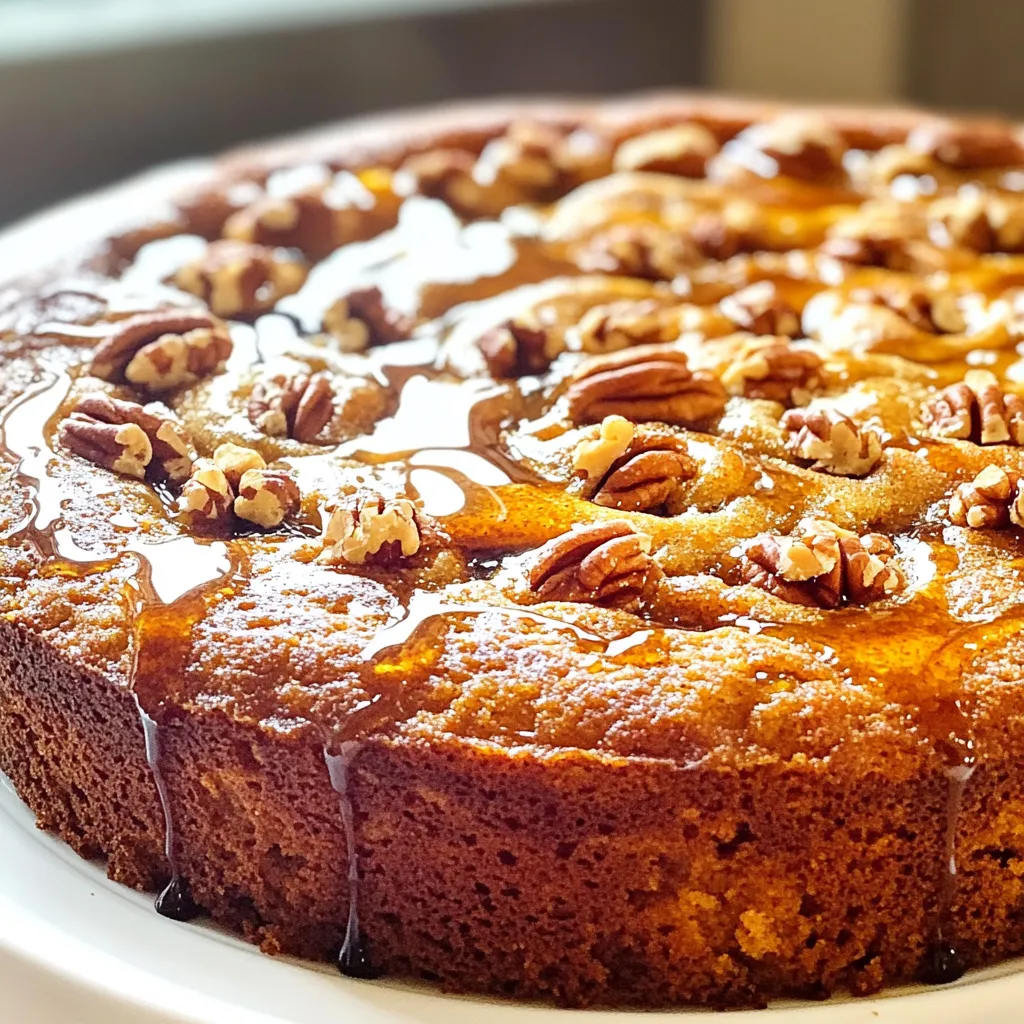
If you’re looking for a cozy treat that brightens your mornings, you’ve found it! This Maple Pecan Coffee Cake recipe

Here are the ingredients you need for Chocolate Mint Oreo Truffles: - 1 package (15.25 oz) Oreo cookies - 8 oz cream cheese, softened - 1 teaspoon peppermint extract - 1 cup semi-sweet chocolate chips - 1 tablespoon coconut oil (optional) - ½ teaspoon green food coloring (optional) - Mint sprinkles or crushed Oreos for garnish To make these truffles, start with the Oreo cookies. They give the truffles their rich flavor. The cream cheese adds a creamy texture. Peppermint extract brings a fresh, minty taste. Chocolate chips coat the truffles and add sweetness. You can use coconut oil to make the chocolate smoother when melting. Green food coloring is fun for a festive look, but it’s not required. Mint sprinkles or crushed Oreos make lovely toppings. Gather all these ingredients before you begin. It keeps your cooking process smooth and fun. {{ingredient_image_1}} To crush Oreos, start by placing them in a food processor. Pulse until they turn into fine crumbs. If you don’t have a food processor, use a sealed bag. Place the cookies inside and crush them with a rolling pin. Aim for a crumb texture, not powder. This gives the truffles a nice bite. Next, grab a large mixing bowl. Add the crushed Oreos, softened cream cheese, and peppermint extract. Use a spatula or your hands to mix everything together. Keep mixing until you have a smooth, dough-like texture. This blend brings together rich flavors and a creamy feel. Now it’s time to shape the truffles. Scoop out small portions and roll them into balls, about one inch in size. Place these on a baking sheet lined with parchment paper. Once shaped, put the baking sheet in the freezer for about 30 minutes. This helps the truffles firm up nicely. While the truffles chill, melt your chocolate. Use a microwave-safe bowl to heat the semi-sweet chocolate chips. Heat them in 30-second intervals, stirring after each. Keep going until the chocolate is smooth. If you want a smoother dip, add coconut oil and stir it in. After chilling, take out the truffles. Dip each one into the melted chocolate. Make sure they are fully coated. Use a fork to lift them out and let any excess chocolate drip off. If you’re using green food coloring, add it to the leftover chocolate for a fun swirl effect. Drizzle this over the truffles. Quickly sprinkle mint sprinkles or crushed Oreos on top. Let the chocolate harden at room temperature or place the truffles in the fridge. This should take about 15 to 20 minutes. Once the chocolate sets, your truffles are ready. Serve them on a decorative plate or in small cupcake liners. Enjoy your tasty treats! To get the right texture for your truffles, mix the crushed Oreos with softened cream cheese. Use your hands or a spatula to blend them well. The mixture should feel moist but not too sticky. If it seems dry, add a tiny bit of cream cheese. If it’s too wet, add more crushed Oreos. Chill the truffles to help them firm up before dipping. Store your truffles in a cool place. You can keep them in the fridge for up to a week. If you want to keep them longer, freeze them. Just place them in an airtight container. They can last for up to three months in the freezer. Remember to let them thaw in the fridge before serving. One common mistake is over-mixing the ingredients. This can make your truffles too soft to shape. Another mistake is not chilling them long enough. If the truffles are too soft, they will fall apart when you dip them in chocolate. Lastly, don’t skip the garnish. It adds a nice touch and makes them look even more tempting! Pro Tips Chilling is Key: Ensure the truffles are fully chilled before dipping in chocolate; this helps maintain their shape and makes the coating easier. Use Quality Chocolate: Opt for high-quality semi-sweet chocolate for a richer flavor; it makes a significant difference in the final taste of the truffles. Experiment with Flavors: Don’t hesitate to substitute peppermint extract with other flavors like orange or almond for a unique twist on these truffles. Storage Tips: Store the truffles in an airtight container in the refrigerator for up to a week for maximum freshness. {{image_2}} You can change the flavor of your truffles easily. Try adding orange extract for a citrus twist. Almond extract gives a nutty taste that pairs well with chocolate. For a fun twist, use crushed candy canes instead of Oreos. This gives your truffles a festive touch. You can also mix in flavored syrups for added sweetness and complexity. Garnishing your truffles can make them pop! Instead of mint sprinkles, try crushed nuts like almonds or pecans. Shredded coconut can add a tropical vibe. You can also drizzle white chocolate on top for a beautiful contrast. For a fun touch, use colored sugar or edible glitter. These options can make your truffles look like little jewels. If you want to make these truffles fit special diets, there are simple swaps. For a gluten-free version, choose gluten-free Oreo cookies. You can use dairy-free cream cheese and chocolate chips for a vegan option. If you need to cut sugar, try using sugar-free cookies and sweeteners. These changes make the truffles more inclusive while keeping them delicious. To keep your Chocolate Mint Oreo Truffles fresh, store them in an airtight container. Line the container with parchment paper for extra protection. This helps prevent sticking and keeps the truffles intact. Always place them in the fridge. This keeps them cool and firm. When stored properly, these truffles last about one week in the fridge. You can enjoy the rich flavors for days. If you notice any changes in smell or texture, it’s best to throw them away. Trust your senses; they’ll guide you well. If you want to keep them longer, freezing is a great option. Place the truffles on a baking sheet in a single layer. Freeze them until solid. Once frozen, transfer them to a freezer-safe container. Label the container with the date. They can last up to three months in the freezer. To enjoy, let them thaw in the fridge for a few hours. No, you should not use regular cream cheese. You need softened cream cheese for easy mixing. Softened cream cheese blends well with crushed Oreos. It helps form a smooth truffle mixture. If it's too hard, your truffles won’t hold together right. The best way to melt chocolate is in a microwave. Use a microwave-safe bowl for this. Heat the chocolate chips in 30-second bursts. Stir the chocolate in between bursts. This keeps it from burning. If you want a smoother texture, add coconut oil while melting. To make these truffles vegan, swap the cream cheese. Use a dairy-free cream cheese instead. Replace semi-sweet chocolate with dairy-free chocolate chips. Always check the labels to ensure they are vegan. This way, everyone can enjoy these tasty treats! Yes, you can make these truffles ahead of time! They store well in the fridge. You can make them a day or two before serving. Just keep them in an airtight container. This keeps them fresh and tasty for when you’re ready to enjoy! You can make Oreo truffles with simple ingredients and easy steps. We covered everything from crushing Oreos to melting chocolate. Remember, consistency matters, and don’t skip the fun garnishes. Try different flavors or modify for dietary needs. These truffles are good to store and share. Following these tips will help you create tasty treats everyone loves. Enjoy making, eating, and sharing these delightful desserts!

Chocolate Mint Oreo Truffles Irresistible Dessert Treat

Get ready to delight your taste buds with my Chocolate Mint Oreo Truffles! This fun and easy recipe combines the

- 14 oz (400g) firm tofu, pressed and cubed - 2 tablespoons cornstarch - 2 tablespoons vegetable oil - 3 cloves garlic, minced - 1 red bell pepper, sliced - 1 yellow bell pepper, sliced - 1 cup snap peas, trimmed - 2 tablespoons soy sauce - 1 tablespoon chili paste (adjust for spice level) - 1 tablespoon sesame oil - Salt and pepper to taste - Sesame seeds for garnish Chili Garlic Tofu Stir Fry pairs well with rice or noodles. You can serve it over fluffy jasmine rice or soba noodles for a hearty meal. Add a side of steamed broccoli for extra greens. You can also top it with chopped cilantro or lime wedges for a fresh touch. First, I press the tofu to remove extra moisture. I place the tofu on a plate, then add a weight on top. This helps it become firmer. I usually press it for about 20 minutes. After this, I cut the tofu into bite-sized cubes. This makes it easy to cook and eat. Next, I coat the tofu cubes in cornstarch. This gives it a crispy texture. In a large skillet, I heat vegetable oil over medium-high heat. I add the tofu cubes and fry them until they turn golden brown. This usually takes about 8 to 10 minutes. When done, I remove the tofu and set it aside. In the same skillet, I add minced garlic. I sauté it for about 30 seconds. I want it to be fragrant, but I must not burn it. Then, I add sliced red and yellow bell peppers and snap peas. I stir-fry these for about 5 minutes. I want them tender but still crisp. I return the crispy tofu back to the skillet with the vegetables. In a small bowl, I mix soy sauce, chili paste, and sesame oil. I pour this sauce over the tofu and veggies. I toss everything to combine. I then season with salt and pepper to taste. Finally, I stir-fry everything together for another 2 to 3 minutes. This helps heat everything through. When it’s ready, I remove the skillet from heat. I sprinkle chopped green onions and sesame seeds on top to garnish. This adds a nice crunch and flavor. To get that crunchy bite, cornstarch is key. It coats the tofu and helps it crisp up when cooked. Without it, your tofu may turn out soft. After pressing the tofu, cube it and toss it in cornstarch. Make sure each piece is well-coated. When frying, heat your oil well before adding tofu. A hot pan seals the outside quickly, creating a nice golden crust. Fry the tofu for about 8-10 minutes, turning it often. This will ensure every side gets that perfect crunch. Not everyone likes the same spice level. To adjust the heat, you can change the amount of chili paste used. Start with one teaspoon if you prefer mild. Taste and add more if you want more heat. You can also mix in some honey for sweetness to balance the spice. Feel free to mix up the vegetables in your stir fry. You can use broccoli, carrots, or even zucchini. Each veggie has a unique taste and texture. Cooking times vary for each vegetable. For example: - Broccoli takes about 4-5 minutes to become tender. - Carrots need about 3-4 minutes for a nice crunch. - Zucchini cooks quickly, just 2-3 minutes will do. Pay attention to each vegetable's cooking time for the best results! {{image_2}} You can switch tofu for tempeh or seitan. Both have great textures and flavors. Tempeh is made from fermented soybeans. It adds a nutty taste. Seitan is wheat-based and has a chewy texture. Both options boost protein and flavor. Other vegetarian proteins include chickpeas or lentils. These options add variety and nutrition to your dish. Feel free to mix and match for a unique meal. To keep the recipe fully vegan, use plant-based oils and sauces. Check that all your ingredients are free from animal products. For gluten-free options, look for gluten-free soy sauce. Tamari is a great choice and tastes similar. Many brands offer gluten-free alternatives, so check the labels. These simple swaps help everyone enjoy this tasty dish. To add more depth, try fresh herbs like basil or cilantro. They brighten the dish and add freshness. You can also experiment with different sauces. Adding hoisin or teriyaki sauce can change the flavor profile. Just balance the sauces to avoid overpowering the dish. Don’t hesitate to get creative with flavors! To store leftover chili garlic tofu stir fry, let it cool first. Place it in an airtight container. Make sure to keep it in the fridge. It will stay fresh for about 3-4 days. Keeping the tofu and veggies separate can help them stay crisp longer. To reheat the stir fry, use a skillet over medium heat. Add a splash of oil to help restore some crispiness. Stir often for about 5-7 minutes. You can also use a microwave, but this might make the tofu soft. Heat it in short bursts, stirring between each until warm. If you want to freeze the stir fry, do so right after cooking. Allow it to cool completely. Place it in a freezer-safe bag or container. Remove as much air as possible before sealing. It can last up to 2-3 months in the freezer. When ready to eat, thaw it in the fridge overnight. Reheat it in a skillet for the best texture. The best tofu for stir fry is firm or extra-firm tofu. Firm tofu holds its shape well during cooking. It absorbs flavors and has a nice texture. Extra-firm tofu is even denser. It offers a chewier bite, perfect for crispy dishes. Both types work well, but I prefer firm tofu for its balance of softness and sturdiness. Yes, you can make this dish ahead of time. For meal prep, cook the tofu and vegetables as usual. Store them separately in airtight containers. This keeps the tofu crispy and the veggies fresh. You can store them in the fridge for up to three days. When ready to eat, simply reheat in a pan over low heat. To add more heat, try a few simple tricks. You can increase the chili paste in the sauce. Another option is to add sliced fresh chili peppers. Jalapeños or Thai bird chilies work great. For a different flavor, sprinkle in some red pepper flakes. Adjust the spice level to fit your taste. Chili Garlic Tofu Stir Fry is a simple and tasty dish. We learned about the key ingredients, like tofu and soy sauce. The cooking steps were clear, from prepping the tofu to frying it just right. I shared tips for crispiness and ways to change the heat level. You can even swap tofu for tempeh or seitan. Remember, leftovers store well if kept right. Enjoy this dish for a quick meal or impress your friends! You now have the tools to make it perfect every time.

Chili Garlic Tofu Stir Fry Flavorful Plant-Based Dish

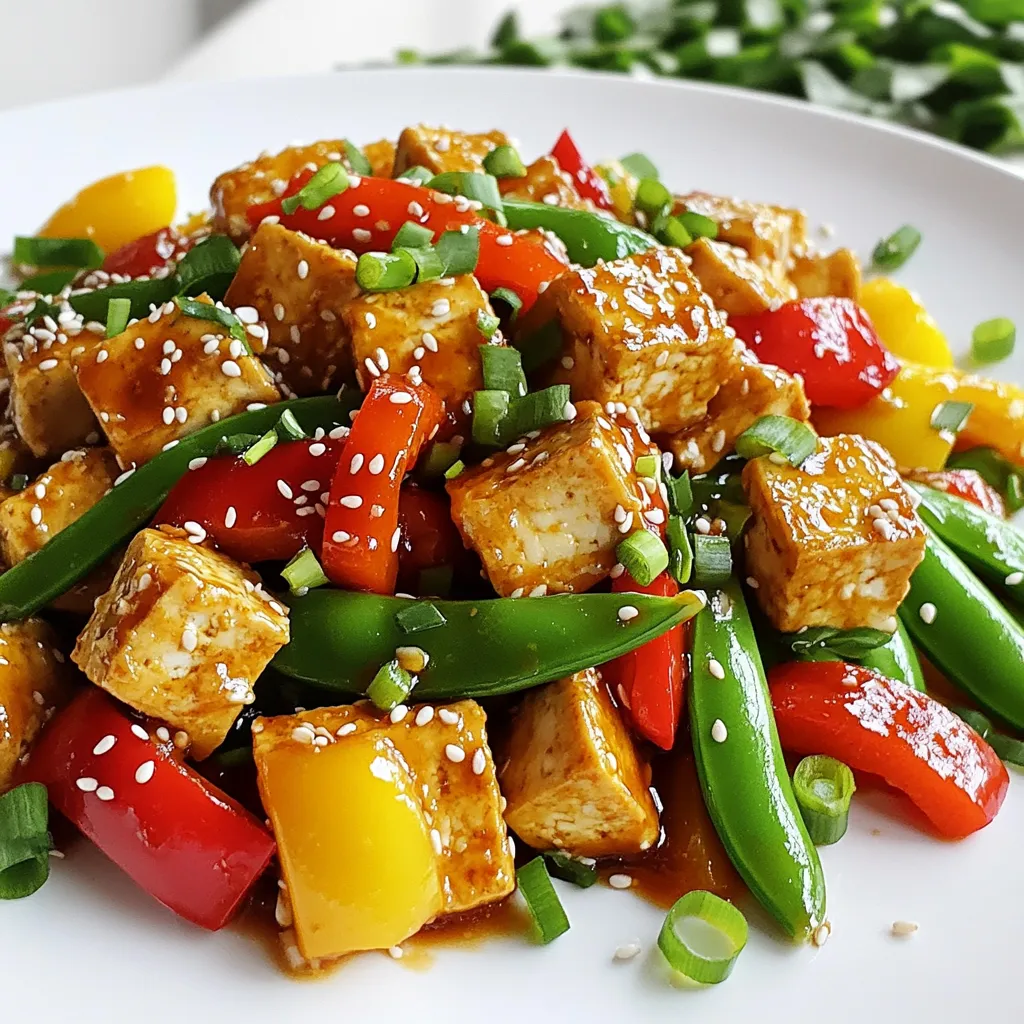
If you’re craving a quick, tasty meal, look no further than my Chili Garlic Tofu Stir Fry. This dish is

- 1 cup rolled oats - 1/2 cup protein powder (vanilla or unflavored) - 1 cup pumpkin puree - 1/2 cup almond milk (or any milk of choice) - 2 large eggs - 2 tablespoons maple syrup - 1 teaspoon pumpkin spice (or a mix of cinnamon, nutmeg, ginger, and cloves) - 1 teaspoon baking powder - 1/2 teaspoon vanilla extract - Pinch of salt Each serving has about: - Calories: 250 - Protein: 15g - Carbohydrates: 30g - Dietary Fiber: 5g - Sugars: 5g - Fat: 7g These pancakes are a great mix of protein and carbs. They help keep you full. The fiber in oats and pumpkin adds good health benefits, too. - Rolled oats: You can use quick oats, but the texture will change slightly. - Protein powder: If you prefer plant-based options, use pea or hemp protein. - Almond milk: Any milk works here. Try oat milk, soy milk, or cow's milk. - Maple syrup: Honey or agave syrup can replace maple syrup if you wish. - Pumpkin spice: Make your own mix with equal parts cinnamon, nutmeg, ginger, and cloves. These swaps make the recipe flexible. You can adjust based on what you have at home. Enjoy the fun of creating your own version! Start by making oat flour. You need rolled oats for this. Place 1 cup of rolled oats in a blender or food processor. Blend until the oats look like fine flour. This takes about a minute. Oat flour adds a nice texture to the pancakes. Now, grab a large mixing bowl. Add the oat flour, 1/2 cup of protein powder, 1 teaspoon of pumpkin spice, 1 teaspoon of baking powder, and a pinch of salt. Mix these dry ingredients well. In another bowl, whisk together 1 cup of pumpkin puree, 1/2 cup of almond milk, 2 large eggs, 2 tablespoons of maple syrup, and 1/2 teaspoon of vanilla extract. Make sure this mix is smooth. Then, pour this wet mix into your dry ingredients. Stir until just combined. Let the batter sit for about 5 minutes. This helps it thicken. Preheat a non-stick skillet or griddle over medium heat. Lightly grease it with cooking spray or a little butter. For each pancake, pour about 1/4 cup of batter onto the skillet. Cook until bubbles form on the surface, which takes around 2 to 3 minutes. Next, flip the pancake and cook for another 1 to 2 minutes until it turns golden brown. Keep cooking until you use all the batter. Adjust the heat if needed to avoid burning. Enjoy your fluffy pancakes! To get the best texture, use rolled oats. Blend them until they are a fine flour. This helps the pancakes stay light and fluffy. When mixing the wet and dry ingredients, don’t overmix. Stir gently and just until combined. Let the batter sit for about five minutes. This resting time helps thicken the batter, giving your pancakes a better structure. For perfect pancakes, I recommend a non-stick skillet or a griddle. A good spatula is key for flipping. You can also use a blender for making oat flour quickly. A mixing bowl is needed to combine your ingredients. Having a measuring cup handy ensures you pour just the right amount of batter. Stack your pancakes high for a fun look. Drizzle with maple syrup for sweetness. A sprinkle of pumpkin spice adds extra flavor. You can also top them with Greek yogurt or whipped cream for creaminess. Fresh fruit like bananas or berries makes a great addition, too. Try these tips to enhance your breakfast experience! {{image_2}} I love a good twist on classic recipes. To make chocolate chip pumpkin spice protein pancakes, simply add 1/2 cup of chocolate chips to the batter. The rich chocolate pairs well with the warm pumpkin spice. You get a sweet treat and a boost of protein too. Just fold the chips in gently before cooking. This adds a fun texture and flavor that everyone will enjoy. Making vegan pumpkin spice pancakes is easy. Replace the eggs with 1/4 cup of applesauce for each egg. Use plant-based protein powder. Swap almond milk for any plant milk you like. These simple changes keep the pancakes fluffy and delicious. The texture remains great, and you still get that warm pumpkin spice flavor. Everyone can enjoy this version, even if they avoid animal products. You can switch up the protein powder flavors to create new tastes. Use chocolate or cinnamon protein powder for a twist. Vanilla adds a nice base, while unflavored keeps the pumpkin taste front and center. Experimenting with flavors lets you make pancakes you love. Just keep in mind that different powders might change the texture slightly. Feel free to adjust the liquid if needed to keep the batter smooth. After a fun breakfast, you might have some pancakes left. To store them, let the pancakes cool to room temperature. Place them in an airtight container. You can stack them, but put a piece of parchment paper between each layer. This way, they won’t stick together. Store the container in the fridge for up to three days. When you're ready to eat your leftover pancakes, reheating them well is key. You can use a microwave, skillet, or toaster. For the microwave, place a pancake on a plate. Heat it for about 20-30 seconds. If you want a crispier texture, use a skillet. Heat it on low for 1-2 minutes per side. This will help keep them soft and tasty. To freeze your pancakes, first cool them completely. Then, place parchment paper between each pancake. Stack them in a freezer-safe bag or container. Remove as much air as you can to prevent freezer burn. You can freeze the pancakes for up to two months. When you're ready to eat, just thaw them in the fridge overnight or reheat them straight from the freezer! Yes, you can make these pancakes gluten-free. Just use certified gluten-free rolled oats. Blend them as directed to create your oat flour. This simple swap keeps your pancakes light and fluffy while avoiding gluten. Enjoy them guilt-free! You can boost the protein content easily. Add an extra scoop of protein powder to the batter. You can also mix in some Greek yogurt or cottage cheese. Both options add creaminess while increasing protein. This makes your breakfast even more satisfying. If your batter is too thick, add a splash of almond milk. Mix well until you reach the right consistency. If it’s too thin, sprinkle in a bit more oat flour. This will help you achieve the ideal pancake batter. Adjusting is key for perfect pancakes! We explored how to make delicious pancakes from start to finish. We covered the key ingredients, their nutrition, and tasty alternatives. I walked you through each step to prepare these pancakes perfectly. We also discussed tips for the right texture and tools, along with fun variations to try. Finally, I shared how to store and reheat leftovers. Now you can enjoy these pancakes any time and impress your family and friends. Happy cooking!

Pumpkin Spice Protein Pancakes Flavorful Breakfast Treat

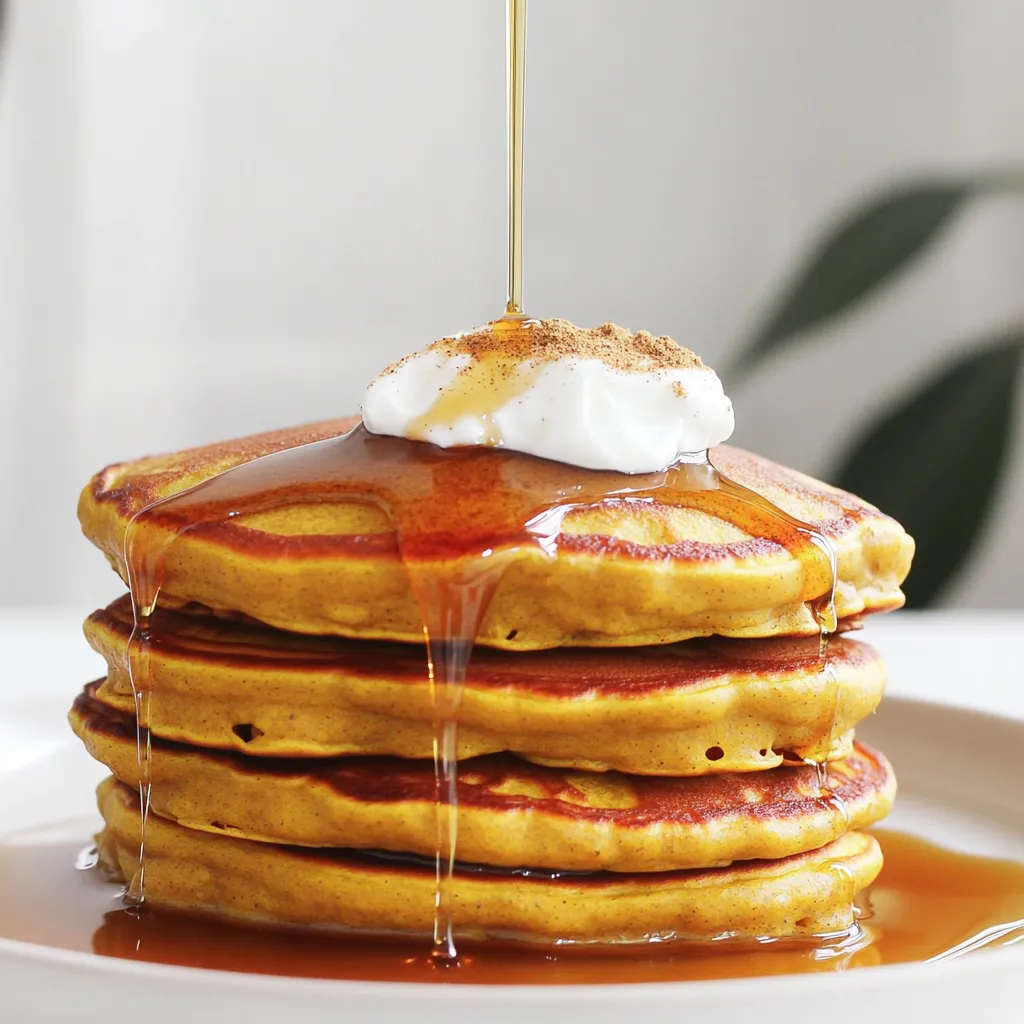
Start your morning with a burst of fall flavor! These Pumpkin Spice Protein Pancakes offer a tasty way to enjoy

To make a delightful Apple Butter Cinnamon Roll Cake, gather these ingredients: - 2 cups all-purpose flour - 1 cup granulated sugar - 1 tablespoon baking powder - 1 teaspoon baking soda - 1/2 teaspoon salt - 1 teaspoon ground cinnamon - 1 large egg - 1 cup buttermilk - 1/2 cup vegetable oil - 1 cup apple butter - 1/2 cup chopped pecans (optional) - 1/4 cup melted butter (for topping) - 1/4 cup brown sugar (for topping) - 1 tablespoon ground cinnamon (for topping) - For icing: 1 cup powdered sugar, 2 tablespoons milk Accurate measuring makes a big difference in baking. Use dry measuring cups for flour and sugar. Level off the top with a knife for precision. For liquids, use a clear measuring cup with markings. Pour until you reach the right line. When measuring sticky ingredients like apple butter, spray the cup with oil first. This helps it slide out easily. You can switch things up with some optional ingredients. If you want a crunch, add chopped pecans. You can also use other nut butters instead of apple butter. For a richer taste, try using whole milk instead of buttermilk. If you need a dairy-free option, use almond milk with a splash of vinegar to mimic buttermilk. These small changes can make the cake unique while keeping it delicious! Start by preheating your oven to 350°F (175°C). Grease a 9x13 inch cake pan. In a large bowl, whisk together 2 cups of all-purpose flour, 1 cup of granulated sugar, 1 tablespoon of baking powder, 1 teaspoon of baking soda, 1/2 teaspoon of salt, and 1 teaspoon of ground cinnamon. Mix these dry ingredients well. In another bowl, crack 1 large egg and mix it with 1 cup of buttermilk and 1/2 cup of vegetable oil. Stir until smooth. Pour this wet mix into the dry ingredients. Gently stir until just combined. Be careful not to overmix. Now, fold in 1 cup of apple butter. If you like, add 1/2 cup of chopped pecans for some crunch. Pour the batter into the greased pan and spread it evenly. In a small bowl, mix together 1/4 cup of melted butter, 1/4 cup of brown sugar, and 1 tablespoon of ground cinnamon. This mix will be your topping. Drizzle it over the cake batter in a swirl pattern. Use a knife or skewer to gently swirl the topping into the batter. This gives it the classic cinnamon roll look. Place the cake in your preheated oven. Bake for 30 to 35 minutes. To check if it’s done, insert a toothpick into the center. If it comes out clean, your cake is ready. Once baked, let the cake cool for about 10 minutes. Then, drizzle with icing made from mixing 1 cup of powdered sugar and 2 tablespoons of milk. Enjoy it warm or at room temperature! To make a fluffy cake, start with room temperature ingredients. This helps mix them well. Use fresh baking powder and baking soda for the best rise. Do not overmix your batter; mix until just combined. Gently fold in the apple butter to keep air in the batter. This creates a light texture. Serve the cake warm for the best taste. A drizzle of icing adds sweetness. You can also top it with whipped cream for a creamy touch. Add chopped pecans for crunch or a sprinkle of cinnamon for extra flavor. Pair it with a hot cup of coffee or tea for a cozy treat. Avoid using cold ingredients; they can lead to a dense cake. Do not skip the mixing steps; each helps the cake rise. Be careful not to mix too much, as it may ruin the fluffiness. Always check your oven temperature with a thermometer. An incorrect temperature can lead to uneven baking. {{image_2}} You can easily switch up the flavor of your cake. Try adding pumpkin puree instead of apple butter. This gives the cake a moist texture and a warm, fall taste. You can also use maple syrup in place of granulated sugar. This adds a rich sweetness that pairs well with cinnamon. If you need a gluten-free option, use a gluten-free flour blend. Look for a blend that includes xanthan gum, which helps bind the ingredients. Replace buttermilk with almond milk mixed with a bit of lemon juice. This keeps the cake moist and fluffy without gluten. While icing is great, you can try other toppings. Sprinkle crushed nuts on top for crunch. A mix of chopped apples and a drizzle of caramel sauce adds sweetness. You can also use a dollop of whipped cream and a sprinkle of cinnamon for a fun twist. Each of these options makes the cake even more delightful. To keep your Apple Butter Cinnamon Roll Cake fresh, store it in an airtight container. Place a layer of plastic wrap over the cake before sealing. This helps keep moisture in and prevents it from drying out. You can store it at room temperature for up to three days. If you need to keep it longer, the fridge is a better choice. When it's time to enjoy the leftovers, preheat your oven to 350°F (175°C). Place the slices on a baking sheet. Cover them with foil to keep them moist. Heat for about 10 to 15 minutes. You can also microwave individual pieces for 20 to 30 seconds. This warms the cake without drying it out, making it taste fresh again. To freeze your cake, first let it cool completely. Then, wrap each slice tightly in plastic wrap. Place the wrapped slices in a freezer bag or container. Label it with the date. The cake can stay in the freezer for up to three months. When you're ready to enjoy it, thaw in the fridge overnight, then reheat as needed. Yes, you can use homemade apple butter. It adds a unique flavor. If you made it, go ahead and use it. Just make sure it’s thick and smooth for the best results. If you don't have buttermilk, you can use regular milk. Add one tablespoon of vinegar or lemon juice to one cup of milk. Let it sit for five minutes to sour. This gives a similar tang and texture to your cake. The cake stays fresh for about three days at room temperature. If you want it to last longer, store it in the fridge for up to a week. Just make sure to cover it with plastic wrap or foil to keep it moist. Yes! You can use walnuts or almonds if you prefer. Just chop them up and add them like you would the pecans. This gives your cake a different crunch and flavor. If you don’t have ground cinnamon, you can use pumpkin pie spice. It has a similar flavor profile. Just use the same amount as the recipe calls for. Absolutely! You can freeze the cake for up to three months. Just wrap it tightly in plastic wrap. When you're ready to eat it, thaw it overnight in the fridge. Check with a toothpick. Insert it into the center of the cake. If it comes out clean or with a few crumbs, the cake is done. If it’s wet, give it a few more minutes. In this article, we explored the key ingredients and instructions to make a delicious apple butter cinnamon roll cake. You learned how to measure ingredients, make a fluffy cake, and avoid common mistakes. We also discussed tasty variations, storage practices, and answered frequently asked questions. Baking can be fun and rewarding. You now have the tools to create a delightful treat. Enjoy the process and share it with friends and family for a joyful experience.

Apple Butter Cinnamon Roll Cake Delightful and Fluffy

If you love sweet, warm treats, you’ll adore this Apple Butter Cinnamon Roll Cake. It’s fluffy, filled with rich apple

- 2 lbs beef chuck roast - 1 cup soy sauce - 1/2 cup brown sugar - 1/4 cup sesame oil - 1 tablespoon grated fresh ginger - 4 cloves garlic, minced - 1 tablespoon rice vinegar - 1 teaspoon black pepper - 2 green onions, chopped (for garnish) - 12 small corn tortillas - 1 cup shredded cabbage - 1 cup fresh cilantro leaves (for garnish) - 1 tablespoon sesame seeds (for garnish) Gather these ingredients before you start cooking. I love using fresh items for the best taste. The beef chuck roast gives a rich flavor. Soy sauce adds a nice saltiness. Brown sugar balances the salt with sweetness. Sesame oil brings a nutty taste. Grated ginger and minced garlic add depth. Rice vinegar gives a touch of tartness. Black pepper enhances the overall flavor. For the tacos, I use small corn tortillas. They hold the filling well. Shredded cabbage adds crunch. Fresh cilantro leaves brighten the dish. Finally, sesame seeds provide a nice crunch on top. With these ingredients, you create a tasty dish everyone will love. - Trim excess fat and cut into chunks: Start with 2 lbs of beef chuck roast. Use a sharp knife to remove any excess fat. Cut the beef into 2-inch chunks for even cooking. This step helps the beef cook well and become tender. - Create the marinade: In a large bowl, mix 1 cup of soy sauce, 1/2 cup of brown sugar, and 1/4 cup of sesame oil. Add 1 tablespoon of grated fresh ginger, 4 cloves of minced garlic, 1 tablespoon of rice vinegar, and 1 teaspoon of black pepper. Whisk until combined. This marinade adds rich flavor to the beef. - Slow cook details: Place the beef chunks in the slow cooker. Pour the marinade over the beef, making sure each piece is covered. Cover the slow cooker and cook on low for 8 hours or on high for 4 hours. This slow cooking makes the beef soft and tasty. - How to know when beef is tender: Check the beef after the cooking time. It should be easy to shred with a fork. If it still feels tough, cook it a bit longer until it's fork-tender. - Shredding the cooked beef: Once the beef is done, use two forks to shred it while still in the slow cooker. Mix it well with the juices for a moist filling. - Warming the tortillas: In a skillet over medium heat, warm 12 small corn tortillas. Heat each tortilla for about 30 seconds on each side. You want them soft and warm, ready to hold the beef. - Assembling the tacos: Take a warm tortilla and add a generous scoop of shredded beef. Top with 1 cup of shredded cabbage, chopped green onions, and fresh cilantro leaves. These toppings add crunch and fresh flavors to your taco. To make your marinade pop, add a splash of orange juice or a bit of gochujang. These ingredients bring a sweet and spicy twist. Marinate your beef for at least an hour, but overnight works best. This allows the flavors to soak in deeply. Slow cooking is vital for this dish. It makes the beef tender and juicy. Cooking on low for eight hours breaks down the meat, making it easy to shred. The longer, the better. This method also lets the flavors blend perfectly. For filling, I recommend shredded cabbage and fresh cilantro. These add crunch and freshness. You can also add sliced radishes for extra zing. When serving, stack your tacos high. Use small corn tortillas for the best taste. Warm them lightly before filling. This keeps them soft and pliable. Add sesame seeds on top for crunch. Enjoy these tacos right away for the best experience! {{image_2}} You can change the beef cut to fit your taste. - Use brisket for a richer flavor. - Try flank steak for a leaner option. If you want a vegetarian or vegan meal, use jackfruit. - Shredded jackfruit mimics the beef texture well. - Use soy sauce and spices to give it flavor. You can serve this Korean BBQ beef in many ways. - Tacos are fun and easy to eat. - Rice bowls give a hearty option. For added zest, mix in different sauces. - Try sriracha for heat. - A fresh salsa can add a bright taste. Feel free to get creative with toppings! To keep your Korean BBQ beef fresh, store it in an airtight container. This helps to lock in flavors and moisture. Place the beef in the fridge right after it cools. It will stay good for about 3 to 4 days. If you want to keep it longer, consider freezing it. In the freezer, it can last for up to 3 months. Just make sure to label the container with the date. When you're ready to eat, you can reheat the beef in several ways. Use the microwave for quick heating. Just place it in a bowl and cover it. Heat in short bursts, stirring in between. You can also reheat it on the stove. Place it in a pan over low heat. Add a splash of water or beef broth to keep it moist. To maintain its great flavor and texture, avoid overheating. Be gentle, and stir often to prevent sticking. Enjoy your tasty tacos just like they were fresh! You can add spicy elements to the marinade. A great choice is adding sriracha or gochujang. Both bring heat and flavor. Start with a teaspoon and add more if you like it hot. You can also serve the tacos with jalapeños on top for extra spice. Yes, you can use other meats like pork shoulder or chicken thighs. Both will work well with the marinade. Just adjust the cooking time. Pork may need about 6 hours on low, while chicken cooks faster at around 4 hours. Make sure the meat is tender before shredding. These tacos pair well with fresh sides. Consider serving rice or kimchi on the side. You can also add a simple salad for freshness. If you want a fun twist, try making queso dip or guacamole to complement the flavors. - Can I freeze the leftovers? Yes, you can freeze the beef for up to three months. Just let it cool first. Store in an airtight container or freezer bag. - What toppings can I use? Besides cabbage and cilantro, try avocado or radish slices. You can also use lime wedges for a zesty finish. - How do I know the beef is cooked? The beef should shred easily with two forks. If it's tender, it's ready. If not, let it cook longer. To sum up, I shared a tasty recipe for Korean BBQ beef tacos. We covered key ingredients, cooking steps, and finishing touches. You learned tips to boost flavor and make this dish your own. Plus, I provided storage advice and answers to common questions. Enjoy creating these delicious tacos! They are sure to impress your friends and family. Remember, the joy of cooking comes from experimenting and sharing good food. Have fun in the kitchen!

Slow Cooker Korean BBQ Beef Tacos Flavorful Delight

Get ready for a flavor boost with Slow Cooker Korean BBQ Beef Tacos! This dish mixes tender beef chuck roast

To make this easy shrimp scampi, gather these main ingredients: - 1 lb large shrimp, peeled and deveined - 4 tablespoons unsalted butter, melted - 4 cloves garlic, minced - Juice of 2 lemons - Zest of 1 lemon - 1 teaspoon red pepper flakes - Salt and pepper to taste - 1 cup cherry tomatoes, halved - 8 oz asparagus, trimmed and cut into 2-inch pieces - 1/2 cup fresh parsley, chopped - Lemon wedges for serving These ingredients work together to create a bright and tasty dish. Feel free to add some optional ingredients to enhance the taste: - White wine (about 1/4 cup) for depth - Parmesan cheese for a cheesy touch - Fresh basil or thyme for added freshness These extras can elevate your meal and make it special. You can swap some ingredients if needed: - Use olive oil instead of butter for a lighter dish. - Replace shrimp with chicken or tofu for different protein. - Cherry tomatoes can be swapped for bell peppers or zucchini. These substitutions allow you to adjust the recipe to your liking while keeping the flavors balanced. 1. Preheat the Oven: Set your oven to 400°F (200°C). This step is key for cooking. 2. Mix the Butter and Garlic: In a large bowl, add melted butter and minced garlic. 3. Add Lemon Juice and Zest: Squeeze in the juice of two lemons. Then add the zest of one lemon. 4. Season the Mixture: Sprinkle in red pepper flakes, salt, and pepper. Whisk until it blends well. 5. Prepare the Shrimp: Add the shrimp to this bowl. Toss them until each shrimp gets coated. 1. Arrange on the Sheet Pan: Line a large baking sheet with parchment paper. Spread the shrimp in a single layer. 2. Add Vegetables: Halve the cherry tomatoes and trim the asparagus. Place them around the shrimp. 3. Pour Remaining Marinade: Drizzle any leftover marinade over the shrimp and veggies. 4. Roast in the Oven: Place the sheet in the oven. Roast for 10-12 minutes. Look for pink shrimp and tender asparagus. 5. Garnish: Take the sheet out of the oven and sprinkle chopped parsley over the dish. Toss if needed. Serve this dish hot. Include lemon wedges on the side for extra flavor. I love pairing it with crusty bread or a fresh salad. This makes a great meal for family or friends. Enjoy the bright, fresh tastes! To cook shrimp just right, focus on timing. Shrimp cook fast, usually in about 10-12 minutes. Look for the shrimp to turn pink and opaque. Overcooking makes shrimp tough. If you see curl, it’s ready. You need a few basic tools for this dish. A large mixing bowl helps combine the marinade. A whisk makes mixing quick and easy. Use a sheet pan lined with parchment paper for easy cleanup. A good oven mitt protects your hands when removing the hot pan. One big mistake is not thawing shrimp properly. Always thaw shrimp in the fridge, not on the counter. Another mistake is crowding the pan. Spread shrimp and veggies in a single layer. This helps them cook evenly. Lastly, don’t skip the parsley. It adds fresh flavor and a bright look. {{image_2}} You can switch shrimp for other proteins. Try chicken breast for a hearty meal. Cut it into small pieces to cook evenly. Fish like salmon or cod also works great. Just adjust the cooking time. Fish cooks faster than shrimp. Turkey can also be a lean choice. Use ground turkey for a unique twist. Want a plant-based version? Use firm tofu or tempeh. Cut them into cubes and marinate in the sauce. You can also use mushrooms for a meaty texture. Portobello mushrooms are a great choice. Add extra veggies like zucchini or bell peppers for color and taste. You can change up the flavors easily. Try fresh basil or dill for a fresh twist. Oregano or thyme adds depth to the dish. If you like heat, add more red pepper flakes. A sprinkle of smoked paprika gives a warm, smoky flavor. Don’t forget to taste as you go! Adjust the seasonings to suit your palate. To store leftovers, let the dish cool to room temperature. Place the shrimp, veggies, and sauce in an airtight container. This helps keep the flavors fresh. Store it in the fridge for up to three days. If you want to keep it longer, consider freezing. When you are ready to eat, reheat gently. You can use the microwave or a skillet. If using the microwave, heat in short bursts. Stir in between to ensure even warming. In a skillet, add a little olive oil. Heat on low until warm. Be careful not to overcook the shrimp. If you want to freeze the shrimp scampi, place it in a freezer-safe container. It can last up to three months in the freezer. To thaw, move it to the fridge a day before you plan to eat. Then reheat as mentioned above. Avoid freezing shrimp that are still in their shells for better texture. Yes, you can use frozen shrimp. Just make sure to thaw them first. Place the shrimp in a bowl of cold water for about 15-20 minutes. This will help them thaw quickly. After thawing, pat them dry with a paper towel. This step helps the shrimp absorb the tasty lemon-garlic mix better. Using frozen shrimp can save you time and still give great flavor. To prevent overcooking, watch the shrimp closely while baking. Cook them for about 10-12 minutes. They are done when they turn pink and opaque. Another tip is to remove them from the oven as soon as they look ready. If you let them sit too long, they can get rubbery. You can also cook the asparagus separately if you want to control the cooking time better. You can serve shrimp scampi with many sides. Here are some great options: - Pasta: A light pasta, like angel hair, works well. - Rice: Fluffy white or brown rice will soak up the sauce. - Bread: Crusty bread is perfect for dipping in leftover sauce. - Salad: A fresh green salad adds a nice contrast. These sides will complement the bright flavors of the shrimp scampi and make your meal even better. Shrimp scampi is a delicious dish that anyone can make. We covered key ingredients, cooking steps, and tips for perfect shrimp. Remember to avoid common mistakes for the best results. You can also try fun variations like vegetarian options or different proteins. Store leftovers carefully to enjoy this meal later. With practice, you'll create a shrimp scampi that impresses everyone. Enjoy cooking and experimenting with this classic dish! Your kitchen will be full of flavor and joy.

Sheet Pan Lemon Garlic Shrimp Scampi Easy Dinner Recipe

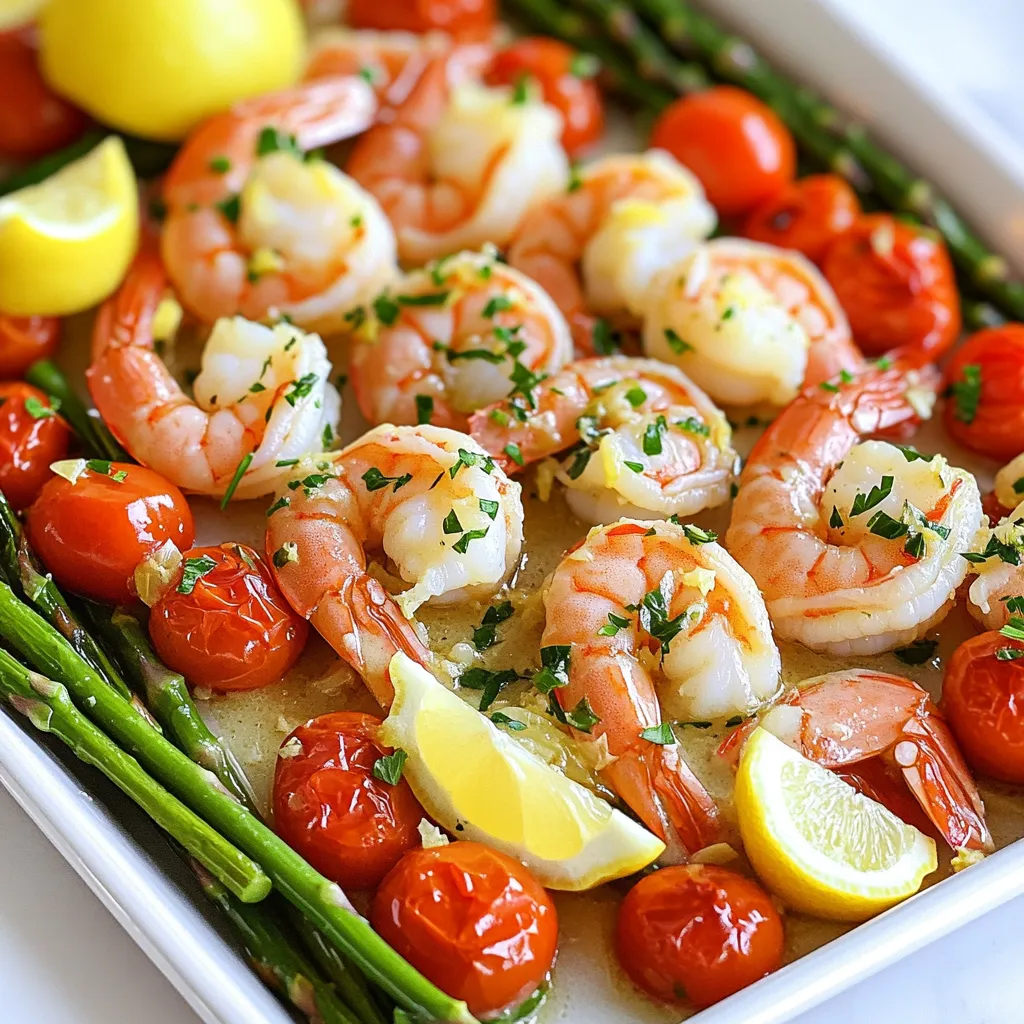
Looking for a quick and tasty dinner? Try my Sheet Pan Lemon Garlic Shrimp Scampi! This easy recipe combines fresh

- 24 Oreo cookies, crushed - ½ cup unsalted butter, melted - 1 cup cream cheese, softened - 1 cup canned pumpkin puree To make these bars, start with the main ingredients. First, the Oreo cookies form a tasty crust. Crush them finely to get that perfect texture. Next, use unsalted butter, melted to help bind the crumbs. The cream cheese adds a creamy base, while canned pumpkin puree gives that rich fall flavor. - ½ cup powdered sugar - 1 teaspoon vanilla extract - 1 teaspoon pumpkin pie spice - 1 cup whipped topping (Cool Whip) Now, let’s add some flavor enhancers. Powdered sugar sweetens the cheesecake filling nicely. Vanilla extract gives a warm aroma and taste. Pumpkin pie spice adds that classic fall flavor. Finally, the whipped topping, or Cool Whip, brings a light and fluffy texture. Each ingredient plays a role in making these bars a real treat. To start, gather 24 crushed Oreo cookies and ½ cup of melted unsalted butter. In a medium bowl, mix the cookie crumbs with the melted butter. Stir until the crumbs are well coated. This mixture creates a rich, tasty crust. Next, take a 9x9-inch square baking pan. Press the Oreo mixture evenly into the bottom of the pan. Use a spatula or the bottom of a glass to smooth it out. This step is key for a solid base. For the filling, grab 1 cup of softened cream cheese. In a large mixing bowl, beat the cream cheese until it is smooth. This makes the base creamy and rich. Now, add 1 cup of canned pumpkin puree, ½ cup of powdered sugar, 1 teaspoon of vanilla extract, and 1 teaspoon of pumpkin pie spice to the bowl. Beat the mixture until everything is combined smoothly. The pumpkin puree gives this filling its warm, autumn flavor. Next, gently fold in 1 cup of whipped topping. Be careful not to deflate the mixture. This step keeps the filling light and fluffy, making each bite delightful. Now, pour the pumpkin cheesecake mixture over the crust. Spread it evenly using a spatula. Make sure every part of the crust is covered by the filling. Cover the pan with plastic wrap and refrigerate it for at least 4 hours. This chilling time allows the bars to set fully. Once set, cut into bars and serve them chilled. Enjoy each slice of this creamy, pumpkin-flavored treat. To whip the cream cheese, use a hand mixer on medium speed. Start with softened cream cheese to get a smooth texture. It should take about two minutes to beat it well. If it's too cold, it won't mix well. When folding in the whipped topping, use a spatula. Gently scoop from the bottom and fold over the top. Do this slowly to keep the air in the whipped topping. This step makes the cheesecake light and fluffy. For a nice presentation, serve each bar on a dessert plate. Drizzle some chocolate sauce over the top for a sweet touch. You can also add a dollop of whipped cream and a sprinkle of crushed Oreos. This adds color and texture, making it more appealing. Pair these bars with a warm cup of coffee or tea. The flavors mix well with pumpkin spice lattes too. You can also serve them with vanilla ice cream for a fun twist. One common mistake is over-mixing or under-mixing the filling. If you over-mix, the filling can become runny. If you under-mix, lumps can form. Aim for a smooth, creamy consistency. Another mistake is not allowing enough chill time. It’s important to refrigerate the bars for at least four hours. This helps them set properly. If you cut them too soon, they will fall apart. Give them time to firm up for the best results. {{image_2}} You can change the flavor of your cheesecake bars easily. For a fun twist, try using chocolate graham crackers instead of Oreos. This adds a rich chocolate taste that pairs well with pumpkin. You can also add spices like cinnamon or nutmeg to enhance the pumpkin flavor. A pinch of ginger or allspice can create a warm, cozy vibe. If you need gluten-free options, use gluten-free Oreos or any gluten-free cookies you love. For a vegan version, swap cream cheese with a plant-based alternative. You can use coconut cream or a cashew cream mix. Replace whipped topping with coconut whipped cream for a creamy texture. These changes keep the recipe delicious while meeting dietary needs. You can get creative with seasonal flavors. Try adding melted chocolate or a drizzle of caramel on top. This adds a sweet layer that kids and adults love. If you prefer less spice, adjust the pumpkin pie spice to your taste. Less spice gives a more classic cheesecake flavor. These small tweaks can make your bars feel fresh each season. To keep your no-bake pumpkin Oreo cheesecake bars fresh, store them in an airtight container. This helps prevent them from absorbing any odors from the fridge. I recommend using a glass or plastic container with a tight seal. If you don’t have one, you can cover the pan with plastic wrap. Just make sure it’s snug against the bars to keep air out. You can freeze these cheesecake bars for later enjoyment. First, cut them into squares. Then, wrap each piece in plastic wrap. Place the wrapped bars in a freezer-safe bag or container. When you're ready to eat them, take out the bars and let them thaw in the fridge overnight. This keeps them creamy and delicious. In the fridge, these bars last about five days. Keep an eye out for any changes in texture or smell, as these can be signs of spoilage. If the bars become watery or develop an off odor, it's best to throw them away. Enjoy your delightful treat while it's fresh for the best taste! Yes, you can use homemade whipped cream. Just make sure to whip it until soft peaks form. This will give your bars a light and fluffy texture. It’s a great option if you prefer to avoid store-bought toppings. These cheesecake bars need to chill for at least 4 hours. This helps them set properly. If you can wait longer, they will taste even better. Chilling allows the flavors to blend and the texture to firm up. Absolutely! You can prepare these bars a day in advance. Just cover them well and store them in the fridge. This makes them perfect for parties or family gatherings. They are ready to serve when you are. We explored how to make delicious pumpkin cheesecake bars with a simple Oreo crust. You learned the main ingredients like cream cheese and pumpkin puree, along with flavor enhancers that boost taste. I shared step-by-step instructions for assembling the dessert and tips to achieve the perfect texture. Don't forget to experiment with variations and keep storage tips in mind. Now, you can create tasty bars that impress family and friends. Enjoy your baking journey and savor each bite!

No-Bake Pumpkin Oreo Cheesecake Bars Delightful Treat

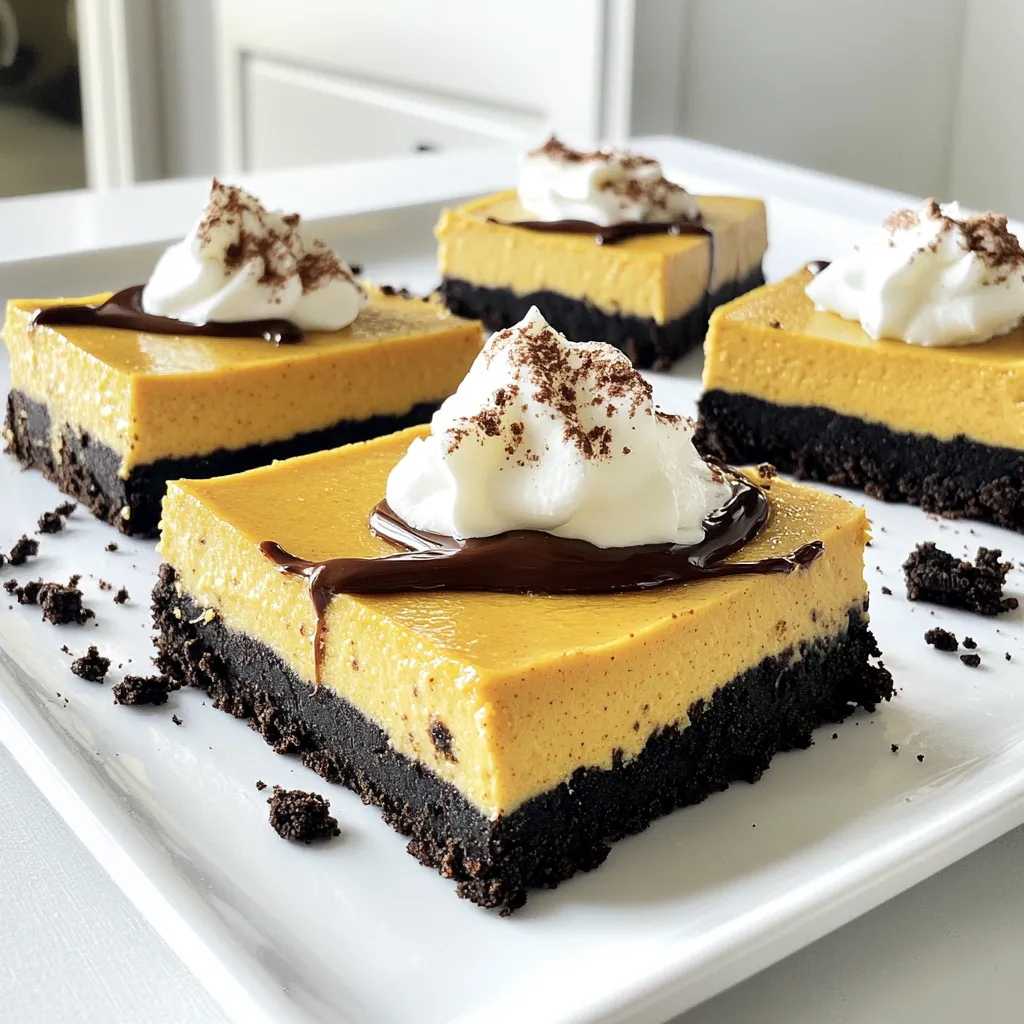
Get ready for a treat that combines the flavors of fall with a fun twist! My No-Bake Pumpkin Oreo Cheesecake

To make a delicious roasted sweet potato chickpea salad, gather these fresh ingredients: - 2 medium sweet potatoes, peeled and diced - 1 can (15 oz) chickpeas, drained and rinsed - 1 red bell pepper, chopped - 1/2 red onion, finely diced - 2 cups baby spinach or mixed greens - 3 tablespoons olive oil - 2 tablespoons maple syrup - 1 teaspoon smoked paprika - 1/2 teaspoon cumin - Salt and pepper to taste - Juice of 1 lemon - 1/4 cup feta cheese (optional) - Fresh parsley for garnish I love using sweet potatoes because they add a natural sweetness. Chickpeas provide a nice protein boost. The bell pepper and red onion add crunch and color. For the dressing, I mix olive oil, maple syrup, lemon juice, and spices. This adds a bright flavor. If you want to add a creamy touch, sprinkle some feta cheese on top. Garnish with parsley for a fresh look. Start by preheating your oven to 425°F (220°C). This hot oven helps our sweet potatoes become tender and crispy. While the oven heats, peel and dice two medium sweet potatoes. Next, open a can of chickpeas, drain them, and rinse them well. In a big bowl, toss the diced sweet potatoes and chickpeas with two tablespoons of olive oil, smoked paprika, cumin, salt, and pepper. Make sure everything is well coated with the oil and spices. Spread the mixture evenly on a large baking sheet, allowing space between pieces for even roasting. Roast the sweet potatoes and chickpeas in the preheated oven for 20-25 minutes. This time lets the sweet potatoes soften and crisp up. Stir the mixture halfway through to ensure even cooking. This step is key to getting that perfect texture. You want the sweet potatoes to be tender and slightly crispy. While the sweet potatoes and chickpeas roast, prepare the dressing. In a small bowl, whisk together the remaining olive oil, maple syrup, lemon juice, and a pinch of salt and pepper. Set this aside. Once the roasted mixture is done, take it out of the oven and let it cool slightly. In a large mixing bowl, combine the roasted sweet potatoes and chickpeas with chopped red bell pepper and finely diced red onion. Pour the dressing over the mixture and toss gently to combine. Finally, add in two cups of baby spinach or mixed greens and toss lightly to mix everything well. If you like, sprinkle crumbled feta cheese on top and garnish with fresh parsley for a beautiful finish. To get crispy sweet potatoes and chickpeas, start with the right heat. Preheat your oven to 425°F (220°C). This high temperature helps achieve that golden-brown finish. Toss the sweet potatoes and chickpeas well with olive oil and spices. Use enough oil to coat evenly. This step is key for crispiness. Make sure to stir them halfway through roasting. This ensures even cooking and helps avoid sogginess. If you want more flavor, adjust your seasonings. Try adding more smoked paprika for a smoky kick or a bit more salt to enhance the taste. For a beautiful presentation, serve your salad in a large bowl. The colors of the sweet potatoes, red bell pepper, and greens pop against each other. You can also add a lemon wedge on the side for a fresh touch. If you want to make it a full meal, pair this salad with grilled chicken or fish. You can also enjoy it with whole-grain bread for extra fiber. This salad is not just a side; it is a vibrant dish that can stand on its own! {{image_2}} You can change up the protein in this salad. If you want to skip chickpeas, try lentils or black beans. Both give a nice boost of protein and flavor. You might also use quinoa for a unique touch. For dressings, you can mix things up. A tahini dressing adds a creamy texture. A simple balsamic vinaigrette works well too. You can also add nuts or seeds for extra crunch. Using seasonal veggies can make this salad even better. In spring, add fresh peas or asparagus. In the fall, swap in roasted Brussels sprouts. These changes bring freshness and keep things interesting. For holidays or special events, you can adapt the recipe. Add cranberries for a festive feel or use festive spices like nutmeg. This way, your salad shines at any table. To keep leftovers fresh, store them in an airtight container. This prevents moisture loss and keeps flavors intact. I recommend using glass containers. They are sturdy and easy to clean. You can also use BPA-free plastic containers. Make sure to cool the salad completely before sealing. This step helps avoid condensation inside the container. You can enjoy the salad for up to three days in the fridge. You can freeze this salad, but some ingredients may change texture. I suggest freezing the roasted sweet potatoes and chickpeas separately. Place them in a freezer-safe bag or container. Make sure to label it with the date. They can last up to three months in the freezer. For reheating, let them thaw in the fridge overnight. To warm them, use a microwave or oven. Be careful not to overcook, as this can make them mushy. Enjoy your salad warm or cold, depending on your preference! Can this salad be made in advance? Yes, you can make this salad ahead of time. Keep the dressing separate. This keeps the greens fresh. Store the salad in the fridge for up to three days. What are the best toppings for this salad? You can add many tasty toppings. Some popular choices include: - Crumbled feta cheese - Chopped nuts like walnuts or almonds - Sliced avocado - Fresh herbs, such as cilantro or basil These toppings add extra flavor and texture. How can I make this salad vegan-friendly? To make it vegan, simply omit the feta cheese. You can also use a different dressing. Try a tahini or vinaigrette made with balsamic vinegar and olive oil. Both options taste great. What to serve with roasted sweet potato chickpea salad? This salad pairs well with a variety of dishes. Here are some ideas: - Grilled chicken or tofu for protein - Quinoa or brown rice for a hearty side - A warm soup for a comforting meal These options can create a balanced meal that satisfies. This blog covered a tasty roasted sweet potato chickpea salad. We looked at simple ingredients like sweet potatoes, chickpeas, and fresh veggies. You learned to prepare, roast, and dress the salad for great flavor. Tips on serving and variations helped you spice it up. Remember, store leftovers properly to keep them fresh. With these insights, you can make a delicious salad perfect for any meal. Enjoy creating and sharing this nutritious dish with friends and family!

Roasted Sweet Potato Chickpea Salad Flavorful Delight

Looking for a bright, tasty dish that bursts with flavor? You’ll love this Roasted Sweet Potato Chickpea Salad! Packed with

Older posts
Newer posts
← Previous Page1 … Page4 Page5 Page6 … Page84 Next →

dsad

© 2026 Lisa Dishes • Built with GeneratePress

Our Policies

  • Copyright Policy
  • Cookie Policy
  • GDPR Policy
  • Privacy Policy
  • Disclaimer
  • Terms Of Use

More Information

  • Home
  • About
  • Contact
  • Appetizers
  • Dessert
  • Dinner
  • Drinks
©2026, Lisa Dishes About Back To Top