Skip to content
DisclaimerTerms Of UseGDPR PolicyCookie Policy

Lisa Dishes

  • Home
  • Drinks
  • Appetizers
  • Dinner
  • Dessert
  • About
  • Contact
  • Privacy Policy
DisclaimerTerms Of UseGDPR PolicyCookie Policy

NO-ING-IMG

To create a delightful Brownie Batter Dip, gather these simple ingredients: - 1 cup all-purpose flour - 1 cup granulated sugar - ½ cup unsweetened cocoa powder - 1 cup cream cheese, softened - ½ cup unsalted butter, softened - 2 tablespoons milk - 1 teaspoon vanilla extract - ½ cup mini chocolate chips - Optional: graham crackers, fruit slices, or pretzels for dipping You can swap out some ingredients if needed. For a gluten-free version, use almond flour instead of all-purpose flour. You can also use a dairy-free cream cheese for a vegan dip. If you don’t have mini chocolate chips, feel free to chop regular chocolate bars into small pieces. Enjoy experimenting with these swaps to match your taste or dietary needs. For the full recipe, you can refer to the instructions provided above. First, gather your ingredients. For this brownie batter dip, you need cream cheese, butter, sugar, flour, cocoa powder, milk, vanilla extract, and mini chocolate chips. Make sure the cream cheese and butter are at room temperature. This helps them mix well and become creamy. If you forget to take them out, you can soften them in the microwave for a few seconds. Next, in a large mixing bowl, beat together the cream cheese and softened butter with a hand mixer. Start mixing at a slow speed to avoid splashes. Once creamy, gradually add the sugar. This step is key for a smooth texture in your dip. Mix until it is fully combined, and you see no lumps. Now, let’s mix the dry ingredients. In a separate bowl, whisk together the flour and cocoa powder. This helps blend them evenly. Slowly add this mixture to the wet ingredients. Stir gently to avoid making a mess. When you reach this point, pour in the milk and vanilla extract. This is where the dip starts to take shape. Mix until it becomes smooth and creamy. If it feels too thick, add more milk, one tablespoon at a time. You want that perfect dip consistency where it’s creamy but still thick enough to hold its shape. Once your dip is ready, it’s time to serve. Transfer it to a clean serving bowl. Use a spatula to smooth the top. This gives a nice look to your dip. For a fun garnish, sprinkle some mini chocolate chips on top. You can also arrange graham crackers, fruit slices, or pretzels around the bowl. This not only looks great but also adds fun options for dipping. Enjoy your delicious brownie batter dip! For the complete recipe, check out the Full Recipe section. To get the right texture for your brownie batter dip, start with the basics. If your dip feels too thick, add milk one tablespoon at a time. Mix well after each addition until you reach the perfect consistency. You want it creamy, not runny. When folding in chocolate chips, be gentle. Use a spatula and lift the mixture from the bottom. This helps keep the chips evenly spread throughout the dip. If you mix too hard, you risk breaking the chips. A good fold keeps them whole and adds nice bites of chocolate. To store leftover dip, transfer it to an airtight container. This keeps it fresh and prevents it from drying out. Make sure to cover the top with plastic wrap for extra protection. In the fridge, your dip will stay good for about three to five days. If you want to enjoy it longer, consider freezing it. Just remember to thaw it in the fridge before serving again. This way, you can enjoy your delicious brownie batter dip later! {{image_2}} You can make your brownie batter dip even more fun by adding different flavors. Try mixing in a bit of mint extract for a fresh twist. Just a teaspoon can change the whole taste. If you love coffee, add a teaspoon of espresso powder. It gives a nice depth to the chocolate flavor. You can also switch up your mix-ins. Instead of mini chocolate chips, try peanut butter chips or even crushed cookies. Each mix-in brings its own fun taste. You can even add chopped nuts for a crunchy texture. The options are endless, and you can get creative with what you have at home. Making this dip fit different diets is easy. For a gluten-free version, swap all-purpose flour for a gluten-free blend. Look for one that measures cup-for-cup to keep the same texture. If you need a vegan option, use plant-based cream cheese and butter. Replace the milk with almond milk or coconut milk. These swaps keep the dip creamy and tasty without the dairy. You can still enjoy this treat, no matter your diet! The right dippers can make your brownie batter dip even better. Here are some great options: - Graham crackers: They add a nice crunch and sweetness. - Fresh fruit slices: Try apples, bananas, or strawberries for a fresh touch. - Pretzels: Their salty flavor pairs well with the sweet dip. - Marshmallows: These are fun to dip and add a chewy texture. You can also get creative! Use cookies, rice cakes, or even potato chips for a twist. Arrange your dippers around the bowl for a beautiful display. This dip works for many events. It’s perfect for: - Birthday parties: Kids and adults will love it. - Game nights: A fun snack for a casual gathering. - Potlucks: Easy to share and everyone can enjoy it. - Family movie nights: A simple treat to enjoy while watching a film. To enhance the dessert experience, consider adding toppings. You can sprinkle mini chocolate chips or crushed nuts on top. A drizzle of caramel or chocolate sauce would also be delightful. This will make your dip look even more appealing and taste even better! What can I do if the dip is too thick? If your dip is too thick, don’t worry. Just add more milk! Start with one tablespoon at a time. Mix well after each addition. Keep adding until you reach your desired texture. Can I make this dip ahead of time? Yes, you can make this dip ahead of time. Just store it in the fridge in an airtight container. Let it sit out for a few minutes before serving. This helps it soften a bit. Is it safe to eat raw flour in this recipe? Raw flour can carry bacteria, so it’s best to heat it. You can bake it in the oven at 350°F for about five minutes. This kills harmful bacteria and makes the dip safer to eat. How long can I keep the brownie batter dip? You can keep the brownie batter dip for about three to five days in the fridge. Just make sure it is in a sealed container to keep it fresh. Can I freeze brownie batter dip? I don’t recommend freezing this dip. Freezing can change the texture. It’s best enjoyed fresh or stored in the fridge. Calories per serving Each serving has about 200 calories. This can change based on what you dip in it. Nutritional breakdown of ingredients Here’s a quick look at what’s in the dip: - Flour: Provides carbs. - Sugar: Adds sweetness. - Cocoa powder: Gives that rich chocolate flavor. - Cream cheese: Adds creaminess and fat. - Butter: Adds richness. - Milk: Helps with consistency. - Chocolate chips: Adds extra sweetness and texture. For the full recipe, check the [Full Recipe]. This post covered everything you need for a perfect brownie batter dip. We looked at ingredients, preparation steps, mixing techniques, and creative ways to serve it. You now have tips to adjust texture, store leftovers, and try fun flavor variations. Remember, the right dippers can elevate your dessert. Enjoy this treat at your next gathering, and feel free to experiment! Your friends will love what you create.

Brownie Batter Dip Irresistible Dessert Delight

Are you ready to indulge in something sweet and fun? Brownie Batter Dip is the dessert you’ve been craving! This

- 1 can (15 oz) chickpeas, drained and rinsed - 1 can (14 oz) coconut milk - 1 medium onion, finely chopped - 3 cloves garlic, minced - 1-inch piece of ginger, grated - 1 tablespoon red curry paste - 1 teaspoon ground cumin - 1 teaspoon turmeric powder - 1 tablespoon olive oil - 1 cup vegetable broth - 1 bell pepper (red or yellow), diced - 1 cup spinach (fresh or frozen) - Salt and pepper to taste - Fresh cilantro, for garnish - Cooked jasmine rice or quinoa, for serving These ingredients create a warm, rich taste in the dish. Chickpeas give it protein and fiber. Coconut milk adds creaminess and flavor. Aromatics like onion, garlic, and ginger create a fragrant base. The spices bring heat and depth. Bell peppers and spinach add color and nutrition. - Large pot - Wooden spoon - Measuring cups and spoons Using the right tools makes cooking easier and more fun. A large pot helps you cook everything in one place. A wooden spoon stirs without scratching your pot. Measuring cups and spoons help you get the exact amounts right. This way, your coconut curry chickpeas will shine with flavor. For the full recipe, check out [Full Recipe]. First, gather your ingredients. You will need: - 1 can (15 oz) chickpeas, drained and rinsed - 1 can (14 oz) coconut milk - 1 medium onion, finely chopped - 3 cloves garlic, minced - 1-inch piece of ginger, grated - 1 tablespoon red curry paste - 1 teaspoon ground cumin - 1 teaspoon turmeric powder - 1 tablespoon olive oil - 1 cup vegetable broth - 1 bell pepper (red or yellow), diced - 1 cup spinach (fresh or frozen) - Salt and pepper to taste - Fresh cilantro, for garnish - Cooked jasmine rice or quinoa, for serving Next, heat a large pot over medium heat. Pour in the olive oil. Wait until the oil is warm. Add the chopped onion. Sauté for about 5 minutes. You want the onion to be soft and translucent. Now, stir in the minced garlic and grated ginger. Cook for one minute until you smell their great aroma. Then, add the red curry paste, cumin, and turmeric. Mix these spices well and let them cook for 2 minutes. This brings out their rich flavors. After that, pour in the coconut milk and vegetable broth. Stir everything together. Bring the mixture to a gentle simmer. Now it's time to add the drained chickpeas and diced bell pepper. Stir well and let it simmer for about 10 to 15 minutes. This allows all the flavors to blend nicely. In the last 5 minutes of cooking, add the spinach. Stir until it wilts down. This adds a nice green color and extra nutrients. Finally, season your curry with salt and pepper to taste. You can adjust the seasoning if needed. Serve your Coconut Curry Chickpeas hot over a bed of cooked jasmine rice or quinoa. Garnish with fresh cilantro for a burst of flavor. For the complete recipe, check out the Full Recipe. To make your coconut curry chickpeas burst with flavor, focus on spices. Start by heating your pot before adding oil. This helps release the spice oils. Use fresh spices, as they add more taste. Toast your spices briefly before adding liquids to enhance their flavor. Keep the heat at medium. This allows the aromatics to cook evenly without burning. Stir often to avoid sticking. When adding chickpeas, let them simmer gently. This helps them absorb all the flavors. Serve your coconut curry chickpeas over jasmine rice or quinoa. Both pair well with the rich coconut flavor. Add a side of naan bread for a fun twist. You can also serve it with a fresh salad for a crunchy contrast. Adding a squeeze of lime brightens up the dish. It balances the richness of the curry. For extra texture, top with chopped nuts or seeds. Garnishing makes your dish visually appealing. Use fresh cilantro to add a pop of color. Sprinkle it on top just before serving. A few lime wedges on the side also look great. Use a shallow bowl to show off the vibrant colors. Layer rice first, then ladle the curry on top. This creates a beautiful contrast of white and orange. The right presentation makes your meal more inviting. For the full recipe, click here: [Full Recipe]. {{image_2}} You can make coconut curry chickpeas even better by adding different veggies. Zucchini and carrots work great. You can also use seasonal vegetables for fresh flavors. In summer, try corn or bell peppers. In winter, add root vegetables like sweet potatoes or butternut squash. Each veggie adds a new taste and texture. Want to boost the protein? You can add chicken, shrimp, or tofu. Chicken adds a hearty bite, while shrimp cooks quickly and adds a seafood twist. Tofu is a fantastic choice for a vegetarian or vegan meal. Just make sure it absorbs the curry flavor well. How spicy do you like it? You can adjust the spice level easily. Start with less red curry paste if you prefer mild curry. Add more paste or some chili flakes for heat. Different curry pastes have varied spice levels too. Experiment with yellow, green, or massaman curry pastes to find your favorite flavor profile. To keep your coconut curry chickpeas fresh, store them in airtight containers. Make sure to let them cool to room temperature before sealing. This helps prevent moisture buildup, which can spoil the dish. Glass or BPA-free plastic containers work best. They help keep flavors intact and make reheating easier. When you’re ready to enjoy your leftovers, reheat them gently. The best method is to use a pot on low heat. Stir often to ensure even heating and to keep it creamy. If the curry thickens, add a splash of water or vegetable broth. This helps bring back the smooth texture without losing flavor. Yes, you can freeze coconut curry chickpeas! Transfer them to freezer-safe containers or bags. Be sure to leave some space at the top, as the curry will expand when frozen. For thawing, place them in the fridge overnight. Reheat on the stove with a little liquid to restore the perfect consistency. Enjoy your delicious meal anytime! What is coconut curry made of? Coconut curry is a mix of coconut milk, spices, and vegetables. In this recipe, I use chickpeas, onion, garlic, ginger, and red curry paste. The coconut milk gives it a rich, creamy base. The spices add warmth and depth. It’s a simple way to create a flavorful dish. Can I make this recipe in advance? Yes, you can make this recipe ahead of time! Store it in an airtight container. It keeps well in the fridge for up to three days. The flavors will deepen over time, making it even tastier. Just reheat it on the stove or in the microwave before serving. Is coconut curry chickpeas healthy? Yes, coconut curry chickpeas are healthy. They are packed with nutrients. Chickpeas offer protein and fiber. Coconut milk adds healthy fats. This dish is also rich in vitamins from the vegetables. Overall, it’s a nourishing meal that satisfies and fuels your body. What are the nutritional benefits of chickpeas? Chickpeas are very nutritious. They are high in protein, making them great for muscle health. They also have fiber, which helps digestion. Plus, they contain vitamins and minerals like iron and folate. Adding chickpeas to your diet can support overall health. What can I substitute for coconut milk? If you need a substitute for coconut milk, use almond milk or soy milk. For a creamy texture, add a little nut butter. You can also use cashew cream for a rich flavor. Keep in mind that this will change the taste slightly. Alternatives for red curry paste? You can use green curry paste or yellow curry paste as an alternative. Each has a different flavor profile. If you want a milder option, try using curry powder. Adjust the amount to taste, as some pastes and powders are stronger than others. Coconut curry chickpeas are a delightful blend of flavors and textures. This dish combines chickpeas, coconut milk, and spices. You can customize it with various vegetables and proteins. Remember to store leftovers properly and reheat gently for the best taste. As you explore different flavors, feel free to experiment with spice levels. This dish not only satisfies your taste buds but also provides numerous health benefits. Enjoy your cooking and sharing these delicious meals with others!

Coconut Curry Chickpeas Flavorful and Easy Recipe

Looking for a quick and tasty meal? This Coconut Curry Chickpeas recipe is not only flavorful but also super easy

To make roasted red pepper hummus, gather these main ingredients: - 1 can (15 oz) chickpeas, drained and rinsed - 2 large roasted red peppers (jarred or homemade) - 3 tablespoons tahini - 2 tablespoons extra-virgin olive oil - 1 garlic clove, minced - 1 tablespoon fresh lemon juice - 1 teaspoon ground cumin - Salt and pepper to taste - Water as needed for desired consistency These ingredients blend together to create a tasty and creamy dip. The chickpeas add protein and fiber, while roasted red peppers give it a sweet, smoky flavor. You can add some optional ingredients to boost the flavor of your hummus: - A pinch of cayenne pepper for heat - A splash of white wine vinegar for tang - Fresh herbs like basil or cilantro for freshness - Nuts like pine nuts or walnuts for extra texture These extras can make your hummus unique and even more delicious. Try different combinations to find what you love best! Each key ingredient in this hummus brings its own benefits: - Chickpeas are high in protein and fiber. They help keep you full and aid digestion. - Roasted red peppers are packed with vitamins A and C. They support your immune system and skin health. - Tahini adds healthy fats and calcium. It can benefit bone health and provide energy. - Olive oil contains antioxidants. It is great for heart health and helps reduce inflammation. Using these ingredients not only makes a tasty dip but also provides nutrition for your body. Enjoy making this full recipe as a healthy snack or appetizer! To make roasted red pepper hummus, start by gathering your ingredients. You need canned chickpeas, roasted red peppers, tahini, olive oil, garlic, lemon juice, cumin, salt, and pepper. Rinse the chickpeas in a colander. If you use jarred red peppers, drain them well. You can also roast your own peppers for extra flavor. Next, put all the ingredients into a food processor. Add the chickpeas, red peppers, tahini, olive oil, minced garlic, lemon juice, and cumin. Pulse the mixture until it gets smooth. If it feels too thick, add water a little at a time. Blend until you have a creamy texture. Finally, taste it. Add salt and pepper as needed, then blend again. Once your hummus is ready, transfer it to a bowl. Use a spoon to make a swirl on top. Drizzle some olive oil over it and sprinkle paprika and parsley for flair. Serve it with pita bread, veggie sticks, or crackers. You can find the full recipe to impress your guests! To get that smooth and creamy texture, start with well-drained chickpeas. If you want a silkier dip, peel the chickpeas before blending. I like to add water slowly. This helps control the thickness. Blend until you reach the creaminess you like. For extra flavor, try adding a pinch of smoked paprika. You can also mix in some roasted garlic. If you like it spicy, throw in a dash of cayenne pepper. Fresh herbs like basil or cilantro can add a bright note. Taste as you go. Adjust salt and lemon juice to fit your taste. One common mistake is over-blending the hummus. This can make it too runny. Another mistake is using too much tahini. This can overpower the other flavors. Lastly, don’t skip on seasoning! A little salt and pepper make a big difference in taste. For more details, check the Full Recipe. {{image_2}} To make your hummus spicy, add some heat! You can blend in one or two fresh jalapeños. If you like it milder, use a pinch of cayenne pepper. This adds a kick without losing the red pepper flavor. You can also drizzle some sriracha on top before serving. It gives a nice color and zing! Fresh herbs can elevate your hummus. Try adding a handful of fresh basil or cilantro. Blend them in for a fresh taste. You could also mix in some dried herbs like oregano or thyme. These add depth and complexity to the flavor. Experiment to find your favorite herb blend! If you're avoiding nuts, don’t worry! You can still enjoy creamy hummus. Instead of tahini, use sunflower seed butter. It provides a similar creaminess without nuts. You can also skip the nut butter altogether and add more chickpeas. This keeps your hummus thick and delicious. Don't hesitate to play around with the ingredients! For the complete recipe, check out the Full Recipe section. To store your roasted red pepper hummus, place it in a clean container. Use a lid to cover it tightly. This keeps air out and helps keep the hummus fresh. You can store it in the fridge for easy access. Roasted red pepper hummus lasts about 4 to 7 days in the fridge. After that, it may lose flavor and freshness. For longer storage, you can freeze it. To freeze, pour the hummus into a freezer-safe container. Leave some space at the top for expansion. It can last up to 3 months in the freezer. Use glass or high-quality plastic containers to store your hummus. Glass containers are great because they do not stain or hold odors. If you use plastic, choose BPA-free containers. This choice keeps your food safe and fresh. For freezing, silicone bags are also handy. They save space and can be reused. For the full recipe, visit the recipe section above. Roasted red pepper hummus is a creamy dip made from chickpeas and roasted red peppers. It has a rich, smoky flavor that pairs well with many foods. The base is classic hummus, which includes tahini, garlic, and lemon juice. The roasted peppers add a sweet taste and vibrant color. Yes, you can find pre-made roasted red pepper hummus at most grocery stores. Many brands offer this tasty option in the refrigerated section. While these store-bought versions are convenient, they may not match the freshness of homemade hummus. Making it at home with the Full Recipe allows you to control flavors and ingredients. You can enjoy roasted red pepper hummus with many dippers. Some of the best options include: - Pita bread - Vegetable sticks (carrots, cucumbers, bell peppers) - Crackers - Tortilla chips - Breadsticks These dippers add great texture and taste to your snack. Yes, roasted red pepper hummus is a healthy choice. It is rich in protein and fiber from chickpeas. The tahini provides healthy fats, while the peppers add vitamins. This dip is a good option for a snack or appetizer, especially when served with fresh veggies. You can easily adjust the hummus recipe for different diets: - For a nut-free version, stick with the classic ingredients. - If you are gluten-free, use gluten-free crackers or fresh veggie sticks. - You can also reduce garlic for those sensitive to it. Experiment with spices or herbs to suit your taste or dietary needs! Roasted red pepper hummus is easy to make and very tasty. We discussed its main ingredients, preparation steps, and tips for perfect texture. You can enjoy various flavors, like spicy or herb-infused hummus. Proper storage is key to keeping it fresh. Now, you have all you need to create this delicious snack. Get creative and make it your own! Enjoy every scoop with your favorite dippers. Happy cooking!

Roasted Red Pepper Hummus Flavorful and Easy Recipe

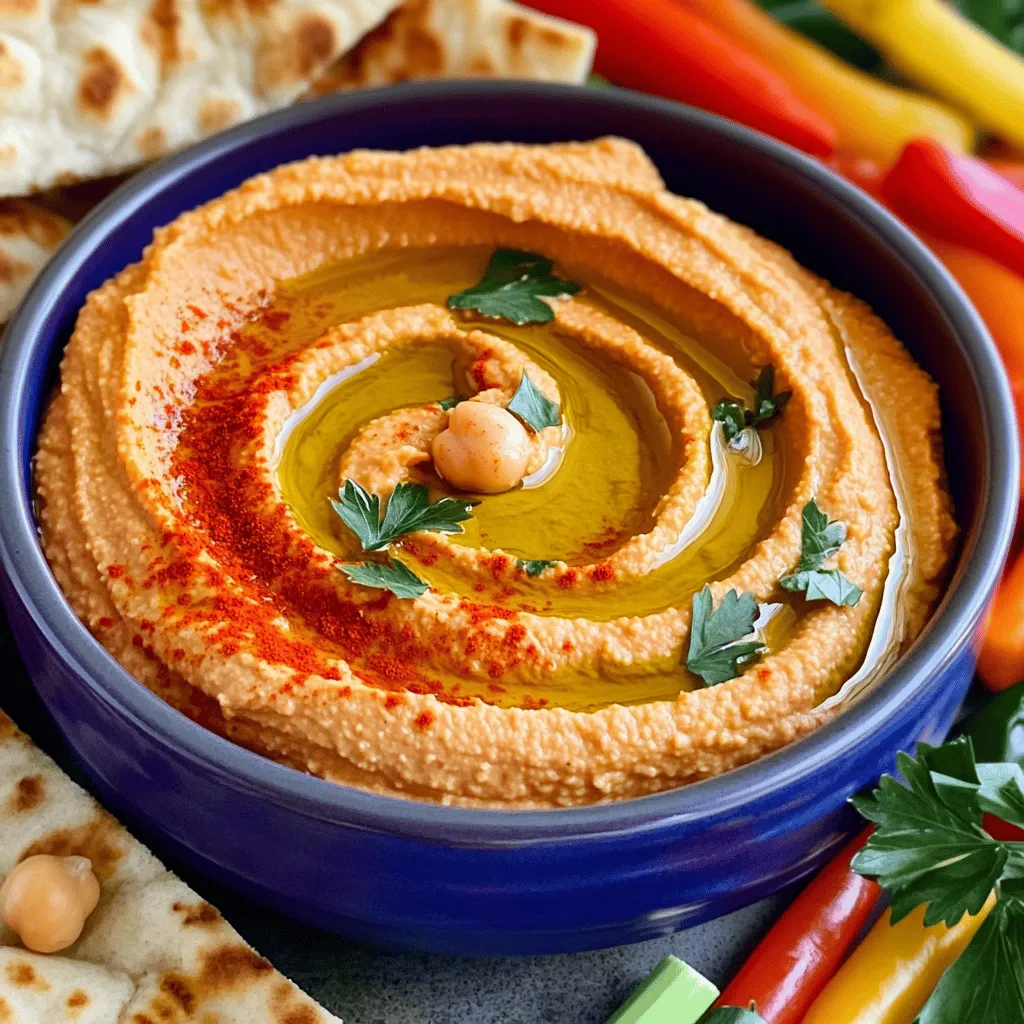
Are you ready to make a tasty Roasted Red Pepper Hummus? This easy recipe packs bold flavor and makes a

For this honey lime fruit salad, you need a mix of colorful fruits. Here’s what to gather: - 1 cup strawberries, hulled and sliced - 1 cup blueberries - 1 cup kiwi, peeled and diced - 1 cup pineapple, chopped - 1 cup watermelon, diced These fruits add sweetness and a pop of color. Fresh fruits make the salad bright and tasty. The dressing is simple yet full of flavor. You will need: - 2 tablespoons honey - 2 tablespoons lime juice - Zest of 1 lime This dressing adds a sweet and tangy taste. It helps bring all the flavors together. To make your salad even better, consider these garnishes: - Fresh mint leaves Mint adds a nice, refreshing touch. It makes the dish look pretty and taste great. For the full recipe, check the complete list above. Now, you’re ready to create a delightful honey lime fruit salad! Start by washing all the fruits well. This ensures they are clean and safe to eat. Cut the strawberries and kiwi into small pieces. Dice the pineapple and watermelon into bite-size chunks. Place all prepared fruits in a large mixing bowl. This colorful mix will add joy and sweetness to your salad. In a small bowl, whisk together two tablespoons of honey. Add two tablespoons of lime juice to the bowl. Zest one lime and mix it in. Keep whisking until everything blends well. This dressing gives the salad a bright and tangy flavor. Pour the honey lime dressing over the fruit in the large bowl. Gently toss the fruit with the dressing. Make sure every piece is coated. Let the salad sit for about ten minutes. This helps the flavors meld together. Before serving, toss it again and add fresh mint leaves on top. The mint adds a nice touch and makes it look pretty. Enjoy your fresh and tasty dish! For the full recipe, check out the details above. Choose ripe, fresh fruits for the best taste. Look for vibrant colors and good scents. Here are some tips: - Strawberries: Pick bright red, firm berries with no bruises. - Blueberries: Select plump, deep blue berries with a silvery sheen. - Kiwi: Choose slightly soft, brown-skinned kiwis for sweetness. - Pineapple: Pick a pineapple that feels heavy and smells sweet. - Watermelon: Look for a uniform shape and a yellow spot for ripeness. To make your salad even better, try these ideas: - Use fresh lime juice for a zesty kick. - Add lime zest for a burst of lime flavor. - Let the salad sit for 10 minutes to mix the flavors well. - Use honey that is local for a unique taste. Serve the Honey Lime Fruit Salad in a large bowl. This makes it easy for guests to scoop. For a fun twist, try these serving ideas: - Use small cups for individual servings at parties. - Garnish with mint leaves to add color. - Pair it with yogurt or whipped cream for extra creaminess. Consider checking the Full Recipe for more details on making this delightful dish! {{image_2}} You can change the fruits based on the season. For spring, add juicy peaches or ripe cherries. In summer, use fresh berries or sweet mango. Autumn brings apples and pears, while winter can feature citrus fruits like oranges and grapefruits. This keeps the salad fresh and exciting. Not all honeys taste the same. You might prefer clover honey for a mild touch. For a bolder flavor, try buckwheat honey. If you want a floral hint, use wildflower honey. Adjust the amount of honey to suit your taste. Taste the dressing before pouring it over the fruit. To add crunch, toss in nuts like almonds or walnuts. Pumpkin seeds or sunflower seeds work well too. These additions make the salad more filling and add protein. You can also sprinkle in some chia seeds for extra fiber. Just remember to mix well after adding these ingredients for even flavor. Feel free to explore these variations to make your Honey Lime Fruit Salad unique. For the full recipe, check out the ingredients and steps provided earlier. Store any leftover honey lime fruit salad in the fridge. Use an airtight container to keep it fresh. If you leave it out, the fruit can get mushy. The honey lime dressing helps preserve the fruit but does not prevent spoilage. I recommend glass containers for storing your fruit salad. They do not retain odors and keep the salad fresh. You can also use plastic containers, but make sure they seal tightly. Avoid metal containers, as they can react with the lime juice. When stored properly, honey lime fruit salad lasts about three days in the fridge. After that, the fruit may lose its texture. Always check for any signs of spoilage before serving leftovers. If the fruit looks or smells off, it’s best to toss it. For the best taste and quality, enjoy it within the first two days. Yes, you can make Honey Lime Fruit Salad ahead of time. I recommend preparing it no more than a day in advance. This keeps the fruit fresh and tasty. The dressing adds flavor, but it can also make fruit soggy if left too long. To avoid this, mix the fruit and dressing just before serving. If you want to make it earlier, store the fruit and dressing separately in the fridge. Many fruits work well with honey and lime. Here are some great options: - Bananas: They add creaminess. - Mango: Its sweetness complements the lime. - Grapes: They bring crunch and juiciness. - Oranges: They add a bright, citrusy flavor. - Peaches: Their softness adds a nice texture. These fruits mix well and create a colorful salad with amazing taste. Yes, this salad is great for meal prep. It’s simple to make and store. You can divide it into small containers for easy grab-and-go meals. Just remember to mix the dressing and fruit together just before eating. This way, the fruit stays fresh and crisp. You can enjoy this salad as a snack or a side dish throughout the week. For the full recipe, check out my earlier section! This blog post guided you through the sweet and tangy world of Honey Lime Fruit Salad. We discussed the fruits you need, the honey and lime dressing, and optional garnishes. I shared step-by-step instructions for easy preparation and tips to choose the best fruit. You learned about fun variations and smart storage tips. In total, this salad is simple and customizable. Enjoy creating a fresh, tasty dish that brightens any table! Happy cooking!

Honey Lime Fruit Salad Refreshing and Simple Dish

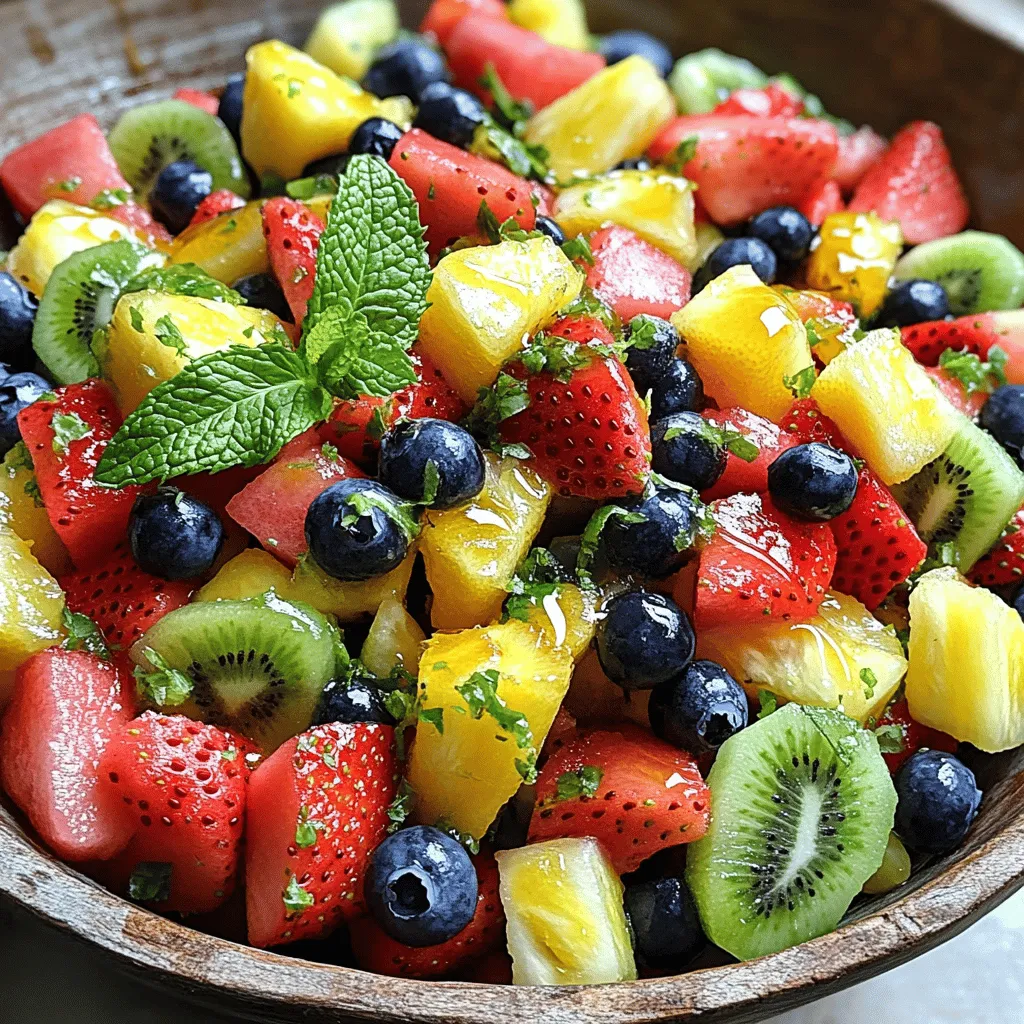
Looking for a quick, tasty treat? This Honey Lime Fruit Salad is your answer! Packed with fresh fruits and a

- 1 can chickpeas - 1 ripe avocado - 1 tablespoon tahini - 1 tablespoon lemon juice - 1 small red onion - 1 clove garlic - 1 teaspoon ground cumin - Salt and pepper to taste - 4 slices whole grain bread - Fresh spinach or arugula leaves - Sliced tomatoes (optional) I love using simple, fresh ingredients for this sandwich. The chickpeas pack protein, while the avocado adds creaminess. You can find chickpeas in a can. Make sure to drain and rinse them well. This step helps remove excess salt and makes them cleaner. Choosing a ripe avocado is key. It should feel soft but not mushy. When you mash it, aim for a smooth texture but leave some chunks for a nice bite. The tahini and lemon juice give that extra flavor kick. Tahini adds depth, and lemon brightens everything. Minced garlic and chopped red onion add a lovely crunch and bite. Whole grain bread holds everything together. You can toast it for extra crunch. I like to add fresh spinach or arugula for some green goodness. If you want, sliced tomatoes make a great topping. All these ingredients come together to create a delightful and fresh sandwich. For the full recipe, check out the details above. First, gather your ingredients. You will need one can of chickpeas, a ripe avocado, and some tahini. You will also need lemon juice, a small red onion, and garlic. Don't forget cumin, salt, and pepper. Next, drain and rinse the chickpeas. This step removes excess salt and juices. Then, pit and mash the avocado in a mixing bowl. Use a fork to mash it well. Now, combine the chickpeas and mashed avocado in the bowl. With a fork, roughly mash everything together. You want some whole chickpeas for texture. Add the lemon juice, chopped red onion, minced garlic, and ground cumin to the mix. Season with salt and pepper to taste. Stir until all the ingredients blend nicely. Toast your slices of whole grain bread in a toaster or on a skillet. Aim for a golden brown color. This adds crunch and flavor. Now, it's time to assemble the sandwiches. Take two slices of your toasted bread and spread the chickpea and avocado mixture evenly on top. Add fresh spinach or arugula leaves for a pop of color and flavor. If you like tomatoes, slice them and add them too. Place the other two slices of toasted bread on top. Gently press down to keep everything in place. When serving, cut the sandwiches in half. This makes them easier to eat. Arrange them nicely on a plate. For a fresh touch, add extra greens or slices of tomato on the side. You can also serve these sandwiches with a light salad or some crunchy chips. If you want to make this meal even better, pair it with a refreshing drink, like iced tea or lemonade. Enjoy this delightful Chickpea Avocado Salad Sandwich with friends or family! For the full recipe, see above. To create the perfect Chickpea Avocado Salad Sandwich, focus on texture first. You want a mix of smooth and chunky. When mashing, leave some chickpeas whole. This gives a nice bite. Next, balance the flavors. The creamy avocado pairs well with the tangy lemon juice. Use just enough salt and pepper to enhance the taste. Many folks over-mash the ingredients. This results in a uniform paste, which can lack excitement. Aim for a mix of textures for the best experience. Another common mistake is incorrect seasoning. Taste your mixture before serving. It should burst with flavor, not be bland. Adjust salt, pepper, or lemon juice as needed. To elevate your sandwich, consider adding herbs and spices. Fresh cilantro or parsley can brighten the flavors. A pinch of smoked paprika adds a nice kick. You can also try alternative dressings for a twist. A dollop of yogurt or a splash of balsamic vinegar can change the flavor profile. Experiment and find what you love! For the full recipe, check out the Chickpea Avocado Delight Sandwich 🥑🥪. {{image_2}} You can easily make this chickpea avocado salad sandwich vegan. The recipe is already vegan-friendly since it uses no animal products. You can enjoy it guilt-free and still have a tasty meal. If you need a gluten-free option, choose gluten-free bread. Many brands offer tasty gluten-free bread that works well. Just make sure to check the labels for any allergens. To mix things up, add different vegetables. Sliced cucumbers or bell peppers add crunch. You can also toss in grated carrots for color and sweetness. Feel free to experiment with your favorite veggies. Using alternative bread options can change the flavor too. Try pita pockets for a fun twist. You can also use wraps or lettuce leaves for a low-carb version. This keeps the sandwich fresh and exciting. Incorporating seasonal produce makes this sandwich even better. In summer, add ripe tomatoes or fresh basil for a burst of flavor. In the fall, some roasted sweet potatoes can add warmth. For holiday-themed sandwiches, think about festive colors. Use red peppers and green spinach for a Christmas look. You can even add cranberry sauce for a sweet touch. Let your creativity shine! To keep your chickpea avocado salad fresh, store leftovers in the fridge. Use an airtight container to prevent air from getting in. This helps the salad stay tasty. Make sure to eat it within three days for the best flavor. You don’t need to reheat this sandwich. It tastes great cold! If you want warmth, toast the bread again. This keeps it crispy. Just be careful not to overdo it, or the bread can burn. Keep leftover salad in a separate container to maintain its freshness. Freezing this sandwich is not ideal, but you can freeze the chickpea avocado salad. Place it in a freezer-safe container and seal tightly. It can last up to one month in the freezer. When you’re ready, defrost it in the fridge overnight. Then, put it on fresh bread before serving. Avoid freezing the whole sandwich, as bread can get soggy. A chickpea avocado salad sandwich is a tasty meal. It combines mashed chickpeas and avocado. You mix in some spices and veggies for flavor. The sandwich is hearty and filling. Yes, you can make this sandwich ahead. Prepare the chickpea avocado mix and store it in the fridge. Use an airtight container to keep it fresh. You can assemble the sandwich when you're ready to eat. If you can't use avocado, try these options: - Hummus for a creamy texture - Mashed banana for a sweet twist - Silken tofu for a protein boost Yes, this sandwich is healthy. Chickpeas provide protein and fiber. Avocado adds healthy fats. Together, they support heart health and digestion. This meal keeps you full and satisfied. This sandwich stays fresh for about two days. Store it in an airtight container. Be sure to keep the filling and bread separate if possible. This helps maintain the texture. Absolutely! You can add extra flavors and ingredients. Consider adding: - Diced bell peppers for crunch - Fresh herbs like cilantro or parsley - Sliced cucumbers for a refreshing bite For the full recipe, check out the Chickpea Avocado Delight Sandwich. This blog post explored making a chickpea avocado salad sandwich. You learned about the key ingredients, preparation steps, and cooking methods. I shared tips for perfecting texture and flavor, as well as common mistakes to avoid. You also discovered variations, storage info, and answers to FAQs. The beauty of this sandwich lies in its flexibility, making it easy to fit any taste or diet. Enjoy this tasty, healthy option in your meals and let your creativity shine!

Chickpea Avocado Salad Sandwich Delightful and Fresh

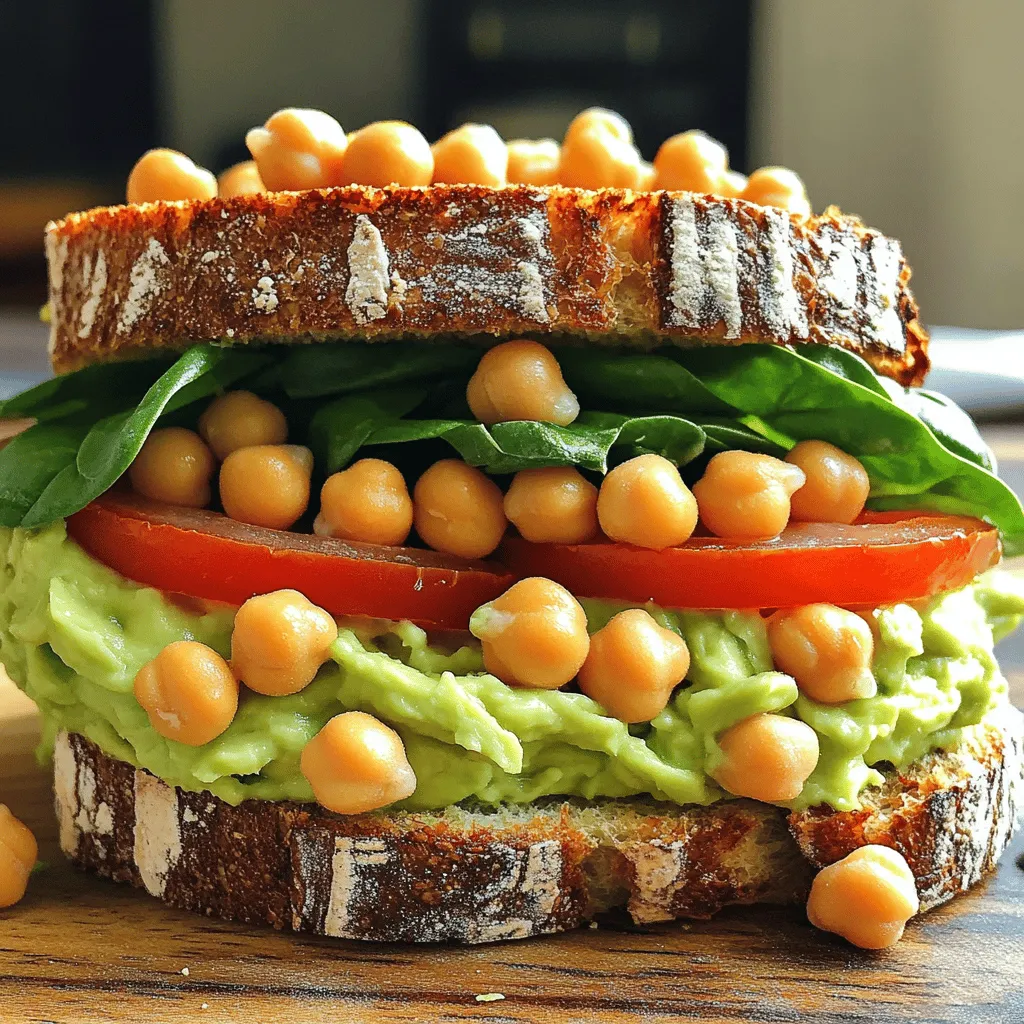
Are you ready to dive into a fresh and tasty twist on lunch? My Chickpea Avocado Salad Sandwich is packed

To make pumpkin cheesecake brownies, you need a mix of rich and sweet flavors. The recipe combines two tasty layers: a pumpkin layer and a creamy cheesecake layer. This blend creates a treat that is both soft and flavorful. You can find the full recipe at the end of this section. Here are the key ingredients you will need: - 1 cup pumpkin puree - 1 cup cream cheese, softened - 1/2 cup granulated sugar - 1/4 cup brown sugar - 1/4 cup unsalted butter, melted - 1 teaspoon vanilla extract - 2 large eggs - 1 cup all-purpose flour - 1/3 cup cocoa powder - 1 teaspoon baking powder - 1 teaspoon cinnamon - 1/2 teaspoon nutmeg - 1/4 teaspoon salt - 1/4 cup chocolate chips (optional, for topping) Each ingredient plays a role in making the brownies rich and creamy. Pumpkin puree gives moisture and flavor. Cream cheese adds a smooth texture. The sugars provide sweetness, while cocoa powder gives a deep chocolate taste. You can make these brownies even more special. Consider these add-ins: - Chopped nuts for crunch - Mini chocolate chips for extra sweetness - A sprinkle of sea salt on top for flavor contrast - Whipped cream for a light topping Feel free to mix and match these options to create your perfect dessert! Start by preheating your oven to 350°F (175°C). Grab a 9x9 inch baking pan. You can grease it well or line it with parchment paper. Lining helps with easy removal later. In a medium bowl, add the softened cream cheese, granulated sugar, one egg, and vanilla extract. Beat everything together until the mixture is smooth. Set this creamy layer aside for now. In a large bowl, mix the melted butter with the pumpkin puree. Add the brown sugar and the remaining egg. Stir until everything combines well. This will be your pumpkin base. In another bowl, whisk together the flour, cocoa powder, baking powder, cinnamon, nutmeg, and salt. Gradually add this dry mix to the pumpkin batter. Stir just until combined. Pour half of this mixture into the prepared pan. Then, drop spoonfuls of the cheesecake layer over it. Use a knife to swirl them together. Finally, pour the rest of the pumpkin batter on top and smooth it out. Bake the brownies in the oven for 30-35 minutes. Check if they are done by inserting a toothpick into the center. If it comes out clean or with a few moist crumbs, they're ready. Let the brownies cool completely in the pan before slicing them into squares. Enjoy your delicious pumpkin cheesecake brownies! For the complete recipe, refer to the Full Recipe section. To get the best swirl, use a knife. After you add the cheesecake layer, gently drag the knife through both layers. This creates a lovely marbled look. Start at the edges and work toward the center. Don’t overdo it; a few swirls are perfect. You want to see both the pumpkin and cheesecake layers. This method makes your brownies look fancy and taste great! Baking can be tricky, but avoiding a few common mistakes helps. First, make sure your cream cheese is soft. Cold cream cheese does not mix well. Next, don’t skip preheating your oven. A hot oven cooks the brownies evenly. Lastly, avoid overmixing the batter. Mix just until combined. Overmixing can make your brownies tough instead of soft and chewy. To keep your brownies fresh, store them in an airtight container. They stay good at room temperature for up to three days. If you need them to last longer, refrigerate them. To reheat, warm them in the microwave for about 10-15 seconds. This makes them soft and gooey again. You can also enjoy them cold, straight from the fridge. They taste delicious any way you serve them! For the full recipe, check the sections above. {{image_2}} You can play with spices to make your brownies shine. Try adding a pinch of ginger or allspice to the pumpkin batter. These spices bring warmth and depth to each bite. You can also mix in some cloves for a spicier kick. Adjust the amounts to suit your taste. A little dash of cardamom can also add a unique twist. These warm spices create a cozy vibe perfect for fall! If you need a gluten-free treat, it’s easy to switch up the recipe. Replace the all-purpose flour with gluten-free flour blend. This swap keeps the texture light and fluffy. Make sure to check the blend labels, as some may contain added starch. This option allows everyone to enjoy these brownies without worry! Experimenting with chocolate types can change the flavor profile. You can use dark chocolate for a richer taste or milk chocolate for a sweeter touch. White chocolate can also add a creamy contrast to the pumpkin flavor. Just swap the cocoa powder in the recipe with melted chocolate. This option gives you a fun twist on the classic brownies. You can even mix different chocolates for an exciting layered taste! For the full recipe, check out the detailed steps above. When serving pumpkin cheesecake brownies, the right sides can make them even better. Here are some ideas: - Whipped Cream: A dollop of fresh whipped cream adds a light touch. - Ice Cream: Vanilla or caramel ice cream pairs perfectly with warm brownies. - Nuts: Chopped walnuts or pecans add a crunchy contrast. - Chocolate Sauce: Drizzle chocolate sauce for an extra sweet boost. These brownies shine at gatherings. For special events, think about these tips: - Festive Plate: Use a colorful or themed plate to present your brownies. - Garnish: Add a sprinkle of cinnamon or cocoa powder for flair. - Portion Sizes: Cut into smaller squares for a cute, bite-sized treat. Choosing the right drink can enhance your dessert experience. Here are some great pairings: - Coffee: A rich, dark coffee complements the flavors well. - Tea: Spiced chai or herbal tea matches the warm spices. - Milk: A glass of cold milk balances the sweetness of the brownies. - Wine: Pair with dessert wine for an elegant touch. For the full recipe, check the earlier section. Enjoy your Pumpkin Cheesecake Brownies! Pumpkin Cheesecake Brownies stay fresh for about 3 to 5 days when stored properly. Keep them in an airtight container at room temperature. If you want them to last longer, refrigerate them. In the fridge, they can stay good for up to a week. Just remember to let them sit out for a bit before serving. This helps regain their soft texture. Yes, you can freeze Pumpkin Cheesecake Brownies! To freeze them, first cut the brownies into squares. Wrap each square tightly in plastic wrap. Then, place them in a freezer-safe bag or container. They will stay fresh for about 2 to 3 months in the freezer. When you want to eat them, just thaw them overnight in the fridge. If you need a cream cheese substitute, there are a few options. You can use mascarpone cheese for a similar texture. Greek yogurt is another great choice, as it adds creaminess. Soft tofu can also work if you blend it until smooth. These alternatives can change the flavor a bit, but they still create a delicious dessert. To check if your brownies are done baking, insert a toothpick into the center. It should come out clean or with a few moist crumbs attached. If there is wet batter on the toothpick, they need more time. Remember, brownies continue to cook a bit after you take them out, so don’t overbake them! This blog post covered how to make delicious Pumpkin Cheesecake Brownies. You learned about the key ingredients, step-by-step instructions, and helpful tips for baking. I shared ways to add flavor and variations to suit your taste. Don't forget the best serving suggestions to impress your guests. Now, you have everything you need to enjoy these tasty treats! Whether for a party or a simple dessert, these brownies will delight anyone. Happy baking!

Pumpkin Cheesecake Brownies Irresistible Dessert Treat

Are you ready to indulge in a dessert you can’t resist? Pumpkin Cheesecake Brownies combine rich chocolate and creamy cheesecake,

To make a tasty sesame ginger beef stir fry, you need: - 1 lb (450 g) beef sirloin, thinly sliced against the grain - 2 tablespoons sesame oil - 1 tablespoon fresh ginger, minced - 3 cloves garlic, minced - 1 bell pepper (red or yellow), sliced - 1 cup snap peas, trimmed - 1 carrot, julienned - 4 green onions, sliced - 2 tablespoons soy sauce - 1 tablespoon hoisin sauce - 1 tablespoon rice vinegar - 1 tablespoon sesame seeds - Salt and pepper to taste - Cooked jasmine rice, for serving You can add extra flavor by using: - 1 tablespoon chili paste for heat - 1 tablespoon oyster sauce for richness - 1 teaspoon sugar to balance flavors - Fresh herbs like cilantro or basil for garnish If you can't find some ingredients, here are swaps: - Use flank steak or sirloin tip instead of sirloin. - Swap sesame oil with canola or vegetable oil. - Replace snap peas with green beans or broccoli. - Use coconut aminos instead of soy sauce for a gluten-free option. - If you want a different vinegar, try apple cider vinegar. By mixing and matching, you can make this dish your own! For the full recipe, check out the detailed instructions above. 1. Marinate the Beef: In a bowl, mix the sliced beef with 1 tablespoon of soy sauce, a pinch of salt, and pepper. Let it sit for 15 minutes to soak in the flavors. 2. Prep the Sauce: In a small bowl, whisk together the remaining soy sauce, hoisin sauce, rice vinegar, minced ginger, and minced garlic. Set this aside for later. 3. Heat the Oil: In a large wok or skillet, heat the sesame oil over medium-high heat until it shimmers. 4. Stir Fry the Beef: Add the marinated beef to the hot wok in a single layer. Cook for 2-3 minutes without stirring. This helps brown the beef. Stir and cook for another 1-2 minutes until it cooks through. Remove the beef from the wok and set it aside. 5. Cook the Vegetables: In the same wok, add the sliced bell pepper, snap peas, and carrot. Stir fry for about 3-4 minutes. You want them soft but still crunchy. 6. Combine Everything: Return the cooked beef to the wok. Pour in the sauce and toss everything together. Cook for another 2 minutes until the sauce thickens slightly and coats the beef and veggies. 7. Finish: Stir in the sliced green onions and sprinkle sesame seeds over the stir fry. 8. Serve: Serve your sesame ginger beef stir fry over a bed of fluffy jasmine rice for a complete meal. This dish is not just tasty; it also looks great on the plate! For the full recipe, check the section above. To cook beef just right, start with thin slices. This helps it cook faster. Marinate the beef for at least 15 minutes. Use salt and soy sauce to boost flavor. When cooking, let the beef rest in one layer in the hot wok. Don't move it for 2-3 minutes. This gives a nice brown crust. Stir it only after it browns. This keeps the beef tender and juicy. A great sauce makes your stir fry shine. Combine soy sauce, hoisin sauce, rice vinegar, ginger, and garlic. This mix brings sweet, salty, and tangy notes. The balance is key to a rich flavor. Don’t rush this step. Let the sauce sit a bit before adding it to the beef. This allows the flavors to meld well. To keep your veggies crunchy, heat the wok well before adding them. High heat cooks them fast, locking in texture. Stir fry for only 3-4 minutes. This keeps them vibrant and crisp. Use fresh veggies for the best taste and quality. You can add them in stages if needed. Start with heartier vegetables like carrots. Add softer ones like bell peppers later. This ensures all veggies are just right. {{image_2}} You can easily turn this dish into a vegetarian delight. Replace the beef with mushrooms or tempeh. Both add great texture and soak up the flavors. Use the same marinade for the mushrooms. Marinate them for about 10 minutes. Sauté them until golden brown. This gives you a rich and savory taste. Add your favorite veggies like broccoli or zucchini for more nutrients. Chicken is another great option. Use chicken breast, sliced thinly. Follow the same steps as with beef. Cook it until it turns golden and juicy. Tofu is also a fantastic choice. Press the tofu to remove excess water. Cut it into cubes and sauté until crispy. Both options work well with the sauce and spices. Feel free to mix in different vegetables. You can add bell peppers in various colors for a vibrant look. Broccoli, bok choy, or snow peas add crunch and flavor. Carrots and snap peas are also excellent choices. Using seasonal vegetables makes it fun. Experiment and find what you like best! Each vegetable brings its unique taste and texture, making your stir fry even better. To keep your sesame ginger beef stir fry fresh, let it cool first. Once cooled, place it in an airtight container. Store it in the fridge for up to three days. This keeps the flavors intact and prevents spoilage. When you’re ready to enjoy your leftovers, heat them in a skillet. Add a splash of water or broth to keep it moist. Heat on medium until warm, stirring often. You can also use the microwave, but cover the dish to avoid drying it out. If you want to save it for later, freezing works well. Place the stir fry in a freezer-safe container. It can last up to three months in the freezer. When you’re ready to eat, thaw it in the fridge overnight before reheating. This method helps maintain its tasty flavors. For the complete cooking process, refer to the Full Recipe. The best type of beef for stir fry is beef sirloin. It is tender and flavorful. You can also use flank steak, which is great for stir frying. Both cuts cook fast and stay juicy. Cut the meat thinly against the grain to help with tenderness. This helps make each bite easy to chew. Yes, you can make sesame ginger beef stir fry ahead of time. Store the cooked stir fry in an airtight container. It will last in the fridge for about three days. When you are ready to eat, simply reheat it in a skillet or microwave. This dish tastes even better the next day as the flavors blend together. Good side dishes for sesame ginger beef stir fry include: - Steamed jasmine rice - Fried rice - Quinoa - Noodles You can also serve a simple salad or sautéed greens. These sides balance the rich flavors of the stir fry. For more ideas, check out the Full Recipe for extra tips. In this post, we explored ingredient lists for a tasty sesame ginger stir fry. I shared preparation and cooking steps to make each bite delicious. We discussed tips to cook beef perfectly and keep veggies crunchy. I also included vegetarian options and storage tips for leftovers. Stir fry is simple and fun. You can mix and match to fit your taste. Enjoy your cooking journey and share the joy of this dish!

Sesame Ginger Beef Stir Fry Flavorful Dinner Recipe

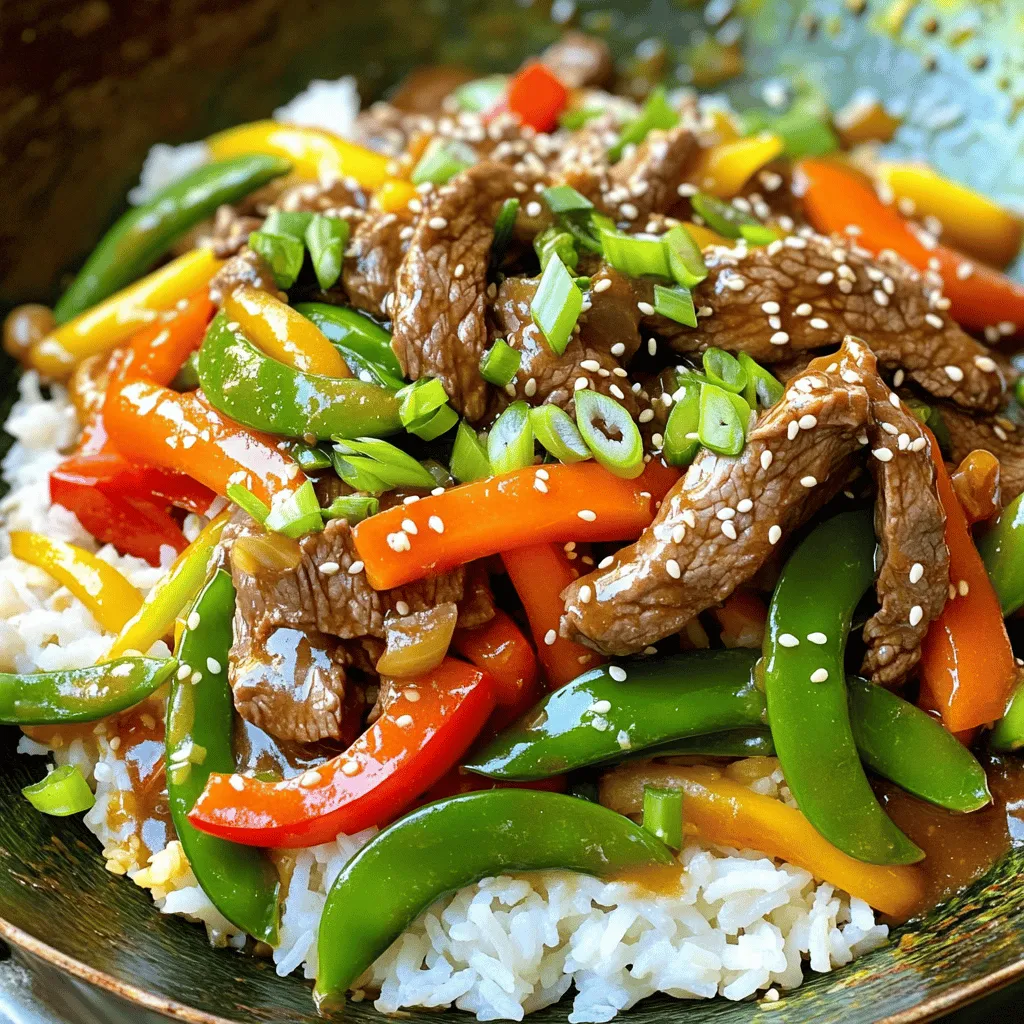
Looking for a quick, delicious dinner? You’ve come to the right place! This Sesame Ginger Beef Stir Fry recipe features

For this delicious caramel apple dip, you need a few key ingredients. Here’s the list: - 2 large apples (Granny Smith or Honeycrisp), cored and sliced - 1 cup caramel sauce (store-bought or homemade) - 1 cream cheese (8 oz), softened - 1/4 cup powdered sugar - 1 teaspoon vanilla extract - 1/2 teaspoon ground cinnamon These ingredients come together to make a creamy, sweet dip that pairs perfectly with fresh apple slices. The apples provide a crisp bite, while the caramel adds a rich flavor. You can add toppings to make your dip even better. Here are some fun options: - Chopped nuts (walnuts or pecans) for crunch - A drizzle of extra caramel sauce for sweetness - A light sprinkle of sea salt for contrast These toppings add different textures and flavors. Try mixing and matching to find your favorite combination! Choosing the right apples is key to a great dip. I recommend using tart apples like Granny Smith or sweet ones like Honeycrisp. Here’s what to look for: - Firmness: Pick apples that feel firm, not soft. - Color: Look for vibrant colors. This shows they are fresh. - Aroma: Sniff the apples. They should smell sweet and fruity. Using the right apples helps balance the dip's sweetness. Enjoy experimenting with different varieties for unique flavors! Making caramel apple dip is fun and easy. You will need just a few simple steps. First, gather your ingredients. You will need apples, cream cheese, powdered sugar, vanilla, cinnamon, and caramel sauce. This dip is perfect for fall, and your friends will love it! Start by softening the cream cheese. Place it in a medium mixing bowl. Add the powdered sugar, vanilla extract, and ground cinnamon. Use an electric mixer to blend it all together. Mix until the blend is smooth and creamy. This will be the base of your dip. The cream cheese gives it a rich flavor that pairs well with caramel. Now, it’s time to add the caramel sauce. Gradually mix in the caramel, but save some for later. Blend until everything is combined well. Next, transfer this mixture into a serving dish. Drizzle the reserved caramel sauce over the top. This adds a beautiful look and extra sweetness. Finally, sprinkle chopped nuts on top for some crunch. If you like, add a pinch of sea salt for a sweet and salty taste. Serve it with sliced apples for dipping. Enjoy this delicious fall treat! For the full recipe, check out the details above. To get the smoothest dip, start with room temperature cream cheese. If it's cold, it won't mix well. Use an electric mixer to blend the cream cheese with sugar and vanilla. Mix until it's creamy, about two minutes. Gradually add the caramel sauce. This helps it blend smoothly. Mixing slowly prevents lumps. You can boost the flavor with a few easy tweaks. Try adding a pinch of sea salt on top. It adds a nice contrast to the sweet caramel. You can also mix in some chopped nuts into the dip. Walnuts or pecans add crunch and a nutty taste. If you want more spice, add a dash of nutmeg or a bit more cinnamon. These flavors blend well with the apples and caramel. This dip is great for gatherings or cozy nights at home. Serve it in a shallow bowl, and drizzle extra caramel on top. Arrange apple slices around the bowl for a fun display. You can also offer graham crackers or pretzels for dipping. Both pair well with the sweet dip. For a festive touch, add some sliced strawberries or bananas. This makes it colorful and tasty. Remember to check out the Full Recipe for more details! {{image_2}} To make a vegan version of caramel apple dip, swap cream cheese for a dairy-free alternative. You can use cashew cream or coconut cream. These ingredients give a rich texture without dairy. For the caramel, use coconut sugar and plant-based milk. Blend them until smooth. This version still tastes great and keeps the fall spirit alive. If you need gluten-free options, you’re in luck! The base of this dip is naturally gluten-free. Just ensure the caramel sauce you use is gluten-free. Most store-bought sauces are safe, but check the label. You can also make your own caramel with sugar, butter, and cream. This way, you control the ingredients. Want to mix it up? Here are some fun flavor ideas: - Chocolate Caramel Dip: Add melted chocolate to the caramel mixture for a sweet twist. - Nutty Flavor: Stir in almond or peanut butter for a nutty taste. It adds creaminess and a punch of flavor. - Spicy Kick: Add a pinch of cayenne pepper or chili powder for a surprising heat. It contrasts nicely with the sweet apples. Feel free to explore these options to make your dip unique! For the full recipe, check out the details above. To keep your caramel apple dip fresh, store it in an airtight container. Make sure to cover it well to avoid air exposure. If you have any leftover apples, keep them separate. Apples can brown quickly once cut. Add a splash of lemon juice to the apple slices to slow down the browning. This dip is best stored in the fridge for the freshest taste. Properly stored caramel apple dip will last about three to five days in the fridge. The cream cheese and caramel sauce help keep it safe for a few days. However, for the best flavor and texture, enjoy it within three days. After that, the dip may lose some of its creaminess. If you want to serve the dip warm, gently reheat it. Place the dip in a microwave-safe bowl. Heat it in short bursts, about 15 to 20 seconds at a time. Stir after each burst until it reaches your desired warmth. Make sure not to overheat it, as the cream cheese can separate. Enjoy your warm dip with fresh apple slices for a cozy fall treat. For the full recipe, refer to the sections above. Yes, you can make Caramel Apple Dip in advance. Just prepare the dip and store it in an airtight container. Keep it in the fridge for up to two days. Before serving, stir it gently. If the dip thickens, add a bit of cream or milk for a smoother texture. This method saves time during busy fall gatherings. You have many tasty options! Try using: - Pear slices - Banana chunks - Pretzel sticks - Graham crackers - Marshmallows These choices add fun flavors and textures. Each dipper brings a unique taste to the creamy caramel dip. Absolutely! Homemade caramel sauce works great in this recipe. It adds a personal touch. To make it, melt sugar, butter, and cream on the stove. Stir until smooth. Use it in place of store-bought caramel sauce. This way, you control the flavor and sweetness. It'll make your dip even more special. For the full recipe, follow the steps mentioned above. Enjoy your delicious dip! This blog post covered how to create delicious caramel apple dip. We explored key ingredients, optional toppings, and tips for picking the best apples. I shared easy steps to mix and assemble the dip and included tips to make it creamy and flavorful. You learned about variations, including vegan and gluten-free options, along with storage tips. In the end, caramel apple dip is fun to make and share. It’s perfect for any gathering or treat at home. Enjoy every bite and get creative!

Caramel Apple Dip Irresistible Fall Treat Recipe

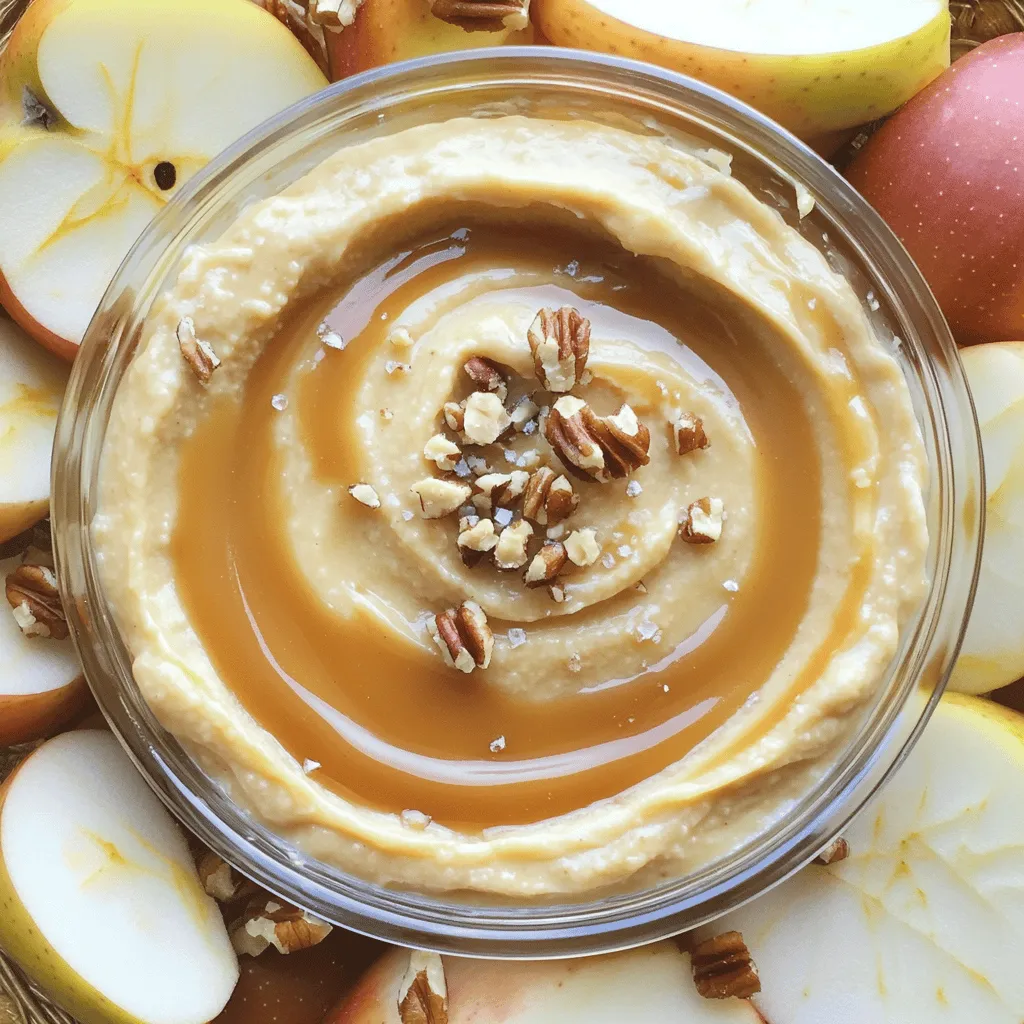
Fall is here, and what better way to celebrate than with a warm bowl of Caramel Apple Dip? This simple

To make a hearty veggie loaded minestrone soup, gather these ingredients: - 1 tablespoon olive oil - 1 medium onion, diced - 2 cloves garlic, minced - 2 medium carrots, diced - 2 stalks celery, diced - 1 zucchini, diced - 1 cup green beans, trimmed and cut into 1-inch pieces - 1 cup kale or spinach, chopped - 1 can (14 oz) diced tomatoes - 4 cups vegetable broth - 1 teaspoon dried oregano - 1 teaspoon dried basil - 1 bay leaf - 1 cup cannellini beans, drained and rinsed - 1 cup small pasta (like ditalini or elbow macaroni) - Salt and pepper to taste - Grated Parmesan cheese for serving (optional) - Fresh basil for garnish (optional) Using fresh ingredients makes the soup bright and tasty. Fresh veggies give crunch and flavor. However, canned items save time. Canned tomatoes and beans are handy. They help you make the soup faster. If you choose canned, look for low-sodium options. They add flavor without too much salt. For broth, I recommend brands like Pacific Foods or Swanson. They make a rich vegetable broth. For beans, try Eden Organic or Goya. These brands offer quality and taste. They help your soup shine. When you use good ingredients, your soup will be great. Check the labels for added sugars or preservatives. Using quality ingredients makes your soup a nourishing meal. For the full recipe, check the section above. To start, gather all your ingredients. This makes cooking easy and fun. You will need: - 1 tablespoon olive oil - 1 medium onion, diced - 2 cloves garlic, minced - 2 medium carrots, diced - 2 stalks celery, diced - 1 zucchini, diced - 1 cup green beans, trimmed and cut into 1-inch pieces - 1 cup kale or spinach, chopped - 1 can (14 oz) diced tomatoes - 4 cups vegetable broth - 1 teaspoon dried oregano - 1 teaspoon dried basil - 1 bay leaf - 1 cup cannellini beans, drained and rinsed - 1 cup small pasta (like ditalini or elbow macaroni) - Salt and pepper to taste - Grated Parmesan cheese for serving (optional) - Fresh basil for garnish (optional) Chop all your veggies and measure your broth. This step saves time. Now, let's cook! In a large pot, heat the olive oil over medium heat. Add the onion and garlic. Sauté them for about 3-4 minutes. They should smell great! Next, toss in the carrots and celery. Cook these for another 5 minutes until they soften. Then, add the zucchini and green beans. Stir them in and cook for 3 more minutes. Pour in the diced tomatoes and vegetable broth. Stir everything together. Add the dried oregano, dried basil, and bay leaf. Bring the pot to a boil. Once it boils, lower the heat to a simmer. Now, add the small pasta and cook for 8-10 minutes. Check the pasta to make sure it is al dente. Stir in the chopped kale or spinach and let it cook for another 2-3 minutes. The greens will wilt nicely. Don’t forget to remove the bay leaf! Season your soup with salt and pepper to taste. Ladle the soup into bowls. For an extra touch, top with grated Parmesan cheese. If you like, add fresh basil for garnish. Serve hot and enjoy! For the full recipe, check out the complete instructions. This soup is perfect for any meal. To boost the taste of your minestrone soup, consider adding a splash of lemon juice. Acid brightens flavors and makes veggies pop. You can also try fresh herbs like thyme or parsley. They add depth to your soup. For more warmth, include a pinch of red pepper flakes. This gives a gentle heat that many enjoy. If you want a richer broth, use homemade vegetable stock. It adds a personal touch that store-bought options often lack. One common mistake is overcooking the pasta. Follow the package directions to keep it al dente. If you cook it too long, it becomes mushy. Another mistake is skimping on seasoning. Always taste your soup as it cooks. Adjust salt and pepper to your liking. Forgetting to remove the bay leaf before serving is also common. That leaf is not meant to be eaten! Lastly, don’t skip the greens. They add nutrition and color to your dish. Serve minestrone soup hot for the best taste. A good temperature is around 165°F. Ladle it into bowls and top with grated Parmesan cheese. This adds a creamy texture that many love. For a finishing touch, sprinkle fresh basil on top. It gives a burst of color and fresh flavor. You can also serve it with crusty bread on the side. This makes for a complete and satisfying meal. For the full recipe, check the detailed instructions above. {{image_2}} You can easily boost the protein in your minestrone. Adding cooked chicken gives a nice flavor and extra protein. Simply shred or chop the chicken and stir it in before serving. If you want a meat-free option, try tofu. Use firm tofu, cut into cubes, and add it to the soup. Cook it with the vegetables to soak up all the tasty broth. Minestrone is all about using fresh veggies. Change the vegetables based on what you have or what’s in season. In spring, add peas or asparagus. In fall, try butternut squash or sweet potatoes. This keeps the soup fun and fresh. Feel free to mix and match your favorites for a unique flavor. For a gluten-free version, choose gluten-free pasta. Many brands offer great options, like brown rice or chickpea pasta. These choices cook well and taste great in soup. Just make sure to check the cooking time. Add the pasta later to avoid overcooking. Enjoy this Veggie Loaded Minestrone Soup with ease, knowing it fits your diet. For the full recipe, check out the detailed instructions above. After you make a big pot of veggie loaded minestrone soup, let it cool. Once cooled, store it in an airtight container. It stays fresh in the fridge for up to five days. Make sure to keep it in the back of the fridge, where it's coldest. This keeps the soup safe and tasty. You can freeze minestrone soup for later. Pour the cooled soup into freezer-safe containers. Leave some space at the top for the soup to expand. It’s best to use the soup within three months. When you’re ready to eat it, just thaw it in the fridge overnight. Reheat your soup on the stove or in the microwave. If using the stove, pour it into a pot and heat over medium heat. Stir it often so it warms evenly. If using a microwave, use a microwave-safe bowl. Heat in short bursts, stirring in between, until it's hot. Enjoy your veggie loaded minestrone soup warm and delicious! For the full recipe, visit the main article. Yes, you can use frozen vegetables. They work well in this dish. Frozen veggies save time and still provide good flavor. Just add them to the pot a bit later in the cooking process. This way, they heat through without getting mushy. This soup lasts about 3 to 4 days in the fridge. Store it in an airtight container for best results. The flavors will deepen as it sits, making it even tastier on the next day. You can use other beans like kidney beans or chickpeas. Both options offer great taste and texture. Just make sure to drain and rinse them first. This keeps the soup light and fresh. For a different flavor, try using lentils instead. They cook quickly and blend well with the soup. For the full recipe, check the earlier section. Veggie Loaded Minestrone Soup offers tasty, healthy options for your meals. You learned about key ingredients, whether to use fresh or canned, and trusted brands. The cooking steps guide you through preparation, cooking, and serving ideas. Tips help you avoid common mistakes and enhance flavor. Variations let you tailor the soup with proteins and seasonal veggies. Finally, proper storage tips ensure your soup lasts longer. Enjoy making this warm and filling dish, knowing you can always switch things up!

Veggie Loaded Minestrone Soup Flavorful Healthy Meal

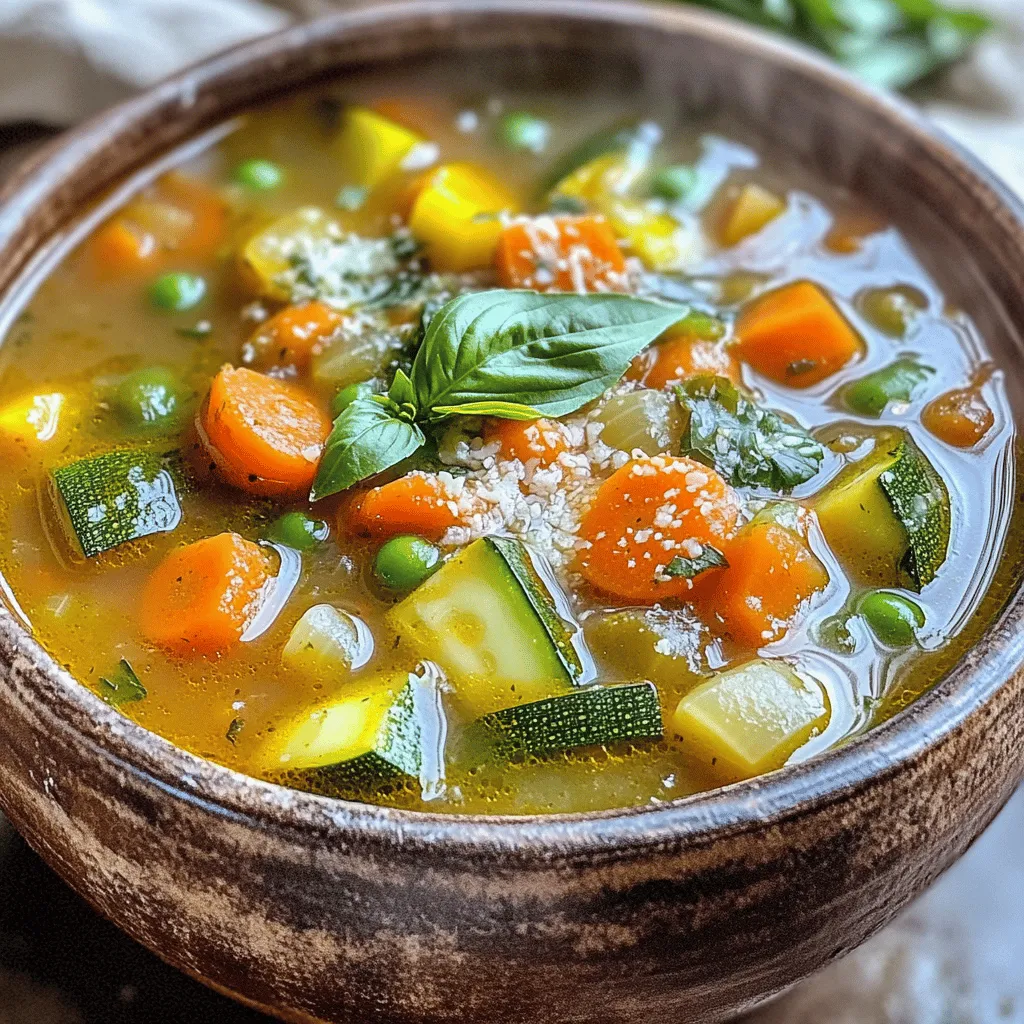
Looking for a hearty meal that’s both healthy and packed with flavor? Look no further than my Veggie Loaded Minestrone

No-Churn Rocky Road Ice Cream needs some simple ingredients. Each one adds to the great taste. Here are the items you will need: - 2 cups heavy whipping cream - 1 can (14 ounces) sweetened condensed milk - 1 teaspoon vanilla extract - 1/2 cup mini marshmallows - 1/2 cup chopped walnuts or pecans - 1/2 cup semisweet chocolate chips - 1/4 cup cocoa powder - Pinch of salt These ingredients make the ice cream rich and creamy. The heavy whipping cream gives it a smooth texture. Sweetened condensed milk adds sweetness and richness. Vanilla extract enhances the flavor. Mini marshmallows and nuts add fun textures. Semisweet chocolate chips bring in chocolatey goodness. Cocoa powder deepens the chocolate flavor. A pinch of salt balances all the sweetness. When using these ingredients, make sure they are fresh. This will help your ice cream taste its best. Once you have everything ready, you can start making this delightful treat. If you want to see how to make it, check out the Full Recipe. Enjoy the process and the tasty results! 1. Whipping the cream until stiff peaks Start with a large bowl. Pour in 2 cups of heavy whipping cream. Use a hand mixer or stand mixer. Beat the cream on medium speed. Watch for stiff peaks to form. This means it holds its shape well. This step creates a fluffy texture for your ice cream. 2. Combining the condensed milk mixture In a separate bowl, add one can of sweetened condensed milk. Mix in 1 teaspoon of vanilla extract and a pinch of salt. Stir until it is smooth and creamy. This mixture adds sweetness and depth to our ice cream. 3. Folding the mixtures together Take a small amount of the whipped cream. Add it to the condensed milk mixture. Gently fold it in to lighten the mix. Now, pour the rest of the whipped cream in. Carefully fold it all together. Avoid stirring too hard. You want to keep that fluffy texture. 4. Adding cocoa powder and mix-ins Sift in 1/4 cup of cocoa powder. This adds a rich chocolate flavor. Gently fold it until there are no lumps. Next, add the fun stuff: 1/2 cup of mini marshmallows, 1/2 cup of chopped walnuts or pecans, and 1/2 cup of semisweet chocolate chips. Stir them in carefully. This makes each scoop exciting. 5. Freezing the mixture Pour the combined mixture into an airtight container. Smooth the top with a spatula. Cover it tightly to prevent ice crystals. Freeze for at least 6 hours. For the best taste, freeze it overnight. Then, your delicious no-churn rocky road ice cream is ready to enjoy! You can find the Full Recipe for all the steps and ingredients. To make the best no-churn rocky road ice cream, pay attention to the details. - Whip the cream correctly for best texture: Start with chilled heavy cream. Whip it until stiff peaks form. This makes the ice cream light and fluffy. If you over-whip, it can turn grainy. - Ensuring the cocoa powder is lump-free: Sift the cocoa powder before adding it. This helps blend it smoothly. Lumps can ruin the creamy texture. A fine mixer can also help. - Folding techniques to retain airiness: When you mix the whipped cream with the condensed milk, do it gently. Use a spatula to fold, not stir. This keeps the air in the cream, making your ice cream light. Serving your ice cream well makes it even more fun. - Serving ideas for extra appeal: Use nice bowls or waffle cones. You can layer the ice cream in clear cups. This shows off the layers of chocolate and marshmallows. - Garnishing with additional toppings: Top your ice cream with extra mini marshmallows and chocolate chips. You can also add a drizzle of chocolate sauce. This makes your creation look extra special. By following these tips, you can create a delightful no-churn rocky road ice cream that looks as good as it tastes. For the full recipe, check out the detailed instructions above. Enjoy your sweet treat! {{image_2}} You can easily change the flavors in your No-Churn Rocky Road Ice Cream. Try using different nuts like almonds or pecans. Each nut brings its own taste and crunch. You can also add fun mix-ins like cookie crumbles or fruits. Cherries or strawberries work great. They add a burst of flavor and color. If you need dairy-free options, swap heavy whipping cream with coconut cream. This will still give you a creamy texture. For a low-sugar version, use sugar-free sweetened condensed milk. These changes let everyone enjoy this treat. Whether you stick with the classic or try new twists, the joy of making ice cream stays the same. For the full recipe, check out the No-Churn Rocky Road Ice Cream section above. To keep your No-Churn Rocky Road Ice Cream fresh, store it in an airtight container. This helps prevent ice crystals from forming. You can use a glass or plastic container with a tight lid. Make sure to smooth the top of the ice cream before sealing. This keeps air out and preserves its texture. You can keep this ice cream in the freezer for up to two weeks. After that, it may start to lose flavor and texture. Look for signs of freezer burn, such as ice crystals on the surface. If the ice cream smells off or has a different color, it's best to toss it. Always trust your senses! How to make No-Churn Rocky Road Ice Cream without a mixer? You can whip the cream by hand. Use a whisk and beat until stiff peaks form. This takes time, but it works! Can I use heavy cream alternatives? Yes, you can use coconut cream or whipped topping. They will create a different flavor but still taste great. What to do if the ice cream doesn't freeze properly? Ensure your freezer is cold enough. If it is not freezing, check your container seal. Can I add alcohol for flavor? Yes, you can add a splash of whiskey or rum. This adds a nice depth but may soften the ice cream. How to soften the ice cream for easier scooping? Let your ice cream sit at room temperature for about 5-10 minutes. This will make scooping much easier. What to do if the texture isn’t creamy enough? If the texture is grainy, you might not have whipped the cream enough. Make sure to whip until stiff peaks form. How to fix ice crystals in the ice cream? Ice crystals happen from air exposure. Store your ice cream in an airtight container to prevent this. This blog post covered all the must-know steps to make No-Churn Rocky Road Ice Cream. You learned about the key ingredients, precise steps for preparation, and tips to achieve a perfect texture. Exploring flavor variations and diet-friendly options can help customize your ice cream. Proper storage methods keep your treat fresh longer. Finally, I answered common questions and troubleshooting tips to ensure success. Enjoy making this easy, delicious ice cream! Your friends and family will love it.

No-Churn Rocky Road Ice Cream Delightful and Simple

Craving a sweet treat without the churn? You’re in the right place! This No-Churn Rocky Road Ice Cream is not

Older posts
Newer posts
← Previous Page1 … Page46 Page47 Page48 … Page84 Next →

dsad

© 2026 Lisa Dishes • Built with GeneratePress

Our Policies

  • Copyright Policy
  • Cookie Policy
  • GDPR Policy
  • Privacy Policy
  • Disclaimer
  • Terms Of Use

More Information

  • Home
  • About
  • Contact
  • Appetizers
  • Dessert
  • Dinner
  • Drinks
©2026, Lisa Dishes About Back To Top