Skip to content
DisclaimerTerms Of UseGDPR PolicyCookie Policy

Lisa Dishes

  • Home
  • Drinks
  • Appetizers
  • Dinner
  • Dessert
  • About
  • Contact
  • Privacy Policy
DisclaimerTerms Of UseGDPR PolicyCookie Policy

NO-ING-IMG

Here are the ingredients you need to make chocolate espresso brownies. Each item plays a key role in creating rich flavor and texture. - 1 cup unsalted butter (2 sticks) - 2 cups granulated sugar - 4 large eggs - 2 teaspoons vanilla extract - 1 cup all-purpose flour - 1 cup unsweetened cocoa powder - 1 teaspoon baking powder - 1 teaspoon salt - 1 tablespoon instant espresso powder - 1 cup dark chocolate chips - 1/2 cup chopped walnuts or pecans (optional) - Unsalted butter: It adds moisture and richness. Using unsalted allows you to control the salt level. - Granulated sugar: This sweetens the brownies and helps form that nice, shiny crust. - Eggs: They bind the ingredients and add fluffiness. - Vanilla extract: It enhances the overall flavor, making the brownies more delicious. - All-purpose flour: This gives structure to the brownies. - Cocoa powder: It provides the deep chocolate flavor we love. - Baking powder: It helps the brownies rise slightly for a better texture. - Salt: A little salt boosts the sweetness and flavor. - Instant espresso powder: This gives a coffee kick, enhancing the chocolate flavor. - Dark chocolate chips: They create gooey pockets of chocolate in every bite. - Chopped walnuts or pecans: These add crunch and a nutty flavor, but they're optional. Gathering these ingredients will set you up for success. Each one plays a vital role in making your brownies rich and indulgent. 1. Preheat your oven to 350°F (175°C). Grease a 9x13-inch baking pan or line it with parchment paper. This makes it easy to lift the brownies out later. 2. In a medium saucepan, melt 1 cup of unsalted butter over low heat. Once melted, take it off the heat. Stir in 2 cups of granulated sugar until mixed well. 3. Next, add 4 large eggs, one at a time. Mix well after each egg. Then, stir in 2 teaspoons of vanilla extract. This will add a lovely flavor. 1. In a separate bowl, whisk together 1 cup of all-purpose flour, 1 cup of unsweetened cocoa powder, 1 teaspoon of baking powder, 1 teaspoon of salt, and 1 tablespoon of instant espresso powder. This mix gives the brownies their rich taste. 1. Slowly add the dry mix into the wet mix. Stir gently until just combined. Be careful not to overmix. 2. Fold in 1 cup of dark chocolate chips and, if you like, 1/2 cup of chopped walnuts or pecans. This adds great texture. 1. Pour the brownie batter into your prepared pan. Spread it evenly with a spatula. 2. Bake in the preheated oven for 25-30 minutes. Check with a toothpick. It should come out with a few moist crumbs, not wet batter. 1. Let the brownies cool in the pan for at least 15 minutes. Then, move them to a wire rack to cool completely. 2. Once cooled, cut them into squares. Enjoy your rich, fudgy chocolate espresso brownies! To get the best brownies, you must not overmix the batter. Overmixing adds too much air and can make your brownies cakey. You want a rich, fudgy texture. Mix just until the dry and wet ingredients blend together. The ideal baking time for fudgy brownies is about 25 to 30 minutes at 350°F. Check them with a toothpick. You want a few moist crumbs on the toothpick, not wet batter. Too much baking can dry them out. If you love coffee, add more espresso powder. You can also use brewed coffee instead of water in the batter. This adds depth to the chocolate flavor. Pair your brownies with whipped cream for a creamy touch. Ice cream is another great option. Vanilla or coffee ice cream works well. You can also sprinkle some sea salt on top for a salty contrast. Serve your brownies warm for a gooey texture. You can warm them in the microwave for a few seconds if they cool down. For a great presentation, cut the brownies into neat squares. Place them on a fancy plate. You can add a dollop of whipped cream or a scoop of ice cream on the side. This makes your dessert look inviting and delicious. {{image_2}} You can easily make these brownies nut-free. Simply skip the chopped walnuts or pecans. This keeps the rich flavor while making it safe for those with nut allergies. You can also add a bit more chocolate chips to enhance the taste. This small change keeps the texture nice and fudgy. To turn these brownies into a vegan delight, swap out the butter and eggs. Use 1 cup of coconut oil instead of butter. For eggs, mix 1 tablespoon of ground flaxseed with 2.5 tablespoons of water. Let it sit for five minutes to thicken. This mix acts like an egg and gives structure to your brownies. You will still enjoy the rich chocolate flavor without any animal products. If you need gluten-free brownies, replace all-purpose flour with almond flour or gluten-free flour. Almond flour gives a moist texture, while gluten-free flour offers a similar feel to regular brownies. Just be sure to check the flour blend for added starches. This way, you still get the same delicious taste without the gluten. To keep your brownies fresh, place them in an air-tight container. This method prevents them from drying out. If you have leftovers, you can also wrap them tightly in plastic wrap before placing them in the container. For longer storage, consider refrigeration. Place the brownies in an air-tight container, and they will stay fresh for about a week. You can also freeze brownies. Cut them into squares and wrap each piece in plastic wrap. Then, put them in a freezer-safe bag or container. At room temperature, brownies stay fresh for 3 to 4 days. If you store them in the fridge, they can last up to a week. However, the texture may change slightly in the fridge. Freezing extends their shelf life to about 3 months. Just remember to thaw them before enjoying for the best taste. To reheat brownies, use the oven for even warmth. Preheat it to 350°F (175°C). Place brownies on a baking sheet and cover them with foil. Heat for about 10 minutes. This method keeps them moist and fudgy. You can also use the microwave if you are in a hurry. Heat a brownie for about 10 to 15 seconds. Be careful not to overheat, or they will dry out. Enjoy your rich chocolate espresso brownies warm! Yes, you can use instant coffee. It will add some coffee flavor. However, espresso powder gives a stronger taste. If you want a richer flavor, stick with espresso. To boost the chocolate flavor, add extra chocolate chips. You can also use dark cocoa instead of regular cocoa. This change adds depth and richness. Try both options for a delicious twist. If your brownies are too cakey, you may have overmixed the batter. Mix just until combined. You can also add an extra egg yolk for moisture. This will make them richer and fudgier. Absolutely! Adding flavors like peppermint or orange zest can be fun. You can use peppermint extract or fresh zest. Start with a little and taste as you go. I recommend using semi-sweet or dark chocolate. Semi-sweet gives a nice balance of sweetness. Dark chocolate adds a deeper flavor. Use what you love for the best results. These brownies pair well with coffee or vanilla ice cream. A scoop of whipped cream also works great. For drinks, try a cold glass of milk or a cappuccino. Enjoy your sweet treat! We covered how to make delicious brownies using simple ingredients and clear steps. I shared tips to get the best texture and flavor, plus ideas for fun variations. Remember, you can customize your brownies to fit different diets and preferences. Storing and reheating them properly keeps them tasting great! Enjoy baking these treats and experiment with what you like. Your perfect brownie awaits!

Chocolate Espresso Brownies Indulge in Rich Flavor

Are you ready to indulge in a dessert that combines chocolate and coffee bliss? These Chocolate Espresso Brownies are rich,

- 1 lb chicken breast, cut into 1-inch cubes - 1 cup fresh pineapple, cut into 1-inch pieces - 1 bell pepper (red or yellow), cut into 1-inch pieces - 1 red onion, cut into wedges You can choose between store-bought and homemade teriyaki sauce. Store-bought sauces are quick and easy. They save you time when you are in a hurry. Homemade teriyaki sauce offers richer flavors and lets you control the taste. A simple recipe includes soy sauce, brown sugar, garlic, and ginger. Both options work well, so pick what suits you best. You will need a few tools to make these kabobs. Gather skewers, either wooden or metal. Wooden skewers need to soak in water for 30 minutes before grilling. A grill is essential for that smoky flavor. Mixing bowls help you marinate the chicken and combine your ingredients. With these tools, you are set for a fun cooking experience. To start, marinate the chicken. In a bowl, mix the cubed chicken with teriyaki sauce, olive oil, garlic powder, grated ginger, salt, and pepper. Coat the chicken well. Cover the bowl and refrigerate for at least 30 minutes. This helps the chicken absorb all the flavors. If you use wooden skewers, soak them in water for 30 minutes. This step stops them from burning on the grill and makes your kabobs safe to enjoy. Next, it's time to assemble your kabobs. Take the marinated chicken and thread it onto the skewers. Alternate the chicken with pineapple pieces, bell pepper, and red onion. This mix of colors not only looks nice but also adds great flavor. Aim for a fun pattern to make them more appealing. Preheat your grill to medium-high heat. Lightly oil the grill grates to prevent sticking. Place the kabobs on the grill and cook for about 12 to 15 minutes. Turn them occasionally to cook evenly. Make sure the chicken reaches an internal temperature of 165°F. You want those beautiful grill marks for a tasty look! For the best taste, marinate your chicken for at least 30 minutes. This time lets the chicken soak up the teriyaki sauce and spices. If you have time, marinate for up to 2 hours for even more flavor. Just remember to keep it in the fridge while it soaks. To stop your kabobs from sticking, oil your grill grates lightly before cooking. Use tongs to turn the kabobs often. This helps them cook evenly and get those nice grill marks. Cook them until the chicken reaches 165°F. This ensures it’s safe to eat and juicy. Make your kabobs look great when serving. Use a large platter to arrange them neatly. You can garnish with fresh cilantro or green onions for a pop of color. Serve extra teriyaki sauce on the side for dipping. This adds flavor and lets everyone enjoy their kabobs just how they like them. {{image_2}} You can change the veggies and protein in your kabobs. Use shrimp or tofu instead of chicken. Both options add unique flavors. For veggies, try zucchini, mushrooms, or cherry tomatoes. Each will give a different taste and texture. Mix and match to find your favorite combo! Want to spice things up? Add a dash of cayenne pepper for heat. You can also try adding sesame oil for a nutty flavor. For a twist, use different sauces like teriyaki BBQ or sweet chili. These small changes can make a big difference in taste! Pair your kabobs with rice or a fresh salad. Jasmine or coconut rice adds a lovely touch. You can also serve them with a fruity salsa. Mango or avocado salsa works well. This adds freshness and color to your meal. Get creative and enjoy your kabobs in new ways! To keep your leftover kabobs fresh, store them in the fridge. Place them in an airtight container. They will last for up to three days. If you want to keep them longer, freeze the kabobs. Wrap them tightly in plastic wrap, then in foil. This way, they can last for three months in the freezer. When you are ready to enjoy the kabobs again, reheat them gently. You can use the oven or a skillet. If using the oven, set it to 350°F. Place the kabobs on a baking sheet and cover them with foil. Heat for about 10-15 minutes. If you prefer a skillet, heat a little olive oil over medium heat. Add the kabobs and cook for about 5-7 minutes, turning occasionally. This keeps them juicy and tasty. Meal prepping these kabobs can save you time. You can marinate the chicken and chop the veggies ahead of time. Store them in the fridge for up to two days. On a busy night, just thread the ingredients onto skewers and grill. You can also cook a larger batch and freeze some for later. This makes for quick weeknight meals with great flavor. Yes, you can easily make these kabobs in the oven. Start by preheating your oven to 400°F. Use a baking sheet lined with foil for easy cleanup. Arrange the kabobs on the sheet, making sure they are spaced out. Bake for about 20 minutes, turning halfway through. This helps the chicken cook evenly and gives it a nice color. These kabobs pair well with many sides. Here are some tasty options: - Steamed rice or jasmine rice - Quinoa salad with veggies - Grilled corn on the cob - A fresh green salad - Stir-fried vegetables These sides enhance the meal while keeping it light and healthy. To check if the chicken is done, use a meat thermometer. The internal temperature should reach 165°F. If you don’t have a thermometer, cut into a piece of chicken. If the juices run clear and the meat is no longer pink, it’s ready to eat. Always ensure the chicken is cooked well to keep it safe and tasty. Pineapple Teriyaki Chicken Kabobs are easy to make and fun to grill. We covered key ingredients like chicken and pineapple, along with sauce options. You learned essential tools, preparation steps, and grilling tips. I shared ideas for enhancing flavor and creative serving. Remember to store leftovers properly and reheating gently keeps them tasty. Enjoy making these kabobs any day of the week! You'll impress friends and family with your skills.

Pineapple Teriyaki Chicken Kabobs Easy and Flavorful Meal

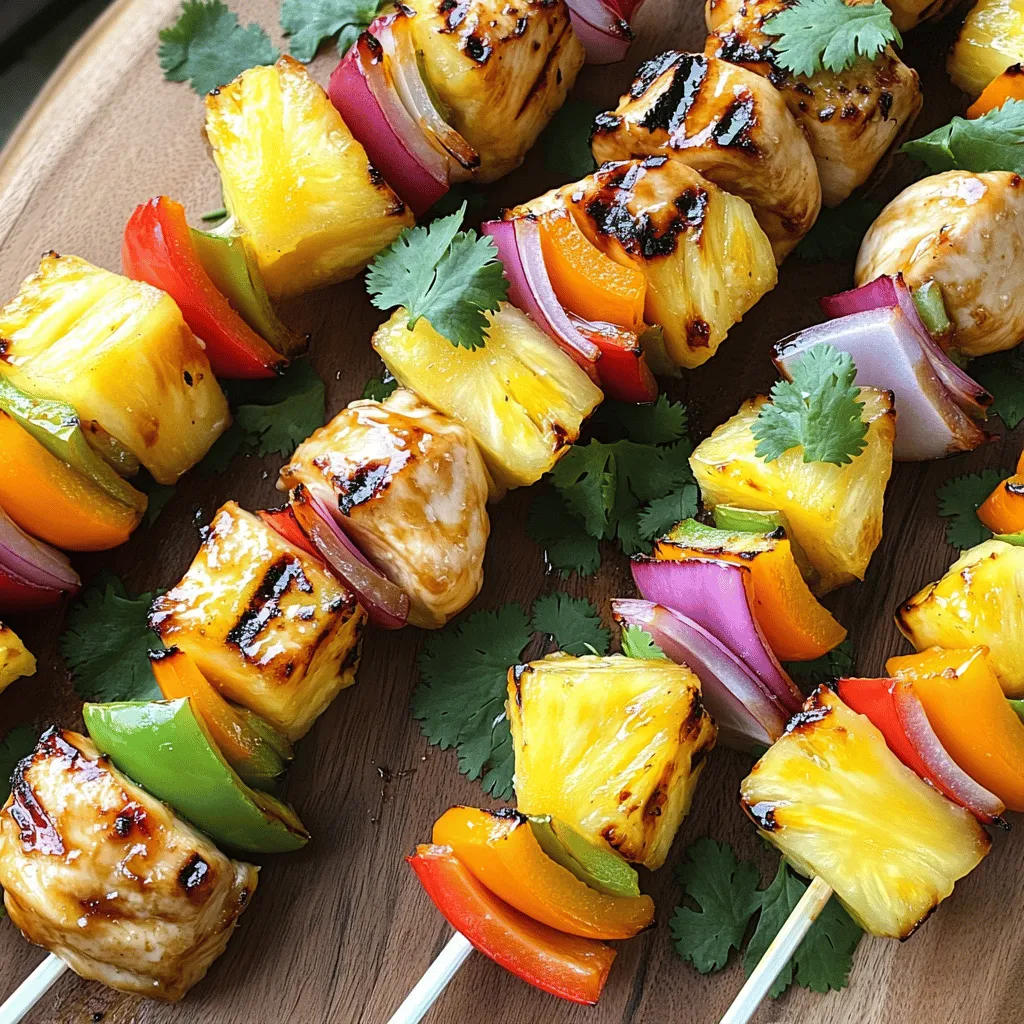
Looking for a quick and tasty meal? Pineapple Teriyaki Chicken Kabobs are the perfect solution! These kabobs mix juicy chicken,

To make crispy air fryer falafel, you need fresh and simple ingredients. Here's what you'll need: - 1 can (15 oz) chickpeas, drained and rinsed - 1 small onion, chopped - 3 cloves garlic, minced - 1 cup fresh parsley, chopped - 1 teaspoon cumin - 1 teaspoon coriander - 1 teaspoon baking powder - 1 tablespoon lemon juice - 2 tablespoons flour (whole wheat or all-purpose) - Salt and pepper to taste - Olive oil spray Using these ingredients gives you a flavorful and healthy snack. Chickpeas are high in protein and fiber. Fresh parsley adds a nice touch of color and taste. Spices like cumin and coriander bring warmth and depth to the falafel. When you combine these ingredients, you create a mixture that is both tasty and nutritious. Do not skip the baking powder. It helps the falafel become light and airy. The flour helps bind the ingredients together. This balance is key to making great falafel that holds its shape during cooking. Make sure your chickpeas are well-drained and rinsed. This removes excess salt and helps create the right texture. Fresh herbs and spices make a big difference in flavor, so avoid dried versions if you can. Once you have these ingredients ready, you can move on to making the falafel mixture. Trust me, this is a snack you'll want to share! To start, prepare your chickpeas and veggies. Drain and rinse one can of chickpeas. This helps remove extra salt and makes them fresher. For the onion, chop it into small pieces. Mince three cloves of garlic. Finally, chop one cup of fresh parsley. When you blend these ingredients, use the pulse setting. This method keeps the mix coarse and chunky. If you blend too long, you might end up with a puree. We want texture in our falafel! Next, mix your dry and wet ingredients. In your food processor, add the chickpeas, onion, garlic, and parsley. Then, sprinkle in one teaspoon each of cumin and coriander. Add one teaspoon of baking powder, one tablespoon of lemon juice, and two tablespoons of flour. Season with salt and pepper to taste. Pulse the mix a few times until it just combines. The mix should hold together when you press it. If it feels too dry, add water slowly, one teaspoon at a time, until it binds. Before you start air frying, preheat your air fryer to 375°F (190°C). This step is key. It helps the falafel cook evenly and get crispy. Preheat for about 5 minutes. Now, shape the falafel mixture into small balls or patties. Aim for 1 to 1.5 inches in diameter. Lightly spray your air fryer basket with olive oil. Place the falafel balls in a single layer, ensuring they do not touch. Spray them lightly with olive oil on top too. Air fry the falafel for 12 to 15 minutes. Flip them halfway through to ensure they brown on all sides. They should look golden brown when ready. After cooking, let them cool slightly before serving. To make sure your falafel holds together, use properly cooked chickpeas. Drain and rinse them well. If your mix feels too dry, add a teaspoon of water until it binds. Do not over-process; pulse just enough to combine. This way, your mixture stays chunky and flavorful. If your falafel falls apart during cooking, adjust moisture levels. You may need to add a bit more flour to help it stick. A good texture is key for that crispy bite! To boost flavor, consider adding more spices. Try smoked paprika or chili powder for heat. Fresh herbs like cilantro or mint can add a new twist, too. While dried herbs are easier, fresh herbs give a brighter taste. Play around to find your favorite combination! For the best crispiness in your air fryer, preheat it to 375°F (190°C). This helps your falafel cook evenly. Arrange the balls in a single layer and avoid crowding. If they cook unevenly, shake the basket halfway through cooking. This helps all sides get that perfect golden brown! {{image_2}} You can easily change the main ingredients in falafel. Chickpeas are the usual choice, but you can use other beans or legumes. Black beans or lentils work well too. They bring new flavors and textures. If you want a gluten-free option, swap regular flour with chickpea flour or almond flour. These alternatives keep the falafel crispy while making them safe for those with gluten issues. Falafel can take on many flavors. Different regions have unique spice mixes. You can add spices like paprika for a smoky taste or sumac for a tangy note. This really changes the falafel's profile. You can also mix in veggies for added nutrition. Carrots or zucchini can be grated and added to the mix. This gives the falafel extra moisture and flavor. Plus, it makes them more colorful! Falafel is versatile in how you serve it. You can wrap them in pita bread with fresh veggies and sauces. This makes for a fun and filling meal. You can also serve falafel on a salad. Add greens, tomatoes, and cucumbers for a fresh touch. Pair them with dips like tahini sauce or yogurt. These sauces add great flavor and make your meal even more exciting! To keep your falafel fresh, place them in an airtight container. Store in the fridge for up to four days. For longer storage, freeze your falafel. Arrange them on a baking sheet first. This prevents sticking together. Once frozen, transfer them to a freezer bag. They can last for up to three months in the freezer. To enjoy your falafel again, reheat them in the air fryer. Set it to 350°F (175°C). Heat for about 5-7 minutes. This method keeps them crispy. You can also use an oven. Preheat to 375°F (190°C) and bake for 10-12 minutes. If you prefer the microwave, use it, but they might lose their crunch. Refrigerated falafel stay good for about four days. When frozen, they last around three months. Check for signs of spoilage. If they smell off or show mold, discard them. Proper storage helps maintain flavor and texture. Enjoy your falafel safely! Yes, you can make falafel ahead of time. To do this, prepare the falafel mixture but do not cook it. Store the mixture in an airtight container in the fridge for up to 24 hours. You can also shape the falafel into balls or patties and freeze them. Lay them flat on a tray to freeze, then transfer to a bag. This way, you can cook them straight from the freezer. If your falafel falls apart, it may be too dry or too wet. To fix dry falafel, add a little water, one teaspoon at a time, until it holds together. If it’s too wet, add a bit more flour to help bind it. Make sure to pulse the mixture until it’s just combined, not pureed. This helps keep the texture right. Air fry falafel at 375°F (190°C) for 12 to 15 minutes. Flip them halfway through cooking. This ensures even crispiness on all sides. They should turn golden brown and feel firm when done. Adjust the time slightly if your air fryer has different settings. Yes, you can bake falafel. Preheat your oven to 400°F (200°C). Place the falafel on a baking sheet lined with parchment paper. Bake for about 20-25 minutes, flipping halfway through. Spray the tops with olive oil to help them crisp up. Baking may take a bit longer, but it still yields tasty results. This blog post covered how to make delicious falafel, from ingredients to cooking methods. You learned about the key components, the step-by-step preparation, and cooking tips for the best texture and flavor. Remember to experiment with swaps and variations to make falafel your own. With proper storage, your homemade falafel can stay fresh for later. Enjoy this tasty dish in wraps or salads, or share it with friends. Making falafel can be fun, easy, and rewarding.

Air Fryer Falafel Tasty and Healthy Snack Option

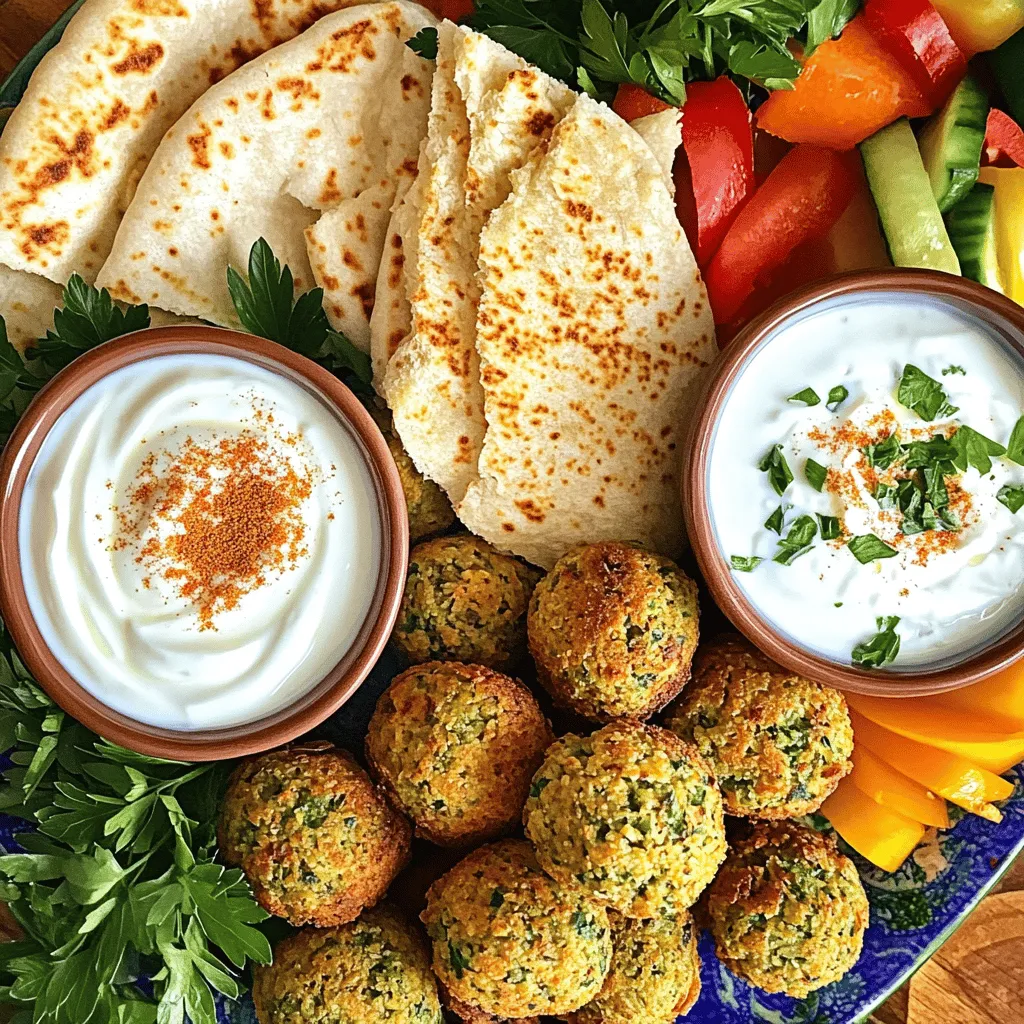
Looking for a tasty, healthy snack? You’ve come to the right place! Air fryer falafel is a quick and easy

To make a tasty Cranberry Pecan Chicken Salad, you need fresh and simple ingredients. Here’s what you will need: - 2 cups cooked chicken breast, shredded - 1/2 cup dried cranberries - 1/2 cup pecans, roughly chopped - 1/4 cup red onion, finely diced - 1/2 cup celery, finely chopped - 1/2 cup plain Greek yogurt - 1 tablespoon honey - 1 tablespoon Dijon mustard - Salt and pepper to taste - 1 tablespoon fresh lemon juice - Mixed salad greens for serving Each ingredient adds its own flavor. The chicken gives protein, while cranberries add sweetness. Pecans add crunch and healthy fats. Red onion gives a bit of bite, and celery adds freshness. The Greek yogurt acts as a creamy base. Honey and mustard bring in a nice zing. Lemon juice brightens the salad, while salt and pepper enhance all the flavors. You can customize your salad by adding or swapping ingredients. Think about using apples for sweetness. Or, try walnuts instead of pecans. Each choice changes the taste and texture, keeping your salad fun and fresh! To prepare the chicken, start with cooked chicken breast. You can use rotisserie chicken or boil your own. If boiling, cook in water for about 15 minutes. Make sure it’s fully cooked and tender. Let it cool before shredding. For shredding chicken, use two forks. Grab a piece of chicken with one fork and pull apart with the other fork. This way, you get nice, even shreds. Shredding makes the chicken mix well with the other ingredients. Let’s combine the base ingredients. In a large bowl, add your shredded chicken, dried cranberries, chopped pecans, diced red onion, and chopped celery. Stir gently to mix everything well. Each bite should have a bit of everything for the best flavor. Now, whisk the dressing. In a small bowl, mix the Greek yogurt, honey, Dijon mustard, lemon juice, salt, and pepper. Use a fork or whisk to blend until smooth. This dressing will bring all the flavors together. Next, pour the yogurt dressing over the chicken mixture. Stir carefully until all ingredients are coated. Taste it and adjust the flavors. If you want it sweeter, add more honey. If it needs more kick, add salt and pepper. For serving, place a handful of mixed salad greens on each plate. Top with a scoop of your cranberry pecan chicken salad. You can add more pecans or cranberries as a garnish for extra color and crunch. Enjoy your fresh and tasty salad! - Choosing the right chicken: I recommend using cooked chicken breast. It's lean and easy to shred. You can use rotisserie chicken for added flavor and convenience. Just make sure it’s tender and moist for the best taste. - Balancing flavors and textures: For a great salad, mix sweet and savory. The dried cranberries add sweetness, while the pecans bring crunch. Use a light dressing with Greek yogurt for creaminess. This gives you a nice balance that keeps each bite interesting. - Pre-cooking chicken options: If you’re short on time, you can boil or grill chicken ahead of time. Cook a big batch to use in other recipes too. This way, you always have chicken ready for salads or meals. - Prep ahead instructions: You can chop veggies and mix the dressing a day before. Just store them separately in the fridge. This makes assembly quick and easy when you’re ready to eat. - Best sides to pair with the salad: This salad goes well with crusty bread or a light soup. A refreshing fruit salad also makes a great side. These options keep your meal balanced and tasty. - Creative serving ideas: Try serving the chicken salad in lettuce wraps for a fun twist. You can also use it as a filling for sandwiches or on top of whole-grain crackers. These ideas make the dish more versatile and exciting. {{image_2}} You can make this salad even better by swapping some ingredients. If you want to change the nuts, try walnuts or almonds. They add a nice crunch too. For fruits, consider using chopped apples or grapes. Both add sweetness and freshness. For dressings, Greek yogurt is great, but you can use avocado or hummus instead. These options give a creamy texture while keeping it healthy. If you need a gluten-free salad, check your yogurt and mustard. Most brands are safe, but some may have gluten. Always read the labels to be sure. For a dairy-free version, swap the Greek yogurt with a plant-based yogurt. You can also use tahini for a nutty flavor. Both options keep the salad creamy and tasty. In summer, add fresh fruit like berries or peaches. Their juiciness makes this salad refreshing. You can also include cucumbers for extra crunch. For fall, think about adding roasted butternut squash or apples. Their warm flavors pair well with the salad. You can even sprinkle some cinnamon for a cozy touch. To keep your cranberry pecan chicken salad fresh, store it in the fridge. Use an airtight container to prevent moisture loss. This salad tastes best when fresh, but it can last up to three days in the fridge. If you have leftovers, make sure to eat them within this time frame. Can you freeze the salad? It is not recommended to freeze this salad. The texture of the chicken and veggies may change. Freezing can make the salad watery when thawed. If you still wish to freeze it, do so without the dressing. When you thaw it, use it in a cooked dish. This way, you can enjoy the flavors without the texture loss. How long does it last in the fridge? The salad can last for three days in the fridge. After that, it may start to spoil. Signs of spoilage include a sour smell or a change in color. If you see any mold, throw it away. Always trust your senses when it comes to food safety. You can use several non-dairy alternatives for Greek yogurt. Coconut yogurt works well and adds a light coconut taste. Almond yogurt is another option that keeps it creamy. Other creamy options include sour cream or mayo. Each adds a unique flavor, so choose what you like best. Yes, you can make this salad ahead of time. To keep it fresh, store the salad and dressing separately. Mix them just before serving. This keeps the greens crisp and tasty. This salad is quite healthy! It has lean protein from the chicken. The cranberries offer fiber and vitamins. Pecans add healthy fats, which are good for your heart. You will also get nutrients from the veggies. Overall, it makes a balanced meal. This salad pairs well with many side dishes. A light soup, like tomato or vegetable, complements it nicely. You can also serve it with crusty bread or whole grain crackers. A fresh fruit salad adds a sweet touch and balances the meal. For the complete Festive Cranberry Pecan Chicken Salad recipe, click [here](#). This blog post covered how to make a tasty, nutritious Cranberry Pecan Chicken Salad. You learned the ingredients, step-by-step instructions, and storage tips. We explored quick prep methods and fun variations too. Remember, you can mix and match ingredients to fit your taste. Enjoy trying different sides and flavors. This salad is great for any meal. Happy cooking!

Cranberry Pecan Chicken Salad Simple and Fresh Delight

If you’re craving a light and tasty meal, try my Cranberry Pecan Chicken Salad! This dish combines tender chicken, sweet

To make Creamy Roasted Red Pepper Pasta, you need these simple ingredients: - 12 oz penne pasta - 2 large red bell peppers, roasted and peeled - 1 cup heavy cream - 3 cloves garlic, minced - 1 tablespoon olive oil - 1 teaspoon smoked paprika - Salt and pepper to taste - 1/2 cup grated Parmesan cheese - Fresh basil leaves, for garnish - Optional: Red pepper flakes for heat These ingredients work together to create a rich and tasty dish. The roasted red peppers bring a sweet, smoky flavor. Heavy cream makes the sauce creamy and smooth. The garlic adds a nice kick. If you want some heat, add red pepper flakes. You can try using different pastas if you prefer. Just remember to adjust the cooking time based on the pasta type. Each ingredient is key to making this dish a success. I find that using fresh ingredients really helps boost the flavor. The basil at the end adds a lovely pop of color and freshness. Enjoy gathering these items for your cooking adventure! - Preheating the oven: Start by warming your oven to 400°F (200°C). - Roasting process and timing: Place the whole red bell peppers on a baking sheet. Roast them for about 20-25 minutes. Turn them halfway through. You want the skin to be charred. - Steaming and peeling: Once done, remove the peppers and cover them with foil. Let them steam for 10 minutes. This helps to loosen the skin. After steaming, peel off the charred skin and remove the seeds. - Boiling water preparation: While the peppers cool, fill a large pot with water. Add salt and bring it to a boil. - Cooking time and tips: Cook the penne pasta according to the package instructions. This usually takes about 8-10 minutes. - Reserving pasta water: Before draining, save 1/2 cup of pasta water. This water helps to adjust the sauce later. - Blending ingredients: In a blender, add the roasted red peppers, heavy cream, minced garlic, smoked paprika, salt, and pepper. Blend until smooth and creamy. - Achieving the right consistency: If the sauce seems too thick, you can add a bit of reserved pasta water. Blend again until you reach a nice, creamy texture. - Heating the sauce: In a large skillet, heat olive oil over medium heat. Pour the creamy red pepper sauce into the skillet. Simmer for 5-7 minutes, stirring often. - Tossing pasta with sauce and cheese: Add the cooked penne to the skillet. Stir until the pasta is well coated with the sauce. Mix in the grated Parmesan cheese. Stir until it melts and becomes creamy. - Adjusting seasoning: Taste the pasta and adjust the seasoning as needed. Serve it in bowls and top with fresh basil leaves. If you like heat, sprinkle on red pepper flakes. - To keep pasta from sticking, use plenty of water. Salt the water well before boiling. Stir the pasta right after adding it. This step helps separate the noodles. - When blending, ensure your red pepper mixture is smooth. Let the peppers cool a bit. This makes blending easier and safer. If your blender struggles, add a splash of pasta water. - To boost flavor, consider adding herbs like thyme or oregano. A squeeze of lemon juice can add brightness too. You can also sprinkle in some freshly cracked black pepper for extra warmth. - Always use fresh ingredients for the best taste. Fresh basil enhances the dish, while fresh garlic packs a punch. Choosing high-quality olive oil makes a big difference in flavor. - Avoid overcooking your pasta. Check it a minute or two before the package time. You want it al dente, firm yet tender. - Balancing flavors is key. If your sauce tastes bland, it may need more salt or seasoning. Taste as you go, and adjust based on your preference. {{image_2}} You can add proteins to enhance your creamy roasted red pepper pasta. Here are some tasty options: - Chicken: Cooked and diced chicken breast adds great flavor. - Shrimp: Sauté shrimp until pink and toss them in for a seafood twist. - Tofu: For a plant-based option, use firm tofu. Sauté it until golden for extra texture. If you have dietary needs, you can easily adapt this recipe. - Gluten-Free Pasta Alternatives: Swap the penne for gluten-free pasta made from rice or quinoa. - Dairy-Free Substitutions: Use coconut cream instead of heavy cream for a dairy-free version. Nutritional yeast can replace Parmesan cheese. You can change the flavor of the pasta with simple additions. - Adding Vegetables or Herbs: Spinach or peas blend well in this dish. Fresh basil or parsley adds a nice touch too. - Adjusting Spice Levels: If you enjoy heat, add red pepper flakes or a dash of cayenne pepper for a kick. You can also reduce spice if you prefer mild flavors. To keep your creamy roasted red pepper pasta fresh, place it in an airtight container. Let it cool to room temperature first before sealing. This helps avoid moisture buildup. You can store it in the fridge for up to three days. After that, the pasta may lose its creamy texture and flavor. To reheat, you can use a microwave or a stovetop. If using a microwave, place the pasta in a bowl and cover it. Heat it for 1-2 minutes, stirring halfway through. For stovetop, use a skillet over low heat. Add a splash of water or cream to keep it moist. This helps avoid a dry texture, ensuring it stays creamy and delicious. If you want to freeze portions, let the pasta cool completely. Use a freezer-safe container or bag. Divide into single servings for easy meals later. Creamy pasta can be frozen for up to two months. When reheating frozen pasta, thaw it overnight in the fridge. Then reheat using stovetop or microwave as mentioned earlier. This keeps the flavors intact and the texture smooth. You can serve this pasta with a simple green salad. A nice Caesar salad pairs well too. Garlic bread is a tasty side that everyone loves. If you want protein, grilled chicken or shrimp works great. Yes, you can prepare the sauce ahead of time. Just store it in the fridge for up to two days. Cook the pasta fresh when you are ready to eat. This keeps the pasta from getting mushy. To spice up the sauce, add red pepper flakes. Start with a pinch and taste as you go. You can also add a dash of hot sauce for extra heat. If you love spice, feel free to go wild! Absolutely! You can use any pasta you like. Fusilli, spaghetti, or even gluten-free options work well. Just make sure to cook it according to package directions for best results. You can use half-and-half for a lighter option. Coconut cream is a great dairy-free choice. Silken tofu blended with a bit of water can also give you a creamy texture. To make it vegan, swap heavy cream for coconut cream or cashew cream. Use nutritional yeast instead of Parmesan cheese. You can also add more veggies for flavor and texture. You can find the full recipe in the earlier sections of this article. It includes all the steps and ingredients you need to make this delightful dish. This creamy roasted red pepper pasta features fresh ingredients and simple steps. You learned about roasting peppers, cooking pasta, and making the sauce. You can add proteins or modify for dietary needs. Store leftovers wisely to enjoy later or freeze for quick meals. Remember to avoid common cooking mistakes for the best results. Your kitchen creativity can shine with this dish, making it a family favorite. Enjoy crafting this delightful meal, and don't hesitate to tweak it to suit your taste!

Creamy Roasted Red Pepper Pasta Delightful Recipe

Looking for a warm and comforting meal? This Creamy Roasted Red Pepper Pasta is the perfect dish for you! With

- 2 packs of instant ramen noodles (discard seasoning packets) - 4 cloves of garlic, minced - 2 tablespoons vegetable oil - 1 tablespoon sesame oil - 2 tablespoons soy sauce - 2 teaspoons chili paste (adjust to taste) - 2 cups vegetable broth - 1 teaspoon sugar - 1 tablespoon rice vinegar - 1 cup frozen mixed vegetables (carrots, peas, corn) The main ingredients create a strong base for your spicy garlic ramen. Instant ramen noodles cook fast and soak up flavors well. The garlic adds depth, while the oils give a rich taste. Soy sauce brings umami, and chili paste adds heat. Vegetable broth makes it all come alive. Sugar and rice vinegar balance the flavors, while frozen veggies add texture and color. - Soft-boiled eggs, sliced for topping - 2 green onions, sliced - 1 tablespoon sesame seeds (for garnish) Optional ingredients let you customize your dish. Soft-boiled eggs add protein and a creamy texture. Green onions bring freshness, and sesame seeds give a nice crunch. Feel free to mix and match other toppings, like sliced mushrooms or spinach. Each ingredient enhances the dish, making it truly yours. Enjoy the process of creating your perfect bowl of ramen! First, boil water in a large pot. Once the water bubbles, add the ramen noodles. Cook them for about 3-4 minutes or until soft. Drain the noodles and set them aside. This step is key for a great base. In a large skillet or wok, heat 2 tablespoons of vegetable oil over medium heat. Once the oil is hot, add 4 minced garlic cloves. Sauté for 1-2 minutes. You want the garlic to smell great, but don’t let it burn. After this, mix in 1 tablespoon of sesame oil, 2 tablespoons of soy sauce, and 2 teaspoons of chili paste. Then, add 2 cups of vegetable broth, 1 teaspoon of sugar, and 1 tablespoon of rice vinegar. Bring this to a gentle simmer. Next, add 1 cup of frozen mixed vegetables to the skillet. Let them cook in the broth for about 5 minutes. After the veggies are heated through, add the drained ramen noodles. Toss everything together well. Let it cook for 2-3 more minutes. This will let the noodles soak up all the spicy garlic flavor. Finally, serve the ramen hot, topped with sliced green onions and sesame seeds for a nice finish. To cook ramen noodles perfectly, start with enough water. Use a large pot and bring it to a rolling boil. Add the ramen noodles and cook them for about 3-4 minutes. Stir gently to prevent sticking. Once cooked, drain the noodles and set them aside. This keeps them firm and ready to soak up the tasty sauce later. Adjusting spice levels is easy. Start with 2 teaspoons of chili paste. If you like it hotter, add more chili paste, one teaspoon at a time. The soy sauce adds depth, while rice vinegar gives a nice tang. Taste as you go and find your perfect balance. Don’t forget the sugar! It helps balance the heat and salt. Serve your spicy garlic ramen in deep bowls. Arrange the noodles in a swirl for a nice look. Drizzle a little sesame oil on top for shine. Sprinkle extra sesame seeds and sliced green onions for color. For a special touch, add soft-boiled egg slices on top. It makes the dish look inviting and adds creaminess. {{image_2}} Adding protein makes your spicy garlic ramen noodles heartier. Here are some great options: - Chicken: Cook diced chicken in the skillet until golden. Add it with the vegetables to soak up the sauce. - Tofu: Use firm tofu for a vegetarian choice. Cube it and sauté until crispy, then mix it in with the noodles. - Shrimp: Shrimp cooks quickly. Add peeled shrimp to the skillet during the last few minutes of cooking. They will soak up the spicy flavors. You can easily make this dish vegetarian or vegan. Here are some swaps: - Broth: Use vegetable broth instead of chicken broth. - Sauces: Check that your soy sauce is vegan; some brands include fish products. - Eggs: Omit the soft-boiled eggs to keep it vegan. You can add more vegetables or tofu for protein. Switch up the flavors to keep things exciting. Here are some ideas: - Sauces: Try hoisin sauce for a sweeter taste. Add sriracha for extra heat. - Add-ins: Toss in fresh herbs like cilantro or basil for freshness. - Spices: Experiment with curry powder or smoked paprika for a different twist. These variations let you customize your ramen to fit your taste and dietary needs. Enjoy experimenting! To store your spicy garlic ramen noodles, let them cool first. Place the leftovers in an airtight container. Make sure to cover it tightly to keep out air. This helps the noodles stay fresh. If you have any sauce left, store it separately. It keeps flavors better that way. When you want to enjoy your leftovers, reheat them gently. The best way is to use a skillet. Heat it on low and add a splash of broth or water. This keeps the noodles from drying out. Stir often to blend the flavors back together. You can also use the microwave. Cover the dish to retain moisture, and heat in short bursts. Your spicy garlic ramen can last in the fridge for about three days. After that, the flavors may fade. If you want to keep it longer, consider freezing it. Just remember that the texture may change once thawed. To make spicy garlic ramen noodles, follow these steps: 1. Start by boiling water in a large pot. 2. Add the ramen noodles and cook them for 3-4 minutes. Drain and set aside. 3. In a skillet, heat vegetable oil over medium heat. 4. Add minced garlic and sauté for 1-2 minutes until it smells great. 5. Mix in sesame oil, soy sauce, chili paste, vegetable broth, sugar, and rice vinegar. 6. Let the mixture simmer gently. 7. Stir in frozen mixed vegetables and cook for about 5 minutes. 8. Add cooked ramen noodles to the skillet. Toss everything to coat well. 9. Cook for another 2-3 minutes so the noodles soak up the flavors. 10. Serve hot, garnished with sliced green onions and sesame seeds. Yes, you can use various noodles! Here are some options: - Udon noodles offer a thick and chewy texture. - Soba noodles bring a nutty flavor and are healthy. - Rice noodles work well for a gluten-free option. - Spaghetti can be a quick substitute if you have no ramen. Each type brings its own taste and texture, so feel free to experiment! You can pair this dish with tasty side items. Here are some ideas: - Soft-boiled eggs add protein and creaminess. - A simple salad with fresh greens balances the meal. - Steamed dumplings can complement the flavors nicely. - Pickled vegetables provide a crunchy contrast. These sides enhance your ramen experience and create a complete meal! This blog post covered how to make tasty spicy garlic ramen. We discussed the key ingredients, cooking steps, and helpful tips that can elevate your dish. I shared ideas for variations to fit your taste and dietary needs. Plus, I explained how to store and reheat your leftovers properly. With this guide, you can enjoy a delicious meal anytime. Experiment with flavors and toppings to make your ramen truly yours. Enjoy cooking and savor every bite!

Spicy Garlic Ramen Noodles Flavor-Packed Comfort Meal

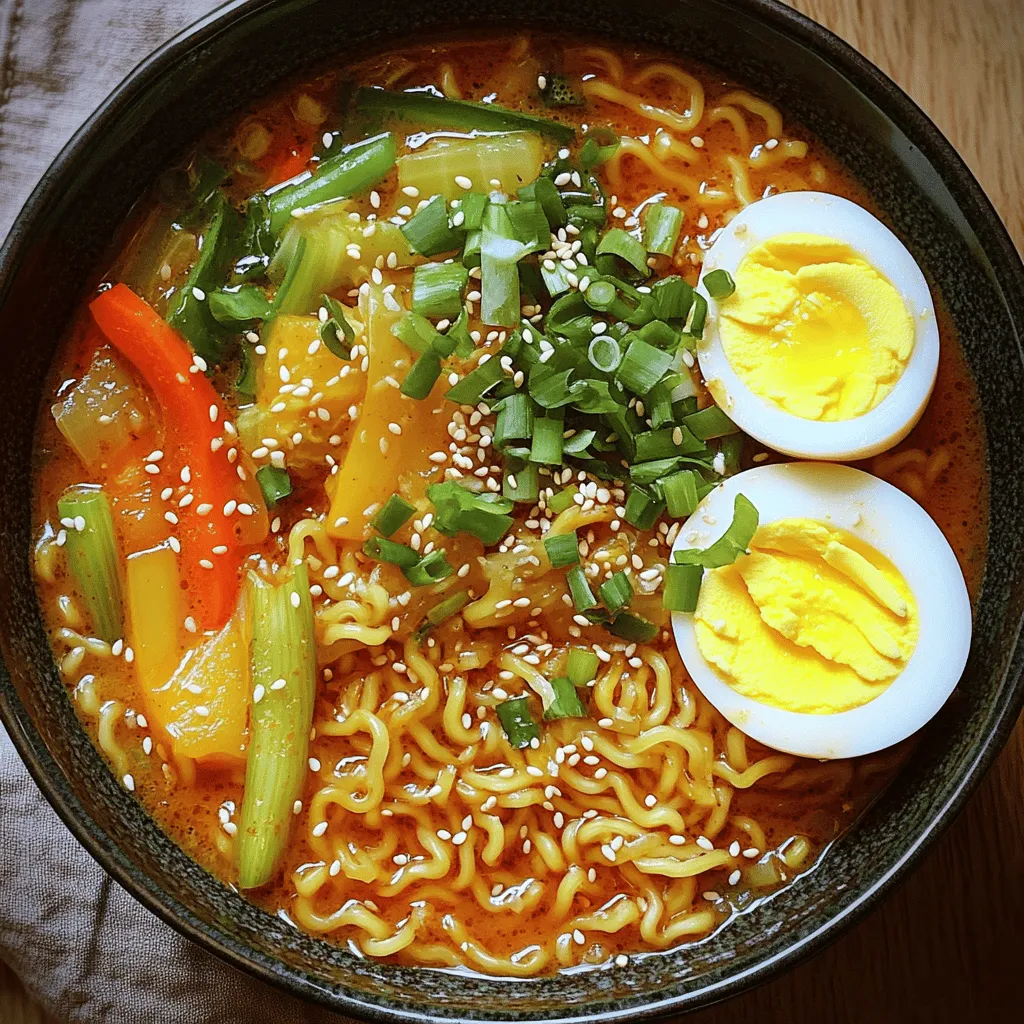
Are you craving a comforting meal that packs a punch? Look no further! My Spicy Garlic Ramen Noodles are loaded

- 2 (15 oz) cans sliced peaches in syrup - 1 cup brown sugar - 1 teaspoon ground cinnamon - 1 box yellow cake mix (15.25 oz) - 1 cup unsalted butter, melted - 1/2 cup rolled oats - 1/2 cup chopped pecans (optional) - Vanilla ice cream (for serving, optional) This recipe uses simple, tasty ingredients. The sliced peaches make it sweet and juicy. Brown sugar adds a rich flavor. Ground cinnamon gives a warm spice that pairs well with the peaches. The yellow cake mix creates a fluffy, soft texture. Melted butter is key. It helps the cake mix absorb flavors and adds moisture. Rolled oats add a nice crunch. Chopped pecans, if you choose to use them, give an extra layer of texture. Lastly, serving with vanilla ice cream is a great option. The ice cream melts and mixes with the warm cake. This makes every bite extra special. Gather these ingredients, and you’re ready to create a delightful dessert that everyone will love. - Preheat your oven to 350°F (175°C) and grease a 9x13-inch baking dish. - Drain the sliced peaches, reserving about 1/4 cup of the syrup. - In a medium bowl, combine the peaches, brown sugar, and cinnamon. Pour this mixture into the prepared baking dish. - Sprinkle the yellow cake mix evenly over the peach mixture. Make sure all the peaches are covered. - Drizzle the melted butter over the cake mix and let it soak in. This adds flavor and moisture. - If you like, top with rolled oats and chopped pecans for added crunch. - Bake for 30-35 minutes until golden brown and bubbly on the edges. You want it to look delicious! This process is simple but results in a delightful dessert. It’s the perfect treat for any occasion. - Use fresh peaches for a more robust flavor if available. Fresh fruit gives the dish a vibrant taste and smell. - Adjust sugar according to your sweetness preference. Taste the peaches first; they can be sweet or tart. - Let the cake cool slightly for better serving consistency. This helps the cake set up nicely and makes it easier to serve. - Serve warm with vanilla ice cream on top. The creaminess of the ice cream balances the warm, sweet peaches. - Pair with whipped cream or fresh fruit for added flavor. A dollop of cream adds richness and freshness to each bite. {{image_2}} You can switch the yellow cake mix for white cake mix. This gives a lighter taste. If you want a new crunch, try using chopped almonds or walnuts instead of pecans. Each nut brings its own flavor and texture. To make your dump cake extra special, add a splash of vanilla extract. Almond extract also works well. These give a nice depth to the flavor. For added warmth, mix in a pinch of nutmeg with the cinnamon. This small change makes a big difference in taste. Enjoy experimenting with these variations! After you enjoy your peach cobbler dump cake, store any leftovers properly. Keep it covered at room temperature for 1-2 days. This works well if you plan to eat it soon. If you want it to last longer, refrigerate the cake. It can stay fresh for up to 5 days when chilled. Just make sure to cover it tightly to keep moisture in. When you're ready to enjoy your leftovers, reheating is key. For the best taste and texture, reheat in the oven. Set it to 350°F (175°C) and warm it for 10-15 minutes. This method helps regain the crispy top. If you're in a hurry, the microwave is an option. But be aware, it may soften the cake a bit. So, choose the method that fits your time and mood! Can I use frozen peaches instead of canned? Yes, you can use frozen peaches. Just thaw them first. Drain any extra liquid. This keeps the cake from being too soggy. How can I make this recipe gluten-free? To make it gluten-free, swap the yellow cake mix with a gluten-free cake mix. Many brands offer great options. Is it possible to make well in advance and freeze? Yes, you can freeze it. Bake the cake and let it cool completely. Then, wrap it tightly and freeze for up to three months. Can I replace the butter with coconut oil? Yes, coconut oil works well as a substitute for butter. Use the same amount for a tasty twist. What other fruits can be used in a dump cake? You can use many fruits! Try apples, cherries, or blueberries. Each fruit gives a unique flavor to the cake. What is the origin of cobbler desserts? Cobbler desserts come from the American South. They started in the 1800s as a way to use fresh fruit. The name "cobbler" comes from the way the topping looks, resembling a cobbled street. This guide covered all you need to know for making a peach cobbler dump cake. You learned about the essential ingredients, step-by-step instructions, and handy tips. The options for variations and serving suggestions help make this dish fun and customizable. Remember, this cake is best warm and pairs well with ice cream. With a few easy storage tips, you can enjoy leftovers too. I hope you feel inspired to try this tasty dessert! Happy baking!

Peach Cobbler Dump Cake Simple and Delicious Treat

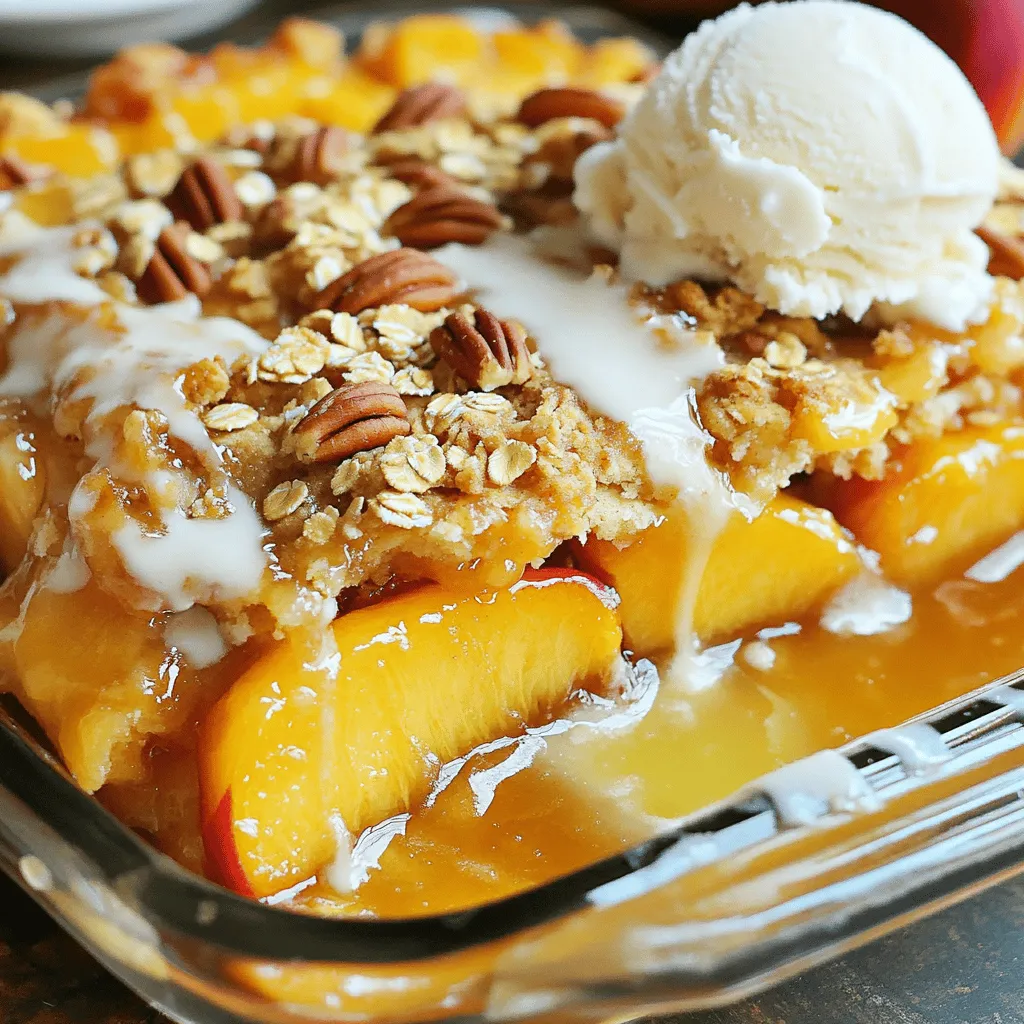
Are you craving a dessert that’s easy to make and bursting with flavor? Look no further than Peach Cobbler Dump

- Zucchini: Grated zucchini adds moisture and a subtle flavor. It keeps the bread soft and rich. Use about 1 medium zucchini, which gives you 1 ½ cups when grated. This hidden veggie boosts nutrition without altering taste. - Cocoa powder: I recommend using unsweetened cocoa powder for a deep chocolate flavor. It’s key to the bread's richness. You can also try Dutch-processed cocoa for a smoother taste. - Essential baking ingredients: You need flour, sugar, baking soda, baking powder, and salt. These make the bread rise and help it stay moist. The blend of granulated and brown sugar adds depth to the sweetness. - Chocolate chips: Semi-sweet chocolate chips are my go-to. They melt beautifully and add extra chocolatey goodness. You can also use dark or milk chocolate chips for different tastes. - Nuts or seeds: Chopped walnuts add crunch. They also bring a nice nutty flavor. You can swap them with pecans or even seeds if you prefer. - Baking pan: A 9x5 inch loaf pan works best for this recipe. It gives the bread a nice shape and helps it bake evenly. - Mixing bowls: Use one medium bowl for wet ingredients and one large for dry. This keeps things organized and makes mixing easier. - Utensils: A whisk is perfect for mixing dry ingredients. A spatula helps you fold the batter gently without overmixing. To make great Chocolate Espresso Zucchini Bread, you need to grate the zucchini well. Start by washing the zucchini. Use a box grater or a food processor. Grate it finely to mix well into the batter. Moisture control is key. Too much water can make the bread soggy. After grating, place the zucchini in a clean cloth and squeeze out excess moisture. This helps keep your bread rich and moist. Mix the ingredients in the right order for the best results. First, beat the eggs, oil, and vanilla in a bowl. Then, whisk the dry ingredients in another bowl. This includes flour, cocoa powder, sugars, and baking agents. When combining the wet and dry mixes, fold gently. This technique avoids overmixing. Overmixing can lead to tough bread. Stop mixing as soon as you see no dry flour. Bake the bread at 350°F (175°C) for 50-60 minutes. This temperature allows the bread to rise and cook evenly. To check if the bread is done, insert a toothpick into the center. If it comes out clean, your bread is ready. Also, the edges will pull slightly away from the pan. Let the bread cool in the pan for about 10 minutes before transferring it to a wire rack. To keep your Chocolate Espresso Zucchini Bread moist, follow a few simple tips. First, avoid squeezing the grated zucchini too much. This keeps the moisture inside the bread. Next, mix your wet and dry ingredients just until they come together. Overmixing can make your bread tough. Common baking pitfalls include not measuring ingredients correctly. Use measuring cups for accuracy. Also, check your oven's temperature with an oven thermometer. A too-hot oven can dry out the bread. You can add extra spices to boost flavor. Consider a pinch of cinnamon or nutmeg. These spices pair well with chocolate and espresso. If you want a sweeter bread, increase the sugar by a few tablespoons. Taste the batter before baking. This way, you can adjust sweetness to your liking. You can also try adding a splash of almond or coconut extract. These flavors add a unique twist to the bread. For serving, slice the bread evenly. Arrange the slices on a rustic wooden board. Add a drizzle of melted chocolate on top for a nice touch. A sprinkle of cocoa powder adds a refined look. Pair your Chocolate Espresso Zucchini Bread with coffee or tea. The rich flavors complement each other perfectly. You can also serve it with whipped cream for a special treat. {{image_2}} You can make Chocolate Espresso Zucchini Bread gluten-free. Use almond flour or oat flour instead of all-purpose flour. These flours add a unique taste and good texture. When using gluten-free flour, reduce the baking time. Check for doneness about five minutes earlier than the recipe states. To make this bread vegan, replace the eggs with flaxseed meal. Mix one tablespoon of flaxseed meal with three tablespoons of water. Let it sit for a few minutes. This mix acts like an egg. Use almond milk or oat milk instead of dairy. You can also use coconut oil in place of vegetable oil. This keeps the bread rich and moist. Adding different types of chocolate can change the flavor. Try dark chocolate chips or white chocolate chips for a twist. You can also include fruits like bananas or apples. Grated carrots can add moisture and sweetness, while nuts like pecans or walnuts add crunch. Experiment with your favorite flavors for a new take on this classic dish. To keep your chocolate espresso zucchini bread fresh, follow these steps. First, allow the bread to cool completely. This prevents condensation. Then, wrap it tightly in plastic wrap. You can also place it in an airtight container. This keeps moisture in while stopping it from drying out. A good container is a glass dish with a lid. If you want to save some for later, freezing is a great option. Slice the bread into pieces. Wrap each slice in plastic wrap, then place them in a freezer bag. Make sure to remove as much air as possible. For best results, eat the frozen bread within three months. When you’re ready to enjoy it, take out a slice. Let it thaw in the fridge overnight or at room temperature for a few hours. You can also warm it up in the microwave for a quick treat. You can keep your chocolate espresso zucchini bread at room temperature for about three days. If you store it in the fridge, it may last up to a week. Always check for signs of spoilage. If you see mold or if it smells off, it’s best to throw it away. Keep an eye on the texture, too. If it feels dry or hard, it’s time to say goodbye. Yes, you can use frozen zucchini. Just thaw it first. After thawing, drain any excess water. Squeeze it gently to remove moisture. This step ensures your bread stays moist but not soggy. You can use brewed coffee as a substitute. Use about 1 tablespoon of strong coffee. You might also try cocoa powder, but the flavor will change. Instant coffee granules work well too, but they may taste less bold. To check if the bread is done, insert a toothpick into the center. If it comes out clean, the bread is ready. You can also gently press the top; it should spring back. Lastly, the edges should pull away from the pan slightly. In this post, we explored how to make delicious Chocolate Espresso Zucchini Bread. We covered the main ingredients, optional add-ins, and essential tools. I also shared step-by-step instructions, tips for the best texture, and tasty variations. Remember, baking is all about balance and creativity. Enjoy experimenting with flavors and textures. With practice, you'll make a moist, flavorful bread everyone loves. Happy baking!

Chocolate Espresso Zucchini Bread Rich and Moist Delight

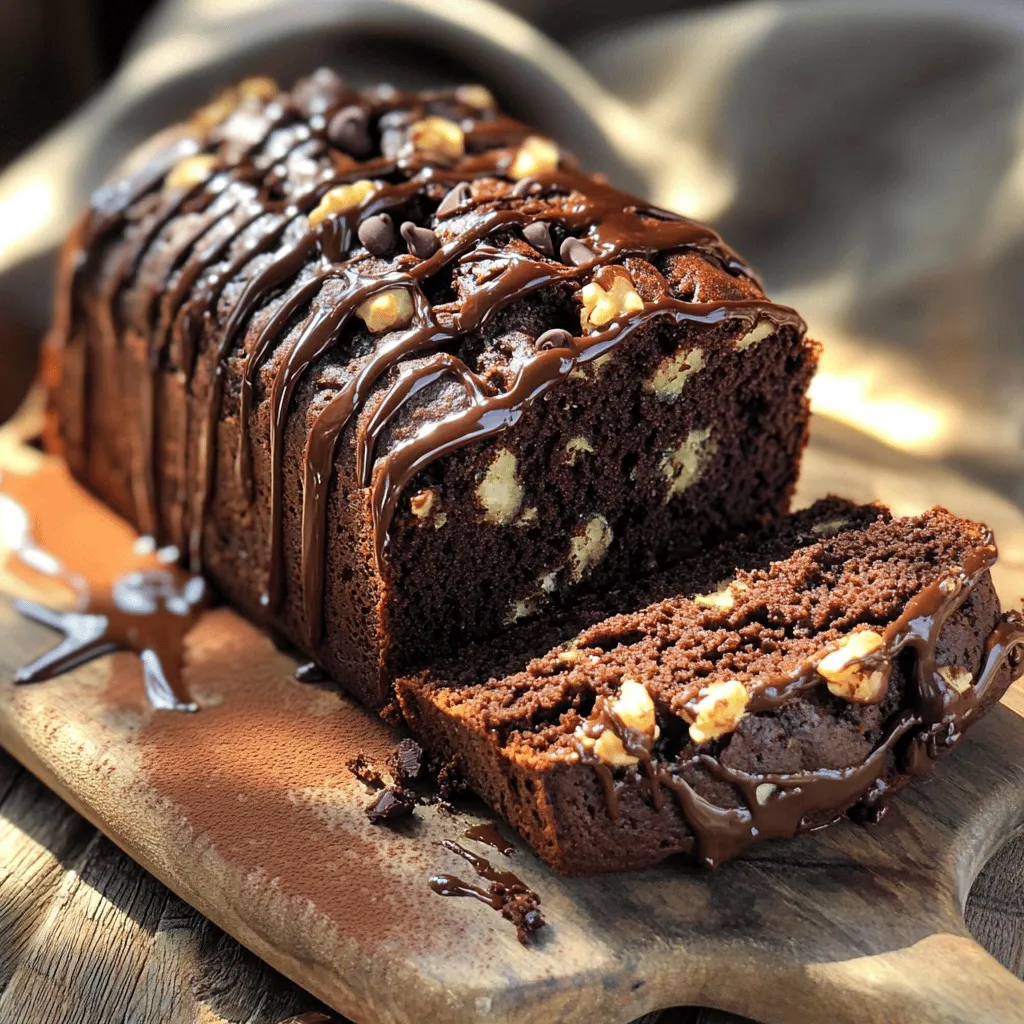
Looking for a delicious twist on your classic zucchini bread? Let me introduce you to Chocolate Espresso Zucchini Bread! This

- 1 pound ground turkey or chicken - 6 cups low-sodium chicken broth - 1 cup small pasta (such as acini di pepe or orzo) The base of Italian wedding soup is simple yet rich. Ground turkey or chicken gives it a lean protein source. I love using low-sodium chicken broth for a clean taste. Small pasta like acini di pepe or orzo adds a delightful texture. You can also choose gluten-free pasta if you prefer. - 1 medium onion, finely chopped - 2 cloves garlic, minced - 1 large carrot, diced - 1 large stalk celery, diced - 1 cup fresh spinach, chopped Next, we have the vegetables. Onions and garlic bring depth and warmth. Carrots and celery add crunch and sweetness. Fresh spinach adds a vibrant color and nutrients. I chop it finely so it wilts nicely in the soup. - 1 teaspoon dried oregano - 1 teaspoon dried thyme - 1 cup grated Parmesan cheese - Fresh parsley, chopped (for garnish) Seasoning is key to great flavor. Dried oregano and thyme complement the broth and meatballs. Grated Parmesan adds creaminess and richness. Finally, fresh parsley brightens up the dish with its fresh taste. I sprinkle it on top right before serving. First, grab a large bowl. Add 1 pound of ground turkey or chicken. Next, pour in 1/4 cup of breadcrumbs. Crack in 1 large egg, and sprinkle in some salt and black pepper. Mix the ingredients well with your hands. Form the mixture into small meatballs, about 1 inch in size. Once you shape them, set them aside on a plate. Now, take a large pot and heat 1 tablespoon of olive oil over medium heat. Add 1 medium chopped onion, 2 minced garlic cloves, 1 large diced carrot, and 1 large diced stalk of celery. Sauté these veggies for about 5 minutes. You want them to soften but not brown. This step builds a great base for the soup. Next, pour 6 cups of low-sodium chicken broth into the pot. Bring the broth to a gentle boil. Add in 1 teaspoon of dried oregano and 1 teaspoon of dried thyme. Carefully drop your meatballs into the boiling broth. Lower the heat and let it simmer for about 10 minutes. This cooks the meatballs through. After that, stir in 1 cup of small pasta, like acini di pepe or orzo. Simmer according to the package instructions for about 7 to 10 minutes. In the last minute of cooking, toss in 1 cup of chopped fresh spinach. Stir until it wilts. Finally, remove the pot from heat. Mix in 1 cup of grated Parmesan cheese until it melts. Taste and adjust seasoning with salt and pepper to your liking. To boost flavor, adjust your seasonings. Add more oregano or thyme if you prefer. Fresh herbs can also brighten the soup. They have a stronger taste than dried ones. Use fresh parsley for garnish to add a pop of color. To keep meatballs tender, do not overmix the meat. Just combine the ingredients gently. Shape them into small balls, about an inch wide. This size helps them cook evenly. For perfect pasta, add it at the right time. Follow the package's cooking time for best results. Remember, overcooked pasta can become mushy. Serve the soup in deep bowls for a cozy feel. Garnish with fresh parsley and a sprinkle of Parmesan. This adds flavor and looks nice. Pair your soup with crusty bread for a hearty meal. A side salad can also work well. {{image_2}} You can easily make a vegetarian version of Italian wedding soup. Start by swapping chicken broth for vegetable broth. This swap keeps the soup rich and flavorful. For the meatballs, use plant-based meat alternatives like lentils, chickpeas, or tofu. These options provide protein and texture. Add a variety of vegetables to enhance your dish. Try zucchini, bell peppers, or peas. Each vegetable brings its own unique taste. Fresh herbs like basil or parsley can also add a burst of flavor. For those needing gluten-free meals, choose gluten-free pasta. Brands now offer options like rice or chickpea pasta. These types blend well with the soup. Adjust the breadcrumbs in your meatballs. Use gluten-free breadcrumbs or ground nuts for binding. This ensures your meatballs hold together without gluten. Italian wedding soup has many regional twists across Italy. In some areas, they add different meats like sausage or beef. Others may include unique vegetables that grow abundantly in their region. Explore local flavors by using specific herbs or spices. For example, adding saffron can give a distinct taste. Each region's special touch makes the soup even more inviting. Store your Italian Wedding Soup in the fridge for up to three days. Use airtight containers to keep it fresh. Let the soup cool before sealing it. This helps prevent condensation inside the container. When you’re ready to eat, simply reheat it on the stove or in the microwave. Stir it well to ensure even heating. You can freeze Italian Wedding Soup for up to three months. To freeze, let the soup cool completely. Then, pour it into freezer-safe containers or bags. Leave some space at the top for expansion. When you want to enjoy it again, move the soup to the fridge overnight to thaw. Avoid microwaving it directly from frozen, as this can change the texture. When reheating, do it slowly on the stove. Stir occasionally to keep the soup smooth. Add a splash of broth or water if it seems thick. This will help keep the flavors bright and tasty. Enjoy the comfort of your soup, even after some time in the freezer! Italian Wedding Soup has roots in Italy. It is not a wedding dish, but a symbol of unity. The name comes from the Italian phrase "minestra maritata," meaning "married soup." This refers to the tasty mix of greens and meat. Traditional ingredients include small pasta, meatballs, and greens. You often find spinach or escarole in the mix. These fresh veggies add color and nutrients to the soup. The combination creates a comforting dish that many families enjoy. Yes, you can make Italian Wedding Soup ahead of time. Meal prep saves time on busy nights. Cook the soup and store it in the fridge for up to three days. However, the pasta may soak up broth and become soft. To keep the soup fresh, cook the pasta separately and add it when serving. This keeps the texture just right, so you enjoy every bite. If you want a meat-free option, you have choices! You can use lentils, beans, or tofu. These alternatives cater to different diets and still taste great. Substituting meat may change the flavor and texture a bit. Lentils add earthiness, while beans give a creamy feel. No matter what you choose, the soup remains hearty and satisfying. Italian Wedding Soup is a delicious blend of flavors and textures. We explored its main ingredients, from ground turkey to vibrant veggies. I shared step-by-step instructions to help you create this dish at home. Remember to enhance flavors with herbs and customize it to fit your diet. Whether you choose to make it vegetarian, gluten-free, or stick to tradition, this soup warms the heart. Store leftovers properly, and don't worry about making it ahead of time. Enjoy the process of cooking and sharing this comforting meal with others.

Italian Wedding Soup Flavorful Comfort in a Bowl

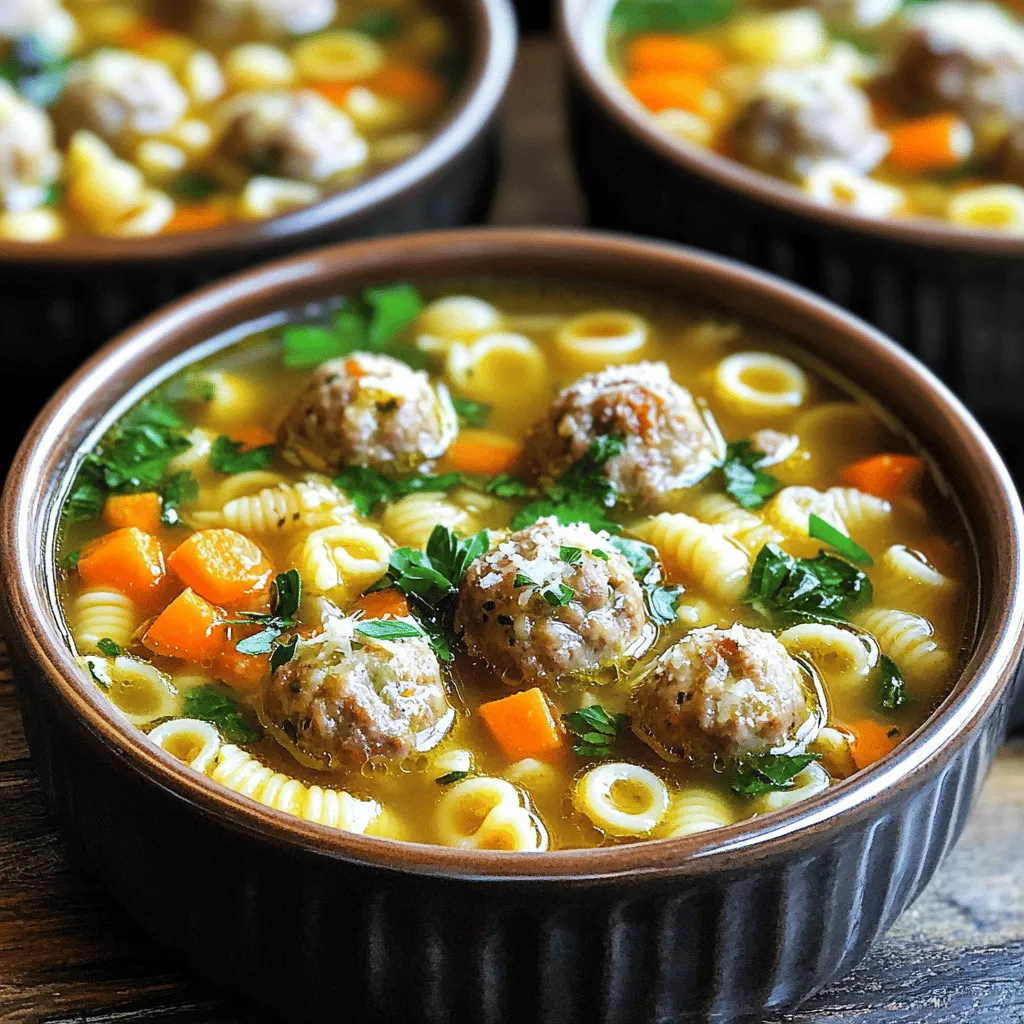
Are you ready to dive into a warm bowl of Italian Wedding Soup? This dish isn’t just delicious; it’s a

When making Cranberry Orange Shortbread Cookies, you need the right ingredients. Here's what you'll need: - 1 cup unsalted butter, softened - 1/2 cup powdered sugar - 1 teaspoon vanilla extract - Zest of 1 orange - 2 cups all-purpose flour - 1/4 teaspoon salt - 1/2 cup dried cranberries, chopped - 1/4 cup chopped pecans (optional) - 1 tablespoon orange juice Each ingredient plays a key role in the flavor and texture. The butter adds richness, while the sugar sweetens the cookies. The orange zest gives a fresh, bright taste that pairs well with cranberries. The all-purpose flour forms the base, and the salt enhances the flavors. Dried cranberries add a chewy texture, and pecans (if you choose to use them) bring a nice crunch. Finally, orange juice adds moisture and a hint of citrus flavor. Make sure to gather these ingredients before starting. This way, you’ll have everything ready to create your delicious cookies! 1. Creaming the butter and sugar Start by taking your softened butter and powdered sugar. Place them in a large bowl. Mix them with a hand mixer or a spatula. You want the mixture to be light and fluffy. This step is key for a soft cookie. 2. Adding flavorings and zest Next, pour in the vanilla extract and add the orange zest. Mix until everything is combined well. The orange zest gives a fresh taste that pairs perfectly with the cranberries. 3. Combining dry and wet ingredients In another bowl, whisk together the all-purpose flour and salt. Slowly add this mix to the wet ingredients. Stir gently until the dough starts to come together. 1. Forming logs and wrapping them Once the dough is mixed, divide it into two equal parts. Shape each part into a log about 1.5 inches wide. Wrap each log tightly in parchment paper or plastic wrap. This helps keep the shape. 2. Refrigeration and chilling process Place the wrapped logs in the fridge for at least one hour. Chilling firms the dough, making it easier to slice later. 1. Preheating the oven While the dough chills, preheat your oven to 350°F (175°C). Getting the oven hot ensures even baking. 2. Slicing the cookies After an hour, take the logs out of the fridge. Unwrap them and slice each log into 1/4-inch thick rounds. Place the slices on a baking sheet lined with parchment paper. Make sure to leave some space between each cookie. 3. Baking until golden Bake the cookies in your preheated oven for 12-15 minutes. Watch for the edges to turn lightly golden. Let them cool on the baking sheet for about 5 minutes. Then, transfer them to a wire rack to cool completely. Enjoy your delicious cookies! To make the best cookies, start with the right creaming technique. Cream the butter and sugar until light and fluffy. This step adds air and helps the cookies rise. Use a stand mixer or a hand mixer at medium speed for about 3 to 5 minutes. Be careful to avoid overmixing. Once you add the flour, mix gently. Stir just until the dough comes together. Overmixing can lead to tough cookies. Adjust baking time based on your oven. Start with 12 minutes, but keep an eye on the cookies. They should be lightly golden at the edges. If they are not, add a minute or two. Every oven is different, so check often. For festive serving, arrange the cookies on a colorful plate. Dust them with powdered sugar for a snowy look. You can add fresh cranberries and orange slices on the side. This adds color and a touch of elegance. For garnishing, consider drizzling a bit of orange glaze. Mix powdered sugar with orange juice until smooth. A light drizzle over the cookies makes them shine. This small touch can impress your guests and make the cookies look gourmet. {{image_2}} You can make these cookies even better! Here are some ideas: - Adding other dried fruits: Try raisins, apricots, or cherries. They will add sweet and chewy bites to your cookies. Mix in about 1/2 cup of your favorite fruit. - Incorporating nuts or chocolate: Feel free to add chopped walnuts, almonds, or dark chocolate chips. Nuts add crunch, while chocolate adds a rich flavor. Use 1/4 cup of nuts or chocolate for a tasty twist. If you have dietary needs, you can still enjoy these cookies. Here are some easy swaps: - Gluten-free alternatives: Use a gluten-free flour blend instead of all-purpose flour. This will let everyone enjoy your cookies. Look for a blend that works well for baking. - Vegan substitutes for butter: Replace unsalted butter with coconut oil or vegan butter. This keeps the cookies rich and tasty for everyone. Use the same amount as the recipe states for butter. To keep your cranberry orange shortbread cookies fresh, store them properly. Place the cookies in an airtight container at room temperature. This helps maintain their crispness. You can also line the container with parchment paper to avoid sticking. If you want to keep them longer, refrigerate the cookies. Use a sealed container to prevent them from absorbing any odors. For even longer storage, freeze the cookies. Wrap them in plastic wrap, then place them in a freezer bag. This keeps them fresh for months. How long do cookies last? When stored at room temperature, these cookies last about one week. In the fridge, they can last up to two weeks. If frozen, they stay good for about three months. Recognizing signs of spoilage is key. Look for changes in texture or smell. If the cookies feel soft or crumbly, or if they have an off odor, it’s time to throw them away. Enjoy your cookies while they are fresh and tasty! Can I use fresh cranberries instead of dried? Yes, you can use fresh cranberries. However, they are tart. I suggest adding more sugar to balance the taste. Chop the fresh cranberries into small bits before mixing them in. This helps them blend well into the dough. How to achieve a softer texture? To make your cookies softer, add a little more butter. You can also bake them for a shorter time. Keep an eye on them in the oven. When they are just lightly golden, take them out. They will firm up as they cool. What is the best way to store cookies? Store cookies in an airtight container. This keeps them fresh longer. If you want to keep them for a while, place parchment paper between layers. This prevents them from sticking together. Can I freeze the cookie dough? Absolutely! Freezing the dough is a great idea. Shape the logs and wrap them tightly in plastic wrap. You can freeze them for up to three months. When you’re ready, just slice and bake without thawing. How to make the cookies in advance? You can prepare the dough ahead of time. After mixing, shape it into logs and refrigerate. This will last up to a week in the fridge. When you are ready to bake, just slice and enjoy fresh cookies. You now have all the steps and tips to make delicious cookies. We covered the ingredients, preparation, and baking. Plus, I shared helpful hints and fun variations. With these details, you can create tasty cookies that impress everyone. Remember, practice makes perfect, so don’t hesitate to try different flavors. Enjoy your baking journey and share these cookies with friends and family!

Cranberry Orange Shortbread Cookies Simple and Easy

Looking for a quick and tasty treat? These Cranberry Orange Shortbread Cookies are simple to make and bursting with flavor.

Older posts
Newer posts
← Previous Page1 … Page40 Page41 Page42 … Page84 Next →

dsad

© 2026 Lisa Dishes • Built with GeneratePress

Our Policies

  • Copyright Policy
  • Cookie Policy
  • GDPR Policy
  • Privacy Policy
  • Disclaimer
  • Terms Of Use

More Information

  • Home
  • About
  • Contact
  • Appetizers
  • Dessert
  • Dinner
  • Drinks
©2026, Lisa Dishes About Back To Top