Skip to content
DisclaimerTerms Of UseGDPR PolicyCookie Policy

Lisa Dishes

  • Home
  • Drinks
  • Appetizers
  • Dinner
  • Dessert
  • About
  • Contact
  • Privacy Policy
DisclaimerTerms Of UseGDPR PolicyCookie Policy

NO-ING-IMG

- 1 cup raw pistachios, shelled - 1 cup dried cranberries - 1/2 cup rolled oats - 1/2 cup nut butter (almond or cashew) - 1/4 cup honey or maple syrup - 1/2 teaspoon vanilla extract - 1/4 teaspoon salt - Optional: 1/4 cup mini dark chocolate chips These ingredients make up a tasty and healthy snack. I use raw pistachios for their crunch and flavor. Dried cranberries add a sweet and tart twist. Rolled oats provide a chewy texture and help bind everything together. For the nut butter, I love almond or cashew. Both add creaminess and healthy fats. Honey or maple syrup works as a sweetener, making the clusters stick together. The vanilla extract and salt round out the flavors beautifully. If you want a little extra sweetness, add mini dark chocolate chips. They melt slightly and create a lovely contrast with the nuts and fruit. - In a large bowl, combine 1 cup of raw pistachios, 1 cup of dried cranberries, and 1/2 cup of rolled oats. - Stir well to mix the dry ingredients evenly. - In a separate bowl, mix 1/2 cup of nut butter (choose almond or cashew), 1/4 cup of honey (or maple syrup), 1/2 teaspoon of vanilla extract, and 1/4 teaspoon of salt. - Blend this mixture until it is smooth and creamy. - Pour the nut butter mixture over the dry ingredients in the large bowl. - Use a spatula or your hands to mix everything together well. Ensure all the dry ingredients get coated. - If you like, fold in 1/4 cup of mini dark chocolate chips for extra sweetness. - Line a baking sheet with parchment paper. - Use your hands or a tablespoon to shape small clusters from the mixture. Place them tightly on the lined sheet. - Put the baking sheet in the refrigerator for about 30 minutes until the clusters are firm. - Once they are set, gently break apart any clusters if needed. - Store the energy clusters in an airtight container in the fridge for up to a week. You can also freeze them for longer storage. - Nut butter alternatives: You can use sunflower seed butter if you have nut allergies. It gives a nice flavor and works well. - Sweetener variations: Instead of honey, try agave syrup or date syrup. Both add a different sweetness and can change the taste. - Adjusting moisture levels: If your mixture seems too dry, add a bit more nut butter or sweetener. This will help the clusters stick together better. - Tips for binding ingredients together: Press the mixture firmly when forming clusters. This helps hold them together and keeps them from falling apart. - Additional flavoring options: Try adding a pinch of cinnamon or a splash of almond extract for a warm flavor. - Experimenting with spices: You can also mix in a little ginger or nutmeg. These spices will give your clusters a unique taste that surprises your taste buds. {{image_2}} You can boost your energy clusters with protein. Adding protein powder is an easy choice. Just mix in a scoop when you combine the wet ingredients. This gives you extra fuel for your day. You can also swap in different nuts and seeds. Try almonds, walnuts, or sunflower seeds. Each one adds its own flavor and crunch. Want to change the taste? Incorporate dried fruits like apricots or figs. They add sweetness and a chewy texture. You can also spice it up with cinnamon or nutmeg. Just a pinch can add warmth and depth. If you love chocolate, this option is for you. Use dark chocolate chips for a rich taste. They melt slightly and coat the clusters perfectly. You can also swap in caramel or white chocolate. This gives a creamy, sweet twist. You can even mix different types of chocolate for fun flavor blends. To keep your cranberry pistachio energy clusters fresh, use an airtight container. Glass or plastic containers work well. They keep out air and moisture. Moisture can make your clusters soggy. Always store them in a cool place, away from heat and humidity. When stored in the fridge, these clusters last about a week. You can also freeze them for longer storage. If you freeze them, they stay good for up to three months. To check if they are still good, look for any signs of mold or off smells. If they look or smell funny, it's best to toss them. Make a big batch for quick snacks! You can prepare these clusters on the weekend. Store them in small portions for easy grab-and-go snacks. This way, you always have a healthy treat ready. Just take one and enjoy whenever you need a boost! Cranberry Pistachio Energy Clusters are tasty bite-sized snacks. They combine nuts, fruits, and oats. You can make them easily at home. These clusters are chewy and crunchy. The mix of sweet cranberries and salty pistachios is delightful. They are great for a quick energy boost or a snack on the go. Cranberry Pistachio Energy Clusters last about one week in the fridge. Keep them in an airtight container. You can freeze them for longer storage. If frozen, they can last for about three months. Just let them thaw before eating. Yes, you can make these clusters vegan. Use maple syrup instead of honey. Choose almond or cashew butter without animal products. Check the nut butter label to be sure. This way, you can enjoy a tasty, vegan snack. Yes, Cranberry Pistachio Energy Clusters are gluten-free. The main ingredients, like nuts and oats, do not contain gluten. Just ensure your oats are certified gluten-free. This way, you can safely enjoy these clusters if you avoid gluten. Cranberry Pistachio Energy Clusters offer many health benefits. They are rich in protein, fiber, and healthy fats. Pistachios provide good fats and protein. Dried cranberries add vitamins and antioxidants. The oats give you energy and keep you full. They are a perfect snack for a quick energy boost. You now have all the steps to make tasty Cranberry Pistachio Energy Clusters. We covered the key ingredients, easy instructions, and useful tips to enhance your snack. You can customize these clusters with different flavors or ingredients. They are quick to prepare and perfect for on-the-go energy. Store them correctly, and enjoy a nutritious snack anytime. Keep experimenting and finding your best version! Healthy snacking can be fun and delicious.

Cranberry Pistachio Energy Clusters Easy Snack Recipe

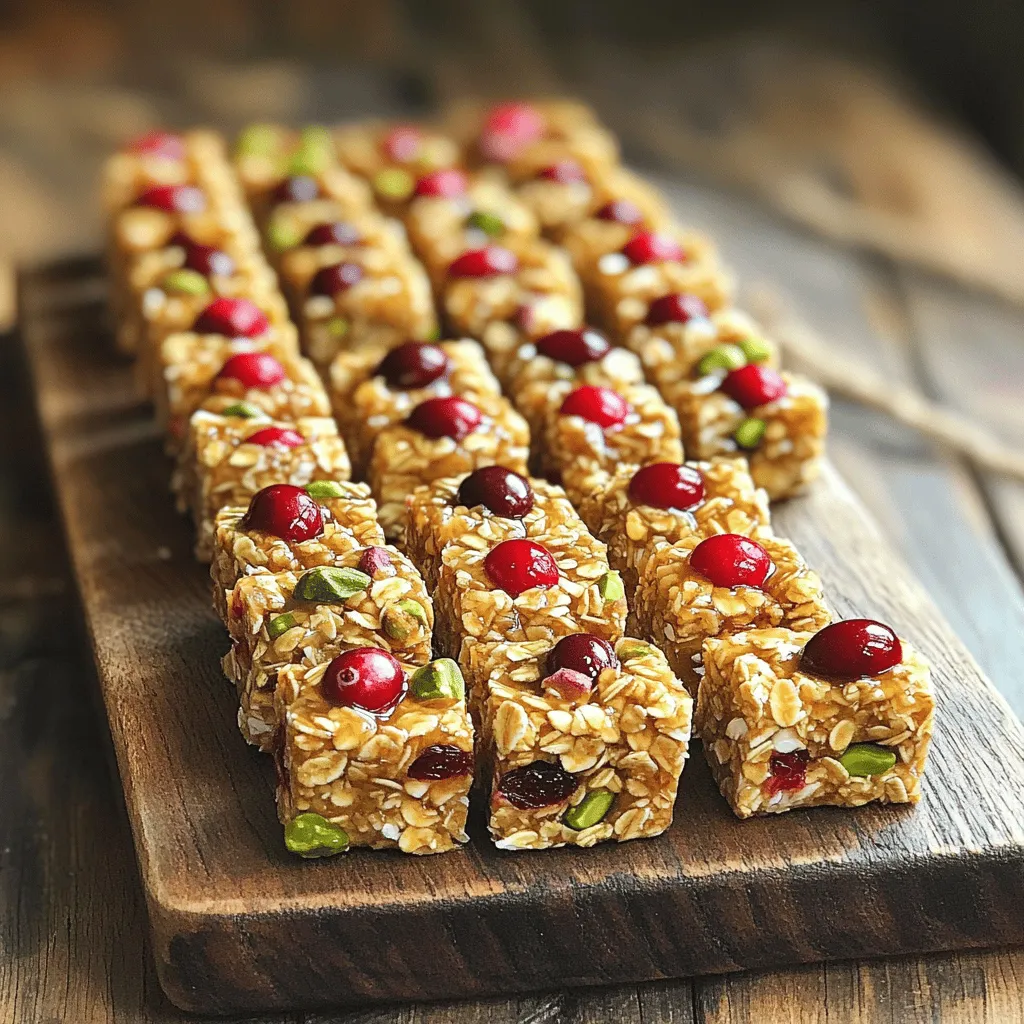
Looking for a quick and tasty snack? These Cranberry Pistachio Energy Clusters are both easy to make and delicious. Packed

- 1.5 pounds boneless, skinless chicken thighs - 1 cup low-sodium soy sauce - 1/2 cup honey - 1/4 cup rice vinegar - 2 tablespoons sesame oil - 4 cloves garlic, minced - 2 teaspoons fresh ginger, minced - 4 cups cooked jasmine rice - 1 cup broccoli florets - 1 cup shredded carrots - 1 tablespoon sesame seeds (for garnish) - Green onions, chopped (for garnish) - Cornstarch for sauce thickening - Water for slurry Gather these ingredients before you start cooking. The chicken thighs are tender and juicy, making this dish flavorful. The low-sodium soy sauce gives the dish a rich taste without too much salt. Honey adds a sweet touch, while rice vinegar brings a bit of tanginess to balance the flavors. Minced garlic and ginger add warmth and depth. Cooked jasmine rice forms a soft base, while broccoli and carrots bring color and nutrition. The sesame seeds and green onions not only taste great but also make the dish look beautiful. You can use cornstarch and water to thicken the sauce if you want a richer texture. These ingredients come together to create a hearty meal that is sure to please everyone. Start by setting your Instant Pot to sauté mode. Add the sesame oil. Next, toss in the minced garlic and ginger. Sauté them for about one minute until they smell great. This step adds depth to your dish. Now, add the chicken thighs to the pot. Pour in the low-sodium soy sauce, honey, and rice vinegar. Stir well to coat the chicken evenly with the sauce. This mix gives the chicken a sweet and savory flavor. Close the Instant Pot lid. Make sure the steam valve is set to sealing. Set the pot to manual pressure and cook for 8 minutes. This cooks the chicken perfectly and keeps it juicy. After cooking, let the pressure release naturally for 5 minutes. Then carefully switch the steam valve to venting to release any remaining steam. This technique is safe and effective for tender chicken. Once the pressure is released, remove the chicken from the pot. Use two forks to shred the chicken into bite-sized pieces. Set the shredded chicken aside for now. In a small bowl, mix the cornstarch with water to create a slurry. Select sauté mode on the Instant Pot again. Add the slurry to the sauce left in the pot. Stir continuously until the sauce thickens, which takes about 2 minutes. Now, add the shredded chicken back into the pot. Stir until the chicken is well combined with the thickened sauce. This step ensures each bite is packed with flavor. To build your bowls, start with a layer of cooked jasmine rice at the bottom. Next, add the teriyaki chicken on top. Then, add steamed broccoli florets and shredded carrots. For the final touch, sprinkle sesame seeds and chopped green onions on top. This adds a nice crunch and fresh pop of flavor. Your Instant Pot Teriyaki Chicken Bowls are now ready to enjoy! - Always ensure your Instant Pot is sealed before cooking. - Use the sauté function to enhance flavor before adding other ingredients. - Avoid overfilling your pot to prevent pressure issues. - Let the pressure release naturally to keep the chicken tender. - Add crushed red pepper for heat. - Mix in pineapple juice for a sweet twist. - Experiment with garlic powder or onion powder for depth. - For a sweeter dish, add more honey or agave syrup. - Serve with steamed edamame or a simple green salad. - Pair with a light, crisp white wine or green tea. - Use colorful bowls to make the meal pop. - Garnish with fresh herbs for an extra touch. {{image_2}} You can switch chicken thighs for chicken breasts. Chicken breasts cook quickly and stay juicy. They give a lighter taste but still absorb the teriyaki sauce well. If you want a plant-based option, try tofu or shrimp. Tofu absorbs flavors nicely and gives a great texture. Shrimp cooks fast too, and adds a different flavor profile to your dish. You can add many vegetables to your teriyaki bowls. Bell peppers, snap peas, or zucchini work well. They bring color and crunch. Seasonal veggies like asparagus in spring or butternut squash in fall can add a fresh twist. Always choose veggies that you enjoy to make the dish your own. Making your own teriyaki sauce is easy and fun. Combine soy sauce, honey, and rice vinegar. Adjust the sweetness by adding more honey or brown sugar. If you want it saltier, add more soy sauce. You can even add a splash of orange juice for a fruity kick. Customizing the sauce can elevate your dish and make it special. To store your teriyaki chicken bowls, place leftovers in airtight containers. This keeps them fresh. Cooked teriyaki chicken bowls last about 3 to 4 days in the fridge. Make sure to cool them before sealing. This helps prevent sogginess. You can freeze teriyaki chicken bowls for later. Use freezer-safe containers or bags. This helps save space and keeps food fresh. To reheat, thaw the chicken in the fridge overnight. You can then warm it in the microwave or on the stove. To maintain the flavor and texture, avoid reheating in high heat. For meal prep, use glass or BPA-free plastic containers. These are safe and easy to clean. To assemble, layer cooked jasmine rice, then add the teriyaki chicken. Top with broccoli and carrots. This makes a quick grab-and-go meal for busy days. You will spend about 15 minutes preparing the meal. Cooking time takes 8 minutes. After cooking, let the pressure release naturally for 5 minutes. This brings the total time to around 40 minutes. You can enjoy a tasty meal without a long wait! Yes, you can! There are some great options. Coconut aminos is a popular choice. It is a bit sweeter and has a nice flavor. You can also try tamari, which is a gluten-free soy sauce. Both options will work well in your teriyaki chicken bowls. These chicken bowls are great on their own, but you can add more. Try serving them with steamed rice or quinoa. You can also add a fresh salad or some pickled vegetables. For a crunchy touch, serve with sesame crackers or edamame on the side. Enjoy the variety! In this blog post, I shared an easy way to make teriyaki chicken bowls in an Instant Pot. We explored the main ingredients, step-by-step instructions, and helpful tips for cooking. I also covered variations for protein and veggies, plus storage info for your leftovers. Remember, you can customize this dish to fit your taste. Enjoy the process and make it your own! Your meals can be flavorful, quick, and fun to prepare.

Instant Pot Teriyaki Chicken Bowls Flavorful Delight

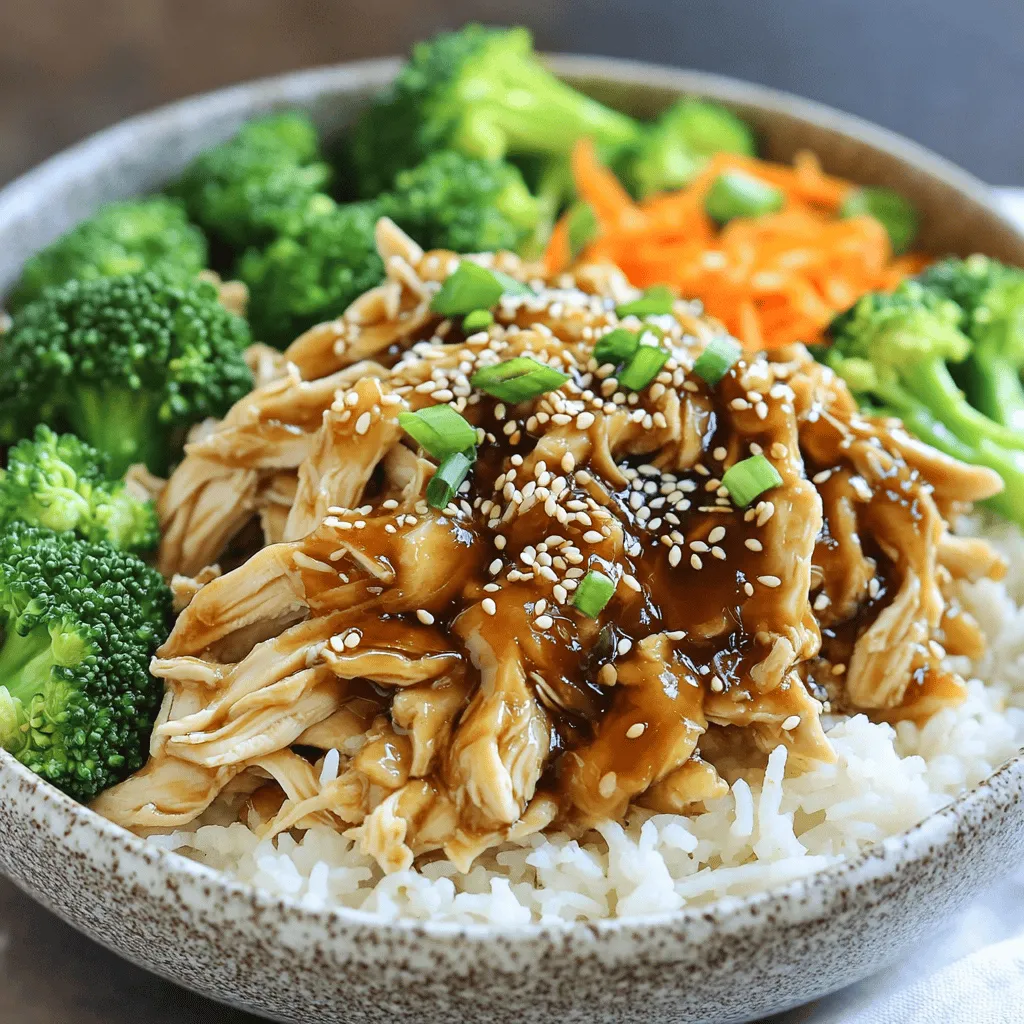
Craving a quick, tasty meal? Look no further than my Instant Pot Teriyaki Chicken Bowls. In just minutes, you can

To make creamy pesto chicken tortellini soup, gather these simple ingredients: - 2 tablespoons olive oil - 1 pound boneless, skinless chicken breast, diced - 1 onion, diced - 3 cloves garlic, minced - 4 cups chicken broth - 2 cups heavy cream - 1 cup basil pesto (store-bought or homemade) - 1 package (9 oz) cheese tortellini - 1 cup cherry tomatoes, halved - 2 cups fresh spinach - Salt and pepper to taste - Grated Parmesan cheese for serving - Fresh basil leaves for garnish Choose ingredients with care for the best taste. Here are some tips: - Chicken: Look for bright pink chicken. Avoid any that looks dull or gray. - Onion: Pick firm onions with smooth skin. They should feel heavy for their size. - Garlic: Choose garlic bulbs that are firm and dry. Avoid any with green sprouts. - Spinach: Select fresh spinach with vibrant green leaves. Avoid wilted or yellowing leaves. - Tomatoes: Choose firm, bright cherry tomatoes. They should smell sweet and fruity. - Pesto: If using store-bought pesto, check the label for fresh ingredients. If you can't find an ingredient, here are some easy swaps: - Chicken: Use diced turkey or cooked sausage instead of chicken. - Cream: Substitute coconut cream for a dairy-free option. - Pesto: You can use sun-dried tomato paste for a different flavor. - Tortellini: Try using gnocchi or any small pasta if tortellini is not available. - Spinach: Kale or Swiss chard makes a great substitute for spinach. These tips help you make the best creamy pesto chicken tortellini soup. Happy cooking! Start by gathering all your ingredients. You need olive oil, diced chicken, onion, garlic, chicken broth, heavy cream, basil pesto, cheese tortellini, cherry tomatoes, fresh spinach, salt, pepper, Parmesan cheese, and basil leaves. Next, prepare your workspace. Dice the chicken and onion. Mince the garlic. Halving the cherry tomatoes is next. Set everything aside in bowls for easy access. Heat the olive oil in a large pot over medium heat. Add the diced chicken. Cook it for about 5-7 minutes until it turns light brown. Now, add the diced onion and minced garlic to the pot. Sauté for 3-4 minutes until the onion looks clear and smells great. Pour in the chicken broth. Bring it to a gentle boil, then lower the heat to a simmer. Stir in the heavy cream and basil pesto. Mix well until everything blends nicely. Add the tortellini to the pot. Cook them according to the package instructions. They usually take about 3-5 minutes to float to the top. When the tortellini are cooked, add the halved cherry tomatoes and fresh spinach. Stir and cook for another 2-3 minutes until the spinach wilts. Taste the soup and season with salt and pepper. Adjust it to your liking. Serve the hot soup in deep bowls. For a special touch, drizzle a little extra pesto on top. Garnish with grated Parmesan cheese and fresh basil leaves. This adds color and flavor. Enjoy your delicious creamy pesto chicken tortellini soup! To get the best creamy texture, use heavy cream. It adds richness and smoothness. When you add the cream, stir gently to blend it well with the broth. If you want it even creamier, try blending some soup and adding it back in. This makes the soup thick and velvety. Seasoning makes your soup shine. Start with salt and pepper. Taste as you go. If you want more flavor, add Italian herbs or a pinch of red pepper flakes. Fresh basil is also a great choice to boost the flavor. For a twist, a squeeze of lemon juice adds brightness. One mistake is overcooking the tortellini. Follow the package instructions closely. If overcooked, they turn mushy. Another tip is to add spinach at the end. This keeps it bright and fresh. Finally, don’t skip the garnish. Grated Parmesan and fresh basil make a big difference in taste and look. {{image_2}} You can easily make a vegetarian version of this soup. Start by swapping the chicken for extra veggies. Use mushrooms, zucchini, or bell peppers for great texture. Replace the chicken broth with vegetable broth to keep the flavor rich. This way, you still get a creamy, tasty soup without meat. If you want to change the protein, you have options. You can use diced turkey or shrimp. Each choice adds a unique flavor. Just remember to cook the protein until it's fully done. Adjust cooking times as needed. This keeps the soup fun and fresh each time you make it. Herbs can transform this soup into something special. Fresh herbs like thyme or rosemary add depth. Simply toss them in when you add the broth. You can also use dried herbs if fresh ones aren’t available. Just be careful with amounts, as dried herbs are stronger. A little goes a long way! To keep your creamy pesto chicken tortellini soup fresh, store it in an airtight container. Make sure the soup cools down to room temperature first. Place it in the fridge if you plan to eat it within three days. If you want it to last longer, consider freezing it. When reheating, do it slowly on the stove over low heat. Stir often to prevent sticking. If the soup thickens too much, add a splash of chicken broth or cream. You can also microwave it in short bursts. Stir between each burst to heat evenly. To freeze, pour the cooled soup into freezer-safe bags or containers. Leave some space at the top, as soup expands when frozen. Label the bags with the date. It can last up to three months in the freezer. Thaw it overnight in the fridge before reheating. Yes, you can use frozen tortellini. Just add it straight to the soup. Cook it for about 5-7 minutes. Check the package for specific times. Frozen tortellini works well in this creamy pesto chicken tortellini soup. It saves time and is easy to find. To make this soup dairy-free, swap heavy cream for coconut milk or almond milk. Use a dairy-free pesto too. You can find many brands in stores. Make sure to check the labels. This change keeps the soup creamy while being friendly for dairy-free diets. Serve the soup hot in deep bowls. Add a sprinkle of grated Parmesan on top for flavor. Garnish with fresh basil leaves for color and aroma. Drizzle a bit of extra pesto on top for a nice touch. This makes the soup look fancy and appetizing. Enjoy it with crusty bread for a complete meal. This blog post covered the key steps to make a delicious soup. We discussed ingredients, cooking instructions, and tips to improve flavor. You learned how to avoid common mistakes and adapt the recipe to your taste. I also shared storage tips to keep your soup fresh. In conclusion, using the right ingredients and techniques makes a great meal. Enjoy experimenting with variations to find your favorite. Happy cooking!

Creamy Pesto Chicken Tortellini Soup Delight

Are you ready to treat your taste buds? My Creamy Pesto Chicken Tortellini Soup is a warm hug in a

- 3 ripe mangoes, peeled and diced - 1/2 cup fresh lime juice (about 4 limes) - 1/2 cup sugar (adjust according to sweetness of mangoes) - 1 cup water - 1/2 teaspoon ground chili powder (or to taste) - Pinch of salt Mango chili lime sorbet bursts with sweet and zesty flavors. The ripe mangoes are the star. Choose mangoes that are soft to the touch and smell sweet. They add a rich, fruity base. Fresh lime juice gives the sorbet its bright tang. The sugar balances the tartness. Adjust it based on how sweet your mangoes are. Water helps blend everything smoothly. The chili powder adds a kick. Just a pinch will do, but taste as you go. A small pinch of salt enhances all the flavors. - Fresh mint leaves - Additional lime slices Garnishing adds a fun touch. Fresh mint leaves give a burst of color and flavor. Lime slices look pretty and add extra zest. You can serve the sorbet in bowls or even in halved lime shells for a special twist. - First, take a medium saucepan. - Add 1/2 cup of sugar and 1 cup of water. - Heat it over medium heat. - Stir until the sugar fully dissolves. - Remove the pan from heat and let it cool to room temperature. - Now, grab your blender. - Add 3 ripe mangoes, peeled and diced. - Squeeze in 1/2 cup of fresh lime juice. - Sprinkle in 1/2 teaspoon of chili powder and a pinch of salt. - Blend everything until it is smooth and creamy. - Pour the cooled sugar syrup into the blender with the mango mix. - Blend again until it is fully combined. - Taste it and adjust the chili powder if you want more spice. - Next, pour the mixture into a shallow dish or your sorbet maker. - If using a shallow dish, place it in the freezer. - Stir the mixture every 30 minutes for about 3-4 hours. - This will make it smooth and ready to scoop. - If you use a sorbet maker, follow the instructions that come with it. To get a great texture, you must stir the mixture while it freezes. This step helps break up ice crystals. Stir every 30 minutes for about 3-4 hours. This keeps your sorbet smooth. If you forget to stir, your sorbet may turn icy. Avoiding ice crystals is key. Use a shallow dish for freezing. This allows the mixture to freeze faster and more evenly. If you have a sorbet maker, use it! It can help create a creamier texture. Taste is everything when adding chili powder. Start with a little and adjust to your liking. Remember, you can always add more, but you can't take it out! Balancing sweetness and spiciness is important. The sugar helps tame the heat from the chili. So, if it’s too spicy, add a bit more sugar. Get creative with how you serve your mango chili lime sorbet. You can scoop it into bowls and garnish with fresh mint leaves. This adds color and flavor. You can also serve it in halved mango skins for a fun twist! Pair it with other desserts like brownies or coconut cake. The sorbet's bright flavors can balance rich desserts. You could also serve it with sparkling water or a fruity drink for a refreshing treat! {{image_2}} You can make this sorbet even better by adding other fruits. Pineapple brings a tropical flair. Oranges add brightness and sweetness. You can mix and match to find your favorite blend. Using frozen mangoes is also a great option. They are often picked at peak ripeness. This means they can taste just as good as fresh mangoes. Plus, they can make your sorbet extra cold and refreshing. If you want to change the sweetness, try honey or agave. They add unique flavors and can be healthier options. Just use the same amount as the sugar in the recipe. If you use different natural sweeteners, adjust to taste. Some sweeteners are stronger than sugar. Keep tasting until you get the flavor you love. You can easily make this sorbet vegan. The recipe is already dairy-free, so you are halfway there! Just check your sweetener to ensure it fits your diet. For a low-calorie option, use less sugar or a low-calorie sweetener. This keeps the delicious flavor while making it lighter. Lastly, this recipe is gluten-free. All the ingredients are safe for those avoiding gluten. Enjoy this treat without worry! To keep your mango chili lime sorbet fresh, store it in the freezer. This helps maintain its firmness. Use an airtight container or a shallow dish. These options prevent ice crystals from forming, keeping the texture smooth. You can also wrap the dish tightly with plastic wrap. This extra layer keeps air out and helps with storage. For the best taste, consume your sorbet within one month. After this time, it can lose flavor and texture. Look for signs of spoilage, like ice crystals on the surface or a change in color. If it smells off or has a grainy texture, it’s time to toss it. Yes, you can refreeze sorbet. If it becomes too hard, let it sit at room temperature for a few minutes. This softens it up. You can also stir it gently to break up any ice crystals. This way, you restore some of the creamy texture you love. Mango chili lime sorbet is a frozen treat. It combines ripe mangoes, fresh lime juice, and a hint of chili. The sorbet has a sweet and tangy flavor. The chili powder adds a spicy kick. This dessert is smooth and refreshing, perfect for hot days. Yes, you can make sorbet without a blender. You can mash the mangoes with a fork. Then mix in lime juice, sugar, and chili powder by hand. Use a whisk to combine well. This method takes longer but still works. You can find mango chili lime sorbet at many local shops. Look in ice cream parlors or specialty grocery stores. Some supermarkets may carry it in the frozen aisle. If you prefer online shopping, check delivery services or gourmet food websites. Mango chili lime sorbet can be a healthy treat. Mangoes are rich in vitamins A and C. Lime juice adds more vitamin C and can aid digestion. The sweetness comes from sugar, so adjust it to your taste. Enjoy this sorbet in moderation for a balanced diet. Mango chili lime sorbet is refreshing and fun to make. You now know the key ingredients, step-by-step instructions, and helpful tips for the best texture. Remember to adjust spice to your liking and try fun variations. This sorbet is perfect for hot days or gatherings. With simple storage tips, you can keep it fresh and tasty. Get creative with serving ideas to impress everyone. Enjoy making and sharing this delicious treat!

Mango Chili Lime Sorbet Refreshing and Zesty Delight

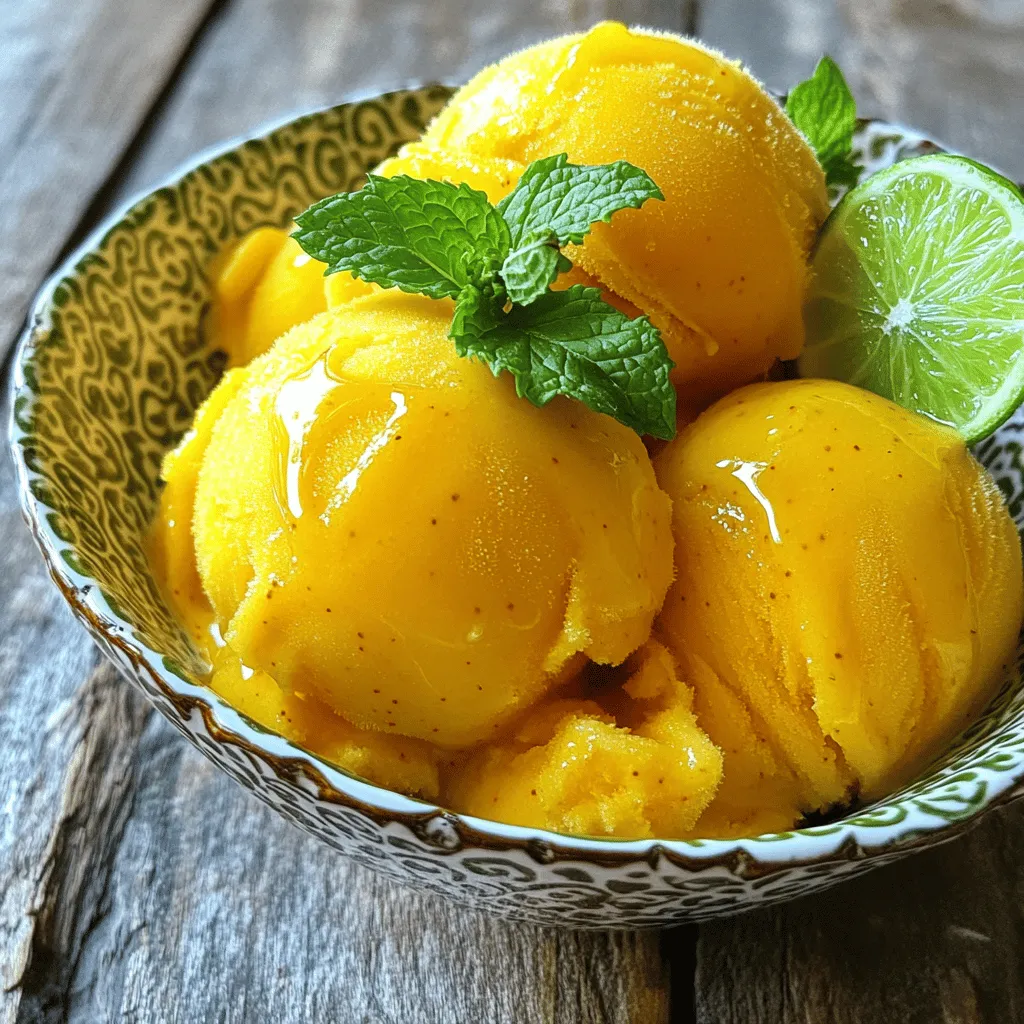
Looking for a sweet and zesty treat? Mango Chili Lime Sorbet is your answer! This refreshing dessert combines ripe mangoes

- 1 pound fresh green beans - 2 tablespoons soy sauce - 1 tablespoon fresh ginger, grated - 2 cloves garlic, minced - 1 tablespoon sesame oil - 1 tablespoon honey or maple syrup - 1 tablespoon rice vinegar - 1 tablespoon sesame seeds (for garnish) - Salt and pepper to taste - Optional: 1 teaspoon red pepper flakes (for heat) I love using fresh green beans for this dish. They bring a nice crunch and vibrant color. For the glaze, I use soy sauce, which adds a salty depth. Fresh ginger gives warmth and spice. Garlic adds a punch of flavor. Sesame oil is rich and nutty, enhancing the dish. Honey or maple syrup adds a touch of sweetness. Rice vinegar brightens everything up. I sprinkle sesame seeds on top for a nice crunch. If you want some heat, add red pepper flakes. You can adjust each ingredient to suit your taste. Each one plays a role in making these green beans shine. Start by bringing a large pot of salted water to a boil. This step is key. The salt helps flavor the beans. Once the water boils, add 1 pound of trimmed green beans. Blanch them for about 3-4 minutes. You want them bright green and a bit tender, but still crisp. Drain the beans and quickly transfer them to a bowl of ice water. This stops the cooking. After a few minutes in the ice water, drain them again and set aside. In a small bowl, whisk together the glaze ingredients. Combine 2 tablespoons of soy sauce, 1 tablespoon of grated ginger, and 2 minced garlic cloves. Add 1 tablespoon of sesame oil for richness. For sweetness, mix in either 1 tablespoon of honey or maple syrup. Finish with 1 tablespoon of rice vinegar for a nice zing. If you like heat, add 1 teaspoon of red pepper flakes. This glaze will bring great flavor to your beans. In a large skillet, heat a splash of sesame oil over medium heat. Once hot, add the blanched green beans. Sauté them for about 2-3 minutes until they are heated through. Then, pour the ginger soy glaze over the green beans. Toss to coat them evenly. Let the mixture cook for another 2-3 minutes. This allows the glaze to thicken and coat the beans nicely. Finally, season with salt and pepper to taste. Enjoy your delicious green beans! To make the green beans just right, watch your cooking time. Sauté them for only 2-3 minutes after blanching. This keeps them crisp and fresh. For the best texture, use medium heat. High heat can burn them. Stir often to coat each bean in the glaze. This helps them stay crunchy and bright. If you want a different flavor, try these swaps. Instead of soy sauce, use tamari for a gluten-free option. You can also use coconut aminos for a sweeter taste. For those with dietary needs, replace honey with maple syrup for vegan-friendly sweetness. If garlic isn’t your thing, skip it or use shallots instead. These green beans pair well with many main dishes. Try them with grilled chicken or salmon for a tasty meal. They also match nicely with rice or quinoa. For special occasions, plate the beans in a beautiful dish. Top with extra sesame seeds for a nice touch. You can also add a squeeze of lemon for brightness. {{image_2}} You can make Ginger Soy Glazed Green Beans even better by adding protein. Chicken works great here. Simply grill or sauté diced chicken. Stir it into the green beans when you add the glaze. Tofu is another option. Press it, cut it, and pan-fry until golden. This gives a nice texture and flavor. Toss in the tofu with the green beans for a tasty mix. Want more heat? You can adjust the spice in this dish easily. Try using different types of peppers. For mild heat, add a few slices of jalapeño. For more kick, use serrano peppers. If you like it really spicy, add more red pepper flakes. Just remember to start small and taste as you go. This way, you control the heat just right for your taste. This dish can easily become plant-based. Simply skip the honey and use maple syrup instead. This keeps the sweetness while making it vegan. If you add tofu, it gives the dish a protein boost. You can also mix in other veggies. Try adding bell peppers or carrots for color and crunch. This way, you can enjoy a delicious, colorful meal that fits any diet. To store leftovers, place the green beans in an airtight container. This keeps them fresh. You can also use plastic wrap over a plate. In the fridge, they last about three to four days. The beans may lose some crunch but will still taste good. To freeze green beans, start by blanching them as you did before. After cooling, drain well and spread them on a baking sheet. Freeze them for about two hours. Once frozen, transfer beans to a freezer bag. Remove as much air as possible. They can last up to three months in the freezer. When you thaw them, the texture may change. They might become softer. However, they will still have great flavor. Use them in stir-fries or soups for the best results. Blanching time is key. For softer beans, blanch them for 5-6 minutes instead of 3-4. This gives them time to cook through. After blanching, cool the beans in ice water to stop cooking. This helps keep their bright color while softening them just right. Yes, you can use frozen beans! Just skip the blanching step. Instead, heat the frozen beans in the skillet with sesame oil. Cook them for 5-7 minutes until they are hot. Then, add the glaze and mix well. Frozen beans tend to be softer, so keep an eye on them. These green beans match well with many meals. Try serving them with grilled chicken or fish for a fresh twist. They also go great with rice dishes or stir-fries. Add them to your next Asian-inspired meal for a tasty side! The blog post guides you through making Ginger Soy Glazed Green Beans. We discussed ingredients, from fresh green beans to flavorful glazes. You learned step-by-step cooking methods, including preparation, sautéing, and tips for perfecting your dish. In the end, this recipe is versatile, offering options for spice levels and dietary needs. Whether you enjoy them alone or as a side, these beans are simple yet impactful. You can master this dish and impress your family or guests with ease. Enjoy your cooking!

Ginger Soy Glazed Green Beans Delightful Side Dish

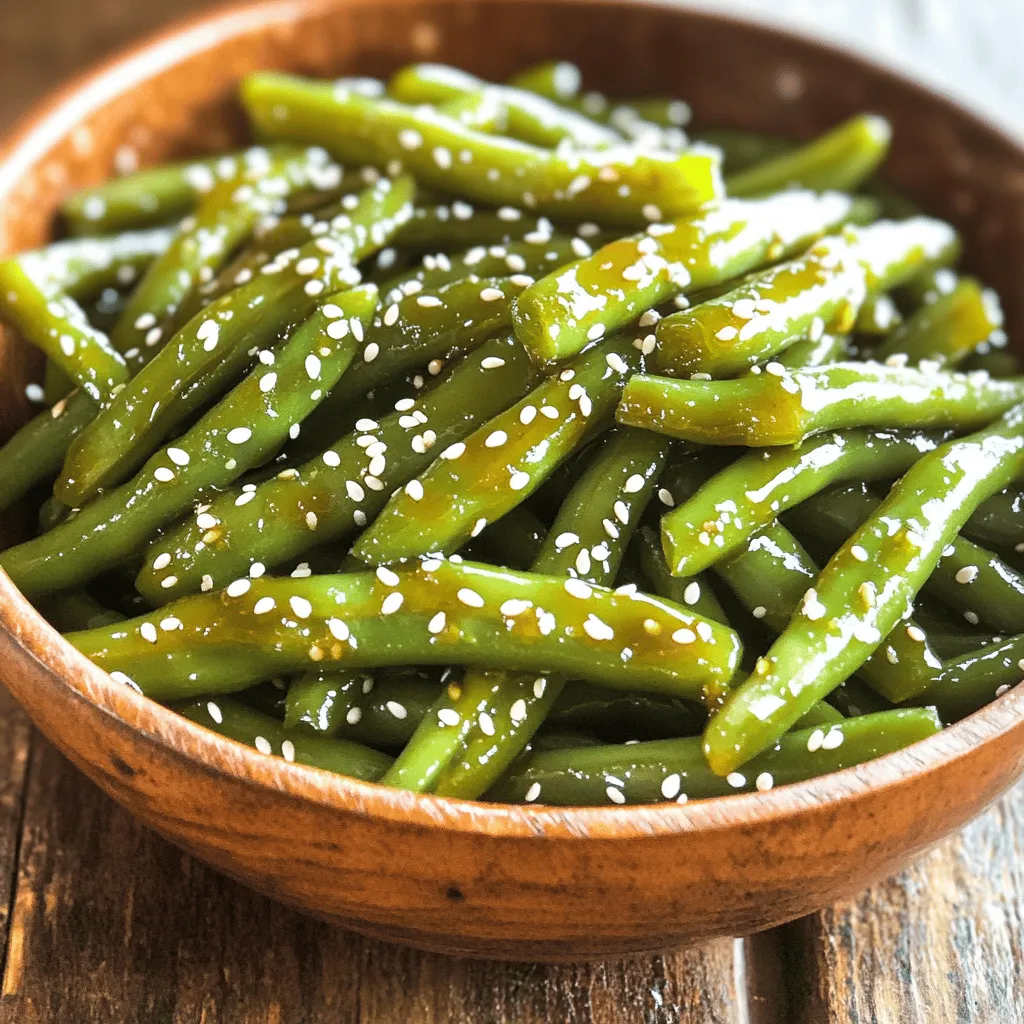
Looking for a fresh and easy side dish? Ginger Soy Glazed Green Beans are your answer! This vibrant recipe pairs

To make delightful cranberry orange scones, gather these simple ingredients: - 2 cups all-purpose flour - 1/3 cup granulated sugar - 1 tablespoon baking powder - 1/2 teaspoon salt - 1/4 cup unsalted butter, cold and cubed - 1/2 cup fresh cranberries, roughly chopped - Zest of 1 large orange - 1/2 cup heavy cream - 1 large egg - 1 teaspoon vanilla extract - Extra sugar for sprinkling Each ingredient plays a key role in the final taste. The all-purpose flour gives structure, while granulated sugar adds sweetness. Baking powder helps the scones rise, and salt balances the flavor. Using cold butter is crucial. It creates flaky layers in the scone. Fresh cranberries add bursts of tartness. The orange zest brightens the flavor, making every bite refreshing. Heavy cream provides richness, while the egg adds moisture and helps bind everything together. Finally, the vanilla extract enhances the overall flavor. The extra sugar on top adds a delightful crunch. With these ingredients ready, you’re all set to bake a batch of tasty scones! Start by preheating your oven to 400°F (200°C). This ensures your scones bake evenly. Next, line a baking sheet with parchment paper. This helps the scones not stick and makes cleanup easy. In a large bowl, combine the dry ingredients. Add 2 cups of all-purpose flour, 1/3 cup of granulated sugar, 1 tablespoon of baking powder, and 1/2 teaspoon of salt. Use a whisk to mix them well. This step is key for even flavor. Now it's time to add the butter. Take 1/4 cup of unsalted butter, cold and cubed, and add it to the dry mix. Use a pastry cutter or your fingers to cut the butter into the flour. You want it to look like coarse crumbs. This helps make your scones flaky. Next, mix in the cranberries and orange zest. You need 1/2 cup of fresh cranberries, roughly chopped, and the zest of 1 large orange. Stir well to ensure they are evenly spread through the mix. This adds a bright, fresh taste. In a separate bowl, whisk together the wet ingredients. Use 1/2 cup of heavy cream, 1 large egg, and 1 teaspoon of vanilla extract. Pour this mix into the dry ingredients. Stir gently until just combined. Don't overmix; the dough will be slightly sticky. Turn the dough out onto a lightly floured surface. Knead it gently a few times until it comes together. Pat the dough into a circle about 1-inch thick. This shape helps the scones rise nicely. Cut the circle into 8 wedges and place them on the prepared baking sheet. For a sweet touch, sprinkle some extra sugar on top of each scone. Bake them for 15-20 minutes. They should be golden brown and fully cooked. Let them cool slightly before moving them to a wire rack. Enjoy your warm, tasty scones! Cold butter is key to great scones. When you use cold butter, it helps create a flaky texture. This happens because the butter melts in the oven, leaving small pockets of air. These pockets make the scones rise and become light. To get cold butter, keep it in the fridge until you are ready to use it. Cut it into small cubes before mixing it with the flour. This way, you will have the best texture. Fresh cranberries bring a bright, tart taste to your scones. They burst while baking, releasing their juices. This adds a lovely flavor. Dried cranberries are sweeter and do not provide the same freshness. If you prefer a sweeter scone, you can use dried cranberries. Just remember, fresh ones will give you the best taste. The right tools make baking easier. A pastry cutter helps you mix butter and flour well. A large mixing bowl is great for combining ingredients. Use a baking sheet lined with parchment paper to prevent sticking. An oven thermometer ensures your oven is at the right temperature. This helps the scones bake evenly. With the right tools, you will make perfect cranberry orange scones every time. {{image_2}} You can make these scones gluten-free with simple swaps. Use gluten-free all-purpose flour. This flour blends well and keeps the taste great. You can also add a bit of xanthan gum. This helps mimic the texture of regular flour. Making these scones vegan is easy. Replace the butter with coconut oil or vegan butter. For the egg, use a flax egg. Mix one tablespoon of flaxseed meal with three tablespoons of water. Let it sit until thickened. Use this in place of the egg for binding. Want to add more flavor? Consider adding chopped nuts like walnuts or pecans. You can also mix in some chocolate chips for a sweet twist. For a warm spice, try adding cinnamon or nutmeg. Each of these options brings something new and exciting to your scones. Store your scones at room temperature for up to two days. Place them in an airtight container to keep them fresh. Avoid stacking the scones; this prevents them from getting soggy. A paper towel inside the container can help absorb moisture. For longer storage, freeze the scones. First, let them cool completely after baking. Then, wrap each scone in plastic wrap. Place the wrapped scones in a freezer bag or container. They can last for up to three months in the freezer. To enjoy your scones warm, preheat your oven to 350°F (175°C). Place the scones on a baking sheet and heat for about 5 to 10 minutes. This method keeps them crisp on the outside and warm inside. You can also microwave a scone for about 15 to 20 seconds, but it may lose some crispness. How do I make scones lighter and fluffier? To make scones lighter, use cold butter. This helps create air pockets. Also, avoid overmixing the dough. Mixing just until combined keeps the scones fluffy. Can I use frozen cranberries in the recipe? Yes, you can use frozen cranberries. Just chop them while frozen. They may add a bit of moisture, so adjust the flour slightly if needed. Frozen cranberries work well and keep the scones fresh. What’s the best way to serve cranberry orange scones? Serve cranberry orange scones warm. They are great plain or with butter. You can also enjoy them with jam or cream. Pair with tea or coffee for a delightful treat. You now have a clear path to make delicious cranberry orange scones. I detailed essential ingredients, step-by-step instructions, and valuable tips. Remember to use cold butter for the best texture and fresh cranberries for great flavor. Don't hesitate to try gluten-free or vegan variations. Store them properly to keep them fresh and tasty. With practice, you can perfect this recipe. Enjoy the baking process and the delightful results awaiting you!

Cranberry Orange Scones Delightful and Easy Recipe

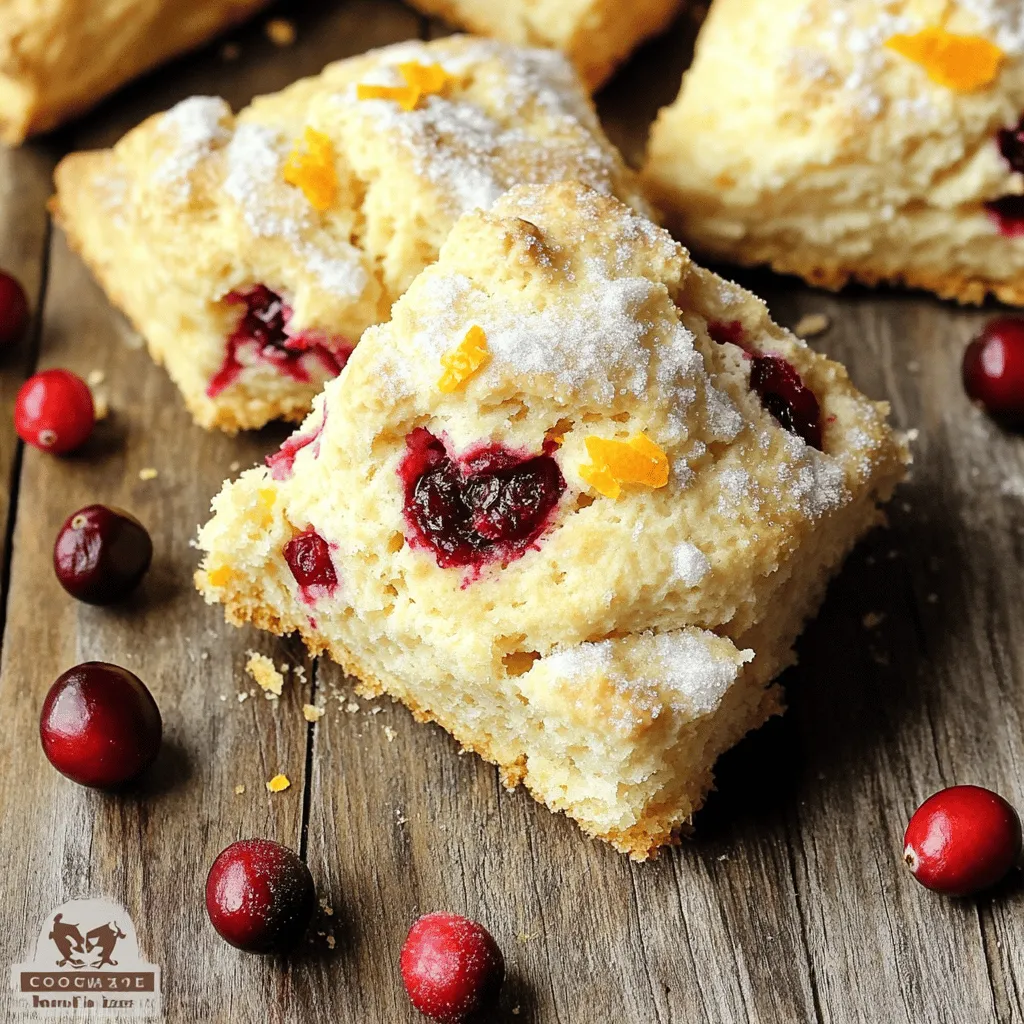
Cranberry orange scones are a sweet and tangy treat perfect for any time of day. You can bake these fluffy

- 4 medium zucchinis - 2 cups cooked chicken, shredded - 1/2 cup buffalo sauce - 1/2 cup cream cheese, softened - 1/2 cup shredded cheddar cheese - 1/4 cup green onions, chopped - 1/2 teaspoon garlic powder - Salt and pepper to taste - Olive oil for drizzling Buffalo Chicken Stuffed Zucchini Boats are a fun twist on a classic dish. The zucchinis act as the perfect vessel for the flavorful filling. You can easily find all the ingredients at your local grocery store. Zucchini is key. Choose medium-sized zucchinis that feel firm and heavy. They should have smooth skin and no blemishes. For the chicken, I like using rotisserie chicken. It saves time and adds great flavor. If you have leftover grilled chicken, that works well too. Buffalo sauce brings the heat! You can adjust the amount based on your spice level. Cream cheese adds a rich, creamy texture. It balances the heat from the buffalo sauce. Don’t forget the cheddar cheese! It melts beautifully and adds a nice flavor. Green onions give a fresh touch. They brighten up the dish with their crunch. Garlic powder enhances the flavor without overpowering. A pinch of salt and pepper brings everything together. Finally, a drizzle of olive oil helps the zucchini roast nicely. Gather these ingredients and get ready to make a savory delight that everyone will love! 1. Preheat your oven to 375°F (190°C). This makes sure the zucchini cooks well. 2. Slice the zucchinis in half lengthwise. Use a spoon to scoop out the seeds, creating boat-like shapes. This gives you room for the filling. 1. In a bowl, combine the shredded chicken, buffalo sauce, and cream cheese. 2. Add in half of the cheddar cheese, garlic powder, and chopped green onions. 3. Mix until all ingredients are well blended. This creates a tasty and creamy filling. 1. Fill each zucchini boat with the buffalo chicken mixture. Pack it in generously. 2. Top each boat with the remaining cheddar cheese. This adds a nice cheesy crust. 3. Place the filled zucchinis on a baking sheet. Bake for 25-30 minutes. You want the zucchini to be soft and the cheese to bubble and brown. 4. Once done, remove from the oven. Let them cool for a few minutes before serving. This makes them easier to handle. To make your buffalo chicken stuffed zucchini boats perfect, follow these tips. First, set your oven to 375°F (190°C). This heat helps the zucchini cook nicely while the cheese melts. Bake them for 25 to 30 minutes. You want the zucchini to be tender and the cheese golden. When choosing zucchinis, look for ones that are firm and shiny. They should feel heavy for their size. Avoid zucchinis with soft spots or blemishes. Fresh zucchinis will give you the best flavor and texture. To add extra flavor, serve your zucchini boats with ranch or blue cheese dressing. These creamy dips pair perfectly with the spicy buffalo chicken. They help cool the heat while adding richness. For a bright touch, garnish your boats with chopped green onions. A drizzle of buffalo sauce on top creates a great look and adds more flavor. Serve these boats on a nice platter for a fun meal! {{image_2}} You can easily change the protein in this dish. Try using turkey instead of chicken for a lighter option. If you prefer a plant-based twist, tofu works well too. Just make sure to cube it and mix it with the same ingredients. Cheese is another area where you can get creative. Instead of cheddar, use mozzarella for a milder taste. Feta cheese can add a tangy twist. Mixing different cheeses gives each bite a unique flavor. If you need a gluten-free option, check your buffalo sauce. Some brands contain gluten. Look for sauces labeled gluten-free. They taste just as good and keep your dish safe. For a vegan version, swap out the cream cheese for a plant-based alternative. You can also replace chicken with chickpeas or lentils. This keeps the texture while making it friendly for all diets. After making buffalo chicken stuffed zucchini boats, store any leftovers in the fridge. Use an airtight container to keep them fresh. They will stay good for up to three days. For best taste, eat them within this time. If you want to store them longer, freezing is a great option. To freeze, wrap each stuffed zucchini boat tightly in plastic wrap. Then, place them in a freezer-safe bag or container. Label it with the date. You can freeze them for up to three months. Just remember, the texture may change a bit after freezing. When it's time to enjoy your leftovers, reheating methods can vary. If you use a microwave, place one or two boats on a plate. Heat them for about 1-2 minutes. Check to see if they are warm all the way through. For a crispier texture, use the oven. Preheat your oven to 350°F (175°C). Place the zucchini boats on a baking sheet and cover them with foil. Heat for about 10-15 minutes. This method helps keep the cheese bubbly and the zucchini tender. Choose the method you like best! Can you use raw chicken in stuffed zucchini boats? No, you should not use raw chicken. Always use cooked chicken for safety. Raw chicken can make you very sick. Cooked chicken adds flavor and keeps the dish safe to eat. For best results, shred rotisserie chicken or use leftover chicken. How do I know when the zucchini is fully cooked? You can tell zucchini is done when it is tender. Use a fork to poke the zucchini. If it goes through easily, it’s ready. The cheese on top should be bubbly and golden. This means the dish is hot and ready to eat. What can I substitute for buffalo sauce? You can use BBQ sauce or hot sauce if you like. For a milder flavor, try a ranch dressing. Mix it with some hot sauce to get a nice kick. Experiment with flavors to see what you love. This post covers a tasty buffalo chicken stuffed zucchini recipe. You learned about the ingredients, step-by-step instructions, tips, and storage methods. You can use different proteins and cheeses to make it your own. Don't forget to try various sauces and garnishes for extra flavor. These stuffed zucchinis are fun to make and great for meals. Now, grab your ingredients and start cooking this delicious dish! Enjoy your cooking adventure!

Buffalo Chicken Stuffed Zucchini Boats Savory Delight

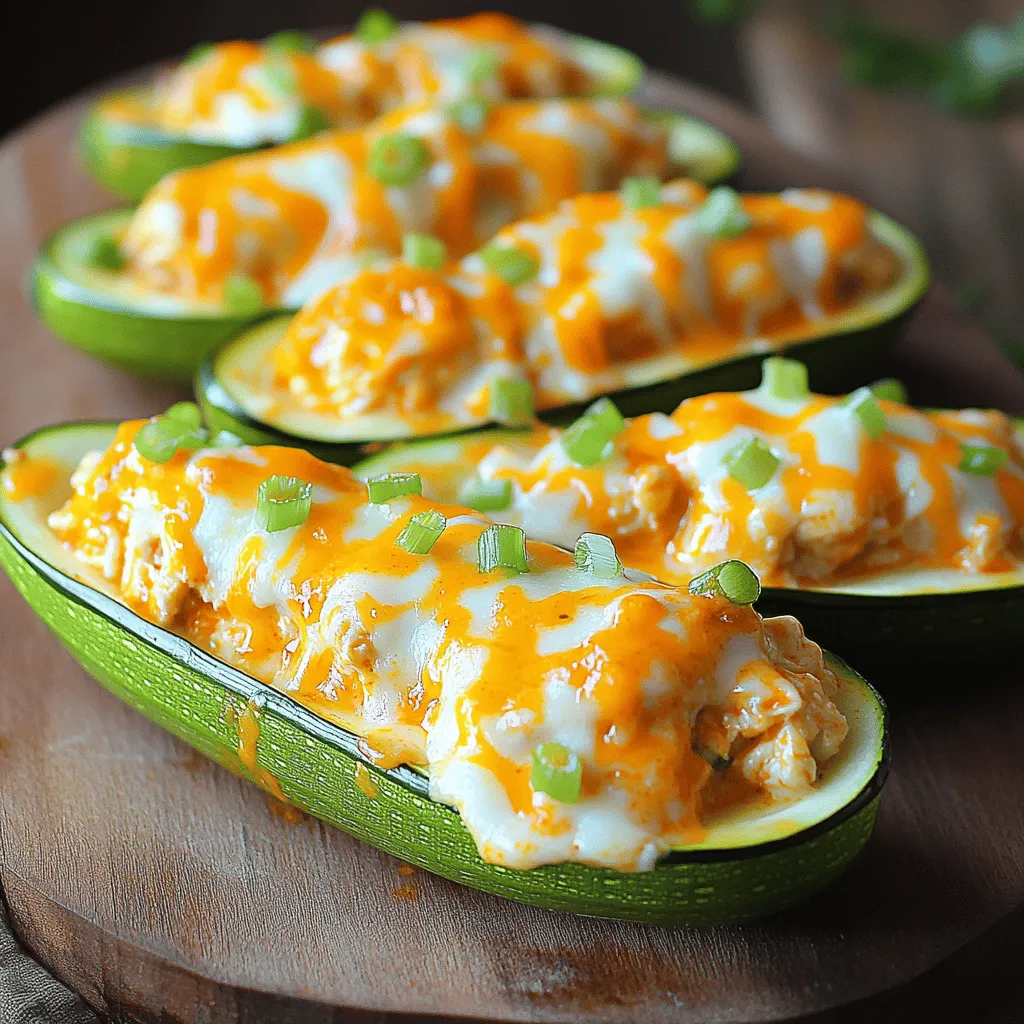
Craving a tasty yet healthy meal? Try my Buffalo Chicken Stuffed Zucchini Boats! Packed with shredded chicken and zesty buffalo

- 8 oz linguine pasta - 1 lb shrimp, peeled and deveined - 4 cloves garlic, minced - 1 lemon (juice and zest) Linguine pasta makes a great base for this dish. It holds the sauce and flavors well. Shrimp adds a tender, sweet touch. I love using fresh shrimp for the best taste. Garlic gives a strong, aromatic flavor that pairs perfectly with lemon. The lemon juice and zest bring brightness and a zesty kick. - 3 tablespoons olive oil - 1 teaspoon red pepper flakes (adjust for spice level) - 1/2 cup cherry tomatoes, halved - 1/4 cup fresh parsley, chopped Olive oil is key for sautéing the garlic and shrimp. It adds richness and depth. Red pepper flakes give this dish the heat. You can adjust the amount to your taste. Cherry tomatoes add sweetness and color. Fresh parsley adds a pop of green and freshness. - Salt and pepper - Grated Parmesan cheese for serving (optional) Salt and pepper enhance all the flavors in this meal. Grated Parmesan cheese is a great touch but is optional. It adds creaminess and a savory finish. This dish tastes best when served fresh and hot right away. First, fill a large pot with water and add salt. Bring the salted water to a boil. This step helps the pasta gain flavor. Once the water boils, add the linguine. Cook it according to the package directions until it is al dente, which means it should be firm but not hard. This usually takes about 8 to 10 minutes. After cooking, drain the linguine and set it aside. Be sure to save about half a cup of the pasta water for later. Next, heat three tablespoons of olive oil in a large skillet over medium heat. Wait until the oil is hot. Then, add four minced garlic cloves and one teaspoon of red pepper flakes. Stir this mixture for about 30 seconds. You want to cook it just until it smells amazing. This brings out the flavor of the garlic and spice. Now, it’s time to add the shrimp. Place one pound of peeled and deveined shrimp into the skillet. Season the shrimp with salt and pepper to taste. Cook the shrimp for about 2 to 3 minutes on each side. They should turn pink and opaque when done. After that, toss in a half cup of halved cherry tomatoes. Squeeze the juice of one lemon over the shrimp and add the lemon zest. Cook everything together for another 2 minutes. This helps the flavors blend well. Add the drained linguine to the skillet with the shrimp mixture. Toss everything together until the pasta is fully coated. If it seems too dry, slowly add some of the reserved pasta water. This will help achieve the creaminess you want. Mix until everything is well combined. Finally, take the skillet off the heat. Stir in a quarter cup of chopped fresh parsley. This adds a nice pop of color and flavor. Serve your lemon garlic shrimp linguine right away. If you like, sprinkle grated Parmesan cheese on top for extra flavor. Enjoy your meal! To get tender shrimp, cook them for just 2-3 minutes on each side. They should turn pink and opaque. Overcooking makes shrimp tough. Season the shrimp with salt and pepper before cooking. This step is key for great taste. Use the reserved pasta water to add creaminess. Start with a little and stir until you reach the right texture. If you want a richer sauce, try adding a splash of heavy cream. This can make your dish even more delicious. Fresh herbs, like parsley, add bright taste. Dried herbs work, too, but fresh is best. If you like heat, add more red pepper flakes. Adjust the spice to your taste. {{image_2}} You can switch up the shrimp in this dish. Chicken or scallops work well. Cook the chicken until it is fully done. For scallops, sear them until golden brown and firm. If you want a vegetarian option, try mushrooms or tofu. Both absorb flavors nicely and give a great texture. Adding veggies can boost the dish's nutrition. Spinach adds color and nutrients. Stir it in at the end to keep it bright and fresh. Asparagus is another great choice. Cut it into pieces and sauté it with garlic. You can also use seasonal veggies like bell peppers or zucchini for a fun twist. You can play with flavors to make this dish unique. Try using lime instead of lemon for a zesty change. The taste shifts but keeps it fresh. Adding a splash of white wine to the shrimp can deepen the flavors. The wine helps blend everything together and adds richness. To keep your Lemon Garlic Shrimp Linguine fresh, store leftovers in the fridge. Use an airtight container for best results. This dish stays good for up to three days. Make sure to cool the pasta down before sealing it away. When it’s time to reheat, use a skillet on low heat. Add a splash of olive oil or reserved pasta water. This helps bring back the flavor and moisture. Stir gently to keep the shrimp tender. Avoid using a microwave, as it can make the shrimp rubbery. You can freeze Lemon Garlic Shrimp Linguine, but it might change in texture. To freeze, let it cool completely. Then, place it in a freezer-safe container. Make sure to label it with the date. To thaw, leave it in the fridge overnight, then reheat on the stove. This keeps the flavors fresh, and the dish will still taste good. You want to look for a few signs. Cooked shrimp turn pink and opaque. The flesh should also feel firm. If the shrimp curl into a tight "C" shape, that's a good sign. Overcooked shrimp can become rubbery, so keep an eye on them. Yes, you can prep this dish ahead. Cook the shrimp and pasta but keep them separate. Store each in the fridge. When ready to eat, just reheat them in a skillet with a bit of olive oil. Add the lemon juice and parsley before serving. If you want a change, try spaghetti or fettuccine. Penne or fusilli work well too. You can even use zucchini noodles for a low-carb option. Just adjust cooking time based on the pasta you choose. Use gluten-free pasta made from rice or chickpeas. Many brands offer great options. Just follow the cooking instructions on the package. This way, you can still enjoy the flavors without the gluten. Absolutely! This dish works well for meal prep. Cook everything and pack it in containers. Keep the pasta and shrimp mixed or separate, depending on your taste. This makes for quick meals during a busy week. This recipe combines fresh shrimp with tasty ingredients like garlic and lemon. You learned how to cook linguine, sauté shrimp, and create a delicious sauce. You also discovered tips for perfecting the dish and making it creamy. Feel free to switch proteins or add seasonal veggies. Store your leftovers properly and enjoy them later. This meal is simple, tasty, and perfect for any occasion. So, gather your ingredients and get cooking. Enjoy the burst of flavors and the joy of sharing this dish with others!

Lemon Garlic Shrimp Linguine Flavorful Dinner Dish

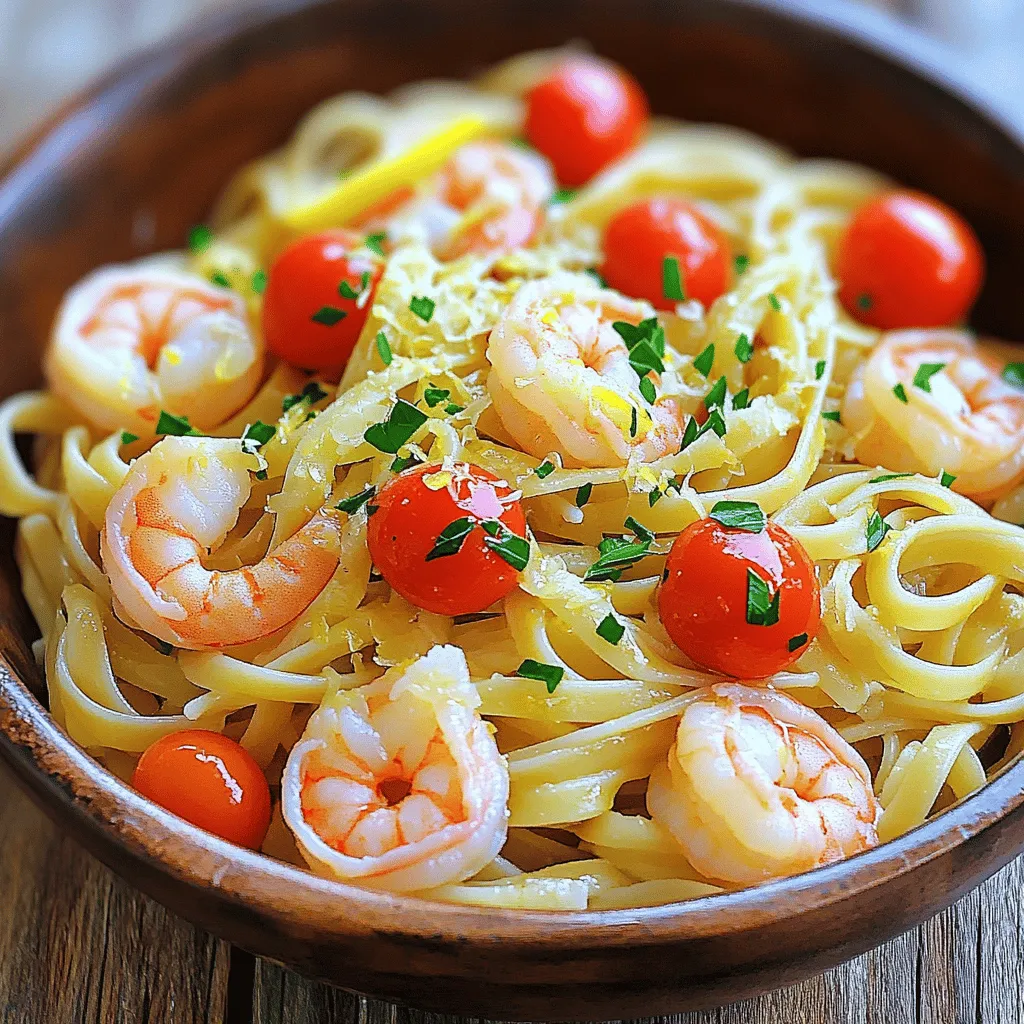
Looking for a quick and tasty dinner idea? Lemon Garlic Shrimp Linguine packs a zesty punch that will impress your

To make a delightful Cinnamon Swirl Coffee Cake, gather these simple ingredients: - 2 cups all-purpose flour - 1 ½ teaspoons baking powder - 1 teaspoon baking soda - ½ teaspoon salt - ½ cup unsalted butter, softened - 1 cup granulated sugar - 2 large eggs - 1 teaspoon vanilla extract - 1 cup sour cream - ½ cup packed brown sugar - 2 teaspoons ground cinnamon - ½ cup chopped walnuts (optional) - Powdered sugar for dusting Each ingredient plays an important role in making the cake soft and tasty. The all-purpose flour gives the cake its structure. Baking powder and baking soda help it rise. Salt enhances the flavor. Softened butter and granulated sugar create a rich and sweet base. The eggs help bind everything together, while the vanilla extract adds a warm note. Sour cream adds moisture, which keeps the cake tender. Brown sugar and ground cinnamon create the sweet, spicy swirl that makes this cake special. If you like a little crunch, add chopped walnuts. Finally, a dusting of powdered sugar gives a beautiful finish. With these ingredients, you’re ready to bake an amazing coffee cake that will impress everyone. - Preheat the oven to 350°F (175°C). - Prepare a 9-inch round cake pan by greasing and flouring it. - In a mixing bowl, combine 2 cups of all-purpose flour, 1 ½ teaspoons of baking powder, 1 teaspoon of baking soda, and ½ teaspoon of salt. Mix well and set aside. - In a large bowl, cream together ½ cup of softened unsalted butter and 1 cup of granulated sugar until it looks light and fluffy. - Add 2 large eggs, one at a time. Mix in 1 teaspoon of vanilla extract and 1 cup of sour cream until it is smooth. - Gradually mix the dry ingredients into the wet mixture. Stir until just combined. Do not overmix. - In a small bowl, prepare the cinnamon filling by combining ½ cup of packed brown sugar, 2 teaspoons of ground cinnamon, and ½ cup of chopped walnuts if you want. - Pour half the batter into the prepared cake pan. Smooth it out evenly. - Sprinkle half of the cinnamon mixture over the batter. - Add the rest of the batter on top and smooth it gently. - Finally, sprinkle the remaining cinnamon mixture on top. - Take a knife or skewer and swirl the cinnamon mixture into the batter. Be careful not to swirl too much. - Bake the cake in the preheated oven for 35-40 minutes. A toothpick inserted should come out clean. - Let the cake cool in the pan for about 10 minutes. - Carefully transfer it to a wire rack to cool completely. - Dust the top with powdered sugar before serving. To make the best swirl, use a knife or skewer. After layering the batter and cinnamon mix, gently drag the knife in a figure-eight motion. This will create beautiful swirls. Be careful not to overdo it. You want a nice marbled look, not a mixed batter. For a moist cake, use room-temperature butter and eggs. This helps the cake mix well. Also, sour cream adds moisture and richness. If you want an even richer taste, try using yogurt instead of sour cream. It works great! Cinnamon swirl coffee cake pairs well with coffee or tea. The warm spices blend nicely with a hot drink. You can also add a side of fresh fruit. Berries or sliced apples add freshness to each bite. Dust the top with powdered sugar for a sweet finish. {{image_2}} If you want a nut-free cake, you can easily swap the walnuts. Try using sunflower seeds or pumpkin seeds instead. These seeds add a nice crunch without the nut allergy risk. You can also skip them altogether for a smooth texture. To make this cake even better, think about adding chocolate or vanilla. For a chocolate twist, mix in chocolate chips. They melt and add a rich flavor. If you prefer vanilla, add an extra teaspoon of vanilla extract. This gives a nice depth to the cake. For a gluten-free version, use gluten-free flour blends. Look for ones that include xanthan gum. This helps mimic the texture of regular flour. Almond flour is another option, but mix it with coconut flour for balance. This keeps the cake light and fluffy. To keep your Cinnamon Swirl Coffee Cake fresh, follow these steps. First, let the cake cool down fully. Once cool, wrap it tightly in plastic wrap. You can also use an airtight container for extra protection. This will help keep moisture in and prevent it from drying out. Store it at room temperature for up to 3 days. If you want to keep it longer, consider freezing. Freezing your cake is easy and keeps it tasty. First, wrap the cooled cake in plastic wrap. Then, place it in a freezer-safe bag or container. This helps avoid freezer burn. You can freeze the cake for up to 3 months. When you're ready to eat, just remove it from the freezer and let it thaw in the fridge overnight. Reheating your cake is simple. If you want to enjoy it warm, preheat your oven to 350°F (175°C). Place the cake on a baking sheet and cover it with foil. Heat it for about 10-15 minutes. This method keeps the cake moist. You can also microwave a slice for 20-30 seconds. Just be careful not to overheat, as this can dry it out. Enjoy your cake just like fresh! Yes, you can use Greek yogurt. It gives the cake a similar tangy taste. Greek yogurt also adds moisture, making the cake soft. Use the same amount as sour cream in the recipe. You can store the cake for about 3-4 days at room temperature. Keep it in an airtight container to keep it fresh. If you want it to last longer, consider freezing it. If you don’t have baking powder, you can use baking soda instead. For each teaspoon of baking powder, use 1/4 teaspoon of baking soda and add 1/2 teaspoon of vinegar or lemon juice. This will help the cake rise. Yes, many people enjoy this cake for breakfast. It pairs well with coffee or tea. You can also serve it as a snack or dessert. The rich cinnamon flavor makes it perfect for any time of day. This article outlines how to make a delicious Cinnamon Swirl Coffee Cake. We covered essential ingredients, easy steps, and helpful tips. Remember, the secret to a great cake lies in creaming the butter and sugar well. You can enjoy it with coffee or tea, or try fun variations. Proper storage keeps leftovers fresh, so follow the tips given. Now, you have all you need to impress your friends or family with a tasty treat. Enjoy baking and savoring your creation!

Cinnamon Swirl Coffee Cake Delightful and Simple Recipe

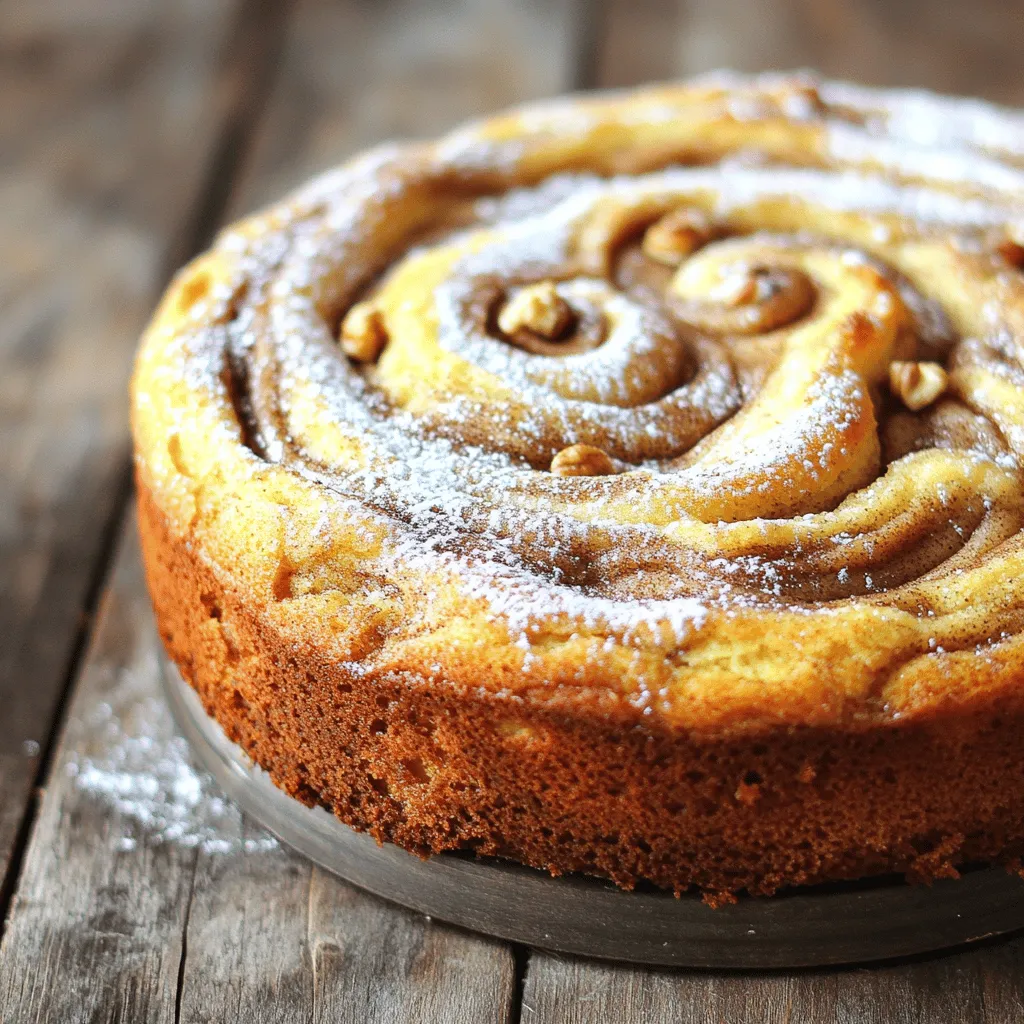
If you love the warm, comforting taste of cinnamon, this Cinnamon Swirl Coffee Cake is for you! This simple recipe

For the Cheesy Taco Pasta Skillet, you need a simple list of ingredients. Here’s what you’ll need: - 8 oz (about 2 cups) elbow macaroni - 1 lb ground beef or turkey - 1 tablespoon taco seasoning - 1 can (15 oz) diced tomatoes with green chilies These ingredients create a tasty meal that’s quick to make. The elbow macaroni gives a nice shape. The ground beef or turkey adds protein. Taco seasoning gives it that zesty kick. The diced tomatoes with green chilies add flavor and a bit of heat. Make sure to gather everything before you start cooking. This helps keep things organized and fun. Enjoy the process as you bring these ingredients together! 1. Heating olive oil and sautéing vegetables Start by heating 2 tablespoons of olive oil in a large skillet over medium heat. Add 1 diced onion and 1 diced bell pepper to the pan. Sauté them for about 3 to 4 minutes. You want them to soften and get fragrant. Then, stir in 2 minced garlic cloves. Cook this mixture for another minute until you can smell the garlic. 2. Cooking the meat and adding seasoning Now, add 1 pound of ground beef or turkey to the skillet. Use a spatula to break it apart. Cook until it turns brown and is fully cooked, which takes about 5 to 6 minutes. Next, sprinkle in 1 tablespoon of taco seasoning. Mix it well so the meat is coated in the spices. 3. Combining all ingredients and cooking the pasta Pour in 1 can of diced tomatoes with green chilies, 1 cup of beef or vegetable broth, 1 cup of corn, and 1/2 cup of rinsed black beans. Stir everything together until well combined. Now add 8 ounces of elbow macaroni. Bring the mixture to a simmer, then cover and cook for about 8 to 10 minutes. Stir occasionally until the pasta is tender and most of the liquid is gone. Once done, lower the heat and stir in 1 cup of shredded cheddar cheese. Let it melt and become creamy. Season with salt and pepper to your taste. - How to achieve the best texture for pasta To get the best pasta, cook it until it's al dente. This means it should be firm but not hard. Start with boiling water, then add salt. This adds flavor to the pasta. Stir occasionally to stop it from sticking. Drain the pasta and mix it right into the skillet. This way, it absorbs all the tasty sauce. - Adjusting spice levels with taco seasoning Taco seasoning can be mild or spicy. If you like it mild, use less seasoning. Start with half a tablespoon and taste it. You can always add more later. If you love heat, feel free to add more. You can also add some chili powder or hot sauce for an extra kick. - Using fresh vs. canned ingredients Fresh ingredients often taste better, but canned items can save time. Use fresh bell peppers and onions for crunch and flavor. Canned diced tomatoes add great taste and save prep time. Frozen corn works well, too. It’s sweet and easy to add. Balance fresh and canned to fit your time and taste. {{image_2}} You can change up the recipe to fit your taste. Here are some fun ideas for ingredient swaps: - Substituting proteins: Instead of ground beef or turkey, try chicken or plant-based options like lentils or tofu. These options add new flavors and textures. - Cheese alternatives: If you want a different cheese, go for pepper jack for some heat or mozzarella for a milder taste. Both melt beautifully and enhance the dish. - Adding vegetables: You can boost nutrition by stirring in more veggies. Try adding diced zucchini, fresh spinach, or extra bell peppers. They add color and crunch to your meal. Making these changes lets you create a dish that's perfect for you. Feel free to mix and match based on what you have at home! To keep your Cheesy Taco Pasta Skillet fresh, follow these simple steps. First, let the dish cool to room temperature. This helps prevent moisture buildup, which can make your pasta soggy. - Refrigerating: Place the leftovers in an airtight container. You can refrigerate the pasta for up to three days. This keeps flavors intact and helps maintain texture. - Freezing: If you want to save it for longer, freezing works great. Use a freezer-safe container or a resealable bag. Make sure to remove as much air as possible. Your pasta can stay good in the freezer for up to three months. When it's time to enjoy your leftovers, reheating correctly keeps the dish tasty. You can use a microwave or stovetop. - Microwave: Place a portion in a bowl. Add a splash of water to help steam the pasta. Cover it with a microwave-safe lid. Heat in 30-second bursts, stirring between each. - Stovetop: Warm a skillet over low heat. Add a little broth or water to the pan. Stir the pasta often until heated through. This method helps keep the pasta creamy and flavorful. Following these steps makes sure your Cheesy Taco Pasta Skillet stays delicious for later meals. Enjoy every bite! Yes, you can use gluten-free pasta. It cooks similarly to regular pasta. Just check the package for cooking times. This change keeps the dish tasty and safe for those with gluten issues. To make it vegetarian, swap the ground meat for a plant-based option. You can use lentils, mushrooms, or extra beans. This keeps the dish hearty and flavorful. Add more veggies like zucchini or spinach to enhance the taste. Many sides go well with this dish. Try a fresh green salad for crunch. You can also serve tortilla chips with salsa for a fun dip. Another great option is Mexican-style corn on the cob. These sides add color and flavor to your meal. This blog post shared a simple Cheesy Taco Pasta Skillet recipe. We covered key ingredients like elbow macaroni, ground meat, and taco seasoning. I walked you through easy steps from cooking the meat to combining all the flavors. Remember, cooking can be fun and simple. Don't hesitate to try new ingredients or adjust spices. This dish is versatile and can fit many tastes. Enjoy experimenting with variations and make it your own!

Cheesy Taco Pasta Skillet Quick and Flavorful Meal

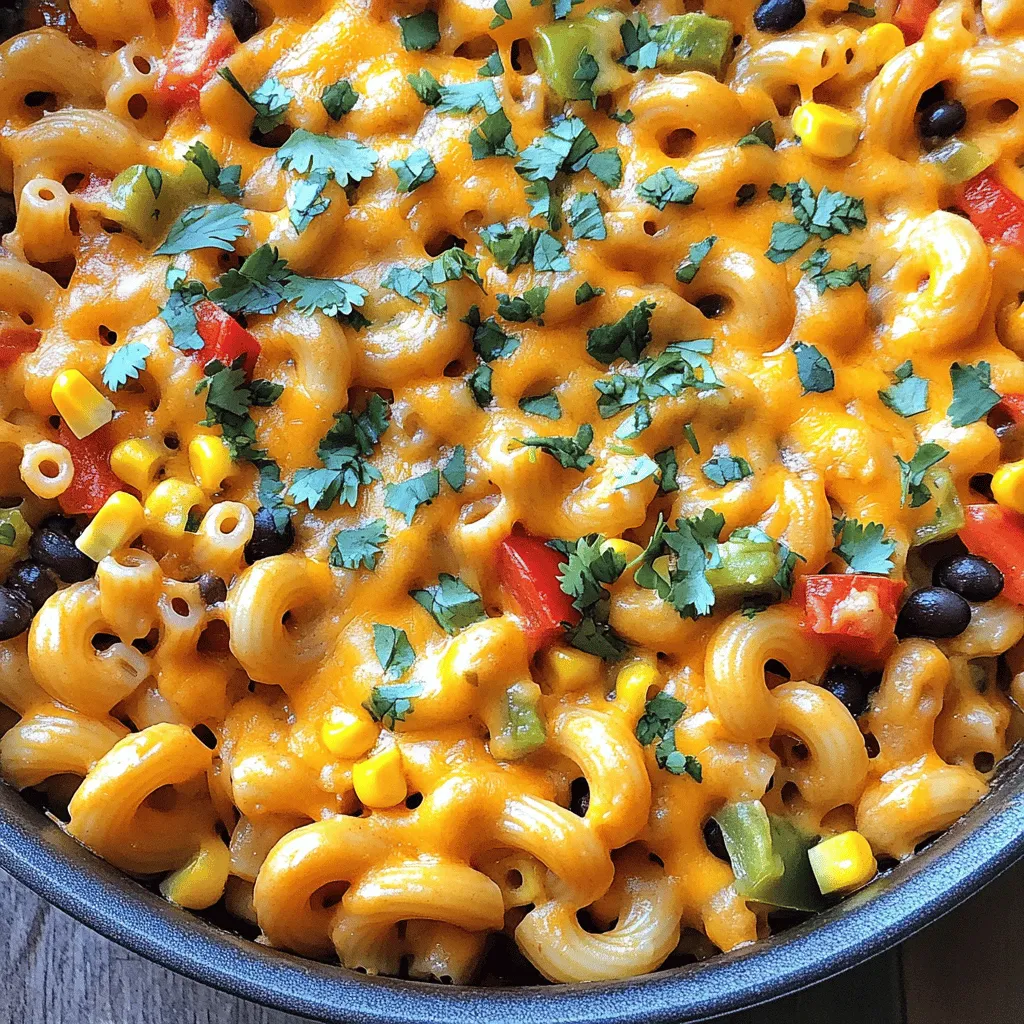
If you’re looking for a quick and tasty dinner, this Cheesy Taco Pasta Skillet is it! With just a few

Older posts
Newer posts
← Previous Page1 … Page32 Page33 Page34 … Page84 Next →

dsad

© 2026 Lisa Dishes • Built with GeneratePress

Our Policies

  • Copyright Policy
  • Cookie Policy
  • GDPR Policy
  • Privacy Policy
  • Disclaimer
  • Terms Of Use

More Information

  • Home
  • About
  • Contact
  • Appetizers
  • Dessert
  • Dinner
  • Drinks
©2026, Lisa Dishes About Back To Top