Skip to content
DisclaimerTerms Of UseGDPR PolicyCookie Policy

Lisa Dishes

  • Home
  • Drinks
  • Appetizers
  • Dinner
  • Dessert
  • About
  • Contact
  • Privacy Policy
DisclaimerTerms Of UseGDPR PolicyCookie Policy

NO-ING-IMG

- 1 banana, frozen - 1 cup almond milk (or any milk of choice) - 3 tablespoons creamy peanut butter - 2 tablespoons cocoa powder - 1 tablespoon honey or maple syrup (optional) - 1/2 cup Greek yogurt (optional for creaminess) - 1/4 cup granola - 2 tablespoons dark chocolate chips - 1 tablespoon crushed peanuts - Fresh banana slices and cocoa nibs for topping You can play with this smoothie bowl. Add your twist! Here are some ideas: - Swap almond milk for oat or coconut milk. - Use crunchy peanut butter for a fun texture. - Try adding a scoop of protein powder for extra energy. - Mix in spinach or kale for a green boost. - Top with fresh berries for added sweetness and color. Each ingredient adds something special. Here’s why they matter: - Banana: Packed with potassium, it helps your heart and muscles. - Almond Milk: Low in calories and rich in vitamins, it’s a smart choice. - Peanut Butter: Full of protein and healthy fats, it keeps you full. - Cocoa Powder: Contains antioxidants that may boost your mood. - Greek Yogurt: Adds probiotics for gut health and extra creaminess. - Granola: Provides fiber and energy to start your day right. - Dark Chocolate: Offers a touch of sweetness and rich flavor while being lower in sugar than milk chocolate. With these ingredients, you get a tasty and healthy bowl! Enjoy the flavors and the nutrition they bring. 1. First, gather your ingredients. You need: - 1 frozen banana - 1 cup almond milk (or any milk of choice) - 3 tablespoons creamy peanut butter - 2 tablespoons cocoa powder - 1 tablespoon honey or maple syrup (optional) - 1/2 cup Greek yogurt (optional for creaminess) - 1/4 cup granola - 2 tablespoons dark chocolate chips - 1 tablespoon crushed peanuts - Fresh banana slices and cocoa nibs for topping 2. In a blender, combine the frozen banana, almond milk, peanut butter, and cocoa powder. If you want sweetness, add honey or maple syrup. 3. Next, if you like creaminess, toss in the Greek yogurt. 4. Blend everything on high until it gets smooth and creamy. If it’s too thick, add more almond milk to reach your desired texture. 5. Pour the smoothie into a bowl. To get the best texture, start with the liquids first. This helps the blender run smoothly. If your blender struggles, stop and mix with a spoon. Blend it again until smooth. For a thicker smoothie, use less almond milk. When serving, make it look pretty! Top the smoothie with: - Granola for crunch - Dark chocolate chips for sweetness - Crushed peanuts for extra flavor Garnish with fresh banana slices and a sprinkle of cocoa nibs. For a fun touch, drizzle extra peanut butter on top. Serve it on a colorful plate for a nice pop! Enjoy your tasty treat! To get the best texture, start with frozen bananas. They add creaminess and chill. Use almond milk, or your favorite milk, to blend. Add it gradually. If you want a thicker bowl, use less milk. For a creamier feel, add Greek yogurt. Blend until smooth. If it’s too thick, add a splash more milk. Toppings make your smoothie bowl fun and tasty. Try using granola for crunch. Dark chocolate chips add sweetness. Crushed peanuts give a nice, nutty flavor. Fresh banana slices look great and taste good. Cocoa nibs add a bit of crunch and a chocolatey taste. Arrange your toppings in a colorful way, as it makes the bowl more appealing. If you have leftover smoothie, store it right. Pour it into an airtight container. Keep it in the fridge for up to one day. Stir it well before eating. For longer storage, freeze it in ice cube trays. This way, you can use it later in other smoothies or bowls. Just blend the frozen cubes when you're ready to enjoy! {{image_2}} You can turn your Peanut Butter Cup Smoothie Bowl into a chocolate lover's dream. Just add extra cocoa powder. Use two tablespoons instead of one. This boosts the chocolate flavor and makes it even richer. You can also add chocolate protein powder if you want more protein. Blend it all together for a tasty treat. If you want a vegan version, swap Greek yogurt for a plant-based yogurt. Almond milk works great, but any nut milk is fine. You can also use maple syrup instead of honey. Make sure your chocolate chips are dairy-free. This way, everyone can enjoy this smoothie bowl. For a protein boost, mix in some protein powder. You can choose any flavor you like. Another option is to add a tablespoon of chia seeds. This gives you extra fiber and protein. If you want more crunch, toss in some nuts or seeds. This way, you make your smoothie bowl filling and nutritious. If you have leftover smoothie bowl, store it in an airtight container. Make sure to cover it well. This keeps the flavors fresh and prevents oxidation. Place it in the fridge. It will stay good for one day. Stir it well before eating. If it thickens, add a splash of milk to loosen it. You can freeze parts of the smoothie bowl. For example, freeze extra bananas or peanut butter. Store them in freezer bags. Remove the air and seal tightly. When you want to make another bowl, just blend them straight from the freezer. This saves time and makes it easy to whip up a treat. Most ingredients in this recipe have a good shelf life. - Frozen bananas can last up to six months. - Almond milk stays fresh for about seven to ten days once opened. - Peanut butter can be good for several months, even up to a year if unopened. - Cocoa powder remains fresh for about two to three years if stored in a cool, dry place. - Greek yogurt lasts about one week in the fridge after opening. By knowing how to store and freeze these ingredients, you can enjoy your peanut butter cup smoothie bowl anytime! Yes, you can use fresh bananas. However, frozen bananas give a thicker texture. They also make the smoothie cool and creamy. If you choose fresh, add ice to your blender. This keeps the smoothie bowl cold and enjoyable. You have many options if you need a peanut butter substitute. Almond butter, cashew butter, or sun butter all work well. Each option has a unique taste, so pick one you like. If you want a nut-free option, try tahini or coconut cream. Yes, this smoothie bowl is great for meal prep. You can blend the base and store it in the fridge for up to 24 hours. Just add your toppings when you're ready to eat. This keeps the granola and bananas fresh and crunchy. This blog shared key steps to make a delicious smoothie bowl. We covered main ingredients, their health benefits, and how to blend them to get the perfect texture. You now know tips for serving and storing your leftovers. You can also explore tasty variations, including vegan options. Finally, answers to common questions help clear any confusion. Enjoy creating your smoothie bowl and customizing it to your taste! Feel excited to try new flavors and make this treat your own.

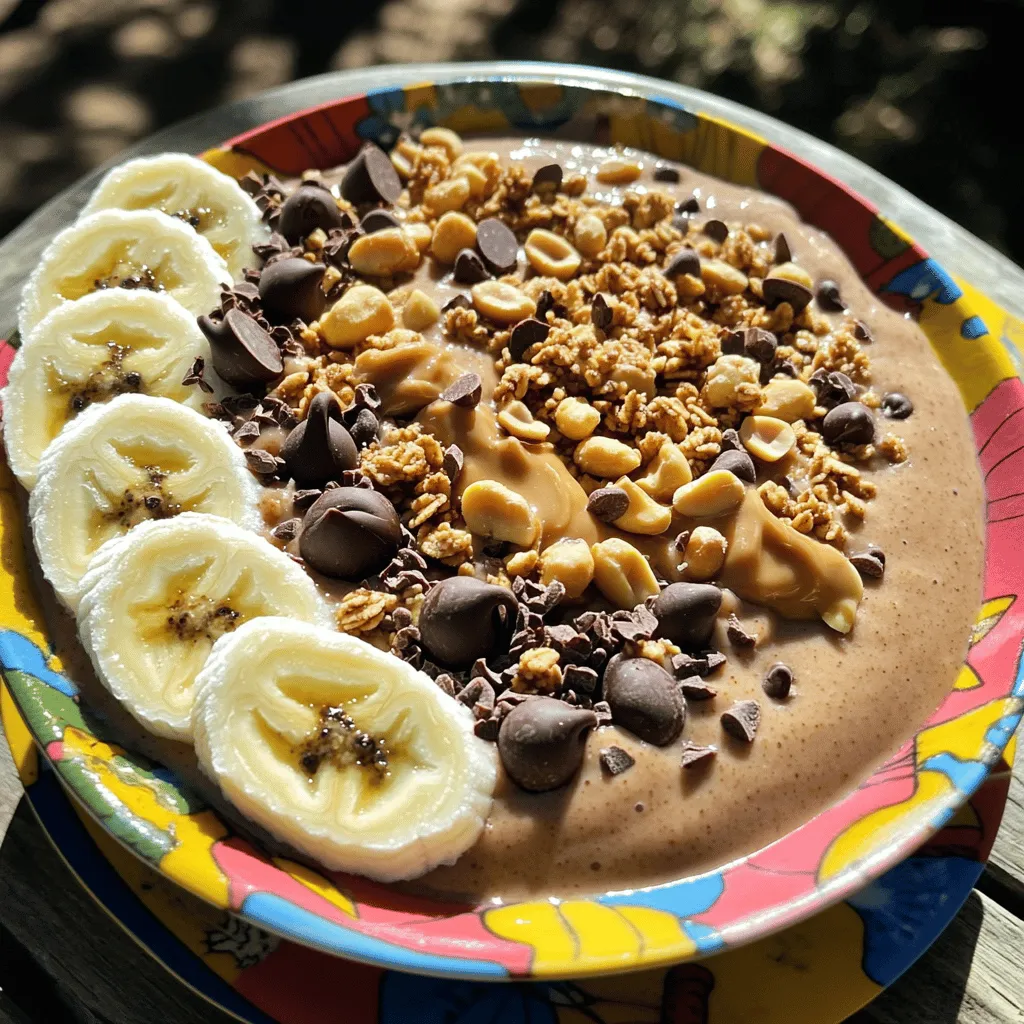
Peanut Butter Cup Smoothie Bowl Simple and Tasty

Are you ready for a delicious treat that’s both simple and healthy? The Peanut Butter Cup Smoothie Bowl hits all

- 1 cup rolled oats - 1/2 cup hazelnuts, chopped - 1/2 cup almond flour - 1/4 cup cocoa powder - 1/3 cup maple syrup - 1/4 cup almond butter (or peanut butter) - 1 teaspoon vanilla extract - 1/2 teaspoon salt - 1/4 cup dark chocolate chips (dairy-free if desired) These ingredients come together to create a tasty and nutritious treat. Rolled oats provide a hearty base. Hazelnuts add a delightful crunch, while almond flour gives a nice texture. Cocoa powder brings rich chocolate flavor. Maple syrup offers natural sweetness, and almond butter adds creaminess. Vanilla extract enhances the taste, and salt balances all the flavors. Dark chocolate chips are a sweet bonus. If you have nut allergies, try sunflower seed butter instead of almond butter. Use pumpkin seeds instead of hazelnuts for crunch. For a gluten-free option, ensure the oats are certified gluten-free. If you need a sweetener swap, honey can replace maple syrup. Remember, each swap may change the taste or texture a bit, but the bars will still be delicious. Each bar has roughly: - Calories: 150 - Protein: 4g - Fat: 7g - Carbohydrates: 20g - Fiber: 3g - Sugar: 5g These bars are a great snack. They provide healthy fats and protein, keeping you full. Plus, they contain fiber for digestive health. Enjoy them as a quick breakfast or a midday treat! First, preheat your oven to 350°F (175°C). Take an 8x8-inch baking pan and line it with parchment paper. Leave some paper hanging over the sides. This makes it easy to lift the bars out later. In a large bowl, add the rolled oats, chopped hazelnuts, almond flour, cocoa powder, and salt. Mix these dry ingredients well. Make sure everything is evenly spread out. In a different bowl, whisk together the maple syrup, almond butter, and vanilla extract. Keep whisking until the mixture is smooth. This step is key for the right texture. Now, pour the wet mix into the dry mix. Stir it all together until it looks thick and sticky. Next, gently fold in the dark chocolate chips. Make sure they are spread evenly throughout the mixture. Transfer your mixture to the prepared baking pan. Press it down firmly using a spatula. Bake it in the preheated oven for about 20-25 minutes. Look for golden edges to know when it’s done. After baking, take the pan out and let it cool for about 15 minutes. Use the parchment paper to lift the bars out. Allow them to cool completely on a wire rack. Finally, cut them into squares or rectangles. Enjoy your tasty chocolate hazelnut oat bars! To get chewy bars, use the right ingredients. Rolled oats work best for texture. Adding almond butter keeps them moist. Maple syrup adds sweetness and helps bind. Mix until sticky but not too dry. If you want more chewiness, bake for less time. Check them at 20 minutes. They should be soft when warm. Storing your bars well keeps them fresh. Once cooled, cut them into squares. Use an airtight container to keep them soft. They can stay at room temperature for up to five days. For longer storage, place them in the fridge. You can also freeze them. Wrap each bar in plastic before freezing. They last up to three months frozen. You can enjoy these bars in many ways. Serve them as a snack or breakfast. Pair them with yogurt for a great start. Crumble them over ice cream for dessert. Drizzle with more chocolate for extra flavor. You can also pack them for lunch or hikes. They are perfect for on-the-go energy! {{image_2}} You can swap hazelnuts for other nuts. Walnuts, pecans, or cashews work great. Each nut gives a new taste. You can also use seeds like sunflower or pumpkin seeds. This adds a nut-free option for those with allergies. Maple syrup is sweet and nice, but other sweeteners can change the taste. Honey is a great choice if you are not vegan. Agave syrup is another good option. Brown sugar can also add a rich flavor. Adjust the amount based on your sweet tooth. Add-ins can make your bars pop! Try adding dried fruits like cranberries or raisins. Chia seeds boost nutrition and add texture. You can also mix in spices like cinnamon or nutmeg for warmth. For a twist, consider adding a scoop of protein powder for extra protein. You can store your chocolate hazelnut oat bars at room temperature. Place them in an airtight container. This keeps them fresh for up to five days. If you live in a warm area, refrigeration may help. Just make sure to let them sit at room temp before serving. This way, they will be soft and chewy. Freezing is a great option for long-term storage. Cut the bars into squares first. Wrap each square tightly in plastic wrap. Then, place them in a freezer-safe bag. You can freeze them for up to three months. When you want to eat one, just take it out and let it thaw. You can also warm it in the microwave for ten seconds. These bars taste best when fresh, but they last well. At room temperature, enjoy within five days. In the fridge, they can stay good for up to a week. Always use an airtight container to keep moisture out. If you freeze them, label your bag with the date. This helps you remember when you made them. Following these tips will keep your chocolate hazelnut oat bars tasty! Yes, you can use quick oats. They will change the texture. Quick oats make the bars softer and chewier. Rolled oats give a heartier bite. Yes, this recipe can be gluten-free. Just ensure your oats are certified gluten-free. Many brands offer gluten-free rolled oats. Check the label to be sure. To make these bars vegan, replace almond butter with another plant-based butter. You can also use maple syrup, which is already vegan. Make sure your chocolate chips are dairy-free. You can substitute almond butter with peanut butter or sun butter. Both options work well. If you use peanut butter, the taste will change a bit but remain delicious. To adjust sweetness, add more maple syrup or use a different sweetener. You can add honey if not vegan. Taste the mix before baking to find your perfect sweetness level. In this blog post, we covered how to make tasty oat bars. We listed the key ingredients, provided tips for substitutions, and shared nutritional info. I outlined simple steps for mixing, baking, and cutting your bars. Our tips helped ensure a chewy texture and offered storage suggestions. We even explored fun variations for extra flavor. With this knowledge, you can bake your own bars that fit your tastes. Enjoy experimenting with ingredients and flavors as you create your perfect oat bars.

Chocolate Hazelnut Oat Bars Delicious and Easy Recipe

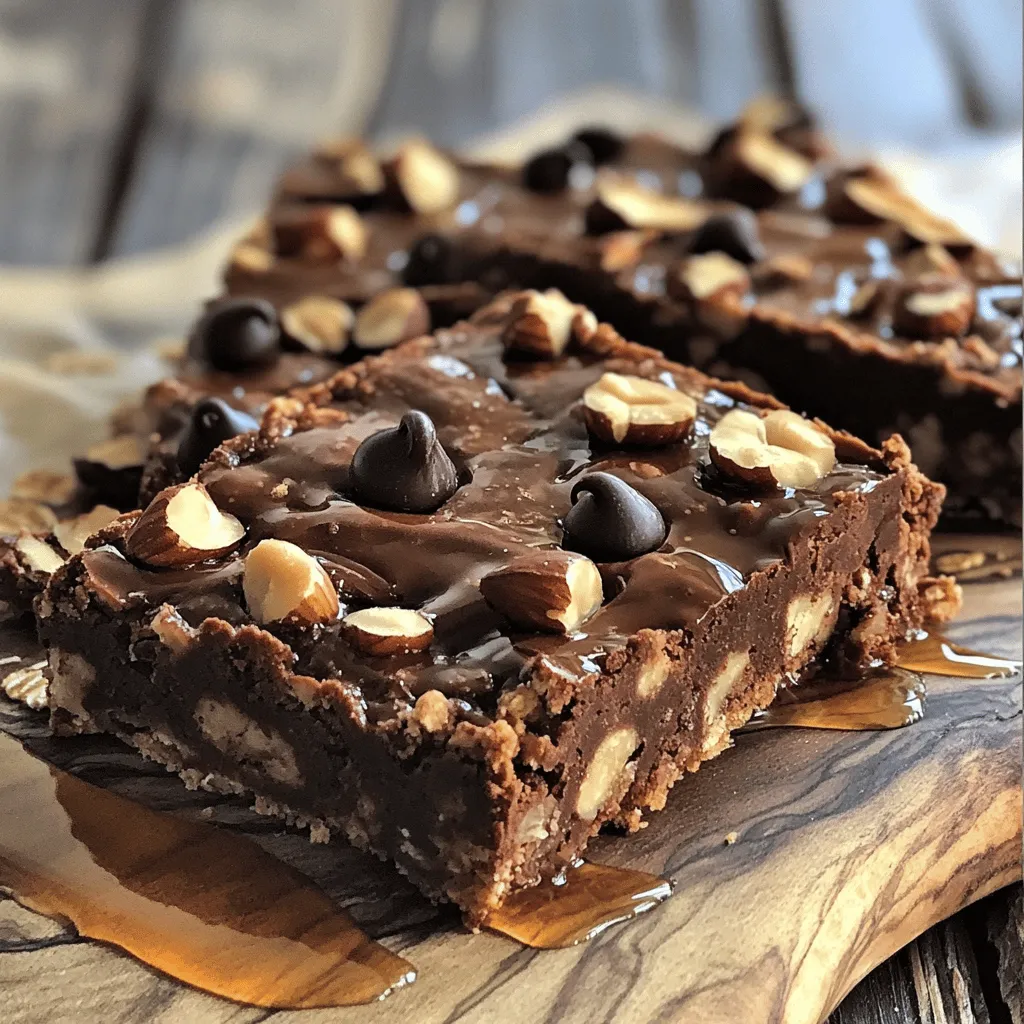
Looking for a tasty treat that’s simple to make? You’re in the right place! My Chocolate Hazelnut Oat Bars are

- 1 ½ cups all-purpose flour - 1 teaspoon baking powder - ½ teaspoon baking soda - ½ teaspoon salt - 1 teaspoon ground cinnamon - ½ teaspoon ground nutmeg - ½ cup unsalted butter, softened - 1 cup granulated sugar - 2 large eggs - 1 teaspoon vanilla extract - 1 cup apple cider - ½ cup finely chopped apples (preferably Granny Smith) - ½ cup unsalted butter, softened - 2 cups powdered sugar - 3 tablespoons pure maple syrup - 1 tablespoon milk (optional, for consistency) - Pinch of salt If you need to swap ingredients, here are some ideas: - Substitute whole wheat flour for all-purpose flour for a nuttier taste. - Use brown sugar instead of granulated sugar for a richer flavor. - Replace unsalted butter with coconut oil for a dairy-free option. - Try almond milk instead of regular milk in the frosting for a nutty twist. - Use honey or agave syrup in place of maple syrup for a different sweet flavor. These swaps can change the flavors slightly but still keep the cupcakes delicious! Start by preheating your oven to 350°F (175°C). This step is key for even baking. Line a muffin tin with cupcake liners. This makes it easy to remove the cupcakes later. In a medium bowl, whisk together the dry ingredients. Combine 1 ½ cups of flour, 1 teaspoon of baking powder, ½ teaspoon of baking soda, ½ teaspoon of salt, 1 teaspoon of cinnamon, and ½ teaspoon of nutmeg. This mix adds great flavor and helps the cupcakes rise. In a large bowl, cream together ½ cup of softened butter and 1 cup of sugar. Beat this mixture until it is light and fluffy, about 3 to 4 minutes. This process adds air to the mix, making your cupcakes soft. Now, add 2 large eggs one at a time, mixing well after each. Then, stir in 1 teaspoon of vanilla extract. Gradually mix in the dry ingredients and 1 cup of apple cider. Start and end with the dry mix. Finally, fold in ½ cup of finely chopped apples. This adds a nice texture. Fill each cupcake liner about two-thirds full with batter. Bake in the preheated oven for 18 to 20 minutes. Use a toothpick to check if they are done. If it comes out clean, they are ready. While the cupcakes cool, make the maple frosting. Beat ½ cup of softened butter in a bowl until creamy. Gradually add 2 cups of powdered sugar. Then mix in 3 tablespoons of pure maple syrup and a pinch of salt. If needed, add 1 tablespoon of milk for a smoother texture. Once the cupcakes are cool, frost them generously. For a fun touch, sprinkle cinnamon on top or add a small apple slice. To keep your apple cider cupcakes moist, use fresh apple cider. It adds flavor and moisture. Do not overmix the batter; mix until just combined. This helps keep the cupcakes light. Fill each cupcake liner about two-thirds full. This allows room for rising without overflowing. For the maple frosting, start with soft butter for easy mixing. Gradually add powdered sugar to avoid a cloud of sugar. If the frosting seems too thick, add a little milk. This helps you reach the perfect consistency. Use a spatula or piping bag to frost the cupcakes. For a neat look, swirl the frosting high. A sprinkle of cinnamon on top adds a nice touch. One common mistake is not preheating the oven. Always preheat to ensure even baking. Another mistake is using cold butter. Softened butter mixes better and creates a fluffy texture. Avoid opening the oven door too soon. This can cause the cupcakes to sink. Lastly, let the cupcakes cool completely before frosting. This prevents melting and sliding of the frosting. {{image_2}} You can change up the flavor of your Apple Cider Cupcakes in fun ways. Try adding chopped walnuts or pecans for a nutty crunch. Dried cranberries or raisins can add a sweet twist. For a spicier kick, mix in a bit of ginger. If you prefer a different type of apple, use Honeycrisp or Fuji for a sweeter taste. You can also swap half the apple cider for orange juice. This adds a bright note to your cupcakes. Maple frosting is a classic, but you can switch it up! Try cream cheese frosting for a tangy bite. A simple vanilla buttercream works well, too. For a chocolate twist, mix cocoa powder into your frosting. You can also fold in some crushed candy canes during the holidays for a festive touch. If you want a lighter option, use whipped cream instead. Just make sure to frost right before serving, so it stays fluffy. Mini cupcakes are a great choice for parties or snacks. You can simply follow the same recipe but use a mini muffin tin. Bake them for about 12-15 minutes instead of 18-20 minutes. Watch them closely to avoid overbaking. Mini cupcakes are perfect for sharing, and they look adorable on any dessert table. Plus, you can try different toppings on each one for a fun variety! To keep your apple cider cupcakes fresh, store them in an airtight container. This helps maintain moisture and flavor. You can place a piece of bread in the container to keep them soft. Avoid stacking them, as this can cause them to stick together. Keep them at room temperature for up to two days. If you want to save them longer, consider refrigeration. You can freeze the cupcakes and frosting separately. To freeze the cupcakes, let them cool completely. Wrap each cupcake in plastic wrap, then place them in a freezer-safe bag. They can last up to three months in the freezer. For the frosting, store it in an airtight container. It can also freeze well for up to three months. When you’re ready to use them, thaw the cupcakes and frosting in the fridge overnight. These delicious cupcakes last about three days at room temperature. If you keep them in the fridge, they can last up to a week. The flavor may change over time, but they will still be safe to eat. If you notice any signs of mold or an off smell, it’s best to discard them. Enjoy your cupcakes fresh for the best taste! To make apple cider, you need fresh apples. Choose sweet and tart apples for great taste. First, wash and cut the apples into quarters. Place them in a large pot and cover with water. Simmer for about 2 hours, mashing the apples with a potato masher. Strain the mixture through a fine mesh sieve or cheesecloth. This will give you fresh apple cider. Yes, you can use different types of apples. Mixing sweet and tart apples creates a balanced flavor. For apple cider cupcakes, I like using Granny Smith apples. Their tartness adds a nice contrast to the sweet frosting. Other good choices are Honeycrisp or Fuji apples. Feel free to experiment with what you have. To check if the cupcakes are done, insert a toothpick into the center of one. If it comes out clean or with a few crumbs, they are ready. Typically, baking takes 18 to 20 minutes at 350°F (175°C). Let them cool in the pan for a few minutes before transferring to a wire rack. This prevents them from sticking. To store leftover frosting, place it in an airtight container. You can keep it in the fridge for up to a week. If it's too thick after chilling, let it warm up a bit before using. You can also freeze the frosting for up to three months. Just thaw it in the fridge before using it again. You now have a clear path to bake delicious apple cider cupcakes with maple frosting. We covered all the ingredients you'll need, easy steps to follow, and tips for success. Plus, options for variations and storage will keep your treats fresh. Remember to avoid common baking mistakes for the best results. With this guide, you can impress anyone with your baking skills and enjoy these sweet delights. Happy baking!

Apple Cider Cupcakes with Maple Frosting Delight

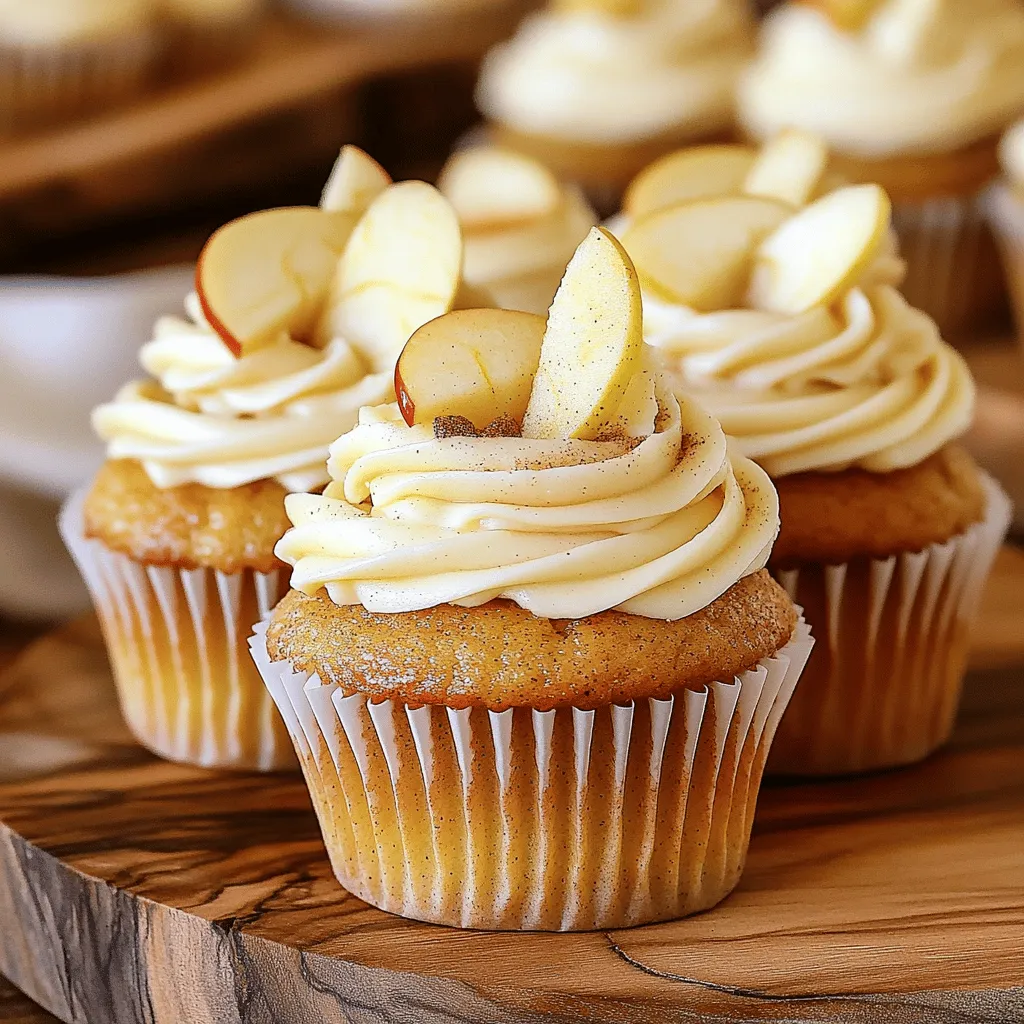
Get ready to indulge in a delightful treat with my Apple Cider Cupcakes with Maple Frosting! These cupcakes blend the

Here’s what you will need to make creamy spinach tortellini soup. Each ingredient brings great taste and texture. - 2 cups cheese tortellini (fresh or frozen) - 4 cups vegetable broth - 2 cups fresh spinach, roughly chopped - 1 cup heavy cream or coconut cream - 1 medium onion, diced - 3 cloves garlic, minced - 1 teaspoon dried oregano - 1 teaspoon dried basil - 1/2 teaspoon red pepper flakes (optional) - Salt and pepper to taste - 2 tablespoons olive oil - Freshly grated Parmesan cheese (for serving) This soup shines with the rich flavor of cheese tortellini and the freshness of spinach. The creamy base makes it comforting and delicious. Don't forget the Parmesan cheese! It adds a nice touch at the end. If you want a kick, toss in the red pepper flakes. You can also mix and match with different tortellini or creams. Gather these ingredients, and you are ready to cook! 1. Sautéing the onion and garlic Start by heating 2 tablespoons of olive oil in a large pot over medium heat. Once hot, add 1 medium diced onion. Sauté for about 5 minutes, until the onion is soft and translucent. Then, add 3 minced garlic cloves. Cook for 1 more minute, stirring often to avoid burning. 2. Adding broth and tortellini Next, pour in 4 cups of vegetable broth. Bring this mix to a gentle simmer. Once it simmers, stir in 2 cups of cheese tortellini. You can use fresh or frozen tortellini. Add 1 teaspoon of dried oregano and 1 teaspoon of dried basil. If you like a kick, add 1/2 teaspoon of red pepper flakes. Cook for 5 to 7 minutes, until the tortellini is tender. 3. Incorporating cream and spinach Reduce the heat to low. Next, pour in 1 cup of heavy cream or coconut cream. Stir well to combine it with the soup. Heat it gently, but don’t let it boil. Now, add 2 cups of roughly chopped fresh spinach. Cook for another 2-3 minutes until the spinach wilts. 4. Final seasoning and serving tips Taste your soup and add salt and pepper as needed. Once everything is mixed and warmed through, it’s time to serve. Ladle the soup into bowls and sprinkle freshly grated Parmesan cheese on top for extra flavor. Enjoy your creamy spinach tortellini soup hot! - Ensuring the tortellini is cooked properly To cook tortellini just right, follow the package instructions. Fresh tortellini cooks fast, usually in about 5 minutes. For frozen, give it a few extra minutes. Check for a tender bite before you add the cream. Overcooking can make it mushy. - How to balance flavors with seasonings Flavor is key in this soup. Use fresh garlic and onion for a strong base. Dried herbs like oregano and basil add depth. If you like some heat, add red pepper flakes. Always taste as you go. Adjust salt and pepper to suit your liking. - Cream alternatives for dietary preferences If you want a lighter option, use coconut cream instead of heavy cream. It gives a nice richness and a hint of sweetness. For a dairy-free choice, try almond milk or oat milk. Just know these may alter the soup's final taste. {{image_2}} You can change this soup in many fun ways. First, if you want a vegetarian twist, try adding different vegetables. Carrots, bell peppers, or zucchini work great. Just chop them up and toss them in when you sauté the onion. This adds color and extra nutrients. Next, if tortellini is not your favorite, swap it out for other pasta. You can use shells, penne, or even orzo. Just make sure to adjust the cooking time based on the pasta type you choose. Lastly, you can play with the spice level. If you like heat, add more red pepper flakes. For a milder soup, skip them altogether. You can also try adding a pinch of smoked paprika for a unique flavor. These simple changes keep the soup fresh and exciting every time you make it! To keep your creamy spinach tortellini soup fresh, store it in the fridge. Use an airtight container. This helps keep out air and moisture. Your soup will stay good for about three days. If you want to save it longer, freezing is a great option. Let the soup cool completely before you freeze it. Then, pour it into freezer-safe bags or containers. Make sure to leave some space for the soup to expand while it freezes. You can keep it in the freezer for up to three months. When you're ready to eat your frozen soup, thaw it in the fridge overnight. Reheat it gently on the stove over low heat. Stir it often to ensure even warming. If the soup is too thick, add a little water or broth. Always check your soup before eating. If it has an off smell or strange color, it's best to throw it away. Trust your senses; they are your best guide. Following these tips will help you enjoy your creamy spinach tortellini soup even after the first serving! Can I use frozen spinach instead of fresh? Yes, you can use frozen spinach. Just thaw it and drain excess water. This saves time and still gives you great flavor. What can I substitute for heavy cream? You can use coconut cream or a plant-based milk. Both options keep the soup rich and creamy while being lighter. How do I add protein to the soup? You can add cooked chicken, sausage, or beans. This boosts the protein and makes the soup more filling and hearty. Is this soup suitable for meal prep? Absolutely! This soup stores well in the fridge for up to three days. You can also freeze it for later. Just reheat before serving for a warm meal. This blog post covered how to make Creamy Spinach Tortellini Soup. We discussed key ingredients, cooking steps, and helpful tips. You learned how to adjust flavors and substitute items. This soup is easy to prepare and offers room for creativity. You can explore different vegetables or pasta types. Also, storing leftovers is simple with the right methods. Enjoy this dish with family or friends. Give it a try, and you won't be disappointed!

Creamy Spinach Tortellini Soup Easy and Delicious Recipe

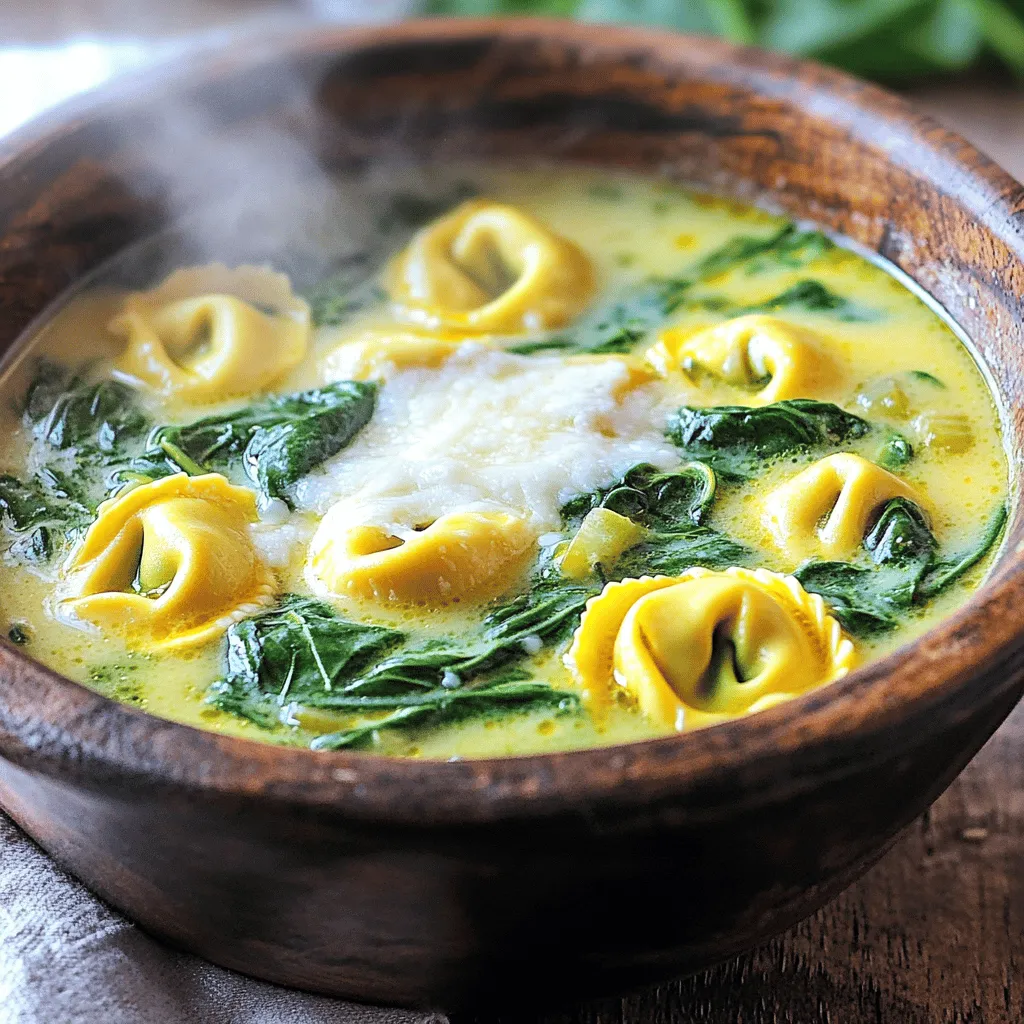
Warm, comforting, and oh-so creamy, this Spinach Tortellini Soup is a must-try! I love how easy it is to make

- 1 lb Brussels sprouts, trimmed and halved - 1 cup fresh cranberries (or frozen, thawed) - 3 tablespoons pure maple syrup - 2 tablespoons olive oil - 1 teaspoon ground cinnamon - 1/2 teaspoon salt - 1/4 teaspoon black pepper - 1/2 cup pecans, roughly chopped (optional) - Zest of 1 orange (for garnish) I love using fresh Brussels sprouts for this dish. They are crunchy and full of flavor. When you slice them in half, they roast evenly and caramelize nicely. Fresh cranberries add a burst of tartness. If you can’t find fresh ones, frozen cranberries work too. Just remember to thaw them first. Pure maple syrup is the star ingredient. It gives a sweet touch to the sprouts and cranberries. The olive oil helps everything roast perfectly. It adds a nice richness and helps the flavors blend. For seasoning, I use ground cinnamon, salt, and black pepper. The cinnamon adds warmth and a hint of spice. Chopped pecans bring a crunchy texture that contrasts well with the soft vegetables. Lastly, orange zest brightens the dish with a fresh aroma. Gather all these ingredients, and you are ready to create a delicious side dish. - Preheat your oven to 400°F (200°C). - Trim the Brussels sprouts and cut them in half. - Wash the fresh cranberries or thaw the frozen ones. - In a large bowl, combine the halved Brussels sprouts and cranberries. - Drizzle olive oil and maple syrup over them. - Sprinkle ground cinnamon, salt, and black pepper. Toss well until coated. - Spread the mixture on a baking sheet. Place the cut side of Brussels sprouts down. - Roast for 25-30 minutes. Stir halfway through for even cooking. - In the last 5 minutes, add the chopped pecans for extra crunch. For the best results, set your oven to 400°F (200°C). This hot temperature helps the Brussels sprouts turn crispy and golden. To prevent burning, make sure to spread the sprouts evenly on the baking sheet. Place them cut side down to get that lovely caramelization. Stir them halfway through roasting to ensure even cooking. Pair your Brussels sprouts and cranberries with nuts like pecans for a nice crunch. The texture adds fun to every bite. You can also add a splash of balsamic vinegar for extra depth. If you like spice, try a pinch of cayenne pepper or a dash of nutmeg. Fresh herbs like thyme or rosemary can elevate the dish too. When serving, use a large white platter. The bright colors pop against a neutral background. Garnish with the orange zest for a fresh look. You can also sprinkle some extra pecans on top for added flair. This not only looks beautiful but also invites your guests to dig in! {{image_2}} You can easily swap sweeteners in this recipe. Try honey or agave syrup for a different taste. Each will add its own flavor and sweetness. If you prefer no syrup, use brown sugar. For nuts, pecans are great, but walnuts work well too. They add crunch and a slight bitterness. Almonds are another tasty option if you want extra flavor. Just chop them roughly before adding. Embrace seasonal fruits! In fall, add diced apples or pears for sweetness. In winter, consider adding pomegranate seeds. They bring a lovely pop of color and flavor. For spring, fresh strawberries can brighten the dish. Adjust for holiday themes by using spices like nutmeg or ginger. These warm spices make the dish festive and cozy. You could also garnish with fresh herbs like rosemary or thyme for a special touch. To make this dish vegan, ensure your maple syrup is pure. Most brands are vegan-friendly, but check the label. For nut-free needs, skip the pecans. You can also add seeds like pumpkin or sunflower seeds for crunch. If gluten-free is your goal, this recipe is already safe! All ingredients are gluten-free. Just ensure that your maple syrup and any added toppings are certified gluten-free. To store leftovers, place them in an airtight container. This helps keep the flavors fresh. You can store them in the fridge for about 3-5 days. For longer shelf life, you can freeze the leftovers. First, let them cool completely. Then, place them in a freezer-safe bag or container. This way, they stay fresh for up to 2-3 months. When you're ready to enjoy them, just thaw them overnight in the fridge. Reheat in the oven at 350°F (175°C) until warm. Look for signs of spoilage, like a sour smell or mushy texture. If the Brussels sprouts feel slimy or the cranberries look shriveled, it’s best to toss them. To maintain flavor, keep your leftovers in a cool, dark place and use them quickly. Enjoy that delicious taste for as long as possible! To make this tasty dish, follow these simple steps: 1. First, preheat your oven to 400°F (200°C). 2. Take 1 pound of Brussels sprouts, trim them, and cut them in half. 3. In a big bowl, mix the Brussels sprouts and 1 cup of cranberries. 4. Drizzle in 2 tablespoons of olive oil and 3 tablespoons of pure maple syrup. 5. Add 1 teaspoon of ground cinnamon, 1/2 teaspoon of salt, and 1/4 teaspoon of black pepper. 6. Toss everything well until it gets coated. 7. Spread the mix on a baking sheet with the cut side of the sprouts down. 8. Roast for 25-30 minutes, stirring halfway through. 9. In the last 5 minutes, add 1/2 cup of chopped pecans for some crunch. 10. Once done, let it cool a bit, then garnish with orange zest. Maple roasted Brussels sprouts pair well with many dishes. Here are some great options: - Serve them as a side with roasted chicken or turkey. - They go well with pork chops or grilled salmon. - Add them to a warm salad with quinoa or farro. - They make a lovely addition to a holiday feast. - Try them with a cheese plate for an elegant touch. Yes, you can use frozen cranberries! Just be sure to thaw them first. Here’s how they compare: - Fresh cranberries have a firm texture and lively taste. - Frozen cranberries may be softer but still taste great. - Both options add a lovely tartness to the dish. Using frozen cranberries can save time and still deliver flavor. This post explored making Maple Roasted Brussels Sprouts with cranberries. We covered main ingredients, step-by-step instructions, tips, and variations. Roasting these veggies with cranberries makes for a tasty dish. Remember to try different ingredients to match the season. Store leftovers properly to keep them fresh and tasty. With these tips, you can impress your friends and family. Enjoy creating a dish that brightens your table!

Maple Roasted Brussels Sprouts Cranberries Delight

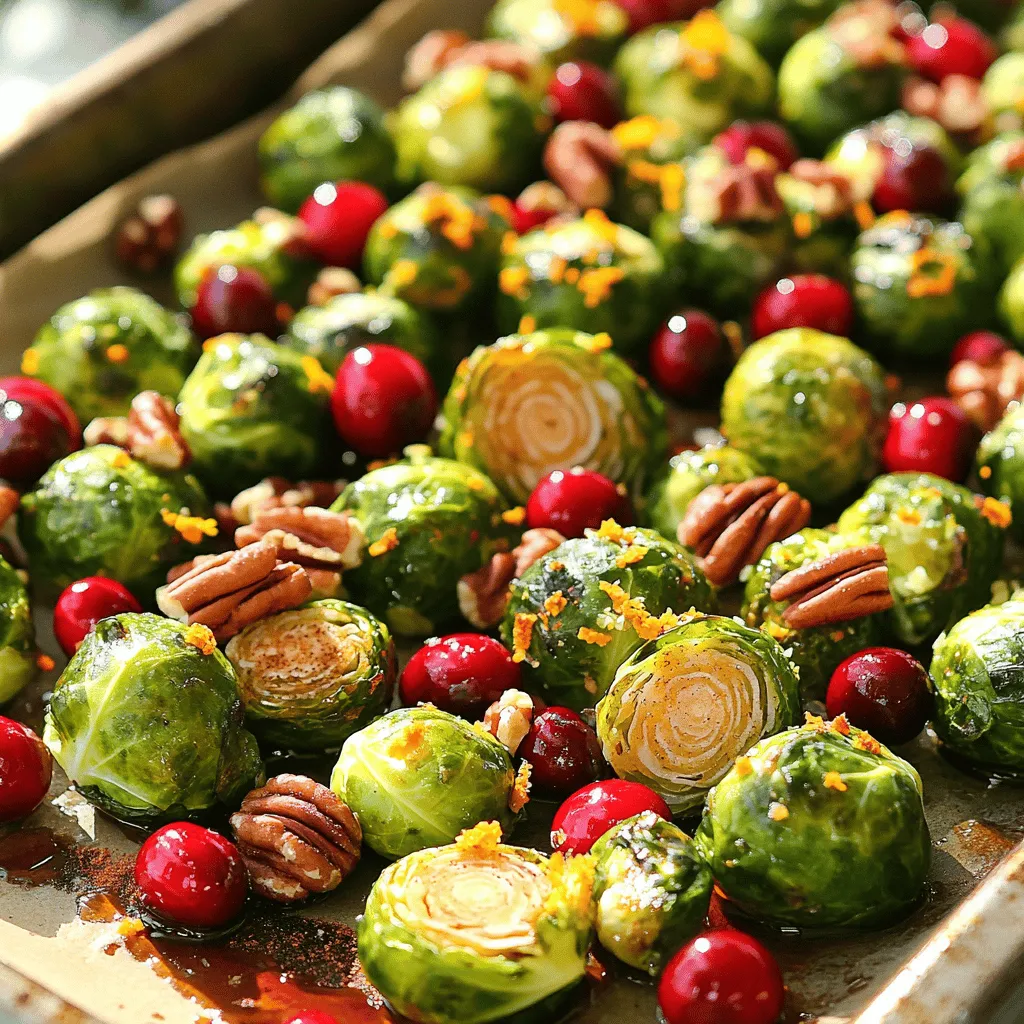
Are you ready to elevate your side dish game? Maple Roasted Brussels Sprouts with Cranberries is both sweet and savory,

To make Pumpkin Spice Latte Tiramisu, you will need: - 1 cup strong brewed coffee (cooled) - 1 cup pumpkin puree - 1 cup mascarpone cheese - 1 cup heavy cream - ½ cup powdered sugar - 1 teaspoon vanilla extract - 2 teaspoons pumpkin spice blend - 24 ladyfinger cookies - Cocoa powder for dusting - Dark chocolate shavings for garnish You can swap some ingredients if needed. For coffee, use strong tea or a coffee substitute. If you can’t find mascarpone, cream cheese works well. For a lighter option, use low-fat cream instead of heavy cream. If you want a sweeter dessert, add more powdered sugar. You can use any spice blend that fits your taste if you can’t find pumpkin spice. Using fresh and high-quality ingredients makes a big difference. Fresh pumpkin puree adds a rich flavor. Good coffee enhances the overall taste. Mascarpone cheese provides that creamy texture we love in tiramisu. Each ingredient builds layers of flavor, so choose wisely. Quality ingredients mean a more delicious and satisfying dessert. Start by mixing the pumpkin puree, mascarpone cheese, vanilla extract, powdered sugar, and pumpkin spice blend in a bowl. Use an electric mixer on medium speed. Beat until the mix is smooth and creamy. This step gives the filling a rich flavor. Set it aside while you prepare the cream. In another bowl, whip the heavy cream until it forms stiff peaks. This means it holds its shape well. Gently fold the whipped cream into the pumpkin mixture. Use a spatula and make sure not to deflate the cream. This keeps your filling light and airy. Grab a 9x9-inch serving dish. Dip each ladyfinger into the cooled coffee for just a few seconds. Don't soak them too long, or they will get too soggy. Lay the dipped ladyfingers in a single layer at the bottom of the dish. Spread half of the pumpkin filling over the ladyfingers. Smooth it out evenly. Repeat this with another layer of dipped ladyfingers. Finally, top with the rest of the pumpkin filling. Smooth the top with a spatula. Cover the dish with plastic wrap. Refrigerate for at least 4 hours, or overnight for the best taste. Before serving, dust the top with cocoa powder and add dark chocolate shavings for a nice touch. To get a smooth texture, mix the pumpkin puree and mascarpone well. Use an electric mixer to blend these ingredients until they are creamy. This step helps the flavors come together nicely. When you whip the cream, make sure to get stiff peaks. This means the cream holds its shape well. Gently fold the whipped cream into the pumpkin mix. This keeps your filling light and airy. One common mistake is soaking the ladyfingers too long in coffee. If you dip them for too long, they can become soggy. Aim for just a few seconds in the coffee. Another mistake is skipping the chilling time. Let the tiramisu chill for at least four hours. Overnight chilling enhances the flavors. Don’t forget to smooth the top layer before chilling. This gives a nice finish when you serve it. For a special touch, serve your tiramisu in individual cups or bowls. This makes it easy to share. You can add an extra sprinkle of pumpkin spice on top for flair. Dust the top with cocoa powder just before serving. Dark chocolate shavings add a nice visual contrast and taste. Use a clean spatula to smooth out the layers for a neat look. {{image_2}} You can change the flavor of your tiramisu easily. Try using chocolate or caramel instead of pumpkin. For a fruity twist, use berry puree like strawberries or raspberries. Each new flavor can bring a fresh taste to this classic dessert. Do not be afraid to get creative with your ingredients. If you need a gluten-free version, swap ladyfinger cookies with gluten-free sponge cake. You can also use gluten-free ladyfingers, which are now widely available. Just check the label to ensure they are gluten-free. This way, everyone can enjoy this tasty treat without worry. To make this dessert vegan, use dairy-free options. Replace mascarpone cheese with a mix of soaked cashews and coconut cream. For heavy cream, use coconut whipped cream. Substitute powdered sugar with a vegan-friendly sweetener. These changes will keep the spirit of the dish while making it plant-based. Enjoy this version with the same rich flavors. To keep your pumpkin spice latte tiramisu tasty, store it in the fridge. Use an airtight container to prevent drying. If you use plastic wrap, press it gently on the surface. This keeps the tiramisu from absorbing other flavors in the fridge. Enjoy your leftovers within three days for the best taste. You can freeze tiramisu, but it may change in texture. To freeze, cut the tiramisu into portions. Wrap each piece in plastic wrap, then place it in a freezer bag. Remove as much air as you can from the bag. This helps prevent freezer burn. You can freeze it for up to one month. Thaw it in the fridge before you eat it. The shelf life of pumpkin spice latte tiramisu is about three days in the fridge. After that, the texture may not be as good. If you notice any change in smell or color, it’s better to toss it. Always check for freshness before serving. Keeping it stored correctly ensures you enjoy every delicious layer. Yes, you can make Pumpkin Spice Latte Tiramisu ahead of time. This dessert actually tastes better after it sits. I recommend making it a day before. This gives the flavors time to blend. Just cover it well and chill it in the fridge. If you want to skip the coffee, you can use milk or almond milk. Brew a strong tea, like chai, for a different flavor. Just dip the ladyfingers in your chosen liquid for a few seconds. The rest of the recipe stays the same and still tastes great! Yes, you can use store-bought ingredients for this recipe. You can buy mascarpone cheese and whipped cream. Look for ladyfinger cookies in the store as well. Just remember that homemade always tastes best, but store-bought works in a pinch! This blog covered all you need for making a great Pumpkin Spice Latte Tiramisu. We explored key ingredients, and I shared tips on preparation, texture, and assembly. You learned about variations, storage tips, and answered common questions. In the end, quality ingredients and careful steps make all the difference. Enjoy the process and make it your own. Whether you're serving guests or treating yourself, this dessert promises delight.

Pumpkin Spice Latte Tiramisu Irresistible Dessert Treat

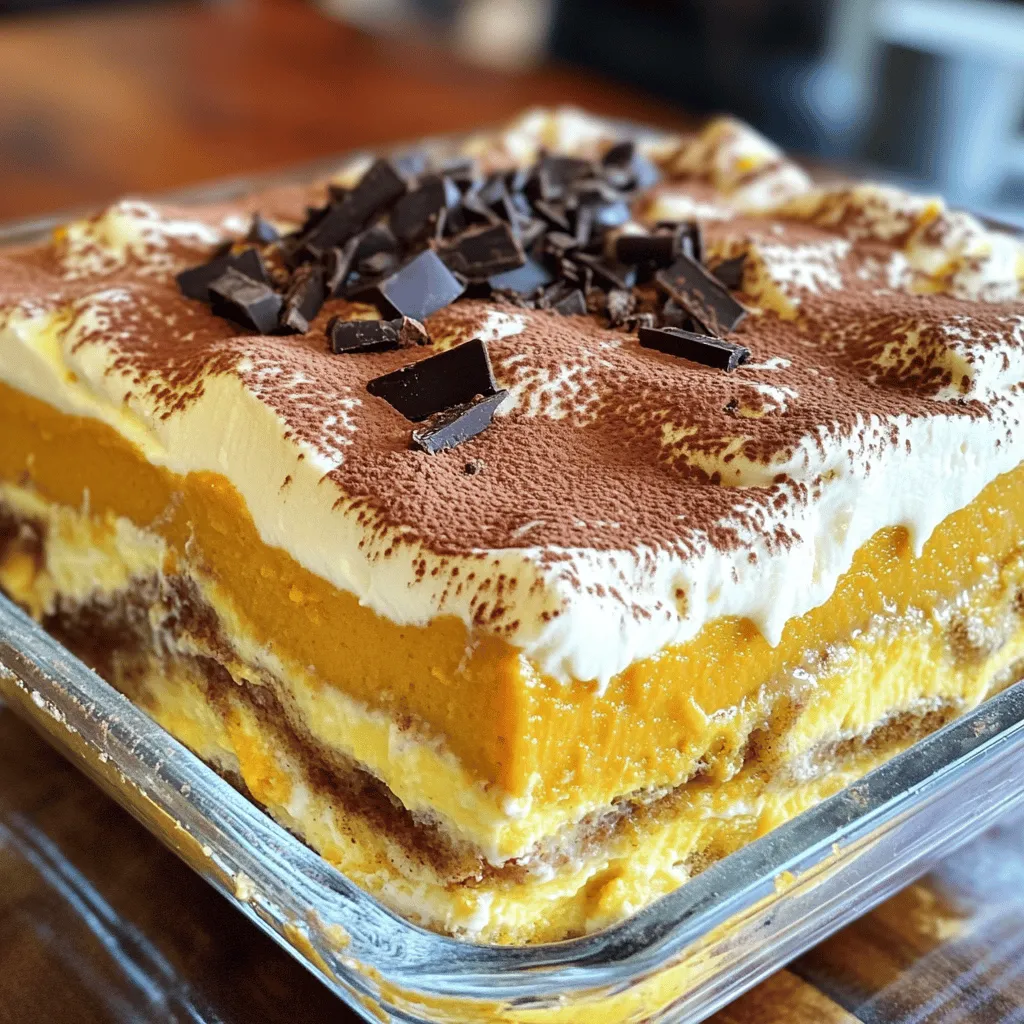
If you love fall flavors and rich desserts, this Pumpkin Spice Latte Tiramisu is for you! This creamy treat combines

- 1 ½ cups all-purpose flour - 1 teaspoon baking soda - ½ teaspoon baking powder - ½ teaspoon salt - 1 teaspoon ground cinnamon - ½ teaspoon ground nutmeg - ¼ teaspoon ground ginger - ½ cup granulated sugar - ½ cup brown sugar, packed - ½ cup vegetable oil - 2 large eggs - 1 cup pumpkin puree - 1 teaspoon vanilla extract - ½ cup walnuts or pecans, chopped (optional) - ½ cup caramel sauce - ½ cup all-purpose flour - ¼ cup brown sugar, packed - ½ teaspoon ground cinnamon - ¼ cup unsalted butter, melted - Pinch of salt To make caramel pumpkin bread streusel, you need to gather your ingredients first. The dry ingredients include flour, baking soda, baking powder, salt, and spices. Ground cinnamon, nutmeg, and ginger give this bread its warm flavor. Next, for the wet ingredients, you will mix sugars and oil with eggs and pumpkin puree. Vanilla extract adds a nice touch. If you want some crunch, chop walnuts or pecans to add. Finally, caramel sauce will make the bread sweet and rich. The streusel topping is simple. Mix flour, brown sugar, cinnamon, melted butter, and a pinch of salt. This topping will give your bread a nice crunchy layer. Having all these ingredients ready will make your baking fun and easy. You can create a tasty, sweet treat that everyone loves! - Step 1: Preheat your oven to 350°F (175°C). Greasing a 9x5-inch loaf pan helps the bread pop out easily. You can also line it with parchment paper for easy removal. - Step 2: In a medium bowl, mix together 1 ½ cups of flour, 1 teaspoon of baking soda, ½ teaspoon of baking powder, ½ teaspoon of salt, 1 teaspoon of ground cinnamon, ½ teaspoon of ground nutmeg, and ¼ teaspoon of ground ginger. Make sure it’s well combined and set aside. - Step 3: In a large mixing bowl, combine ½ cup granulated sugar, ½ cup brown sugar, and ½ cup vegetable oil. Stir them together until they blend well. Add in 2 large eggs, 1 cup of pumpkin puree, and 1 teaspoon of vanilla extract. Beat until the mixture is smooth. - Step 4: Gradually add the dry ingredients to the wet mixture. Stir gently until just combined. If you want, fold in ½ cup of chopped walnuts or pecans for extra crunch. - Step 5: Pour half of the batter into the prepared loaf pan. Drizzle half of the ½ cup caramel sauce on top. Repeat with the remaining batter and caramel. You’ll create a lovely layered effect. - Step 6: To make the streusel topping, combine ½ cup of flour, ¼ cup of brown sugar, and ½ teaspoon of ground cinnamon in a small bowl. Add ¼ cup of melted unsalted butter and a pinch of salt. Mix with a fork until it looks crumbly. - Step 7: Evenly sprinkle the streusel topping over the batter in the loaf pan. This will give your bread a tasty crunch. Now you’re ready to bake! Enjoy the sweet aroma that fills your kitchen as it bakes. To ensure your caramel pumpkin bread has a moist texture, use fresh pumpkin puree. You can also add a bit more oil if needed. This will keep the bread soft and tender. Bake the bread at 350°F (175°C) for 55 to 65 minutes. Check for doneness by inserting a toothpick in the center. If it comes out with a few moist crumbs, it’s ready. Serve your bread warm for the best flavor. Drizzle extra caramel sauce on top for a sweet touch. You can also add a scoop of vanilla ice cream or a dollop of whipped cream for extra delight. Pair this treat with a hot cup of coffee or spiced chai. The flavors will blend perfectly, making every bite a joy. Avoid overmixing the batter when combining wet and dry ingredients. This can lead to a tough texture. Mix gently until just combined for the best results. Let the bread cool properly before slicing. If you cut it too soon, it may fall apart. Cooling for at least 10 minutes in the pan helps keep its shape. {{image_2}} You can easily make this recipe fit different diets. For a gluten-free option, use a gluten-free flour blend instead of all-purpose flour. This will keep the bread soft and tasty. If you want a vegan version, replace the eggs with flax eggs. Mix one tablespoon of ground flaxseed with three tablespoons of water. Let it sit for a few minutes until it thickens. You can swap vegetable oil with coconut oil or applesauce for moisture. You can boost the flavor of your caramel pumpkin bread. Adding chocolate chips gives a sweet twist. Try dark or semi-sweet chips for a rich taste. Dried fruit, like cranberries or raisins, can add a nice chewiness. You can also experiment with different nuts. Pecans and walnuts add a crunchy texture, but you could use almonds or hazelnuts for a change. Seasonal changes can make this bread even more fun. Swap pumpkin puree with sweet potato for a different base. Sweet potato has a lovely flavor and pairs well with the spices. You can also play with spices. Adding allspice or clove can give a warm, cozy taste. This is perfect for fall or winter gatherings. To keep your caramel pumpkin bread fresh, wrap it tightly in plastic wrap. This helps prevent air from drying it out. You can also place it in an airtight container. It keeps well for several days at room temperature. If you want to save some for later, freeze the bread. First, let it cool completely. Then, wrap it well in plastic wrap and foil. This protects it from freezer burn. When you are ready to eat it, thaw it in the fridge overnight. To warm it up, pop it in the oven at 350°F for about 10-15 minutes. At room temperature, this bread lasts for about 3-5 days. After that, it may start to spoil. Look for signs like a sour smell or mold. If you see any of these, it’s best to toss it. Enjoy this delightful treat while it’s fresh! Caramel pumpkin bread streusel is a sweet and moist bread. It blends pumpkin puree with warm spices like cinnamon and nutmeg. The caramel sauce adds a rich, sweet layer. When you take a bite, you feel the soft bread and crunchy streusel topping. The streusel has a buttery, crumbly texture that contrasts nicely with the bread. Together, they create a delightful mix of flavors and textures. Yes, you can prepare this recipe ahead. Bake the bread, then let it cool completely. Wrap it in plastic wrap or foil. Store it at room temperature for up to three days. If you want to keep it longer, you can freeze it. Slice the bread before freezing for easy servings. Just remember to thaw it in the fridge overnight before enjoying. To adjust the sweetness, you have a few options. You can reduce the amount of granulated sugar and brown sugar by ¼ cup. This change will still keep the bread tasty. Alternatively, you can use natural sweeteners like maple syrup or honey. Just remember, if you use liquids, you may need to adjust other wet ingredients. This way, you can find the perfect balance for your taste. In summary, making caramel pumpkin bread with streusel is easy and fun. You blend dry and wet ingredients, layer in caramel sauce, and top with a sweet streusel mix. Remember to avoid overmixing and let your bread cool before serving. Feel free to adjust for diet needs or explore new flavors. This recipe not only tastes great, but it also adds a cozy touch to any meal. Enjoy your baking journey and share this treat with others!

Caramel Pumpkin Bread Streusel Delightful Treat

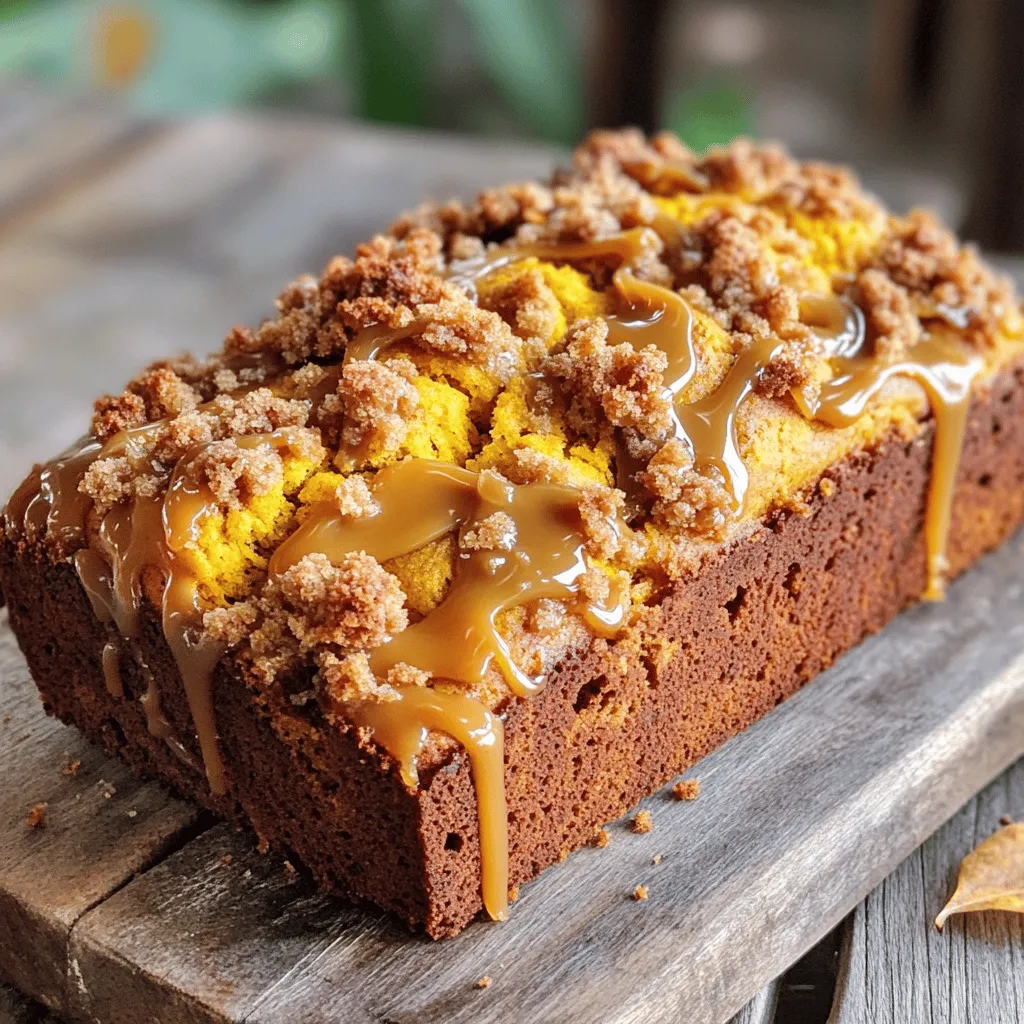
Looking to add a cozy touch to your fall baking? This Caramel Pumpkin Bread Streusel is a sweet delight that

- 1 pound boneless, skinless chicken breasts - 8 oz pasta (penne or fusilli) - 1 cup buffalo sauce - 1 cup cream cheese, softened - 1 cup chicken broth - 1 cup shredded cheddar cheese - 1 cup ranch dressing - 1 teaspoon garlic powder - 1 teaspoon onion powder - Salt and pepper to taste - Fresh parsley, chopped (for garnish) In this creamy buffalo chicken pasta, each ingredient plays a key role. Start with the chicken, which adds protein and flavor. I love using boneless, skinless chicken breasts for this dish. They cook up tender and shred easily. Next, the pasta brings a hearty base to the meal. Penne and fusilli work best because their shapes hold sauce well. I suggest cooking the pasta until it's al dente for the perfect bite. Now, let’s talk about the sauces. Buffalo sauce gives that spicy kick we crave. Cream cheese adds rich creaminess that balances the heat. Ranch dressing brings in a tangy flavor, creating a lovely depth. For seasoning, garlic powder and onion powder boost the taste of the chicken. Don’t forget salt and pepper to season everything to your liking. Finally, sprinkle fresh parsley on top for a burst of color and a fresh taste. Each ingredient combines to create a dish that’s comforting and full of flavor. Enjoy the process of gathering these ingredients; it sets the stage for a delicious meal! To start, I place the boneless, skinless chicken breasts into the slow cooker. I season them with garlic powder, onion powder, salt, and pepper. This step adds great flavor. After seasoning, I cover the slow cooker. I set it to low and let it cook for four hours. The chicken will become very tender during this time. Once the chicken is cooked, I carefully take it out. I shred it using two forks, making it easy to mix. I return the shredded chicken to the slow cooker. Now, I pour in the buffalo sauce and chicken broth. This mixture gives the dish its spicy kick. Next, I add the softened cream cheese and ranch dressing. I stir well until everything is creamy. This is the magic moment when the flavors come together. While the chicken mixture cooks, I prepare the pasta. I use a separate pot and cook the pasta according to the package instructions. I drain the pasta when it's al dente. Once the chicken and sauce are ready, I fold in the cooked pasta and shredded cheddar cheese. I stir gently to combine all the ingredients. Finally, I cover the slow cooker again. I let it heat through for 15 to 20 minutes on low. This helps the pasta absorb all the yummy flavors before serving. To make your creamy buffalo chicken pasta truly rich, focus on the cream cheese. Use soft cream cheese for easy mixing. If you want a thicker texture, add a bit more cream cheese. For a lighter touch, you can use less. Spices can enhance the flavor. Try adding paprika or cayenne for extra warmth. You can also mix in some Italian seasoning for a twist. This helps balance the heat from the buffalo sauce. Slow cookers can be tricky. To avoid overcooking, set your timer carefully. Cook on low for about four hours. Check the chicken with a fork. It should shred easily when done. Keeping the dish warm is easy. After cooking, set your slow cooker to the warm setting. This helps the flavors mingle without drying out the pasta. If you need to, just stir occasionally to keep everything creamy. {{image_2}} For those who need gluten-free options, you can easily swap the pasta. Use gluten-free penne or fusilli. These options taste great and keep the dish creamy and flavorful. Check the package for cooking times. If dairy is a concern, consider using dairy alternatives. You can find dairy-free cream cheese and ranch dressing at most stores. They will still give you that rich taste you crave. Adding vegetables to your dish can boost nutrition and flavor. Try mixing in spinach, bell peppers, or broccoli. These veggies can add color and crunch. Just chop them up and toss them in during the last hour of cooking. Adjusting spice levels is easy too. If you like more heat, add extra buffalo sauce or cayenne pepper. For a milder dish, reduce the buffalo sauce. You can also mix in some honey to balance the heat. To keep your creamy buffalo chicken pasta fresh, use proper storage containers. I recommend airtight glass or plastic containers. These help keep your food safe and tasty. Allow the pasta to cool before sealing it up. Place the containers in the refrigerator. Your leftovers can last up to three days. When it’s time to enjoy leftovers, reheating is key. Use a microwave-safe dish to heat your pasta. Cover it with a damp paper towel to keep moisture in. Heat it in short bursts, stirring in between, until hot. If you want to freeze it, portion it into freezer bags. Squeeze out all the air before sealing. This way, your creamy buffalo chicken pasta can last up to three months in the freezer. When ready to eat, thaw it in the fridge overnight before reheating. Yes, you can use frozen chicken breasts. Just make a few adjustments. When using frozen chicken, increase the cooking time. Cook on low for 6 to 7 hours instead of 4 hours. This helps the chicken cook evenly and safely. Always check that the chicken reaches 165°F (75°C) before shredding. To add more heat, try these tips. Use extra buffalo sauce for a bolder flavor. You can also add crushed red pepper flakes. Toss in some diced jalapeños for a fresh kick. If you like it very spicy, mix in a dash of hot sauce before serving. This dish goes well with several sides. A fresh green salad adds nice crunch. Garlic bread is great for soaking up the creamy sauce. You can also serve it with steamed broccoli or carrots. These sides enhance the meal and add healthy options. This blog post covered how to make creamy buffalo chicken pasta. We explored ingredients, step-by-step instructions, and tips for the best result. Remember, small changes can make big differences. You can adjust flavors and textures to suit your taste. Use the storage tips to keep your dish fresh. With practice, you’ll perfect this recipe and impress anyone who tries it. Enjoy creating this tasty meal and make it your own!

Creamy Buffalo Chicken Pasta Slow Cooker Delight

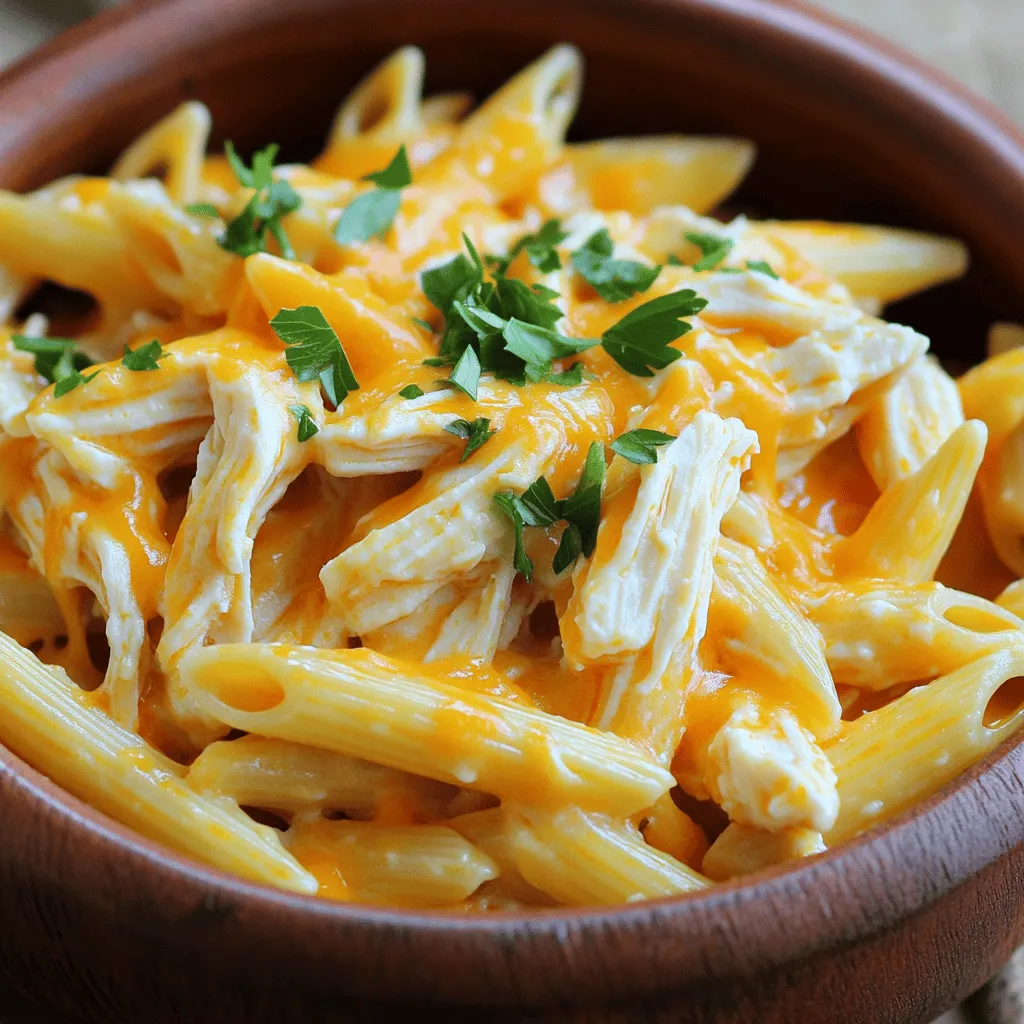
Are you ready to spice up your dinner routine? My Creamy Buffalo Chicken Pasta is a game changer, especially when

- 4 boneless, skinless chicken breasts - 1 cup broccoli florets - 1 cup bell peppers (mixed colors), sliced - 1 cup baby carrots, halved - 1/4 cup olive oil - 4 cloves garlic, minced - 1/2 cup grated Parmesan cheese - 1 teaspoon Italian seasoning - Salt and pepper to taste - Fresh parsley, chopped (for garnish) The main ingredients make this dish shine. The chicken is juicy, and veggies are colorful. - Lemon juice for a fresh kick - Red pepper flakes for some heat - Balsamic vinegar for depth - Other herbs like thyme or rosemary These optional ingredients add a tasty twist. You can mix and match to suit your taste. - Large sheet pan - Parchment paper for easy cleanup - Mixing bowls for sauces and veggies - Whisk or fork for mixing - Knife and cutting board for prep Having the right tools makes cooking smooth. This recipe is easy, so you’ll enjoy the process! First, set your oven to 400°F (200°C). This temperature cooks the chicken and veggies just right. Next, grab a large sheet pan and line it with parchment paper. This keeps your meal from sticking and makes clean-up easy. Take your four boneless, skinless chicken breasts. Place them on one side of the sheet pan. In a small bowl, mix 1/4 cup of olive oil, 4 cloves of minced garlic, 1 teaspoon of Italian seasoning, salt, and pepper. Brush half of this mix over the chicken. This adds flavor and keeps the chicken moist. Now, let’s work on the veggies. In a big bowl, combine 1 cup of broccoli florets, 1 cup of sliced bell peppers, and 1 cup of halved baby carrots. Drizzle the rest of the olive oil mix over these vegetables. Toss them well to coat. This ensures each piece is tasty and seasoned. Spread the seasoned veggies on the other side of the sheet pan. Do not crowd them; give them room to roast. Next, sprinkle 1/2 cup of grated Parmesan cheese over both the chicken and the vegetables. This gives them a nice cheesy crust. Bake everything in the oven for 20-25 minutes. Check that the chicken reaches an internal temp of 165°F (75°C). The veggies should be tender too. Once done, let the dish rest for a few minutes. Garnish it with freshly chopped parsley for a pop of color before serving. To keep your chicken juicy, start with the right cut. I prefer boneless, skinless chicken breasts. They cook well and stay tender. Marinate the chicken in olive oil and garlic before cooking. This adds moisture and flavor. Use a meat thermometer. Aim for an internal temperature of 165°F (75°C). This ensures the chicken cooks perfectly. Let it rest for a few minutes after baking. This helps the juices settle back in the meat. For this dish, I love using bright, colorful veggies. Broccoli florets add crunch and nutrition. Bell peppers bring sweetness and color. Baby carrots are easy and tasty, too. You can also try zucchini, asparagus, or red onions. These veggies roast well and soak up flavors. Aim for a mix of colors for a beautiful plate. This not only looks good but also adds different nutrients. To boost flavor, use fresh herbs. Chopped parsley adds a fresh taste. You can also use rosemary or thyme for a more earthy flavor. Another trick is to add lemon juice before serving. This brightens the dish and adds a zesty kick. Don’t forget the Parmesan cheese! A generous sprinkle enhances both taste and texture. For a spicy twist, add red pepper flakes to the olive oil mix. This adds a nice heat without overpowering the dish. {{image_2}} You can easily switch up the protein in this dish. Instead of chicken, try turkey breasts or pork chops. Both cook well on a sheet pan and absorb flavors nicely. For a lighter option, use fish, like salmon or cod. Fish cooks faster, so check it after 15 minutes. Ground meats also work; just form them into patties. Feel free to experiment and find what you enjoy most. If you want a vegetarian dish, simply remove the chicken. Replace it with hearty vegetables, like zucchini or eggplant. You can also add chickpeas for protein. For a vegan version, skip the cheese or use a dairy-free alternative. Nutritional yeast adds a cheesy flavor without dairy. This way, you keep the dish rich and tasty while fitting different diets. Using seasonal vegetables makes this dish even better. In the spring, add asparagus or snap peas for a fresh crunch. Summer brings fresh corn and tomatoes, which add sweetness. In the fall, try butternut squash or Brussels sprouts for warmth. Winter veggies like root vegetables work great too. Mixing different colors and textures keeps the meal exciting and nutritious. To keep your Garlic Parmesan Chicken Veggie Sheet Pan fresh, let it cool first. Place the chicken and veggies in an airtight container. This helps keep moisture in and air out. Store it in the fridge for up to three days. Label the container with the date. This way, you know when to use it. When you’re ready to eat, you can reheat it easily. Preheat your oven to 350°F (175°C). Place the leftovers on a baking sheet. Cover them with foil to keep them moist. Heat for about 15-20 minutes or until warm. You can also use a microwave. Just heat it on high for 2-3 minutes. Stir halfway through to heat evenly. If you want to store it for longer, freezing is a good option. Cut the chicken and veggies into smaller pieces. Place them in freezer-safe bags or containers. Remove as much air as you can. Label them with the date. You can freeze this meal for up to three months. When ready to eat, thaw it in the fridge overnight before reheating. The best temperature for cooking chicken is 400°F (200°C). This heat cooks the chicken evenly. It helps the chicken stay juicy and tender. At this temp, it takes about 20-25 minutes to cook. Always check the thickest part of the chicken for doneness. Yes, you can use frozen vegetables. They are a great time-saver. Just make sure to thaw and drain them first. This helps avoid too much moisture on the pan. It’s best to use mixed vegetables for color and taste. To know if the chicken is cooked, use a meat thermometer. The safe internal temperature is 165°F (75°C). If you don’t have a thermometer, cut into the thickest part. The meat should be white, not pink. Juices should run clear. You can serve this dish with rice or quinoa. These grains soak up the tasty juices. A fresh salad also pairs well with it. You can add a light vinaigrette for extra flavor. Garlic bread makes a nice side, too! This blog post guided you through making a tasty Garlic Parmesan Chicken Veggie Sheet Pan dish. You learned about the main and optional ingredients, the right equipment, and step-by-step cooking methods. I also shared tips to keep your chicken juicy and ways to add more flavor. Remember, you can try different proteins or veggies to suit your taste. Finally, I covered storing and reheating leftovers for easy meals. Enjoy your tasty creation!

Garlic Parmesan Chicken Veggie Sheet Pan Delight

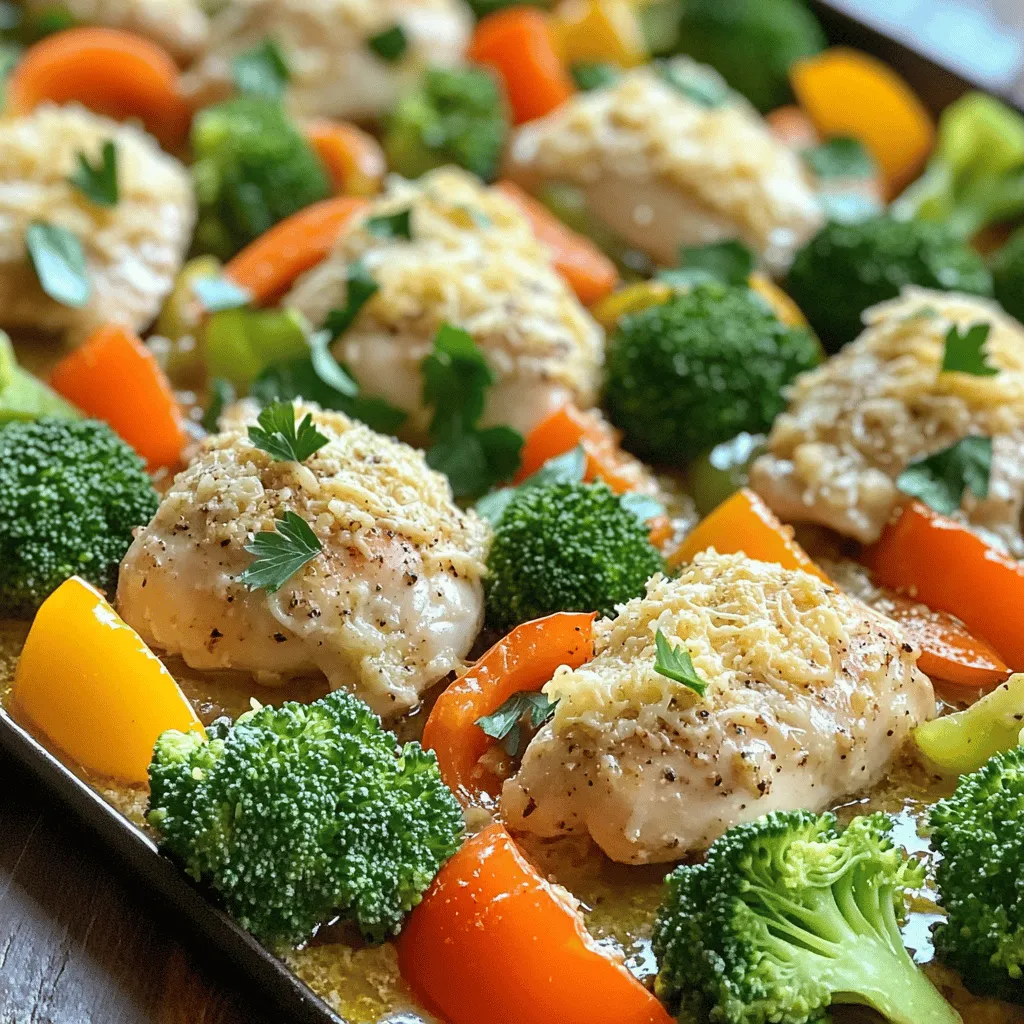
Are you ready for a simple and tasty meal? My Garlic Parmesan Chicken Veggie Sheet Pan Delight makes cooking fun

- 10 cups popped popcorn (about 1/2 cup kernels) - 1 cup apple cider - 1 cup granulated sugar - 1/2 cup unsalted butter - 1/4 cup light corn syrup - 1 teaspoon vanilla extract - 1/2 teaspoon cinnamon - 1/4 teaspoon nutmeg - 1/2 teaspoon salt - Optional: 1 cup chopped nuts (walnuts or pecans) - Calories per serving: About 150-200 calories - Breakdown of macronutrients: - Carbohydrates: 25-30g - Protein: 1-2g - Fat: 7-10g This treat packs flavor and crunch, perfect for fall gatherings. The apple cider brings a sweet and tangy note. The spices add warmth and depth to the caramel. Each bite is a cozy reminder of autumn days. You can easily adjust the recipe by adding nuts or more spices. Have fun with it! Popping the popcorn Start by popping the popcorn. You can use a large pot or an air popper. If using a pot, heat it over medium heat. Add about 1/2 cup of popcorn kernels. Cover it and wait for the kernels to pop. Once done, pour the popcorn into a big bowl. Remove any unpopped kernels. Making the apple cider reduction Next, grab a medium saucepan. Pour in 1 cup of apple cider. Turn the heat to medium and bring it to a boil. Once boiling, lower the heat. Let it simmer for about 20 minutes. It should reduce to about 1/3 cup. Remove it from heat and let it cool a bit. Preparing the caramel In another saucepan, combine 1 cup of granulated sugar, 1/2 cup of unsalted butter, and 1/4 cup of light corn syrup. Add 1/2 teaspoon of cinnamon, 1/4 teaspoon of nutmeg, and 1/2 teaspoon of salt. Cook over medium heat. Stir often until it boils. Let it boil without stirring for 4 to 5 minutes. The color should turn deep golden. Mixing caramel with popcorn Now, take the caramel off the heat. Stir in the reduced apple cider and 1 teaspoon of vanilla extract. Be careful, as the mix might bubble up. Pour this caramel over your popped popcorn. Gently stir until the popcorn is fully coated. Adding optional ingredients If you like, fold in 1 cup of chopped nuts like walnuts or pecans. This adds a nice crunch and flavor to your popcorn balls. Forming the popcorn balls Let the mixture cool for about 10 to 15 minutes. It should be warm but easy to handle. Grease your hands with a little butter. Take small handfuls of the mixture and form balls. Aim for the size of a golf ball. Cooling time Place the popcorn balls on a parchment-lined baking sheet. Let them sit at room temperature for about 30 minutes. This helps them firm up. Tips for shaping If the mixture is too sticky, you can grease your hands more. This makes it easier to shape the balls. Make sure they are well-formed so they hold together well. Enjoy your tasty fall treat! - Monitoring temperature: Use a candy thermometer. The right temperature is key. Aim for 240°F to 250°F for a rich caramel. This ensures it will harden well and hold shape. - Avoiding sugar crystallization: Stir the mixture gently, but not too much. If sugar crystals form, you may end up with grainy caramel. Adding a little corn syrup helps keep the caramel smooth. - Using fresh kernels: Make sure your popcorn kernels are fresh. Old kernels may not pop well. Store them in an airtight container to keep them fresh. - Methods for popping: You can use an air popper or the stovetop. If using the stovetop, heat oil in a pot and add kernels. Cover with a lid and shake the pot often to prevent burning. - Presentation ideas: Stack the popcorn balls in a pretty bowl. Drizzle any leftover caramel sauce on top for a gourmet look. You can also sprinkle some chopped nuts over them for extra crunch. - Pairing with beverages: Serve these popcorn balls with warm apple cider or hot chocolate. The flavors blend perfectly and enhance the fall vibe. {{image_2}} To make your apple cider caramel popcorn balls even more fun, try these ideas: - Adding chocolate drizzle: Melt some chocolate and drizzle it over the popcorn balls. This gives a nice sweet touch. You can use dark, milk, or white chocolate depending on your taste. - Using different spices: Mix things up by adding spices like ginger or allspice. This can bring a warm flavor that matches the fall season. If you want to switch things up, consider these swaps: - Alternative sweeteners: Instead of granulated sugar, you can use honey or maple syrup. This adds a unique flavor and can cut down on refined sugars. - Substituting nuts: If you have a nut allergy, try seeds like pumpkin or sunflower seeds. They add a nice crunch without the worry. Making these popcorn balls fit different diets is simple: - Gluten-free options: Use gluten-free popcorn and check your caramel ingredients to ensure they are gluten-free. Most ingredients are naturally gluten-free. - Vegan alternatives: Swap the butter for coconut oil and use a vegan caramel recipe. This way, everyone can enjoy this tasty treat. To keep your apple cider caramel popcorn balls fresh, use an airtight container. This helps prevent them from becoming stale. You can also wrap them in plastic wrap for extra protection. These popcorn balls stay fresh for about a week. After that, they may lose their crunch. If you want to store them longer, freezing is a great option. First, let the popcorn balls cool completely. Then, place them in a single layer on a baking sheet. Freeze them for about an hour until firm. After that, move them to a freezer-safe bag. They can last for up to three months in the freezer. To thaw, simply take them out and let them sit at room temperature for about 30 minutes. If you're in a hurry, you can also microwave them for about 10 seconds on low power. This helps bring back some of their original texture. If your popcorn balls become stale, don’t worry! You can revive them easily. Preheat your oven to 200°F (93°C). Place the popcorn balls on a baking sheet and warm them for 5-10 minutes. This warms them up without making them too soft. For the best texture, enjoy them fresh. But if you need to store them, follow these tips to keep them tasty and enjoyable. You can use an air popper or the stovetop. An air popper is easy and quick. Just add your kernels and turn it on. The popcorn pops up light and fluffy. If you choose stovetop, use a large pot with a lid. Heat oil over medium heat, then add the kernels. Shake the pot as it pops to avoid burning. This method gives you great flavor and control. Yes, you can prepare the popcorn balls in advance. Make the caramel and popcorn, then form the balls. Store them in an airtight container. They will stay fresh for about three days. If you want to keep them longer, consider freezing them. Just make sure to wrap them well. To prevent sticky popcorn balls, keep your hands greased. Use a little butter or cooking spray. This helps the mixture slide off easily. Also, let the caramel cool slightly before mixing. If it's too hot, it can make the popcorn sticky. Lastly, ensure your popcorn is fully coated but not drenched in caramel. This blog post covered a fun recipe for apple cider popcorn balls. You learned about the ingredients, detailed steps, and helpful tips. We discussed flavor variations and storage options, too. By following these tips, you can make your popcorn balls perfect every time. Remember, practice helps improve your skills. Enjoy making this tasty treat, and don’t be afraid to get creative! Your popcorn balls can be a hit at any gathering.

Apple Cider Caramel Popcorn Balls Tasty Fall Treat

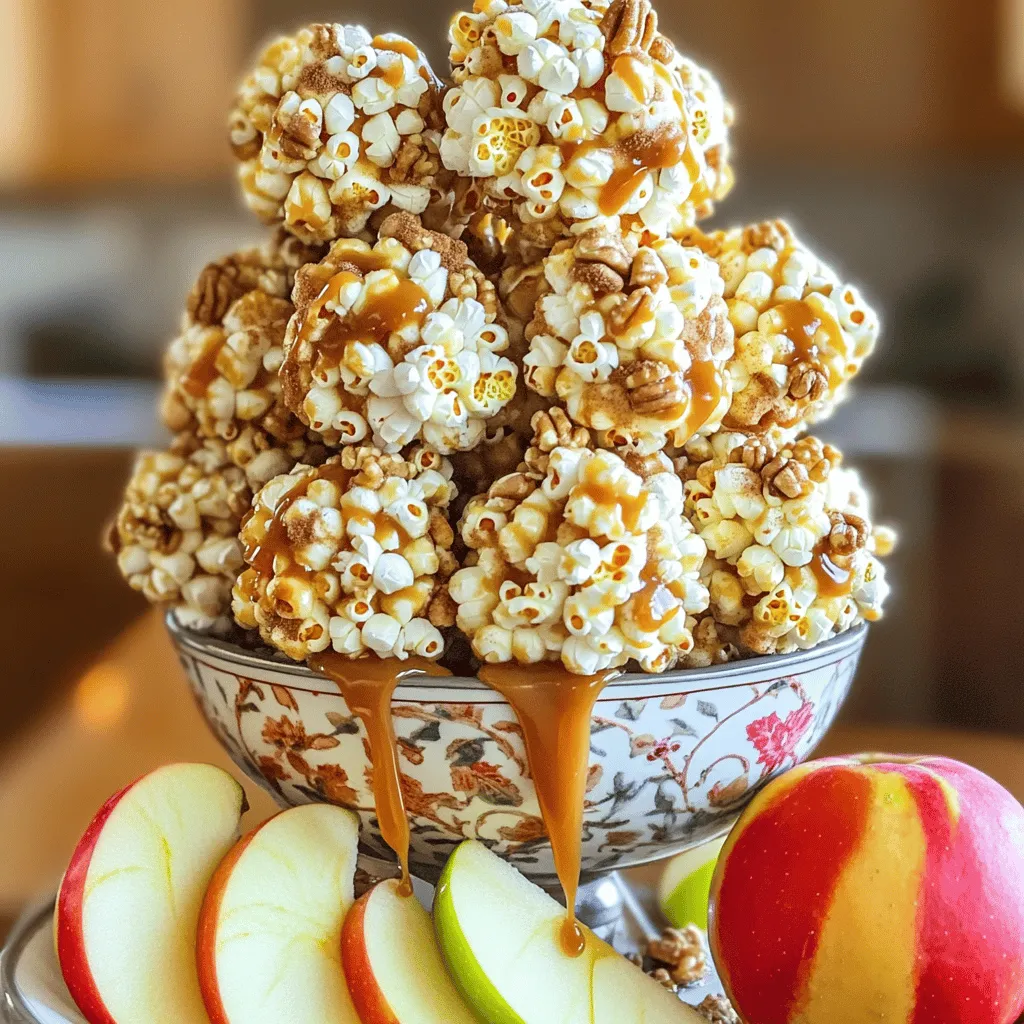
Fall is here, and it’s time to celebrate with a delicious treat: Apple Cider Caramel Popcorn Balls! Picture fluffy popcorn

Older posts
Newer posts
← Previous Page1 … Page20 Page21 Page22 … Page84 Next →

dsad

© 2026 Lisa Dishes • Built with GeneratePress

Our Policies

  • Copyright Policy
  • Cookie Policy
  • GDPR Policy
  • Privacy Policy
  • Disclaimer
  • Terms Of Use

More Information

  • Home
  • About
  • Contact
  • Appetizers
  • Dessert
  • Dinner
  • Drinks
©2026, Lisa Dishes About Back To Top