Skip to content
DisclaimerTerms Of UseGDPR PolicyCookie Policy

Lisa Dishes

  • Home
  • Drinks
  • Appetizers
  • Dinner
  • Dessert
  • About
  • Contact
  • Privacy Policy
DisclaimerTerms Of UseGDPR PolicyCookie Policy

NO-ING-IMG

- 1 lb large shrimp, peeled and deveined - 1 bunch of asparagus, trimmed - 4 cloves garlic, minced - 2 lemons (one for zest and juice, one sliced) - 3 tablespoons olive oil - 1 teaspoon paprika - ½ teaspoon red pepper flakes - Salt and pepper to taste - Fresh parsley, chopped Gathering fresh ingredients is key to making this dish shine. First, choose large shrimp. They are best for this recipe since they cook quickly and stay juicy. Next, pick bright green asparagus. It should snap easily when fresh. Garlic adds a strong flavor. I recommend using four cloves, minced. Lemons bring brightness to the dish. One lemon will give zest and juice. The other will be sliced for garnish. Olive oil helps everything cook well and adds richness. For spices, paprika gives a nice color and depth. Red pepper flakes add a kick but feel free to adjust the amount. Lastly, season with salt and pepper to enhance the taste. Don’t forget the fresh parsley! It adds a lovely touch and color when you finish the dish. These ingredients make the Lemon Garlic Shrimp & Asparagus Sheet-Pan a delight for the senses. Enjoy the freshness and flavors! - Preheat your oven to 400°F (200°C). - Line a sheet pan with parchment paper for easy cleaning. - In a large bowl, mix together: - 1 lb large shrimp, peeled and deveined - 1 bunch of asparagus, trimmed - 4 cloves garlic, minced - 3 tablespoons olive oil - Zest and juice of 1 lemon - 1 teaspoon paprika - ½ teaspoon red pepper flakes - Salt and pepper to taste - Spread the shrimp and asparagus mixture evenly on the sheet pan. - Make sure the shrimp do not overlap. - Place lemon slices on top for added flavor. - Bake in the oven for 10-12 minutes. - Look for the shrimp to turn pink and opaque. - The asparagus should be tender-crisp by this time. - Remove the sheet pan from the oven. - Check the shrimp to ensure they are cooked through. - Garnish the dish with fresh parsley before serving. For great results, cook shrimp for 10 to 12 minutes. The asparagus needs about the same time to get tender but still crisp. To check if shrimp are cooked, look for a pink color. They should also be opaque and firm to the touch. If they curl tightly, they are overcooked. Using parchment paper helps a lot. It keeps food from sticking to the pan. Plus, it makes cleanup quick and easy. Just lift off the paper and toss it! For easy cleanup, use a large bowl to mix your ingredients. This keeps your workspace tidy and saves time later. You can serve this dish right on the sheet pan for a fun look. If you prefer, transfer it to a platter. For sides, try rice or a fresh salad. A glass of white wine goes well too. Enjoy your meal with some lemon wedges for added zing! {{image_2}} You can easily swap shrimp for other proteins. Chicken works well, or try tofu for a vegetarian option. For chicken, cut it into bite-sized pieces. For tofu, use firm tofu and press it to remove water. You can also add seasonal veggies to enhance this dish. Think about using bell peppers, zucchini, or cherry tomatoes. These add color and flavor. To change the taste, try different spice blends. Cajun seasoning or Italian herbs can give it a new twist. You can also add cheese for richness. A sprinkle of feta or Parmesan cheese before serving adds creaminess. Another idea is to top it with nuts for crunch. Sliced almonds or pine nuts work great. If you need a gluten-free option, this recipe already fits the bill! Just make sure your spices are gluten-free. For a low-carb or keto-friendly version, skip the asparagus and add more shrimp. You can also use cauliflower rice instead of pasta or rice as a base. This keeps it light and healthy while still being filling. To keep your Lemon Garlic Shrimp and Asparagus fresh, store leftovers in the fridge. Use airtight containers to prevent moisture loss. Glass or plastic containers work well. Let the dish cool before sealing it to avoid steam build-up. This helps keep your shrimp and asparagus tasty. If you want to save some for later, freezing is a great option. Place the cooled dish in freezer-safe containers. Leave some space at the top since liquids expand when frozen. Wrap the containers with plastic wrap for extra protection. To reheat, let the dish thaw in the fridge overnight. When ready, heat in the oven at 350°F (175°C) until warmed through. This keeps the shrimp and asparagus from becoming rubbery. In the fridge, your leftovers can last for about three days. Always check for freshness before eating. If the shrimp smell sour or the asparagus looks mushy, it’s time to toss it. You want to enjoy this dish at its best, so trust your senses! Yes, you can use frozen shrimp. Start by thawing them. Place the shrimp in a bowl of cold water for about 15-20 minutes. Change the water halfway through. This method keeps the shrimp tender. After thawing, pat them dry with paper towels. This step helps the shrimp absorb the lemon and garlic flavors better. This dish pairs well with various sides. Here are some ideas: - Rice or quinoa for a filling base. - A fresh green salad to add crunch. - Garlic bread to soak up the sauce. - White wine like Sauvignon Blanc for a nice drink. These sides complement the shrimp and asparagus flavors, making your meal more satisfying. You can easily change the heat level. If you like it spicy, add more red pepper flakes. Start with one teaspoon and taste. If you want it milder, reduce the flakes to a pinch or leave them out. You can also use sweet paprika instead of regular paprika. This swap will give a warm flavor without the heat. This blog post detailed a simple, tasty dish of Lemon Garlic Shrimp and Asparagus. You learned about fresh ingredients, cooking instructions, and useful tips. I shared easy swaps for different diets and flavors. Storing leftovers is simple, and you saw how to keep things fresh. Try this dish to impress your friends. It's quick and healthy. With the right herbs and spices, you’ll find new ways to enjoy this meal. Remember, cooking should be fun and satisfying!

Lemon Garlic Shrimp & Asparagus Sheet-Pan Delight

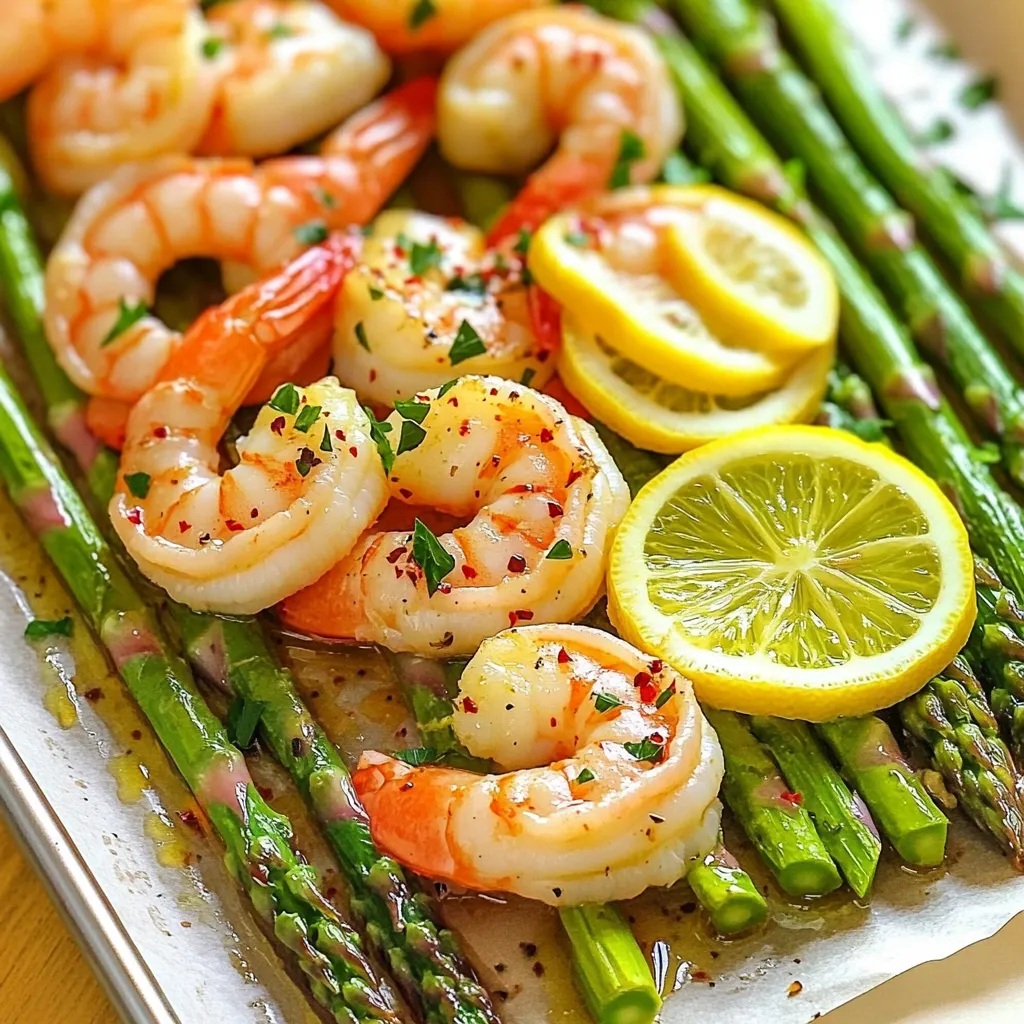
Looking to impress at your next meal without spending hours in the kitchen? Try my Lemon Garlic Shrimp & Asparagus

- 500g boneless chicken thighs, cubed - 2 tablespoons ginger-garlic paste - 1 teaspoon turmeric powder - 1 teaspoon red chili powder - 1 teaspoon garam masala - 1 large onion, finely chopped - 2 tablespoons vegetable oil - 200g tomato puree - 100ml heavy cream - 50g unsalted butter - Salt to taste - Fresh coriander leaves, for garnish To make butter chicken, you need good-quality ingredients. Start with boneless chicken thighs for juicy meat. The spices are key: turmeric adds color, red chili gives heat, and garam masala brings warmth. You’ll also need a large onion, finely chopped, to create a rich base. Tomato puree adds depth, while heavy cream and butter make the dish creamy and rich. Don’t forget salt to enhance the flavors. Fresh coriander leaves make a lovely garnish. - Additional spices for extra flavor - Suggestions for fresh herbs - Alternative sources of cream or butter You can add more spices if you like. Try cumin or paprika for extra depth. Fresh herbs, like mint or parsley, can brighten the dish. If you want a lighter option, use yogurt instead of cream. You can also use ghee instead of butter for a more traditional taste. Remember, cooking is all about personal touch, so feel free to play with these options! {{ingredient_image_1}} Marinating the chicken First, take 500g of boneless chicken thighs and cube them. In a mixing bowl, add the chicken cubes. Include 2 tablespoons of ginger-garlic paste, 1 teaspoon of turmeric powder, 1 teaspoon of red chili powder, 1 teaspoon of garam masala, and salt to taste. Mix everything well. Make sure all the chicken gets coated. Let it marinate for at least 30 minutes. This step helps the chicken soak up all those tasty flavors. Preparing the onions While the chicken marinates, chop 1 large onion finely. This will add sweetness to your dish. Heat 2 tablespoons of vegetable oil in a large pan over medium heat. Once the oil is hot, add the chopped onions. Sauté them for about 5 to 7 minutes. You want them to turn golden brown. This caramelization gives great flavor. Browning the chicken Now, it’s time to cook the chicken. Add the marinated chicken to the pan with the caramelized onions. Cook it for 8 to 10 minutes. Stir occasionally to ensure even cooking. Your chicken should turn brown on all sides. This step seals in the juices and gives a nice texture. Creating the sauce Next, pour in 200g of tomato puree. Stir well to mix it with the chicken and onions. Let this simmer on low heat for about 10 minutes. You want the sauce to thicken nicely. It will create a rich base for your Butter Chicken. Adding cream and butter Reduce the heat to low. Now, add 50g of unsalted butter into the pan. Slowly pour in 100ml of heavy cream while stirring. This will make your curry rich and creamy. Let it simmer for another 5 to 7 minutes. Make sure the chicken is fully cooked and the sauce is luscious. Garnishing and serving Finally, remove the pan from the heat. Garnish with freshly chopped coriander leaves. This adds a pop of color and fresh flavor. Serve your Butter Chicken in a warm bowl. Drizzle with extra cream if you like. Enjoy it with steamed basmati rice or naan bread for a complete meal experience. Marination time: Marinate the chicken for at least 30 minutes. This step helps the spices soak in. For better flavor, consider marinating overnight. It makes the chicken tender and juicy. Cooking technique for juicy chicken: Cook the chicken on medium heat. This keeps the meat juicy and avoids dryness. Stir occasionally to ensure even cooking. Look for a nice golden brown color on the chicken. Best accompaniments: Serve Butter Chicken with fluffy basmati rice or warm naan. Both pair well with the creamy sauce. The rice soaks up the flavors, while naan is perfect for scooping. Presentation ideas for serving: Use a warm bowl for serving. Drizzle some extra cream on top for a rich look. A sprinkle of fresh coriander adds a nice touch. This makes the dish look vibrant and appetizing. Pro Tips Marinate Longer for More Flavor: For the best results, marinate the chicken for at least 1-2 hours, or even overnight, to allow the spices to penetrate deeply and enhance the overall flavor. Use Fresh Ingredients: Whenever possible, use fresh ginger and garlic instead of paste for a more vibrant and aromatic taste in your Butter Chicken. Adjust Spice Levels: Feel free to modify the amount of red chili powder based on your heat preference. Start with less if you're unsure, and add more to taste. Perfect Creaminess: To achieve an ultra-creamy texture, add the heavy cream gradually while stirring. This helps to emulsify the sauce and maintain its richness. {{image_2}} You can make some simple swaps to make Butter Chicken healthier. - Using chicken breast instead of thighs: Chicken breast has less fat. It is leaner and cooks quickly. Just remember, it may dry out if overcooked. - Low-fat cream options: Use yogurt or low-fat cream for a lighter sauce. This keeps the dish creamy but cuts calories. Changing a few ingredients can bring new life to your Butter Chicken. - Adding coconut milk for a different taste: Coconut milk adds a sweet and creamy flavor. It also makes the dish dairy-free, which is great for some diets. - Experimenting with different spices: You can try adding cinnamon, cardamom, or cumin. Just a pinch can change the whole flavor profile. Have fun with it! To keep your butter chicken fresh, refrigerate it. Place it in an airtight container. This helps keep it moist. You can store it in the fridge for up to 3 days. For longer storage, freezing is a great option. - Best practices for freezing: - Allow the curry to cool completely. - Transfer it to a freezer-safe container. - Leave some space at the top for expansion. - Label the container with the date. - It can last up to 3 months in the freezer. Reheating butter chicken the right way is key. You want to keep the flavors and texture. Here are some methods to try: - Stovetop Method: - Place the curry in a pan over low heat. - Stir it often to warm evenly. - Add a splash of water or cream to keep it creamy. - Microwave Method: - Transfer your curry to a microwave-safe bowl. - Cover it with a microwave-safe lid. - Heat it for 2-3 minutes, stirring halfway through. Time and temperature recommendations: - Reheat until it’s hot all the way through. Aim for 165°F (73.8°C) to ensure safety. What is the origin of Butter Chicken? Butter Chicken comes from India. It started in Delhi in the 1950s. Chefs made it to use leftover chicken. They mixed it with spicy tomato sauce and cream. This dish became very popular. How spicy is Butter Chicken? Butter Chicken is mild to medium spicy. The heat comes from red chili powder. You can adjust the spice level by adding or reducing it. If you prefer less spice, use less chili powder. Can I make Butter Chicken vegetarian? Yes, you can make Butter Chicken vegetarian. Swap chicken with paneer or tofu. Use the same spices and sauce. This way, you still get that creamy flavor. How long does Butter Chicken last in the fridge? Butter Chicken lasts about 3 to 4 days in the fridge. Store it in an airtight container. Make sure it cools down before placing it in the fridge. What is the best way to reheat Butter Chicken? Reheat Butter Chicken on the stove or in the microwave. On the stove, warm it gently over low heat. Stir it often to avoid burning. In the microwave, use a low setting and stir every minute. This keeps it creamy and tasty. This blog post covered how to make delicious butter chicken. We explored key ingredients like chicken thighs, spices, and cream. You learned steps for marinating, cooking, and garnishing. We also shared tips for perfecting your dish and ways to store leftovers. In the end, butter chicken is easy to customize and enjoy. With practice, you can make your own version shine. Whether you're a beginner or a pro, cooking can always bring joy. Go ahead and try this dish; it might just become a favorite!

Butter Chicken Curry Simple and Flavorful Recipe

Welcome to the delicious world of Butter Chicken Curry! As an expert, I’ll guide you through a simple yet flavorful

- 1 lb (450g) mixed mushrooms (cremini, shiitake, and button) - 4 tablespoons unsalted butter - 4 cloves garlic, minced - 2 tablespoons olive oil - 1 teaspoon fresh thyme leaves (or ½ teaspoon dried thyme) - 1 teaspoon fresh parsley, chopped - Salt and pepper to taste - Zest of 1 lemon Best types of mushrooms for roasting I love using a mix of cremini, shiitake, and button mushrooms. Each type brings its own flavor. Cremini mushrooms are earthy and firm. Shiitake mushrooms add a nice umami taste. Button mushrooms are mild and absorb flavors well. This mix makes the dish truly special. Substitutions for butter and oil If you need to avoid butter, use ghee or vegan butter. You can also use coconut oil for a different flavor. For olive oil, avocado oil works great too. These swaps still give you a tasty result! First, preheat your oven to 400°F (200°C). This will make sure your mushrooms cook well. While the oven heats, line a baking sheet with parchment paper. This helps with easy cleanup later. Next, clean the mushrooms. Use a damp cloth or a soft brush to wipe off dirt. Trim the stems if needed. You want them ready for the tasty coating. Now, grab a large mixing bowl. Add the cleaned mushrooms, olive oil, and melted butter. Then, add minced garlic, thyme, lemon zest, salt, and pepper. Toss everything together. Make sure the mushrooms get coated evenly. Spread the mushrooms on the baking sheet in a single layer. Don't crowd them! This helps them roast evenly and get that nice golden color. Roast the mushrooms for 20-25 minutes. Halfway through, flip them. This step ensures they cook well on both sides. When they look tender and golden brown, they are ready to enjoy! To make your garlic butter roasted mushrooms shine, focus on even seasoning. Start by mixing the mushrooms well with olive oil and melted butter. This helps every piece get coated. Use fresh garlic for the best taste. It adds a rich flavor that dried garlic can't match. For herbs, fresh thyme is a winner. It complements the mushrooms well. If you use dried thyme, remember it's stronger. You can use half the amount of dried to get the same flavor. A touch of lemon zest brightens the dish. It gives a fresh burst that makes the mushrooms pop. Get creative with how you serve your garlic butter roasted mushrooms. They work well as a side for grilled meats, pasta, or risotto. You can even toss them into a salad for added flavor. Pairing these mushrooms is easy. Try them with a steak for a hearty meal. They also go great with fish, adding a savory touch. Don’t forget a sprinkle of parsley on top for color. This small step makes the dish look fancy and inviting. {{image_2}} You can change up the flavor of garlic butter roasted mushrooms easily. One great way is to add cheese. Grated Parmesan gives a nice salty taste. Feta adds a creamy and tangy twist. Just sprinkle your chosen cheese on top after roasting. Another way to boost flavor is with herbs. Fresh rosemary pairs well with mushrooms. You can also try basil for a sweet hint. Just add your herbs to the mixing bowl with the garlic and butter. This will fill the mushrooms with more taste. You don't have to roast mushrooms for this dish. Sautéing them on the stovetop is a quick option. Heat some olive oil in a pan and add the mushrooms. Cook them for about 10 minutes, stirring often. This method gives you a different texture and flavor. Grilling is another fun way to cook mushrooms. Toss them in the garlic butter mix and place them on a grill. Cook until they are tender and have nice grill marks. This adds a smoky taste that is hard to beat. Feel free to experiment with these ideas to find your favorite twist on garlic butter roasted mushrooms! To store leftover garlic butter roasted mushrooms, use an airtight container. Glass or plastic containers work well. Let the mushrooms cool to room temperature before sealing. This helps keep moisture out. Store in the fridge for up to three days. If you want to save them longer, consider freezing. Place the mushrooms in a freezer-safe bag or container. They can last up to three months in the freezer. When it's time to enjoy your leftovers, reheating is key. The best way to reheat roasted mushrooms is in the oven. Preheat your oven to 350°F (175°C). Spread the mushrooms on a baking sheet, ensuring they have space. Heat for about 10 minutes or until warm. This method helps keep the mushrooms crispy. You can also use a skillet on low heat. Add a little olive oil or butter to prevent sticking. Stir gently to maintain texture and flavor. Avoid using the microwave, as it can make the mushrooms soggy. Reheating properly will make your garlic butter roasted mushrooms taste fresh again! Can I use different types of mushrooms? Yes, you can use many types of mushrooms. Cremini, shiitake, and button mushrooms work well together. You can also try portobello or oyster mushrooms. Each type adds its own taste and texture. Mixing them gives a nice variety to your dish. How do I know when the mushrooms are done roasting? Mushrooms are done when they are tender and golden brown. This usually takes about 20 to 25 minutes in the oven. Flipping them halfway helps them cook evenly. You can poke them with a fork; if they are soft, they are ready. Can I make this recipe ahead of time? You can prepare the mushrooms in advance. Clean and coat them, then store them in the fridge. When you are ready to cook, just roast them in the oven. This makes it easy for last-minute meals or gatherings. Garlic butter roasted mushrooms are simple and fun to make. You learned about the best ingredients, tips for flavoring, and cooking methods. Each step brings a delicious dish to life. Remember to check your mushrooms for doneness and have fun with flavors. Try different herbs, cheeses, or cooking methods to make this dish your own. Enjoy your cooking and impress your friends. Happy roasting!

Garlic Butter Roasted Mushrooms Flavorful Side Dish

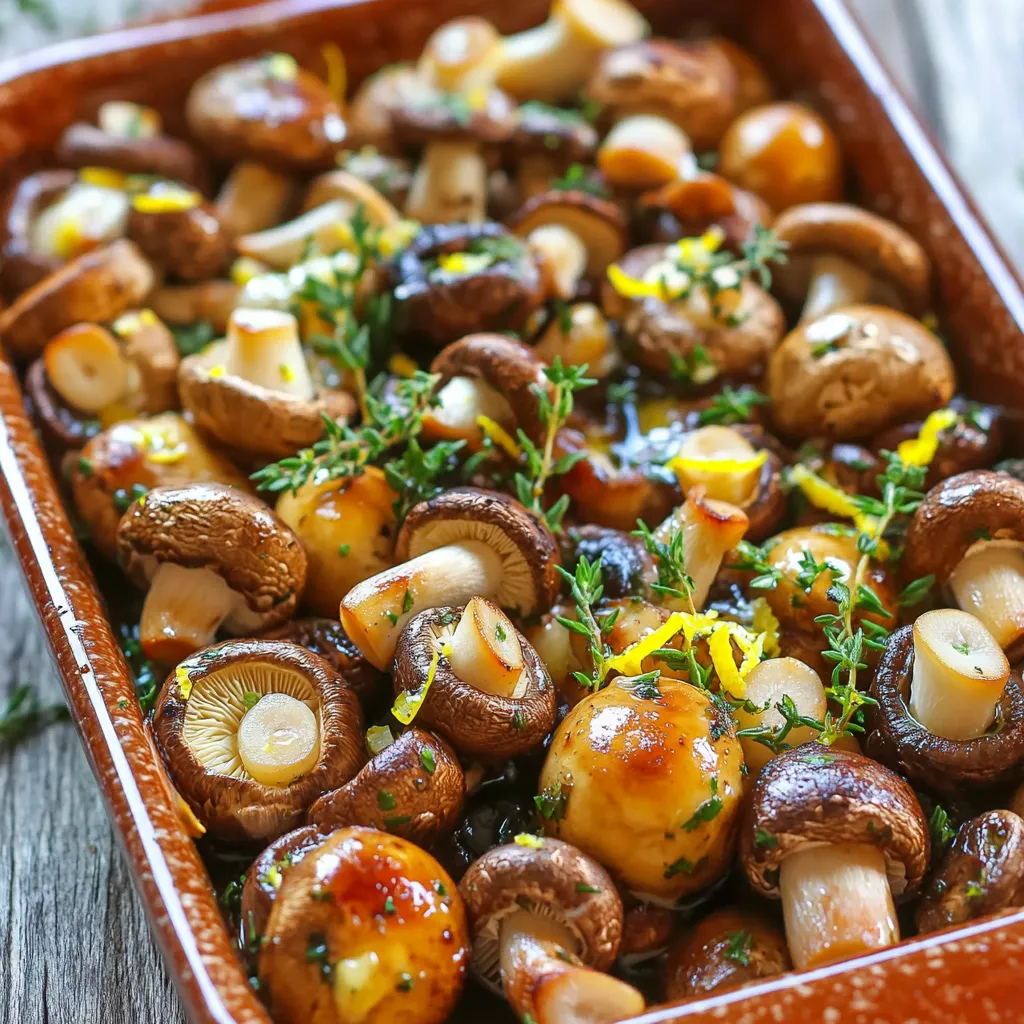
If you’re searching for a tasty side dish, Garlic Butter Roasted Mushrooms are a must-try. These mushrooms burst with flavor

- Large head of cauliflower - All-purpose flour - Hot sauce - Plant-based milk - Honey or maple syrup - Fresh parsley for garnish - Garlic powder - Onion powder - Paprika - Salt - Unsalted butter When I create a snack like Air Fryer Buffalo Cauliflower, I focus on fresh ingredients. The main star is the large head of cauliflower. This vegetable gives a nice crunch and absorbs flavors well. Next, I use all-purpose flour to make a batter. This helps the cauliflower get crispy in the air fryer. Hot sauce adds that spicy kick we all love. Frank’s RedHot is my go-to, but feel free to pick your favorite. You might want to try some optional ingredients too. Plant-based milk can make the batter creamier. Honey or maple syrup adds a hint of sweetness that balances the heat. Fresh parsley makes for a pretty garnish and adds a pop of color. For seasoning, I never skip garlic powder, onion powder, paprika, and salt. These spices bring out the best in the cauliflower. Unsalted butter, melted, gives the sauce a smooth finish. It’s a simple mix of flavors that works well together. Overall, the right ingredients make this snack both tasty and fun to make! Start by cutting the large head of cauliflower into bite-sized florets. This size helps them cook evenly. Place the florets in a bowl. Next, it's time to prepare the batter. In a large mixing bowl, combine 1 cup of all-purpose flour, 1 teaspoon of garlic powder, 1 teaspoon of onion powder, 1 teaspoon of paprika, and 1 teaspoon of salt. Mix these dry ingredients well. Now, gradually pour in 1 cup of water or plant-based milk, whisking until you have a smooth batter. The batter should feel like pancake batter. Before cooking, preheat your air fryer to 400°F (200°C). This step ensures the cauliflower cooks evenly and gets crispy. Dip each cauliflower floret into the batter. Make sure to coat each piece well. After coating, shake off any extra batter. Arrange the battered cauliflower in the air fryer basket. Place them in a single layer and avoid overcrowding. If your air fryer is small, you may need to cook in batches. Air fry the cauliflower for 12 to 15 minutes. Be sure to shake the basket halfway through. This helps them cook evenly and become golden brown. While the cauliflower cooks, mix 1 cup of hot sauce, 2 tablespoons of melted butter, and 1 tablespoon of honey or maple syrup in a large bowl. Adjust the hot sauce for your spice level. Once the cauliflower is ready, move them to the bowl with the hot sauce mixture. Toss them gently to coat each floret evenly. If you want extra crispiness, you can air fry the coated cauliflower for an additional 3 minutes. Finally, garnish with fresh chopped parsley before serving. Enjoy your tasty snack! To get that perfect crunch, avoid overcrowding the air fryer basket. If you pack the cauliflower in too tightly, it will steam instead of crisp up. Cook in batches if needed. Aim for a cooking time of 12 to 15 minutes. Shake the basket halfway through to ensure even cooking. Check for a golden brown color for the best crispiness. The right batter texture is key to a great result. You want it thick enough to cling to the cauliflower but not too thick. It should feel like pancake batter. If you need a gluten-free option, swap the all-purpose flour with a gluten-free blend. Just make sure the consistency stays the same. Buffalo cauliflower pairs well with dips like ranch or blue cheese. These creamy dips balance the heat from the hot sauce. For a complete meal, serve with a fresh salad or some crunchy veggies. You can also turn this snack into a main dish by adding it to tacos or wraps. {{image_2}} You can change the taste of your Air Fryer Buffalo Cauliflower easily. Adding spices can bring new life to the dish. Try cumin for a warm flavor or cayenne pepper for extra heat. Each spice adds a unique twist. If you want to switch up the sauce, consider options like teriyaki or BBQ sauce. These sauces give a sweet and tangy taste. Each sauce can change the whole vibe of your snack. Don’t be afraid to experiment and find your favorite flavor. This recipe can fit many diets. For those needing gluten-free options, swap all-purpose flour for a gluten-free flour blend. Many blends work well for this dish and keep it tasty. If you're vegan, you can make easy changes. Use plant-based milk instead of regular milk. Replace butter with vegan butter and skip the honey for maple syrup. This keeps the flavor strong while fitting your diet. Buffalo cauliflower is fun to serve in many ways. You can make tacos by placing the cauliflower in a warm tortilla. Add some fresh veggies to make it exciting. This dish also shines as an appetizer or snack. Serve it with a cool dip like ranch or blue cheese. The spicy cauliflower pairs well with these creamy dips. No matter how you serve it, it brings joy to any table. To keep your buffalo cauliflower fresh, store it in an airtight container. Use a glass or plastic container with a tight lid. This helps keep the flavors locked in. Make sure the cauliflower is cool before sealing the container. It can last in the fridge for up to four days. If you want to keep it longer, consider freezing. When reheating, the air fryer is your best friend. Preheat the air fryer to 350°F (175°C). Place the cauliflower in a single layer and cook for about 5-7 minutes. This keeps it crispy. If you use a microwave, it may get soggy. Heat it in short bursts, but know the texture won’t be the same. To freeze your buffalo cauliflower, let it cool completely. Spread the florets on a baking sheet. Freeze them for about an hour until firm. Then, transfer them to a freezer bag or container. Remove as much air as possible to prevent freezer burn. For reheating, let the cauliflower thaw in the fridge overnight before cooking. This helps maintain the texture and flavor. Yes, you can use frozen cauliflower. Just thaw and drain it first. Frozen florets may be softer than fresh ones. This can affect the crunchiness, but the flavor remains great. Keep an eye on the cooking time. You may need to add a couple of extra minutes to ensure they cook through. The spice level depends on the hot sauce you use. Frank's RedHot gives a nice kick without being overwhelming. If you prefer it less spicy, reduce the amount of hot sauce. You can also mix in honey or maple syrup for sweetness. This balance can help tone down the heat for those who are sensitive to spice. Yes, you can prep ahead! Cut the cauliflower and make the batter a few hours in advance. Store them separately in the fridge. Toss the florets in the batter just before air frying for the best texture. If you coat them too early, they may get soggy. Enjoy this tasty snack fresh for the best flavor! In this article, I covered how to make Air Fryer Buffalo Cauliflower. We discussed main ingredients, like cauliflower, flour, and hot sauce. I shared tips for achieving that perfect crispy texture and how to customize flavors. You learned options for dietary needs and ways to store and reheat leftovers. Enjoying this dish is simple and fun. You can make delicious meals with just a few steps. Experiment and make it your own. Happy cooking!

Air Fryer Buffalo Cauliflower Savory and Simple Snack

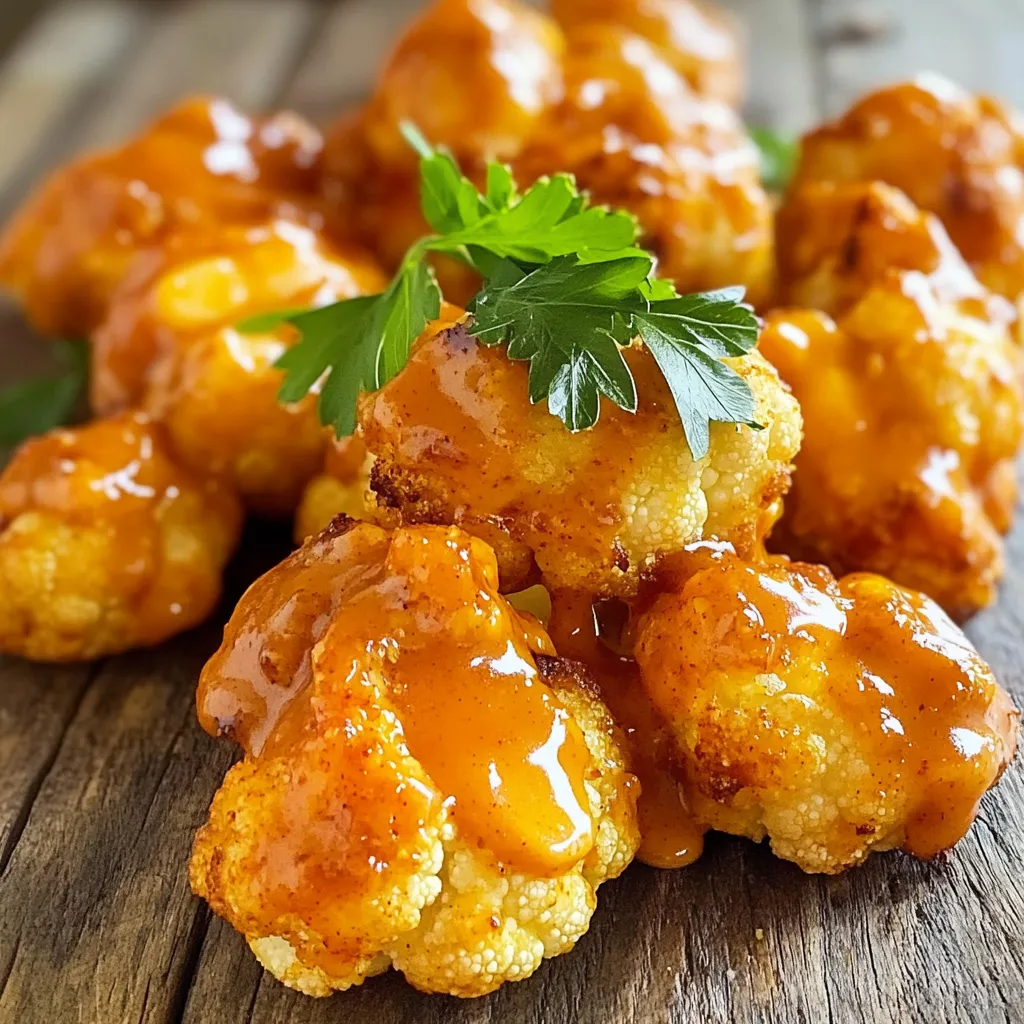
Looking for a quick and tasty snack? Air Fryer Buffalo Cauliflower checks all the boxes! It’s simple to make, packed

- 1 cup hazelnuts, toasted and chopped - 1 cup pitted dates, soaked in warm water for 10 minutes - 1/2 cup cocoa powder - 1/4 cup almond butter - 1 teaspoon vanilla extract - Pinch of salt These ingredients create a rich and tasty treat. The hazelnuts add a nice crunch. Dates bring sweetness and help bind everything. Cocoa powder gives the truffles their deep chocolate flavor. Almond butter adds creaminess and a hint of nuttiness. The vanilla and salt enhance all the flavors. - Crushed hazelnuts - Cocoa powder Rolling the truffles in crushed hazelnuts or cocoa powder adds texture and flavor. You can choose one or use both for variety. The crushed hazelnuts give a nice bite, while cocoa powder adds richness. You can swap hazelnuts for other nuts. Try almonds or walnuts for a different taste. If you need a nut-free option, use sunflower seeds. For dates, you can use prunes if you prefer. Any nut or seed butter can replace almond butter. Just pick your favorite! Using vanilla bean paste instead of extract can add a richer flavor. With these ingredients, you will make delicious truffles. Feel free to play around with flavors and textures! Start by soaking your pitted dates in warm water for ten minutes. This softens them, making it easier to blend. After soaking, drain the dates well. Place them in a food processor. Blend until they turn into a smooth paste. This step is key for a creamy truffle texture. Next, add the almond butter, cocoa powder, vanilla extract, and a pinch of salt to the food processor. Blend all the ingredients until they mix well. You want a thick chocolate mixture that sticks together. This forms the base for your truffles. Now, stir in the toasted and chopped hazelnuts using a spatula. Make sure to mix them evenly. Scoop out tablespoon-sized portions of the mixture. Roll these portions between your hands to shape small balls. If you want, roll the truffles in crushed hazelnuts or cocoa powder for extra flavor. This makes them look nice too! Place the truffles on a parchment-lined tray. Chill them in the fridge for at least thirty minutes. This helps them firm up, making them perfect for serving. Toasting hazelnuts brings out their rich flavor and crunch. First, preheat your oven to 350°F (175°C). Spread the hazelnuts on a baking sheet in a single layer. Bake for about 10-12 minutes. Watch them closely, as they can burn quickly. The nuts are ready when they smell nutty and turn golden brown. Let them cool before chopping. This adds depth to your truffles. Once you form the truffles, place them on a parchment-lined tray. Cover them with plastic wrap or a lid. Chill in the fridge for at least 30 minutes. This sets the truffles and makes them firm. You can store them in an airtight container for up to a week. For longer storage, freeze them. Just let them thaw in the fridge before serving. Presentation can elevate your truffles. Use a decorative box to gift them or a beautiful platter to serve. Dust the truffles with cocoa powder or crushed hazelnuts for flair. You can also add fresh mint leaves for a pop of color. Arrange them in clusters or in rows for an eye-catching display. A simple touch makes a big difference! {{image_2}} You don’t have to use hazelnuts. You can switch to any nut you like. Almonds, walnuts, or pecans work well. Each nut brings a new taste. Almonds add a sweet touch, while walnuts give a nice crunch. Try cashews for a creamier bite. Just make sure to toast them for the best flavor. Want to spice things up? Add some cinnamon or nutmeg for warmth. A pinch of sea salt can heighten the taste, too. You can also use different extracts. Swap vanilla for almond or hazelnut extract. These small changes create a flavor adventure. You can even add coffee to deepen the chocolate taste. To make these truffles vegan, use a plant-based nut butter. Almond butter is great, but you can also try peanut or sunflower butter. For a raw version, skip the cocoa powder and use cacao powder instead. This keeps the nutrients intact. Always check your ingredients to ensure they are vegan and raw. To keep your no-bake chocolate hazelnut truffles fresh, store them in an airtight container. Place a layer of parchment paper between the truffles to prevent sticking. This will help maintain their shape and texture. You can keep them in the fridge for a cool treat anytime. These truffles last about one week in the fridge. If you store them properly, they stay tasty and fresh. Check for any signs of spoilage, like an off smell or change in texture. With proper care, you can enjoy these treats for days! If you want to keep your truffles longer, freezing is a great option. Place the truffles in a single layer on a tray. Once they freeze, transfer them to an airtight container. They can last up to three months in the freezer. When you're ready to eat them, move them to the fridge for a few hours to thaw. Enjoy your delicious truffles any time! Yes, you can make these truffles ahead of time. They are perfect for parties or gifts. Just follow the recipe, then chill them for at least 30 minutes. After that, store them in an airtight container in the fridge. They will stay fresh and tasty for up to a week. The truffles stay fresh for about one week in the fridge. If you want to enjoy them later, you can freeze them. When frozen, they can last up to three months. Just let them thaw in the fridge before serving. You can easily swap some ingredients. If you don’t have hazelnuts, try almonds or walnuts. You can use peanut butter instead of almond butter. For a sweeter taste, add a bit of honey or maple syrup. Just make sure to keep the main elements, like dates and cocoa powder, to maintain the truffle's flavor. We covered how to make delicious no-bake chocolate hazelnut truffles. You learned about the key ingredients and substitutions. I shared step-by-step instructions for easy preparation. We explored tips for toasting hazelnuts and storing your truffles. You also discovered fun variations and storage practices to maximize freshness. In conclusion, these truffles are simple and tasty. Experiment with flavors and enjoy making them!

No-Bake Chocolate Hazelnut Truffles Simple Treat

If you love chocolate and want a simple treat, I have the perfect recipe for you! These no-bake chocolate hazelnut

- 1 cup brewed coffee or espresso - 1/2 cup unsweetened almond milk or milk of choice - 1/4 cup pumpkin puree - 1 scoop vanilla or pumpkin protein powder - 1 tablespoon maple syrup (adjust to taste) - 1/2 teaspoon pumpkin pie spice - 1/4 teaspoon vanilla extract - Whipped cream - Cinnamon sprinkle When making a Pumpkin Protein Latte, gather your main ingredients first. Brew your coffee or espresso. This forms the base of your drink. Next, choose your milk. Unsweetened almond milk keeps it light and creamy. If you prefer, you can use regular milk or another dairy-free option. The pumpkin puree adds a rich flavor. It also gives the latte a lovely color. The protein powder boosts the drink's nutritional profile. You can choose vanilla or pumpkin flavor. Both work well with the other ingredients. For sweetness and spice, use maple syrup. This adds a warm, sweet touch. Adjust the amount to suit your taste. The pumpkin pie spice brings in that cozy fall flavor. Finally, add a bit of vanilla extract for depth. You can make your latte even more special with toppings. Whipped cream adds a fun touch. A sprinkle of cinnamon on top finishes it off perfectly. Each ingredient plays a role in making this latte smooth and healthy. Enjoy the process of creating your cozy drink! - In a saucepan, combine 1/2 cup almond milk, 1/4 cup pumpkin puree, and 1 tablespoon maple syrup. - Whisk the mixture over medium heat for 3-5 minutes until warm and smooth. - Add 1 scoop of protein powder, 1/2 teaspoon pumpkin pie spice, and 1/4 teaspoon vanilla extract. - Whisk until you have a lump-free mixture. This should take about 2-3 minutes. - Use an immersion blender or a regular blender to blend the mixture for about 30 seconds until frothy. - While blending, brew 1 cup of coffee or espresso. - In a large mug, pour the brewed coffee, then gently add the pumpkin spice mixture over it. - If you like, top your latte with whipped cream and a sprinkle of cinnamon for extra flavor. To get the best froth, I suggest using an immersion blender. It blends hot mixtures easily. If you use a standard blender, be careful. Hot liquids can spill. Blend for about 30 seconds until smooth. The right temperature is key. Warm your milk and pumpkin mix to about 150°F. This helps create that nice frothy texture. Too hot can cause lumps. Do you like sweet drinks? You can adjust the maple syrup. Start with one tablespoon. Taste it and add more if you want. Everyone’s taste is different. For spices, pumpkin pie spice is great, but you can tweak it. Add more for a strong flavor or less for a milder one. Experiment until you find your perfect mix. A good presentation makes any drink special. Top your latte with whipped cream for a treat. A sprinkle of cinnamon adds color and taste. Choosing the right mug matters, too. Use big mugs for a cozy feel. Clear mugs show off your latte's beautiful colors. Enjoy the look before you take a sip! {{image_2}} You can switch the almond milk for other non-dairy options. Coconut milk adds a nice creaminess. Oat milk is another great choice for a smooth texture. If you prefer, you can even use soy milk. Each milk has a unique taste that can change your latte. When it comes to sweeteners, you have many choices. Instead of maple syrup, try honey or agave nectar. You can also use stevia or monk fruit for a low-calorie option. Each sweetener can give your latte a different flavor. For a fun twist, add a touch of chocolate or almond extract. A small amount of chocolate can make your latte feel like dessert. Almond extract adds a nutty flavor that pairs well with pumpkin. You only need a few drops to make a big impact. Spices can also change your drink. Adding nutmeg brings warmth and depth. You could even try a pinch of ginger for a spicy kick. Feel free to experiment with spices to find your perfect blend. You can choose between plant-based and whey protein powders. Plant-based protein suits those who want vegan options. It often comes from peas or brown rice. Whey protein is great for a creamy texture and mixes well. Different flavors of protein powder can add variety to your latte. Vanilla is a classic choice, but chocolate or pumpkin flavors can enhance your drink. Each flavor brings its own taste and can make your latte special. You can store your pumpkin protein latte in the fridge. Use an airtight container to keep it fresh. It lasts about 2-3 days. To reheat, pour it into a saucepan. Heat it on low until warm. Stir gently to mix. Avoid boiling, as it can change the texture. Yes, you can freeze the mixture. Use a freezer-safe container and leave space for expansion. It can last up to one month in the freezer. To thaw, move it to the fridge overnight. For quick thawing, place it in cold water. Once thawed, stir well before using to restore its creamy texture. Most ingredients last a while. Brewed coffee can sit for about 3 hours at room temperature. Almond milk lasts about 7-10 days in the fridge after opening. Pumpkin puree should be used within 5-7 days once opened. Watch for signs of spoilage: a sour smell or change in color means it’s time to toss it. Yes, you can use regular milk. Each type of milk has its perks. Pros of using regular milk: - Creamy texture - Rich taste Cons of using regular milk: - Higher calories - Lactose for some people Almond milk is lighter and dairy-free. It also gives a nutty flavor. Choose based on your taste and diet needs. Making an iced version is simple and refreshing. Here are the steps: 1. Brew coffee: Start with your coffee or espresso. Let it cool. 2. Prepare pumpkin mixture: Heat almond milk, pumpkin puree, and maple syrup in a saucepan. Stir until smooth. 3. Blend: Add protein powder, spices, and vanilla. Blend it until frothy. 4. Combine: In a tall glass, add ice cubes. Pour the coffee first, then the pumpkin mixture. 5. Garnish: Top it with whipped cream and cinnamon if you like. Enjoy your chilled pumpkin delight! Yes! This Pumpkin Protein Latte is great for meal prep. Tips for making in advance: - Batch cook: Make a larger amount of the pumpkin mixture. Store it in the fridge for up to three days. - Coffee storage: Brew coffee fresh daily for the best taste. - Reheat: Warm the pumpkin mixture before serving. Meal prepping makes mornings easy and tasty! This blog post explored how to make a delicious pumpkin protein latte. We covered main ingredients like brewed coffee, pumpkin puree, and protein powder. I shared step-by-step instructions to help you prepare, blend, and serve your latte perfectly. You learned tips for great flavors, storage options, and how to adapt the recipe. With these insights, you can enjoy a tasty drink that fuels your day. So, grab your ingredients and start crafting your latte masterpiece today!

Pumpkin Protein Latte Smooth and Healthy Delight

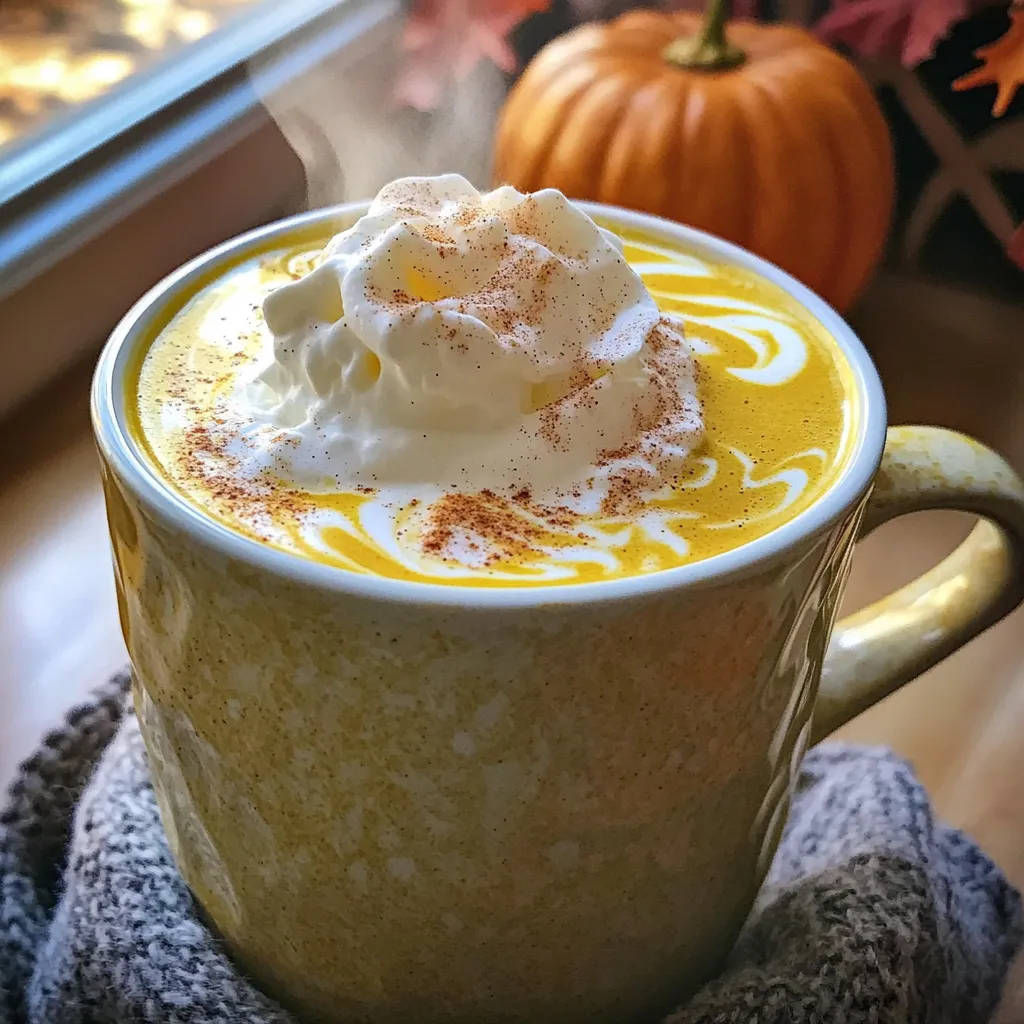
Craving a healthy, delicious treat that boosts your energy? Meet the Pumpkin Protein Latte! This smooth drink combines protein, coffee,

- 2 cups all-purpose flour - 1 cup brown sugar, packed - 1/2 cup unsalted butter, softened - 1 cup maple syrup - 3 large eggs - 1 teaspoon vanilla extract - 1 teaspoon baking powder - 1/2 teaspoon baking soda - 1/4 teaspoon salt - 1 cup chopped pecans - 1 teaspoon ground cinnamon Properly measuring dry ingredients To get the best results, you need to measure flour correctly. Use a spoon to fluff up the flour in the bag. Then, spoon it into a measuring cup. Avoid packing it down. Level off the top with a straight edge. Differences between packed and loose brown sugar Packed brown sugar means you press it down into the measuring cup. This makes it denser. Loose brown sugar is not pressed. For this recipe, you want packed brown sugar. It adds moisture and sweetness to your cake. First, preheat your oven to 350°F (175°C). This step is key for even baking. While the oven heats, grease a 9x13-inch baking pan. You can use butter or cooking spray for this. Next, sprinkle a little flour in the pan and shake it around. This helps the cake release easily later. In a large bowl, cream together the softened butter and brown sugar. Mix until it feels light and fluffy. This might take a few minutes. Next, add the eggs one at a time, mixing well after each one. Then, pour in the maple syrup and vanilla extract. Stir until everything is smooth. In another bowl, whisk together the flour, baking powder, baking soda, salt, and ground cinnamon. This ensures the dry ingredients mix well. Slowly add this mixture to the wet batter. Stir gently until just combined; do not overmix. Finally, fold in the chopped pecans. Pour the batter into your prepared pan, spreading it evenly. Bake for 30-35 minutes. To check if it's done, insert a toothpick into the center. If it comes out clean, the cake is ready. To keep your cake moist, use fresh ingredients. Ensure your butter is soft, but not melted. Mixing in the eggs one at a time helps, too. Always check your oven temperature. An oven thermometer can help find any hot spots. To avoid overmixing the batter, mix just until combined. Lumps are okay, as they bake out. When you fold in the pecans, do it gently. This keeps the cake light and fluffy. Dust the cooled cake with powdered sugar for a lovely finish. It adds a sweet touch. Drizzling maple syrup on top enhances the flavor. Use a spoon to create a beautiful pattern. Garnishing with fresh pecans adds crunch and a nice look. Place them on top or around the cake. They make it feel special and inviting. This cake pairs best with coffee. A strong brew or a latte complements the maple flavor. You can also try it with chai tea for a warm twist. Serve this cake at brunches or casual gatherings. It fits perfectly for a cozy family breakfast. It’s also great for dessert after dinner. Everyone loves a sweet treat! {{image_2}} You can switch out pecans for other nuts. Walnuts work well and add a rich taste. Almonds also add a nice crunch. Both options change the flavor a bit. Feel free to mix nuts, too. This makes the cake even more interesting. Adding spices can elevate your cake. Nutmeg gives a warm flavor that pairs well with maple. Ginger adds a nice zing and freshness. You can start with a half teaspoon of each. Adjust to your taste. These spices bring new life to the classic recipe. For a healthier twist, try whole wheat flour. It adds fiber and nutrients. Coconut sugar is another choice. It brings a caramel-like sweetness and lowers the glycemic index. Both of these swaps keep your cake tasty and nutritious. Enjoy your delicious creation without any guilt! To keep your maple pecan coffee cake fresh, wrap it tightly in plastic wrap. You can also use an airtight container. This helps keep moisture in and air out. Store it at room temperature for up to three days. If you want to keep it longer, refrigerate it for up to a week. To freeze leftover cake, first let it cool completely. Then, slice the cake into pieces. Wrap each piece in plastic wrap, then in aluminum foil. This prevents freezer burn. You can freeze the cake for up to three months. When you're ready to eat it, take out a piece and thaw it in the fridge overnight. Serve it at room temperature or warm it up for a cozy treat. The maple pecan coffee cake lasts about 3 to 5 days at room temperature. Keep it in an airtight container. If you store it in the fridge, it can last up to a week. Just make sure to wrap it well to keep it moist. Yes, you can make this cake a day before you need it. Bake it, let it cool, and then wrap it tightly in plastic wrap. Store it in the fridge. This helps the flavors blend nicely. When you're ready to serve, you can dust it with powdered sugar. If you need a substitute for maple syrup, you have a few options. Honey works well, but it will change the flavor. Agave nectar is sweeter and also a good choice. For a vegan option, you can use brown rice syrup. Each option may slightly alter the taste, but they will still give you a sweet cake. This blog post covered everything you need for a tasty maple pecan coffee cake. We listed the key ingredients and shared tips for measuring and baking. I gave steps for making the batter and baking the cake, along with ways to present and serve it beautifully. Try different nuts and flavors to find your favorite twist. Store it right to keep it fresh, or freeze it for later. With these pointers, you're ready to bake a cake that impresses every time. Enjoy the delicious results!

Maple Pecan Coffee Cake Rich and Simple Recipe

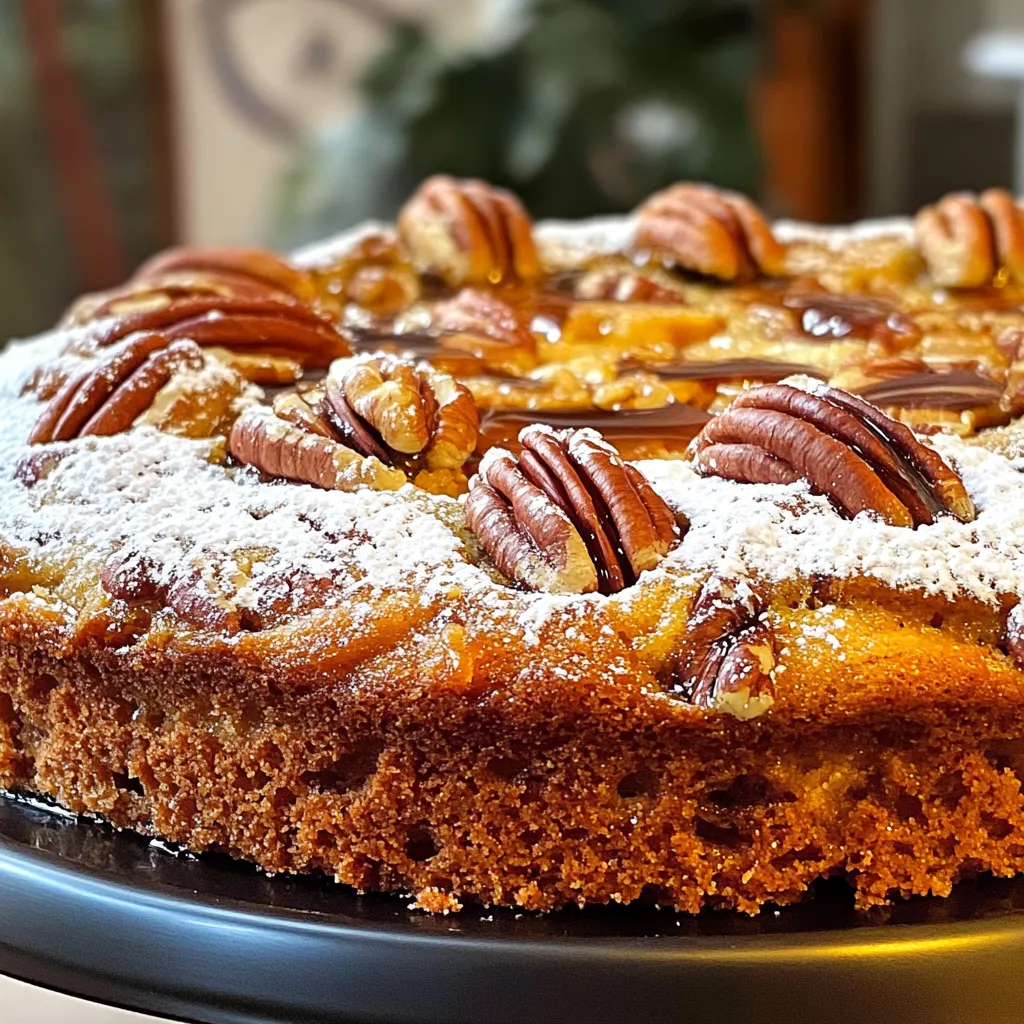
If you crave a cozy, delicious dessert to enjoy with your coffee, look no further! This Maple Pecan Coffee Cake

- 500g beef sirloin, thinly sliced - 2 tablespoons soy sauce - 1 tablespoon oyster sauce - 1 tablespoon cornstarch - 2 tablespoons vegetable oil - 4 cloves garlic, minced - 1 red chili, sliced - 1 green bell pepper, sliced - 1 cup snap peas - 1 tablespoon ginger, grated - 2 green onions, chopped - Salt and pepper to taste You need 500 grams of beef sirloin. Thin slices cook fast and stay tender. Use two tablespoons of soy sauce for saltiness. The oyster sauce adds depth, so one tablespoon is enough. The cornstarch, one tablespoon, helps make the beef tender. For cooking, two tablespoons of vegetable oil are needed. Garlic adds flavor, so use four cloves, minced. Adjust heat with one red chili, sliced. A green bell pepper, sliced, adds color and crunch. One cup of snap peas gives a fresh taste. Grate one tablespoon of ginger for warmth. Finally, chop two green onions for a nice finish. Use salt and pepper to taste. When choosing beef, look for bright red color and a good amount of marbling. This means more flavor and tenderness. For vegetables, choose snap peas that are crisp and bright green. Make sure bell peppers feel firm and heavy. Pick chili peppers that are shiny and smooth. Fresh ginger should be firm and have a strong aroma. For garlic, choose bulbs that are dry and free from mold. Always check the expiration date on sauces. Fresh ingredients make a big difference in your dish's taste. To start, you need to marinate the beef. Take 500g of thinly sliced beef sirloin. In a bowl, mix the beef with 2 tablespoons of soy sauce, 1 tablespoon of oyster sauce, and 1 tablespoon of cornstarch. Add a pinch of salt and pepper for seasoning. This step is key for adding flavor. Let the beef sit for about 10 minutes. This allows the beef to soak up the marinade. Next, it’s time to heat your skillet or wok. Set it to high heat and add 2 tablespoons of vegetable oil. Once the oil is hot, toss in 4 minced garlic cloves and 1 sliced red chili. Stir quickly for about 30 seconds. You want to smell the garlic and chili. Now, add the marinated beef to the skillet. Stir-fry for 2 to 3 minutes. The beef should turn brown and be just cooked through. After that, add 1 sliced green bell pepper, 1 cup of snap peas, and 1 tablespoon of grated ginger. Stir-fry for another 2 minutes. The veggies should stay crisp and bright. Once the beef and veggies are done, it’s time to finish the dish. Toss in 2 chopped green onions for freshness. Give everything a final stir. Taste and adjust the seasoning if you need to. Remove the stir-fry from heat. Serve it hot over steamed rice or noodles. Enjoy your quick and tasty meal! To get the best flavor, marinate the beef well. Use soy sauce and oyster sauce for depth. The cornstarch helps create a nice glaze. Let the beef sit for about 10 minutes. This step lets the flavors soak in well. Don't rush this part; it makes a big difference. For perfectly cooked beef, slice it thinly against the grain. This makes the meat tender and easy to chew. Use high heat in your skillet or wok. This helps the beef brown quickly and stay juicy. Stir-fry for just 2-3 minutes. Watch the color change to a nice brown. Prep your ingredients ahead of time. Chop the veggies and slice the beef before you start. This way, you can cook fast. Use a non-stick skillet for easier cleanup. Keep everything within reach as you cook. This helps you stay organized and quick. {{image_2}} You can swap the beef for chicken or tofu. Use 500g of chicken breast, thinly sliced. Chicken cooks fast and works well with the same marinade. For tofu, choose firm tofu. Press it to remove excess water, then cut it into cubes. Marinate just like the beef. Both options will soak up the flavors beautifully. Adjust the heat in your stir-fry by changing the chili. For less heat, use half a red chili or remove the seeds. If you love heat, add more sliced chili or a dash of chili flakes. You can also try a spicy sauce, like Sriracha, for an extra kick. Just remember to taste as you go! Feel free to mix and match your veggies! Instead of green bell peppers, try broccoli, carrots, or snow peas. You can also add mushrooms for a nice umami flavor. Use what you have at home. This dish is all about your taste preferences. Just keep the cooking time in mind for each vegetable type. After enjoying your Minute Garlic Chili Beef Stir-Fry, store any leftovers in an airtight container. This keeps the flavors fresh. Let the dish cool to room temperature before sealing it. You can keep it in the fridge for up to three days. If you notice any moisture, use a paper towel to absorb it before sealing. To reheat, use a skillet over medium heat. Add a splash of water or broth to keep it moist. Stir often for about five minutes. You can also use a microwave. Place the stir-fry in a microwave-safe bowl. Cover it loosely and heat for about two minutes. Stir halfway through to ensure even heating. If you want to freeze your stir-fry, place it in a freezer-safe container. Use it within three months for the best taste. When you’re ready to eat, thaw it overnight in the fridge. Reheat it in a skillet or microwave as mentioned above. Avoid refreezing after it has been thawed. It takes about 20 minutes to make this dish. You spend 10 minutes preparing the beef. Then, you stir-fry it for another 10 minutes. This quick cook time makes it perfect for busy nights. Yes, you can use other cuts of beef. Flank steak or ribeye works well, too. Just make sure the beef is thinly sliced. This helps it cook quickly and stay tender. This stir-fry pairs well with steamed rice or noodles. You can also serve it with a side of veggies. Try adding a simple salad for extra crunch. Enjoying it with a cold drink makes it even better! This blog post shared key details for making Minute Garlic Chili Beef Stir-Fry. We explored fresh ingredients, precise measurements, and helpful tips for cooking. You learned how to marinate beef and stir-fry to get great flavors. I provided ideas for different proteins and veggies to try. Keep your dish exciting by adjusting spice levels. Follow the storage tips to enjoy leftovers later. Cooking can be fun and simple, so use these steps to impress your friends and family!

Minute Garlic Chili Beef Stir-Fry Quick and Easy Meal

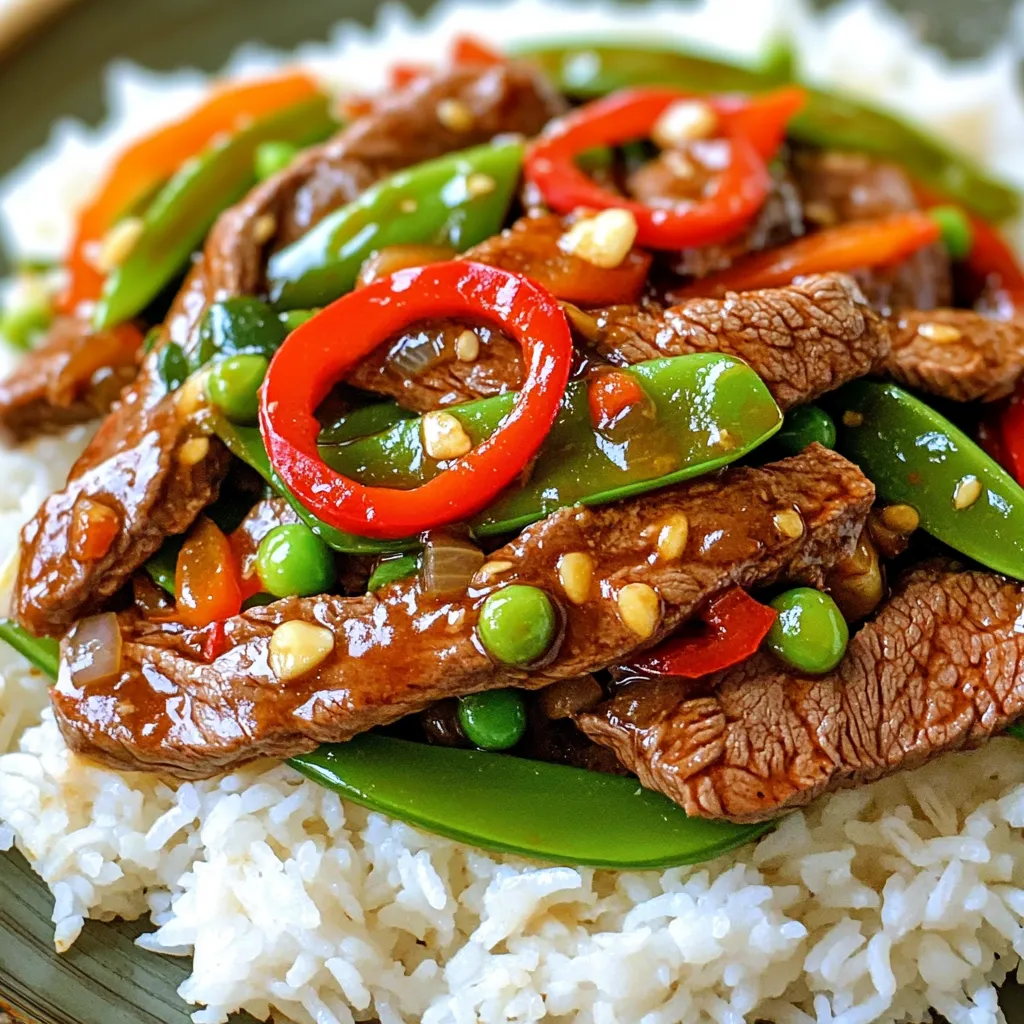
Are you looking for a tasty meal that’s quick and easy? Look no further! This Minute Garlic Chili Beef Stir-Fry

- 1 ½ cups graham cracker crumbs - ½ cup unsalted butter, melted - 1 tablespoon sugar - 2 (8 oz) packages cream cheese, softened - 1 cup granulated sugar - 2 large eggs - 1 teaspoon vanilla extract - 1 cup pecans, chopped - 1 cup caramel sauce (store-bought or homemade) - Sea salt for garnish When you gather your ingredients, choose high-quality items for the best flavor. Use full-fat cream cheese for a rich and creamy filling. It creates a smooth texture and rich taste. For the caramel sauce, you can use store-bought or make your own. Homemade caramel can add a special touch. Make sure your pecans are fresh and chopped evenly. This helps with both taste and texture. You can also toast them lightly for extra flavor. The graham cracker crumbs should be fine to create a sturdy crust. This balance of ingredients makes your dessert truly irresistible. To start, preheat your oven to 350°F (175°C). Line an 8x8 inch baking dish with parchment paper. Leave some overhang for easy removal later. In a medium bowl, mix 1 ½ cups of graham cracker crumbs, ½ cup of melted unsalted butter, and 1 tablespoon of sugar. Stir until the mixture is crumbly and well combined. Press this mixture into the bottom of the dish evenly. Bake it for 10 minutes. After baking, let the crust cool slightly. This step is key, as it helps the cheesecake stay firm. In a large mixing bowl, take 2 packages of softened cream cheese and blend them with 1 cup of granulated sugar. Use an electric mixer to beat this until it is smooth and creamy. Next, add 2 large eggs, mixing on low speed after each one. Finally, stir in 1 teaspoon of vanilla extract. To add some crunch, fold in 1 cup of chopped pecans gently. Pour this creamy mixture over the cooled crust and spread it out evenly. Now comes the fun part! Drizzle 1 cup of caramel sauce over the top of the cheesecake layer. Use a toothpick or knife to swirl it into the cream cheese mixture. This creates a beautiful marbled effect. Bake your creation for 30-35 minutes. You will know it’s done when the edges are set and the center has a slight jiggle. Once baked, remove it from the oven and let it cool to room temperature. Refrigerate it for at least 4 hours or, better yet, overnight. This will enhance the texture. When ready, lift the bars out using the parchment paper, cut them into squares, and enjoy! To make the best caramel pecan cheesecake bars, avoid some common mistakes: - Overmixing the cream cheese: This can make the bars too airy. Mix until just smooth. - Underbaking: Keep an eye on the time. The edges should be set but the center should jiggle slightly. - Not cooling properly: Let the bars cool to room temperature before chilling. This helps firm them up. For cooling and slicing, follow these best practices: - Chill for four hours or overnight: This makes for better texture and easier cutting. - Use a sharp knife: Dip it in hot water and wipe it clean between cuts. This gives you neat slices. For a great presentation, serve the bars on a decorative platter. You can: - Drizzle extra caramel sauce on top or on the side for dipping. - Garnish with chopped pecans and a sprinkle of sea salt for added flair. When it comes to pairing options, consider these: - Coffee: A cup of rich coffee brings out the flavors in the cheesecake. - Other desserts: Ice cream or whipped cream can add a nice touch. These tips will help you create delightful bars that impress every guest. {{image_2}} You can easily adapt this recipe to fit your needs. If you need a gluten-free option, swap the graham cracker crumbs for a gluten-free brand. This will still give you that nice crust without the gluten. For nut allergies, you can use crushed cookies instead of pecans. Almonds or walnuts work well too. You can even leave out the nuts if you prefer a smooth texture. Want to change the flavor? You can! Add melted chocolate to the cream cheese mix for a chocolate cheesecake. Swirl in some pumpkin puree for a seasonal twist in fall. You can also mix in spices like cinnamon or nutmeg to give it a warm flavor. To keep it festive, try adding crushed peppermint candies during the holidays. Experimenting with these variations can lead to a new favorite dessert. The possibilities are endless! To keep your caramel pecan cheesecake bars fresh, store them in the fridge. Use an airtight container for best results. This will prevent them from drying out or absorbing odors from other foods. If you want to freeze them, wrap each bar in plastic wrap, then place them in a freezer bag. - Shelf Life: - In the fridge, they last up to five days. - In the freezer, they can stay fresh for up to three months. When you want to enjoy leftovers, take them out of the fridge. Let them sit at room temperature for a few minutes. If you prefer them warm, use the oven. Set it to 300°F (150°C) and heat for about 10-15 minutes. - To maintain texture, avoid the microwave. It can make the bars too soft. - Serve with a drizzle of caramel sauce for extra yum! To cut cheesecake bars neatly, start with a sharp knife. Dip the knife in hot water to warm it. Wipe it dry after each cut. This keeps the edges clean and smooth. You can also use a ruler to mark even sections before cutting. It helps you get straight lines. For small pieces, use a smaller knife or a bench scraper. Yes, you can make these bars in advance. Prepare the bars up to the baking step. After baking, let them cool completely. Then, wrap them tightly with plastic wrap. Store them in the fridge for up to three days. You can also freeze them for up to three months. Just remember to thaw them in the fridge before serving. You can tell the cheesecake is done when the edges are set. The center should have a slight jiggle. It will firm up as it cools. If you see cracks on the surface, it may be overbaked. To check, gently shake the pan. If the filling wobbles slightly, it is ready to take out. In this post, we covered how to make delicious cheesecake bars. We looked at the key ingredients, step-by-step instructions, and tips for perfecting your bars. I shared options for variations and storage tips, ensuring your bars stay fresh. As you make these cheesecake bars, remember that practice makes perfect. Enjoy experimenting with flavors and sharing them with friends. Making cheesecake bars can be fun and rewarding. So gather your ingredients and get baking!

Caramel Pecan Cheesecake Bars Irresistible Dessert Treat

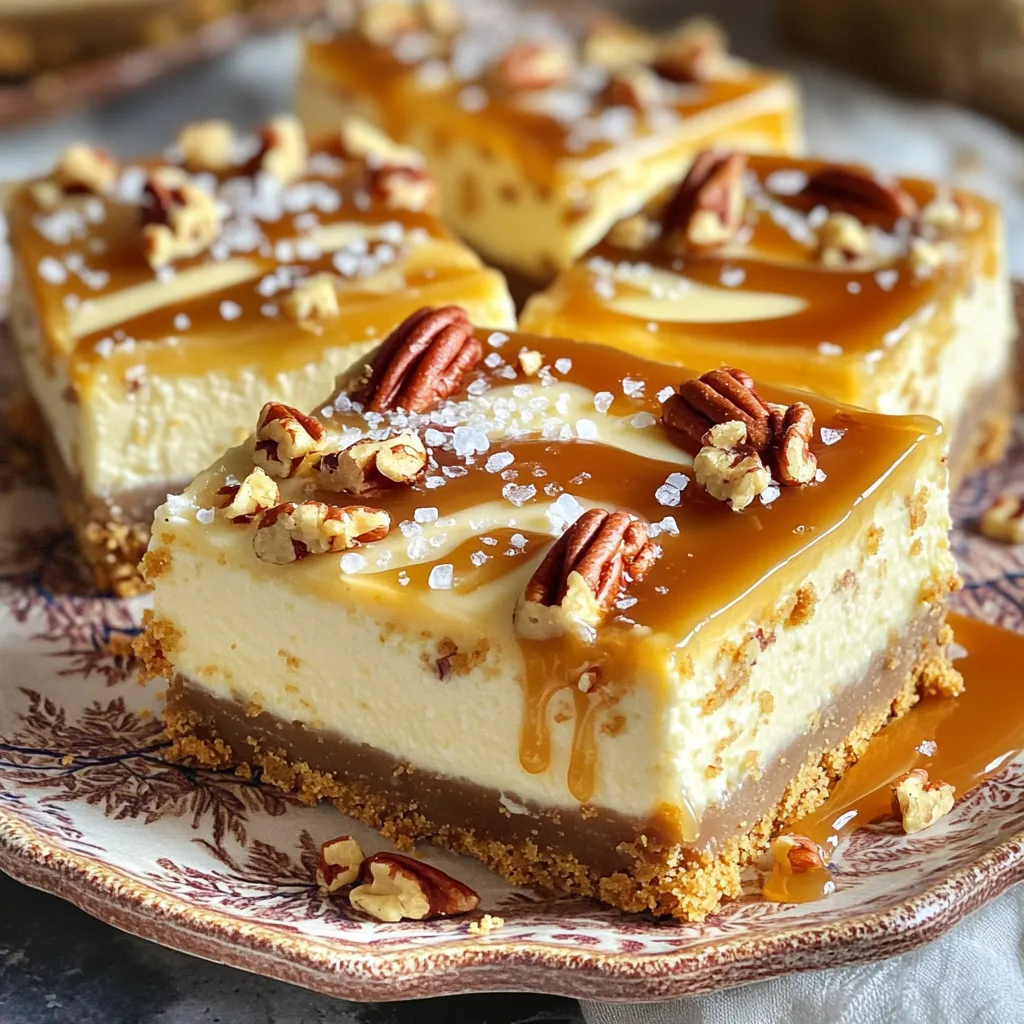
If you love sweet treats, you’ve got to try my Caramel Pecan Cheesecake Bars. These bars combine creamy cheesecake, crunchy

- 2 medium sweet potatoes, peeled and diced - 1 can (15 oz) black beans, rinsed and drained - 1 red bell pepper, diced - 1 small red onion, chopped - 2 tablespoons olive oil - 1 teaspoon cumin - 1 teaspoon chili powder - Salt and pepper to taste - 8 corn tortillas - 1 avocado, sliced - Fresh cilantro, for garnish - Lime wedges, for serving Sweet potatoes are the star here. Their sweetness makes the dish pop. I use two medium sweet potatoes. Dicing them into small cubes helps them roast well. Black beans add protein and creaminess. One can of black beans is enough. The bell pepper adds crunch and color. A red bell pepper works great, but you can use any type. For a bit of flavor, I add a small red onion. It gives a nice bite to the tacos. Next, we have olive oil. This helps to roast the sweet potatoes and veggies. I use two tablespoons. Then come the spices. Cumin and chili powder bring warmth and depth. I recommend one teaspoon of each. Salt and pepper add balance. Adjust to your taste. Now, let’s talk about the tortillas. Eight corn tortillas are perfect for serving. They are soft and flavorful. For toppings, I love adding sliced avocado. It adds creaminess and freshness. Fresh cilantro gives a bright finish. Finally, lime wedges add a zesty kick. Squeeze them on top for extra flavor. This list of ingredients makes sweet potato black bean tacos a true delight! First, preheat your oven to 425°F (220°C). This helps the sweet potatoes cook well. Next, grab a large sheet pan. Spread the diced sweet potatoes, red bell pepper, and chopped onion evenly on the pan. Make sure they have space to cook. Drizzle 2 tablespoons of olive oil over the veggies. Then, sprinkle 1 teaspoon each of cumin and chili powder, along with salt and pepper to taste. Toss everything together. This makes sure all veggies get coated in the spices. Roast them in the oven for 20 to 25 minutes. Stir them halfway through to cook evenly. Look for the sweet potatoes to be tender and slightly caramelized. After roasting, take the pan out of the oven. Stir in the rinsed black beans and mix well. Return the pan to the oven for an additional 5 minutes. This warms the beans through. While the filling cools slightly, warm the corn tortillas in a skillet over medium heat. Heat each side for about 30 seconds. Now, to build your taco, place a generous spoonful of the sweet potato and black bean mix onto each tortilla. Top them with sliced avocado and fresh cilantro. Serve with lime wedges on the side for extra flavor. Using fresh spices makes a big difference. They add a rich taste to your dish. I recommend buying whole spices and grinding them at home. It brings out their full flavor. To ensure even roasting of vegetables, cut them into similar sizes. This way, they cook at the same pace. Toss them halfway through cooking. This helps them brown evenly for great texture. For avocados, I love using Hass avocados. They are creamy and flavorful. Slice them just before serving to keep them fresh. You can also mash them for an extra twist. For extra flavor and beautiful presentation, consider adding some diced tomatoes, radishes, or jalapeños. They add color and crunch. A dollop of sour cream or yogurt can also balance the heat. Prepping ingredients in advance saves time. You can chop the sweet potatoes and bell pepper a day before. Store them in the fridge until you are ready to cook. If you have leftover taco mixture, use it in other meals. It works well in salads or as a filling for burritos. You can even top it with cheese and bake it for a quick casserole. {{image_2}} You can change the beans and veggies easily. Try pinto or kidney beans instead of black beans. For veggies, use zucchini or corn. They add nice flavors too. If you want gluten-free options, corn tortillas are perfect. If you prefer dairy-free, skip cheese or sour cream. Instead, go for extra avocado or lime juice. Boost the taste by adding spices or sauces. Consider smoked paprika for a deeper flavor. You could also add a dash of hot sauce for extra heat. If you love spicy food, try adding jalapeños or cayenne pepper. Mixing in fresh herbs like oregano or thyme will also change the taste. Each herb will give your tacos a unique feel. Tacos can be served in many ways. You can make a taco bowl with rice and beans at the base. Top it with the sweet potato mix and avocado. You can also turn this recipe into nachos. Just spread tortilla chips on a plate, add the taco mixture, and sprinkle cheese on top. Bake until the cheese melts. Another fun option is to make burritos. Use larger tortillas, fill them with the mixture, then roll them up. Enjoy them with your favorite salsa! To keep your sweet potato black bean taco filling fresh, store it in an airtight container. Let it cool down before sealing. This helps keep moisture inside. Place it in the fridge, where it will last for about three to four days. For keeping tortillas fresh, wrap them in a clean kitchen towel. You can also place them in a sealed bag to prevent drying out. To reheat the taco filling, use a skillet over medium heat. Stir it often for even warmth. If you prefer the oven, place the filling in a baking dish. Heat it at 350°F (175°C) for about 10 minutes. For tortillas, heat them in a skillet for about 30 seconds on each side. This helps keep them soft and tasty. You can freeze the taco filling for later use. Let it cool completely, then transfer it to a freezer-safe container. It will stay good for up to three months. For tortillas, stack them with parchment paper in between. Wrap the stack in foil and place it in a freezer bag. To thaw, move the filling to the fridge overnight. Reheat it as mentioned earlier. For tortillas, warm them in a skillet or microwave. Enjoy your tacos again! You can store sweet potato black bean tacos for up to three days. Keep the filling in an airtight container. This helps to keep the flavors fresh. The tortillas can dry out, so store them separately. When ready to eat, reheat the filling and warm the tortillas. Yes, you can prep these tacos ahead of time. Make the filling a day before and store it in the fridge. Just warm it up before serving. You can also chop the veggies in advance. This saves time on busy days. Just keep them covered until you’re ready to cook. Yes, these tacos can fit a gluten-free diet. Use corn tortillas as your base. They are naturally gluten-free. Always check labels for any hidden gluten in other ingredients. If you need more protein, feel free to add extra beans. You can also swap sweet potatoes for another veggie you enjoy. This blog post covered how to make delicious sweet potato black bean tacos. We explored key ingredients and simple steps for preparation. I shared tips for flavor and meal prep, along with variations and storage advice. These tacos fit various diets and can be made ahead. Incorporating nutritious ingredients and flexible options makes this recipe a great choice. Enjoy these tasty tacos any time, knowing they are easy to prepare and full of flavor.

Sweet Potato Black Bean Tacos Sheet Pan Delight

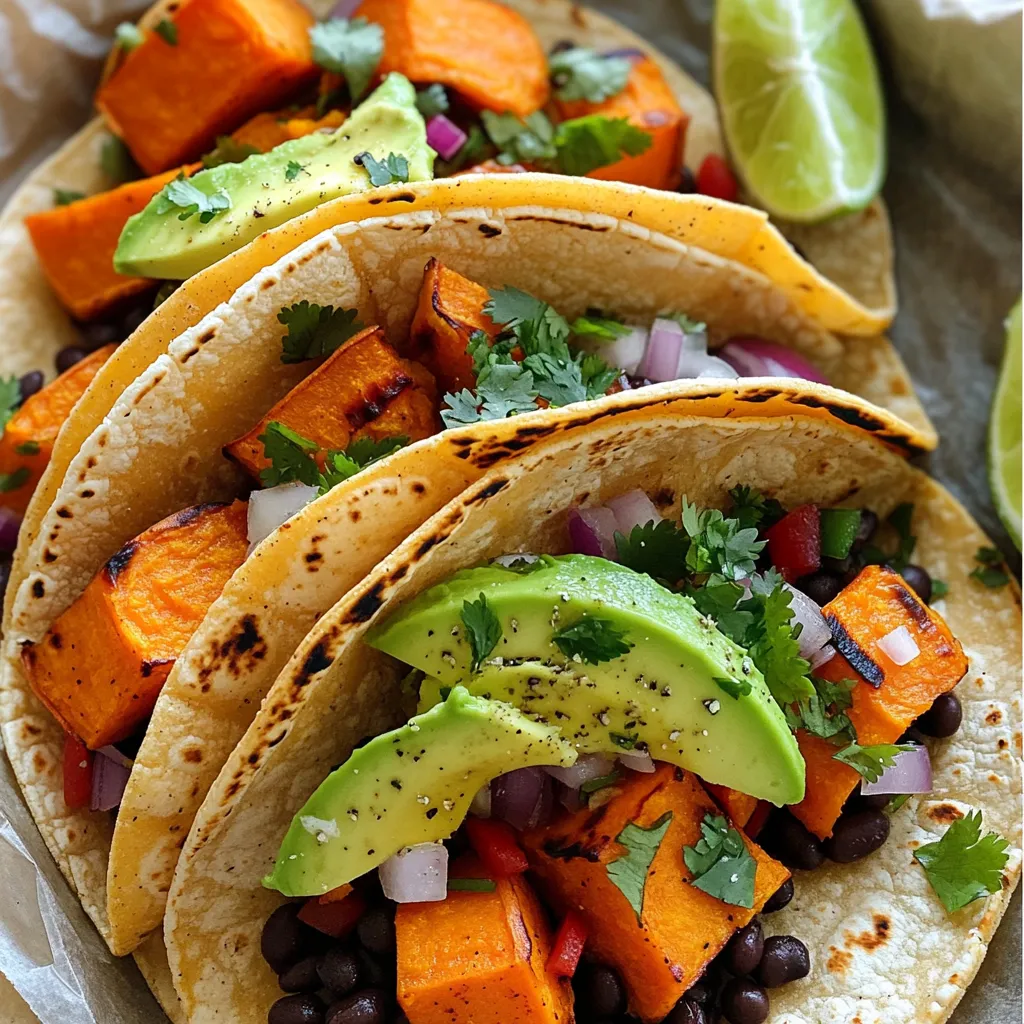
Get ready to savor the flavors of my Sweet Potato Black Bean Tacos! This easy sheet pan recipe brings together

Older posts
Newer posts
← Previous Page1 … Page10 Page11 Page12 … Page84 Next →

dsad

© 2026 Lisa Dishes • Built with GeneratePress

Our Policies

  • Copyright Policy
  • Cookie Policy
  • GDPR Policy
  • Privacy Policy
  • Disclaimer
  • Terms Of Use

More Information

  • Home
  • About
  • Contact
  • Appetizers
  • Dessert
  • Dinner
  • Drinks
©2026, Lisa Dishes About Back To Top