

Latest & Greatest
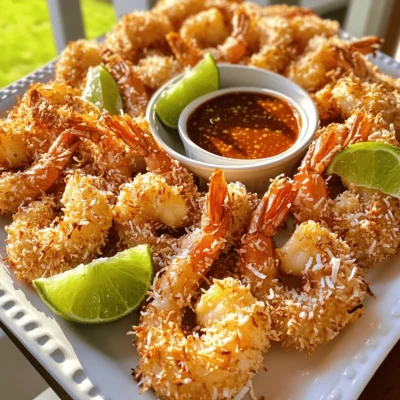
Crispy Coconut Shrimp Flavorful and Easy Recipe
If you’re craving a tasty treat, my Crispy Coconut Shrimp recipe is for you! This dish combines juicy shrimp with a crunchy coconut coating that’s mouthwateringly…
Read more…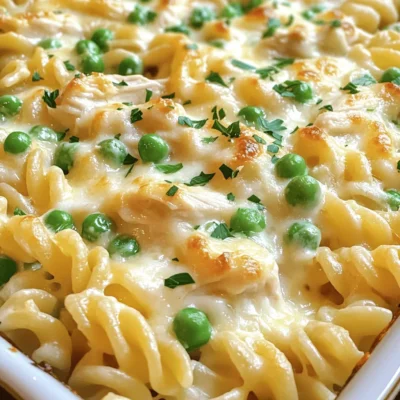
Easy Chicken Alfredo Bake Simple and Delicious Meal
Are you looking for an easy and delicious meal? This Easy Chicken Alfredo Bake is perfect for you! Packed with tender chicken, creamy Alfredo sauce, and…
Read more…
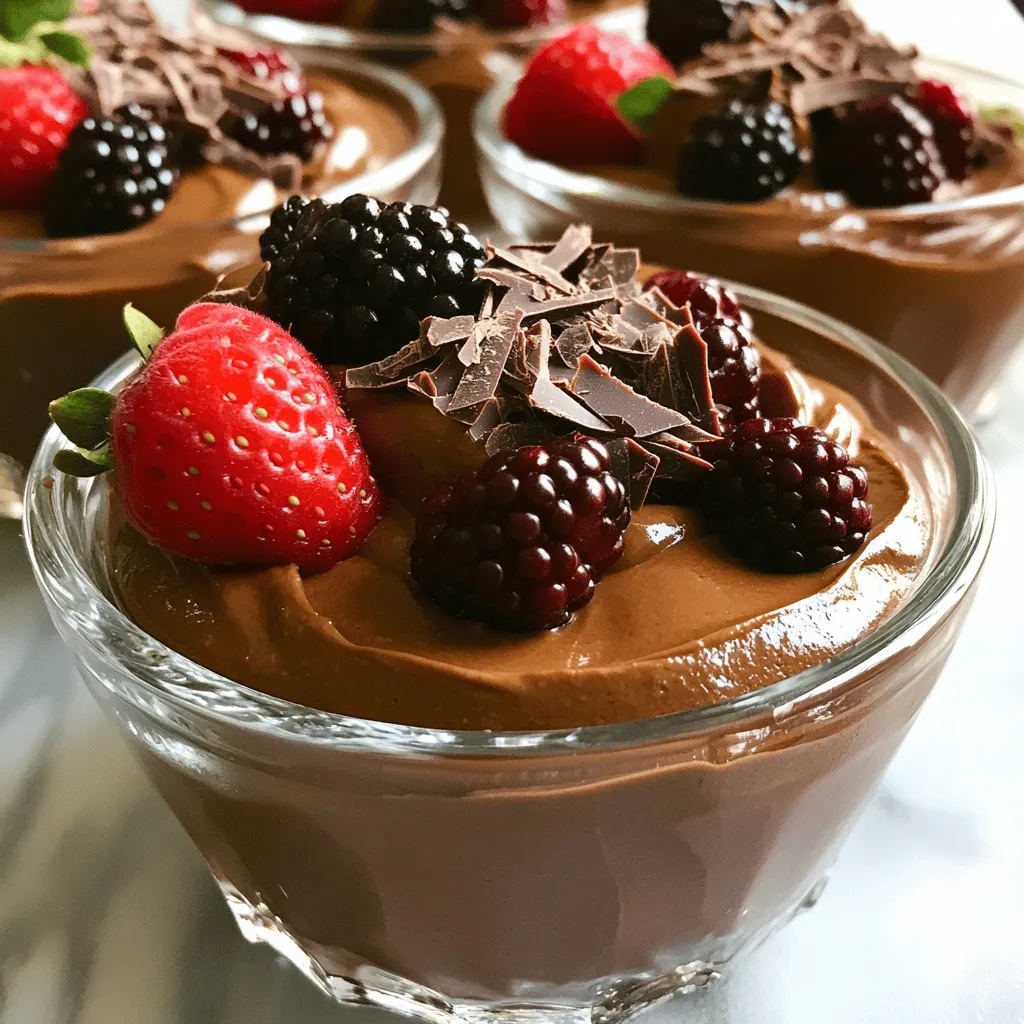
Vegan Chocolate Avocado Mousse Rich and Creamy Delight
If you crave a dessert that’s both rich and healthy, you’re in the right place. This Vegan Chocolate Avocado Mousse combines ripe avocados, unsweetened cocoa powder,…
Read more…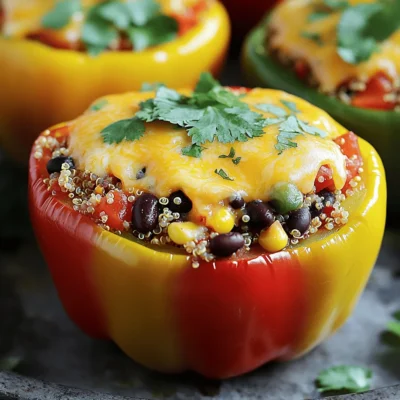
Cheesy Stuffed Bell Peppers Flavorful and Simple Recipe
Get ready to impress your taste buds with my flavorful and simple recipe for cheesy stuffed bell peppers! These vibrant peppers burst with fresh ingredients and…
Read more…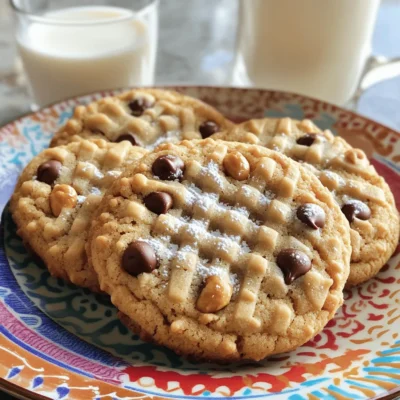
Peanut Butter Chocolate Chip Cookies Simple and Sweet
If you love the rich taste of peanut butter and the sweetness of chocolate, you’re in for a treat! This blog post will guide you through…
Read more…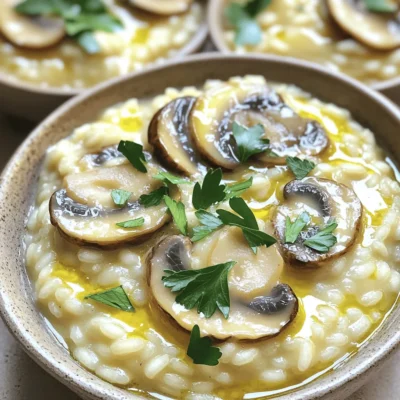
Creamy Mushroom Risotto Irresistibly Delicious Dish
Welcome to a culinary adventure! Today, we dive into the world of creamy mushroom risotto. This dish combines creamy textures with rich mushroom flavors, making it…
Read more…
Spicy Garlic Shrimp Tacos Tasty and Fresh Flavor Guide
Get ready to spice up your taco night with my delicious Spicy Garlic Shrimp Tacos! These easy-to-make tacos pack a punch, thanks to fresh shrimp and…
Read more…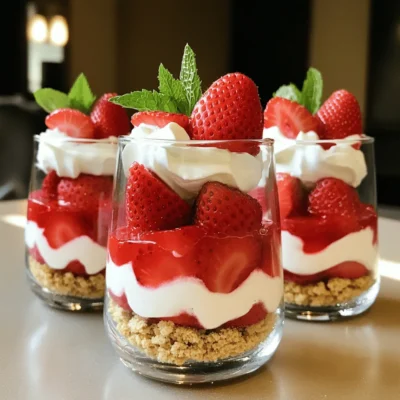
No-Bake Strawberry Shortcake Quick and Simple Delight
Are you craving a sweet treat that’s easy and delicious? Look no further! My No-Bake Strawberry Shortcake is a quick and simple delight, perfect for any…
Read more…browse recipes


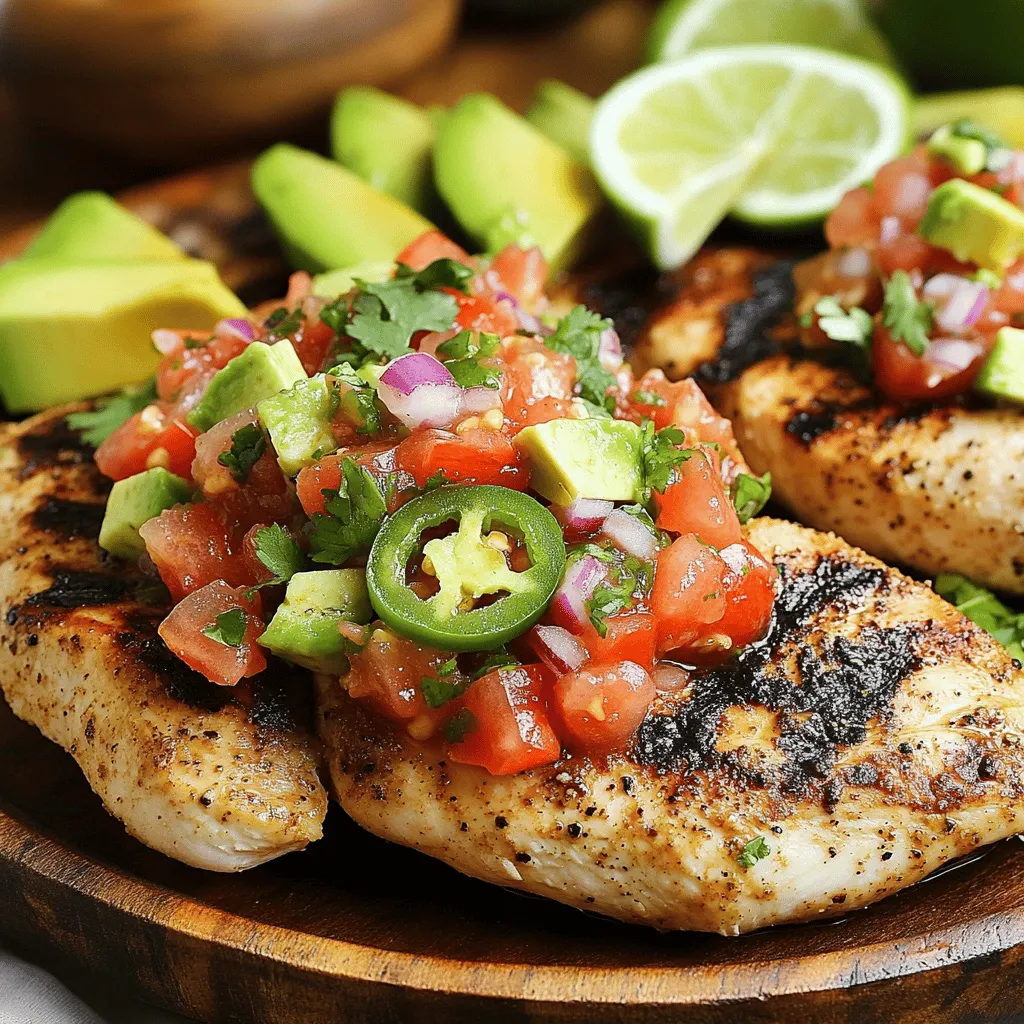
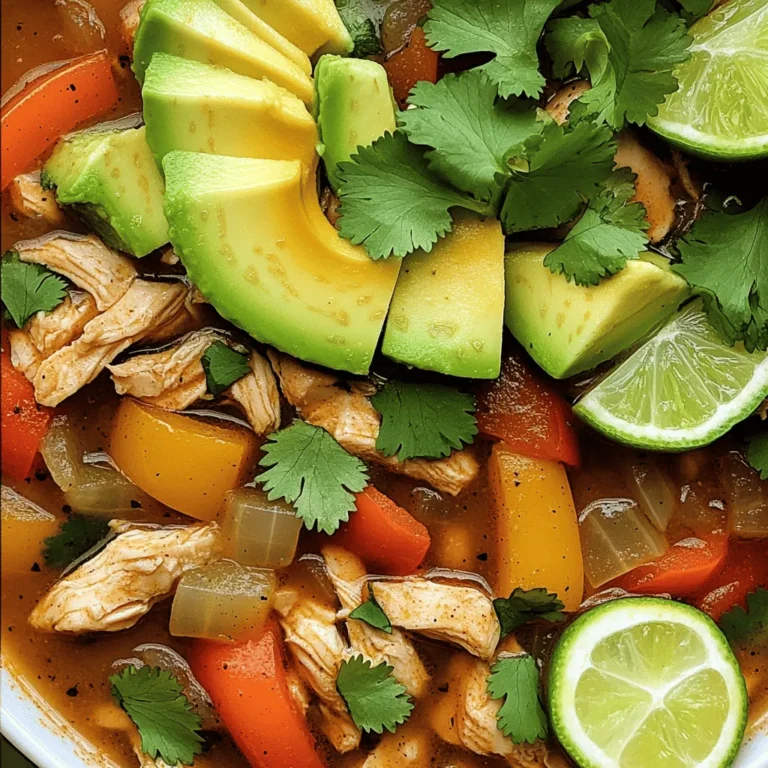
Salsa Fresca Chicken Flavorful and Simple Recipe
Looking for a quick and tasty dinner? My Salsa Fresca Chicken is the answer! This recipe combines juicy grilled chicken with fresh, zesty salsa…
My Latest Desserts

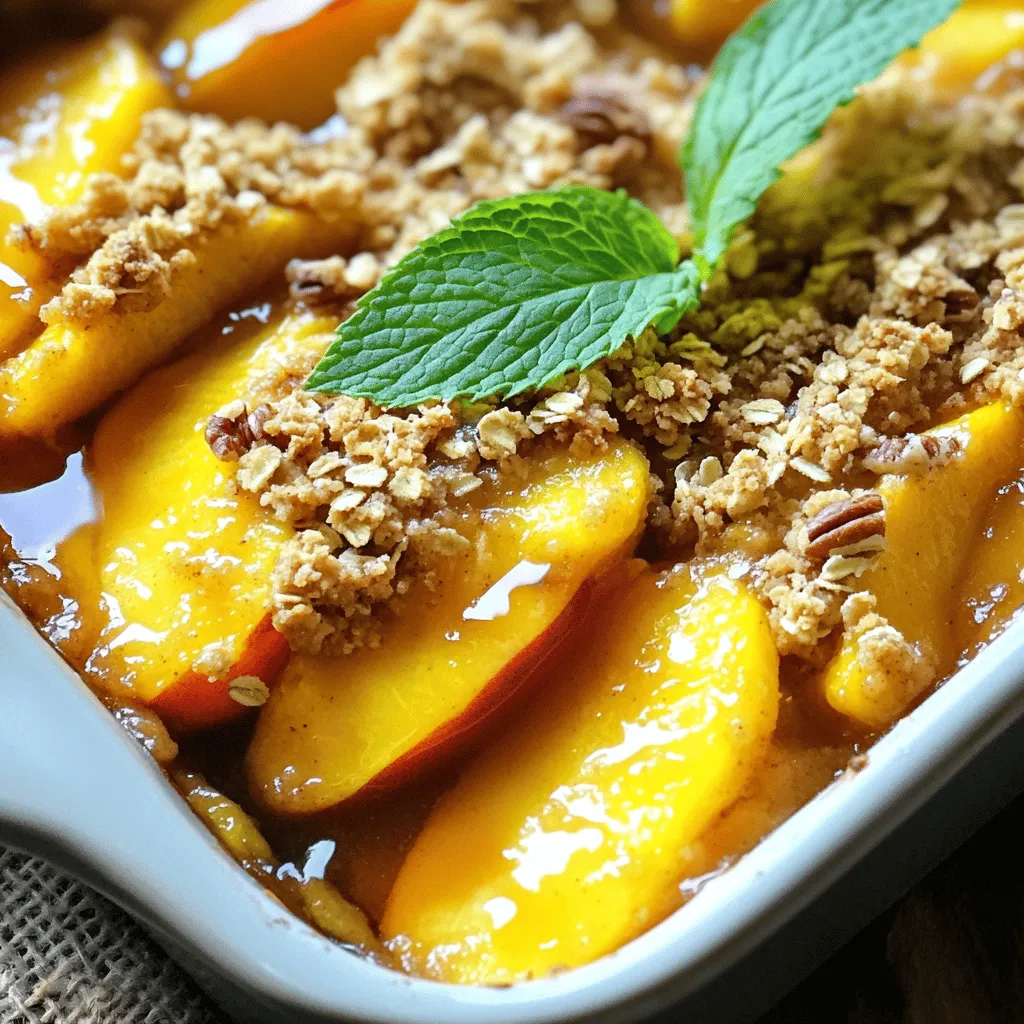
Peach Crisp with Oat Topping Simple Comfort Food
If you’re craving a dessert that combines juicy peaches with a crunchy oat topping, you’re in the right place! My Peach Crisp with Oat Topping is a warm and comforting... Read Full Recipe-
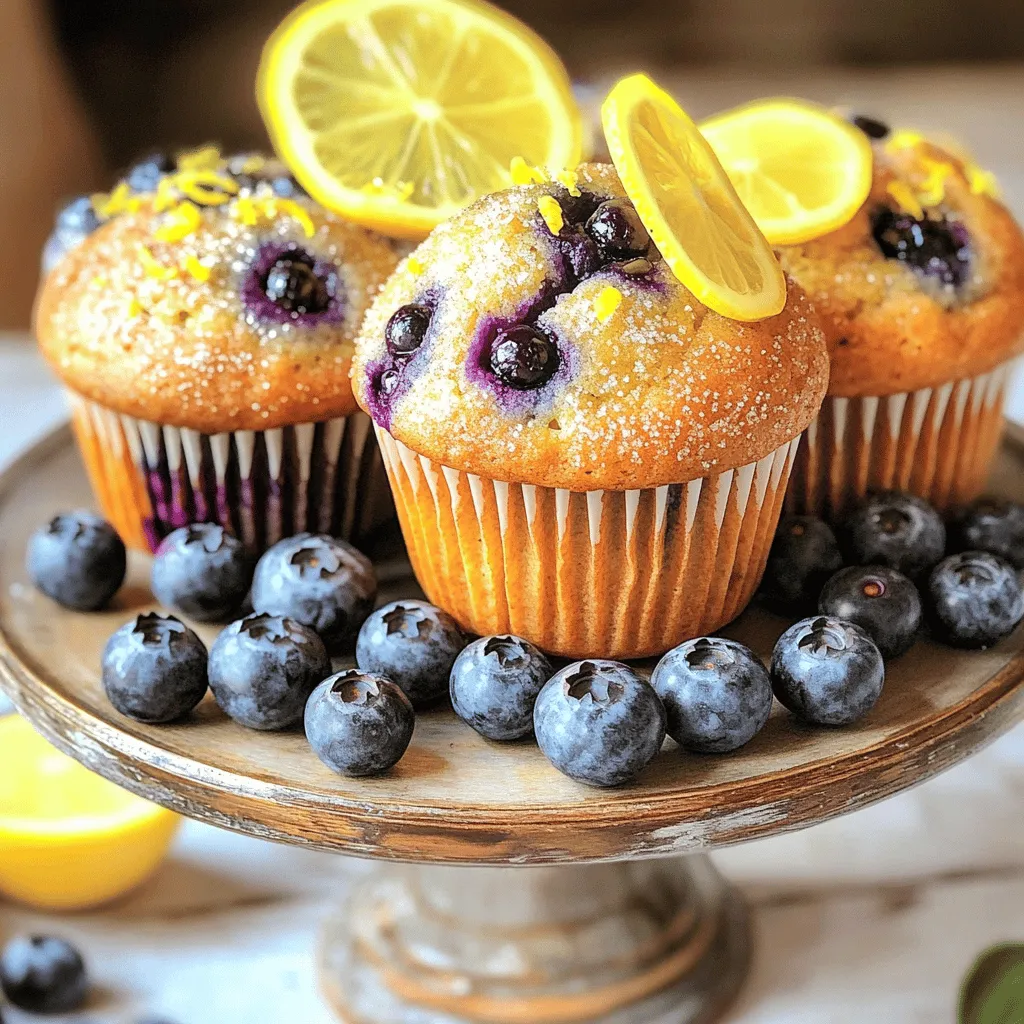
Lemon Blueberry Muffins Fresh and Flavorful Treat
Looking for a fresh and tasty treat? My Lemon Blueberry Muffins are just what you need! Bursting with zesty lemon and sweet blueberries, these muffins are perfect for breakfast or... Read Full Recipe -
Apple Cinnamon Overnight Oats Tasty and Simple Recipe
Start your mornings right with a delicious bowl of Apple Cinnamon Overnight Oats! This simple recipe combines wholesome ingredients to give you a quick, easy breakfast. You’ll only need a... Read Full Recipe -
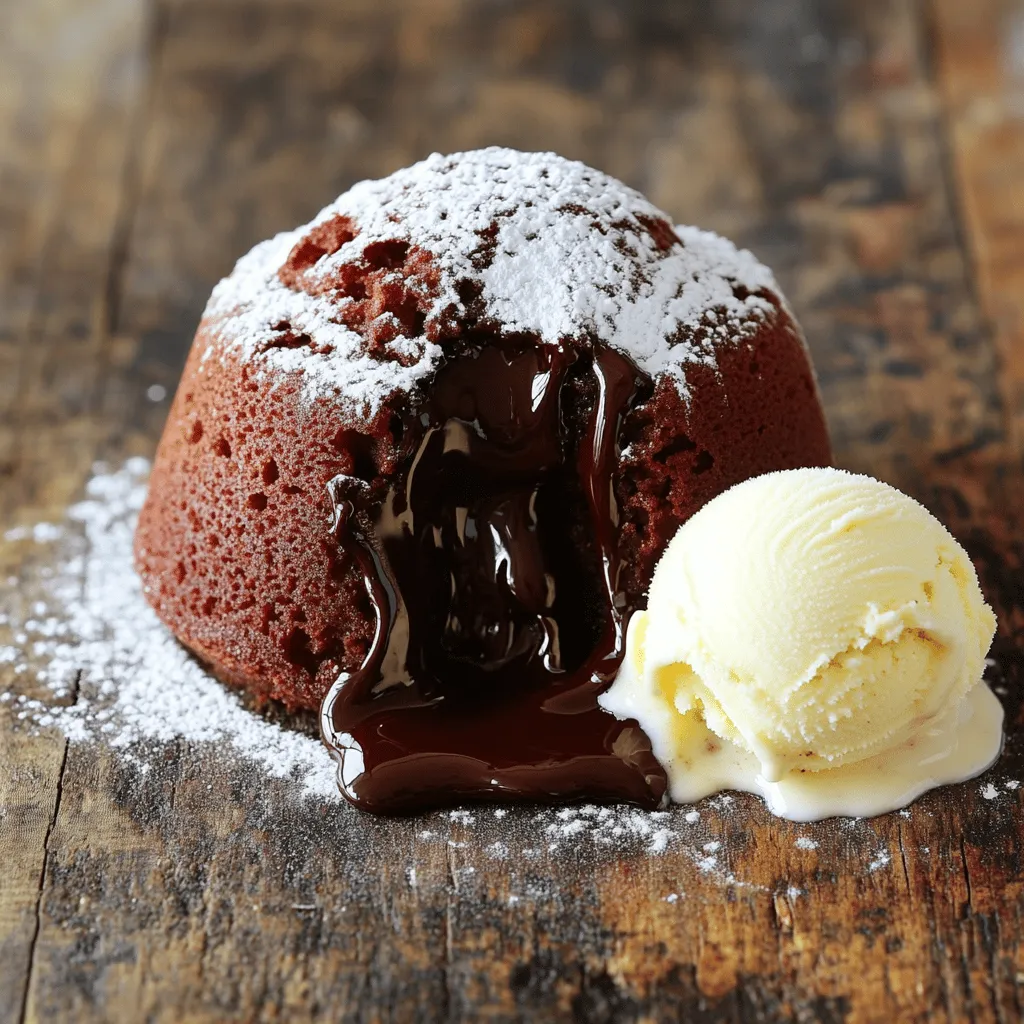
Easiest Chocolate Lava Cake Quick and Delicious Treat
Craving a sweet treat that impresses without complicated steps? You’ll love this Easiest Chocolate Lava Cake recipe! This dessert is quick to make and packed with gooey chocolate goodness. With... Read Full Recipe -
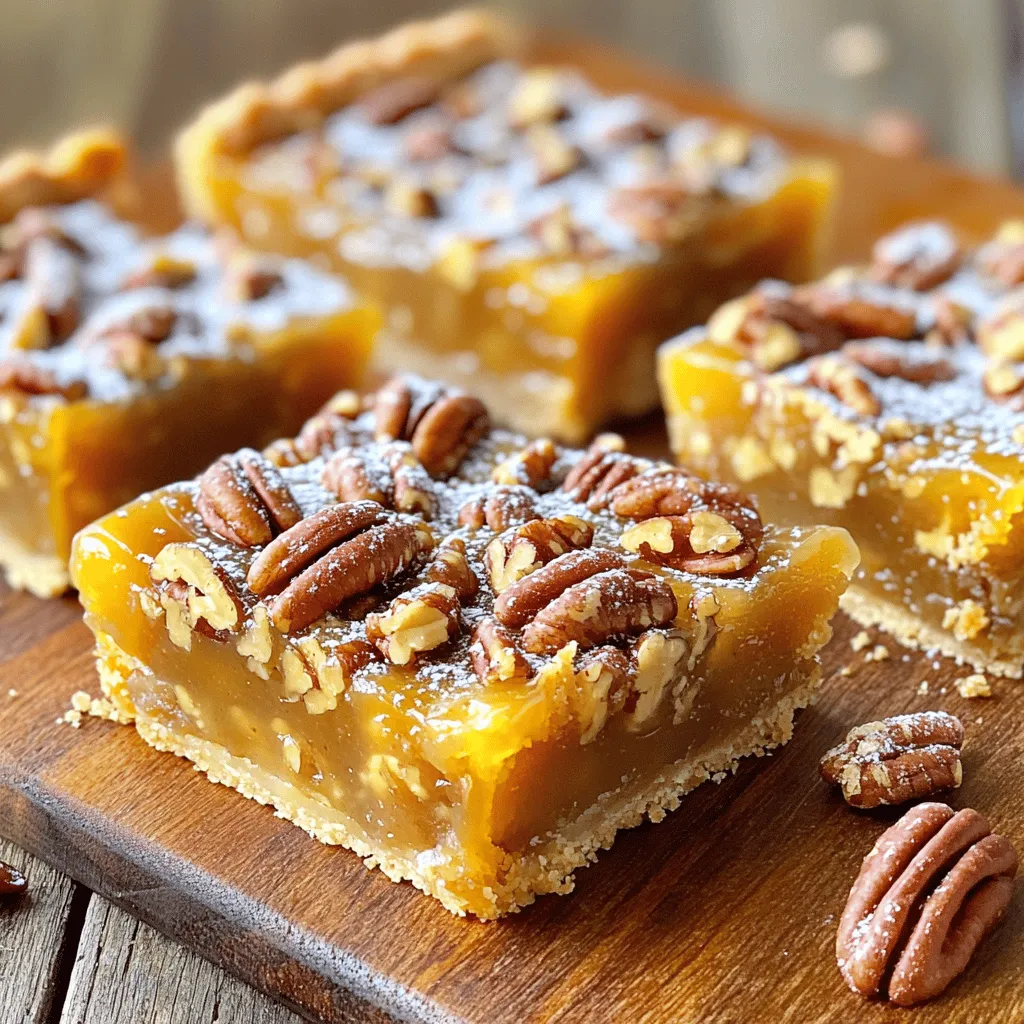
Maple Pecan Pie Bars Delightful Dessert Treat
Are you ready to indulge in a delightful dessert? These Maple Pecan Pie Bars are a sweet twist on a classic favorite! With crunchy pecans and rich maple flavor, every... Read Full Recipe -
Vegan Chocolate Avocado Mousse Rich and Creamy Delight
If you crave a dessert that’s both rich and healthy, you’re in the right place. This Vegan Chocolate Avocado Mousse combines ripe avocados, unsweetened cocoa powder, and a touch of... Read Full Recipe -
Peanut Butter Chocolate Chip Cookies Simple and Sweet
If you love the rich taste of peanut butter and the sweetness of chocolate, you’re in for a treat! This blog post will guide you through making simple and sweet... Read Full Recipe -
No-Bake Strawberry Shortcake Quick and Simple Delight
Are you craving a sweet treat that’s easy and delicious? Look no further! My No-Bake Strawberry Shortcake is a quick and simple delight, perfect for any occasion. With just a... Read Full Recipe -
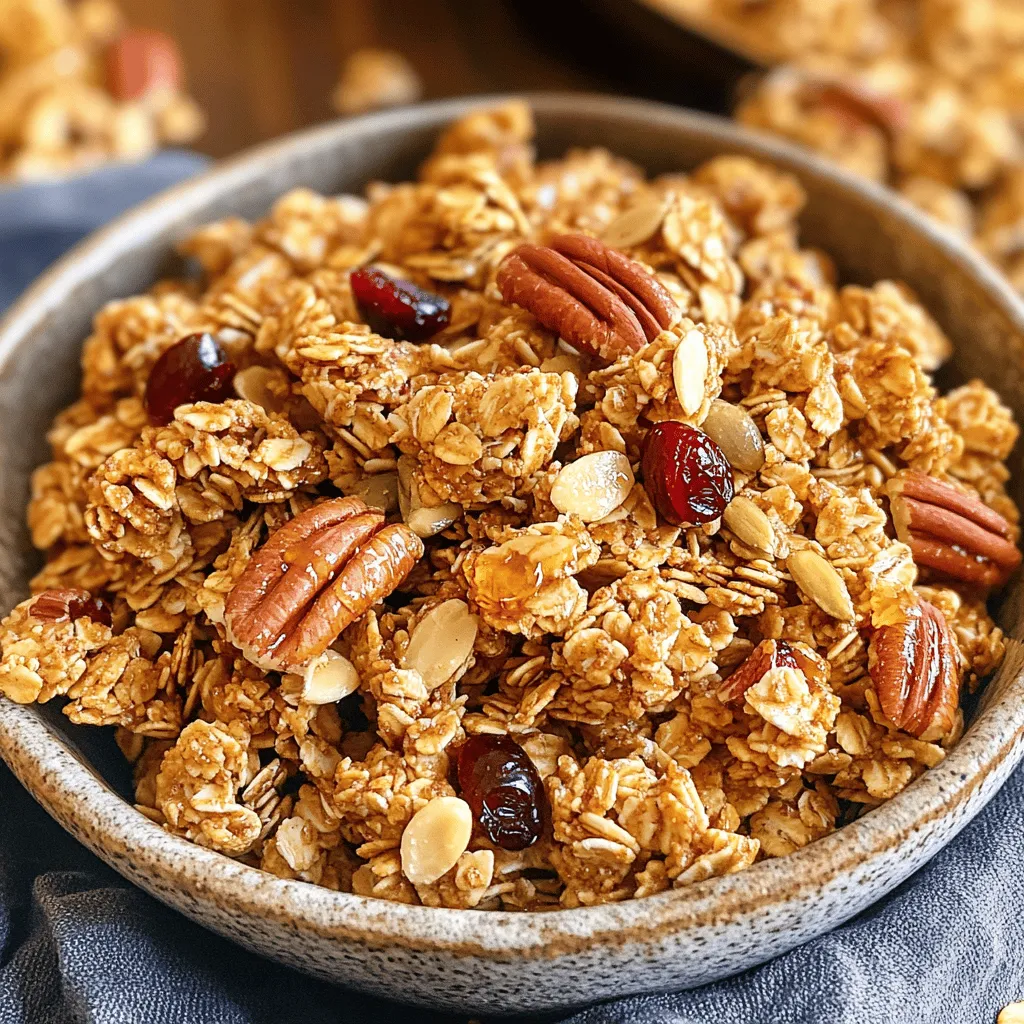
Maple Pecan Granola Crunchy and Healthy Snack
Looking for a tasty yet healthy snack? You’ll love my Maple Pecan Granola! This crunchy treat is simple to make and packed with flavor. With a few key ingredients and... Read Full Recipe -
Strawberry Shortcake Trifle Delightful Layered Treat
Are you ready to impress your friends with a strawberry shortcake trifle? This delightful layered treat combines juicy strawberries, fluffy whipped cream, and soft cake for pure indulgence. It’s a... Read Full Recipe


My Latest Recipes

hey,
i’m !
I’m so happy you’re here!
Each recipe I share is a little piece of love from my kitchen. May they fill your heart and home with warmth. Let’s cook up something wonderful together.

![To make this tasty chocolate chip banana bread, you need key ingredients that blend well. Here’s what you'll need: - 3 ripe bananas, mashed - 1/2 cup melted coconut oil (or unsalted butter) - 1/2 cup brown sugar - 1/4 cup granulated sugar - 2 large eggs, beaten - 1 teaspoon vanilla extract - 1 teaspoon baking soda - 1/2 teaspoon salt - 1 1/2 cups all-purpose flour - 1 cup semi-sweet chocolate chips - 1/2 cup walnuts or pecans, chopped (optional) These ingredients work together to create a moist and delicious bread. The bananas add sweetness, while the chocolate chips give you that rich, gooey texture. You can play around with different flavors. Here are some ideas: - Swap coconut oil for unsalted butter for a richer taste. - Use dark chocolate chips for a deeper chocolate flavor. - Add spices like cinnamon or nutmeg for a warm touch. - If you want nuts, try almonds or hazelnuts instead of walnuts. These options let you customize the bread to fit your taste. You can get creative and make it your own! Ripe bananas are key to great banana bread. Here’s how to pick them: - Look for bananas with brown spots on the peel. - The more spots, the sweeter the banana. - Avoid bananas that are too green or too brown. If you need ripe bananas fast, place them in a paper bag. This traps ethylene gas and speeds up ripening. You can use this trick to ensure your bananas are perfect for baking. First, gather all your ingredients. You will need: - 3 ripe bananas, mashed - 1/2 cup melted coconut oil (or unsalted butter) - 1/2 cup brown sugar - 1/4 cup granulated sugar - 2 large eggs, beaten - 1 teaspoon vanilla extract - 1 teaspoon baking soda - 1/2 teaspoon salt - 1 1/2 cups all-purpose flour - 1 cup semi-sweet chocolate chips - 1/2 cup walnuts or pecans, chopped (optional) Next, preheat your oven to 350°F (175°C). Grease a 9x5-inch loaf pan. You can also line it with parchment paper for easy removal later. This step makes serving easier. In a large bowl, mix the mashed bananas and melted coconut oil. Stir until they blend well. Then add the brown and granulated sugars. Mix until the mixture is smooth. Beat in the eggs and vanilla extract. Make sure they are fully incorporated. Sprinkle the baking soda and salt over this mix. Stir gently to combine. Now, add the flour gradually. Mix just until it all comes together. Avoid overmixing. This keeps the bread light and fluffy. Finally, fold in the chocolate chips and nuts if you chose to add them. Ensure they are evenly mixed. Pour the batter into your prepared pan. Smooth the top with a spatula. Bake in the preheated oven for 55-65 minutes. Check for doneness by inserting a toothpick into the center. It should come out clean or with a few moist crumbs. Once done, remove the banana bread from the oven. Let it cool in the pan for about 10 minutes. After that, transfer it to a wire rack. Let it cool completely before slicing. Enjoy your homemade chocolate chip banana bread! If you want the full recipe, check out the [Full Recipe]. To get the best texture in your chocolate chip banana bread, use ripe bananas. Ripe bananas have more natural sugar and moisture. Mash them well for a smooth mix. When mixing, blend just until the flour disappears. Overmixing can make your bread dense. Add chocolate chips gently to keep them from sinking. One common mistake is using cold ingredients. Always use room temperature eggs. Cold eggs can shock the batter. Also, check your baking soda for freshness. Old baking soda can lead to flat bread. Lastly, avoid opening the oven door too early. This can cause your bread to collapse. If you want to skip chocolate chips, try other flavors. You can add nuts for crunch. Walnuts or pecans work great. Spices like cinnamon can add warmth. For a fruity twist, mix in blueberries or diced apples. You can even add a splash of orange juice or zest for brightness. Each choice will change the taste while keeping it delicious. {{image_2}} You can switch up the flavors in your chocolate chip banana bread. Try adding peanut butter for a nutty taste. You can also mix in dried fruits like cranberries or raisins for a sweet twist. For a hint of spice, add a teaspoon of cinnamon or nutmeg. If you love nuts, toss in some chopped walnuts or pecans. Each choice gives a new feel to the classic recipe. If you need a gluten-free option, replace all-purpose flour with a gluten-free blend. Look for one that works well for baking. For a vegan version, swap eggs with flaxseed meal. Mix one tablespoon of flaxseed with three tablespoons of water and let it sit until it gets thick. Use plant-based butter or coconut oil instead of regular butter. These changes will keep your bread moist and tasty. Serve your chocolate chip banana bread in fun ways. Try toasting slices and spreading almond butter on top. This adds a nice crunch and flavor. You can also serve it warm with a scoop of ice cream for a dessert treat. Drizzling honey or maple syrup can take it to the next level. For breakfast, enjoy it with yogurt and fresh fruit. Each way to serve makes it special. For all the details, check the Full Recipe. To keep your chocolate chip banana bread fresh, store it in an airtight container. This helps maintain moisture and flavor. You can place parchment paper between slices to avoid sticking. If you live in a warm area, store it in the fridge. This keeps it safe from mold. However, cold storage may dry it out slightly. You can freeze banana bread for later enjoyment. Wrap it tightly in plastic wrap and then in aluminum foil. This prevents freezer burn. For best results, slice the bread first. This way, you can thaw only what you need. When ready to eat, remove it from the freezer and let it thaw at room temperature. You can also reheat slices in the microwave for about 15-20 seconds. Banana bread stays fresh for about 3-4 days at room temperature. In the fridge, it lasts up to a week. If frozen, it can last for up to three months. Use a loaf pan or a glass container for storage. Glass is airtight and helps keep the bread moist. For the best taste, enjoy it within the first week! Yes, you can! If you skip the chocolate chips, you can still make a tasty banana bread. You might want to add nuts, like walnuts or pecans, for crunch. Dried fruits, like raisins or cranberries, also work well. This gives your bread a nice texture and flavor. You can also spice it up with cinnamon or nutmeg for extra warmth. To ripen bananas fast, place them in a brown paper bag. The bag traps ethylene gas, speeding up the ripening. You can add an apple or another ripe banana to help the process. If you need them super fast, you can bake them! Simply place unpeeled bananas on a baking sheet and bake at 300°F (150°C) for about 15-20 minutes. Watch them turn black. Let them cool before using them in your recipe. To keep your banana bread fresh, store it at room temperature in an airtight container. A zip-top bag works well too. If you want it to last longer, wrap it tightly in plastic wrap and freeze it. When you want a slice, take it out and let it thaw. You can also warm it up in the oven for a few minutes. This brings back that fresh-baked taste! You now know how to make Chocolate Chip Banana Bread. We explored the key ingredients and steps. You learned how to mix for the best results and how to bake it perfectly. We shared tips for texture and flavor options, plus storage tips to keep it fresh. Try adding your own twists to make it unique. Baking can be fun and simple. Enjoy each slice of your delicious creation!](https://lisadishes.com/wp-content/uploads/2025/05/4d87f946-31f1-4608-8208-2c55f28fcdc2-300x300.webp)


Vegan Cauliflower Tacos Crispy and Flavorful Delight
Are you ready to spice up Taco Tuesday? My Vegan Cauliflower Tacos are a crispy and flavorful delight that will satisfy your taste buds.…

