

Latest & Greatest
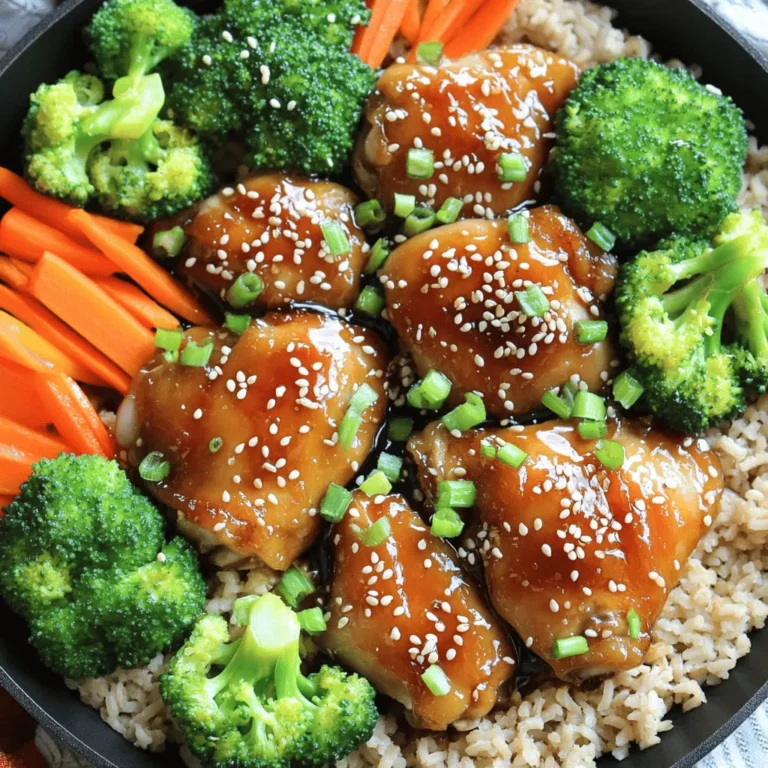
Creamy Chicken and Rice Savory Comfort Meal
Are you craving something warm and comforting? Look no further! I’m excited to share my Creamy Chicken and Rice recipe. This dish combines tender chicken, rich…
Read more…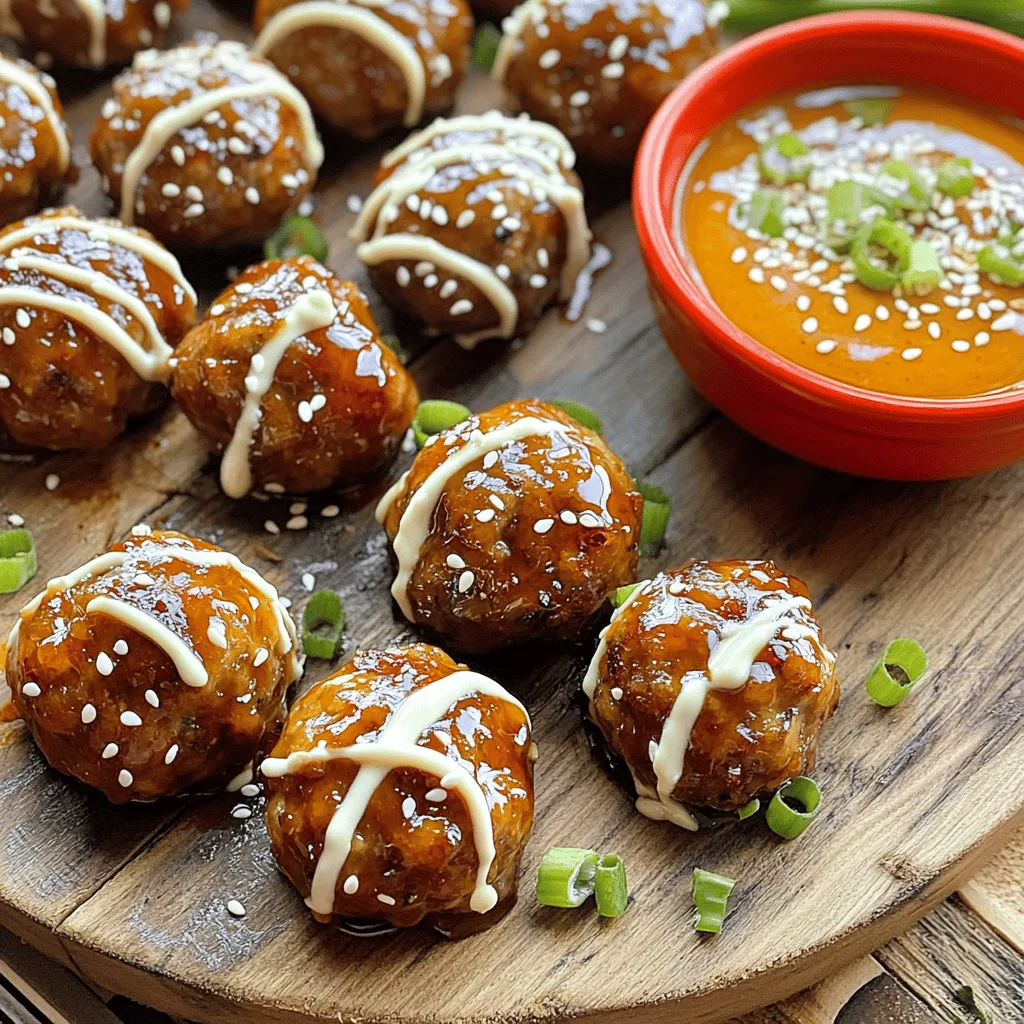
Korean BBQ Meatballs with Spicy Mayo Delight
Ready to wow your taste buds? In this post, I’ll guide you through making Korean BBQ Meatballs with Spicy Mayo. These savory meatballs are a crowd-pleaser,…
Read more…
S’mores Cookies Delightful and Easy Recipe
Get ready to impress your friends and family with the ultimate S’mores Cookies recipe! I’ll guide you step-by-step to create these delightful treats that blend gooey…
Read more…
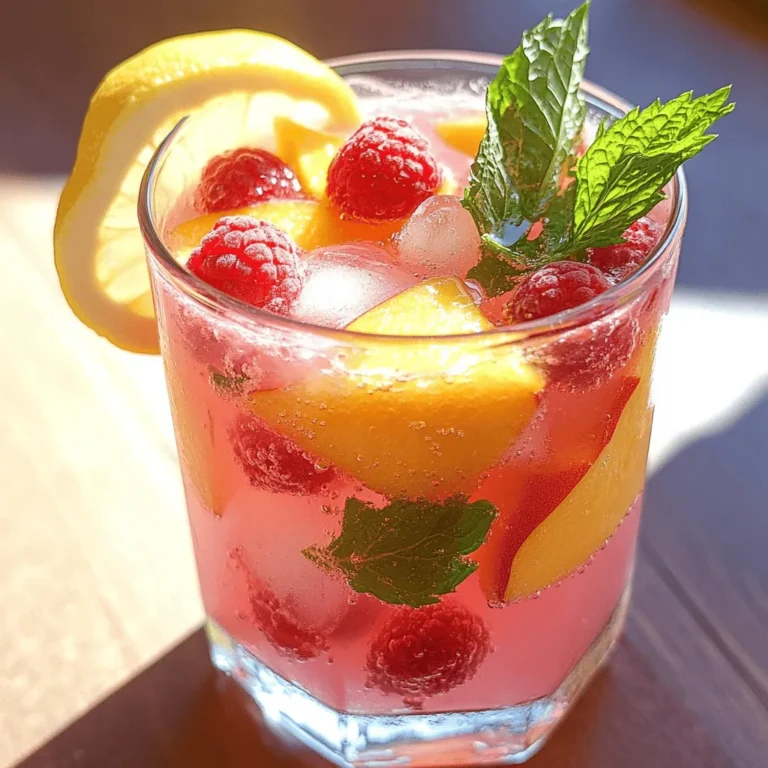
Raspberry Peach Lemonade Refreshing and Fruity Drink
Looking for a drink that’s both refreshing and fruity? You’ve found it! Raspberry Peach Lemonade packs a punch with its bright flavors. Imagine sipping on a…
Read more…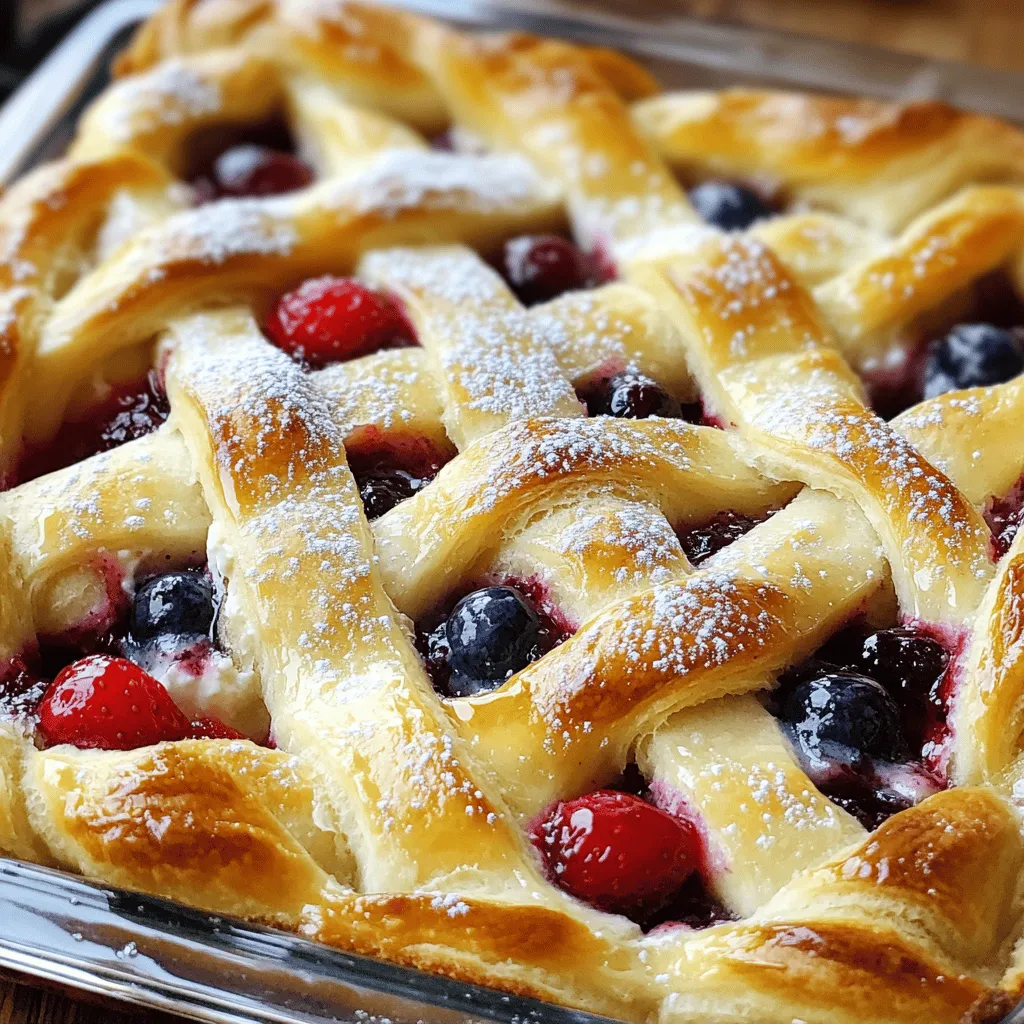
Cheesecake Crescent Rolls Casserole Creamy Delight
Are you ready to dive into a sweet treat that’s simple and oh-so-delicious? This Cheesecake Crescent Rolls Casserole Creamy Delight is the perfect blend of creamy…
Read more…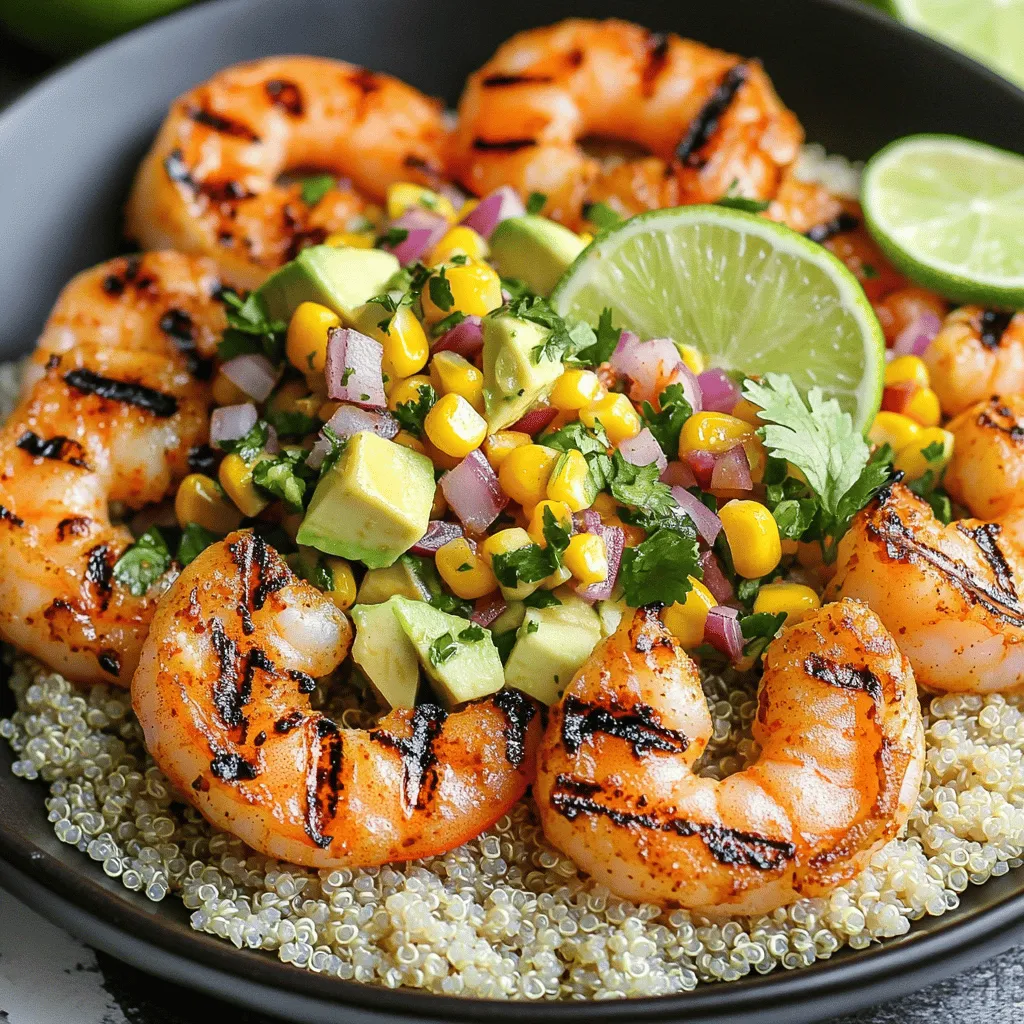
Grilled Shrimp Bowl with Avocado and Corn Salsa Delight
Get ready for a tasty adventure with my Grilled Shrimp Bowl with Avocado and Corn Salsa! This easy recipe is packed with flavor and healthy ingredients.…
Read more…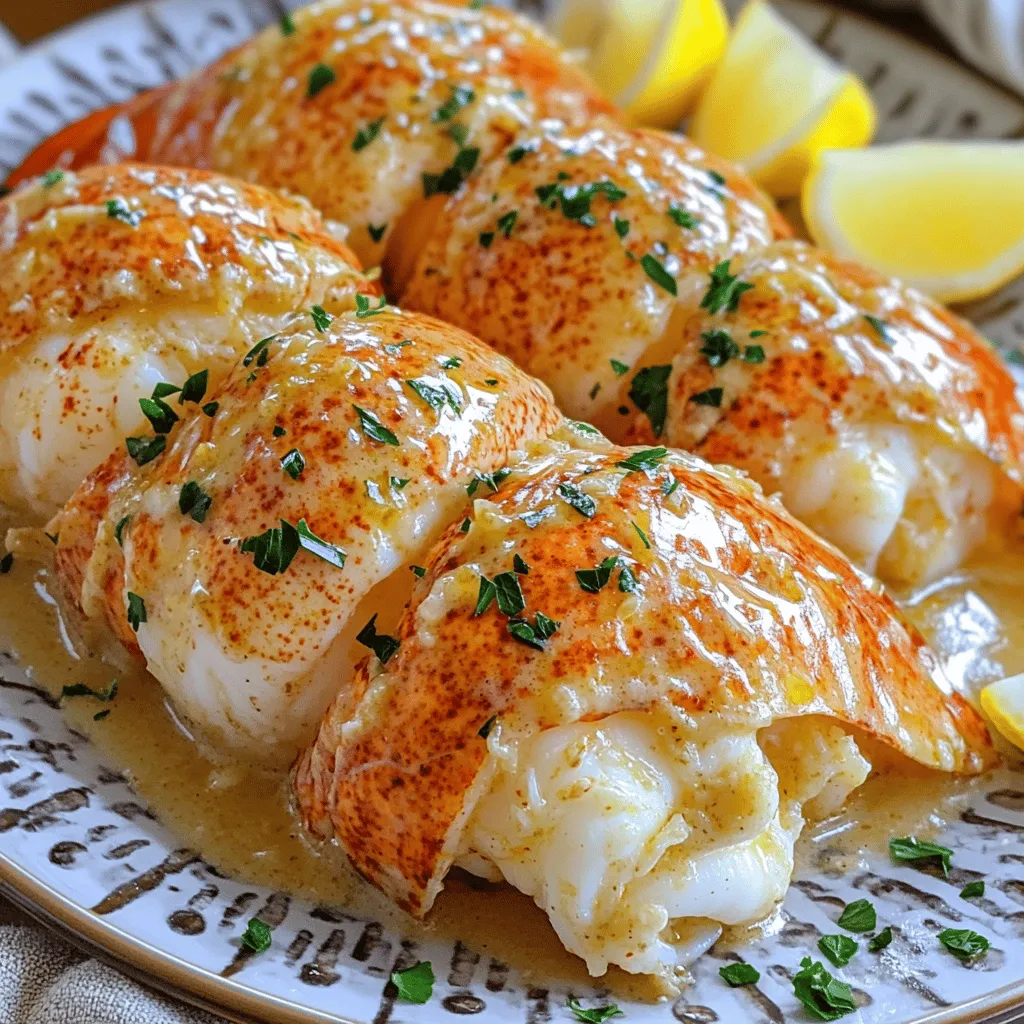
Creamy Garlic Butter Lobster Tails Delightful Recipe
If you love seafood, you’re in for a treat! This creamy garlic butter lobster tails recipe is easy and delicious. You’ll learn how to prepare tender…
Read more…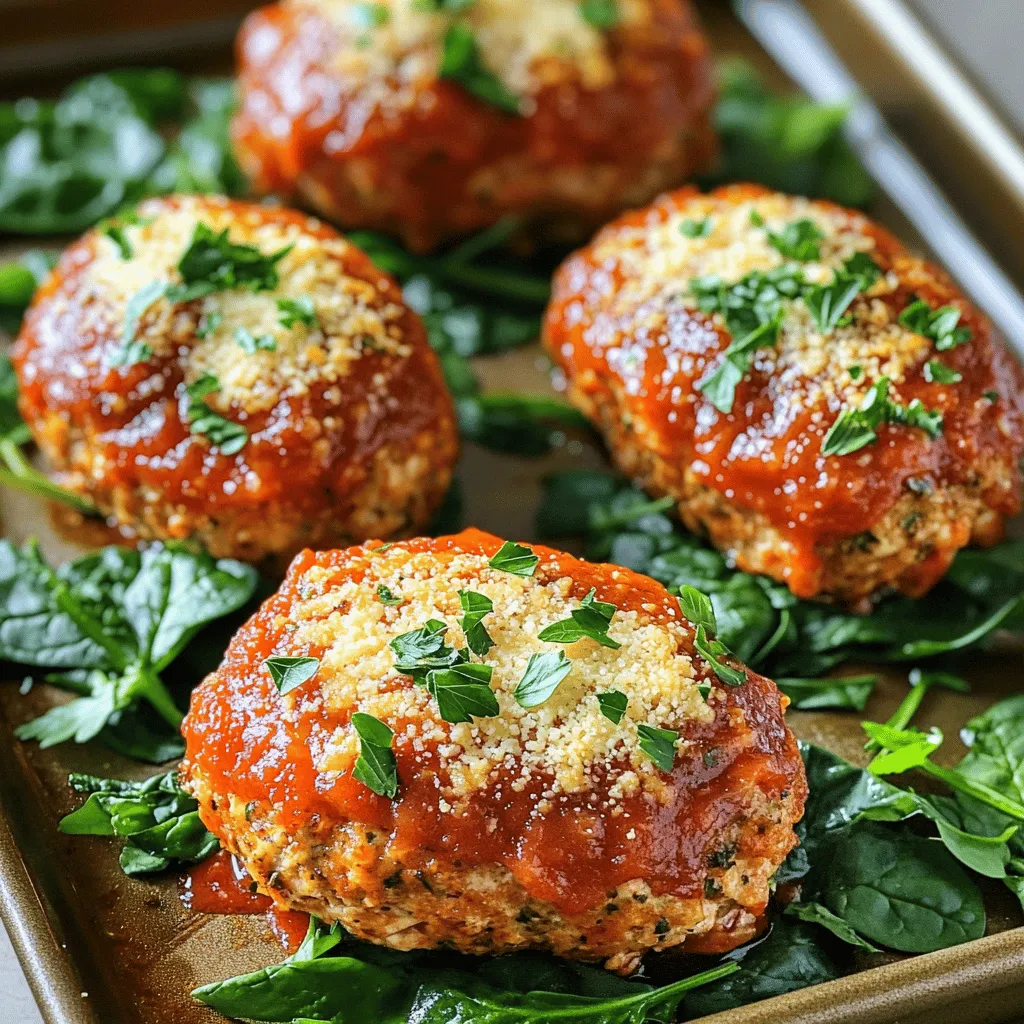
Garlic Parmesan Chicken Meatloaves Flavorful Home Dish
Garlic Parmesan Chicken Meatloaves are a delightful dish that’s simple to make and bursting with flavor. You can enjoy this cozy meal any night of the…
Read more…browse recipes


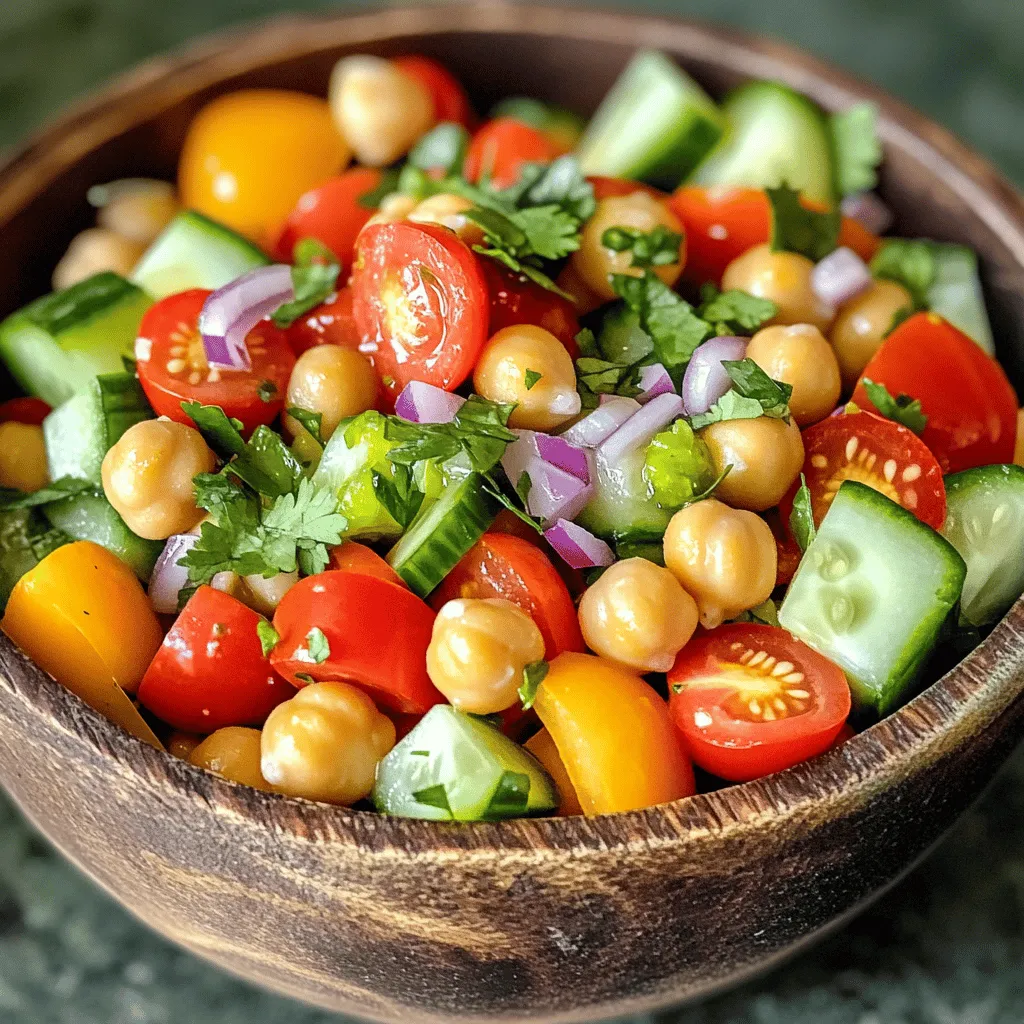
Spicy Chickpea Salad Flavorful and Nourishing Delight
Looking for a fresh, spicy twist on salad? Try this Spicy Chickpea Salad! It’s packed with vibrant flavors and nourishing ingredients that make each…
My Latest Desserts

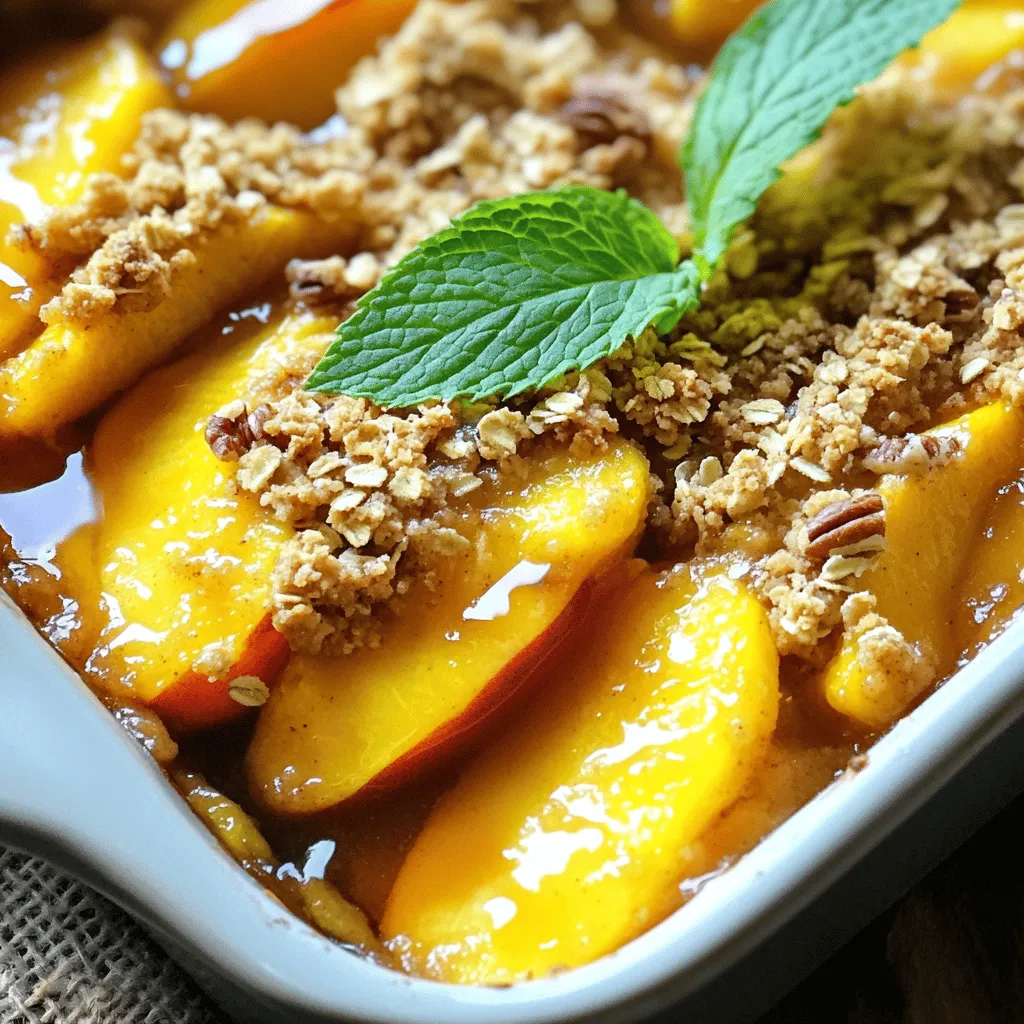
Peach Crisp with Oat Topping Simple Comfort Food
If you’re craving a dessert that combines juicy peaches with a crunchy oat topping, you’re in the right place! My Peach Crisp with Oat Topping is a warm and comforting... Read Full Recipe-
Lemon Blueberry Muffins Fresh and Flavorful Treat
Looking for a fresh and tasty treat? My Lemon Blueberry Muffins are just what you need! Bursting with zesty lemon and sweet blueberries, these muffins are perfect for breakfast or... Read Full Recipe -
Apple Cinnamon Overnight Oats Tasty and Simple Recipe
Start your mornings right with a delicious bowl of Apple Cinnamon Overnight Oats! This simple recipe combines wholesome ingredients to give you a quick, easy breakfast. You’ll only need a... Read Full Recipe -
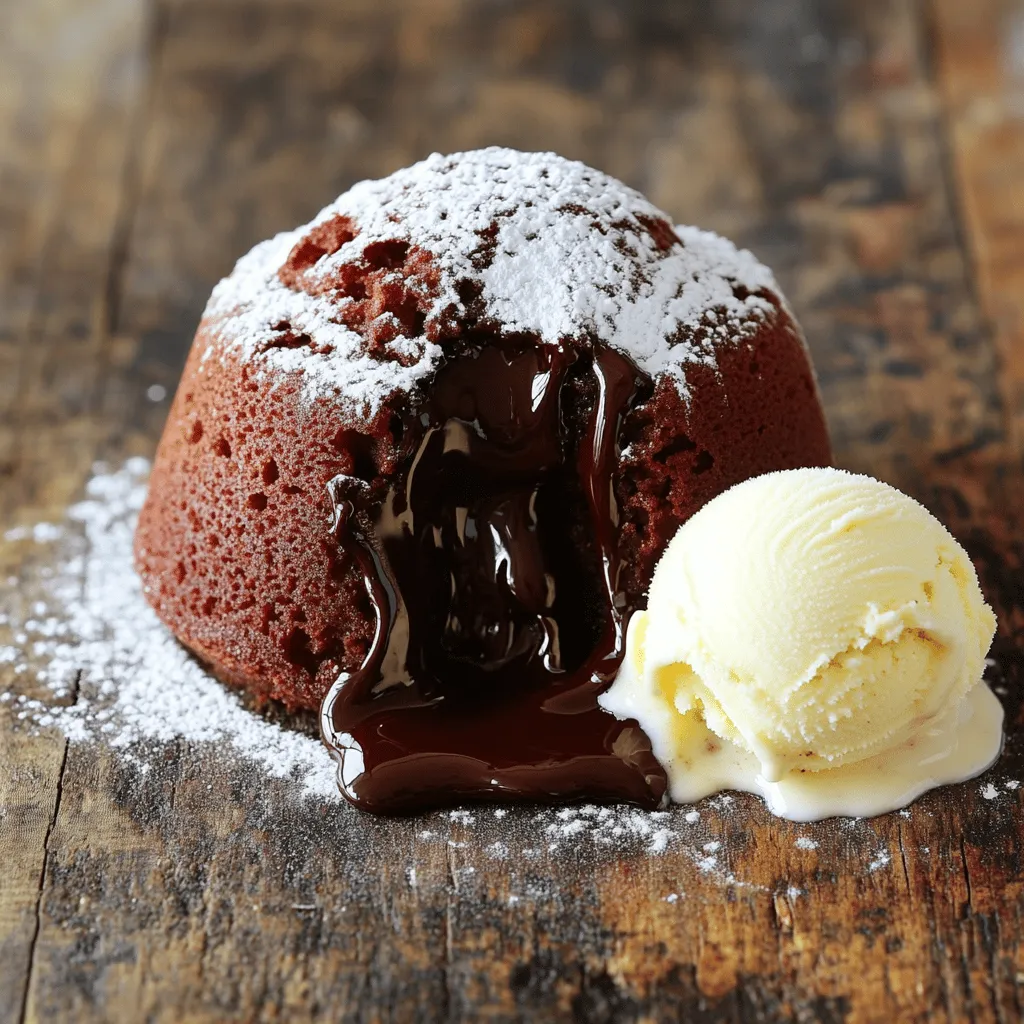
Easiest Chocolate Lava Cake Quick and Delicious Treat
Craving a sweet treat that impresses without complicated steps? You’ll love this Easiest Chocolate Lava Cake recipe! This dessert is quick to make and packed with gooey chocolate goodness. With... Read Full Recipe -
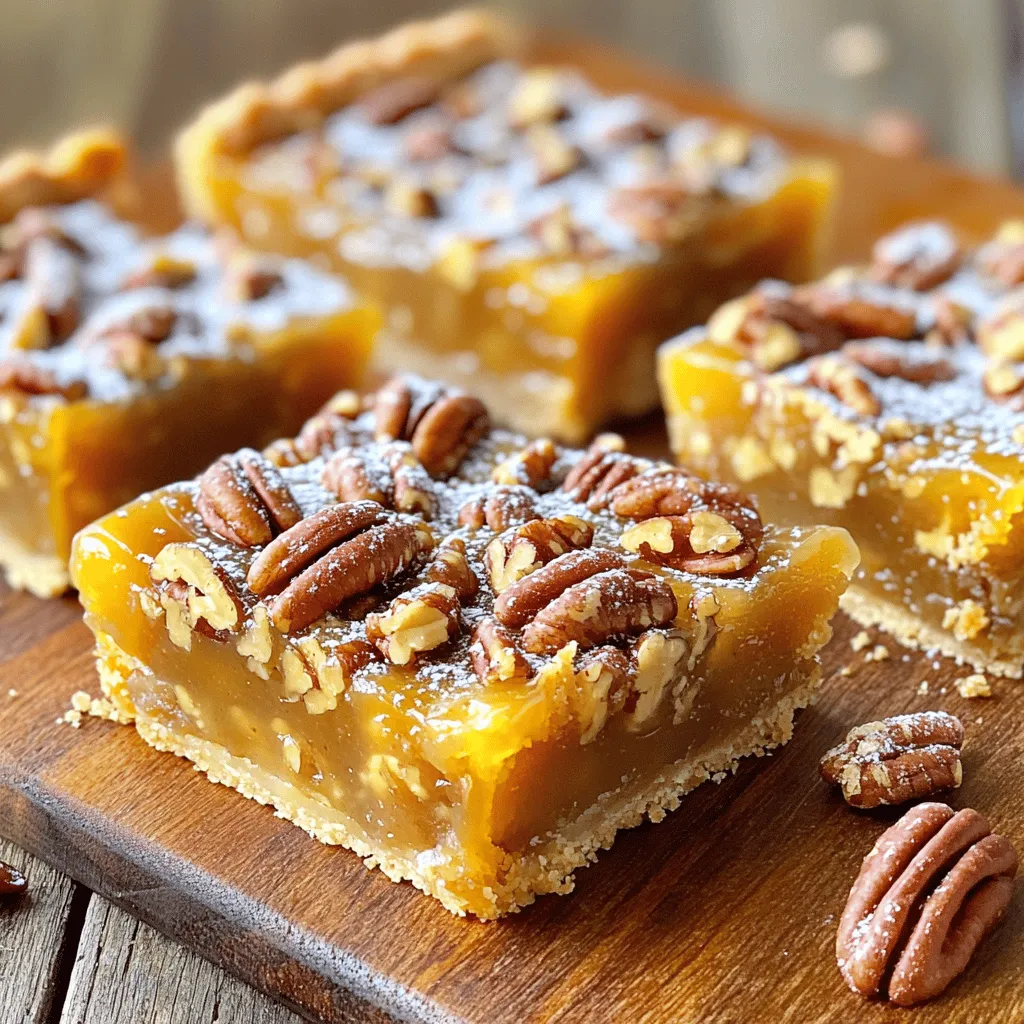
Maple Pecan Pie Bars Delightful Dessert Treat
Are you ready to indulge in a delightful dessert? These Maple Pecan Pie Bars are a sweet twist on a classic favorite! With crunchy pecans and rich maple flavor, every... Read Full Recipe -
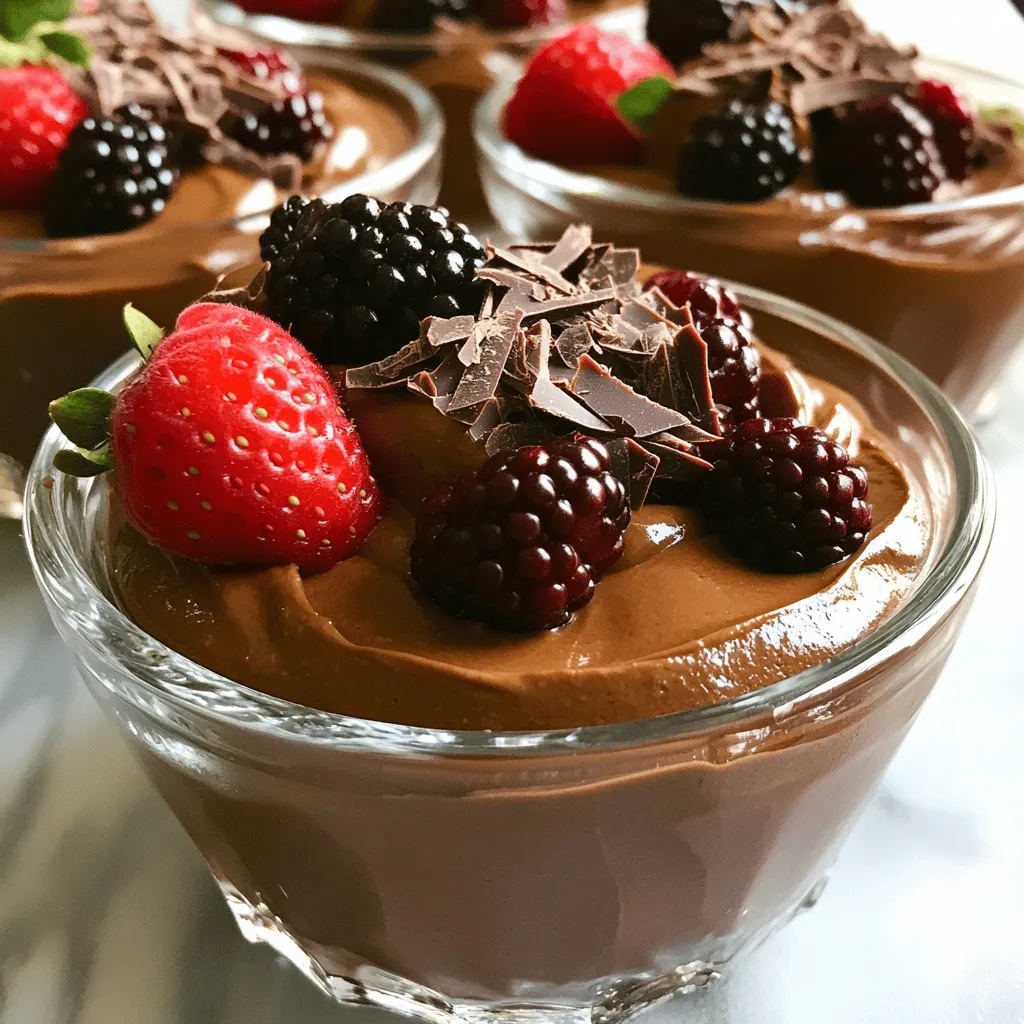
Vegan Chocolate Avocado Mousse Rich and Creamy Delight
If you crave a dessert that’s both rich and healthy, you’re in the right place. This Vegan Chocolate Avocado Mousse combines ripe avocados, unsweetened cocoa powder, and a touch of... Read Full Recipe -
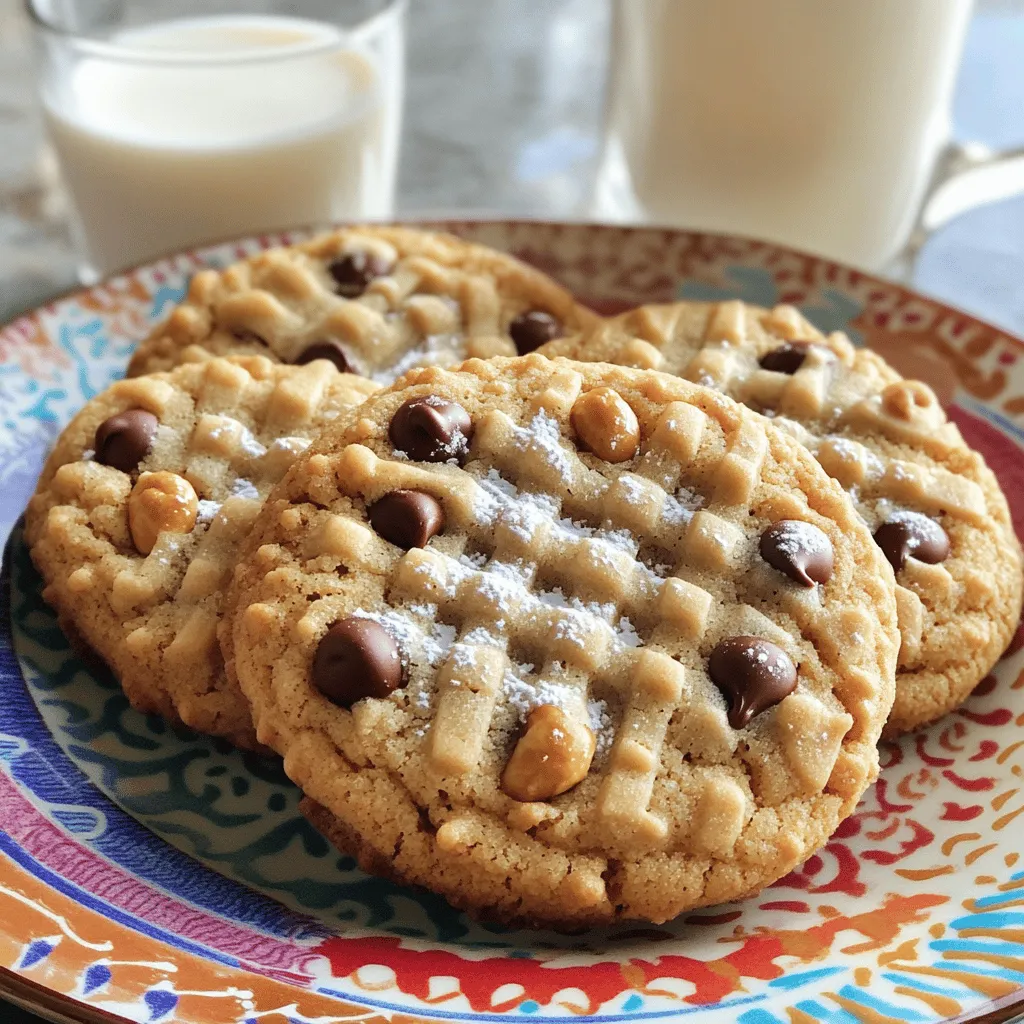
Peanut Butter Chocolate Chip Cookies Simple and Sweet
If you love the rich taste of peanut butter and the sweetness of chocolate, you’re in for a treat! This blog post will guide you through making simple and sweet... Read Full Recipe -
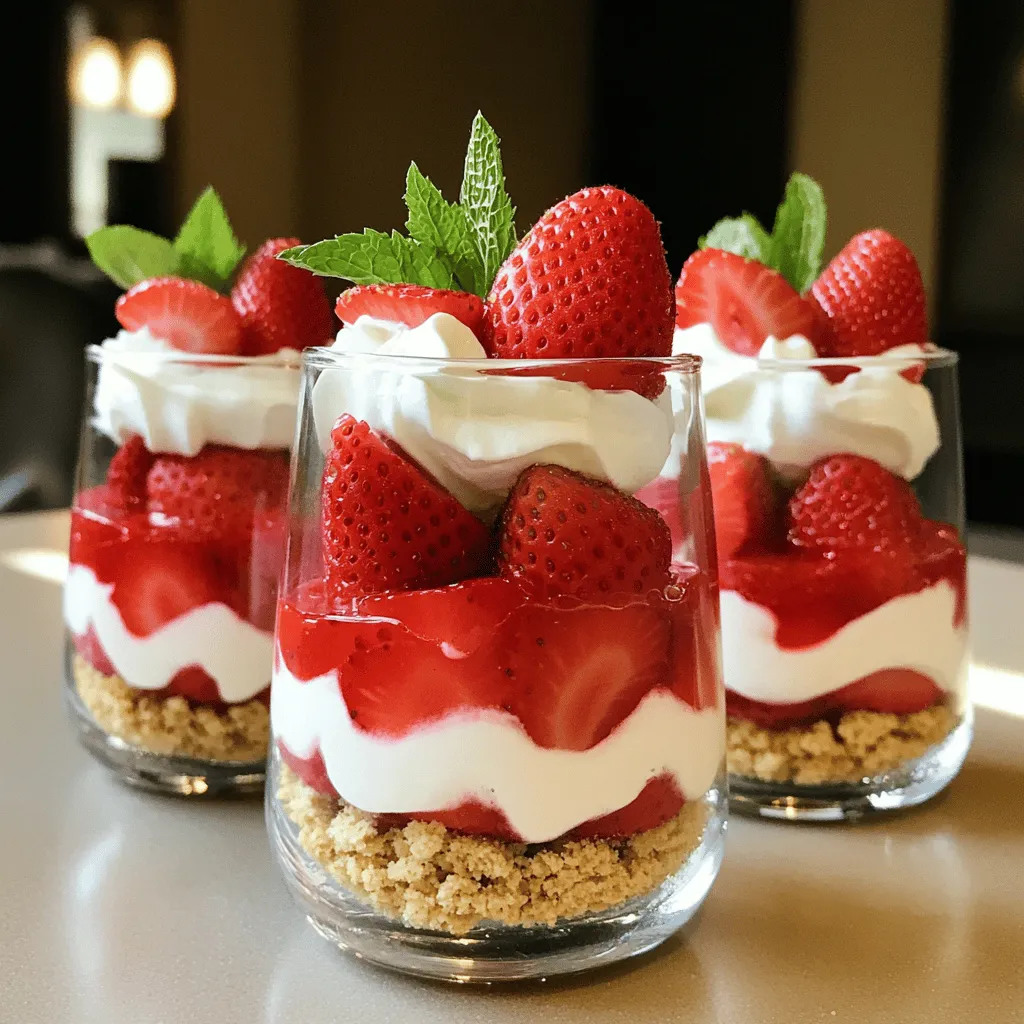
No-Bake Strawberry Shortcake Quick and Simple Delight
Are you craving a sweet treat that’s easy and delicious? Look no further! My No-Bake Strawberry Shortcake is a quick and simple delight, perfect for any occasion. With just a... Read Full Recipe -
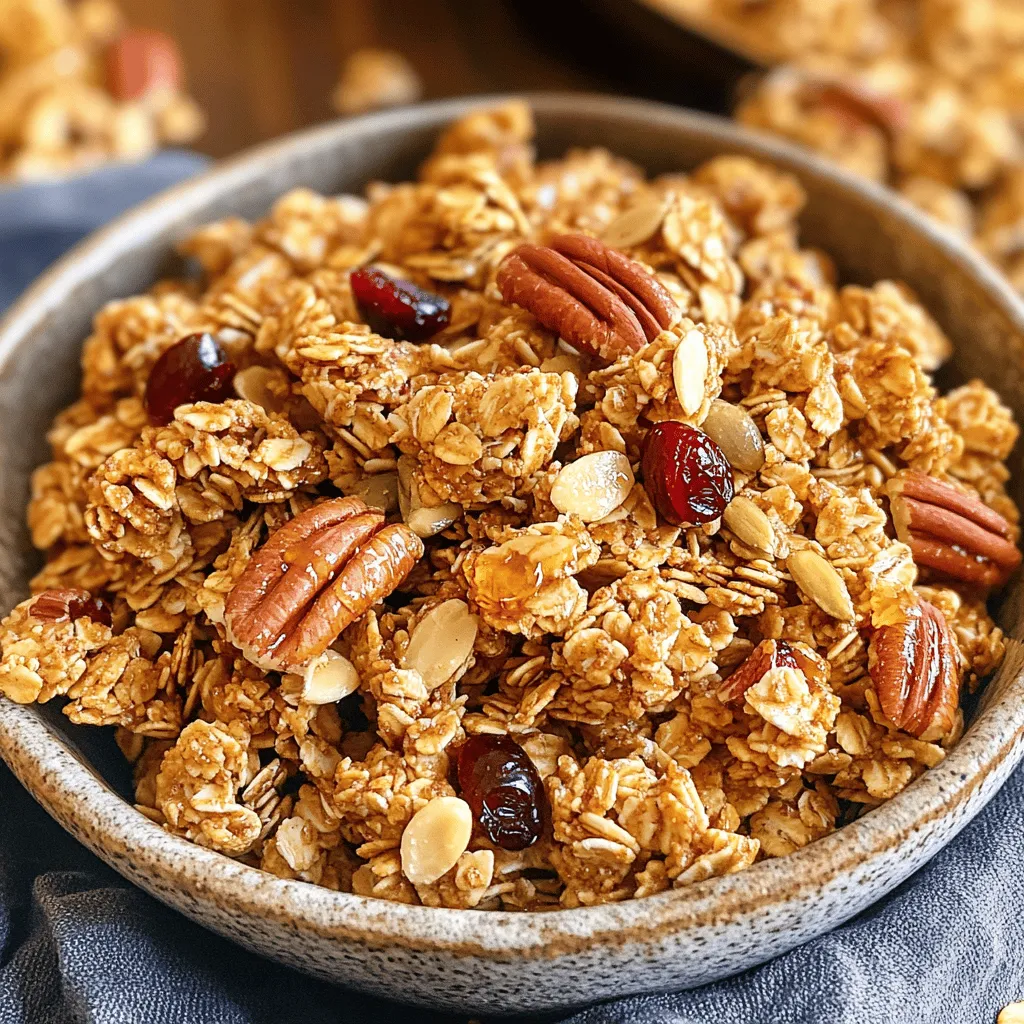
Maple Pecan Granola Crunchy and Healthy Snack
Looking for a tasty yet healthy snack? You’ll love my Maple Pecan Granola! This crunchy treat is simple to make and packed with flavor. With a few key ingredients and... Read Full Recipe -
Strawberry Shortcake Trifle Delightful Layered Treat
Are you ready to impress your friends with a strawberry shortcake trifle? This delightful layered treat combines juicy strawberries, fluffy whipped cream, and soft cake for pure indulgence. It’s a... Read Full Recipe


My Latest Recipes

hey,
i’m !
I’m so happy you’re here!
Each recipe I share is a little piece of love from my kitchen. May they fill your heart and home with warmth. Let’s cook up something wonderful together.

![- 4 boneless, skinless chicken breasts - 1 cup heavy cream - 1/2 cup homemade or store-bought basil pesto - 1 cup cherry tomatoes, halved - 2 tablespoons olive oil - 3 cloves garlic, minced - 1/2 teaspoon red pepper flakes (optional) - Salt and pepper to taste - Fresh basil leaves for garnish - Grated Parmesan cheese for serving When I cook, I love using fresh, high-quality ingredients. Each item in this list plays a vital role in the dish. The chicken breasts stay moist and tender, while the cream and pesto create a rich, flavorful sauce. The sweet roasted tomatoes add a burst of flavor that complements the creaminess. If you're looking for alternatives to heavy cream, consider using coconut milk or cashew cream. Both options provide a creamy texture without dairy. For the pesto, you can try sun-dried tomato pesto or arugula pesto if you want a twist on the classic flavor. Some great herbs to pair with this dish include: - Thyme - Oregano - Parsley These herbs enhance the flavors in the creamy pesto chicken. They add a fresh taste that brightens the meal. You can sprinkle these herbs on top before serving to make your dish even more appealing. For the full recipe, including preparation and cooking steps, check out the [Full Recipe]. - Preheat your oven to 400°F (200°C). This helps roast the tomatoes perfectly. - On a baking sheet, toss halved cherry tomatoes with 1 tablespoon of olive oil, salt, and pepper. If you like a little heat, add red pepper flakes. Spread them out in a single layer. - Season the chicken breasts with salt and pepper. This simple step adds great flavor. - In a large skillet over medium-high heat, add 1 tablespoon of olive oil. Once hot, add the chicken. Cook for about 5-7 minutes on each side until golden brown. - Make sure the chicken is cooked through. The internal temperature should reach 165°F (74°C). - In the same skillet, lower the heat to medium. Add minced garlic and sauté for 1-2 minutes until fragrant. - Pour in 1 cup of heavy cream and 1/2 cup of basil pesto, stirring to combine. Let the sauce simmer for 5 minutes. This helps it thicken slightly. - If your sauce isn’t thick enough, let it simmer longer. It will become creamy and rich. - Return the seared chicken breasts to the skillet. Coat them well in the creamy pesto sauce. - Let the chicken simmer in the sauce for an additional 3-5 minutes. This allows the flavors to meld. - For serving, place a bed of roasted tomatoes on a plate. Top it with a creamy pesto chicken breast. Spoon more sauce over the chicken if you desire. - Finish with grated Parmesan cheese and fresh basil leaves for a beautiful touch. For complete details on all steps, check the Full Recipe. To achieve the ideal cream sauce, focus on the heat. Start on medium, and mix your heavy cream with basil pesto. Stir well to combine. Let it simmer for about five minutes. This helps thicken the sauce. If it feels too thin, cook it a bit longer. For flavor enhancers, consider adding a squeeze of lemon juice. It brightens the dish. You can also mix in a pinch of salt and pepper. This elevates the flavor. A sprinkle of grated Parmesan cheese can add depth too. To cook juicy chicken, always sear it in a hot pan. This creates a nice golden crust. Cook each side for about five to seven minutes. Avoid moving the chicken too much while it cooks. That way, it stays juicy inside. Common mistakes to avoid include overcooking the chicken. Use a meat thermometer. Aim for an internal temperature of 165°F. Also, don’t skip seasoning. A little salt and pepper make a big difference. Pair your creamy pesto chicken with roasted tomatoes. The sweet, tangy flavor complements the rich sauce. You can also serve it over pasta or rice. Both options soak up the sauce well. For presentation, use a white plate. It highlights the vibrant colors of the dish. Garnish with fresh basil leaves and a sprinkle of Parmesan cheese. This adds a touch of elegance and makes the dish pop. For the full recipe, check out the earlier section. Enjoy your cooking adventure! {{image_2}} You can make this dish lighter by using low-fat cream options. Look for options like half-and-half or coconut cream. These alternatives still add creaminess without too many calories. Adding extra vegetables is another way to boost nutrition. Consider bell peppers, spinach, or zucchini. These veggies add color and flavor while keeping it healthy. You can spice up your creamy pesto chicken with new seasonings. Try adding lemon zest for a fresh twist. Fresh herbs like thyme or oregano can also enhance the dish. If you enjoy heat, consider a spicy version. Adding more red pepper flakes or even jalapeños will kick up the flavor. You can swap the basil pesto for sun-dried tomato or arugula pesto for a different taste. You can change how you cook this dish for more variety. An Instant Pot makes it quick and easy. Simply follow the same steps but use the pressure setting for about 10 minutes. A slow cooker is another option. Cook the chicken on low for 6-8 hours for tender results. Grilling the chicken instead of searing gives it a smoky flavor. Just be sure to watch it carefully to avoid drying it out. For the full recipe, check out the [Full Recipe]. To keep your creamy pesto chicken fresh, store leftovers in an airtight container. Place the chicken and roasted tomatoes together for the best flavor. Refrigerate the dish within two hours of cooking. This will help prevent bacteria growth. If you made extra sauce, store it separately. This keeps the chicken from getting soggy. You can freeze creamy pesto chicken for later. Just make sure it cools before you freeze it. Place it in a freezer-safe container. Use it within three months for the best taste. When ready to eat, thaw it overnight in the fridge. This keeps it safe and tasty. Reheat your creamy pesto chicken in a skillet over low heat. This method keeps the sauce creamy. Stir it gently to avoid drying out the chicken. You can also use the microwave. Just cover the dish to keep moisture in. Heat in short bursts until warm, checking often. Enjoy your meal as if it was fresh from the oven! It takes about 15 minutes to prep and 30 minutes to cook. You can have this meal ready in just 45 minutes. This includes roasting the tomatoes and cooking the chicken. Yes, you can use store-bought pesto. It saves time and still tastes great. However, homemade pesto often has a fresher flavor. You can control the ingredients and adjust the taste to your liking with homemade. Several sides go well with this dish. Here are some ideas: - Garlic bread for a crunchy contrast. - A simple green salad to add freshness. - Roasted vegetables for extra nutrients. - Pasta to soak up the creamy sauce. Yes, you can make it dairy-free. Use coconut cream or cashew cream instead of heavy cream. For cheese, try nutritional yeast or a dairy-free cheese. These swaps keep the meal creamy and tasty without dairy. To add heat, include more red pepper flakes. You can also add diced jalapeños or a dash of hot sauce. Adjust according to your spice level preference for a personalized touch. This blog post guides you through making Creamy Pesto Chicken with Roasted Tomatoes. We covered ingredients, cooking steps, and variations. You learned about healthy swaps and how to store leftovers. Follow the tips to perfect your dish and impress your guests. Cooking can be simple and fun. Enjoy this recipe as a delicious and versatile option for any meal. With these insights, you can create great food every time!](https://lisadishes.com/wp-content/uploads/2025/04/5ab67477-361c-4734-9d33-c9a751d3a119-300x300.webp)

![To make shrimp scampi, you need some key ingredients. Here’s what you will need: - 1 pound large shrimp, peeled and deveined - 8 ounces linguine or spaghetti - 4 tablespoons unsalted butter - 4 tablespoons olive oil - 4 cloves garlic, minced - 1 teaspoon red pepper flakes (adjust to taste) - 1 lemon, juiced and zested - 1/4 cup fresh parsley, finely chopped - Salt and pepper to taste - Lemon wedges for garnish These ingredients create a tasty dish. The shrimp gives it a fresh flavor. The garlic and red pepper add a nice kick. Want to take your dish to the next level? Here are some optional ingredients you could try: - White wine: Add 1/2 cup for a richer sauce. - Parmesan cheese: Grate some on top for creaminess. - Cherry tomatoes: Toss them in for color and sweetness. - Spinach: Add a handful for a healthy boost. These extras can boost your dish's flavor and look. Feel free to mix and match! If you can’t find something, don’t worry! Here are some easy swaps: - Shrimp: Use scallops or chicken if you prefer. - Pasta: Any long pasta works well, like fettuccine. - Olive oil: You can use vegetable oil or avocado oil. - Fresh parsley: Dried parsley can work too, just use less. These substitutes will help you create a delicious meal. Don't hesitate to get creative! For the full recipe, check out the entire guide. To start, fill a large pot with water. Add salt to make it taste like the sea. Bring the water to a boil. This step is key for great pasta. Once it boils, add 8 ounces of linguine or spaghetti. Cook according to the package instructions, usually about 8-10 minutes. You want it al dente, which means firm but not hard. Before draining, save 1 cup of pasta water. This water holds starch and flavor. Drain the pasta and set it aside. Next, grab a large skillet. Place it over medium heat. Add 2 tablespoons of butter and 2 tablespoons of olive oil. Let them melt together. Once hot, add 4 cloves of minced garlic and 1 teaspoon of red pepper flakes. Cook for about 1 minute. The garlic should smell great, but don’t burn it. Now, add the shrimp to the skillet. Season with salt and pepper. Cook for 2-3 minutes on each side. The shrimp will turn pink and opaque when done. Now it’s time to bring it all together. Lower the heat and add the remaining 2 tablespoons of butter, the lemon juice, and zest. Pour in the cooked pasta and half of the reserved pasta water. Toss everything together gently. This step ensures the pasta is coated with the sauce. If it seems too thick, add more pasta water as needed. Finish by stirring in 1/4 cup of chopped parsley. Taste and adjust seasoning if necessary. Serve hot, garnished with lemon wedges for that extra zing. For the full recipe, refer to the beginning. When picking shrimp, look for fresh or frozen shrimp. Fresh shrimp should smell like the sea, not fishy. I prefer large shrimp, as they hold up well when cooked. Choose shrimp that are firm and have a slight sheen. If buying frozen, check for clear packaging. Avoid shrimp with ice crystals, as this means they have been thawed and refrozen. Start with a hot skillet. This helps the shrimp sear quickly, locking in flavor. Use butter and olive oil for a rich taste. Garlic adds aroma, while lemon juice gives a fresh kick. Don’t forget the red pepper flakes for a bit of heat. Toss everything together for a few minutes to combine the flavors. If the sauce is too thick, add some pasta water. This adds flavor and helps the sauce cling to the pasta. One mistake is overcooking the shrimp. They cook fast, so only 2-3 minutes per side is best. Another common error is not seasoning enough. A pinch of salt and pepper enhances the dish. Avoid cooking the pasta too long; it should be al dente. Lastly, don’t skip the lemon juice. It brightens the dish and balances the rich flavors. For the full recipe, check out the complete guide. {{image_2}} You can make shrimp scampi creamy by adding dairy. Just mix in heavy cream or cream cheese. Start with half a cup of cream. Stir it in after you add the lemon juice and zest. This adds richness to your dish. The cream will balance the heat from the red pepper flakes. It makes the sauce silky and smooth. You can also sprinkle some Parmesan cheese on top. This takes the dish to another level. To make spicy shrimp scampi, just add more red pepper flakes. Start with one teaspoon and adjust to your taste. You can also add fresh chopped jalapeños for extra heat. Sauté them with the garlic for a bold flavor. If you like a smoky taste, try adding smoked paprika. This gives the dish a unique twist. Remember, always taste as you go. You can balance the heat with more lemon juice if it gets too spicy. If you want a vegetarian version, swap the shrimp for vegetables. Zucchini, bell peppers, and mushrooms work great. Sauté these veggies just like the shrimp. They will soak up the flavor from garlic and butter. You can also use tofu or chickpeas for protein. For a seafood taste, try seaweed or vegan shrimp alternatives. You can still use the same sauce and pasta. This allows you to enjoy the classic flavors without the shrimp. For the full recipe, check the [Full Recipe]. After enjoying your shrimp scampi, store leftovers right away. Let the dish cool to room temperature. Then, place it in an airtight container. This keeps the flavor fresh and prevents drying out. You can safely store shrimp scampi in the fridge for up to three days. Remember to label the container with the date, so you know when to eat it. When reheating shrimp scampi, aim for even warmth without overcooking. The best method is to use the stovetop. Heat a non-stick skillet on low. Add a splash of water or broth to keep it moist. Place the shrimp scampi in the skillet and stir gently until warmed through. This method helps maintain the dish's flavor and texture. Avoid the microwave, as it can make the shrimp tough. Freezing shrimp scampi is a great way to save it for later. First, cool the dish completely. Then, pack it in a freezer-safe container or bag. Be sure to remove as much air as possible. You can freeze shrimp scampi for up to three months. When ready to eat, thaw it in the fridge overnight. Reheat it gently on the stovetop for the best taste. To make shrimp scampi sauce, start with butter and olive oil. Heat them in a pan. Add minced garlic and red pepper flakes. Cook until the garlic smells nice. Then, squeeze in fresh lemon juice and zest for brightness. Mix in chopped parsley for color and flavor. This simple blend makes a rich sauce that pairs well with shrimp and pasta. Yes, you can make shrimp scampi ahead of time. Cook the shrimp and sauce, then store them separately from the pasta. Keep them in airtight containers in the fridge for up to two days. When you are ready to eat, heat the shrimp and sauce gently. Cook fresh pasta to serve with it. This keeps everything tasty and fresh. Shrimp scampi works well with many sides. Here are a few ideas: - Garlic bread: Perfect for soaking up the sauce. - Salad: A fresh green salad adds crunch. - Steamed veggies: Broccoli or asparagus adds color and nutrition. - Rice: A simple rice dish complements the flavors. These sides enhance your meal and keep it balanced. Shrimp scampi is a tasty dish that anyone can make. We covered key ingredients, cooking steps, and helpful tips. You learned how to choose the right shrimp and avoid common mistakes. Plus, you saw fun variations and storage tips. Now you can enjoy shrimp scampi anytime. Make it your own and impress your friends. Happy cooking!](https://lisadishes.com/wp-content/uploads/2025/04/27ad9d9f-435f-4425-a2aa-d8a8a4bdfb77-300x300.webp)
Mini Grilled Cheese Sandwiches Quick and Easy Treat
Craving a warm, gooey snack? Look no further than mini grilled cheese sandwiches! They are a quick and easy treat, perfect for parties or…