
Latest & Greatest
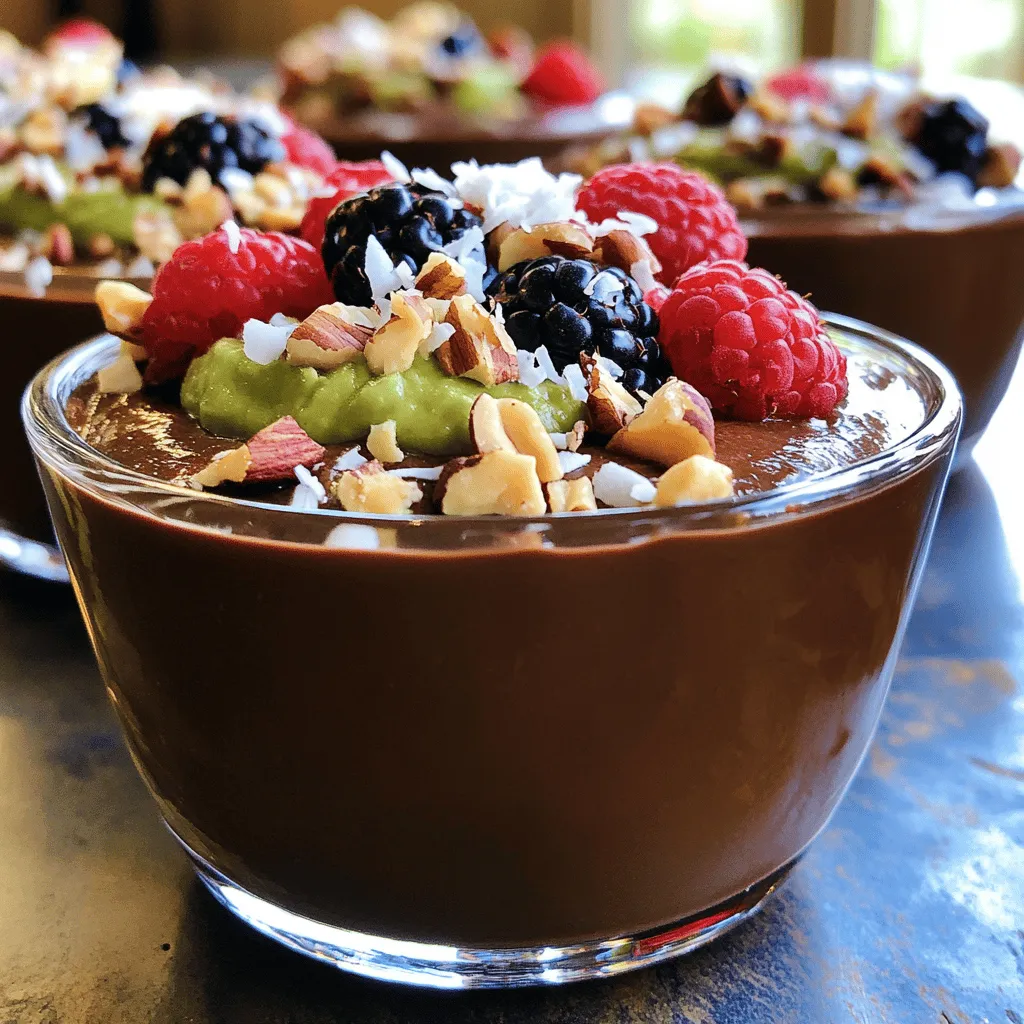
Vegan Chocolate Avocado Pudding Creamy Delight Recipe
Are you ready to indulge in a sweet treat that’s both delicious and healthy? This Vegan Chocolate Avocado Pudding is a game changer. With just a…
Read more…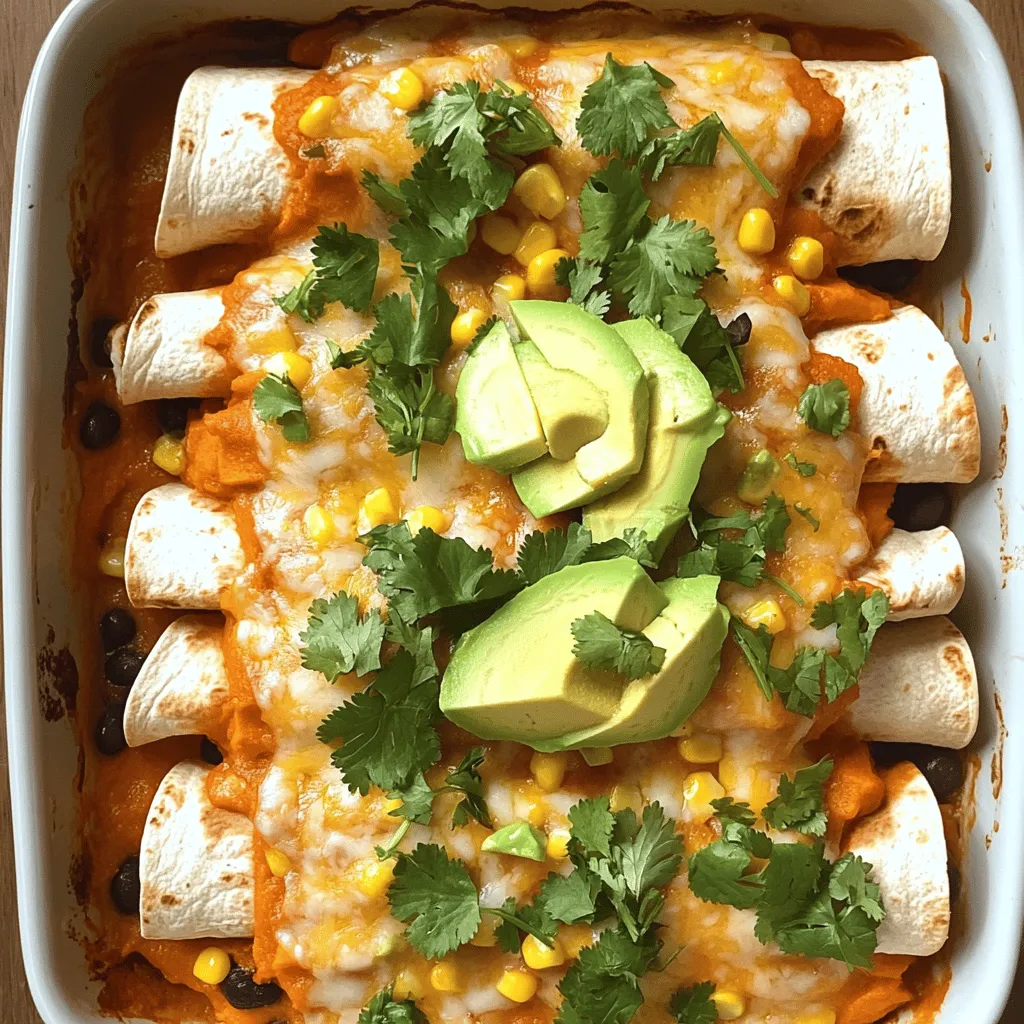
Sweet Potato Black Bean Enchiladas Flavorful Delight
Get ready to savor a dish that warms your heart and fills your belly: Sweet Potato Black Bean Enchiladas! These tasty enchiladas pack a punch of…
Read more…
Crispy Air Fryer Chicken Wings Simple and Tasty Meal
If you’re craving a crispy snack, you’re in the right place! These air fryer chicken wings are easy to make and full of flavor. With just…
Read more…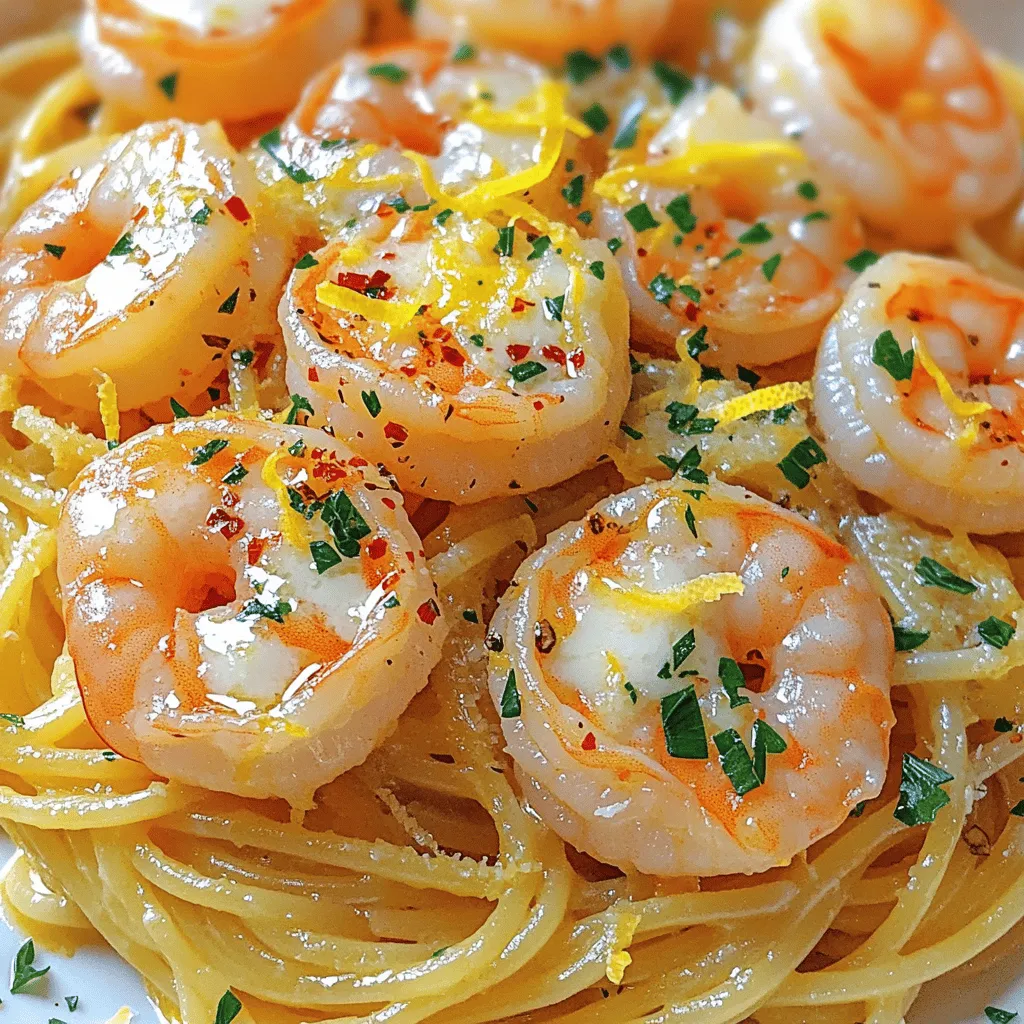
Garlic Butter Shrimp Pasta Simple and Flavorful Meal
If you’re looking for a quick and tasty meal, Garlic Butter Shrimp Pasta is your answer. This dish combines juicy shrimp with rich garlic butter, all…
Read more…
Gluten-Free Blueberry Muffins Simple and Tasty Treat
If you crave a delicious treat that’s easy to make, try my gluten-free blueberry muffins! These muffins are soft, moist, and bursting with juicy blueberries. Whether…
Read more…
Coconut Curry Lentil Soup Easy and Flavorful Recipe
Looking for a warm, tasty dish that’s easy to make? Try my Coconut Curry Lentil Soup! This hearty recipe uses simple ingredients like red lentils, coconut…
Read more…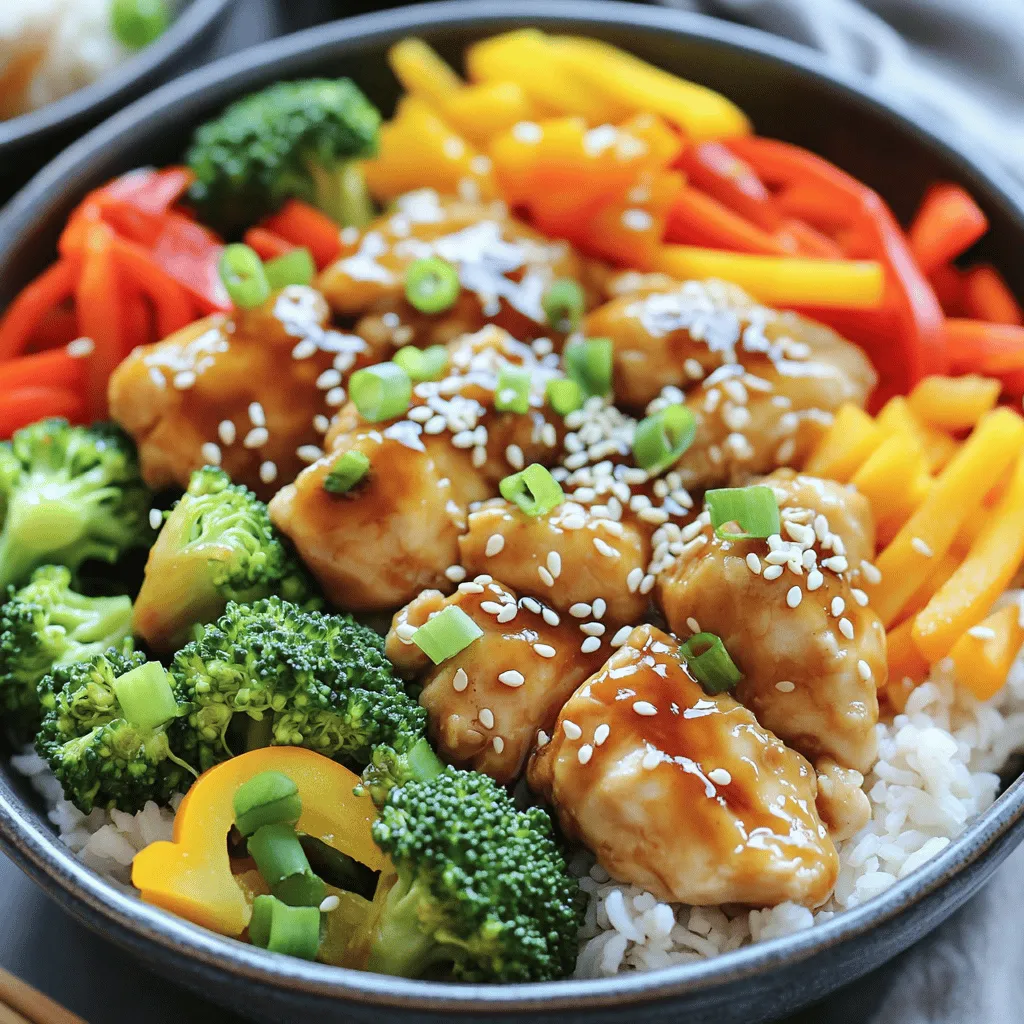
Mouthwatering Teriyaki Chicken Bowls Easy Recipe Guide
Are you ready to elevate your weeknight meals? My easy guide to mouthwatering teriyaki chicken bowls is just what you need! With simple ingredients and step-by-step…
Read more…
Instant Pot Chicken Tikka Masala Easy Family Dinner
Looking for a quick, delicious family dinner? You’ve found it! Instant Pot Chicken Tikka Masala brings rich flavors and tender chicken to your table in no…
Read more…browse recipes


![- 1 cup sushi rice - 1 ¼ cups water - ½ teaspoon salt - 2 tablespoons rice vinegar - 1 tablespoon sugar - 1 (8 oz) sushi-grade tuna, finely diced - 2 tablespoons mayonnaise - 1 tablespoon sriracha (adjust to taste) - 1 teaspoon sesame oil - 1 green onion, finely chopped - 1 tablespoon sesame seeds (toasted) - Cooking oil (for frying) - Nori sheets (cut into squares for serving) - Medium saucepan - Skillet - Mixing bowls When I create crispy rice and spicy tuna bites, the ingredients make all the difference. You need sushi rice for the base. Sushi rice is sticky and holds together well. Water and salt are important for cooking it right. You also want to add vinegar and sugar after cooking to give the rice a nice flavor. For the spicy tuna, I use sushi-grade tuna. This kind of tuna is fresh and safe to eat raw. I mix it with mayonnaise and sriracha for a creamy and spicy kick. Sesame oil adds a nice touch, while green onion gives freshness. Don't forget the toasted sesame seeds for crunch! For tools, a medium saucepan helps me cook the rice. A skillet is great for frying the rice patties until golden and crispy. Mixing bowls are handy for combining the spicy tuna mix. This recipe is fun and easy. You can find the full recipe at the end of this article to try it for yourself. Enjoy making these bites! To start, rinse 1 cup of sushi rice under cold water. This helps remove extra starch. Keep rinsing until the water runs clear. Next, in a medium saucepan, combine the rice, 1 ¼ cups of water, and ½ teaspoon of salt. Bring this mix to a boil. Once boiling, reduce the heat, cover the pot, and let it simmer for 18-20 minutes. The rice should be tender when done. Once your rice is cooked, mix 2 tablespoons of rice vinegar and 1 tablespoon of sugar in a small bowl. Stir until the sugar dissolves. After removing the rice from heat, let it sit covered for 10 minutes. Then, fluff the rice using a fork. Gently fold in the vinegar mixture and allow the rice to cool. In a separate bowl, combine 1 (8 oz) sushi-grade tuna, finely diced, with 2 tablespoons of mayonnaise, 1 tablespoon of sriracha, 1 teaspoon of sesame oil, and 1 chopped green onion. Mix these ingredients well. Set the mixture aside for later. When the rice is cool enough to handle, wet your hands to stop the rice from sticking. Take a heaping tablespoon of rice and form small patties, about 1 inch thick. You should get around 12-15 patties. Heat about ½ inch of cooking oil in a skillet over medium-high heat. Add the rice patties in batches, frying each side for about 3-4 minutes. You want them golden and crispy. Drain the patties on paper towels. Now it’s time to assemble! Top each crispy rice patty with a spoonful of your spicy tuna mixture. For added crunch, sprinkle toasted sesame seeds on top. Serve these bites on a platter with nori squares on the side for dipping. Enjoy this delightful snack! To get the best crispy texture, fry the rice patties for 3-4 minutes on each side. This duration ensures a golden, crunchy outside while keeping the inside soft. Use medium-high heat to achieve that perfect sizzle. If the heat is too low, the patties will absorb oil and become greasy. If it’s too high, they might burn before cooking through. Fry in small batches to keep the oil temperature steady. This helps each patty cook evenly. Want to change the spice levels? It’s simple! Start with less sriracha in the tuna mix. You can always add more later. Mix in a bit of lime juice for a zesty kick without too much heat. If you prefer it mild, skip the sriracha and use a sweet mayonnaise. For extra flavor, add chopped cilantro or avocado to the tuna mix. These ingredients balance the spice and enhance the taste. Make your bites look amazing with a few simple garnishes. A sprinkle of toasted sesame seeds adds a nice crunch and visual appeal. You can also slice some green onions and sprinkle them on top for color. For plating, stack the crispy rice bites on a platter. Place nori squares around them for a fun touch. This not only looks great but also makes dipping easier. Your guests will love the beautiful presentation! For the full recipe, check out the details above. {{image_2}} You can switch up the protein in this dish. Using salmon gives a rich flavor. It works well with the crispy rice. Tofu is a great plant-based option. It absorbs flavors nicely and adds a different texture. Other seafood options include shrimp or crab. These choices keep the dish fresh and exciting. For a meatless take, substitute tuna with diced avocado or cucumber. These ingredients bring a creamy texture. You can also use chickpeas for a protein boost. Add some soy sauce or tahini for flavor. Fresh herbs like cilantro or basil add depth. This builds a bright and tasty profile. You can enhance flavor with fresh herbs like mint or cilantro. A squeeze of lime juice adds brightness. Try creative toppings like pickled ginger or wasabi for a kick. Dipping sauces like ponzu or spicy mayo elevate the bites. Each addition can create a unique twist on this classic snack. For the full recipe and a detailed guide, check out the [Full Recipe]. To keep your crispy rice and spicy tuna bites fresh, follow these tips: - Refrigerate: Store leftovers in an airtight container. - Chill Quickly: Allow the bites to cool before sealing. This helps prevent sogginess. - Use the Right Containers: Glass or plastic containers work well. Make sure they seal tight. To enjoy these bites again, reheating correctly is key: - Oven Method: Preheat your oven to 350°F (175°C). Place the bites on a baking sheet and heat for about 10-15 minutes. This keeps them crispy. - Microwave Method: If you're short on time, use the microwave. Heat on a plate for about 30 seconds. Be careful; the texture may not be as crispy. You can freeze the rice patties for later use: - Freezing: Place the patties in a single layer on a baking sheet. Freeze until solid, then transfer to a freezer bag. - Thawing and Reheating: When you're ready, thaw in the fridge overnight. Reheat in the oven to regain crispness. For the best results, do not refry the frozen patties directly. The best rice is sushi rice. It is short-grain, sticky, and holds shape well. This rice absorbs flavors and creates a great texture for crispy bites. Yes, you can prepare the rice and spicy tuna mix ahead of time. Store the rice in the fridge for up to 2 days. Keep the tuna mix in a separate container. Fry the rice patties just before serving for the best texture. Yes, all the main ingredients can be gluten-free. Use gluten-free mayonnaise and check the soy sauce if you decide to add it. This way, you can enjoy these bites without worry. To tone down the spice, reduce the sriracha. You can also add more mayonnaise to balance the heat. Taste the mix as you go, adjusting to your liking. Some great dipping sauces include soy sauce, ponzu, or a sweet chili sauce. You can also try a creamy avocado sauce for a fresh twist. Each adds a new layer of flavor to your bites. For the full recipe, check the earlier sections. This blog post shares how to make tasty spicy tuna bites with crispy rice. We covered the main and additional ingredients, along with the tools you need. The step-by-step guide helped you cook the rice and prepare the tuna mix. Remember, you can adjust spice levels or try new ingredients to suit your taste. Perfect your presentation for an appealing dish. With these tips, you’ll impress everyone with your cooking skills. Enjoy the journey of creating these delicious bites!](https://lisadishes.com/wp-content/uploads/2025/05/e3cb11aa-1af2-4a00-9b81-176290ffee4b.webp)
Crispy Rice and Spicy Tuna Bites Perfect Snack Delight
If you’re searching for a snack that packs a punch, look no further! Crispy rice and spicy tuna bites offer a delightful crunch combined…
My Latest Desserts

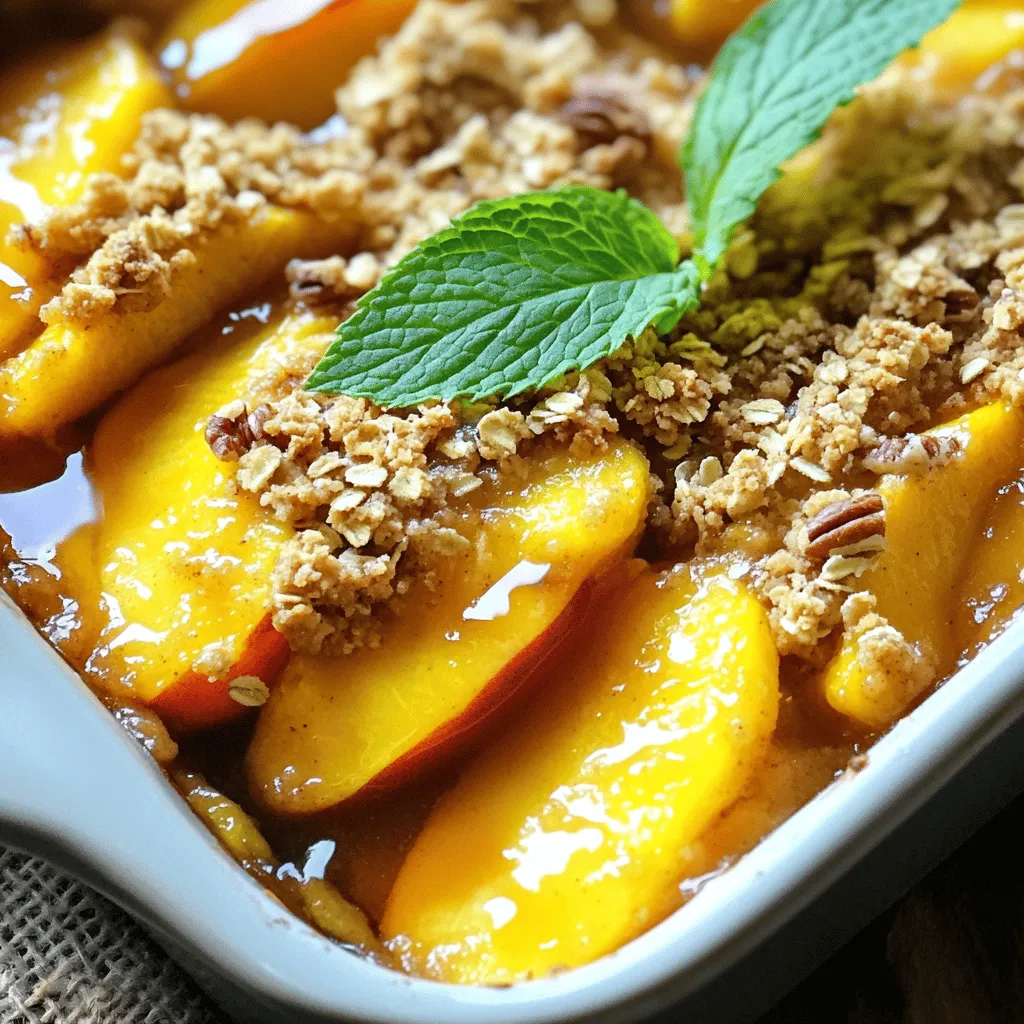
Peach Crisp with Oat Topping Simple Comfort Food
If you’re craving a dessert that combines juicy peaches with a crunchy oat topping, you’re in the right place! My Peach Crisp with Oat Topping is a warm and comforting... Read Full Recipe-
Lemon Blueberry Muffins Fresh and Flavorful Treat
Looking for a fresh and tasty treat? My Lemon Blueberry Muffins are just what you need! Bursting with zesty lemon and sweet blueberries, these muffins are perfect for breakfast or... Read Full Recipe -
Apple Cinnamon Overnight Oats Tasty and Simple Recipe
Start your mornings right with a delicious bowl of Apple Cinnamon Overnight Oats! This simple recipe combines wholesome ingredients to give you a quick, easy breakfast. You’ll only need a... Read Full Recipe -
Easiest Chocolate Lava Cake Quick and Delicious Treat
Craving a sweet treat that impresses without complicated steps? You’ll love this Easiest Chocolate Lava Cake recipe! This dessert is quick to make and packed with gooey chocolate goodness. With... Read Full Recipe -
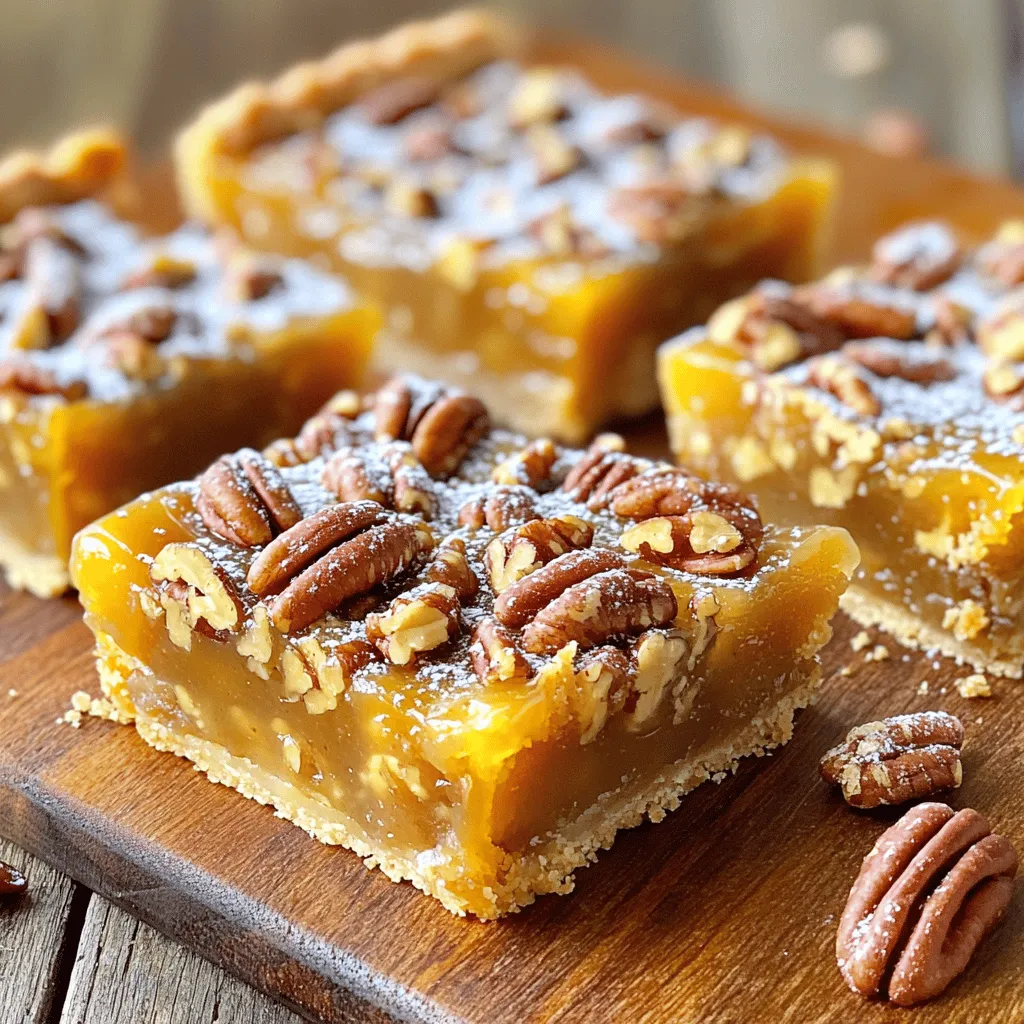
Maple Pecan Pie Bars Delightful Dessert Treat
Are you ready to indulge in a delightful dessert? These Maple Pecan Pie Bars are a sweet twist on a classic favorite! With crunchy pecans and rich maple flavor, every... Read Full Recipe -
Vegan Chocolate Avocado Mousse Rich and Creamy Delight
If you crave a dessert that’s both rich and healthy, you’re in the right place. This Vegan Chocolate Avocado Mousse combines ripe avocados, unsweetened cocoa powder, and a touch of... Read Full Recipe -
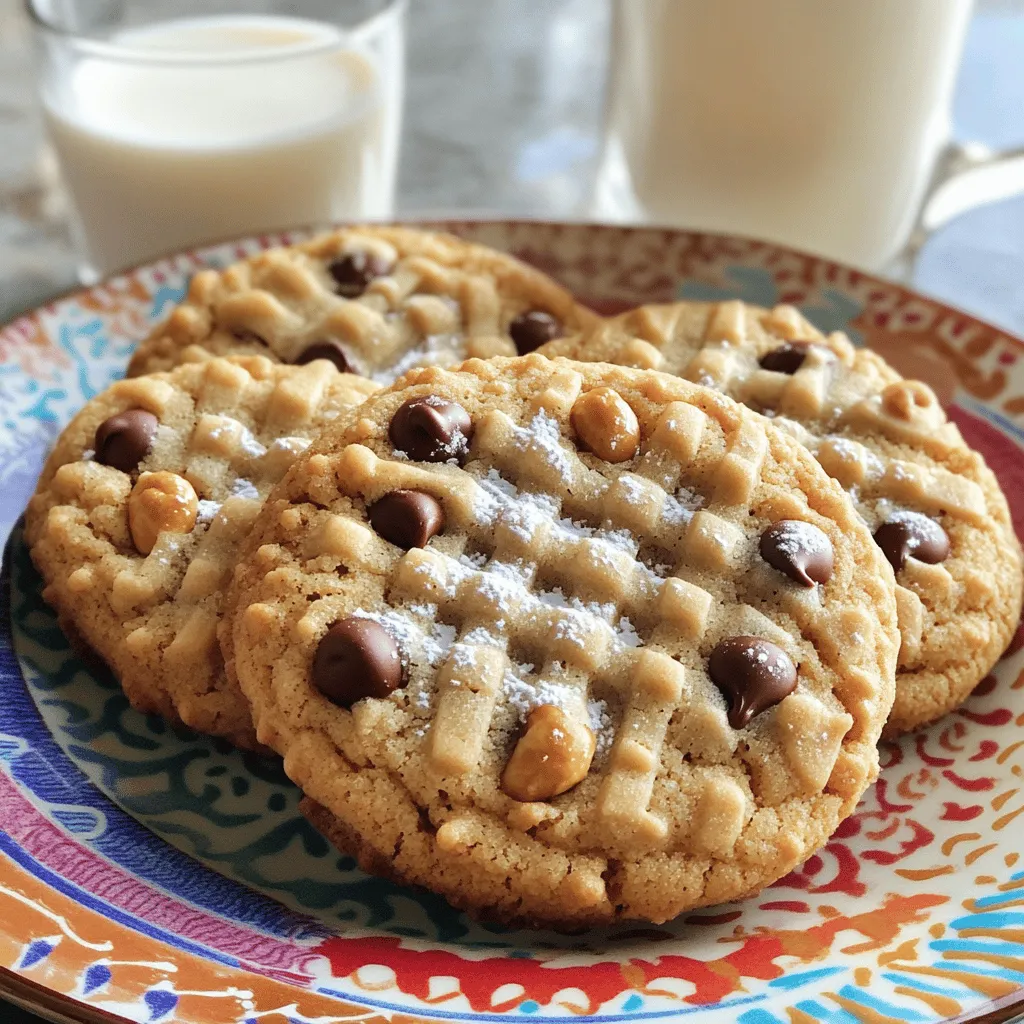
Peanut Butter Chocolate Chip Cookies Simple and Sweet
If you love the rich taste of peanut butter and the sweetness of chocolate, you’re in for a treat! This blog post will guide you through making simple and sweet... Read Full Recipe -
No-Bake Strawberry Shortcake Quick and Simple Delight
Are you craving a sweet treat that’s easy and delicious? Look no further! My No-Bake Strawberry Shortcake is a quick and simple delight, perfect for any occasion. With just a... Read Full Recipe -
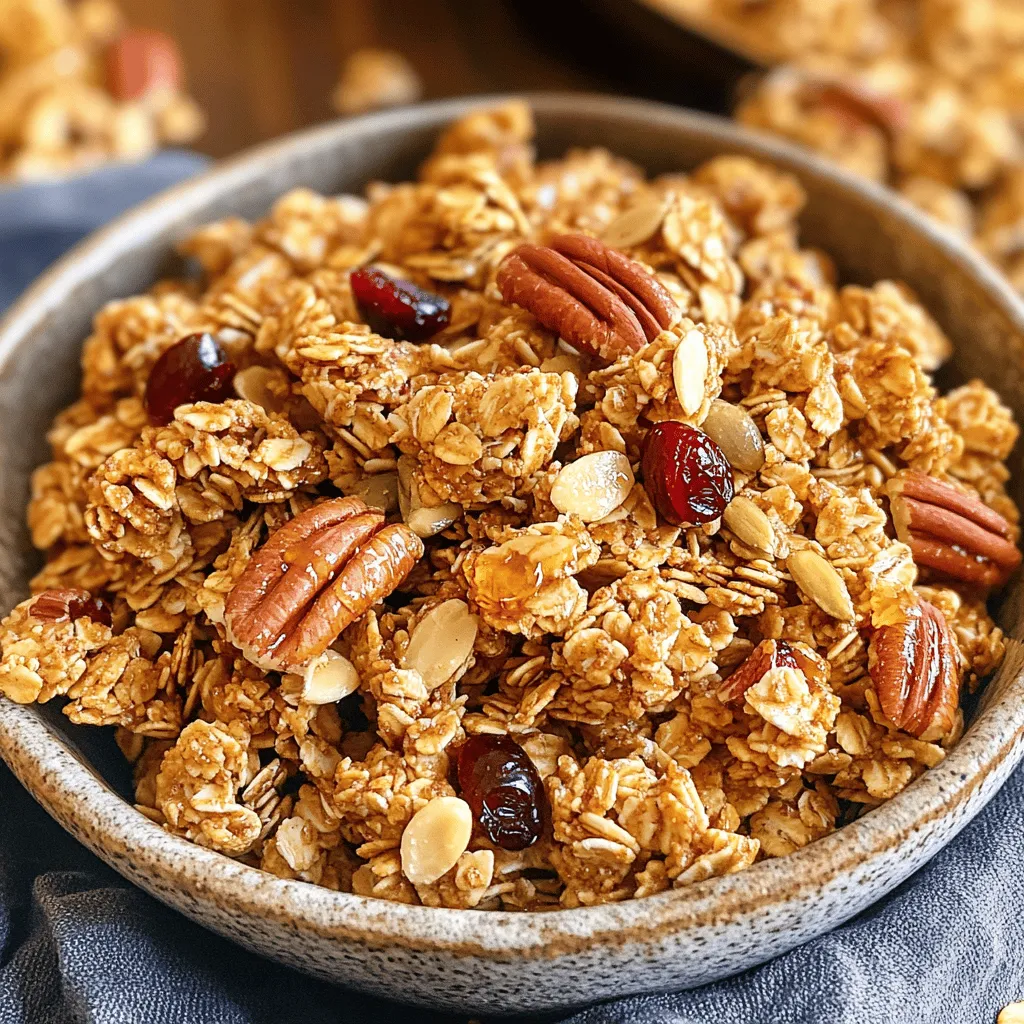
Maple Pecan Granola Crunchy and Healthy Snack
Looking for a tasty yet healthy snack? You’ll love my Maple Pecan Granola! This crunchy treat is simple to make and packed with flavor. With a few key ingredients and... Read Full Recipe -
Strawberry Shortcake Trifle Delightful Layered Treat
Are you ready to impress your friends with a strawberry shortcake trifle? This delightful layered treat combines juicy strawberries, fluffy whipped cream, and soft cake for pure indulgence. It’s a... Read Full Recipe


My Latest Recipes

hey,
i’m !
I’m so happy you’re here!
Each recipe I share is a little piece of love from my kitchen. May they fill your heart and home with warmth. Let’s cook up something wonderful together.


![To make S'mores Monkey Bread, you need simple ingredients. Each one adds a special touch to this fun dessert. Here’s what you will need: - 2 cans (16 oz each) refrigerated biscuit dough - 1 cup mini marshmallows - 1 cup semi-sweet chocolate chips - 1/2 cup graham cracker crumbs - 1/2 cup unsalted butter, melted - 3/4 cup brown sugar - 1 teaspoon vanilla extract - Pinch of salt This list covers everything you need for a tasty treat. The biscuit dough gives a fluffy base, while the chocolate and marshmallows bring the classic s'mores flavor. The graham cracker crumbs offer a nice crunch. When you mix these ingredients, you create a dessert that everyone will love. For the full recipe and instructions, check out the [Full Recipe]. - Preheat the oven to 350°F (175°C) and grease your bundt pan. - Open the biscuit dough cans and cut each biscuit into quarters. - In a large bowl, mix the quartered biscuit pieces with melted butter and vanilla extract. - In another bowl, combine graham cracker crumbs, brown sugar, and a pinch of salt. - Take a handful of the butter-coated biscuit pieces, and roll them in the graham cracker mixture. - Layer the coated dough pieces in the bundt pan, adding mini marshmallows and chocolate chips between layers. - Once all the biscuit pieces are in the pan, sprinkle any leftover graham cracker mixture over the top. Add a few more marshmallows and chocolate chips for a nice finish. - Bake for 35-40 minutes or until golden brown. Check for doneness by inserting a toothpick; it should come out clean. - Let the baked monkey bread cool for about 10 minutes. Invert it onto a platter and serve warm. For extra delight, drizzle melted chocolate and mini marshmallows on top. This S'mores Monkey Bread is a fun, easy dessert that brings joy to any gathering. For the full recipe, refer to the earlier section. Enjoy the gooey, sweet goodness! To make the best S'mores Monkey Bread, focus on texture. You want it soft and fluffy inside, with a golden crust. To achieve this, don’t skip the proper baking time. Bake it for 35-40 minutes. Check it at the 35-minute mark. A toothpick should come out clean. Using quality ingredients is key for flavor. Choose fresh mini marshmallows and good chocolate chips. The better the ingredients, the better your dessert will taste. Get creative when serving S'mores Monkey Bread. Serve it warm, straight from the pan. Use skewers or forks for easy sharing. Drizzle extra melted chocolate on top for fun. You can also add a small bowl of melted chocolate for dipping. A scoop of vanilla ice cream makes a great side too. Enjoy the fun of s'mores in a new way! For the full recipe, check the details above. {{image_2}} You can easily switch up the chocolate or candy in S'mores Monkey Bread. Try using milk chocolate or even dark chocolate for a richer taste. If you love peanut butter, add peanut butter cups instead of chocolate chips. For alternative coatings, consider using crushed cookies or different flavored crackers. You could use chocolate graham crackers or even Oreos to give a fun twist. Each swap will change the flavor and make it unique. Adding spices can elevate your dessert. A pinch of cinnamon or nutmeg adds warmth and depth. You can also add a few drops of peppermint or almond extract for a fresh taste. These tiny changes can create big flavor shifts. Mix-ins are another way to personalize your monkey bread. Try adding chopped nuts like walnuts or pecans for crunch. You could even add fruit, like diced strawberries or banana slices, for a fruity touch. Each mix-in brings new flavors and textures, making your dessert even more exciting. To store leftover S'mores Monkey Bread, first let it cool completely. Place it in an airtight container. You can also wrap it tightly in plastic wrap. This keeps it fresh for up to three days in the fridge. If you want to store it longer, you can freeze it. Just place it in a freezer-safe container or bag. It can last for about two months in the freezer. Yes, you can freeze S'mores Monkey Bread. Make sure it is fully cooled before freezing. Wrap it well to prevent freezer burn. When you are ready to eat it, simply thaw it in the fridge overnight. To reheat your S'mores Monkey Bread, preheat your oven to 350°F (175°C). Place the bread in a baking dish. Cover it with foil to keep it moist. Heat for about 15-20 minutes or until warm. You can also microwave individual pieces for about 20-30 seconds. This helps keep the marshmallows soft and warm. Enjoy your dessert as if it was fresh out of the oven! Can I use homemade biscuit dough instead of refrigerated? Yes, you can use homemade biscuit dough. Just make sure it is soft and easy to cut. The texture may change a bit, but the taste will still be great! What if I don't have a bundt pan? If you don’t have a bundt pan, use a regular cake pan. Just adjust the baking time. Keep an eye on it as it bakes. How can I make this recipe gluten-free? To make it gluten-free, use gluten-free biscuit dough. Check labels on marshmallows and chocolate chips to ensure they are gluten-free too. How long does S'mores Monkey Bread last? S'mores Monkey Bread lasts about 2 to 3 days when stored in an airtight container. Keep it at room temperature. Can I prepare it ahead of time? Yes, you can prepare it a day ahead. Just assemble the monkey bread and cover it tightly. Bake it the next day for fresh, warm goodness. In this article, we explored the fun and tasty S'mores Monkey Bread, covering the ingredients, steps, and best tips. You learned how to mix chilled biscuit dough with chocolate, marshmallows, and graham crackers for a delightful treat. Remember to play with flavors and ingredients for your own twist. Storing leftovers is easy, and reheating keeps it fresh. This dessert is perfect for any gathering. Enjoy every bite and share it with friends. Your kitchen adventures will surely impress!](https://lisadishes.com/wp-content/uploads/2025/05/691d8761-b65c-4ad6-93aa-114559c3fc57-300x300.webp)

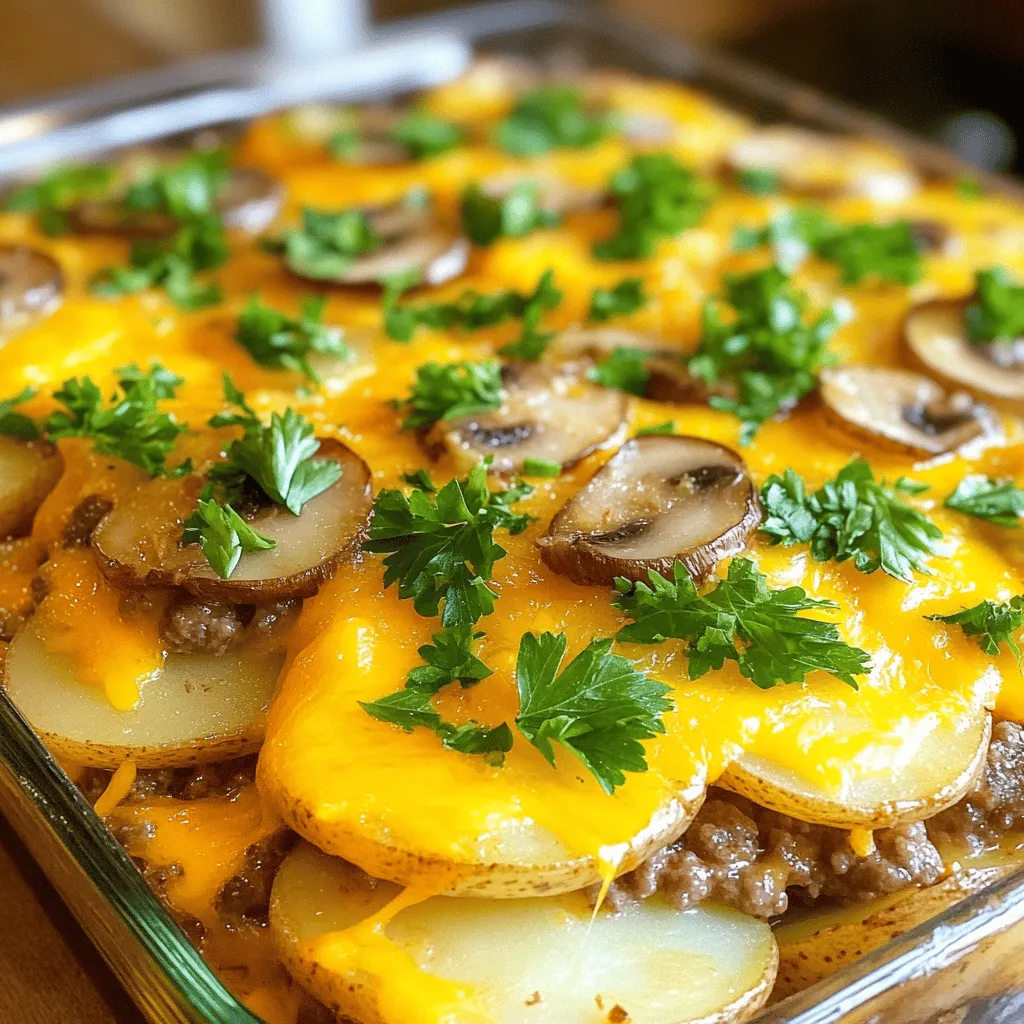
Amish Hamburger Steak Bake Hearty and Satisfying Meal
Looking for a warm, home-cooked meal that hits all the right spots? The Amish Hamburger Steak Bake merges simple ingredients like ground beef, onions,…