Skip to content
DisclaimerTerms Of UseGDPR PolicyCookie Policy

Lisa Dishes

  • Home
  • Drinks
  • Appetizers
  • Dinner
  • Dessert
  • About
  • Contact
  • Privacy Policy
DisclaimerTerms Of UseGDPR PolicyCookie Policy

lisa

- 1 large head of cauliflower, cut into florets - 2 tablespoons olive oil - 1 teaspoon smoked paprika - 1 teaspoon cumin - 1 teaspoon garlic powder - 1/2 teaspoon chili powder - Salt and pepper to taste - 8 small corn or flour tortillas - 1 cup red cabbage, finely shredded - 1 avocado, sliced - 1/2 cup fresh cilantro, chopped - 1 lime, cut into wedges - Optional: hot sauce for drizzling The base of these roasted cauliflower tacos is simple yet flavorful. The cauliflower shines here. Choose a fresh head of cauliflower. Cut it into bite-sized florets. This helps it roast evenly, creating a tender texture with a bit of crisp. Olive oil is vital for roasting. It adds flavor and helps the spices stick. Speaking of spices, smoked paprika gives a warm taste. Cumin, garlic powder, and chili powder provide depth. Don't forget to add salt and pepper. They balance the flavors nicely. For the tortillas, you can use corn or flour. Both work well, so pick what you love. The toppings add a fresh crunch. Shredded red cabbage brings color and texture. Sliced avocado adds creaminess. Fresh cilantro gives a bright touch. Finish with lime wedges for a zesty kick. If you like heat, drizzling hot sauce is a great option. This mix of ingredients creates a tasty meal. You can find the full recipe online for a complete guide. 1. First, preheat your oven to 425°F (220°C). This heat helps the cauliflower get crispy. 2. Next, get a large bowl. Toss the cauliflower florets with olive oil and spices. - Use: - 1 teaspoon smoked paprika - 1 teaspoon cumin - 1 teaspoon garlic powder - 1/2 teaspoon chili powder - Salt and pepper to taste 3. Make sure every piece of cauliflower is coated. This adds flavor and helps with roasting. 4. Now, spread the cauliflower on a baking sheet lined with parchment paper. Keep them in a single layer. 5. Roast the cauliflower for 25-30 minutes. Stir halfway through so they cook evenly. They should be tender and lightly browned. 1. While the cauliflower roasts, warm your tortillas in a dry skillet. Heat them for about 30 seconds on each side. This makes them soft and pliable. 2. Once the cauliflower is done, take a tortilla and add a generous portion of roasted cauliflower. 3. Now, add your toppings: - 1 cup finely shredded red cabbage - 1 sliced avocado - 1/2 cup chopped fresh cilantro 4. Squeeze fresh lime juice over the tacos. If you like heat, drizzle with hot sauce. 5. Serve the tacos right away with extra lime wedges on the side. For the full recipe, check the details above! To get the best texture and flavor, start with fresh cauliflower. Cut it into even florets. This helps all pieces cook at the same time. Toss the florets in olive oil and spices. I like to use smoked paprika, cumin, and garlic powder. These spices add depth to the flavor. To prevent sticking, use parchment paper on your baking sheet. This simple step keeps the cauliflower from sticking. It makes cleanup easy too! Make sure to spread the florets out in a single layer. Crowding them can lead to steaming instead of roasting. Roasted cauliflower tacos pair well with many side dishes. Try serving them with a fresh salad. A simple avocado salad can add creaminess. You can also enjoy these tacos with some chips and salsa. For drinks, consider a light beer or a refreshing agua fresca. These drinks can enhance the flavors in the tacos. A squeeze of lime on top brightens everything. For more ideas, check out the Full Recipe. {{image_2}} You can change the taste of roasted cauliflower tacos by using different spices. For a smoky flavor, try adding chipotle powder. If you like heat, cayenne pepper works well. You could also use Italian herbs like oregano and thyme to add a fresh twist. Another idea is to mix in curry powder for a unique taste. The key is to explore and find what you love. You can even create your own blend with your favorite spices. Just remember to keep the balance, so no single flavor overpowers the others. Toppings can make your tacos special and fun. Besides red cabbage, you can use shredded lettuce or spinach for a crunchy bite. Pickled onions add a tangy flavor that brightens the dish. If you love cheese, crumbled feta or cotija can enhance the richness. For a creamy touch, try a dollop of Greek yogurt or sour cream. You can also sprinkle roasted corn or black beans for extra texture and protein. Each topping can change the vibe of your taco, so feel free to mix and match. Enjoy the creative process! For the complete recipe, check out the Full Recipe. To keep your roasted cauliflower tacos fresh, place them in an airtight container. Make sure they cool down before sealing. This helps avoid sogginess. Store them in the fridge for up to three days. If you have extra toppings, store them separately. This way, your tacos stay crisp and tasty. When you are ready to enjoy your leftovers, reheating is key. I recommend using a skillet. Heat it over medium heat and add the tacos. Warm them for about 2-3 minutes on each side. This keeps the tortillas soft and the filling warm. You can also use the oven. Preheat it to 350°F (175°C). Wrap the tacos in foil and heat for about 10 minutes. This method keeps everything nice and even. Enjoy your delicious meal again! For the full recipe, check out the link above. Yes, these tacos can easily be made vegan. The main ingredients are already plant-based. The olive oil and spices add great flavor without any animal products. You can skip the optional hot sauce or choose a vegan-friendly one. To make these tacos gluten-free, use corn tortillas. They are a great choice for soft and tasty tacos. Many brands offer gluten-free options. Always check the label to ensure they fit your diet. If you want to switch out the cauliflower, try using roasted chickpeas. They add a nice texture and protein. You can also use sweet potatoes for a sweeter flavor. Just make sure to adjust cooking times for different ingredients. To boost nutrition, add leafy greens like spinach or kale. You can also include beans for extra protein. Try adding nuts or seeds for healthy fats. These additions make the dish more balanced and filling. In this post, we covered how to make delicious cauliflower tacos. You learned about the ingredients, preparation steps, and tips for roasting cauliflower. We explored variations to customize your tacos and how to store leftovers. These tacos are tasty, healthy, and easy to make. Try them out with your favorite toppings. You can modify them for your diet too. Enjoy your cooking, and don't forget to share your creations!

Roasted Cauliflower Tacos Fresh and Flavorful Twist

Looking for a fresh and tasty taco idea? Try my Roasted Cauliflower Tacos! These tacos are packed with flavor and

- 1 large sweet potato (about 1 cup mashed) - 1 can (15 oz) black beans, drained and rinsed - 1/2 cup breadcrumbs (whole wheat or gluten-free) - 1/4 cup diced red onion - 2 cloves garlic, minced These main ingredients build the base of the sweet potato black bean burger. The sweet potato adds natural sweetness and creaminess. Black beans provide protein and fiber. Breadcrumbs help hold the mixture together. Red onion adds crunch and flavor, while garlic gives a savory kick. - 1 teaspoon ground cumin - 1/2 teaspoon chili powder - 1/2 teaspoon smoked paprika - Salt and pepper to taste Seasonings bring the burger to life. Ground cumin adds warmth and earthiness. Chili powder lends a bit of heat. Smoked paprika gives a touch of smokiness that enhances the overall flavor. Salt and pepper balance all the tastes. - Lettuce - Tomato slices - Avocado - Burger sauces Toppings can elevate your burger experience. Fresh lettuce adds crunch. Tomato slices bring juiciness. Avocado provides creaminess and healthy fats. Adding your favorite burger sauces can make each bite even more delicious. For the full recipe, check out the [Full Recipe]. To start, preheat your oven to 400°F (200°C). This temperature helps the sweet potato cook evenly. Grab a large sweet potato and pierce it with a fork. This step lets steam escape while it bakes. Place the sweet potato on a baking sheet and bake for about 45 minutes. You want it to be very tender. Once done, let it cool a bit. Then, peel off the skin and mash it in a bowl. In a large mixing bowl, combine the mashed sweet potato and one can of black beans. Drain and rinse the black beans first. Use a fork or a potato masher to mix them together. You should mash the black beans just enough to mix them in, but leave some whole for texture. Next, stir in the breadcrumbs, diced red onion, minced garlic, ground cumin, chili powder, smoked paprika, salt, and pepper. Mix until everything is well combined. If the mix feels too wet, add more breadcrumbs until it's moldable. Now it's time to shape your burgers! Divide the mixture into 4-6 equal portions. Form each portion into a patty about 1/2 inch thick. This will help them cook evenly. Heat some olive oil in a large skillet over medium heat. Once the oil is hot, add the patties. Cook them for 5-7 minutes on each side. You want them to turn golden brown and crispy. Enjoy the great smell while they cook! To get the best texture for your burgers, you need to adjust the breadcrumbs. If the mix feels too wet, add more breadcrumbs. Start with 1/2 cup and add slowly until it holds together well. This helps your patties stay firm while cooking. Mashing the black beans is also key. I like to mash them just a bit. This way, you keep some texture while mixing. It gives the burgers a nice bite and helps everything blend well. For even cooking, set your heat to medium. If it’s too high, the outside will burn before the inside cooks. A steady medium heat allows the burgers to cook through and get crispy. Always use fresh ingredients. Fresh garlic and onions add a punch of flavor. Fresh sweet potatoes also make a big difference. They enhance the taste and make your burgers more enjoyable. When you assemble the burgers, start with a toasted bun or lettuce wrap. Then, add the patty, and pile on your favorite toppings. Lettuce, tomato slices, and avocado work great. You can even add a dollop of yogurt or mayo for extra creaminess. Pair these burgers with a fresh salad or some sweet potato fries. This makes a delicious meal that everyone will love. For the full recipe, check out [Full Recipe]. {{image_2}} You can easily change up the base of your burger. Instead of black beans, try pinto beans or chickpeas for a different taste. You can also add vegetables like diced bell peppers or zucchini to boost nutrition. If you need a gluten-free option, use gluten-free breadcrumbs. For a vegan take, skip the eggs and stick to the plant-based ingredients. Want some heat? Add cayenne pepper or crushed red pepper flakes to your mix. You can also try using fresh herbs like cilantro or parsley for a refreshing twist. Mixing in a bit of lime juice gives your burgers a bright flavor. Each addition lets you personalize your meal to fit your taste. Think beyond lettuce and tomato. Try adding grilled pineapple for a sweet touch or jalapeños for a spicy kick. A dollop of guacamole or salsa can elevate the flavor too. Explore regional toppings like kimchi for a Korean twist or tzatziki for a Mediterranean flair. These combinations will make your burgers exciting and unique. For the full recipe, check out the details above! To store leftover sweet potato black bean burgers, place them in an airtight container. Make sure they cool down first. Refrigerate them right away. They will stay fresh for about three to four days. If you want to keep them longer, consider freezing them. For freezing, wrap each burger in plastic wrap. Then, place them in a freezer bag or container. This helps prevent freezer burn. These burgers can last up to three months in the freezer. When you are ready to eat, take them out and let them thaw in the fridge overnight. You have a few options for reheating. If you use a microwave, place one burger on a microwave-safe plate. Heat for one to two minutes. This method is quick but may not keep them crispy. For a stovetop method, heat a skillet over medium heat. Add a little oil and cook each side for about three to four minutes. This keeps the outside crispy. For an oven method, preheat your oven to 375°F (190°C). Place the burgers on a baking sheet and heat for about ten minutes. This gives them a nice crisp texture while warming them through. Enjoy your burgers just as you made them! For the full recipe, visit the [Full Recipe]. You can use several options if you need a breadcrumb substitute. Here are some good choices: - Crushed cornflakes - Oats (ground to a flour) - Almond flour - Ground flaxseed - Chickpea flour These options are great for gluten-free diets. They help bind the burger while adding flavor. You can adjust the texture by adding more or less of these substitutes. Sweet potato black bean burgers can last about 3 to 5 days in the fridge. Keep them in an airtight container for the best results. Check for signs of spoilage before eating. If you see mold or a strange smell, it’s best to throw them out. Yes, grilling is a great option for sweet potato black bean burgers! Here are some tips for grilling: - Preheat your grill to medium heat. - Use a grill basket or foil to prevent sticking. - Cook the burgers for about 4-5 minutes on each side. - Check for doneness by ensuring they are hot throughout. Grilling adds a nice smoky flavor. Enjoy the charred edges that make these burgers even tastier! For the complete preparation steps, check the Full Recipe. Sweet potato black bean burgers are simple to make and delicious. You need sweet potatoes, black beans, and spices. Don’t forget toppings that can elevate your meal. Follow the step-by-step guide to prep, mix, and cook. Use tips for the perfect texture and flavor. Consider variations and storage ideas to enjoy your burgers longer. Experimenting lets you find unique combinations you’ll love. I hope you find joy in this healthy recipe! Enjoy cooking!

Savory Sweet Potato Black Bean Burgers Recipe

If you’re craving a hearty, plant-based burger, you’ve come to the right place! My Savory Sweet Potato Black Bean Burgers

- 1 cup dried chickpeas, soaked overnight - 1 small onion, roughly chopped - 2 cloves garlic, minced - 1/4 cup fresh parsley, chopped - 1/4 cup fresh cilantro, chopped - 2 teaspoons ground cumin - 1 teaspoon ground coriander - 1/2 teaspoon baking powder - 1 tablespoon lemon juice - 1/4 cup flour (whole wheat or all-purpose) - Salt and pepper to taste - 3 tablespoons olive oil The key to making crispy baked falafel starts with dried chickpeas. Soaking them overnight makes them soft and easy to blend. Fresh herbs like parsley and cilantro bring brightness to your falafel. The spices, such as cumin and coriander, add deep flavors that make each bite delicious. - Additional vegetables - Different herbs for flavor You can add more fun to your falafel. For example, try adding grated zucchini or carrots for extra veggies. You can also swap in other herbs, like dill or mint, for a unique taste. These choices let you customize your falafel to fit your mood. - Gluten-free alternatives for flour - Low-sodium options If you need gluten-free falafel, use chickpea flour instead of regular flour. This gives a great texture and keeps it tasty. For a lower sodium dish, cut back on salt or use a salt-free seasoning blend. These swaps help make the dish fit your dietary needs while keeping it flavorful. For the Full Recipe, check out the detailed steps to create your crispy baked falafel! - Start by soaking 1 cup of dried chickpeas overnight. This step softens the beans. They will blend better in the food processor. - After soaking, drain and rinse the chickpeas under cold water. This removes any dirt or residue. - In a food processor, combine the soaked chickpeas, 1 small chopped onion, 2 cloves of minced garlic, 1/4 cup chopped parsley, and 1/4 cup chopped cilantro. Add 2 teaspoons ground cumin, 1 teaspoon ground coriander, salt, and pepper to taste. - Pulse the mixture until finely ground but not pureed. You want a texture that holds together but is not mushy. Scrape down the sides as needed to mix well. - Transfer the mixture to a bowl. Add 1/2 teaspoon baking powder, 1 tablespoon lemon juice, and 1/4 cup of flour. Stir until combined. If too wet, add more flour until it holds together. - Form the mix into small balls or patties, about the size of a golf ball. Place them on a baking sheet lined with parchment paper. - Drizzle 3 tablespoons of olive oil over the falafel or lightly brush it on for a crisp finish. - Bake in a preheated oven at 400°F (200°C) for about 25-30 minutes. Flip them halfway through baking for even crispiness. They should turn golden brown and crispy on both sides. For the full recipe, check out the earlier sections! To get that perfect crispy texture, oil is key. You should apply a light coat of olive oil on your falafel before baking. This helps the outside become golden and crunchy. Use a brush or drizzle it over the balls. Bake your falafel at a high temperature of 400°F (200°C). This heat will ensure they crisp up nicely. Flip them halfway through baking. This way, both sides get equal heat and crispness. To spice up your falafel, consider adding a pinch of cayenne for some heat. You can also mix in smoked paprika for a deeper flavor. These small changes can make a big difference. Fresh herbs add a burst of flavor. Besides parsley and cilantro, try adding dill or mint. These will brighten up your falafel and make them extra tasty. Falafel pairs well with many sides. Serve it with a fresh salad for a light meal. It also goes great with pita bread. You can stuff it in the bread for a fun wrap. For sauces, tahini is a classic choice. Its creaminess complements the crisp falafel. Tzatziki is another excellent option. The coolness of yogurt balances the spices perfectly. Don’t forget to check out the Full Recipe for more details! {{image_2}} You can make your falafel more exciting. Add some chili or cayenne pepper for heat. This gives your falafel a nice kick. You can also use Middle Eastern spice blends. Try za'atar or sumac for a new flavor. These spices boost the taste and make each bite special. Falafel makes a great filling for wraps. Use pita bread and add fresh veggies. You can also serve falafel in salads. Toss them on greens with a tasty dressing. This makes for a fresh and crunchy meal. You can mix and match your favorite toppings for variety. If you follow a vegan diet, this recipe is perfect. The chickpeas provide protein and fiber. For nut-free versions, avoid any nut-based sauces. Use tahini or yogurt as a dip instead. These options keep the meal safe and delicious for everyone. So, enjoy this crispy baked falafel as a healthy snack or meal. Find the full recipe above to get started! Store your crispy baked falafel in an airtight container. This keeps them fresh. Place a paper towel inside to absorb moisture. It helps maintain crispiness. Keep the container in the fridge. You can freeze falafel for longer storage. Place them in a freezer-safe bag. Make sure to remove as much air as possible. To reheat, bake them at 375°F (190°C) for about 10-15 minutes. This restores their crispiness. In the fridge, falafel lasts about 4-5 days. Look for signs of spoilage. If they smell sour or have a slimy texture, toss them out. If frozen, they can last for up to three months. Check for freezer burn before eating. You can store the falafel mixture before baking. Keep it in a bowl covered with plastic wrap. This mixture stays good for up to 24 hours in the fridge. If you want to pre-bake, shape the falafel and freeze them. Lay them flat on a baking sheet until frozen. Then transfer to a bag. You can bake them directly from frozen, adding a few extra minutes to the baking time. For the full recipe, check out the details above. To make crispy baked falafel, follow these key steps: - Soak 1 cup of dried chickpeas overnight. - Blend soaked chickpeas with onion, garlic, parsley, and spices. - Add baking powder, lemon juice, and flour to the mix. - Shape the mixture into small balls. - Bake at 400°F (200°C) for 25-30 minutes. - Flip halfway for even crispiness. These steps ensure you achieve a tasty, crispy texture. The right blend of herbs and spices makes the falafel flavorful. You can find the full recipe to guide you through the process. Yes, you can use canned chickpeas. However, adjustments are needed: - Drain and rinse the canned chickpeas before use. - Use about 1.5 cups of canned chickpeas. - Reduce the flour slightly, as canned chickpeas are moister. This helps maintain the right texture for your falafel. Remember that the flavor may vary a bit due to the different processing of canned chickpeas. Crispy baked falafel pairs well with several sides: - Serve with tahini sauce for a creamy dip. - Add a side of tzatziki for a refreshing touch. - Place them in pita bread with veggies for a wrap. - Enjoy with a salad for a lighter meal. These combinations make for a well-rounded meal. Each option enhances the falafel's flavor and adds to your dining experience. You can tell falafel is done by checking these signs: - Look for a golden-brown color on both sides. - The texture should be crispy on the outside. - The inside should feel firm and not mushy. These signs indicate that your falafel is ready to enjoy. Proper baking ensures a delicious crunch and a delightful bite. This recipe can be made gluten-free easily: - Substitute regular flour with chickpea flour or gluten-free flour. - Ensure all other ingredients are gluten-free. These options maintain the flavor while catering to gluten-free diets. It's a simple switch that keeps your falafel tasty and suitable for more people. In this article, we explored how to make crispy baked falafel with easy steps. We covered the main ingredients like chickpeas, fresh herbs, and spices. I shared tips for achieving the perfect texture and flavor. You also learned how to adapt the recipe for diets and different tastes. Try making falafel your way, with various herbs and spices. Enjoy the vibrant flavors and healthy benefits. Your kitchen will smell great, and your taste buds will be happy!

Crispy Baked Falafel Tasty and Healthy Snack Idea

Looking for a tasty and healthy snack? Try my Crispy Baked Falafel! Made with simple ingredients like dried chickpeas and

- 1 large head of broccoli, cut into florets - 4 cloves of garlic, minced - 2 tablespoons olive oil - Zest of 1 lemon - 2 tablespoons fresh lemon juice - 1 teaspoon red pepper flakes (adjust for spice preference) - Salt and black pepper to taste - 2 tablespoons grated Parmesan cheese (optional for serving) This recipe serves four people. Each serving has about 120 calories. You get a good amount of vitamin C and fiber from the broccoli. The olive oil adds healthy fats, while garlic gives flavor and health benefits. If you use Parmesan, it adds protein and calcium too. For a quick, tasty side dish, this Lemon Garlic Roasted Broccoli is perfect. Check out the Full Recipe for more details. 1. Preheat the oven: Set your oven to 425°F (220°C). This high heat helps get those crispy edges. 2. Prepare the broccoli and garlic: Cut one large head of broccoli into florets. You want bite-sized pieces. Mince four cloves of garlic. This will add a big flavor punch. 1. Mixing the olive oil and seasonings: In a large bowl, drizzle two tablespoons of olive oil over the broccoli. Add the lemon zest and juice, one teaspoon of red pepper flakes, salt, and black pepper. 2. Tossing the broccoli for even coating: Use your hands or a spoon to mix everything well. Make sure each floret gets coated. This helps all the flavors stick. 1. Spreading on the baking sheet: Line a baking sheet with parchment paper. Spread the broccoli mixture in one even layer. Give it some space for crisping. 2. Cooking time and stirring: Roast in the oven for 20-25 minutes. Halfway through, take it out and stir. This helps everything cook evenly and get that nice golden color. For the full recipe, check the instructions above. Enjoy your tasty side! - Set your oven to 425°F (220°C) for perfect roasting. - For crispy edges, spread the broccoli in a single layer. This allows hot air to circulate around each floret. - If you like heat, add more red pepper flakes. Start small and taste as you go! - No Parmesan? Try nutritional yeast or a dairy-free cheese for a twist. - Serve on a large platter for a stunning look. Drizzle with extra lemon juice to enhance the flavors. - Garnish with lemon slices for a bright, fresh touch. It makes the dish pop! For the complete recipe, check out the [Full Recipe]. {{image_2}} You can change the flavors of this dish easily. Adding herbs like thyme or rosemary gives it a fresh taste. These herbs pair well with lemon. Try them for a new twist. You can also swap lemon for lime. Lime adds a zesty kick that brightens the broccoli. Experiment with different herbs and citrus for your own flavor. If you want something new, try using cauliflower or Brussels sprouts. Both vegetables roast well and taste great with garlic and lemon. You can even mix broccoli with these vegetables. This mix adds variety to your meal and keeps things interesting. This roasted broccoli shines next to proteins or grains. It pairs well with chicken, fish, or quinoa. You can serve it as part of a larger meal, too. Think of a colorful plate with grains, proteins, and this zesty broccoli. It makes for a fun and tasty dining experience. For the full recipe, check out the [Full Recipe]. To store leftovers, place the broccoli in an airtight container. Make sure to cool it first. This helps keep it fresh. In the fridge, it should last up to three days. Avoid leaving it out at room temperature. This can cause spoilage. To maintain freshness, store it whole when possible. Cut broccoli can dry out quicker. If you notice any moisture, use a paper towel to absorb it. This keeps the broccoli crisp. Reheat the broccoli gently. This helps it keep its texture. The best method is to use the oven. Preheat it to 350°F (175°C). Place the broccoli on a baking sheet. Heat it for about 10 minutes. Stir once to ensure even heating. You can use a microwave too. Place the broccoli in a microwave-safe dish. Cover it with a lid or a damp paper towel. Heat for 1-2 minutes. Check to see if it’s warm throughout. To freeze roasted broccoli, let it cool completely. Spread it in a single layer on a baking sheet. Freeze it for a few hours until solid. Then, transfer the broccoli to a freezer bag. Remove as much air as possible. It can last for 2-3 months. When you are ready to eat it, thaw the broccoli in the fridge overnight. You can also use the microwave to thaw it quickly. After thawing, reheat it in the oven or microwave for a nice texture. Roasted broccoli can last about 3 to 5 days in the fridge. To keep it fresh longer, store it in an airtight container. This helps prevent moisture and keeps the broccoli from getting soggy. You can also place a paper towel in the container to absorb excess moisture. Yes, you can use frozen broccoli for this recipe. However, you will need to make some adjustments. First, thaw the broccoli and drain any excess water. Then, pat it dry to remove moisture. This helps the broccoli roast well and not steam. You may want to reduce the roasting time by a few minutes since frozen broccoli cooks faster. Lemon garlic roasted broccoli pairs well with many dishes. You can serve it alongside grilled chicken or fish for a healthy meal. It also goes great with pasta or grain bowls. Try adding it to salads for extra flavor and texture. This side dish can elevate any dinner! In this blog post, we explored how to make delicious roasted broccoli. We discussed key ingredients like garlic and olive oil and shared tips for achieving the perfect roast. You learned how to prepare, combine, and cook broccoli while customizing it to suit your taste. Remember to experiment with flavors and pair it with your favorite dishes. Roasted broccoli can be a tasty side or part of a larger meal. Keep your leftovers fresh, and enjoy this healthy dish again!

Lemon Garlic Roasted Broccoli Tasty and Simple Side

Looking for a side dish that’s both tasty and easy to make? Lemon Garlic Roasted Broccoli is your answer! This

To make a veggie packed breakfast burrito, gather these tasty items: - 4 large whole wheat tortillas - 1 cup black beans, drained and rinsed - 1 cup spinach, roughly chopped - 1 medium bell pepper, diced (any color) - 1 small zucchini, diced - 1/2 cup corn kernels (fresh or frozen) - 4 eggs (or flax eggs for a vegan option) - 1/2 teaspoon ground cumin - 1/2 teaspoon smoked paprika - Salt and pepper to taste - 1 avocado, sliced - 1/2 cup shredded cheese (cheddar or a vegan alternative) - Fresh cilantro, for garnish (optional) - Salsa or hot sauce, for serving You can play with flavors by adding: - Diced onions or garlic for extra zest - Mushrooms for a meaty texture - Jalapeños for heat - Different cheeses like feta or pepper jack - A squeeze of lime for brightness Feel free to mix and match! This burrito is all about your taste. Enjoy getting creative in the kitchen! Start by gathering your ingredients. You will need whole wheat tortillas, black beans, spinach, bell pepper, zucchini, corn, eggs, spices, cheese, and avocado. Wash and chop the veggies. Dice the bell pepper and zucchini into small pieces. Roughly chop the spinach. If you use fresh corn, cut it off the cob. Heat a large skillet over medium heat. Add a little olive oil to the pan. Once the oil is warm, add the diced bell pepper and zucchini. Sauté for about 3-4 minutes until they start to soften. Next, stir in the spinach and corn. Cook until the spinach wilts, which takes about 2 minutes. Then add the black beans, cumin, smoked paprika, salt, and pepper. Mix everything well and cook for 2 more minutes to heat through. In a separate bowl, whisk the eggs until smooth. Pour the eggs into the skillet with the veggies. Stir gently until the eggs cook through and become scrambled. This will take about 3-5 minutes. Once done, remove the skillet from heat. Warm the tortillas in a dry skillet or microwave until they are soft and pliable. For each burrito, place a portion of the veggie-egg mixture in the center of a tortilla. Add sliced avocado and a sprinkle of cheese on top. Fold the sides of the tortilla in, then roll it up from the bottom to enclose the filling. If you like, you can toast the burritos seam-side down in the skillet for 1-2 minutes on each side to add crunch. Serve these warm with salsa or hot sauce. For a fresh touch, garnish with cilantro. Enjoy your veggie packed breakfast burrito! To cook perfect eggs, start with a non-stick skillet. Heat it on medium. Add a little oil to prevent sticking. Crack your eggs into a bowl and whisk them until they are mixed well. This helps create fluffy eggs. Pour the eggs into the hot skillet. Stir gently with a spatula as they cook. Remove them from heat when they are soft and slightly runny. They will keep cooking after you take them off the heat. Warm your tortillas before wrapping. This makes them soft and easy to roll. Place your filling in the center of the tortilla. Fold the sides in first, then roll from the bottom up. Make sure to tuck in the filling as you roll. This keeps everything inside. If you want a crunch, place the wrapped burrito seam-side down in a hot skillet. Toast for 1-2 minutes on each side. Garnishing adds flavor and makes your burrito look great. Sliced avocado gives creaminess. Fresh cilantro adds a nice pop of flavor. You can also sprinkle cheese on top. If you like spice, add salsa or hot sauce. This gives a nice kick to your burrito. For a unique twist, try adding some fresh lime juice. It brightens up all the flavors beautifully. For the full recipe, check out the Veggie Packed Breakfast Burrito section. {{image_2}} You can easily make this breakfast burrito vegan. Swap out the eggs for flax eggs. To make one flax egg, mix one tablespoon of flaxseed meal with two and a half tablespoons of water. Let it sit for five minutes. This mixture works like eggs in the recipe. You can also use tofu to add protein. Crumble firm tofu and sauté it with the veggies for added texture. Feel free to play with your veggie choices. Try adding mushrooms for an earthy flavor. Carrots or sweet potatoes can add sweetness and crunch. Kale can replace spinach for a heartier bite. You can even add cherry tomatoes for a juicy burst. The key is to use what you love and what’s in season. If you want more protein, consider adding cooked quinoa or lentils. These options are filling and nutritious. You can also use tempeh for a nutty taste. For meat lovers, diced chicken or turkey can work well, too. Keep in mind that the balance of flavors is essential. Choose proteins that pair well with your veggies for a delicious meal. This recipe is flexible and fun! Just mix and match to fit your taste. For the full recipe, check out the section above. To keep your veggie packed breakfast burrito fresh, place leftovers in an airtight container. You can store them in the fridge for up to three days. Be sure to let the burritos cool before sealing them. This step helps prevent sogginess. When you’re ready to enjoy your burrito again, you can reheat it easily. For the best results, use a skillet. Heat the skillet over medium heat. Place the burrito seam-side down and cook for about 3-4 minutes on each side. This method gives you a warm, crispy burrito. If you prefer the microwave, heat it for 1-2 minutes, but the texture may not be as nice. If you want to save your burritos for later, freezing is a great option. Wrap each burrito tightly in plastic wrap. Then, place them in a freezer-safe bag or container. They can last up to three months in the freezer. When you’re ready to eat, thaw in the fridge overnight and follow the reheating instructions above. Enjoy your meal prep without stress! You can find the full recipe for this delicious breakfast burrito in the article. Yes, you can make this breakfast burrito ahead of time. Prepare the filling and store it in the fridge. It stays fresh for about three days. You can also wrap the burritos and freeze them. To reheat, just heat in a skillet or microwave until warm. This makes busy mornings easier! You can try many toppings! Here are some tasty ideas: - Sliced avocado for creaminess - Fresh cilantro for a burst of flavor - Salsa for spice and zest - Sour cream or Greek yogurt for richness - Hot sauce for heat These toppings add great flavor and texture. Mix and match to find your favorite! To make this recipe gluten-free, simply use gluten-free tortillas. Many brands offer tasty options. Always check the labels to be sure. All other ingredients are naturally gluten-free, so you can enjoy your burrito worry-free! This blog post covers every step for a tasty breakfast burrito. We started with the key ingredients and options for customization. Then, I shared clear steps for preparation and cooking. Next, we explored tips for cooking eggs, wrapping tortillas, and adding flavor. I also included variations, storage tips, and answers to common questions. Now, you can enjoy this fun meal any time. Try it out, make it your own, and impress your friends!

Veggie Packed Breakfast Burrito for a Nutritious Start

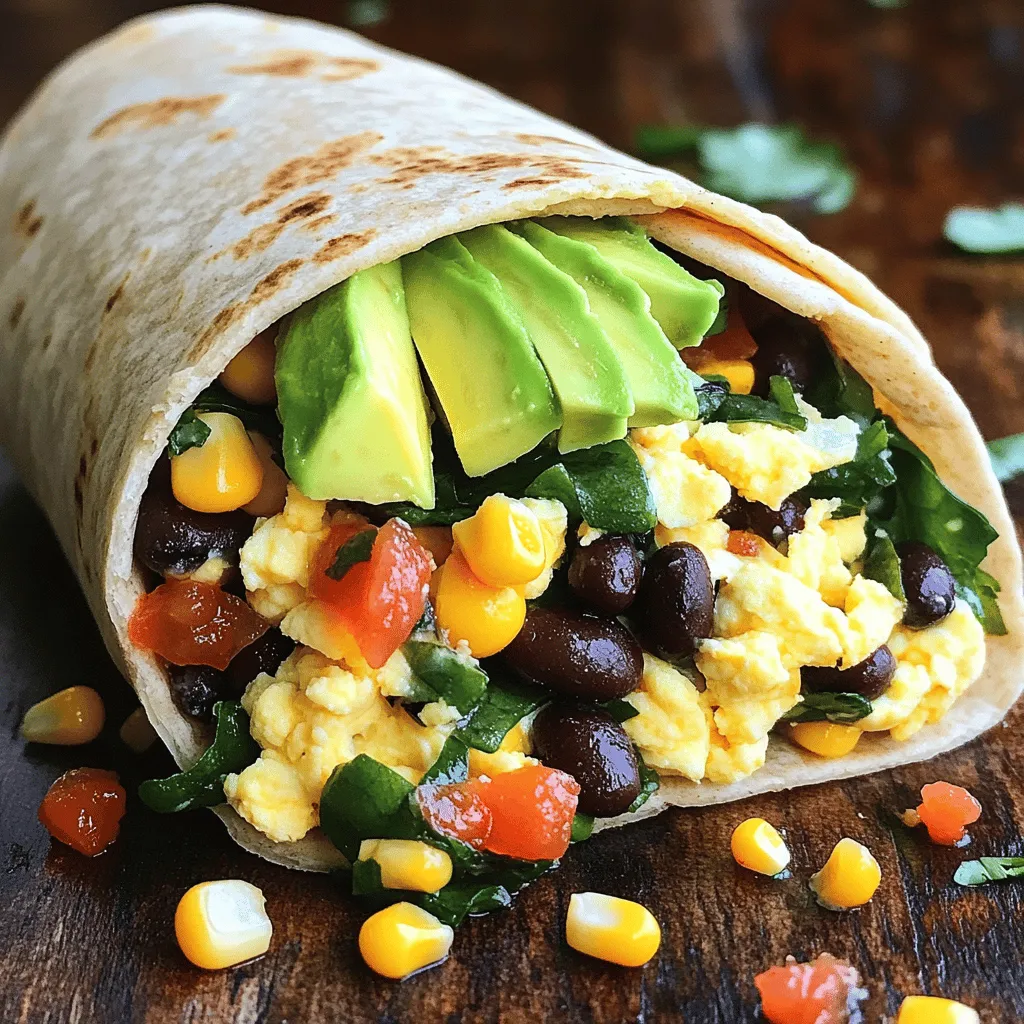
Start your day right with a Veggie Packed Breakfast Burrito! This tasty meal is full of fresh veggies, protein, and

To create these chocolate dipped frozen bananas, you will need a few simple items. Here is the list: - 4 ripe bananas - 1 cup dark chocolate chips - 1 tablespoon coconut oil - 1/4 cup crushed nuts (such as almonds or walnuts) - 1/4 cup shredded coconut (unsweetened) - Sea salt for garnish (optional) These ingredients come together to make a delicious and refreshing treat. Bananas are naturally sweet and healthy. Dark chocolate adds richness, while coconut oil helps the chocolate melt smoothly. You can choose your favorite nuts and coconut for added crunch and flavor. Sprinkle a little sea salt on top for a sweet-salty twist! This recipe is perfect for summer or any time you want a cool snack. Check out the Full Recipe for detailed instructions on how to make this delightful treat! Start by peeling the bananas. Slice them in half or into thick rounds. This makes them fun to eat. Next, insert a wooden skewer or toothpick into each piece. This step helps with dipping. Now, arrange your banana pieces on a baking sheet lined with parchment paper. Make sure they are not touching. Place the baking sheet in the freezer for about 1 to 2 hours. You want the bananas to be solid and ready for chocolate. In a microwave-safe bowl, combine 1 cup of dark chocolate chips and 1 tablespoon of coconut oil. This mix will make the chocolate smooth. Heat in the microwave in 30-second bursts. Stir after each round until the chocolate is fully melted. Once the bananas are frozen, take them out of the freezer. Dip each piece into the melted chocolate. Use a fork for an even coat. Quickly roll or sprinkle crushed nuts or shredded coconut on top. Do this before the chocolate hardens for the best results. After decorating, place the chocolate-dipped bananas back on the baking sheet. Return them to the freezer for about 30 minutes. This time allows the chocolate to set completely. After that, your chocolate-dipped bananas are ready to enjoy! For the full recipe, check out the earlier section. To get a smooth chocolate coating, proper melting is key. Start with good quality chocolate chips. Combine them with coconut oil in a bowl. Heat this mixture in short bursts. Use the microwave for 30 seconds at a time. Stir after each heating. This method helps prevent burning. The goal is to have a glossy, fluid chocolate. If it appears thick, it needs more time. For a fun presentation, arrange your chocolate-dipped bananas on a bright platter. Use colorful plates to make the treat stand out. You can also drizzle any leftover melted chocolate over the bananas. This adds style and a touch of extra flavor. You might also consider adding fresh fruit or mint leaves as a garnish. Want to kick up the flavor? Try adding spices or extracts to the melted chocolate. A hint of cinnamon can add warmth. A splash of vanilla gives a nice depth. These small changes can elevate your frozen bananas. Experimenting is part of the fun! {{image_2}} You can use different types of chocolate for your frozen bananas. Milk chocolate is sweet and creamy. It adds a fun flavor to the bananas. Dark chocolate has a rich taste. It is less sweet and gives a bold flavor. You can also try white chocolate. It is very sweet and pairs well with toppings. Each type of chocolate brings its own twist. Toppings can really enhance your chocolate-dipped bananas. You can use various nuts like pecans or hazelnuts. They add crunch and flavor. Sprinkles bring color and fun. You can also crush cookies to sprinkle on top. Dried fruit, like raisins or cranberries, adds a chewy texture. Mix and match toppings to find your favorite combo. Bananas are great, but other fruits work too! Strawberries are a popular choice. They are juicy and sweet. Pineapple chunks also dip well. They add a tropical twist. You can even try apples or pear slices. Each fruit brings its unique taste and texture. Get creative and see what you enjoy! For more details on making these delicious treats, check out the Full Recipe. To keep your chocolate-dipped bananas fresh, wrap each piece in plastic wrap or foil. Place them in a freezer-safe bag or container. This helps prevent freezer burn and keeps them tasty. Make sure to remove as much air as you can from the bag. Store them in the freezer for best results. Chocolate-dipped bananas can stay fresh for up to three months when stored properly. After that, they may lose flavor and texture. It's best to enjoy them within this time frame for the best taste. When you're ready to enjoy your frozen bananas, place them in the fridge for a few hours. This method keeps them from getting too soft. If you're in a rush, you can leave them out at room temperature for about 15-20 minutes. Avoid microwaving them, as it can make the chocolate melt and ruin the texture. Yes, you can use ripe frozen bananas. They add a nice creaminess. Just make sure they are fully thawed before dipping. This will help the chocolate stick better. To avoid cracking chocolate, temper it first. Slowly melt your chocolate chips with coconut oil. Stir often and cool it down slightly before dipping. This makes the chocolate shine and stay smooth. If you have extra melted chocolate, you can drizzle it on fruit, pancakes, or ice cream. You can also dip pretzels or graham crackers. It’s a fun way to use every bit of chocolate. Yes, you can prepare chocolate dipped frozen bananas ahead. Store them in an airtight container in the freezer. They stay fresh for up to two weeks. Just take them out when you need a sweet treat. Chocolate dipped frozen bananas can be a healthy snack. Bananas provide fiber and potassium. Dark chocolate adds antioxidants. Just watch the portion size to keep it balanced. You can enjoy this treat guilt-free! You can make simple and tasty chocolate-dipped bananas with just a few ingredients. I covered the steps, tips, and creative ideas to help you create this treat. Keep in mind the variations and storage tips for the best results. This fun recipe lets you enjoy a sweet snack that is also healthy. With these easy instructions, you'll impress friends and family. Enjoy your delicious, chocolate-coated bananas and have fun experimenting with flavors!

Chocolate Dipped Frozen Bananas Delightful Summer Treat

Looking for a fun and tasty summer treat? Chocolate-dipped frozen bananas are your answer! They are easy to make and

Sweet potato breakfast hash is a delightful mix of flavors. This dish is colorful and easy to make. It takes about 30 minutes from start to finish. You can serve it for breakfast or brunch. Here’s what you’ll need for this tasty meal. - 2 medium sweet potatoes, peeled and diced - 1 red bell pepper, diced - 1 small red onion, diced - 2 cloves garlic, minced - 1 teaspoon smoked paprika - ½ teaspoon cumin - Salt and pepper, to taste - 2 tablespoons olive oil - 4 large eggs - Fresh parsley, chopped (for garnish) These key ingredients bring out the best in this dish. Sweet potatoes give a natural sweetness. The bell pepper and onion add a nice crunch. Garlic and spices enhance the overall flavor. Beyond the key ingredients, you can play with seasonings. Here are some ideas: - Try adding chili powder for heat. - Use thyme or rosemary for herbal notes. - A splash of hot sauce can add a kick. These seasonings can elevate your hash and make it unique. Feel free to mix and match based on your taste. Cooking is fun when you explore new flavors! Start by peeling and dicing the sweet potatoes. Aim for bite-sized pieces. This helps them cook evenly. Next, chop the red bell pepper and the red onion. Mince the garlic cloves too. Having all your veggies ready makes cooking easy. Heat two tablespoons of olive oil in a large skillet over medium heat. Once hot, add the sweet potatoes. Cook them for about 10 to 12 minutes. Stir them often, so they don’t stick. You want them to soften and get a nice golden color. After that, toss in the diced red bell pepper and onion. Stir everything together. Cook for another 5 to 7 minutes until all the veggies are nice and tender. Now, add the minced garlic, smoked paprika, and cumin. Mix well. Season with salt and pepper to taste. Cook for 2 minutes until it smells amazing. Make four small wells in the sweet potato mix. Crack an egg into each well. Cover the skillet with a lid. Cook for about 5 to 7 minutes. This lets the eggs set just right. When the eggs are cooked to your liking, remove the skillet from heat. Sprinkle with fresh parsley for a pop of color. Serve your sweet potato breakfast hash right away! For the complete recipe, check out the Full Recipe section. To make the best sweet potato breakfast hash, start with fresh ingredients. Sweet potatoes should be firm and bright in color. Dice them evenly to ensure even cooking. Use a large skillet to give your hash enough space to brown well. Don’t rush the cooking process; let the sweet potatoes caramelize for deep flavor. Stir occasionally, but not too much. This will help create crispy edges. One common mistake is overcooking the sweet potatoes. They should be tender but not mushy. Another mistake is crowding the pan. If it’s too full, the hash will steam instead of brown. Also, don’t skip the spices. Smoked paprika and cumin add a warm depth. Lastly, avoid breaking the eggs too soon. Wait until the sweet potatoes are ready before adding them. Use a large skillet or a cast-iron pan for the best results. A sturdy spatula helps flip and mix the hash without damaging it. A good chef's knife is key for easy chopping. You might also want a lid for the skillet to cook the eggs. For the freshest taste, use a microplane for grating garlic. For the full recipe, check the Sweet Potato Breakfast Hash section. {{image_2}} To boost the taste of your sweet potato breakfast hash, consider some fun add-ins. You can mix in cooked bacon or sausage for a savory kick. For a spicy touch, add jalapeños or red pepper flakes. If you love cheese, sprinkle in some cheddar or feta. Fresh herbs like thyme or rosemary can also bring a new flavor layer. Each of these choices can make your dish unique. If you need to change the recipe for dietary reasons, it's easy to do. For a lower-carb option, swap sweet potatoes for cauliflower. If you need a gluten-free dish, ensure all your seasoning blends are gluten-free. You can also replace olive oil with avocado oil for a different fat. Each swap still gives you a tasty hash that fits your needs. To make this dish vegan, simply remove the eggs. You can replace them with tofu or chickpeas. Crumbled tofu can mimic eggs when cooked right. For a vegetarian version, keep the eggs but avoid meat add-ins. This way, you enjoy a delicious breakfast that fits your lifestyle. For the full recipe, check out the Sweet Potato Breakfast Hash! After you enjoy your sweet potato breakfast hash, store leftovers in an airtight container. Let it cool first. Keep it in the fridge for up to three days. Make sure to label the container with the date. This helps you know when to eat it. To reheat, use a skillet over medium heat. Add a splash of olive oil to keep it moist. Stir occasionally until heated through. You can also use the microwave. Place it in a microwave-safe bowl and cover it. Heat for 1-2 minutes, checking every 30 seconds. If you want to freeze your hash, store it in a freezer-safe container. It can last up to three months in the freezer. When ready to eat, thaw it in the fridge overnight. Reheat it in a skillet for the best taste. For a complete guide, check the Full Recipe. Sweet potatoes are very good for you. They are high in vitamins A and C. These vitamins help your skin and eyes. Sweet potatoes also have fiber, which keeps your tummy happy. Eating them may help with weight control. They can also help with blood sugar. This makes sweet potatoes a great choice for breakfast. Yes, you can make sweet potato breakfast hash ahead of time. Cook it fully and let it cool. Then, store it in the fridge. It will last for up to three days. When you’re ready to eat, just reheat it. You can heat it in a skillet or microwave. This saves time on busy mornings. You can serve many things with sweet potato breakfast hash. Try fresh fruit for a sweet taste. Toast or bagels can add crunch. A dollop of yogurt brings creaminess. If you want more protein, add bacon or sausage. You can also top it with avocado for extra flavor. Enjoy mixing and matching! We discussed how to create a delicious sweet potato breakfast hash. You learned about essential ingredients, their preparation, and cooking steps. I shared tips to make your dish perfect and common mistakes to avoid. You discovered tasty variations for different diets and how to store leftovers properly. Enjoy your cooking and impress others with your meals! Remember, food brings joy and good health.

Sweet Potato Breakfast Hash Tasty Morning Delight

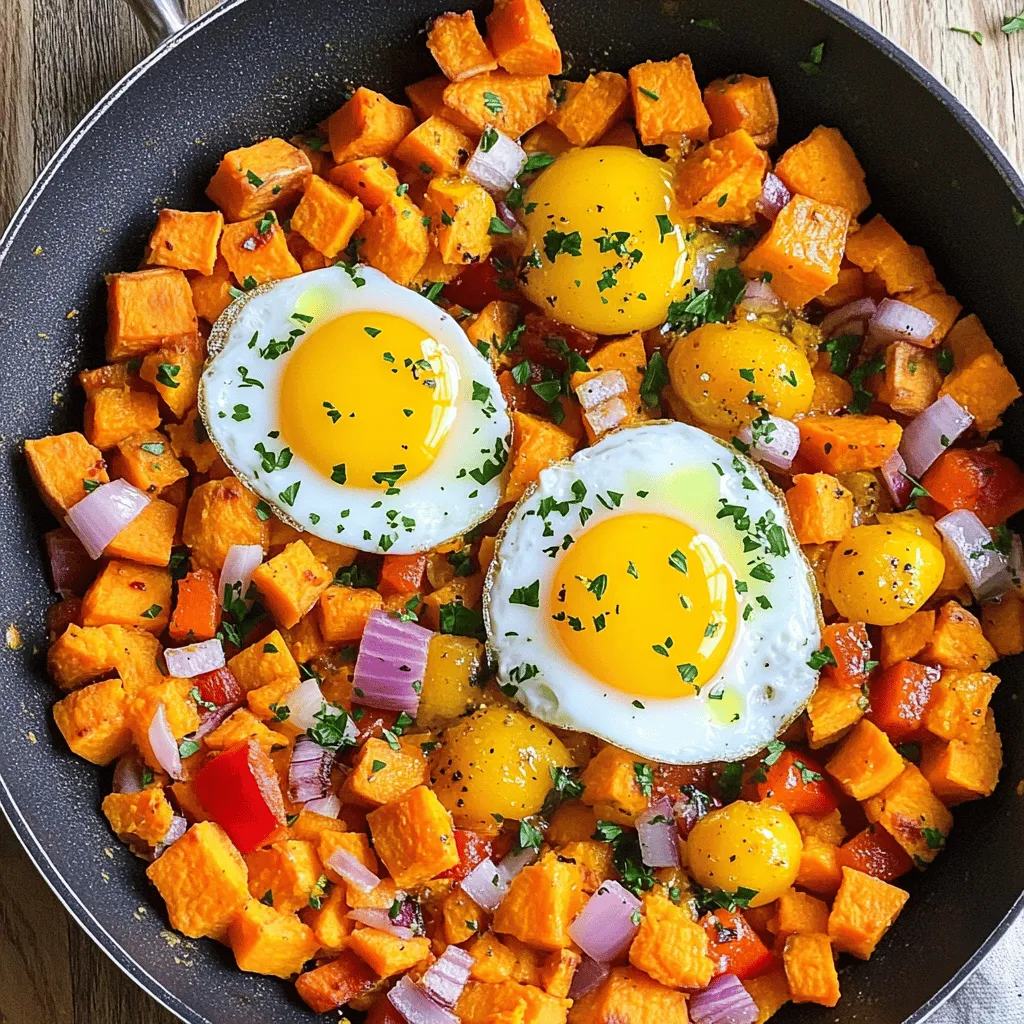
Looking for a tasty way to start your day? Try my Sweet Potato Breakfast Hash! This fun dish is packed

- 1 pound fresh asparagus, trimmed - 1 cup panko breadcrumbs - ½ cup grated Parmesan cheese - 2 large eggs - 2 tablespoons lemon zest - 1 tablespoon lemon juice - 1 teaspoon garlic powder - ½ teaspoon salt - ¼ teaspoon black pepper - Olive oil spray - Baking sheet - Parchment paper - Shallow bowls - Whisk - Prep Time: 10 minutes - Cook Time: 20 minutes - Servings: 4 servings When you gather your ingredients, make sure to choose fresh asparagus. It should look bright green and firm. The panko breadcrumbs give a nice crunch. Parmesan adds a rich flavor. The eggs help the coating stick well. For tools, a baking sheet is a must. Parchment paper saves you from scrubbing later. Shallow bowls help with easy dipping. A whisk makes mixing simple and fast. You can whip this dish up in just 10 minutes! After 20 minutes in the oven, you’ll have a tasty side for four people. This is a great way to enjoy veggies in a fun way. Check out the Full Recipe for more details on how to make this dish shine! - Set the oven to 425°F (220°C). - Line a baking sheet with parchment paper. - Whisk together eggs, lemon juice, salt, pepper, and garlic powder. - Mix panko breadcrumbs, grated Parmesan, and lemon zest in a bowl. - Dip each asparagus spear in the egg mixture. Let any excess drip off. - Roll the dipped asparagus in the panko mixture. Press gently to stick. - Place the coated asparagus on the baking sheet. Spray lightly with olive oil. - Bake for 15-20 minutes until crispy and golden brown. Enjoy this Crispy Lemon Parmesan Asparagus as a delightful side dish or snack. For the full recipe, check out the details above! To get the best crunch, use fresh panko breadcrumbs. They provide a light and airy texture. If you like a little heat, add a dash of cayenne pepper to the panko. This adds a nice kick to the dish. You can experiment with different cheeses. Asiago or Pecorino can enhance the taste. Fresh herbs like parsley or basil make a great garnish. They add color and freshness. You can also serve it with a tasty dip, like ranch or garlic sauce, to elevate the flavor. Crispy lemon parmesan asparagus pairs well with lemon wedges. They add brightness and zing. You can also serve it with a dipping sauce for extra fun. This dish shines alongside grilled meats or as a stand-alone appetizer. It works great for parties and family meals alike. For the full recipe, check the section above. {{image_2}} If you want a vegetarian version, swap out the Parmesan cheese for a plant-based cheese. Many brands offer great-tasting options. This change keeps the dish creamy and flavorful, making it perfect for all diets. I love using cashew-based cheese or nutritional yeast for a cheesy taste without dairy. They both melt well and add a nice flavor boost. You can cook Crispy Lemon Parmesan Asparagus in an air fryer for a quicker result. Preheat your air fryer to 400°F (200°C). Follow the coating steps from the oven method. Instead of baking, place the coated asparagus in the air fryer basket. Cook for about 10-12 minutes. Check halfway through and shake the basket for even cooking. You'll get crispy spears in no time! If you like some heat, add red pepper flakes or sriracha to the coating mixture. Mix in about a teaspoon of red pepper flakes with the panko and cheese. For sriracha, brush it on the asparagus before coating. This spicy twist gives the dish an exciting kick that I know you'll enjoy. Store leftovers in an airtight container in the fridge. This keeps them fresh for up to three days. Be sure to let the asparagus cool before sealing. The best way to reheat is in the oven. This keeps the asparagus crispy. Preheat the oven to 350°F (175°C). Place the asparagus on a baking sheet and heat for about 10 minutes. You can use a microwave, but this may soften the texture. You can freeze the asparagus before baking. Place each coated spear on a baking sheet and freeze for an hour. Once firm, transfer them to an airtight container or freezer bag. Use parchment paper to separate layers to avoid sticking. They can stay in the freezer for up to three months. When ready to bake, cook them directly from frozen, adding a few extra minutes to the baking time. Yes, but the texture may not be as crispy. Panko is preferred for crunch. Regular breadcrumbs can make the dish softer. For that perfect bite, stick with panko. Substitute panko with gluten-free breadcrumbs. Ensure all other ingredients are gluten-free. This way, you keep the same great taste. Just check labels to be safe. It pairs well with grilled chicken, fish, or as a side dish to any meal. You can also enjoy it on its own as a snack. The bright flavors shine alongside rich mains. Yes, you can coat the asparagus ahead of time and bake just before serving for freshness. This saves time when hosting. Just keep the coated asparagus in the fridge until you’re ready to cook. Look for a golden-brown coating and tender asparagus spears. The crunch is key! If the coating looks crispy and the asparagus feels soft, you’re ready to serve. This blog post showed how to make Crispy Lemon Parmesan Asparagus in a few simple steps. We covered the ingredients, cooking tools, prep time, and exact cooking instructions. You learned tips for extra crispiness and flavor, along with variations and storage advice. Enjoying this dish can elevate your meals. Try different cheeses or spices to make it your own. Now, you’re set to impress family and friends with this tasty recipe. Happy cooking!

Crispy Lemon Parmesan Asparagus Baked to Perfection

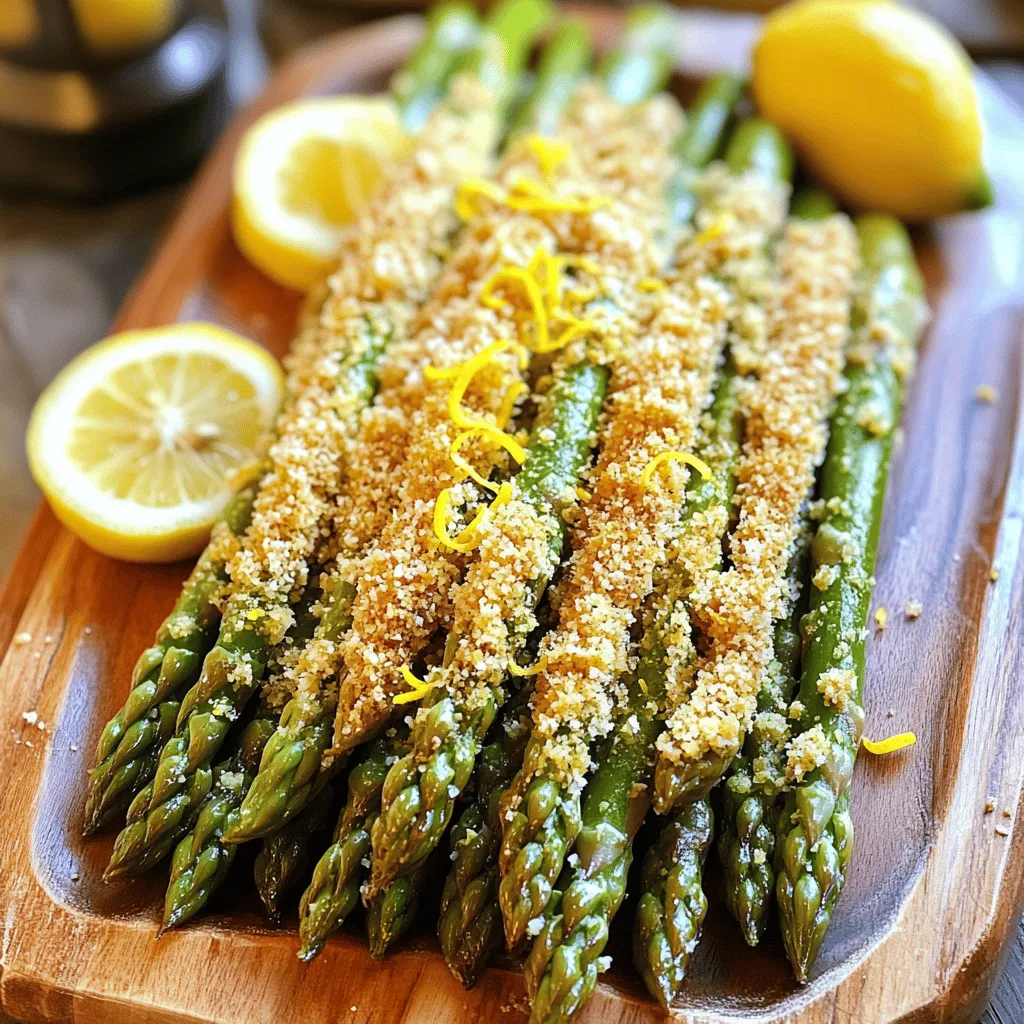
Want a quick, tasty side dish that steals the show? Crispy Lemon Parmesan Asparagus is your answer! This baked delight

- 1 can (15 oz) chickpeas, drained and rinsed - 2 tablespoons olive oil - 4 cloves garlic, minced Chickpeas are the star here. They add protein and fiber. They also have a nice texture. Olive oil helps the spices stick and adds great flavor. Garlic brings a fragrant punch to each bite. - 1 teaspoon dried oregano - 1 teaspoon dried thyme - 1 teaspoon paprika Oregano and thyme add a warm, earthy taste. Paprika gives a slight smokiness. These spices work together to create a savory blend that you will love. - Fresh parsley, chopped, for garnish - Salt and pepper to taste Fresh parsley adds color and a burst of freshness. A sprinkle of salt and pepper enhances all flavors. You can adjust these to fit your taste. You can find the full recipe at the end of this article. Enjoy making your Garlic Herb Roasted Chickpeas! First, rinse the chickpeas in cold water. Drain them well to remove any excess liquid. Then, lay the chickpeas on a clean kitchen towel or paper towels. Gently pat them dry. This step is key for getting them crispy. Next, preheat your oven to 400°F (200°C). This high heat helps the chickpeas roast nicely. Now, grab a large bowl. Combine the dried chickpeas with olive oil, minced garlic, oregano, thyme, paprika, salt, and pepper. Toss everything together until the chickpeas are coated evenly. This ensures every bite is packed with flavor. Line a baking sheet with parchment paper for easier cleanup. Spread the seasoned chickpeas in a single layer on the sheet. This helps them cook evenly. Roast them in the preheated oven for 25 to 30 minutes. Shake the pan halfway through cooking. This prevents burning and helps them get crispy. Keep an eye on them, as oven times can vary. When they are golden brown and crunchy, they’re ready to come out. Let them cool for a few minutes. They will get crisper as they cool. For a final touch, sprinkle freshly chopped parsley on top. Enjoy these as a tasty snack or sprinkle them on salads. For the complete recipe, check the Full Recipe. To get your chickpeas nice and crunchy, start by drying them well. After rinsing, spread them on a clean kitchen towel. Use another towel to pat them dry. This step helps remove extra moisture. The drier they are, the crunchier they will be. Next, set your oven to 400°F (200°C). This high temperature helps the chickpeas roast quickly and evenly. Make sure to spread them out in a single layer on the baking sheet. This allows hot air to circulate around each chickpea, enhancing crispiness. To boost the flavor, think about adding more spices. You can try cumin for a warm taste or chili powder for heat. Each spice brings a new twist to the dish. Experiment to find your favorite mix! Fresh herbs can also make a big difference. They often taste better than dried herbs. If you have fresh oregano or thyme, use them! Just chop them finely and add them to your chickpeas. You will taste the difference. Garlic Herb Roasted Chickpeas make a great snack on their own. But they pair nicely with dips too. Try serving them with hummus or tzatziki for a tasty treat. You can also use them as a crunchy topping. Sprinkle them on salads to add texture. They work well in soups too. The chickpeas add a satisfying crunch to warm dishes. Enjoy your flavorful bite! {{image_2}} You can change the flavor of your chickpeas in fun ways. For a spicy kick, add cayenne or chili powder. Just a little will make your snack fiery and exciting. You can also try sweet variations. A sprinkle of cinnamon or a drizzle of maple syrup can turn these chickpeas into a sweet treat. Both options give you a tasty twist. Garlic Herb Roasted Chickpeas fit many diets. They are naturally vegan and gluten-free. This makes them a great snack for everyone. If you are vegan, you can enjoy these without any worries. They provide protein and fiber, making them a healthy choice. If you want to try something new, use an air fryer. The air fryer cooks the chickpeas quickly and makes them very crispy. Just set it to 400°F (200°C) and cook for about 15-20 minutes. Shake the basket halfway for even cooking. Another method is using the stovetop. Heat a pan over medium heat and add the seasoned chickpeas. Stir them often until they are crispy, about 10-15 minutes. This method is quick and gives you a crunchy bite. For the full recipe, check out the details above. After roasting your chickpeas, let them cool for at least 10 minutes. This step helps them become extra crunchy. Place them on a wire rack if you have one. If not, a plate works too. Make sure they cool completely before storing. Use an airtight container for storage. Glass jars or plastic containers both work well. Choose a size that fits the amount you have. You can keep Garlic Herb Roasted Chickpeas at room temperature for up to three days. Make sure to store them in a cool, dry place. Avoid direct sunlight, as it can make them go stale. If you want to keep them longer, store in the refrigerator. They can last up to a week this way. Just remember that refrigeration may make them less crunchy. To bring back the crunch, reheat in the oven. Preheat it to 350°F (175°C). Spread the chickpeas on a baking sheet and heat for about 5-7 minutes. This method helps keep them crispy. You can also use an air fryer if you have one. Set it to 350°F (175°C) and heat for 3-5 minutes. This method works great for quick snacks! For more details, check out the Full Recipe. Yes, you can use dried chickpeas. First, soak them in water overnight. This helps them soften. After soaking, drain the chickpeas and cook them. Boil them for about 1 to 1.5 hours until they are tender. Once cooked, follow the Full Recipe to make Garlic Herb Roasted Chickpeas. To make chickpeas less chewy, dry them well before roasting. Use a clean towel to pat them dry. Make sure your oven is hot enough. Roast them until they are golden brown. This could take about 25 to 30 minutes. Check them halfway through. They should be crispy and not chewy. Garlic Herb Roasted Chickpeas are great as a snack. You can enjoy them alone or with dips. Try hummus or yogurt-based dips. They also work well on salads and soups. Add them on top for extra crunch and flavor. Garlic Herb Roasted Chickpeas are easy and tasty. You learned about the key ingredients, step-by-step instructions, and useful tips. We explored flavor variations and ways to store leftovers. Remember, you can tweak spices to fit your taste. Whether you use the oven or an air fryer, crispy chickpeas make great snacks or side dishes. Keep experimenting, and enjoy every bite. Easy recipes like this help you eat well without stressing.

Garlic Herb Roasted Chickpeas Crunchy and Flavorful Bite

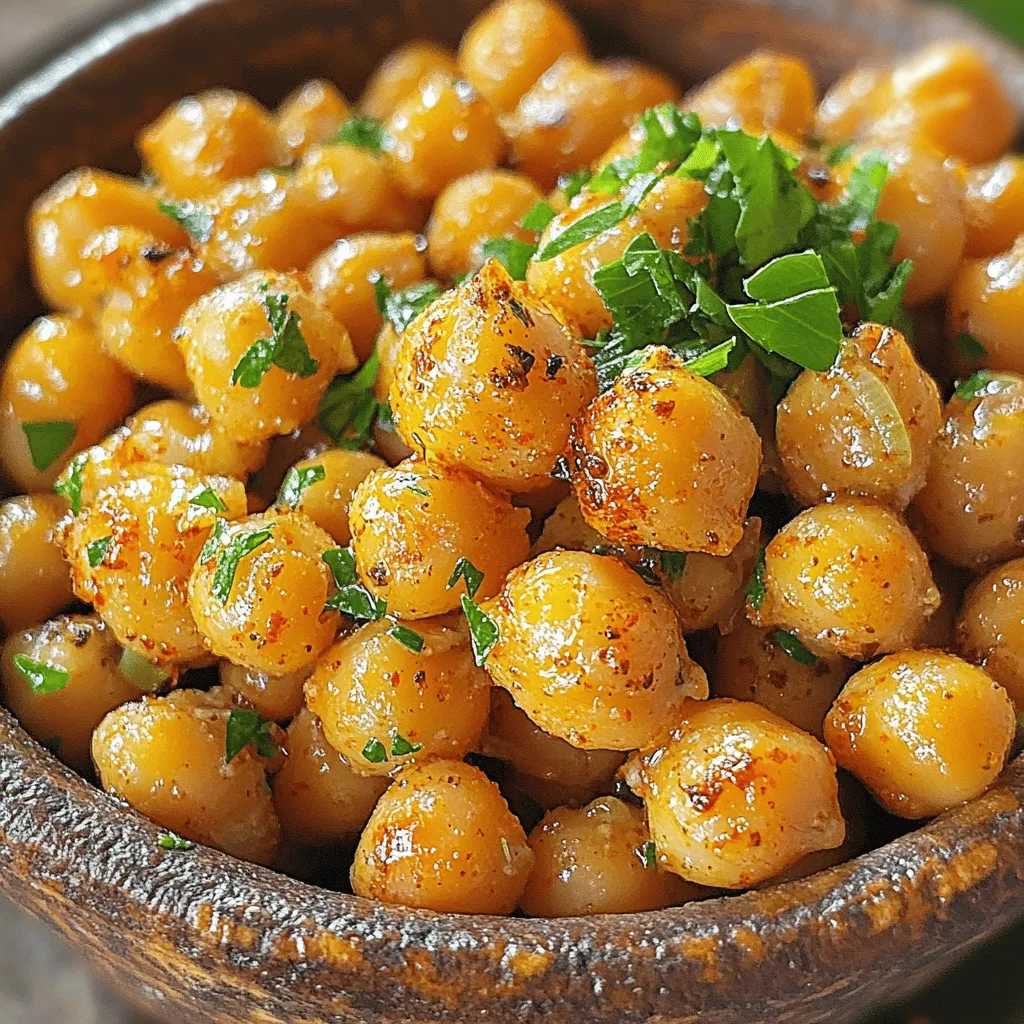
Looking for a tasty snack that’s both crunchy and flavorful? You’re in the right place! Garlic Herb Roasted Chickpeas are

To make this tasty Strawberry Coconut Chia Jam, you need just a few simple ingredients: - 2 cups fresh strawberries, hulled and halved - 1/4 cup coconut sugar (or regular sugar) - 1/4 cup unsweetened shredded coconut - 2 tablespoons chia seeds - 1 tablespoon lemon juice - Pinch of salt These ingredients blend together to create a sweet and fruity jam. The strawberries give a bright taste, while the coconut adds a nice texture. You can easily switch up some ingredients. If you don’t have coconut sugar, regular sugar works great. For the coconut, you could use coconut flakes for added crunch. You can also swap strawberries with other berries like raspberries or blueberries. This change gives the jam a new flavor. This jam is not just tasty; it's good for you too! Chia seeds pack a punch of fiber and omega-3 fatty acids. Strawberries add vitamins and antioxidants. Using coconut sugar instead of white sugar lowers the glycemic index, making it a better choice. Enjoying this jam can be a sweet treat without the guilt! Start by hulling and halving 2 cups of fresh strawberries. This step is key. Removing the green tops helps make the jam smooth. Place the strawberries in a medium saucepan. Add 1/4 cup of coconut sugar to the pan. This sugar adds sweetness and enhances the fruit's flavor. Cook the mixture over medium heat for about 5 to 7 minutes. Stir it occasionally. You want the strawberries to break down and release their juices. When they soften and become syrupy, you know you’re on the right track. After the strawberries are soft, use a fork or potato masher. Mash the fruit to your liking. Some like it smooth, while others prefer it chunky. Once you reach your desired consistency, add 1/4 cup of unsweetened shredded coconut and 2 tablespoons of chia seeds. The coconut gives a nice texture. The chia seeds help the jam set. Also, add 1 tablespoon of lemon juice and a pinch of salt. The lemon juice brightens the flavor, while salt balances the sweetness. Now, reduce the heat to low and let the mixture simmer for another 5 minutes. This allows the chia seeds to absorb the liquid and thicken the jam. Remove the saucepan from heat and let it cool for a few minutes. This cooling step helps the flavors meld together. Once it’s cooled, transfer the jam to a clean jar or airtight container. Allow it to cool completely at room temperature. For the best texture, refrigerate the jam for at least 1 hour before using. The chilling gives it that perfect spreadable texture. Now, you have a delicious Strawberry Coconut Chia Jam ready to enjoy! For more details, check the Full Recipe. To get the best texture for your jam, focus on the strawberries. When cooking them, stir gently to avoid burning. Use a fork or masher to break them down. If you want a smooth jam, mash thoroughly. For a chunkier feel, leave some pieces intact. The chia seeds will help thicken the jam as they absorb moisture. Let the jam sit for at least an hour in the fridge to reach its final thickness. You can boost the flavor with a few simple tricks. Adding lemon juice gives a bright taste. A pinch of salt balances the sweetness from the strawberries and sugar. If you want a tropical flair, add extra shredded coconut. You could also mix in a few drops of vanilla extract for a warm flavor. Experiment with spices like cinnamon or nutmeg for a cozy touch. Taste as you go and adjust until it’s just right. Enjoy your Strawberry Coconut Chia Jam in many ways. Spread it on warm toast or fresh bread for breakfast. It pairs well with pancakes or waffles too. Use it as a topping for yogurt or oatmeal. You can also swirl it into smoothies for a fruity treat. For a fun snack, serve it with cheese and crackers. The jam looks lovely in a glass jar, topped with whole strawberries and coconut. This adds a nice touch to your table. {{image_2}} You can mix in other fruits with strawberries. Try adding blueberries or raspberries for a berry blend. Peaches or mangoes give a tropical twist. Chop the fruit into small pieces before cooking. This helps them break down well. Each fruit adds its unique flavor, making your jam special. If you want to change the sweetener, use honey or maple syrup. These natural sweeteners work well and taste great. You can also use agave syrup for a vegan option. Adjust the amount based on how sweet you like it. Just remember that each sweetener has a different taste. Add extra flavors to make your jam pop! A splash of vanilla extract can enhance the taste. For a spicy kick, try a pinch of cinnamon or ginger. You can also add a few drops of almond extract. These flavors will give your jam a unique twist. Feel free to experiment and find your favorite mix! For the full recipe, check out the detailed instructions above. After making your jam, let it cool. Once it's cool, transfer it to a clean jar. Use an airtight container for the best results. Store it in the fridge. This keeps it fresh and tasty. Your Strawberry Coconut Chia Jam will last about one week in the fridge. Use it within this time for the best flavor. If you see any mold or changes, throw it away. Always check before you spread it on your toast! You can freeze your jam if you want to keep it longer. Pour the jam into freezer-safe containers. Leave some space at the top for expansion. It can last up to six months in the freezer. When you're ready to use it, thaw it in the fridge overnight. Enjoy your jam anytime! For the full recipe, check the section above. Yes, you can. But chia seeds help thicken the jam. If you skip them, the jam may be runny. You could try using ground flaxseeds instead. They work similarly as a thickener. Just remember, it may change the flavor a bit. You can change the sweetness easily. Add more coconut sugar if you want it sweeter. Start with a tablespoon at a time. If you prefer less sweetness, cut back on the sugar. You can also use honey or maple syrup for a different taste. Chia seeds offer many benefits. They are high in fiber, which helps digestion. They also provide healthy omega-3 fatty acids. These seeds can help you feel full longer. Plus, they absorb liquid and create a nice texture in the jam. You’ve learned all about making Strawberry Coconut Chia Jam. We covered essential ingredients, step-by-step instructions, and variations for great flavor. Nutritional highlights show this jam is not just tasty but healthy too. Remember to store it right for the best taste and freshness. Feel free to try new fruits or sweeteners to make it your own. This jam is fun to make and share! Enjoy your tasty creation!

Strawberry Coconut Chia Jam Tasty and Simple Recipe

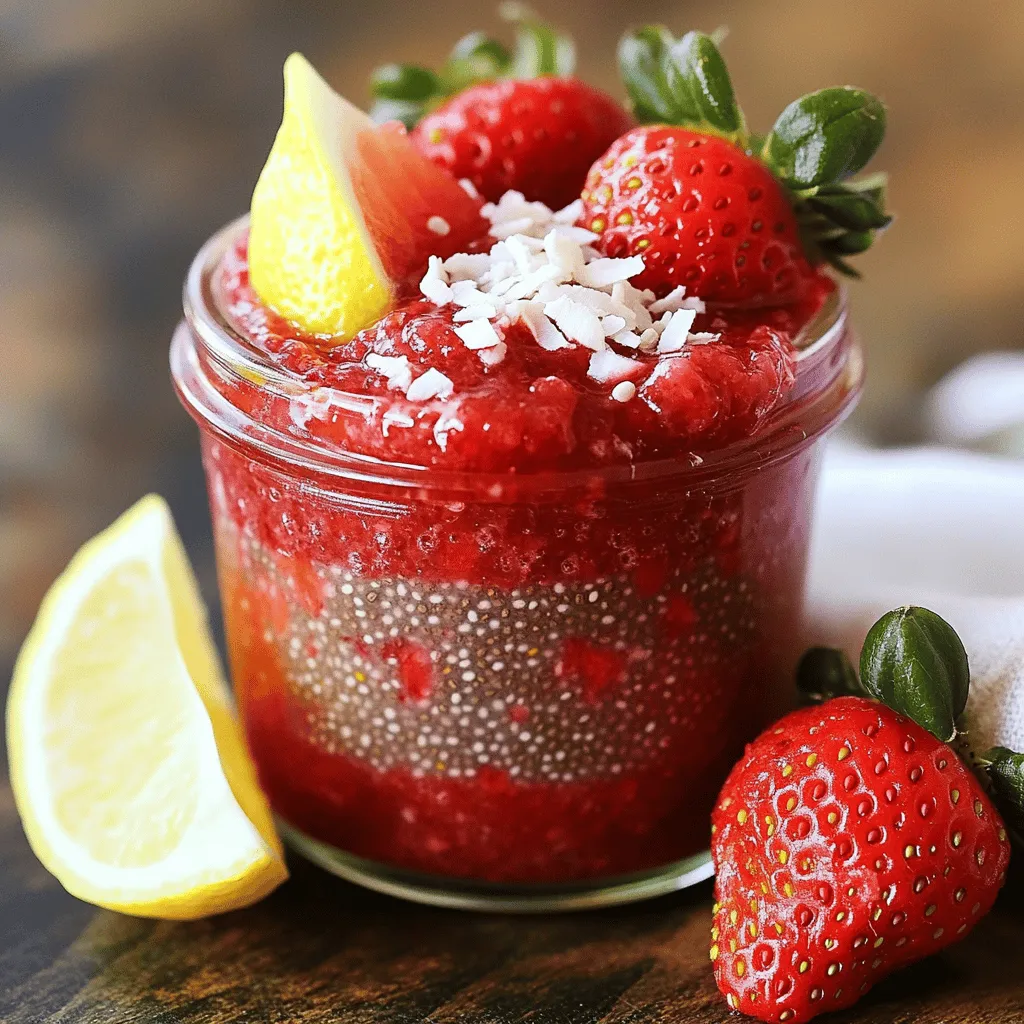
Ready to elevate your breakfast game? This Strawberry Coconut Chia Jam recipe is both tasty and super simple. With just

Older posts
Newer posts
← Previous Page1 … Page7 Page8 Page9 … Page54 Next →

dsad

© 2025 Lisa Dishes • Built with GeneratePress

Our Policies

  • Copyright Policy
  • Cookie Policy
  • GDPR Policy
  • Privacy Policy
  • Disclaimer
  • Terms Of Use

More Information

  • Home
  • About
  • Contact
  • Appetizers
  • Dessert
  • Dinner
  • Drinks
©2025, Lisa Dishes About Back To Top