![- 1 cup sushi rice - 8 oz sushi-grade tuna - 1 avocado, sliced - 1 small cucumber, julienned - 1 carrot, shredded - 2 tablespoons sesame seeds - 2 green onions, chopped The main ingredients create the heart of your spicy tuna sushi bowls. Sushi rice is key for that perfect texture. Sushi-grade tuna ensures freshness and safety. Fresh vegetables add color and crunch. - 1 tablespoon rice vinegar - 1 teaspoon sugar - ½ teaspoon salt These seasoning components give flavor to your rice. Rice vinegar adds a tangy taste. Sugar and salt balance the flavors and enhance the dish. - Seaweed sheets - Pickled ginger Optional add-ons can elevate your sushi bowls. Seaweed sheets are great for garnish. Pickled ginger offers a zesty kick and pairs well with the spicy tuna. For the full recipe, check the details above. To start, rinse the sushi rice under cold water. Keep rinsing until the water runs clear. This step removes excess starch. Next, drain the rice. In a medium saucepan, combine the rinsed rice and 1 ¼ cups of water. Bring it to a boil over medium heat. Once it starts to boil, reduce the heat to low. Cover the pot and let it simmer for 18 minutes. After cooking, remove the rice from heat. Let it sit, covered, for 10 minutes. Then, transfer the rice to a large bowl. For seasoning, mix 1 tablespoon rice vinegar, 1 teaspoon sugar, and ½ teaspoon salt in a small bowl. Stir until the sugar dissolves. Drizzle this mixture over the rice. Gently fold the rice to combine, being careful not to mash it. Let it cool to room temperature. In another bowl, take 8 oz of sushi-grade tuna, diced into small pieces. Add 2 tablespoons of sriracha and 1 tablespoon of mayonnaise. Kewpie mayonnaise adds a nice touch, but any mayo works. Mix everything well until the tuna is fully coated. If you want more heat, add extra sriracha to taste. This spicy tuna is the star of your sushi bowl. Now, it’s time to assemble! Divide the sushi rice evenly among your serving bowls. Top each bowl with a generous scoop of the spicy tuna mixture. Next, add sliced avocado, julienned cucumber, and shredded carrots. Finish off the bowls by sprinkling sesame seeds and chopped green onions on top. Serve with pickled ginger on the side. If you like, add a few strips of seaweed for garnish. Enjoy your Spicy Tuna Sushi Bowls! For the complete recipe, check out [Full Recipe]. Rinsing sushi rice is key. Start by placing your rice in a bowl and filling it with cold water. Swirl the rice gently. Drain the water when it turns cloudy. Repeat this until the water runs clear. This step helps remove excess starch and makes the rice less sticky. Timing is also important. Cook the rice for 18 minutes. After cooking, let it rest for 10 minutes. This resting time allows the rice to finish steaming. Fluff the rice gently with a fork after resting. Achieving the right texture for spicy tuna matters. Dice the sushi-grade tuna into small, even pieces. This helps it mix well with sauces. For the sauce, combine sriracha and mayonnaise in a bowl. Stir until the tuna is evenly coated. Taste it, and add more sriracha for extra heat if you like. You can explore alternative sauces too. Try adding a dash of soy sauce or sesame oil for a different flavor. Mixing in a bit of lime juice can also brighten the dish. Pair your spicy tuna sushi bowls with fresh ingredients. Slices of avocado, julienned cucumber, and shredded carrots work well. They add crunch and color. You can also serve them with pickled ginger on the side for a tangy kick. When it comes to presentation, arrange each component neatly. Use a wide bowl to showcase the layers. Sprinkle sesame seeds and chopped green onions on top for a pop of flavor and texture. If you like, add strips of seaweed for a nice touch. For the full recipe, check out the details above. {{image_2}} You can switch up the protein in your spicy tuna sushi bowls. Salmon is a fantastic choice. It offers a rich flavor and pairs well with the same sauces. If you prefer cooked options, shrimp works great too. Just boil or grill it before mixing it in. For those who want a vegetarian dish, try using marinated tofu. It adds a nice texture and absorbs flavors well. You can customize the flavor of your spicy tuna bowls easily. Adding different sauces gives you endless options. Try mixing in some soy sauce or ponzu for a tangy touch. If you like heat, incorporate chili oil or wasabi. You can also add vegetables to enhance the taste and crunch. Try thinly sliced radish or bell peppers for extra color and flavor. If you want to change the base of your bowl, there are great alternatives for sushi rice. Quinoa is a healthy option, packed with protein and fiber. It has a nutty flavor that pairs nicely with the toppings. Brown rice is another good choice; it’s hearty and full of nutrients. Just remember, both alternatives will change the texture and taste slightly, but they can still make a delicious dish. For the full recipe, check out the details above. Store any leftover spicy tuna sushi bowls in an airtight container. This keeps them fresh and tasty. The best temperature for storage is in the fridge. You should eat them within two days. After that, the fish may lose its quality. When you want to eat leftovers, it’s best to reheat only the rice. Place it in a microwave-safe bowl. Add a splash of water to keep it moist. Heat in short bursts of 30 seconds. Check often to avoid overcooking the rice. For toppings, enjoy them cold or at room temperature. This keeps the fresh taste. You can prepare some parts of the bowls in advance. Cook the sushi rice and store it in the fridge. Mix the spicy tuna but wait to add it until serving. Slice the avocado and cucumber just before you eat. This keeps everything fresh and bright in flavor. Assembling the bowls right before serving makes for a great meal. You can find the Full Recipe for all the details. To make Spicy Tuna Sushi Bowls, follow these basic steps: 1. Prepare the sushi rice: Rinse 1 cup of sushi rice in cold water until clear. Cook it with 1 ¼ cups of water until tender. 2. Season the rice: Mix 1 tablespoon of rice vinegar, 1 teaspoon of sugar, and ½ teaspoon of salt. Fold this into the cooked rice. 3. Make the spicy tuna: In a bowl, mix 8 oz of diced tuna with 2 tablespoons of sriracha and 1 tablespoon of mayonnaise. 4. Assemble the bowls: Place the seasoned rice in bowls, then top with spicy tuna, sliced avocado, julienned cucumber, and shredded carrots. 5. Garnish: Sprinkle sesame seeds and chopped green onions on top. Serve with pickled ginger. For the complete process, check the Full Recipe. If you don’t have sushi rice, you can use: - Short-grain rice: This rice is sticky and will work well. - Quinoa: It’s a healthy option with a nutty taste. - Brown rice: A heartier choice, though it will have a different texture. These options give a unique flavor and texture while keeping your dish fresh. Yes, eating raw tuna is safe if you use sushi-grade fish. Look for these indicators: - Freshness: It should smell like the ocean, not fishy. - Color: Bright red or deep pink indicates quality. - Source: Buy from trusted markets or fishmongers. Always ensure the tuna is handled properly to reduce any risks. Enjoy your sushi bowls with confidence! In this guide, I've covered how to create delicious spicy tuna sushi bowls. We started with the key ingredients like sushi rice and fresh tuna. Then, I shared steps for preparing the rice and mixing the spicy tuna. You learned tips to perfect your dish and variations to try. Ultimately, sushi bowls are fun and simple to make. You can customize them however you like, making each bowl unique. Enjoy experimenting with flavors and ingredients for a tasty meal!](https://lisadishes.com/wp-content/uploads/2025/06/f497bb4a-3bfd-45ce-bd59-a9cb208aa8a3.webp)
Spicy Tuna Sushi Bowls Flavorful and Fresh Delight
Welcome to my guide on Spicy Tuna Sushi Bowls! If you crave a fresh, flavorful dish that packs a punch,
Welcome to my guide on Spicy Tuna Sushi Bowls! If you crave a fresh, flavorful dish that packs a punch,
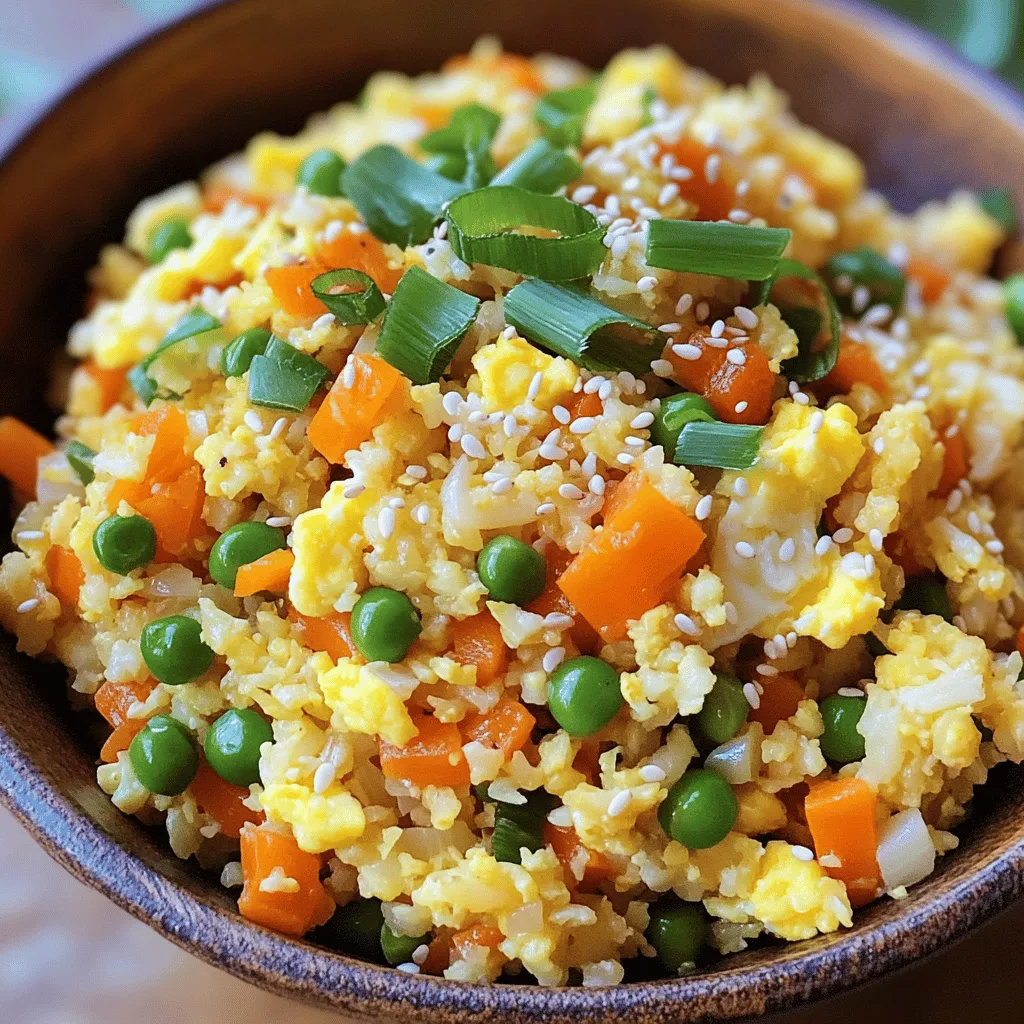
Looking for a tasty, health-friendly meal? Cauliflower fried rice is your answer! This easy recipe replaces traditional rice with cauliflower,
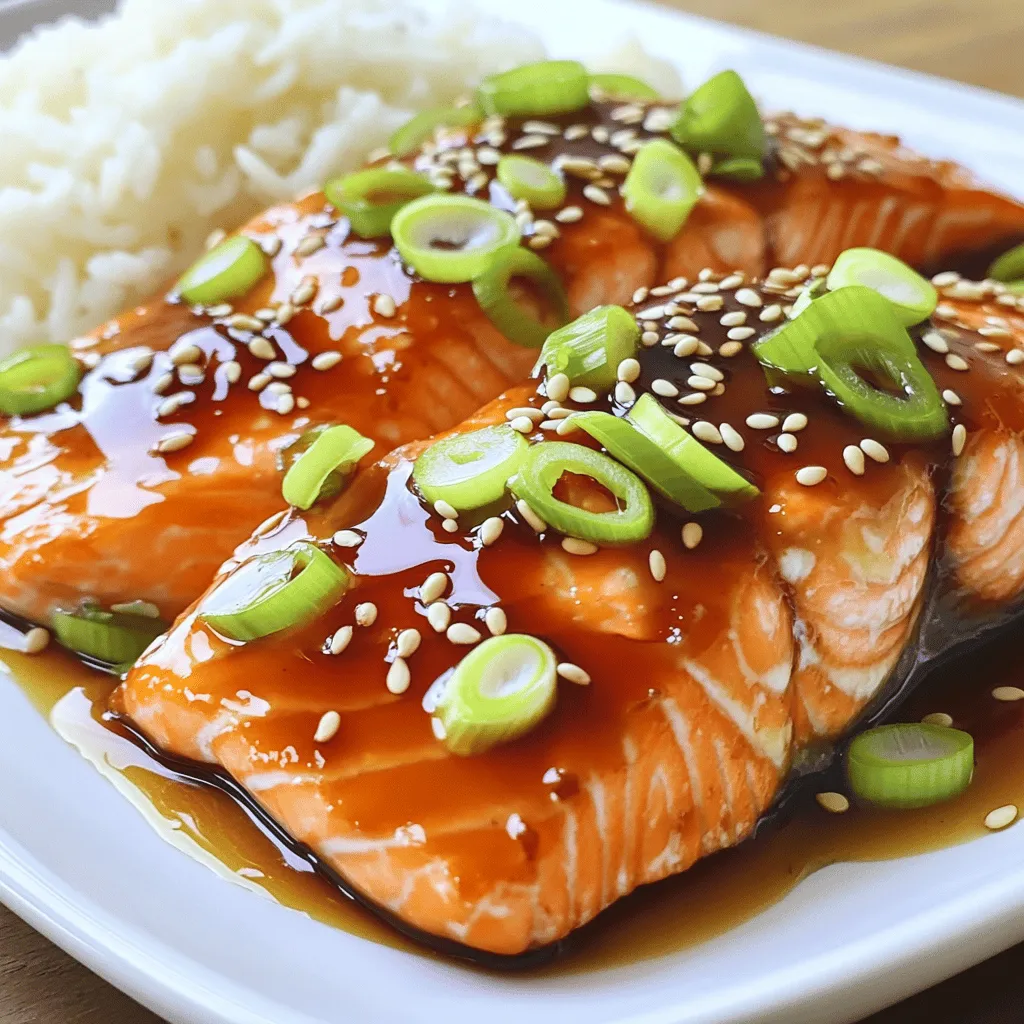
If you’re looking for a quick and tasty dinner, you’ve found it! This Easy Teriyaki Salmon recipe combines fresh salmon

Are you ready for a delicious treat that’s both flavorful and nutritious? In this post, I’ll show you how to
![- 2 ripe avocados - 300g spaghetti or pasta of choice - ¼ cup fresh basil leaves The main ingredients make this dish shine. You need ripe avocados for a creamy texture. Look for smooth, dark green skin. The spaghetti or your favorite pasta gives this dish a nice base. Fresh basil adds a burst of flavor that balances the creaminess. - Extra virgin olive oil - Fresh lemon juice - Garlic These pantry essentials bring your sauce to life. Extra virgin olive oil adds richness. Fresh lemon juice brightens the flavor. Garlic gives a warm, savory touch. Together, they create a smooth, vibrant sauce. - Salt and pepper - Red pepper flakes - Grated Parmesan cheese Seasonings are key to great taste. Salt and pepper enhance all the flavors. Red pepper flakes add a hint of heat if you like spice. Grated Parmesan cheese is optional but adds a savory kick. You can adjust these to suit your taste. For the complete recipe, check out the [Full Recipe]. To start, bring a large pot of salted water to a boil. I recommend using about one tablespoon of salt for every four quarts of water. This adds flavor to the pasta as it cooks. Once the water is boiling, add 300g of spaghetti. Cook the spaghetti according to the package instructions, usually about 8 to 10 minutes. You want it to be al dente, which means it should be firm to the bite. Remember to reserve 1 cup of the cooking water before you drain the pasta. This water helps to make your sauce creamy later. Next, it’s time to make the sauce. Take 2 ripe avocados, pitted and peeled, and place them in a blender. Add 2 tablespoons of fresh lemon juice, 3 tablespoons of extra virgin olive oil, 2 cloves of minced garlic, 1 teaspoon of salt, and ½ teaspoon of black pepper. If you like some heat, toss in ½ teaspoon of red pepper flakes. Blend this mixture until it is smooth and creamy. If the sauce seems too thick, gradually add some of the reserved pasta water until you reach the texture you want. Now, combine the cooked spaghetti with the avocado sauce. In a large mixing bowl, add the drained pasta and pour the creamy sauce over it. Toss everything together so the pasta is well coated. If it seems dry, add a bit more reserved pasta water. This keeps the dish creamy and delicious. Finally, gently fold in ¼ cup of chopped fresh basil leaves. Taste your dish and adjust the seasoning if needed. You can add more salt, pepper, or lemon juice to suit your taste. To make your avocado pasta super creamy, use reserved pasta water. When you cook the pasta, save a cup before draining. This water has starch that helps the sauce stick better. If your sauce is too thick, add some pasta water little by little. Blend your sauce well for a smooth finish. A high-speed blender or food processor works best. This helps break down all the ingredients into a silky sauce. Want more flavor? Add extra lemon juice to brighten the dish. It really lifts the whole meal! You can also use fresh herbs like parsley or cilantro for a twist. They add a nice touch and extra flavor. Consider mixing in some garlic powder or onion powder for more depth. Experiment with these flavors to find your favorite mix. This pasta pairs well with proteins like grilled chicken or shrimp. They add heartiness and make it a full meal. If you prefer plant-based options, try adding some sautéed tofu. For garnishing, use fresh basil or parsley on top. Halved cherry tomatoes look great and add freshness. A sprinkle of grated Parmesan cheese can take it up a notch, too. Enjoy your creamy avocado pasta! You can find the full recipe [here](#). {{image_2}} For a vegan version of creamy avocado pasta, skip the Parmesan cheese. The rest of the recipe remains the same. You still get rich flavor and creaminess from the avocados. This makes it a perfect choice for those who avoid animal products. If you need gluten-free options, use gluten-free pasta instead of regular spaghetti. Many brands offer great gluten-free choices that taste good. This way, everyone can enjoy this dish without worry. To make the dish heartier, add grilled chicken or shrimp. Cook the proteins separately and toss them in just before serving. This adds a nice touch and makes it more filling. If you want a vegetarian alternative, try adding tofu. You can grill or pan-fry it for some extra flavor. Dice it into small cubes and toss it in with the pasta. This keeps the meal healthy and satisfying. You can easily add spices like cumin or smoked paprika to the avocado sauce. These spices bring a new depth to the flavor. Just a pinch can make a big difference. Incorporating seasonal vegetables is another great way to vary the dish. Think of cherry tomatoes, spinach, or zucchini. These add color and nutrients, making your meal even better. Store your creamy avocado pasta in an airtight container. Glass or plastic containers both work well. You can keep it in the fridge for 2 to 3 days. The sooner you eat it, the better it tastes. To reheat, use a skillet over low heat. Stir often to avoid sogginess. Add a splash of reserved pasta water to keep the sauce creamy. You can also use the microwave, but do it in short bursts to prevent overcooking. Can creamy avocado pasta be frozen? Yes, but it may change texture. It’s best to freeze the sauce separately. Use a freezer-safe bag or container. When you’re ready to eat, thaw it in the fridge overnight. Then reheat and mix with freshly cooked pasta for the best taste. Making creamy avocado pasta is quick and easy. The prep time takes about 10 minutes. Cooking the pasta takes around 10 minutes more. So, in total, you only need about 20 minutes to make this dish. You can easily serve four people with this simple recipe. Yes, you can make creamy avocado pasta ahead of time. To keep it fresh, store the sauce and pasta separately. You can mix them when you are ready to eat. This way, the pasta won’t absorb the sauce. If you want to prep it for lunch, keep the sauce in an airtight container. It will stay fresh for up to two days in the fridge. If you don't have avocados, you can use several alternatives. For a creamy texture, try using silken tofu. Another option is to use cooked and pureed cauliflower. Both will give you a nice creaminess. You can also blend cooked white beans for a unique twist. Each of these options adds a different flavor but keeps the dish rich and smooth. This blog post covered the key ingredients and steps to make creamy avocado pasta. You learned about the main ingredients, cooking techniques, and tasty variations. We discussed tips for creaminess and storage options. Experimenting with flavors and textures will bring joy to your meals. Embrace creativity and enjoy every bite. Making this dish can be simple and fun. You can impress your friends and family. Happy cooking!](https://lisadishes.com/wp-content/uploads/2025/06/d2979b5f-2b98-4fb8-98b8-28612186a2ac.webp)
Are you ready to whip up a quick and delicious meal? Creamy avocado pasta is your answer. With just a
![To make a tasty spicy ramen noodle stir fry, gather these ingredients: - 2 packs of instant ramen noodles (discard the seasoning packets) - 2 tablespoons vegetable oil - 1 cup sliced bell peppers (red, yellow, and green for color) - 1 cup broccoli florets - 1 cup snap peas - 1 small red onion, thinly sliced - 2 cloves garlic, minced - 1 tablespoon ginger, grated - 2-3 tablespoons sriracha (adjust to taste) - 2 tablespoons soy sauce - 1 tablespoon sesame oil - 1 tablespoon honey (or maple syrup for vegan option) - 2 green onions, finely sliced - Sesame seeds for garnish You can swap some ingredients if needed. Here are a few ideas: - Use any type of noodle instead of ramen, like udon or soba. - If you can't find snap peas, try using green beans or zucchini. - For a gluten-free option, choose gluten-free soy sauce. - In place of honey, use agave syrup for a vegan choice. - Fresh herbs like cilantro or basil can add a new flavor twist. Fresh vegetables make your stir fry shine. Here are tips to pick the best: - Look for bright colors. Vibrant veggies taste better! - Choose firm bell peppers without soft spots. - Pick broccoli with tight florets that are deep green. - For snap peas, select ones that are crisp and bright. - Always check for freshness. Avoid wilting or yellowing leaves. You can find the Full Recipe for all the details on how to cook this delicious dish! To start, cook the ramen noodles. Boil water in a pot. Add the noodles and cook them for about 3-4 minutes. You want them tender but not mushy. Drain the noodles and set them aside. Next, heat vegetable oil in a large pan or wok over medium-high heat. Add the sliced red onion first. Sauté it for about 2-3 minutes until it softens. Then, add minced garlic and grated ginger. Stir for 30 seconds. This will make your kitchen smell amazing! Now, toss in the sliced bell peppers, broccoli florets, and snap peas. Stir-fry these veggies for 4-5 minutes. They should be bright and crisp. You want to keep that fresh taste! Once the veggies are ready, it's time to add flavor. Stir in the cooked ramen noodles. Then, add sriracha, soy sauce, sesame oil, and honey. Mix everything well. Make sure the noodles are coated in that tasty sauce. Cook for an extra 2-3 minutes. This helps all the flavors blend together. Finally, remove the pan from heat. Sprinkle with sliced green onions and sesame seeds. Serve your spicy ramen noodle stir fry hot. Enjoy your meal! For the full recipe, check out the earlier section. To make your dish really spicy, use more sriracha. Start with two tablespoons and taste. If you want more heat, add another tablespoon. You can also add chopped fresh chili peppers. Jalapeños or Thai bird chilies work well. Just be careful; they pack a punch! Another option is to add a sprinkle of chili flakes while cooking. They add great flavor along with the heat. Stir-frying is all about high heat and quick cooking. Use a large pan or wok to give your ingredients space. Heat the oil until it shimmers before adding food. This helps to sear the veggies quickly. Cut your vegetables into similar sizes for even cooking. Stir constantly to avoid burning. Keep an eye on the color; you want bright and crisp veggies. One common mistake is not prepping ingredients first. Always chop everything before cooking. This saves time and helps the dish cook evenly. Another mistake is overcrowding the pan. If you add too much at once, the food will steam instead of fry. Finally, don’t skip the sauces. They bring flavor and moisture to the noodles. Make sure to coat them well for the best taste. For the full recipe, check out the detailed steps above! {{image_2}} You can easily make this dish vegetarian or vegan. For a vegetarian option, just skip the meat. Use tofu or tempeh instead. Both add protein and texture. If you're vegan, replace honey with maple syrup. This keeps the sweetness while staying plant-based. You can also add more veggies like carrots, mushrooms, or spinach for extra flavor and nutrients. Adding protein boosts the dish's heartiness. For chicken, slice it thinly and cook it first. Once it's golden, remove it and set aside. Then, follow the steps to fry the veggies. For shrimp, add them when the veggies are almost done. They cook fast, so watch them closely. For tofu, press it to remove water. Cube it and cook until golden before adding the vegetables. Each protein offers a unique taste that enhances your stir fry. You can switch up the sauces to change the dish's flavor. Instead of sriracha, try chili paste or gochujang for a different kick. You can also add a splash of rice vinegar for tanginess. If you want a sweeter taste, use teriyaki sauce or hoisin sauce. Feel free to experiment with sauces to find your perfect blend. The [Full Recipe] offers a great base to start your flavor journey. To keep your spicy ramen noodle stir fry fresh, store it in an airtight container. This helps prevent moisture and keeps the flavors intact. Let the stir fry cool down before sealing the container. You can also divide it into smaller portions for easy meals later. When you're ready to eat, reheating is simple. Place your leftovers in a pan over medium heat. Add a splash of water or broth to help steam the noodles and veggies. Stir occasionally until everything is hot. You can also use the microwave. Heat in short bursts of 30 seconds, stirring in between. Your spicy ramen noodle stir fry can last in the fridge for up to three days. If you want to keep it longer, consider freezing it. In the freezer, it can stay fresh for up to two months. Just remember to thaw it overnight in the fridge before reheating. Enjoy your meal anytime! To reduce the heat, cut back on sriracha. Use one tablespoon instead of two. You can also add more honey to balance the flavor. Another option is to mix in some coconut milk. This will add creaminess and cut the spice. Yes, you can use any noodles you enjoy. Rice noodles or udon noodles work well. Just cook them according to package directions. If you want a gluten-free option, try rice noodles. This stir fry goes great with a side salad. A simple cucumber salad adds crunch. You can also serve it with spring rolls for a nice touch. For a heartier meal, pair it with grilled chicken or tofu. For the full recipe, check out the Spicy Ramen Noodle Stir Fry section. Enjoy your cooking! This blog post covered all you need for spicy ramen noodle stir fry. We detailed the ingredients, preparation steps, and tips for making it perfect. You learned about ingredient substitutions and how to choose fresh vegetables. Variations like vegetarian options and adding proteins were also shared. Finally, we discussed storage techniques to keep leftovers fresh. Now you can enjoy this dish in many ways. So grab your ingredients and start cooking. You’ll impress everyone with your delicious meal!](https://lisadishes.com/wp-content/uploads/2025/06/252411d5-7434-4586-8e52-a18cb7679fef.webp)
Get ready to spice up your dinner with my quick and tasty Spicy Ramen Noodle Stir Fry! This dish packs
![- 1 tablespoon olive oil - 1 medium onion, diced - 2 cloves garlic, minced - 2 medium carrots, diced - 2 celery stalks, diced - 6 cups low-sodium vegetable broth - 1 cup orzo pasta - 1 cup frozen peas - 1 lemon, zested and juiced - 1 teaspoon dried thyme - Salt and pepper to taste The ingredients for One-Pot Lemon Orzo Soup are simple yet impactful. Each item plays a role in building flavor. Olive oil gives a rich base. Onion and garlic add depth. Carrots and celery bring sweetness and crunch. The vegetable broth forms the soup's heart. It makes the dish warm and comforting. Orzo pasta cooks quickly and absorbs flavors. Frozen peas add a pop of color and nutrition. Lemon is the star here. Its zest and juice brighten the soup. Dried thyme adds an earthy note. Salt and pepper are key to enhancing all these tastes. - Calories per serving: About 200 - Key nutrients: Vitamin A, Vitamin C, Iron, and Fiber This soup is not just tasty; it's also healthy. Each serving packs vitamins and minerals. You gain nourishment with every spoonful. - Large pot - Cutting board - Knife To create this soup, you need basic tools. A large pot helps you cook everything in one place. A cutting board and knife are essential for chopping vegetables. Make sure you have these items ready. They help streamline your cooking process. Check out the Full Recipe for more details on how to prepare this meal! First, we must prepare the vegetables. Start by dicing 1 medium onion. Then, mince 2 cloves of garlic. Next, peel and dice 2 medium carrots. Finally, dice 2 celery stalks. This gives your soup a fresh base. Now, measure your ingredients. You will need 6 cups of low-sodium vegetable broth and 1 cup of orzo pasta. Also, grab 1 cup of frozen peas, 1 lemon for zest and juice, and 1 teaspoon of dried thyme. Don't forget salt and pepper for taste! Now, let’s cook! In a large pot, heat 1 tablespoon of olive oil over medium heat. Add the diced onion and sauté for about 3-4 minutes. You want them soft but not browned. Next, stir in the minced garlic, diced carrots, and celery. Cook these for about 5 minutes, until they are slightly tender. This step builds the flavor. Pour in the vegetable broth and bring it to a boil. Once boiling, add the orzo pasta. Cook according to the package instructions, about 8-10 minutes. Stir occasionally to keep the pasta from sticking. When the orzo is al dente, stir in the frozen peas, lemon zest, and lemon juice. Add the dried thyme at this stage. Cook for another 2-3 minutes until the peas heat through. Finally, season the soup with salt and pepper to your liking. Remove the pot from heat and let it sit for a few minutes. This allows the flavors to meld well. For the full recipe, be sure to check the recipe section! To make your One-Pot Lemon Orzo Soup even more tasty, add herbs and spices. Fresh herbs like basil or dill can brighten the soup. You can also try a pinch of red pepper flakes for a bit of heat. Adding lemon zest boosts the fresh lemon flavor. Just be careful to use only the yellow part of the peel. The white pith can taste bitter. If you love creamy soup, there are easy ways to add that texture. You can stir in heavy cream or half-and-half. For a lighter option, use plain Greek yogurt or coconut milk. These options give a nice creamy feel without overpowering the lemon taste. If you want to use different pasta types, adjust the cooking time. Smaller pasta shapes, like ditalini, cook faster. Larger shapes like shells may need extra time. Check the package for cooking instructions. If you live at high altitude, you might need to cook the soup a bit longer. Food takes more time to cook at higher altitudes, so keep an eye on it to avoid overcooking. For the Full Recipe, you can find detailed steps to create this wonderful dish. {{image_2}} You can add protein to your soup for extra nutrition. Chicken or shrimp work great. Simply cook them in the pot before adding the broth. For a vegetarian option, use beans like chickpeas or white beans. They add protein and fiber without meat. Feel free to change the vegetables based on what you have. Use seasonal veggies like zucchini, corn, or bell peppers. Leafy greens like spinach or kale can also be added near the end. They wilt nicely and boost the soup's nutrition. If you need gluten-free options, look for gluten-free orzo. This way, you can still enjoy the same texture. For a vegan version, swap vegetable broth for water and use a vegan-friendly seasoning. This makes the soup suitable for everyone. Explore the [Full Recipe] for more details on making this delicious dish! To store leftover soup, let it cool first. Transfer it to an airtight container. This keeps it fresh and flavorful. Store it in the fridge for up to three days. Make sure to label your container with the date. This helps you track how long it's been stored. You can freeze this soup for later. First, let it cool completely. Then, pour it into freezer-safe bags or containers. Remove as much air as possible before sealing. This helps prevent freezer burn. The soup will last in the freezer for about three months. When you're ready to enjoy it, thaw it overnight in the fridge. Reheat on the stove or in the microwave until hot. Pair this soup with warm, crusty bread for a full meal. A fresh side salad also works well. Try a simple green salad with a light vinaigrette. The bright flavors of the soup and salad complement each other nicely. For an added touch, serve with a sprinkle of fresh parsley on top. This adds color and freshness to your meal. For the full recipe, check out the detailed steps above. One-pot lemon orzo soup lasts about three to four days in the fridge. Keep it in an airtight container to maintain freshness. The flavors deepen over time, making it even tastier! Yes, you can make this soup ahead of time. Prepare it, let it cool, and store it in the fridge. Reheat before serving. This soup is perfect for meal prep. Absolutely! You can use any small pasta shapes you like. Just adjust the cooking time according to the package instructions. This makes the soup fun and versatile. This soup pairs well with several side dishes. Here are some ideas: - Crusty bread for dipping - A fresh garden salad - Grilled cheese sandwiches - Roasted vegetables These options enhance the meal and add variety to your table. For the full recipe, check the previous section! This blog post covered the ingredients, steps, tips, and variations for making one-pot lemon orzo soup. You can customize it with herbs, proteins, or veggies to suit your taste. I shared storage tips to keep your soup fresh too. Experiment, enjoy the cooking process, and find your favorite way to make this dish. Whether you serve it warm or cold, this soup can be a go-to for any meal. It’s simple, tasty, and perfect for any level of cook.](https://lisadishes.com/wp-content/uploads/2025/06/630e3a66-b9cb-43d6-9679-5423458858c1.webp)
Looking for a quick, tasty meal? This One-Pot Lemon Orzo Soup is fresh, flavorful, and simple to make. With just
![- 2 boneless, skinless chicken breasts - 1 tablespoon olive oil - Salt and pepper to taste - 1 cup cherry tomatoes, halved - 1 cup fresh basil leaves - 1 cup fresh mozzarella balls (bocconcini) - 1 tablespoon balsamic glaze - 1 teaspoon garlic powder - 1 tablespoon Italian seasoning When it comes to chicken, choose high-quality, fresh breasts. Look for organic or free-range options for better flavor and health benefits. Fresh mozzarella should be soft and moist. You want that creamy texture to melt beautifully. For tomatoes, pick bright, plump cherry tomatoes. They add sweetness and color to the dish. Fresh basil will give your meal that aromatic touch. Don't skip the balsamic glaze; it adds a sweet tang that lifts all the flavors. One serving of Chicken Caprese Skillet has about 400 calories. It provides 30 grams of protein, making it great for muscle health. Each serving has 25 grams of fat, mostly from olive oil and cheese. You also get vitamins from tomatoes and basil. This dish is rich in flavor without adding too many carbs, making it a balanced choice. For the full recipe, check [Full Recipe]. Start by getting your ingredients ready. You will need two boneless, skinless chicken breasts. Season them with salt, pepper, garlic powder, and Italian seasoning on both sides. This adds great flavor. Next, halve one cup of cherry tomatoes and set them aside. Also, gather one cup of fresh basil leaves and one cup of fresh mozzarella balls. These will give your dish its fresh taste. Heat one tablespoon of olive oil in a large skillet over medium-high heat. Once the oil is hot, add the seasoned chicken breasts. Cook them for about 5-7 minutes on each side. You want them golden brown and fully cooked, reaching an internal temperature of 165°F. Once cooked, take the chicken out and put it on a plate. In the same skillet, add the halved cherry tomatoes. Cook them for 2-3 minutes until they soften. Lower the heat and add the fresh mozzarella balls. Stir gently so the cheese can melt a bit. After that, return the chicken to the skillet and sprinkle the fresh basil on top. Drizzle with balsamic glaze for extra flavor. Cover the skillet for about 2 minutes. This helps all the flavors mix well and the cheese to melt fully. Serve your Chicken Caprese Skillet right away. You can serve it in the skillet for a nice rustic look. Add extra basil leaves and a splash of balsamic glaze on top. Enjoy it with some crusty bread to soak up those delicious juices! For a full recipe, check the link provided. Avoid overcooking the chicken. This makes it dry and tough. Cook until it reaches 165°F. Use a meat thermometer for best results. Don't forget to season your chicken well. A little salt, pepper, garlic powder, and Italian seasoning go a long way. Lastly, don’t skip the basil. It adds freshness and bright flavor. Add more herbs for extra depth. Fresh oregano or thyme pairs well with this dish. You can also mix in red pepper flakes for a kick. If you love tang, try a splash of lemon juice. It gives a nice balance to the rich mozzarella and olive oil. For a sweeter touch, drizzle in more balsamic glaze at the end. Timing is key for the best Chicken Caprese Skillet. Cook the chicken for 5-7 minutes on each side. When you add the tomatoes, keep an eye on them. They should soften but not turn mushy. When you add the mozzarella, let it melt just a bit. Cover the skillet for about 2 minutes. This melds the flavors nicely without overcooking. For the best taste, serve right away! For a detailed guide, check the Full Recipe. {{image_2}} You can swap out chicken for turkey or tofu. These options work well in this dish. If you want a twist, use zucchini or eggplant instead of chicken. For cheese, try goat cheese or feta. Both add a tangy flavor that pairs nicely with the tomatoes. You can also use balsamic vinegar if you don’t have glaze. It will still give that sweet and sour taste. You can bake the chicken in the oven instead of using a skillet. Preheat your oven to 400°F (200°C). Place the seasoned chicken on a baking dish, and bake for 20-25 minutes. You can also grill the chicken for a smoky flavor. Just cook on medium heat until the chicken reaches 165°F (75°C). Using a slow cooker is another great method. Cook on low for 4-6 hours for tender meat. Try adding different herbs to change the taste. You can use oregano or thyme for a new twist. For a spicy kick, add red pepper flakes or fresh chili. If you love sweet flavors, consider adding a sprinkle of brown sugar to the tomatoes. This can balance the acidity. For a Mediterranean vibe, add olives or artichokes to the dish. These will enhance the flavors and make the meal even more interesting. For the full recipe, check out the Chicken Caprese Skillet section earlier in the article. After cooking your Chicken Caprese Skillet, let it cool to room temp. Place it in an airtight container. Store it in the fridge for up to three days. Make sure to cover the dish well to keep it fresh. The flavors will meld together, making each bite even tastier. If you want to freeze the dish, let it cool completely first. Divide it into portions for easy thawing. Use freezer-safe containers or bags. Chicken Caprese Skillet can last in the freezer for up to three months. When you are ready to eat, thaw it in the fridge overnight before reheating. Reheating can be simple. Use the stove for best results. Heat a skillet on low and add a splash of water or broth. This will help keep the chicken moist. Stir gently as it warms up. You can also use the microwave. Place it in a microwave-safe dish and cover it. Heat in short bursts, stirring in between. Enjoy your meal hot and fresh! It takes about 25 minutes to make Chicken Caprese Skillet. You spend 10 minutes prepping the food. Cooking takes another 15 minutes. With quick steps, you can enjoy a tasty meal fast. Yes, you can use frozen chicken. However, you need to thaw it first. It’s best to let it sit in the fridge overnight. If you’re in a rush, you can use cold water to thaw it. After thawing, season and cook it just like fresh chicken. You can serve Chicken Caprese Skillet with crusty bread or a fresh salad. The bread helps soak up the tasty sauce. A side salad adds a nice crunch and bright flavor. This combo makes your meal even better and more balanced. For the full recipe, check out the section above. This blog post covered all you need for Chicken Caprese Skillet. We explored ingredients, quality, and nutrition. Step-by-step instructions made the cooking easy and clear. Tips helped avoid common mistakes and enhanced flavor. Variations showed how to customize the dish for your taste. Storage advice ensures your leftovers stay fresh. Enjoy making this recipe and having fun in the kitchen. The more you cook, the better you'll get!](https://lisadishes.com/wp-content/uploads/2025/06/07da6db1-9718-4314-9207-cee9f0d49e89.webp)
Welcome to my kitchen! Today, I’m excited to share a simple and tasty Chicken Caprese Skillet recipe. This dish is
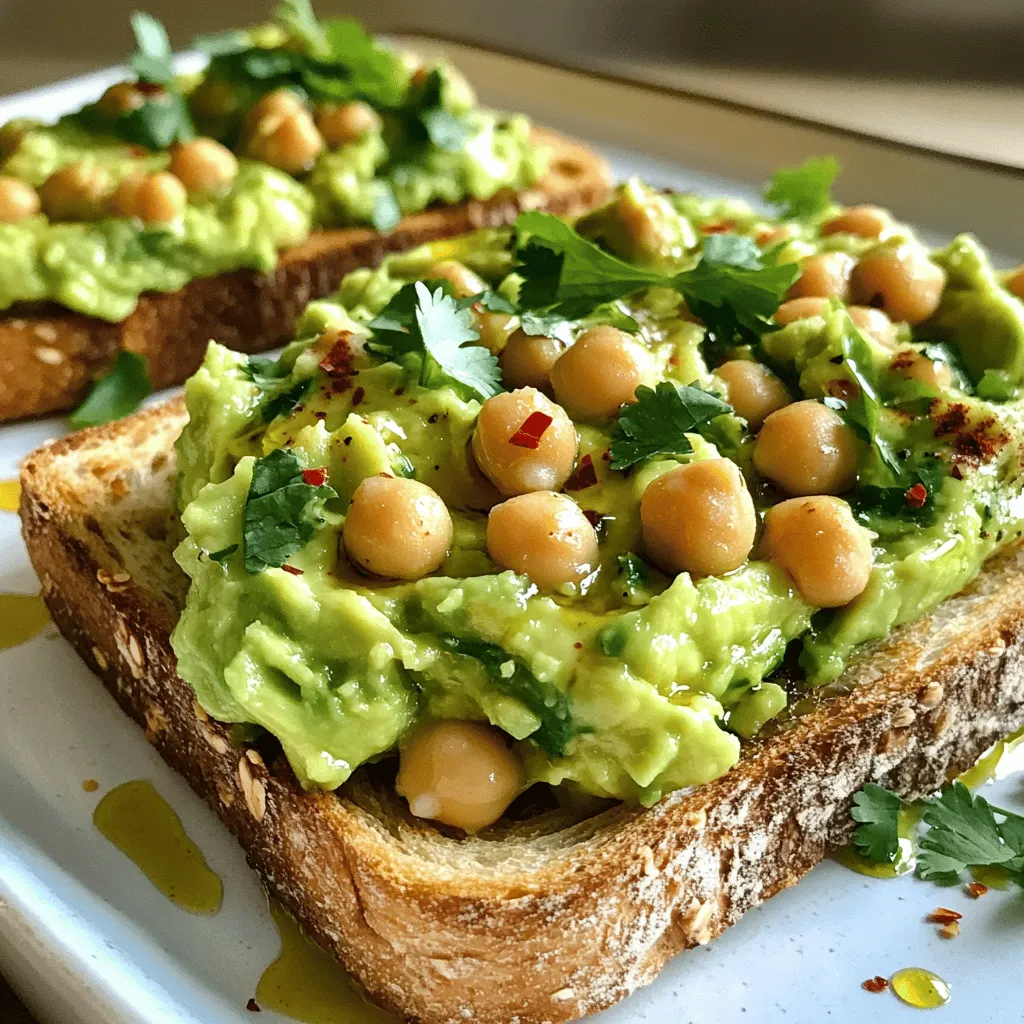
Get ready to elevate your breakfast with my easy Chickpea Avocado Smash Toast! This simple recipe blends creamy avocados and

If you’re craving breakfast that bursts with flavor, you’ve landed in the right spot! Lemon ricotta pancakes offer a fresh,
