![- 1 medium head of cauliflower, riced - 1 tablespoon olive oil - 1 teaspoon cumin - 1 teaspoon smoked paprika - 1 bell pepper, diced (any color) - 1 small red onion, diced - 1 zucchini, diced - 1 cup cherry tomatoes, halved - 1 cup chickpeas, drained and rinsed - 2 tablespoons tahini - 2 tablespoons lemon juice - Salt and pepper to taste - Fresh parsley, chopped, for garnish The main star of this dish is the riced cauliflower. It gives a light and fluffy base. I love how it soaks up flavors from spices and veggies. The olive oil adds a nice richness and helps the spices stick. Spices like cumin and smoked paprika bring warmth and depth. Next, we add colorful vegetables. Bell peppers add crunch and sweetness. Red onion gives a sharp, savory taste. Zucchini adds a nice texture. Cherry tomatoes burst with juicy flavor. The chickpeas provide protein and a satisfying bite. Finally, the tahini dressing ties everything together. It adds creaminess and tang. A squeeze of lemon juice brightens the dish. This bowl is not just healthy; it's a feast for the senses. You can find the Full Recipe above for this vibrant cauliflower rice bowl. Enjoy your cooking! First, take your medium head of cauliflower. Remove the outer leaves and stem. Cut it into small florets. Now, you can rice the cauliflower using a food processor. Pulse the florets until they look like grains of rice. If you don’t have a food processor, use a box grater to achieve the same effect. Next, heat one tablespoon of olive oil in a large skillet over medium heat. Add the diced red onion and bell pepper. Sauté for about five minutes. You want them to soften a bit before adding more ingredients. Now it's time to add some flavor. Stir in one teaspoon of cumin and one teaspoon of smoked paprika. Cook for another minute. This step toasts the spices and brings out their taste. After that, add the diced zucchini. Cook it for three to four minutes. You want the zucchini to become tender but not mushy. Once that's done, add your riced cauliflower and one cup of drained and rinsed chickpeas. Remember to season with salt and pepper. Stir well and cook for about five to six minutes. The cauliflower should be tender by now. While your cauliflower mix cooks, let’s make the tahini dressing. In a small bowl, whisk together two tablespoons of tahini and two tablespoons of lemon juice. If the dressing is too thick, add a little water. Stir until you reach your desired consistency. Once the cauliflower rice is ready, remove it from the heat. Stir in one cup of halved cherry tomatoes. This adds freshness to the dish. Now, you can spoon the cauliflower rice mixture into bowls. Drizzle with the tahini dressing and garnish with chopped parsley for a burst of flavor. For the full recipe, check [Full Recipe]. Enjoy your tasty and colorful cauliflower rice bowl! To avoid mushy cauliflower rice, start with fresh cauliflower. When you rice it, aim for small, even pieces. If the pieces are too small, they may turn mushy. Cook the cauliflower on medium heat, not high. Stir it gently, and make sure it cooks evenly. This helps maintain a nice, firm texture. Want more flavor? Try adding spices like garlic powder or chili flakes. Fresh herbs like cilantro or basil can also add great taste. If you prefer a different dressing, consider yogurt or balsamic vinaigrette. Both can make your bowl pop with flavor. Preparing ingredients ahead saves time. You can rice the cauliflower and chop veggies in advance. Store them in airtight containers in the fridge. For cooked cauliflower rice, let it cool before storing it. Keep it in the fridge for up to four days. This way, you’ll always have a quick meal option ready. Check out the Full Recipe for a delicious way to enjoy your bowl! {{image_2}} You can change up your cauliflower rice bowl with fresh veggies. Use seasonal vegetables like carrots, peas, or broccoli. These add color and flavor. Try adding creamy avocado or bright spinach for a fun twist. Both can make your meal richer and more filling. Explore different proteins to enhance your dish. You can use grilled chicken, shrimp, or steak for a meat option. If you prefer plant-based proteins, chickpeas are a great choice. Other options include tofu or tempeh. These can give your bowl a hearty texture and boost nutrition. Add crunch with nut and seed toppings. Try almonds, sunflower seeds, or pumpkin seeds for extra texture. Don't forget about sauces! A drizzle of soy sauce, sriracha, or homemade pesto can add a burst of flavor. You can also layer in fresh herbs like cilantro or basil for an extra pop. Check out the Full Recipe for more ideas! To store your cauliflower rice bowl leftovers, let it cool first. Place the rice in an airtight container. It keeps well in the fridge for up to four days. When you want to reheat, scoop out a serving. Use a microwave or a skillet on low heat. Stir occasionally to heat evenly. Add a splash of water if it feels dry. Freezing cooked cauliflower rice is simple. First, let it cool completely. Then, portion it into freezer-safe bags or containers. Remove as much air as you can before sealing. Label the bags with the date. It can last for up to three months in the freezer. To thaw, move the cauliflower rice to the fridge overnight. You can also thaw it in the microwave. Just use the defrost setting for a few minutes. When ready to use, heat it in a skillet or microwave until hot. Enjoy it in your next meal! Cauliflower rice is simply cauliflower that you chop into small pieces. It looks like rice but is lower in carbs. This veggie is packed with vitamins C and K. It also has fiber, which helps with digestion. Plus, cauliflower rice is gluten-free and great for weight loss. You can use it in many dishes. It makes a healthy base for meals, adding flavor and nutrients without extra calories. Yes, you can use frozen cauliflower rice. Frozen rice is convenient and saves time. It’s already cut, so you don't need to rice it yourself. However, it may have extra moisture. This can make your dish a bit watery. If you use frozen, make sure to thaw it first and squeeze out excess water. This helps keep your bowl from getting soggy. To boost flavor, try these tips: - Add fresh herbs like cilantro or parsley for a burst of taste. - Use spices like garlic powder or red pepper flakes for heat. - Drizzle with lemon juice or vinegar for a zingy kick. - Top with crunchy seeds or nuts for texture. - Serve with a tasty sauce, like tahini or yogurt, for added richness. These simple changes can make your cauliflower rice bowl shine. For the full recipe, check out the delicious steps above. In this blog post, we've explored how to create a delicious cauliflower rice bowl. You learned about the main ingredients, like riced cauliflower and chickpeas, and how to prepare them step by step. We also covered tips for perfect texture, flavor enhancements, and meal prep ideas. Finally, we shared variations to keep your meals fresh and exciting. Your cauliflower rice bowl can be a tasty, healthy meal with endless options. Try different veggies and proteins. Enjoy experimenting with flavors and toppings for your next bowl!](https://lisadishes.com/wp-content/uploads/2025/04/74f7867e-751c-4b0d-86d5-2638b3324b4f.webp)
Cauliflower Rice Bowl Packed with Flavorful Veggies
Are you ready to spice up your meals with a fun and healthy twist? My Cauliflower Rice Bowl is packed
Are you ready to spice up your meals with a fun and healthy twist? My Cauliflower Rice Bowl is packed
![To make Garlic Butter Chicken, gather these simple and fresh ingredients: - 4 boneless, skinless chicken breasts - 4 tablespoons unsalted butter - 6 cloves garlic, minced - 1 teaspoon dried thyme - 1 teaspoon dried oregano - 1 teaspoon paprika - Salt and pepper to taste - 1/2 cup chicken broth - 1 lemon, juiced - Fresh parsley, finely chopped (for garnish) Each ingredient plays a role in creating the rich and savory flavor of this dish. The chicken breasts serve as the protein base. Butter adds creaminess, while garlic delivers that bold aroma. The dried herbs bring depth and warmth. Chicken broth and lemon juice enhance the sauce's taste. Finally, parsley adds a bright touch, making your dish visually appealing. If you want to make it even better, you can adjust the seasoning to match your taste. For a twist, try adding a pinch of chili flakes for some heat or fresh herbs for a different aroma. This recipe is versatile, so feel free to experiment! For the full recipe, check out the detailed steps to bring this dish to life. First, you need to dry the chicken breasts. Use paper towels to pat them dry. This step helps the chicken sear well. Next, season both sides. Use salt, pepper, dried thyme, oregano, and paprika. The spices add a lot of flavor. You can adjust the amount based on your taste. For more zest, add a pinch of cayenne pepper. Get a large skillet and set it over medium-high heat. Melt 2 tablespoons of butter. When the butter is hot, add the seasoned chicken. Let it sear for about 5-6 minutes on each side. You want a golden brown color. Make sure the chicken is cooked through. The internal temperature should reach 165°F. Use a meat thermometer for accuracy. Once cooked, remove the chicken and set it aside. In the same skillet, add the rest of the butter. Once it melts, add minced garlic. Sauté the garlic for 1-2 minutes. You'll know it's ready when it smells amazing. Be careful not to burn the garlic. Burnt garlic can ruin the sauce. If it starts to brown too quickly, lower the heat. Now, it's time to deglaze the pan. Pour in the chicken broth and lemon juice. Scrape up any browned bits from the bottom. These bits are full of flavor. Let it simmer for 2-3 minutes. This helps thicken the sauce. Then, return the seared chicken to the skillet. Spoon the garlic butter sauce over it. Cook on low for an extra 2-3 minutes. This allows the chicken to soak in all the flavors. When ready to serve, plate the chicken. Drizzle any remaining garlic butter sauce over the top. It adds a nice touch. For a pop of color, garnish with chopped parsley. Pair this dish with rice or steamed veggies for a complete meal. A side salad also works well. Enjoy your Garlic Butter Chicken! For the full recipe, check out the rest of the article. Selecting the right chicken breasts is key. Look for fresh, plump, and pale chicken. Avoid any that have dark spots or an off smell. Fresh chicken ensures great flavor and texture. Adjusting seasoning is also important. I recommend tasting the sauce before serving. If you want more flavor, add a pinch of salt or some fresh herbs. You can also try adding a sprinkle of red pepper flakes for heat. One big mistake is overcooking the chicken. Chicken should be juicy and tender. Cook until it reaches 165°F (75°C). Use a meat thermometer for accuracy. It’s worth it! Another common issue is burning garlic. Garlic cooks quickly and can turn bitter. Always sauté it over medium heat and watch it closely. You want it fragrant, not burnt! To boost flavor, consider adding herbs like rosemary or basil. Fresh herbs can add brightness. You can also mix in some lemon zest for a fresh twist. For deglazing, try using white wine or apple cider vinegar instead of chicken broth. These options can add depth to your sauce. Each choice brings a unique flavor profile to the dish. If you want the full recipe, check out the [Full Recipe] for all the details. {{image_2}} You can boost the flavor of garlic butter chicken by adding vegetables. Good choices include: - Broccoli - Bell peppers - Asparagus - Spinach To add these, chop them into bite-sized pieces. Add them to the skillet after cooking the chicken for about 3-4 minutes. This way, they cook but stay crisp. Adjust cooking times based on the vegetable. For softer veggies, add them earlier. For firmer ones, like bell peppers, add them closer to the end. Fresh herbs can brighten your dish. Use them for a fresh taste. Try these combinations: - Thyme and rosemary - Basil and parsley - Oregano and sage If you use fresh herbs, add them at the end of cooking. This keeps their flavor strong. Dried herbs can go in earlier with the chicken. They need time to release their flavor. You can make garlic butter chicken fit many diets. For a gluten-free version, check the chicken broth. Some brands add gluten. Use a gluten-free broth. For a dairy-free option, swap butter with olive oil or vegan butter. The flavor will change, but it will still taste great. You can also use coconut oil for a different twist. For the full recipe, you can refer to the Garlic Butter Chicken Delight. To keep your garlic butter chicken fresh, cool it first. Place it in an airtight container. This helps keep out air and moisture. I recommend using glass or BPA-free plastic containers. Label the container with the date. This way, you can track how long it stays fresh. When reheating, aim for gentle heat to keep the chicken moist. The best method is on the stove. Add a splash of chicken broth to the pan. Cover it with a lid to trap steam. This keeps the chicken from drying out. If using the microwave, place the chicken on a microwave-safe plate. Cover it loosely with a damp paper towel. Heat in short bursts of 30 seconds, checking often. To freeze, let the chicken cool completely. Cut it into pieces for quicker thawing. Wrap each piece tightly in plastic wrap. Place the wrapped pieces in a freezer bag. Squeeze out as much air as you can. For thawing, move the chicken to the fridge overnight. Reheat it gently as mentioned before. This way, your garlic butter chicken stays tasty and tender. For the full recipe, check the section above. You can serve Garlic Butter Chicken with various sides. Here are some great options: - Steamed broccoli or green beans - Mashed potatoes or rice - A fresh garden salad - Roasted vegetables like carrots or zucchini - Crusty bread for dipping in the sauce These sides balance the rich flavors of the chicken. They add color and nutrition to your meal. To check if chicken is cooked, you should use a meat thermometer. The internal temperature should reach 165°F (75°C). This ensures the chicken is safe to eat. If you don’t have a thermometer, cut the chicken. The meat should be white, not pink. Juices should run clear, not red. Yes, you can make Garlic Butter Chicken ahead of time. Cook the chicken and store it in the fridge. It keeps well for up to three days. To enhance flavor, let it marinate in the sauce overnight. Reheat it gently on the stove or in the microwave before serving. You can change this recipe in many ways. Here are some ideas: - Use turkey or pork instead of chicken. - Try different herbs like rosemary or basil. - Swap lemon juice for lime juice for a twist. - Add a splash of white wine to the sauce for depth. These swaps can keep the dish exciting. Yes, you can adjust this recipe for special diets: - For gluten-free, use gluten-free broth and check labels on butter. - To make it dairy-free, replace butter with olive oil or a dairy-free substitute. - If you're on a low-carb diet, serve it with cauliflower rice instead of regular rice. These changes make the dish fit various dietary needs while keeping it delicious. In this post, we explored a delicious garlic butter chicken recipe. You learned about the key ingredients, step-by-step cooking methods, and tips for perfecting your dish. I shared ways to enhance flavors, avoid common mistakes, and suggested variations for different diets. Remember, cooking is about experimenting and enjoying your meal. Don't hesitate to try new elements and find what works best for you. You can create a fantastic meal that everyone will love. Happy cooking!](https://lisadishes.com/wp-content/uploads/2025/04/19b819d4-7d57-4f57-b44f-390a343be1c3.webp)
If you’re looking for a dish that packs a punch with flavor but is simple to make, look no further!
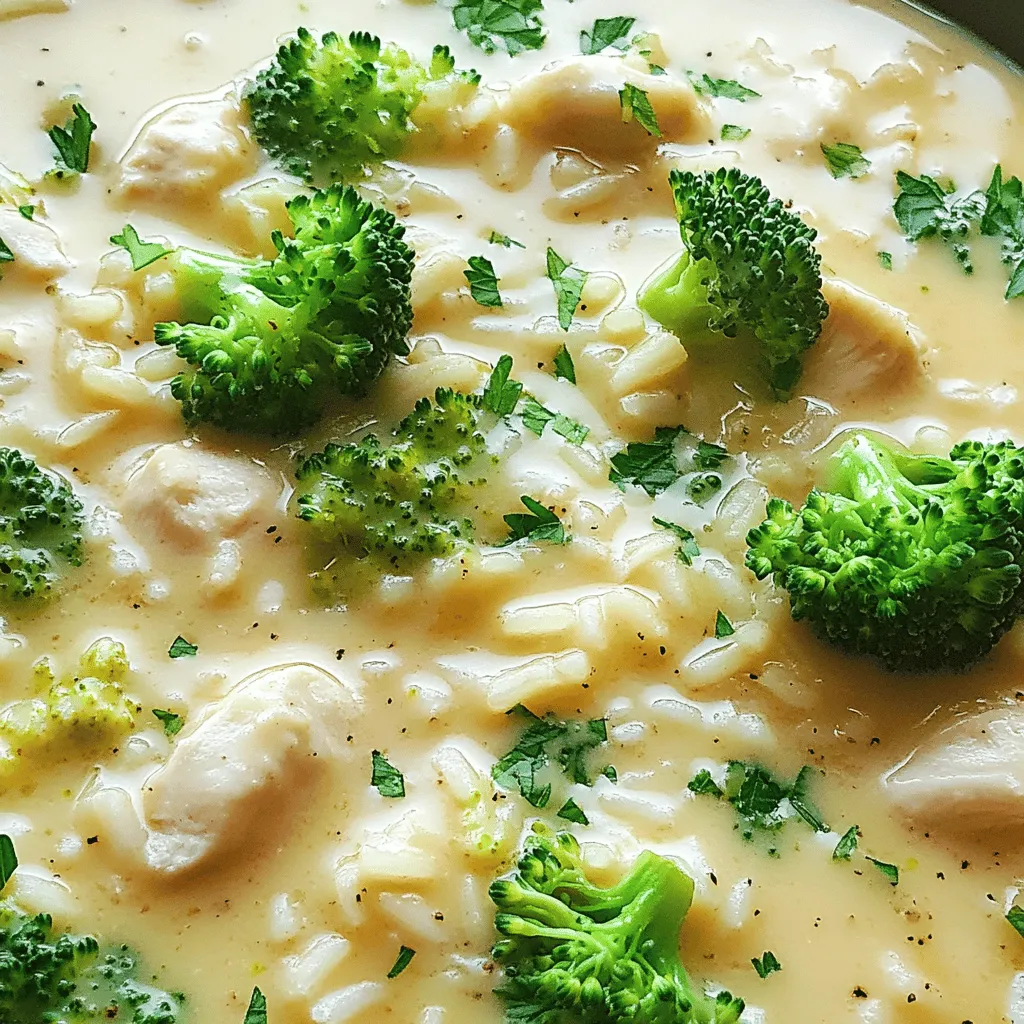
Are you craving something warm and comforting? Look no further! I’m excited to share my Creamy Chicken and Rice recipe.
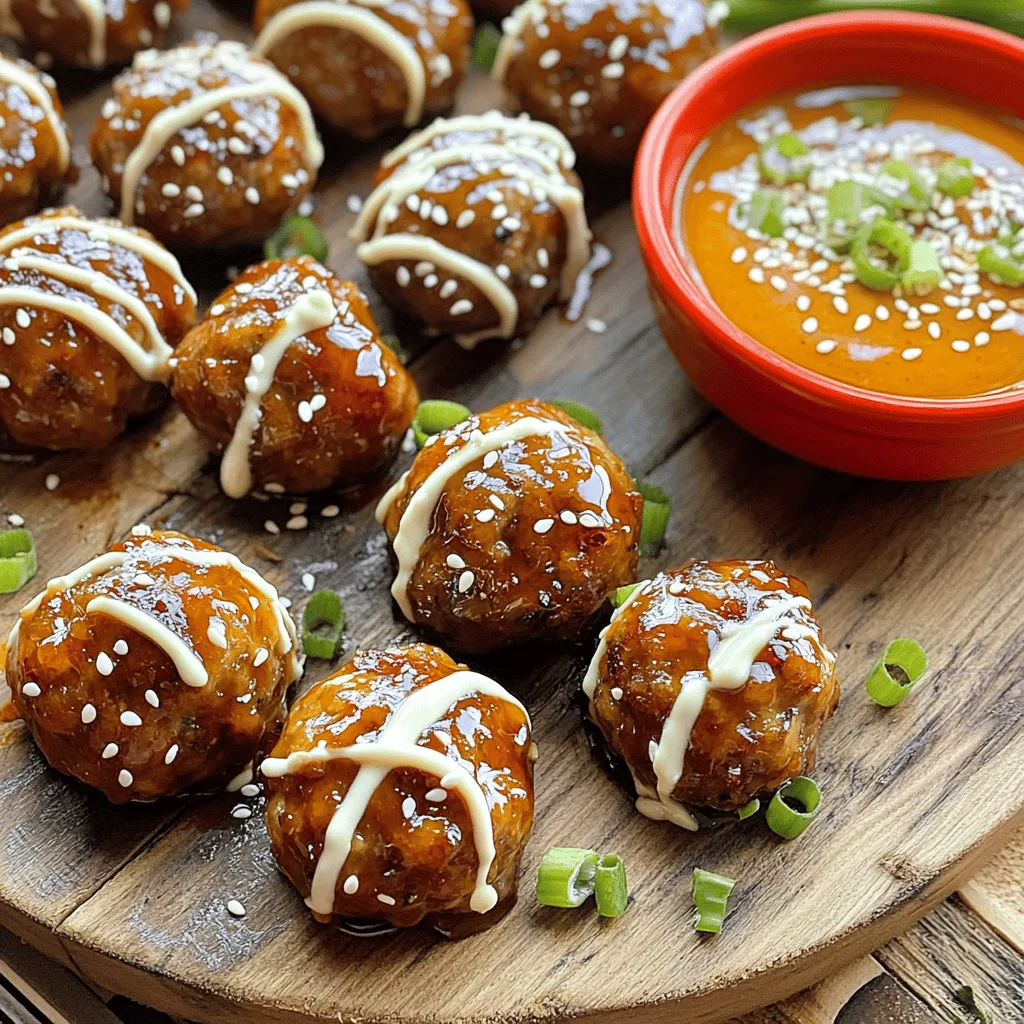
Ready to wow your taste buds? In this post, I’ll guide you through making Korean BBQ Meatballs with Spicy Mayo.

Get ready to impress your friends and family with the ultimate S’mores Cookies recipe! I’ll guide you step-by-step to create
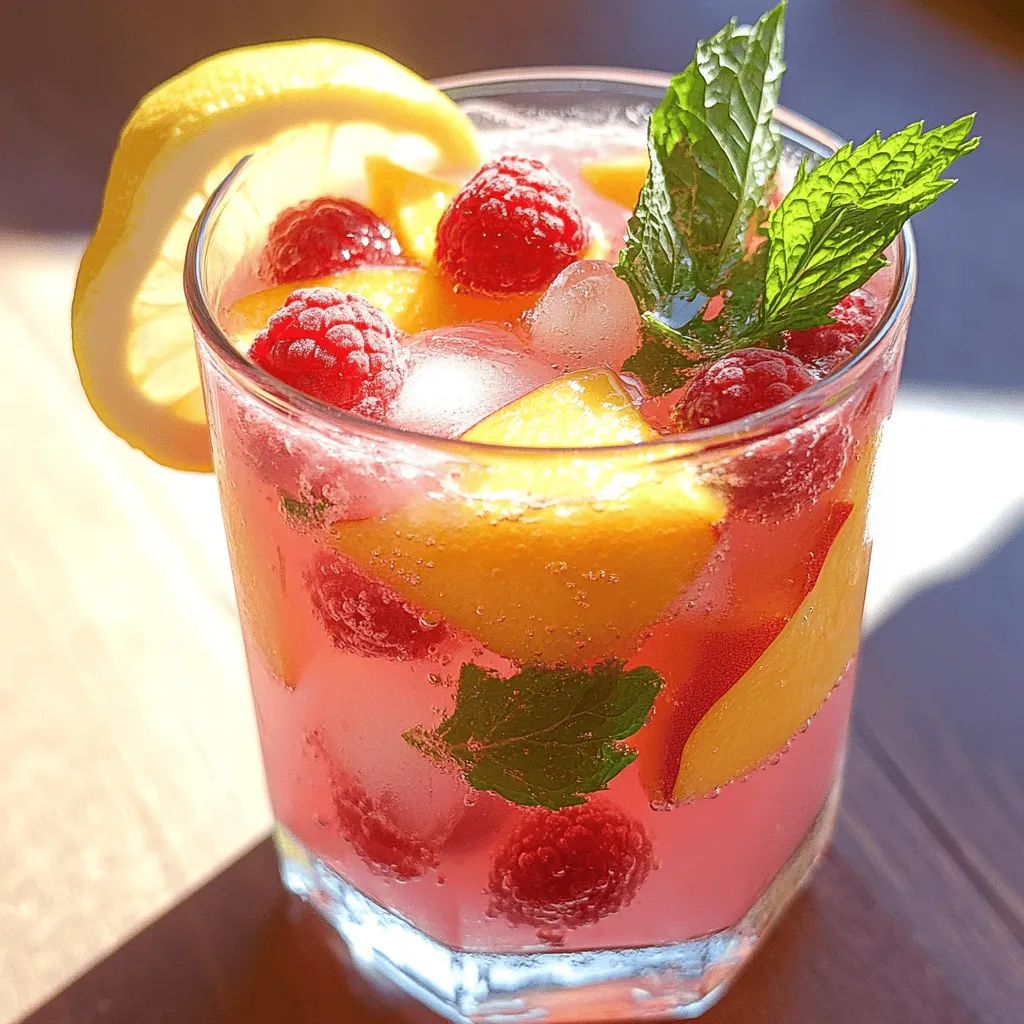
Looking for a drink that’s both refreshing and fruity? You’ve found it! Raspberry Peach Lemonade packs a punch with its
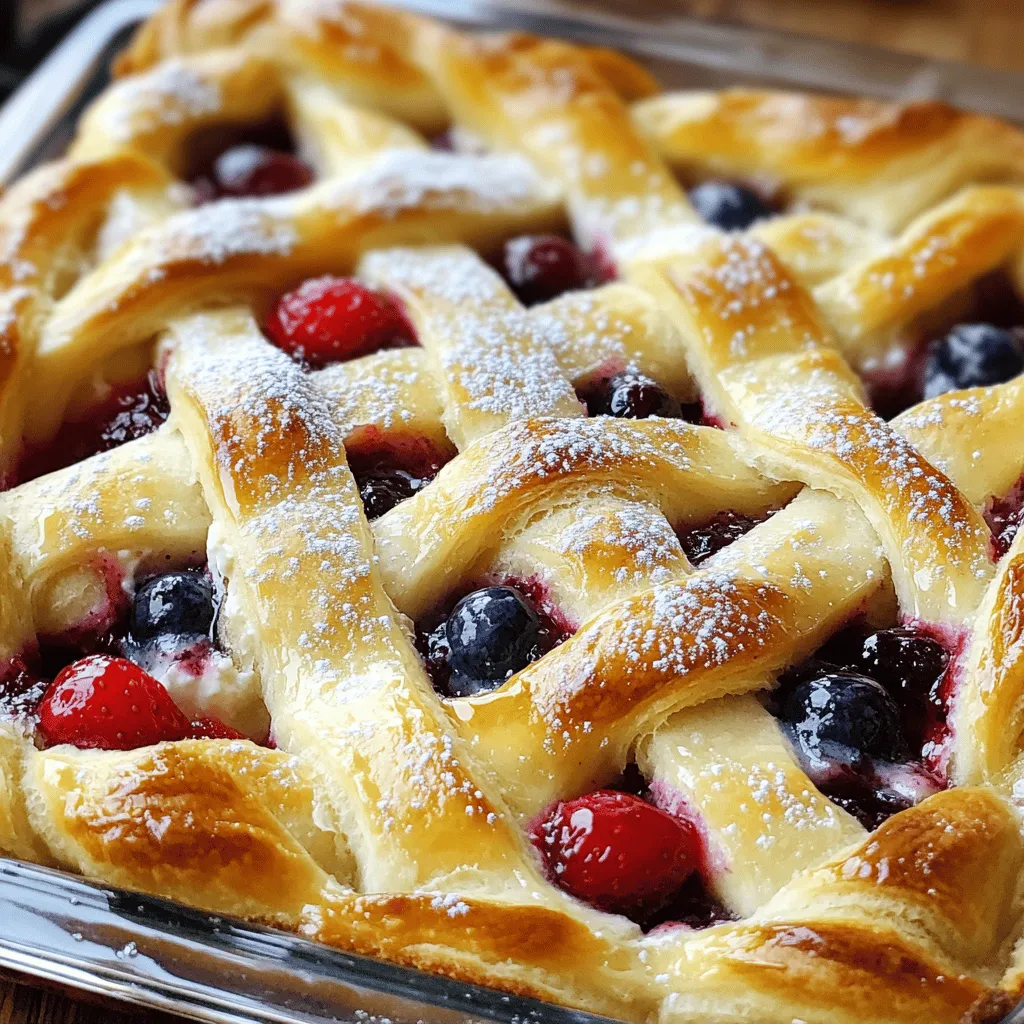
Are you ready to dive into a sweet treat that’s simple and oh-so-delicious? This Cheesecake Crescent Rolls Casserole Creamy Delight
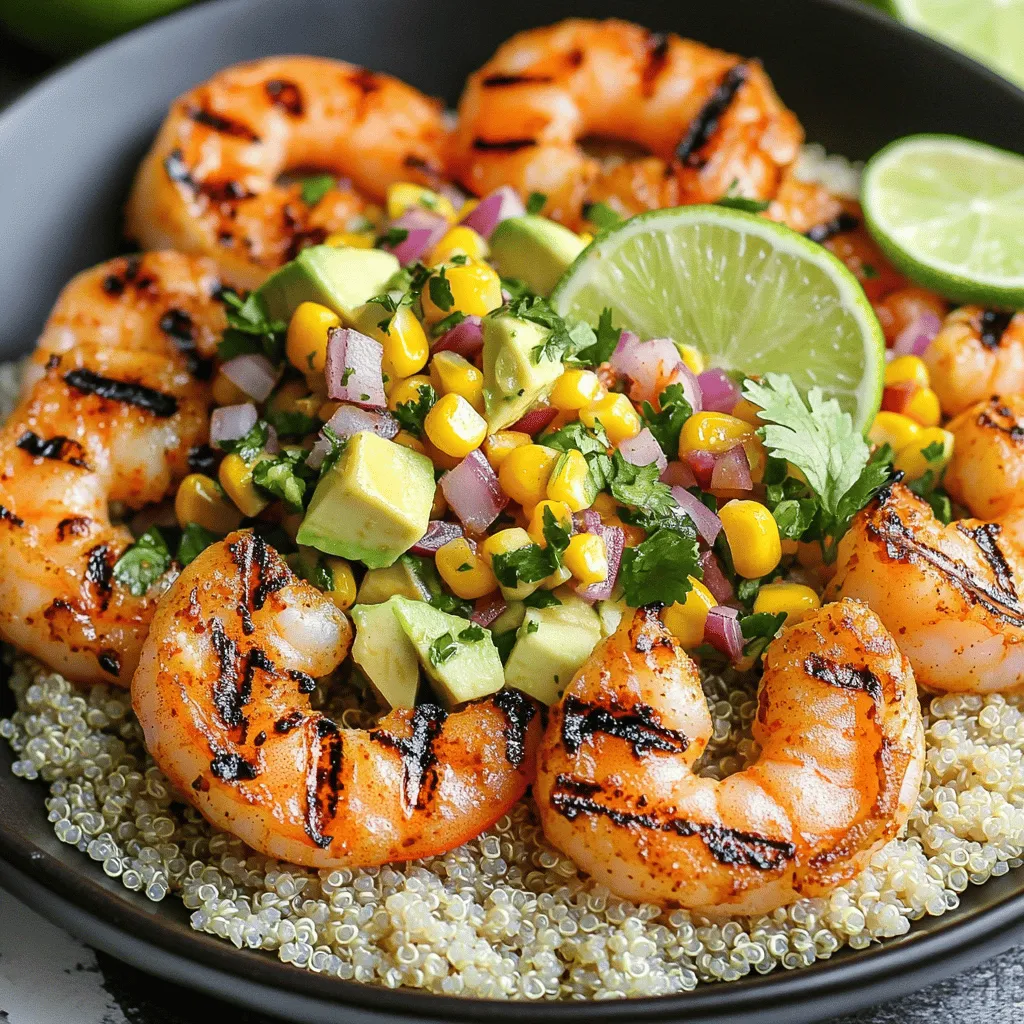
Get ready for a tasty adventure with my Grilled Shrimp Bowl with Avocado and Corn Salsa! This easy recipe is
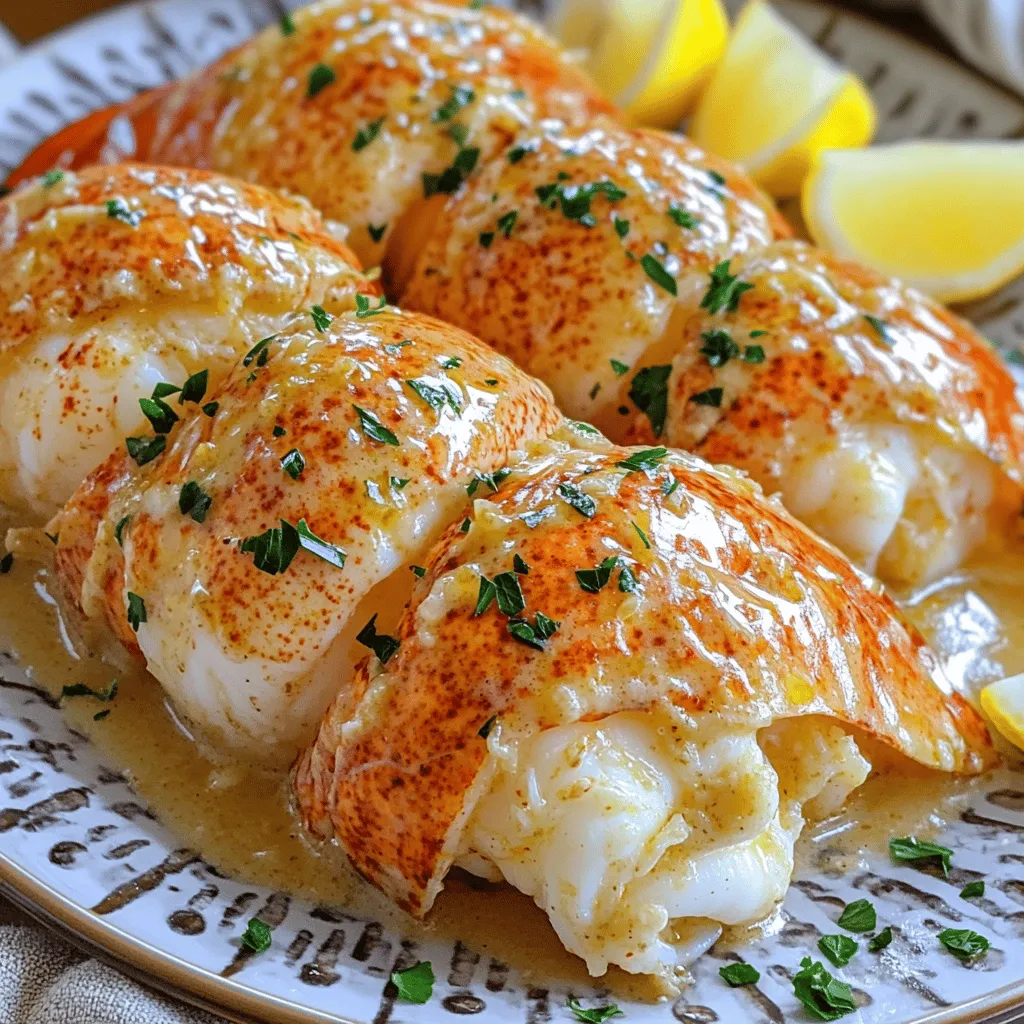
If you love seafood, you’re in for a treat! This creamy garlic butter lobster tails recipe is easy and delicious.
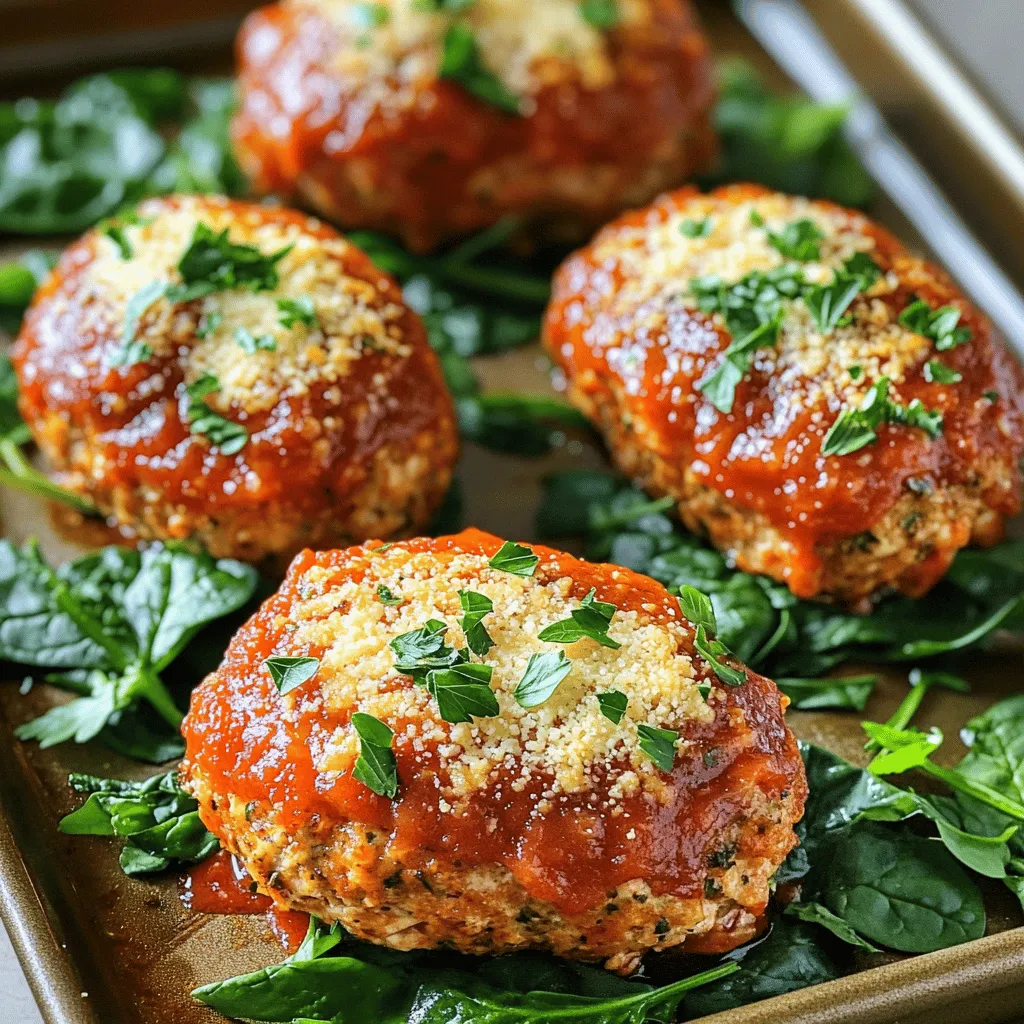
Garlic Parmesan Chicken Meatloaves are a delightful dish that’s simple to make and bursting with flavor. You can enjoy this
