Skip to content
DisclaimerTerms Of UseGDPR PolicyCookie Policy

Lisa Dishes

  • Home
  • Drinks
  • Appetizers
  • Dinner
  • Dessert
  • About
  • Contact
  • Privacy Policy
DisclaimerTerms Of UseGDPR PolicyCookie Policy

lisa

To make Creamy Coconut Lentil Curry, gather these simple ingredients: - 1 cup red lentils, rinsed and drained - 1 can (14 oz) coconut milk - 1 medium onion, finely chopped - 3 cloves garlic, minced - 1-inch piece of ginger, minced - 1 tablespoon curry powder - 1 teaspoon ground cumin - 1/2 teaspoon turmeric powder - 1 can (14 oz) diced tomatoes - 2 cups vegetable broth - 1 tablespoon vegetable oil - 1 tablespoon lime juice - Salt and pepper to taste - Fresh cilantro, for garnish Using fresh ingredients can enhance the flavor. If you can’t find fresh ginger, you can use ground ginger. For the spices, fresh spices give a stronger flavor than dried ones. If you have dried spices, use them, but try to add them earlier in the cooking process. If you’re out of red lentils, you can substitute with green or brown lentils. Keep in mind that these will take longer to cook. Also, if you want a creamier texture, try using full-fat coconut milk instead of light coconut milk. Using vegetable broth adds depth to the dish, but you can easily swap it with water if needed. The lime juice adds a fresh kick, so don’t skip it! Fresh cilantro makes a great garnish, but if you don’t like it, parsley works too. This recipe is flexible, so feel free to adjust based on what you have. For the full recipe, check the main article. To make a great Creamy Coconut Lentil Curry, you need to prepare well. Start by gathering all your ingredients. This makes cooking easier and more fun. Accurate measuring helps you get the right taste. For this dish, use a cup for the lentils and a can for the coconut milk. Sautéing the vegetables is key for flavor. Heat your vegetable oil in a pot over medium heat. Add the chopped onion first. Cook it until it turns soft and a little clear, about five minutes. This step brings out the onion's sweet taste. Next, add minced garlic and ginger. Cook them for one to two minutes. You want to smell their lovely aroma. Add the spices next. Mix in the curry powder, cumin, and turmeric. Let them cook for a minute to release their flavors. This step makes your curry taste amazing. Now, let's cook the lentils. Pour in the diced tomatoes and vegetable broth. Stir everything well and bring it to a gentle boil. Add the rinsed lentils to the pot. Make sure to stir again. Cover the pot and let it simmer for about 20 minutes. The lentils should be soft and cooked through. After that, it’s time for the coconut milk. Stir it in along with lime juice. This adds creaminess and a nice zing. Season with salt and pepper to your liking. Heat everything for another five minutes. When it's ready, take the pot off the heat. Let it sit for a few minutes before you serve. This allows the flavors to blend nicely. Enjoy your creamy, flavorful meal over rice or quinoa. For a lovely touch, add fresh cilantro on top. For the full recipe, check out the [Full Recipe]. To cook lentils perfectly, start by rinsing them well. This removes any dust or debris. Use red lentils for this recipe; they cook fast and become soft. Adjusting spice levels is easy. If you like it mild, add less curry powder and cumin. For heat, add chili powder or fresh chili to the mix. Always taste as you go. Avoid common mistakes like overcooking lentils. When they turn mushy, they lose texture. Keep an eye on them while cooking. Also, don’t skip the lime juice; it brightens the dish. Serve Creamy Coconut Lentil Curry with fluffy rice or warm naan. Both soak up the sauce well. You can also try quinoa for a healthy twist. Garnish your curry for a beautiful look. Fresh cilantro adds color and flavor. A wedge of lime on the side is perfect for a zesty kick. Pair your meal with a light beverage. I recommend coconut water or a crisp white wine. They complement the curry and refresh your palate. For the full recipe, check out the complete guide to Creamy Coconut Lentil Curry. {{image_2}} You can easily adjust this creamy coconut lentil curry to fit your diet. First, it is vegan and vegetarian-friendly. Both options use the same base ingredients, so you get great flavor without meat. For gluten-free needs, this recipe already fits the bill. Just ensure that your vegetable broth is gluten-free. Always check labels when buying broth or other packaged items. If you want to add protein, try chicken or tofu. Cook chicken pieces in the pot before adding other ingredients. For tofu, use firm tofu, and sauté it until golden before mixing it in. Adding different vegetables can enhance the dish. Try spinach, bell peppers, or carrots. You can add them in the last few minutes of cooking for a nice crunch. Incorporating spices like coriander or cardamom can also change the flavor. These spices add a lovely warmth to the curry. You can also use fresh herbs like basil or mint for freshness. Regional adaptations make this recipe even more fun. For instance, add Thai red curry paste for a spicier kick. This gives it a whole new flavor profile. You can also make it Indian-style by adding garam masala or mustard seeds. So, feel free to play around with the ingredients. The creamy coconut lentil curry is all about your taste! After serving, let the curry cool down. Place it in an airtight container. This keeps it fresh. You can store the curry in the fridge for up to 4 days. When you're ready to eat it again, reheat it on low heat. Stir often to keep it from sticking. You want to avoid losing that rich flavor. To freeze the curry, let it cool completely. Use a freezer-safe container or bag. Be sure to leave some space for expansion. The curry can freeze well for up to 3 months. When you want to eat it, take it out of the freezer. Move it to the fridge for a night to defrost. To reheat, warm it gently on the stove. Add a splash of water or broth to keep it creamy and delicious. This way, you maintain the taste and texture. Enjoy your flavorful meal anytime! What makes the curry creamy? The creaminess comes from coconut milk. It adds richness and smoothness. When you stir it in, it blends perfectly with the spices and lentils. This balance creates a soft, velvety texture that feels great in your mouth. Can I use other types of lentils? Yes, you can use other lentils like green or brown. However, they may take longer to cook. Red lentils are best for a smooth curry, as they break down easily. If you choose different lentils, adjust the cooking time accordingly. How can I make the curry spicier? To add heat, try adding chopped chili peppers. You can also use cayenne pepper or red pepper flakes. Mix them in when you add the spices. Taste as you go to find your perfect level of spice. How do I know when lentils are cooked? Lentils are cooked when they are soft and tender. They should not be crunchy. You can taste them to check. If they still feel firm, cook them a bit longer. Can I substitute coconut milk with another ingredient? You can use almond milk or cashew cream as a substitute. However, they will not give the same rich flavor. For a thick texture, add a bit of nut butter or cream. What are the best ways to serve this dish? Serve the curry over rice or quinoa for a hearty meal. You can also pair it with naan bread. Garnish with fresh cilantro and a wedge of lime for extra flavor. Enjoy it hot for the best taste. For the full recipe, check out the earlier section. Creating Creamy Coconut Lentil Curry is simple and rewarding. We covered each ingredient, from fresh spices to helpful substitutes. I walked you through step-by-step cooking techniques to ensure perfect results. You learned essential tips for serving and storing, as well as creative variations for dietary needs. Enjoy experimenting with flavors and making this dish your own. With practice, you'll master this tasty meal and impress your family and friends. Start cooking today and savor the deliciousness!

Creamy Coconut Lentil Curry Easy Flavorful Meal

Are you ready to dive into a bowl of deliciousness? This Creamy Coconut Lentil Curry is not only easy to

- 1 pound fresh salmon fillet - 1 cup panko breadcrumbs - 1/2 cup all-purpose flour - 2 large eggs - 1 teaspoon garlic powder - 1 teaspoon paprika - 1 teaspoon onion powder - Salt and pepper to taste - 1/4 cup mayonnaise - 2 tablespoons sweet chili sauce - 1 tablespoon sriracha - 1 teaspoon lime juice To make the Crispy Bang Bang Salmon Bites, you need fresh salmon. I love using salmon fillets because they are rich in flavor and easy to prepare. Cut the salmon into bite-sized cubes. The panko breadcrumbs give these bites a fantastic crunch. You can find them in most grocery stores. Don’t forget the all-purpose flour and eggs; these help the breadcrumbs stick well. For the seasoning, garlic powder, paprika, and onion powder add nice flavor. Salt and pepper bring everything together. Use them generously but taste as you go. Now for the Bang Bang sauce! This sauce is what makes these bites shine. It combines creamy mayonnaise with sweet chili sauce. Sriracha adds a nice kick, but adjust it based on your spice level. The lime juice brightens the sauce and balances the flavors. You can find the full recipe above, which will guide you step-by-step. Enjoy cooking this delightful dish! To make the Bang Bang sauce, take a small bowl. In this bowl, whisk together the following: - 1/4 cup mayonnaise - 2 tablespoons sweet chili sauce - 1 tablespoon sriracha (adjust for your spice level) - 1 teaspoon lime juice Mix until smooth. Set it aside for later use. This sauce adds a nice kick to the salmon bites. Now, let’s set up your breading station. You will need three bowls: - In the first bowl, mix 1/2 cup all-purpose flour with 1 teaspoon each of garlic powder, paprika, onion powder, and a pinch of salt and pepper. - In the second bowl, place 2 large beaten eggs. - In the third bowl, add 1 cup panko breadcrumbs. This setup makes the breading process quick and easy. You can keep your hands clean by using one hand for wet and the other for dry. Take one salmon cube and coat it in the flour mix. Make sure to cover all sides. Next, dip it into the beaten eggs. Finally, roll it in the panko breadcrumbs. Press gently to ensure an even coating. Repeat this for all your salmon cubes. This technique gives you those crispy bites everyone loves. Heat oil in a large skillet. Aim for about 1/2 inch deep over medium-high heat. You want the oil to shimmer, which means it’s hot enough. Carefully place the salmon bites in the hot oil. Avoid putting too many in at once. Fry for 3 to 4 minutes, flipping them occasionally. Cook until they turn golden brown and crispy. Once cooked, transfer the salmon bites to a paper towel-lined plate. This helps drain any extra oil. Arrange the crispy salmon bites on a serving platter. Drizzle with your Bang Bang sauce, or serve it on the side for dipping. Enjoy this easy and flavorful dish with friends or family! For the full recipe, check out the earlier sections. To get that golden-brown crust, oil temperature matters. Heat your oil to about 350°F. Use a kitchen thermometer for accuracy. If you don't have one, test it with a small piece of bread. It should bubble and brown in about 30 seconds. Avoid overcrowding your pan. If you add too many salmon bites at once, they will steam instead of fry. This makes them soggy, and nobody likes that! Fry in batches if needed to keep them crispy. You can switch up the breadcrumbs for different textures. Try using regular breadcrumbs or even crushed cornflakes for a twist. Both give a nice crunch. If you want a gluten-free option, use gluten-free breadcrumbs or almond flour. They work well and still taste great. Adjust the spice level to suit your taste. If you want less heat, cut back on sriracha. You can also add a bit more sweet chili sauce for extra sweetness. For added flavors, consider mixing in lime zest or a splash of soy sauce. These will enhance the sauce and give it a unique twist. For the full recipe, check out the complete guide above. {{image_2}} You can swap salmon for shrimp or chicken. Shrimp cooks fast and adds a fun twist. Chicken gives a hearty bite. If you choose shrimp, fry them for 2-3 minutes. For chicken, ensure you cook them until they reach 165°F inside. Adjust your cooking times to match your protein choice for the best results. If you want a healthier dish, you can bake the salmon bites. Preheat your oven to 400°F. Line a baking sheet with parchment paper. Place the breaded salmon bites on the sheet. You can spray them lightly with oil for extra crispiness. Bake for 15-20 minutes, flipping halfway through. To keep them crispy, avoid crowding the pan. These salmon bites pair well with many sides. Try serving them with a fresh salad or steamed veggies. Rice or quinoa also works great. For dips, you can use more than just Bang Bang sauce. Consider ranch, tartar sauce, or even a spicy aioli. Each dip adds unique flavor to the bites. When you have extra Crispy Bang Bang Salmon Bites, store them well. Let the bites cool down to room temperature. Place them in an airtight container. This helps keep them fresh. Add a paper towel inside the container to soak up moisture. This will prevent sogginess. The bites can stay in the fridge for up to three days. To reheat these bites, use the oven or an air fryer. Preheat your oven to 350°F. Place the salmon bites on a baking sheet. Bake them for about 10 minutes. This method keeps them crispy. If you use an air fryer, set it to 350°F. Reheat for 5 to 7 minutes. Avoid using the microwave, as it makes the bites soggy. You can freeze Bang Bang Salmon Bites for later. First, let them cool completely. Arrange them in a single layer on a baking sheet. Freeze them for about an hour. After that, transfer them to a freezer-safe bag. Remove as much air as possible. They can stay frozen for up to three months. When you want to eat them, thaw in the fridge overnight. Cook them in the oven or air fryer to regain crispness. The cooking time is quick and simple. Fry the salmon bites for about 3-4 minutes. You want them golden brown and crispy. Make sure to flip them halfway through for even cooking. This process gives you a delicious crunch on all sides. If you want less heat, adjust the sriracha in the Bang Bang sauce. You can cut the sriracha amount in half or leave it out entirely. Also, add more mayonnaise to balance the flavors. This makes the sauce creamy and less spicy. Yes, you can use frozen salmon! First, thaw it in the fridge overnight or under cold water. Once thawed, pat it dry with paper towels. This step helps the breading stick better. Then, follow the recipe as usual. I love serving these bites with fresh salads or rice. Try a simple cucumber salad for a crunchy contrast. Steamed broccoli or rice with lime adds a nice touch too. You can also serve them with sweet potato fries for a fun combo. Absolutely! You can use tofu or eggplant instead of salmon. Just cut them into bite-sized pieces. For tofu, press it to remove moisture, then coat and fry as usual. This method gives you a tasty vegetarian option that everyone can enjoy. In summary, we covered how to make delicious Bang Bang Salmon Bites. You learned about the ingredients, from fresh salmon to tasty sauces. I shared step-by-step instructions and tips for great results. Variations and storage advice can help you get creative and keep leftovers fresh. Now you can enjoy crispy bites anytime and impress your friends and family. Cooking can be easy and fun when you know the steps!

Crispy Bang Bang Salmon Bites Easy and Flavorful Dish

Looking for a quick and tasty way to enjoy salmon? My Crispy Bang Bang Salmon Bites are the answer! They

- 1 lb chicken breast, cut into bite-sized pieces - 1 cup orange marmalade - 2 tablespoons soy sauce The main ingredients are simple. Chicken breast gives a juicy base. Orange marmalade adds sweetness and tang. Soy sauce brings in that savory depth. These three ingredients work together to create a sweet and savory flavor that is hard to resist. - Mixing bowl - Baking dish - Parchment paper You need a few tools to make this dish. A mixing bowl helps you combine the marmalade and soy sauce. Use a baking dish to cook the chicken. Parchment paper keeps the chicken from sticking and makes cleanup easy. - Green onions - Sesame seeds - Rice or vegetables for serving For extra flavor, add green onions on top. They give a nice crunch and color. Sesame seeds add a nutty taste and look great. Serve the chicken over rice or with veggies for a complete meal. You can find the Full Recipe for more details on making this dish. - In a large mixing bowl, combine 1 cup orange marmalade and 2 tablespoons soy sauce. - Use a whisk or spoon to mix until well blended. This creates a tasty glaze for your chicken. - Take 1 lb chicken breast, cut into bite-sized pieces, and coat them in the marinade. - Make sure all pieces are fully covered. For the best flavor, marinate for at least 30 minutes. If you have time, marinate overnight in the fridge. - Preheat your oven to 400°F (200°C) while the chicken marinates. - Line a baking dish with parchment paper for easy cleanup. - Place the marinated chicken pieces in a single layer in the dish. - Bake for 20-25 minutes. Check the chicken halfway through and turn them for even cooking. The chicken should be cooked through and have a nice glaze. - After baking, let the chicken cool for a few minutes before serving. Try serving this dish over rice or with steamed veggies. For a fun touch, drizzle any extra glaze on top! You can find the Full Recipe linked earlier for more details. To get the best taste, marinate the chicken for at least 30 minutes. If you have more time, let it sit overnight in the fridge. This helps the chicken soak up all the flavors. You can also adjust the sweetness of the dish. If you like it sweeter, add more orange marmalade. For a less sweet taste, use less. This way, you control the flavor just how you want it. To check if the chicken is done, use a meat thermometer. The internal temperature should reach 165°F (75°C). If you don’t have a thermometer, cut a piece open. The juice should run clear, and the meat should look white, not pink. To avoid dry chicken, keep an eye on the cooking time. Bake it for 20-25 minutes, turning halfway through. This keeps the chicken juicy and tender. For serving, place the orange chicken over a bed of fluffy white rice or steamed broccoli. This adds color and texture to your plate. After plating, drizzle any extra glaze from the baking dish on top. For added flair, garnish with chopped green onions or sesame seeds. These little touches make your meal look and taste even better. {{image_2}} You can switch the chicken for pork or tofu. For pork, use tenderloin or chops. Cut them into small pieces like the chicken. For tofu, press it to remove water, then cube it. Both options work well with the orange glaze. They soak up the flavor just like chicken. Add garlic or ginger to boost the taste. Garlic adds a nice kick, while ginger gives warmth. You can chop or grate them before mixing with the glaze. Another fun twist is adding veggies. Try bell peppers or snap peas. They add color and crunch. Toss them in the baking dish with the chicken for a complete meal. You can also use a slow cooker. Simply mix the glaze and coat your protein. Pour everything into the slow cooker. Cook on low for 4-6 hours. If you prefer, an Instant Pot is quick. Add the chicken and glaze, then seal the pot. Cook on high pressure for 10 minutes. Both methods yield juicy, tasty results. Check the [Full Recipe] for detailed instructions. To keep your three-ingredient orange chicken fresh, follow these steps. First, allow the chicken to cool completely. This prevents moisture buildup in storage. Next, place the chicken in an airtight container. You can store it in the refrigerator for up to three days. If you want to keep it longer, consider freezing it. For freezing, use freezer-safe bags. Remove as much air as possible before sealing. This helps prevent freezer burn. The chicken can last in the freezer for up to three months. When you're ready to enjoy your leftovers, reheating is key. To avoid dry chicken, use the oven or stove. For oven reheating, preheat it to 350°F (175°C). Place the chicken in a baking dish, cover it with foil, and heat for about 15 minutes. This keeps the moisture in. If you prefer the stovetop, add a splash of water or broth in a pan. Heat on medium-low, stirring gently until warmed through. This method also helps maintain the flavor. Enjoy your tasty meal again with ease! If you don't have orange marmalade, you can try using other fruit jams. Apricot or peach jam works well. You can also mix orange juice with sugar and cornstarch to make a quick glaze. This will mimic the sweet and tangy flavor of orange marmalade. Yes, you can make this dish gluten-free. Look for gluten-free soy sauce. Brands like Tamari and coconut aminos are great choices. They provide the same salty flavor without gluten. Always check the label to make sure it meets your needs. To make this recipe healthier, use less marmalade. Cut the sugar by using only half a cup. You can also add veggies like bell peppers or broccoli. This will boost the nutrients and add color. Consider using chicken thighs for more flavor and moisture. This article showed you how to make easy orange chicken with just three main ingredients. We covered essential tools and some optional flavors to boost taste. I gave you step-by-step instructions, tips for cooking, and ideas for variations. Don't forget how to store leftovers and reheat them right. Cooking should be fun and simple. Try out new flavors and find what you love. Enjoy your meal and share it with others!

Savory 3 Ingredient Orange Chicken Quick and Easy Meal

Looking for a quick and easy meal that packs a punch of flavor? This Savory 3 Ingredient Orange Chicken is

- 8 oz rotini pasta - 1 lb ground beef or turkey - 1 medium onion, diced - 2 cloves garlic, minced - 1 can diced tomatoes with green chilies - 1 1/2 cups beef broth - 1 packet taco seasoning (about 1 oz) - 1 cup corn kernels (fresh, frozen, or canned) - 1 cup shredded cheddar cheese - 1/2 cup sour cream - 1 tablespoon olive oil - Salt and pepper to taste - Fresh cilantro or green onions for garnish (optional) - For a vegetarian option, swap the meat with black beans or lentils. These add protein and flavor. - Use gluten-free rotini for a gluten-free meal. Many brands offer great taste and texture. - If you want a cheese alternative, try a dairy-free cheese or nutritional yeast. These provide a similar creaminess. This recipe is versatile. You can mix and match based on what you have at home. For more details, check the Full Recipe. To start, heat the olive oil in a large pot over medium heat. Add the diced onion and sauté it for about 3-4 minutes. You want it soft and fragrant. Next, stir in the minced garlic. Cook this for another minute. You should smell the garlic now! Then, add the ground beef or turkey to the pot. Break it apart with a spatula. Cook it until it turns brown, about 5-7 minutes. If there is extra fat, drain it out. This keeps your dish from being greasy. Now it's time to add flavor. Sprinkle the taco seasoning over the browned meat. Stir it well to mix. Pour in the diced tomatoes with their juices and the beef broth. Bring this mixture to a gentle boil. Next, stir in the rotini pasta. Once mixed, cover the pot and reduce the heat. You will simmer it for about 10-12 minutes. Stir occasionally to keep it from sticking. Cook until the pasta is al dente, which means it's firm but not hard. When the pasta is ready, stir in the corn and shredded cheddar cheese. Mix it all well until the cheese melts and makes everything creamy. This is where the magic happens! Finally, remove the pot from heat and stir in the sour cream. Taste your dish and adjust the salt and pepper as needed. Let it sit for a few minutes to thicken. For serving, place the One Pot Taco Pasta in bowls. You can garnish it with chopped cilantro or green onions. A sprinkle of extra cheese on top makes it even better! Enjoy with some tortilla chips on the side. To make your One Pot Taco Pasta really pop, use spices like smoked paprika and cumin. These spices add depth and warmth. You can also sprinkle in some chili powder for a kick. For a creamier texture, add extra sour cream or cream cheese. Stir it in right before serving. This makes the dish rich and smooth. When cooking one-pot meals, a large pot or Dutch oven works best. These pots heat evenly and hold the heat well. Look for one that is non-stick for easy cleanup. A wooden spoon is also great for mixing. It helps you get every bit of flavor from the pot. One big mistake is overcooking the pasta. Keep an eye on it and check for doneness. You want it al dente, with a little bite. Another mistake is not seasoning properly. Taste as you go. Adjust the salt and pepper to make sure the flavors shine. Following these tips helps you create a delicious dish every time. For the Full Recipe, check the link provided. {{image_2}} You can easily adapt One Pot Taco Pasta to fit different diets. For a vegetarian or vegan option, swap the meat for black beans or lentils. Use vegetable broth instead of beef broth. This keeps the dish hearty and full of flavor. For a low-carb or keto-friendly version, replace the rotini pasta with spiralized zucchini or cauliflower rice. Both options keep the meal light and fresh. Mixing up the seasonings can change the taste. You can try a chili powder blend or a taco seasoning with a smoky twist. If you want more nutrition, add veggies like bell peppers, spinach, or zucchini. You could also mix in cooked chicken or shrimp for extra protein. These small changes can make your meal unique each time. Get creative with toppings! Add sliced jalapeños, crushed tortilla chips, or a dollop of guacamole on top. Fresh cilantro or green onions also add a nice touch. For sides, consider serving with a crisp green salad or warm tortillas. A cold drink like iced tea or lemonade pairs well too. These choices enhance your dining experience and make the meal even more enjoyable. To store leftovers, let the One Pot Taco Pasta cool down first. Place it in an airtight container. This keeps it fresh and tasty. Glass or plastic containers work well. Label the date so you know when to eat it. For long-term storage, you can freeze this dish. Use freezer-safe bags or containers. Make sure to remove as much air as possible to avoid freezer burn. It can last up to three months in the freezer. When you are ready to eat, thaw it in the fridge overnight. Reheat in a pot over low heat. Stir often to keep the flavors intact. You can get creative with leftover One Pot Taco Pasta. Try adding it to a quesadilla, or use it as a filling for burritos. Mixing it into a salad adds great flavor. You could also make a taco bake by layering it with tortillas and cheese. The options are endless! Yes, you can use chicken instead of beef or turkey. Cook the chicken until it’s no longer pink, about 6-8 minutes. The cooking time stays about the same. Just make sure to shred or dice the chicken into small pieces for even cooking. Yes, this dish is great for meal prep! You can make it ahead and store it in the fridge for up to 4 days. Use airtight containers to keep it fresh. Just reheat in the microwave or on the stove before serving. To add heat, try adding chopped jalapeños or a dash of hot sauce. You can also use spicy taco seasoning instead of the regular mix. Just start with a little and taste as you go. To change the number of servings, multiply or divide the ingredients by your needed amount. For example, if you want to make it for 8 people, double the ingredients. If you want just 2 servings, cut everything in half. You can find the Full Recipe for One Pot Taco Pasta [here](#). This link will give you all the details you need to make this quick and yummy meal! This blog post covered how to make One Pot Taco Pasta. We discussed key ingredients, cooking steps, and tips to elevate flavors. I shared ways to customize for different diets and offered storage advice. In closing, this dish is easy and versatile. You can enjoy it today and reinvent leftovers tomorrow. Grab your tools and ingredients, and let your cooking adventure begin!

One Pot Taco Pasta Quick and Flavorful Meal

Are you ready to spice up your dinner routine? With my One Pot Taco Pasta, you can whip up a

- ½ cup unsalted butter, melted - 1 cup brown sugar, packed - 1 large egg - 1 teaspoon vanilla extract - 1 cup all-purpose flour - ½ cup cocoa powder - ½ teaspoon baking powder - ¼ teaspoon salt - ½ cup chocolate chips - ½ cup unsalted butter, softened - ½ cup granulated sugar - ½ cup brown sugar, packed - 1 large egg - 1 teaspoon vanilla extract - 1 ¾ cups all-purpose flour - ½ teaspoon baking soda - ¼ teaspoon salt - 1 cup chocolate chips - ½ cup walnuts, chopped (optional) These ingredients make your brookies special. The fudgy layer gives a rich taste. The cookie layer adds a soft crunch. You’ll love how they blend together. Make sure to measure carefully for the best results. I recommend using high-quality chocolate chips for a better flavor. If you want a nutty twist, add walnuts to the cookie layer. This recipe is easy and fun, perfect for a baking afternoon. For the full recipe, check out the details above. Enjoy your baking! - Preheat oven to 350°F (175°C). - In a mixing bowl, mix melted butter and brown sugar until smooth. - Add the egg and vanilla extract, combining well. - In another bowl, whisk together flour, cocoa powder, baking powder, and salt. - Gradually add the dry mix to the wet mixture, folding in chocolate chips. - Pour the brownie batter into a prepared pan, spreading it evenly. - Next, prepare the cookie mixture. Layer it on top of the brownie mix. - Bake for 25-30 minutes. Check doneness with a toothpick. If it comes out with a few moist crumbs, it’s ready! For the full recipe, refer to the section above. - Use high-quality chocolate for better flavor. Good chocolate makes a big difference. - Don't overmix the batter for a chewier texture. Mix just until combined for best results. - Serve warm with ice cream or whipped cream. The hot brookies melt the ice cream perfectly. - Dust with powdered sugar for a beautiful presentation. It adds a nice touch for serving. - Overbaking; aim for a chewy texture. Keep an eye on the time to avoid dryness. - Incorrectly measuring ingredients. Use a scale or measuring cups for accuracy. Follow these tips to make your brookies shine! For the complete details on how to make these delicious treats, check out the Full Recipe. {{image_2}} You can make brookies even yummier by adding fun flavors. Consider using different types of chocolate chips. You might try white chocolate, dark chocolate, or butterscotch chips. Each type adds its own special taste. Nuts also bring a nice crunch. Pecans or almonds work well. Just chop them up and mix them in. This way, every bite is a surprise! If you need a gluten-free brookie, it’s simple to swap the flour. Use a gluten-free flour blend instead of all-purpose flour. Many blends work great in baking. Just remember, you might need to change the baking time a bit. Keep an eye on your brookies and check them a few minutes early. Want a vegan brookie? You can make it without eggs! Use flaxseed meal or applesauce instead. Both options keep your brookies moist and tasty. Also, choose dairy-free butter and chocolate chips. With these swaps, your brookies stay delicious and fit many diets. For more details about making these brookies, check the Full Recipe. To keep your brookies fresh, use an airtight container. Store them at room temperature. This keeps them soft for days. For a longer shelf life, you can refrigerate them. Just remember to let them warm up a bit before enjoying. If you want to save some for later, cut the brookies into squares first. This makes it easy to grab a piece when you want one. Wrap each square tightly in plastic wrap. After that, wrap them in foil for the best preservation. They can stay in the freezer for up to three months. When you crave a warm brookie, you can reheat them easily. Use a microwave for quick warming. Heat for about 10-15 seconds. For a crispier texture, use the oven. Preheat to 350°F (175°C) and warm for about 5-10 minutes. This way, they taste just like fresh out of the oven! Brookies mix the best parts of brownies and cookies. You get a soft, chewy texture from the cookie layer and a rich, fudgy base from the brownie layer. Each bite offers a great contrast. The brownie part is dense and rich, while the cookie part is light and crispy. This blend makes brookies a fun treat that everyone loves. Yes, you can use a different pan size! Changing the pan size can change the cooking time. A smaller pan makes thicker brookies, which may need more time to bake. A larger pan leads to thinner brookies, which may bake faster. Always check the baking time, so you don’t overbake them. To know when brookies are done, look for a few signs. The edges should be set and look slightly crispy. The center will be soft but not wet. A toothpick inserted in the middle should come out with a few moist crumbs. If it comes out clean, they may be overbaked. Definitely! You can make brookies your own. Try using different types of chocolate chips, like white or dark chocolate. You can also add nuts, such as walnuts or pecans. For a fun twist, mix in sprinkles or caramel bits. The possibilities are endless! Brookies stay fresh for about 3 to 5 days. Store them in an airtight container at room temperature. For longer storage, you can freeze them. They last up to three months in the freezer. Just make sure to wrap them well to avoid freezer burn. Brookies blend the rich taste of brownies with soft cookies. You learned about key ingredients and easy steps to make them. Remember, high-quality chocolate and proper baking time are crucial. Feel free to try nut options or gluten-free substitutes. Store them well to keep them fresh! Enjoy your delicious brookies warm or chilled. Experiment and have fun with flavors. You now have all the tools to create a tasty treat your friends and family will love.

Fudgy Chewy Brookies Irresistible Dessert Recipe

Are you ready to enjoy a treat that combines the best of both worlds? Fudgy chewy brookies are the perfect

- 8 oz. rotini or penne pasta - 1 cup cherry tomatoes, halved - 1 cucumber, diced - 1/2 red onion, finely chopped - 1/2 cup Kalamata olives, pitted and sliced - 1/2 cup feta cheese, crumbled - 1/4 cup fresh parsley, chopped - 1/4 cup olive oil - 2 tablespoons red wine vinegar (or apple cider vinegar) - 1 teaspoon dried oregano - Salt and pepper to taste - Grilled chicken or shrimp - Roasted bell peppers - Artichoke hearts When making Mediterranean Pasta Salad, focus on fresh, quality ingredients. Start with the pasta. I like using rotini or penne. These shapes hold the dressing well. Cook the pasta until it's al dente. This means it should still have a little bite. Next, add vibrant veggies. Cherry tomatoes add sweetness. Dice the cucumber for crunch. Finely chop the red onion for a bit of sharpness. Kalamata olives bring a salty, briny flavor. Crumbled feta cheese adds creaminess and tang. Finally, toss in fresh parsley for a pop of green. For the dressing, whisk together olive oil and red wine vinegar. You can also use apple cider vinegar if you prefer. Add dried oregano for a Mediterranean touch. Season with salt and pepper. This simple dressing brings everything together. If you want to add more protein, grilled chicken or shrimp works great. Roasted bell peppers or artichoke hearts can add extra flavor too. Check out the Full Recipe for exact measurements and tips. To cook the pasta al dente, start by boiling a large pot of salted water. Add 8 oz. of rotini or penne pasta. Follow the package instructions, usually around 8-10 minutes. You want it firm but not hard. Once done, drain the pasta in a colander. Rinse it under cold water to stop the cooking process. This cooling helps keep the pasta from getting mushy. In a large mixing bowl, combine the cooled pasta with these ingredients: - 1 cup cherry tomatoes, halved - 1 cucumber, diced - 1/2 red onion, finely chopped - 1/2 cup Kalamata olives, pitted and sliced - 1/2 cup feta cheese, crumbled - 1/4 cup fresh parsley, chopped Gently mix these items with the pasta. This ensures each bite has a bit of everything. It also makes the salad more colorful and fun. In a small bowl, whisk together: - 1/4 cup olive oil - 2 tablespoons red wine vinegar (or apple cider vinegar) - 1 teaspoon dried oregano - Salt and pepper to taste Make sure the dressing blends well. Taste a little and adjust the seasoning if needed. You can add more salt or vinegar based on your preference. Pour the dressing over the pasta salad and toss everything gently until well combined. Let it sit in the fridge for at least 15 minutes. This waiting time helps the flavors come together beautifully. For the full recipe, check the section above. To make your Mediterranean Pasta Salad pop, let the flavors meld. This means letting the salad sit after mixing. I suggest chilling it for at least 15 minutes. This helps the tastes blend well. The olive oil and vinegar will soak into the pasta and veggies. You will get a more robust flavor in every bite. One big mistake is overcooking the pasta. You want it al dente, or firm to the bite. Overcooked pasta turns mushy and soggy. Another common error is skipping the cold rinse. Rinsing pasta stops the cooking process and cools it down. This step is key to keeping your salad fresh and crunchy. For a stunning display, serve your salad in a large bowl or platter. This creates a vibrant centerpiece. You can garnish it with fresh parsley on top. Adding a few whole olives also enhances the look. These touches make your salad not just tasty but beautiful too. Check out the Full Recipe to get all the details. {{image_2}} You can add proteins for a heartier dish. Grilled chicken works well. Just chop it into bite-sized pieces. Shrimp is also a tasty option. Grill or sauté them until pink and cook through. For a vegetarian choice, try chickpeas or black beans. They add protein and flavor without meat. Seasonal vegetables make this salad fresh and exciting. In summer, add bell peppers or zucchini. They taste great when grilled or roasted. In winter, consider using roasted winter squash or Brussels sprouts. These will add warmth and texture to your dish. You can also add fresh herbs like basil in summer or thyme in winter. Dressings can change the flavor of your salad. Try a lemon-herb vinaigrette for a zesty kick. A balsamic dressing gives a sweet touch. You can also mix yogurt with herbs for a creamy option. These flavors work well with the olives and feta. Feel free to experiment and find what you love! To keep your Mediterranean Pasta Salad fresh, use airtight containers. Glass or plastic containers work well. Make sure the salad is cool before sealing it. This step helps lock in flavors and keeps the salad safe. If you want to store it longer, divide it into smaller portions. This makes it easier to grab a quick snack. Your salad will stay fresh for about 3 to 5 days in the fridge. After this time, the quality may drop. Look for signs of spoilage. If you see any mold or an off smell, throw it away. A slimy texture is another sign it's time to discard it. Always trust your senses when checking food. While this salad tastes great cold, you can enjoy it at room temperature too. If you want to reheat it, do so gently. Use a microwave for a quick warm-up, but be careful not to overheat. If you serve it cold, add a drizzle of olive oil or a splash of vinegar for a fresh boost. Enjoy it as a quick lunch or a side dish! I love using rotini or penne for this salad. These shapes hold the dressing well. Their curves and ridges trap flavors. You can also use fusilli for a fun twist. Just make sure it's a pasta that cooks al dente. This keeps the texture firm and enjoyable. Absolutely! Making the salad ahead of time is a great idea. The flavors blend better after some time in the fridge. I suggest letting it chill for at least 15 minutes. However, you can prepare it a day in advance. Just keep it in an airtight container. This keeps it fresh and tasty. Yes, you can make this salad gluten-free! Various brands offer gluten-free pasta options. Look for brown rice or chickpea pasta. These give you a great texture and flavor. You won't miss the wheat at all. Just check the packaging to ensure it fits your needs. For the full recipe, refer back to the ingredients and instructions. Enjoy your Mediterranean Pasta Salad! This Mediterranean Pasta Salad is a tasty mix of fresh veggies and pasta. We covered essential ingredients, step-by-step instructions, and handy tips for a perfect salad. Remember to chill it for the best flavor and avoid overcooking the pasta. With easy variations and storage tips, you can enjoy this dish anytime. Make it your own by adding proteins or switching dressings. Enjoy your flavorful creation and share it with friends! This salad is simple, fresh, and sure to please everyone.

Mediterranean Pasta Salad Fresh Flavorful Delight

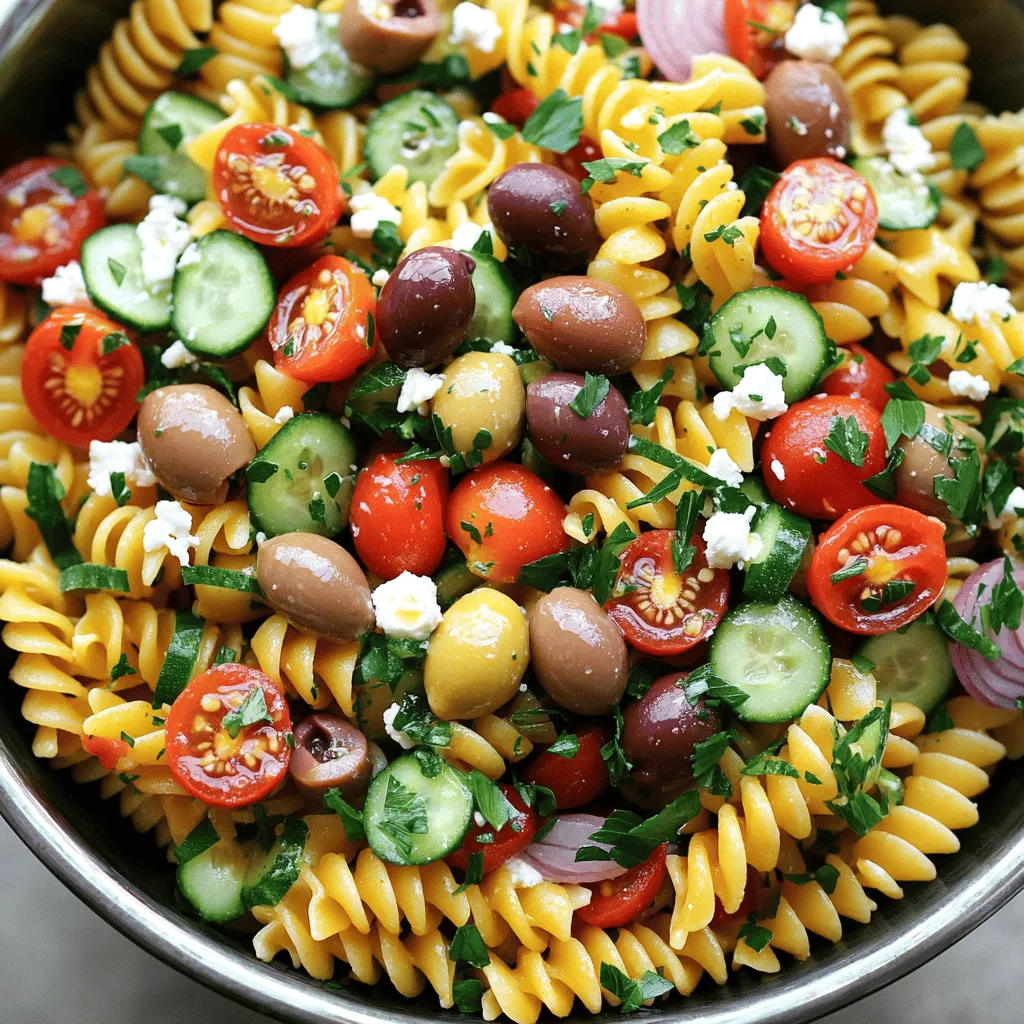
Are you ready to brighten your meal with a Mediterranean Pasta Salad? This fresh and flavorful dish brings together vibrant

When making Chicken Club Lettuce Wraps, you need a few key ingredients to make them delicious: - 2 cups cooked chicken breast, shredded or diced - 6 slices of crispy bacon, chopped - 1 cup cherry tomatoes, halved - 1 avocado, diced - 1/2 cup mayonnaise - 1 tablespoon Dijon mustard - 1 teaspoon lemon juice - Salt and pepper to taste - 1 head of butter lettuce or romaine, leaves separated - Fresh chives or parsley for garnish These ingredients come together to create a tasty, healthy snack. You can also customize your wraps with optional ingredients like: - Cucumber slices for crunch - Red onion for zing - Cheese for creaminess Feel free to mix and match based on your taste. This flexibility makes the Chicken Club Lettuce Wraps fun and personal. For the full recipe, check out the details above. To make Chicken Club Lettuce Wraps, first gather your ingredients. You need cooked chicken, bacon, tomatoes, and avocado. Mix these in a medium bowl. This step is simple but key to your wraps. 1. Combine Ingredients: In your bowl, add shredded chicken, chopped bacon, halved cherry tomatoes, and diced avocado. 2. Make Dressing: In a separate bowl, whisk together mayonnaise, Dijon mustard, lemon juice, salt, and pepper. This dressing adds creaminess. 3. Mix Together: Pour the dressing over the chicken mixture. Toss gently until all ingredients are well coated. Tips for Efficient Preparation: - Use pre-cooked chicken to save time. - Chop ingredients ahead for a quick mix. - Set out all tools and bowls before you start. Now, let’s put your wraps together. 1. Prepare Lettuce: Take a lettuce leaf from the head. Butter lettuce works well, but romaine is fine too. 2. Fill the Leaf: Spoon a generous amount of the chicken mixture into the center of the leaf. 3. Wrap It Up: Fold the sides over the filling. Secure it with a toothpick if needed. Suggestions for Garnishing: - Top your wraps with fresh chives or parsley for a pop of color. - Add a slice of lemon on the side for extra zest. For the complete recipe, check the Full Recipe section. Enjoy your tasty and healthy Chicken Club Lettuce Wraps! You can easily modify this recipe to fit your diet. If you follow paleo or keto, swap the mayonnaise for avocado. Use Greek yogurt for a creamy, low-carb option. You can also change the protein. Try shredded turkey or grilled shrimp for a twist. For a vegetarian version, use chickpeas or mushrooms instead of chicken. These changes keep the dish tasty and healthy. Chicken Club Lettuce Wraps are great for many occasions. They work well at parties, picnics, or even as a quick weeknight meal. Serve them as a fun appetizer or a light lunch. Pair these wraps with sides like sweet potato fries or a fresh garden salad. You can also dip them in salsa, guacamole, or ranch dressing for extra flavor. These options enhance your meal and make it more enjoyable. {{image_2}} You can switch up your Chicken Club Lettuce Wraps to keep things exciting. One tasty idea is an Asian-inspired version. In this twist, you can add sesame oil and soy sauce to your chicken mix. This gives the dish a nice, rich flavor. Toss in some shredded carrots and sliced green onions for a fresh crunch. Another great option is a Mediterranean twist. Use feta cheese and olives to add a salty bite. You can also try sun-dried tomatoes for a burst of flavor. A drizzle of olive oil and a sprinkle of oregano will tie everything together in this version. You may want to change some ingredients based on your taste or diet. If you prefer not to use bacon, try crispy turkey bacon or smoked tempeh. These options give a similar crunch without the pork. For a vegan or vegetarian option, replace chicken with chickpeas or quinoa. This keeps the wraps filling and adds protein. You can use vegan mayo or hummus as a creamy spread. Both swaps keep the flavors bright while making the dish plant-based. You can find the full recipe [here](#). To store Chicken Club Lettuce Wraps, first, keep the filling and lettuce separate. This prevents the lettuce from wilting. Place the chicken mixture in an airtight container. Store it in the fridge for up to three days. For the lettuce, wrap it in a damp paper towel and place it in a bag. This keeps it fresh and crunchy. When you want to eat the leftovers, reheat the chicken mixture in a skillet over medium heat. Stir it gently until warm. Avoid overheating to keep the chicken juicy. You can also use the microwave, but be careful not to cook it too long. Yes, you can freeze Chicken Club Lettuce Wraps! However, I recommend freezing the chicken mixture only. Lettuce does not freeze well. To freeze, put the chicken mixture in a freezer-safe bag. Squeeze out the air before sealing. It will last for about three months. To thaw, move the bag to the fridge for several hours or overnight. When ready to eat, reheat it in a pan or microwave. After warming, serve the chicken in fresh lettuce leaves. This gives you that crisp texture you want. You can find the full recipe to make these wraps here. What can I use instead of mayonnaise? If you want a mayo-free option, try Greek yogurt. It adds creaminess and tang. You can also blend avocado for a smooth texture. Both options keep your wraps tasty and healthy. Can I make Chicken Club Lettuce Wraps in advance? Yes, you can prep the filling ahead of time. Store it in the fridge for up to a day. Just keep the lettuce leaves separate until you're ready to eat. This way, they stay fresh and crisp. How to cook chicken for wraps effectively? Cook chicken breast by grilling, baking, or poaching. For juicy chicken, avoid overcooking. Use a meat thermometer to check for doneness. It should reach 165°F. Shred or dice it into bite-sized pieces for easy wrapping. What type of lettuce is best for wraps? Butter lettuce or romaine works great for wraps. Butter lettuce has a soft texture and is easy to fold. Romaine adds a nice crunch. Both types hold the filling well and make your wraps fun to eat. For more details and the full recipe, check the [Full Recipe] link. In this blog post, we explored how to make delicious Chicken Club Lettuce Wraps. We covered key ingredients, step-by-step prep, and assembly tips. Customization options and serving suggestions help you make these wraps your own. Finally, we shared storage tips to keep your wraps fresh and tasty. You can adapt these wraps for any meal, diet, or flavor you crave. Enjoy creating your own version of this tasty dish!

Savory Chicken Club Lettuce Wraps Healthy Snack Idea

Are you looking for a quick, healthy snack that packs a flavor punch? Let me introduce you to savory Chicken

- 2 cups cooked chicken, shredded - 1/2 cup buffalo sauce - 1/2 cup cream cheese, softened - 1/2 cup shredded cheddar cheese - 1/4 cup green onions, finely chopped - 4 large flour tortillas - 1 cup lettuce, shredded - 1/4 cup ranch dressing (for dipping) These ingredients create a rich and tasty filling. First, you need cooked chicken. It can be grilled or boiled. Shred it into small pieces for easy mixing. Next, the buffalo sauce adds heat and flavor. Adjust the amount based on your spice level. Cream cheese gives a creamy texture. It blends well with the chicken. Cheddar cheese adds a nice sharpness. It also helps hold the roll-ups together. Green onions add freshness and crunch. Flour tortillas are perfect for wrapping. They are soft and flexible. Lettuce gives a nice crunch and freshness. Finally, ranch dressing is great for dipping. - Additional spices (like garlic powder or onion powder) - Different cheese varieties (like blue cheese or pepper jack) - Other vegetables (like diced tomatoes or bell peppers) Feel free to add spices for more flavor. Garlic powder gives depth, while onion powder adds sweetness. You can get creative with cheese too. Blue cheese offers a bold taste. Pepper jack brings extra heat. Adding other veggies can enhance texture and taste. Diced tomatoes add sweetness. Bell peppers add crunch and color. Mix and match these options to make the roll-ups your own. For the full recipe, check the details above. To make Buffalo Chicken Tortilla Roll-Ups, start by mixing the chicken and buffalo sauce. In a large bowl, add 2 cups of shredded chicken. Pour in 1/2 cup of buffalo sauce. Use a spoon to mix until the chicken is fully coated. This step is key for flavor. Next, combine the cheeses for the filling. Add 1/2 cup of softened cream cheese and 1/2 cup of shredded cheddar cheese to the bowl. Stir until the mix is creamy. This blend adds richness to your roll-ups. Now, prepare the tortillas for rolling. Lay a large flour tortilla flat on a cutting board. Spread a generous amount of the buffalo chicken mixture over the tortilla. Leave a small border around the edges. This will help keep the filling inside when you roll. For a tight roll, start at one edge and roll the tortilla carefully. Keep the filling snug inside as you roll. This helps keep everything together. Avoid overfilling the tortillas. Too much filling can cause spillage, making them hard to roll. To slice the roll-ups, use a sharp knife. Cut each roll into bite-sized pieces, about 1 to 2 inches thick. This makes them easy to eat. For plating, arrange the roll-ups on a colorful platter. You can garnish with whole green onions for a nice touch. Place a small bowl of ranch dressing in the center for dipping. It adds a fun element to your meal. Try making these Buffalo Chicken Tortilla Roll-Ups for a quick and tasty dinner. For the full recipe, check it out above! - Overfilling the tortillas: It’s easy to want to add more filling, but this can lead to a mess. A thin layer of filling is best. - Not rolling tightly: A loose roll means the filling spills out. Roll firmly to keep everything inside. - Marinating chicken in buffalo sauce before mixing: This step deepens the flavor. Let the chicken soak in the sauce for at least 30 minutes. - Serving suggestions for enhancing taste: Pair the roll-ups with ranch or blue cheese dressing. Add a side of fresh veggies for crunch. - Best knife for slicing: Use a sharp chef’s knife for clean cuts. A dull knife squishes the roll-ups. - Ideal mixing bowls for preparation: Choose a large, sturdy bowl. It helps mix the ingredients well without spilling. For the full recipe, check out the details above and get cooking! {{image_2}} You can kick up the heat in your roll-ups! Adding jalapeños gives a nice kick. Slice them thin and sprinkle them on top of the chicken mix. If you want even more heat, try using spicy ranch or blue cheese dressing. This adds a zesty flavor that pairs well with the buffalo sauce. If you want a lighter option, consider using low-fat cream cheese. It keeps the creamy texture while reducing calories. You can also swap regular flour tortillas for whole wheat or spinach tortillas. These options add fiber and nutrients, making your meal a bit healthier. Want to make it vegetarian? Substitute chicken with shredded carrots or tempeh. Both options absorb the buffalo sauce well and provide great texture. You can also explore alternative sauces. Try using barbecue sauce or a sweet chili sauce for a different flavor profile. Make sure to check the full recipe for more great ideas! Store your Buffalo Chicken Tortilla Roll-Ups in an airtight container. This keeps them fresh. Place a piece of parchment paper between layers to prevent sticking. They stay good in the fridge for about 3 days. After that, they may lose their flavor and texture. To freeze, wrap each roll-up in plastic wrap. Then, put them in a freezer bag. Make sure to remove as much air as you can. They can last for up to 2 months in the freezer. When you’re ready to eat, thaw them in the fridge overnight. To make your roll-ups crispy again, place them in a hot oven for a few minutes. This revives their crunch. Pair them with ranch dressing or any favorite sauce for dipping. You can also try buffalo sauce for an extra kick. Enjoy your tasty treat! You can prepare these roll-ups a few hours early. First, make the filling as directed. Then, spread it on the tortillas. Roll them up tightly, but do not slice. Wrap each roll in plastic wrap. Store in the fridge until you are ready to serve. This keeps them fresh and easy to slice. These roll-ups pair well with many sides. Here are some ideas: - Fresh veggie sticks (carrots, celery, bell peppers) - Potato chips or tortilla chips - A simple green salad - Extra ranch dressing for dipping - Pickles for a tangy crunch Yes, using leftover rotisserie chicken is a great idea! Shred the chicken and mix it with the buffalo sauce. This saves time and adds flavor. The roll-ups will still taste amazing and turn out great. The spice level depends on the buffalo sauce you use. If you want less heat, choose a milder sauce. For more heat, go for a hot sauce. You can also mix in ranch dressing to tone down the spice in the filling. Adjust it to your taste! Buffalo Chicken Tortilla Roll-Ups are tasty and easy to make. You mix cooked chicken with buffalo sauce and cheese, then roll them in tortillas. Adding spices and veggies can boost flavor. Avoid common mistakes like overfilling. These roll-ups store well in the fridge or freezer for later. They are great for parties or quick meals. Enjoy exploring different variations and serving options. With these tips, you can create a dish everyone will love!

Buffalo Chicken Tortilla Roll-Ups Easy Weeknight Meal

Looking for a quick and tasty dinner? These Buffalo Chicken Tortilla Roll-Ups are your answer! In just a few easy

To make Easy Caramel Apple Pies, gather these ingredients: - 3 cups of peeled and sliced apples (Granny Smith or Honeycrisp work well) - 1/2 cup granulated sugar - 1 teaspoon cinnamon - 2 tablespoons lemon juice - 1/4 cup caramel sauce (store-bought or homemade) - 1 package of refrigerated pie crusts (2 crusts) - 1 egg (for egg wash) - 1 tablespoon milk (for egg wash) - Optional: Whipped cream or vanilla ice cream for serving You can swap ingredients based on what you have. Use any tart apples if you can’t find Granny Smith or Honeycrisp. Brown sugar can replace granulated sugar for a deeper flavor. If you prefer, lemon juice can be substituted with apple cider vinegar. For caramel sauce, you can make your own or use a store-bought option. If you need a vegan version, use a plant-based egg wash made from almond milk and a splash of maple syrup. Choosing the right apples is key to a great pie. Look for firm apples that hold their shape when cooked. Granny Smith apples give a nice tart flavor, while Honeycrisp adds sweetness and crunch. Check for freshness by looking for smooth skin and no bruises. If you can, smell the apples. A sweet, fruity scent means they are ripe and ready to use. Mixing different apple types enhances flavor and texture in your pie. Start by preheating your oven to 425°F (220°C). This helps cook the pie evenly. Next, take your apples, peel and slice them into thin pieces. I love using Granny Smith or Honeycrisp apples. In a large bowl, mix the sliced apples with granulated sugar, cinnamon, and lemon juice. Toss everything well so the apples are coated. This adds flavor and helps keep them fresh. Now, roll out one pie crust and fit it into a 9-inch pie dish. Pour the prepared apple mixture into the crust. Drizzle the caramel sauce over the apples. This adds a sweet, gooey touch that makes the pie special. Once your pie is filled, roll out the second pie crust. You can lay it on top as a solid crust or cut it into strips for a lattice design. If you choose a solid crust, remember to make a few small slits for steam to escape. In a small bowl, whisk together the egg and milk for the egg wash. Brush this mixture over the crust. It gives the pie a nice golden color. Place the pie on a baking sheet to catch any drips. Bake it for 25-30 minutes. You want the crust to turn golden brown and the filling to be bubbly. When it’s done, let the pie cool for at least 10 minutes. This helps the filling set, making it easier to slice. Creating a lattice crust is fun and adds a fancy touch. Roll out the second pie crust and cut it into long strips. Lay half of the strips across the pie in one direction, leaving gaps between them. Then, fold back every other strip. Place a new strip across the pie at a right angle. Unfold the strips back over it. Repeat this with the other half of the strips. Trim any extra dough from the edges and crimp them together for a nice finish. Brush the lattice with the egg wash for a beautiful glaze. The lattice design allows you to see the delicious filling inside. For the full recipe, check the section above. To make a great pie crust, keep your ingredients cold. Use chilled butter and ice water. This helps the crust to stay flaky and tender. When you roll out the dough, don't overwork it. Just roll until it fits your pan. For extra flavor, mix in a pinch of salt. Choose apples that are crisp and tart. Granny Smith or Honeycrisp are my favorites. Slice them thin for even cooking. Toss them with sugar and cinnamon. This gives them a sweet and spicy kick. Next, mix in lemon juice to keep them bright and fresh. Cook them briefly before adding to the pie. This step makes them tender and full of flavor. Serve your pie warm for the best taste. A scoop of vanilla ice cream on top melts perfectly. Whipped cream is also a great choice. You can sprinkle some extra cinnamon on top for fun. For a twist, try drizzling more caramel sauce over each slice. Enjoy the pie with friends or family for a cozy treat! {{image_2}} You can choose many types of apples for your caramel apple pies. I love using Granny Smith apples. They are tart and hold their shape well when baked. Honeycrisp apples are another favorite. They are sweet and crisp, giving a nice balance to the pie. Other great options include Fuji and Braeburn apples. Each apple brings its own taste and texture. Mix different types for extra flavor! You can easily change the spice mix in your pie. Cinnamon is a classic, but you can try nutmeg or allspice for a warm touch. A pinch of ginger adds a nice kick. If you want a sweeter pie, consider adding brown sugar instead of white sugar. You can also add a splash of vanilla extract for depth. Experimenting with spices lets you create a pie that suits your taste. Mini caramel apple pies are fun and cute! To make them, use a muffin tin instead of a pie dish. Roll out the pie crust and cut it into smaller circles. Press these circles into the muffin tin cups. Fill each cup with your apple mixture and drizzle caramel sauce on top. Bake them just like the larger pie, but check them after 15-20 minutes. They are perfect for sharing or for a sweet snack. You can find the full recipe in the recipe section. To store leftover caramel apple pies, let them cool first. Cover the pie with plastic wrap or aluminum foil. You can also place it in an airtight container. Store the pie in the fridge for up to four days. This keeps the crust fresh and the filling tasty. When you want to enjoy leftover pie, preheat your oven to 350°F (175°C). Take the pie out of the fridge and remove any wrapping. Place the pie on a baking sheet. Heat it in the oven for about 15-20 minutes. This warms the pie without making the crust too soft. You can also use a microwave, but the crust may get soggy. You can freeze caramel apple pies for later enjoyment. If you plan to freeze, wrap the pie tightly in plastic wrap. Then, place it in a freezer-safe bag or container. It can stay in the freezer for up to three months. When you’re ready to eat it, let it thaw in the fridge overnight. Then, reheat it in the oven for the best texture. For the full recipe, check out the Easy Caramel Apple Pies section. Yes, you can use homemade caramel sauce. Making it at home gives a fresh taste. You can control the flavor and sweetness. Just follow your favorite recipe, and drizzle it over the apples. It adds a special touch to your Easy Caramel Apple Pies. If you need a recipe, I recommend checking out the Full Recipe. Using an egg wash is not necessary, but it helps create a nice look. It makes the crust shiny and golden. If you skip it, your pie will still taste great. For a quick option, you can use milk instead. Just brush it on top for some color. You can serve your Caramel Apple Pies with whipped cream or vanilla ice cream. Both options add creaminess that balances the pie's flavors. You can also try a drizzle of extra caramel sauce on top. It makes each bite extra special. We explored how to make easy caramel apple pies, from gathering ingredients to baking. You learned about the best apples, making a lattice crust, and achieving perfect caramel. I shared tips for a flaky crust and ways to customize your pie. Remember to store leftovers right and enjoy them later. Every step adds to your tasty treat. These pies are simple yet delicious, perfect for any occasion. Now, you’re ready to impress with homemade caramel apple pies!

Easy Caramel Apple Pies Simple and Delicious Recipe

Are you craving something sweet and easy to make? You’re in the right place! This blog post shares my simple

To whip up this creamy mozzarella shrimp pasta, you'll need a few key items. Here’s what you should gather: - 8 ounces fettuccine or linguine pasta - 1 pound large shrimp, peeled and deveined - 2 tablespoons olive oil - 3 cloves garlic, minced - 1 teaspoon red pepper flakes (adjust for spice level) - 1 cup heavy cream - 1 cup shredded mozzarella cheese - 1/2 cup grated Parmesan cheese - 1 cup cherry tomatoes, halved - 1 cup fresh spinach leaves - Salt and pepper to taste - Fresh basil, for garnish These ingredients create a rich, creamy sauce that hugs the pasta perfectly. I love using fettuccine or linguine for their ability to hold sauces well. The large shrimp add a nice bite, and the garlic brings out great flavor. Fresh cherry tomatoes and spinach not only add color but also offer a fresh taste. The combination of mozzarella and Parmesan gives the sauce its creaminess and richness. You can find these ingredients at any grocery store or farmer's market. For the full recipe, check out the complete guide to make this delightful dish. To cook the pasta, boil a large pot of salted water. Add the fettuccine or linguine. Cook until it is al dente, about 8-10 minutes. Drain the pasta, but save 1/2 cup of the pasta water. This water is helpful later for the sauce. Heat olive oil in a large skillet over medium heat. Add the shrimp and season them with salt, pepper, and red pepper flakes. Cook the shrimp for 2-3 minutes on each side. They should turn pink and opaque. Be careful not to overcook them, or they will be tough. Remove the shrimp from the skillet and set them aside. In the same skillet, add minced garlic and sauté for about 30 seconds. Then, pour in the heavy cream and stir well. Gradually mix in the shredded mozzarella and Parmesan cheese. Stir until everything melts together and becomes creamy. If you want a thicker sauce, you can simmer it a bit longer. Add the halved cherry tomatoes and fresh spinach to the sauce. Cook for 2-3 minutes until the spinach wilts. If the sauce is too thick, add some of the reserved pasta water to adjust the consistency. Finally, add the drained pasta and cooked shrimp to the skillet. Toss everything together to coat in the creamy sauce. Adjust the seasonings with salt and pepper if needed. Serve in bowls and enjoy this delicious meal. For the complete recipe, check out the Full Recipe. To make a rich and creamy sauce, start on medium heat. This helps keep the cream smooth. If your sauce separates, it’s likely too hot. Lower the heat and stir well. For extra creaminess, add cheese slowly. This helps it melt evenly. Use a good non-stick skillet. This prevents the sauce from sticking. A silicone spatula is great for mixing. It ensures you get every bit of flavor. Herbs and spices make your dish shine. Fresh basil adds a bright taste. You can also try oregano or thyme for a twist. A pinch of lemon zest can brighten the flavors too. Pair this pasta with a simple salad. A fresh green salad with vinaigrette works well. Garlic bread is another tasty side. It adds crunch and complements the creamy sauce. For more tips, check out the Full Recipe. {{image_2}} You can easily adapt this recipe to fit your diet. If you need gluten-free options, use gluten-free pasta. Many brands make good pasta that cooks well. For those who avoid dairy, you can swap heavy cream with plant-based cream. Coconut cream or cashew cream works great. These options keep the dish creamy while meeting your needs. Want to boost flavor and nutrition? Adding veggies is a great way to do this. Spinach adds color and nutrients, while cherry tomatoes bring sweetness. You can also toss in mushrooms, bell peppers, or zucchini for more texture. If you want extra protein, try adding chicken or scallops. As for serving, think outside the bowl! You can layer pasta on a plate for a fancy look. Or, serve it in a large dish for sharing. A sprinkle of fresh herbs on top makes a beautiful touch. Check out the full recipe for more ideas! To keep your creamy mozzarella shrimp pasta fresh, start by storing leftovers in an airtight container. Place the container in the fridge. This method keeps the dish safe to eat for about 3 to 4 days. For longer shelf life, you can freeze the pasta. To do this, allow the dish to cool completely. Then, transfer it to a freezer-safe bag or container. This can last for up to 2 months in the freezer. When ready to eat, it’s best to thaw it overnight in the fridge before reheating. Reheating creamy pasta can be tricky. To do it right, use a skillet over low heat. Add a splash of water or cream to help bring back the sauce’s creaminess. Stir gently as you heat it up. Avoid using high heat, as this can overcook the pasta and dry it out. If you need to use a microwave, heat in short bursts, stirring in between to ensure even warming. This way, you can enjoy your creamy mozzarella shrimp pasta just as much as the first time! How can I make this dish spicier? To add heat, increase red pepper flakes. You can also use diced jalapeños or a splash of hot sauce. Try adjusting the spice to match your taste. Just remember to add a little at a time. This helps you control the heat level. Can I substitute another type of cheese? Yes, you can use provolone or gouda if you prefer. Both melt well and add great flavor. Experiment with different cheeses to find your favorite combination. Mixing mozzarella with a sharper cheese can also enhance taste. What can I serve alongside this pasta dish? A fresh garden salad pairs well for a bright contrast. Garlic bread also makes a great side. If you want something warm, roasted vegetables would complement the creamy pasta nicely. How long will leftovers last in the fridge? Leftovers can last up to three days in the fridge. Make sure to store them in an airtight container. When ready to eat, reheat gently on the stove to keep the sauce creamy. For exact instructions, refer to the Full Recipe. This blog post covered how to make creamy mozzarella shrimp pasta. We discussed key ingredients, step-by-step instructions, and tips to enhance flavor. I shared ideas for variations to fit dietary needs and proper storage techniques for leftovers. Remember, cooking should be fun and creative. Don’t hesitate to try your own twists on this dish. Enjoy every bite, and impress your family with a delicious meal!

Creamy Mozzarella Shrimp Pasta Delightful Dinner Idea

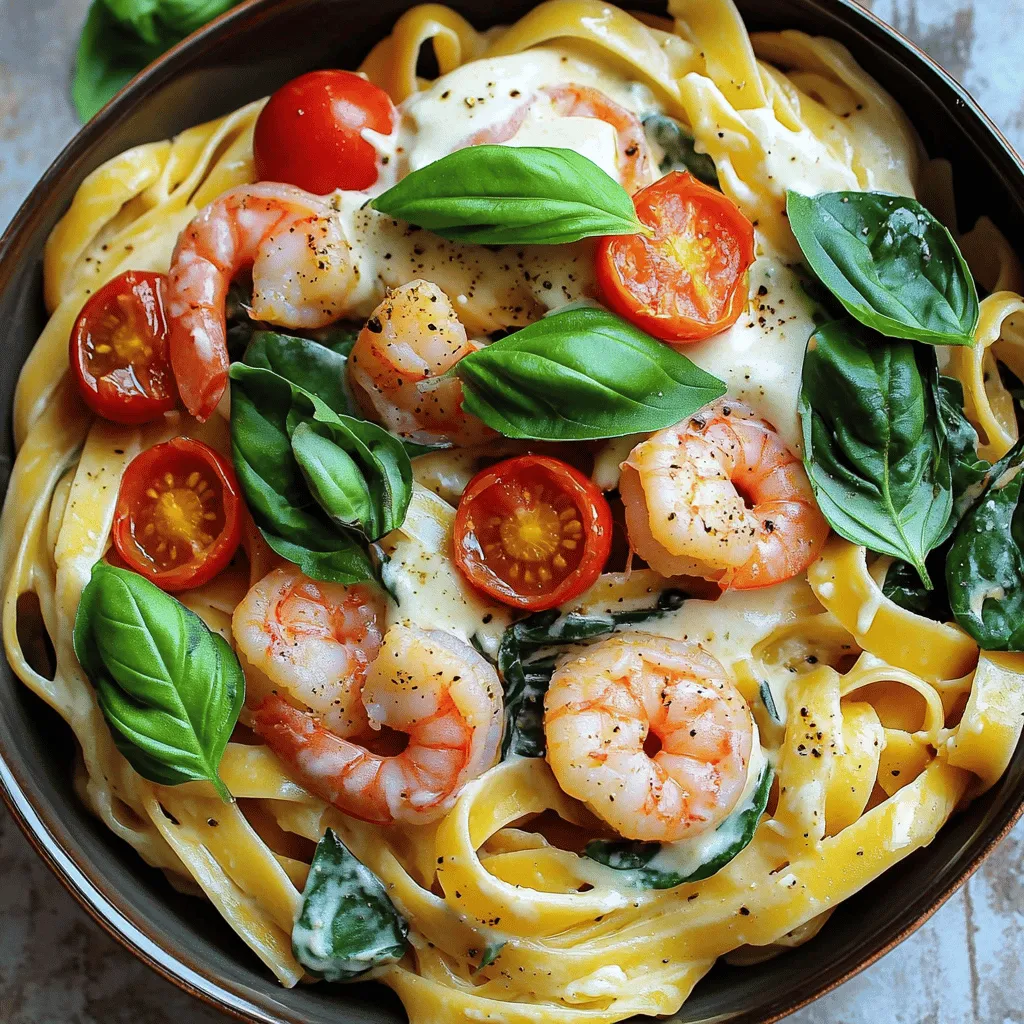
Imagine a creamy pasta dish that combines tender shrimp with rich mozzarella. This Creamy Mozzarella Shrimp Pasta is the perfect

Older posts
Newer posts
← Previous Page1 … Page47 Page48 Page49 … Page54 Next →

dsad

© 2025 Lisa Dishes • Built with GeneratePress

Our Policies

  • Copyright Policy
  • Cookie Policy
  • GDPR Policy
  • Privacy Policy
  • Disclaimer
  • Terms Of Use

More Information

  • Home
  • About
  • Contact
  • Appetizers
  • Dessert
  • Dinner
  • Drinks
©2025, Lisa Dishes About Back To Top