Skip to content
DisclaimerTerms Of UseGDPR PolicyCookie Policy

Lisa Dishes

  • Home
  • Drinks
  • Appetizers
  • Dinner
  • Dessert
  • About
  • Contact
  • Privacy Policy
DisclaimerTerms Of UseGDPR PolicyCookie Policy

lisa

- 1 lb boneless, skinless chicken tenders - 1 cup plain Greek yogurt - 1 tablespoon lemon juice - 3 cloves garlic, minced - 1 teaspoon dried oregano - 1 teaspoon dried thyme - 1 teaspoon paprika - 1 teaspoon salt - 1/2 teaspoon black pepper - 1 cup whole wheat breadcrumbs - 1/2 cup grated Parmesan cheese - Olive oil spray - 2 tablespoons fresh parsley, chopped (for garnish) The key to these crispy Greek chicken tenders is simple, fresh ingredients. First, you need chicken tenders. They stay juicy and cook quickly. I prefer boneless and skinless ones for ease. Next, Greek yogurt acts as a great marinade. It adds creaminess and tang. The lemon juice brightens the flavors and adds zest. Together, they create a flavorful base for your tenders. For seasonings, garlic is a must. It gives a rich aroma. Oregano and thyme add a classic Greek taste. Paprika brings a gentle smokiness. Salt and black pepper enhance all the flavors. Now, let’s talk about the bread crumb mixture. Whole wheat breadcrumbs make the tenders crunchy. Mixing them with Parmesan cheese gives a savory kick. The olive oil spray helps the crumbs crisp up nicely in the oven. Lastly, finish with fresh parsley. It makes the dish look lovely and adds a fresh touch. You can find the complete recipe [Full Recipe]. This combination of ingredients will have your kitchen smelling amazing! To start, combine Greek yogurt, lemon juice, minced garlic, and spices in a bowl. This mix adds a lot of flavor. The spices include oregano, thyme, paprika, salt, and black pepper. Whisk them together until smooth. Next, add the chicken tenders into the bowl. Coat each piece well with the marinade. Cover the bowl with plastic wrap and refrigerate for at least an hour. For the best flavor, let it sit overnight. Before baking, preheat your oven to 400°F (200°C). This step is crucial for even cooking. Line a baking sheet with parchment paper to prevent sticking. In another shallow bowl, mix the whole wheat breadcrumbs with grated Parmesan cheese. This blend gives the tenders a tasty and crispy crust. Now, take each chicken tender from the marinade. Let any extra marinade drip off before coating. Dredge the chicken in the breadcrumb mixture, pressing gently to help it stick. Place the coated tenders on the prepared baking sheet, giving them space. Lightly spray the tops with olive oil spray for added crunch. Bake in the preheated oven for 20 to 25 minutes. The tender should be golden and crispy. Flip them halfway through for even cooking. Enjoy your crispy Greek chicken tenders! Don’t forget to check the [Full Recipe] for all details. Marinate your chicken longer for a richer taste. I suggest at least four hours or overnight. This process lets the spices soak in well. Feel free to experiment with herbs like dill or spices like cumin. Each will give a unique twist to your dish. To get that perfect crunch, use olive oil spray. It helps the breadcrumbs crisp up nicely. Flip your chicken tenders halfway through baking. This ensures they cook evenly on both sides, giving you that golden texture. Serve your chicken tenders with fresh lemon wedges and tzatziki sauce. This adds a refreshing touch. Garnish with chopped fresh parsley for a pop of color. It makes your dish look inviting and tastes great too. For the full recipe, check the detailed instructions above. {{image_2}} To add some heat to your chicken tenders, try cayenne pepper or chili flakes. Start with a small amount. You can always add more if you want more spice. Mix the cayenne or chili flakes into the breadcrumb mixture. This gives a nice kick while keeping the Greek flavors intact. If you need a gluten-free option, switch to gluten-free breadcrumbs. You can also use almond flour for a crunchy texture. Just replace the breadcrumbs in the recipe with your choice. This way, everyone can enjoy these tasty chicken tenders without worry. Using an air fryer is a great way to cook these tenders. To do this, set the air fryer to 375°F (190°C). Cook for about 10-15 minutes, flipping halfway through. This method gives you a crispy texture while using less oil. Enjoy the same great flavor with a different cooking method! After you enjoy your crispy Greek chicken tenders, let them cool down. Once cool, place them in an airtight container. Store them in your fridge for up to three days. This method keeps them fresh and tasty for your next meal. You can freeze the cooked tenders if you want to save some for later. Just put them in a freezer-safe bag. They will stay good for up to two months. When you're ready to eat, I recommend reheating them in the oven. This way, they stay crispy and delicious. To bring back that crispy texture, use an oven or air fryer. Heat them until they reach an internal temperature of 165°F (74°C). This ensures they are safe to eat and perfectly warm. Enjoy your meal just like when they were fresh from the oven! For the full recipe, check it out here. Marinate the chicken for at least one hour. For the best flavor, let it sit overnight. The longer it marinates, the more the flavors blend. This step makes the chicken juicy and tasty. Yes, you can bake the chicken tenders in advance. Bake them and let them cool completely. Once cooled, store them in an airtight container. They will keep in the fridge for up to three days. When ready to eat, reheat them in the oven for a crispy finish. These chicken tenders pair well with many sides. Consider a fresh Greek salad or roasted vegetables. You can also serve them with tzatziki sauce for dipping. Lemon wedges add a bright touch too. For a complete meal, add some whole grain pita bread. Check out the Full Recipe for more ideas! This blog post covered how to make crispy Greek chicken tenders. We discussed the main ingredients, seasonings, and how to bake them to perfection. You learned tips to enhance flavor and achieve the right crunch. I shared variations like spicy options and gluten-free alternatives. Storing and reheating tips ensure you enjoy leftovers. These tenders are simple, tasty, and versatile. Now, get cooking and enjoy your delicious creation!

Crispy Greek Chicken Tenders Flavorful Easy Delight

If you’re craving a tasty, easy meal, these crispy Greek chicken tenders are a must-try! Packed with flavor from simple

- 1 pound baby carrots, peeled - 3 tablespoons unsalted butter - 2 tablespoons honey - 2 cloves garlic, minced - 1 tablespoon fresh thyme leaves (or 1 teaspoon dried thyme) - Salt and pepper to taste - Fresh parsley, chopped (for garnish) - Alternative seasonings (ginger, chili flakes) - Different types of carrots (regular, rainbow) In this dish, the baby carrots bring a sweet crunch. You can use regular carrots too, but baby carrots cook faster. The butter gives a rich flavor, while honey adds a sweet touch. Garlic gives it a nice kick, and thyme adds a fresh taste. You can also switch things up! Try adding ginger for warmth or chili flakes for heat. Using rainbow carrots can make your dish look bright and fun. These choices keep the dish exciting while still being simple. For the best taste, always use fresh ingredients. The fresh parsley at the end makes the dish pop with color. You will love how easy it is to make these honey garlic butter carrots. Check out the Full Recipe for all the steps and details! - Rinse and peel carrots. Use fresh baby carrots for the best taste. - Pat dry with a paper towel. This helps the butter mix well. - Melt butter in a skillet over medium heat. Let it bubble gently for flavor. - Stir in honey and garlic. Cook for about 1 minute until fragrant. - Add carrots and seasonings. Toss them gently in the honey garlic butter. - Sauté until tender and caramelized, about 8-10 minutes. Keep stirring. These steps make the carrots sweet and savory. You’ll love the mix of honey and garlic. For the full recipe, check the earlier section. - Use fresh garlic for the best flavor. Fresh garlic gives a strong taste that enhances the dish. You can crush or mince it for even more flavor. - Choose baby carrots for quicker cooking. Baby carrots cook faster and stay sweet. They also look nice on the plate. - How to adjust for different carrot sizes. If you use larger carrots, cut them into smaller pieces. This helps them cook evenly and faster. Aim for pieces about the same size as baby carrots. - Cooking time for crunchier or softer carrots. For crunchier carrots, cook for about 6-8 minutes. For softer carrots, you can cook for 10-12 minutes. Keep an eye on them to get your desired texture. - Best ways to garnish and present the dish. Sprinkle fresh parsley on top for a pop of color. You can also add a little thyme for a nice look and taste. - Serving suggestions for other dishes. These carrots pair well with grilled chicken or fish. You can serve them with rice or quinoa for a full meal. For a special touch, serve them on a nice platter. Check out the Full Recipe to create this dish! {{image_2}} You can change the taste of honey garlic butter carrots with herbs. Adding fresh rosemary gives a nice woodsy note. You can also try dill for a bright, fresh flavor. Another great twist is to incorporate citrus. Squeeze some lemon or orange juice over the dish for a zesty kick. This brightens the dish and adds a wonderful aroma. Want to cut calories? You can reduce butter and honey for a lighter dish. This still keeps the flavor but makes it healthier. If you follow a vegan diet, use olive oil instead of butter. Replace honey with agave syrup for a sweet touch. These swaps keep the dish tasty while fitting your diet. Honey garlic butter carrots pair well with many proteins. Serve them alongside chicken for a comforting meal. They also complement fish nicely, adding sweetness to the savory taste. For special occasions, these carrots shine as a side for holiday meals. They bring color and flavor to your table, making any feast feel festive. You can explore the full recipe for more tips and details on making this dish shine. To store leftover honey garlic butter carrots, place them in an airtight container. Make sure to cool the carrots first before sealing them up. You can keep them in the fridge for 3 to 5 days. This method helps to retain their flavor and texture. The best way to reheat these carrots is to use a skillet. Heat the skillet over medium heat and add a bit of butter or oil. Once warm, add the carrots. Stir them gently until they heat through. This keeps them tender and tasty. You can also use leftovers in other dishes. Try adding them to a salad or mixing them into a stir-fry. Their sweet and savory flavor adds a nice touch to many meals. You can use maple syrup, agave nectar, or brown sugar. Each option adds a unique flavor. Maple syrup gives a rich taste. Agave nectar is milder and lighter. Brown sugar adds a hint of molasses. Adjust the amount based on your taste preference. To add spice, try red pepper flakes or jalapeños. Mixing in a pinch of red pepper flakes gives a nice kick. If you want more heat, chop fresh jalapeños and toss them in. Start with a small amount, then taste. You can always add more spice if needed. Yes, but you must adjust cooking time and texture. Frozen carrots often cook faster. They may also become softer than fresh ones. To keep some crunch, reduce the cooking time. Ensure they are thawed before cooking for even results. This blog post highlighted how to make tasty sautéed carrots with simple ingredients. You learned about the steps to prepare, cook, and serve them well. I shared tips for perfecting your dish and creative variations to fit your taste. Remember, storage and reheating can keep leftovers delicious. With these ideas, you can enjoy this dish anytime. I hope you try it out and discover your favorite way to prepare sautéed carrots. Happy cooking!

Honey Garlic Butter Carrots Simple and Tasty Dish

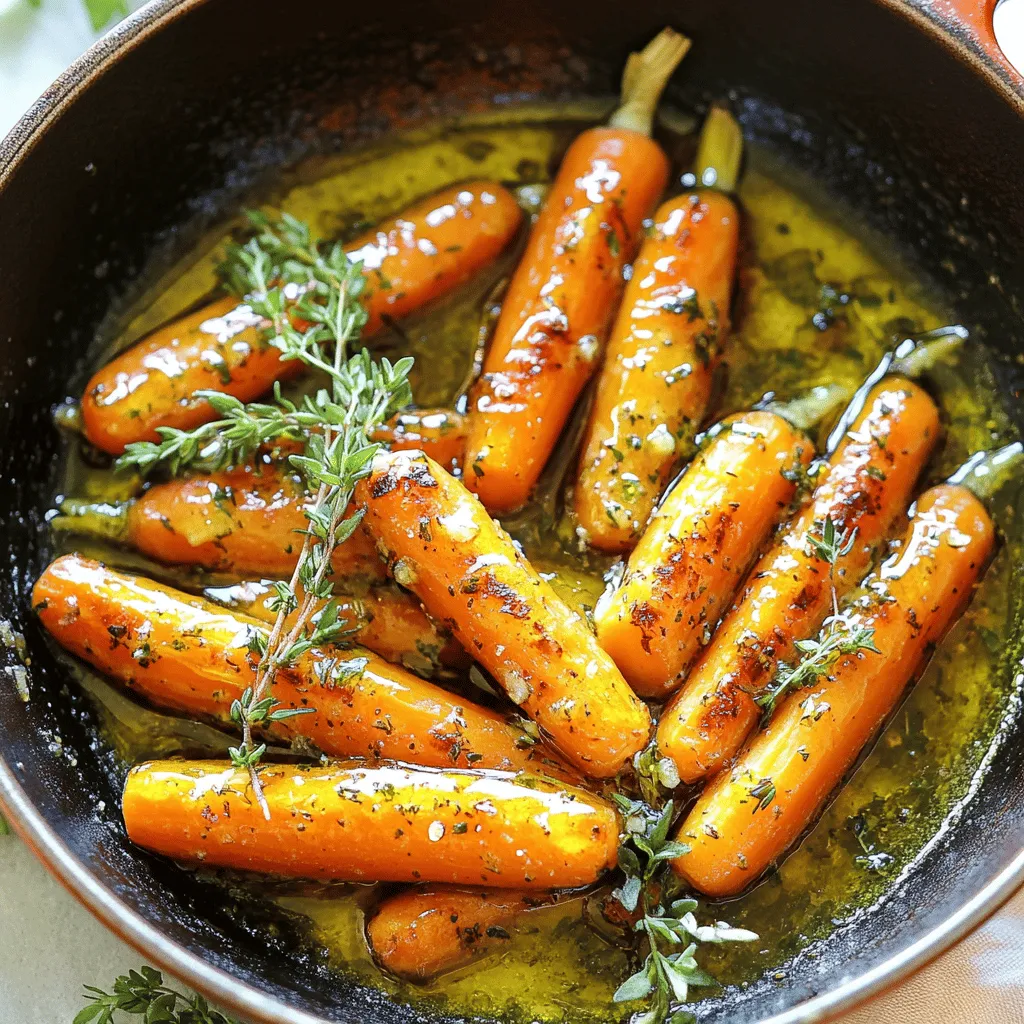
Looking for a quick, tasty side dish? Honey Garlic Butter Carrots are here to save your mealtime! With just a

For a delicious General Tso's Cauliflower, you need the right ingredients. Here’s a detailed list to get you started. - Cauliflower and Breading Components - 1 medium head of cauliflower, cut into florets - 1 cup cornstarch - 1/2 cup all-purpose flour - 1 teaspoon baking powder - 1 teaspoon salt - 1/2 teaspoon black pepper - 1/2 teaspoon garlic powder - 1/2 teaspoon onion powder - 1 cup water - Vegetable oil, for frying - Sauce Ingredients - 1 tablespoon sesame oil - 1 tablespoon minced ginger - 3 cloves garlic, minced - 1/4 cup soy sauce - 1/4 cup rice vinegar - 1/4 cup brown sugar - 1 teaspoon red pepper flakes (adjust for spice level) - Optional Garnishes - 2 green onions, sliced - Sesame seeds, for garnish These ingredients work together to create a flavorful dish. The cauliflower gets crispy, and the sauce adds depth. You can find the full recipe later to see how all these come together. Enjoy cooking! To make the batter, start with a large bowl. Add the following dry ingredients: - 1 cup cornstarch - 1/2 cup all-purpose flour - 1 teaspoon baking powder - 1 teaspoon salt - 1/2 teaspoon black pepper - 1/2 teaspoon garlic powder - 1/2 teaspoon onion powder Whisk these well to combine. Next, slowly add 1 cup of water. Stir until the batter is smooth. It should be thick enough to coat the cauliflower florets. Heat vegetable oil in a deep pot or fryer. Aim for 350°F (175°C). While the oil heats, dip each cauliflower floret into the batter. Make sure to let the excess batter drip off. Carefully lower the florets into the hot oil. Fry them in batches until they are golden and crispy, about 5-7 minutes. Use a slotted spoon to remove them and place them on paper towels to drain. In a separate pan, pour in 1 tablespoon of sesame oil. Heat it over medium heat. Add in 1 tablespoon of minced ginger and 3 cloves of minced garlic. Sauté these for 1-2 minutes until they smell great. Now stir in the sauce ingredients: - 1/4 cup soy sauce - 1/4 cup rice vinegar - 1/4 cup brown sugar - 1 teaspoon red pepper flakes (use less if you want it milder) Let the sauce simmer for 3-5 minutes until it thickens slightly. Toss the crispy cauliflower in this flavorful sauce until every piece is covered. For the best presentation, serve the General Tso's Cauliflower in a large bowl. Garnish with sliced green onions and sesame seeds. Enjoy this dish with some steamed rice for a complete meal. You can find the Full Recipe for more details. Achieving Crispy Cauliflower To get that crispy outside, start with dry cauliflower. Pat the florets with a paper towel. The batter should be thick enough to stick but not too thick. Dip each floret and shake off the extra batter. This helps the coating stay crunchy. Tips for Frying Heat your oil to 350°F (175°C). This is key for crispy cauliflower. If the oil is too cool, the florets will soak up oil and become soggy. Fry in small batches. This keeps the oil temperature steady and helps each piece get golden brown. Sauce Consistency The sauce should coat the cauliflower without being runny. After you mix the sauce, simmer it until it thickens a bit. This adds flavor and helps it stick to the crispy florets. If you want a sweeter sauce, add more brown sugar, but do this slowly. Always taste as you go. For the full recipe, check the section above. {{image_2}} Gluten-Free Modifications To make General Tso's Cauliflower gluten-free, swap regular flour for gluten-free flour. You can also use gluten-free soy sauce or tamari. This keeps the dish tasty while meeting dietary needs. Adding Protein (e.g., Tofu) To add protein, mix in tofu. Press and cube firm tofu, then toss it in the same batter. Fry it until golden and crispy. This boosts the meal's nutrition and makes it more filling. Spice Level Adjustments Adjust the heat by changing the red pepper flakes. For mild flavor, use less or skip them. If you want more spice, add fresh chili peppers or sriracha to the sauce. This gives you control over the heat level. Feel free to explore these variations to fit your taste and dietary needs. You can find the full recipe above for all the details! Store your General Tso's Cauliflower in an airtight container. This helps keep the dish fresh. Make sure it cools to room temperature first. Refrigerate it within two hours of cooking. It will stay good for about three days. To keep the crispy texture, do not cover it tightly. Instead, place a paper towel inside the container. This will absorb excess moisture. You can also store the sauce separately. This way, the cauliflower stays crunchy when you reheat it. To reheat, use an oven or an air fryer. Preheat your oven to 375°F (190°C). Bake for about 10 minutes. If using an air fryer, set it to 350°F (175°C) and heat for 5-7 minutes. This helps restore some crispiness. You can also use a microwave, but it may make the cauliflower softer. You can freeze General Tso's Cauliflower, but the texture may change. To freeze, let it cool completely. Then, place it in a freezer-safe bag or container. Make sure to remove as much air as possible. It will last up to three months in the freezer. When ready to eat, thaw in the fridge overnight, then reheat. For the best taste, use the fresh version whenever possible. For the full recipe, check the link above. Yes, you can prepare General Tso's Cauliflower in advance. Cook the cauliflower and store it in the fridge. Keep the sauce separate. When ready to serve, reheat the cauliflower and toss it with the sauce. This keeps the cauliflower crispy. If you need a soy sauce substitute, try coconut aminos. It has a similar taste but is soy-free. You can also use tamari for a gluten-free option. Both will add flavor to your dish. To add heat, increase the red pepper flakes in the sauce. You can also add sliced fresh chilies for extra spice. Drizzle with hot sauce before serving if you want more kick. Adjust to your taste for the perfect spice level. For the full recipe, check out General Tso's Cauliflower. This blog covered making General Tso's Cauliflower with simple ingredients and clear steps. We explored how to prepare the cauliflower, along with tips for perfect texture. Variations let you customize the dish for diets or spice needs. We also discussed how to store leftovers. In conclusion, cooking this dish can be fun and rewarding. With practice, you’ll master the flavors and techniques. Enjoy your kitchen adventures with this tasty option!

General Tso’s Cauliflower Easy and Flavorful Recipe

Are you ready to turn your dinner into a flavorful feast? In this easy recipe for General Tso’s Cauliflower, I’ll

- 4 boneless, skinless chicken thighs - 1 cup pineapple chunks (fresh or canned) - 1 bell pepper (red or yellow), sliced - 1 red onion, sliced - 2 tablespoons soy sauce (low sodium) - 2 tablespoons honey - 1 tablespoon rice vinegar - 3 cloves garlic, minced - 1 teaspoon grated ginger - 1 teaspoon sesame oil - Salt and pepper to taste - Fresh cilantro for garnish - Cooked rice or quinoa, for serving You can swap chicken thighs for chicken breasts. They cook well too. If you don’t like pineapple, try mango or peach. Use any bell pepper color you like. For a different taste, use lemon juice instead of rice vinegar. You can also use agave syrup in place of honey. If you need a low-carb option, use zucchini noodles instead of rice. These swaps keep the meal tasty and fun. This dish serves 4 people. Each serving has around: - Calories: 350 - Protein: 25g - Carbohydrates: 40g - Fat: 10g - Fiber: 2g - Sugar: 8g These numbers may change based on your ingredient choices. For a healthy meal, this recipe packs flavor and nutrition. You can find the Full Recipe for detailed steps and tips. Start by preheating your oven to 400°F (200°C). This step is key to getting a nice, even cook on the chicken and veggies. Line a large baking sheet with parchment paper to make cleanup easy. In a mixing bowl, combine the soy sauce, honey, rice vinegar, minced garlic, grated ginger, and sesame oil. Whisk them together until well mixed. This marinade packs a punch with sweet and savory flavors, perfect for our chicken. Take the chicken thighs and place them in a large resealable bag. Pour half of the marinade over the chicken, making sure it coats every piece. Reserve the other half for later. Seal the bag and let it marinate for at least 20 minutes. If you have time, marinating for up to 2 hours in the fridge gives even better flavor. Once your chicken has marinated, take the sheet pan out. Place the marinated chicken thighs in the center. Next, surround them with sliced bell pepper, red onion, and pineapple chunks. Sprinkle salt and pepper over the veggies for extra taste. Pour the reserved marinade over everything on the sheet pan. Bake in the preheated oven for 25-30 minutes. Check that the chicken is fully cooked; it should reach an internal temperature of 165°F (75°C). The veggies should be tender and flavorful. For a touch of caramelization, switch your oven to broil for the last 3-4 minutes. This step adds a lovely color and a bit of crunch. Keep a close eye on it to prevent burning. Once cooked, take the sheet pan out of the oven. Garnish your dish with freshly chopped cilantro. Serve over cooked rice or quinoa for a complete meal. If you want more flavor, drizzle some extra marinade over the top. Enjoy your tropical paradise! For the full recipe, check out the Tropical Paradise Sheet Pan Hawaiian Chicken . To get the best flavor, let the chicken marinate. I suggest at least 20 minutes. If you have extra time, go for two hours in the fridge. This helps the chicken soak up all the tasty juices. Use a resealable bag for easy mixing. You can also use a shallow dish. Make sure the chicken is well coated in the marinade. Cooking time can change based on your oven and chicken size. Always check the internal temperature. The chicken should reach 165°F (75°C). If you use larger pieces, add 5-10 more minutes. If your oven runs hot, check the chicken a bit earlier. Use a meat thermometer for the best results. For even cooking, spread the chicken and veggies out. Don’t overcrowd the pan. This helps everything cook nice and evenly. Use parchment paper for easy cleanup. It keeps the food from sticking and makes for a quick wash up. If you want extra caramelization, broil the dish for a few minutes at the end. Just watch it closely so it doesn’t burn. {{image_2}} You can swap chicken for other meats. Try boneless pork chops or turkey thighs. Both options work well and taste great. If you prefer seafood, use shrimp. Just note that shrimp cooks faster than chicken. Bake shrimp for only 15-20 minutes. You can also use tofu for a plant-based dish. Make sure to press and cube the tofu before marinating. Feel free to mix up the vegetables. Zucchini, carrots, and snap peas are fantastic choices. You can even add broccoli or cauliflower for extra crunch. Just make sure to cut the veggies into similar sizes. This ensures they cook evenly. You can also use frozen veggies if you're short on time. Just thaw and pat them dry before adding them to the pan. Want to add some heat? Make your Hawaiian chicken spicy! Add diced jalapeños or red pepper flakes to the marinade. You can also mix in a splash of hot sauce. If you like a smoky flavor, consider adding chipotle powder. This will give your dish a nice kick. Just remember to adjust the amount according to your spice level. Enjoy this Full Recipe for a delicious meal! After you cook the Sheet Pan Hawaiian Chicken, let it cool down. Store leftovers in an airtight container. This keeps the chicken and veggies fresh. They will last for about 3 to 4 days in the fridge. Make sure to label the container with the date. This way, you know when to eat them. If you want to save some for later, freezing is a great option. Place the cooled chicken in a freezer-safe bag. Remove as much air as possible before sealing. This helps prevent freezer burn. You can freeze it for up to 3 months. When ready to eat, thaw it overnight in the fridge. To reheat, use the oven for the best results. Preheat it to 350°F (175°C). Place the chicken on a baking sheet and cover it with foil. Heat for about 20 minutes or until warm. You can also use a microwave, but the oven keeps it juicy. If using a microwave, heat in short bursts, checking for warmth. Enjoy your delicious meal! To make this dish, start by marinating chicken thighs. Whisk soy sauce, honey, rice vinegar, minced garlic, grated ginger, and sesame oil in a bowl. Pour half the marinade over the chicken. Let it sit for at least 20 minutes. Then, place the chicken on a prepared sheet pan. Surround it with sliced bell peppers, red onion, and pineapple chunks. Pour the reserved marinade over everything. Bake at 400°F for 25-30 minutes. You can broil it for a few minutes to add color. Finally, garnish with cilantro and serve over rice or quinoa. For the full recipe, check the details above. You can use frozen chicken, but it’s best to thaw it first. Cooking frozen chicken increases the cooking time. It may also cook unevenly. Thaw the chicken overnight in the fridge or in cold water. Once thawed, follow the marinating and baking steps as usual. Sheet Pan Hawaiian Chicken goes well with many sides. Here are a few options: - Cooked rice - Quinoa - Steamed broccoli - Grilled asparagus - Mixed greens salad These sides add flavor and balance to the meal. Leftover Hawaiian chicken lasts about 3-4 days in the fridge. Store it in an airtight container. Make sure it cools down before sealing. For longer storage, consider freezing it. It can last up to 3 months in the freezer. Yes, you can prepare this dish ahead of time. Marinate the chicken a few hours before cooking. You can also chop the vegetables and store them in the fridge. Just arrange everything on the sheet pan and bake when ready. This way, you can enjoy a quick meal with less prep time. This blog post covered everything you need for Sheet Pan Hawaiian Chicken. You learned about the ingredients, how to make a tasty marinade, and step-by-step cooking tips. We discussed variations, like using different proteins or veggies, and how to store leftovers. Whether you’re a beginner or a pro, this recipe offers something for everyone. Enjoy making this dish, and feel free to experiment with flavors. Happy cooking!

Sheet Pan Hawaiian Chicken Easy and Flavorful Meal

Looking for a quick and tasty dinner idea? You’ve come to the right place! Sheet Pan Hawaiian Chicken is an

- 4 lobster tails - 1/2 cup unsalted butter - 6 cloves garlic, minced - 1/2 cup heavy cream When you make creamy garlic butter lobster tails, the main ingredients are key. The lobster tails give the dish its rich flavor. Unsalted butter adds a creamy base. Garlic brings a strong, savory punch, while heavy cream adds smoothness. Each ingredient works together to create a delightful taste that makes your meal special. - 1/4 teaspoon red pepper flakes - Salt and pepper to taste - 1 tablespoon fresh parsley, chopped - Lemon wedges for serving Now, let’s talk seasonings and garnishes. Red pepper flakes add just the right amount of heat. Salt and pepper enhance the flavors of the lobster and sauce. Fresh parsley not only looks good but also adds freshness. Finally, lemon wedges are perfect for a bright finish. They balance the rich sauce and make each bite shine. For the full recipe, you can check out Creamy Garlic Butter Lobster Tails. Each step is simple and fun, ensuring a delightful dinner experience! 1. Preheat your oven to 375°F (190°C). This step gets the oven ready for baking. 2. Take kitchen scissors and cut the top shell of the lobster tails lengthwise. Stop just before the end. Gently pull the meat upward. This process is called deveining the lobster. 1. In a large skillet over medium heat, melt the butter. This will create a rich base for your sauce. 2. Add the minced garlic to the melted butter. Sauté it for about 1-2 minutes until it smells great. Be careful not to burn the garlic. 3. Next, stir in the heavy cream and red pepper flakes. Mix well until everything is combined and warm. 4. Season your creamy mixture with salt and pepper to taste. Lower the heat and let it simmer gently for 2-3 minutes. This thickens the sauce just right. 5. Arrange the lobster tails in a baking dish. Spoon the creamy garlic butter sauce over each tail. Make sure to cover them evenly. 6. Bake in the preheated oven for 12-15 minutes. The lobster meat should look opaque and feel firm when done. 7. When cooked, take them out of the oven. Garnish with freshly chopped parsley for a pop of color. For the full recipe, follow the steps above to enjoy this delightful dish. To make your creamy garlic butter lobster tails even better, adjust the seasoning. Add more salt or pepper if you like bold flavors. You can also use fresh herbs such as parsley or basil for a brighter taste. Fresh ingredients really boost flavor. Always choose the freshest lobster tails you can find. Fresh garlic packs more punch than the jarred stuff. Do not overcook your lobster. This is key to a tender bite. When lobster is done, it should look opaque and feel firm. If you overcook it, the meat turns tough. Keep an eye on the baking time. You can also grill or broil the lobster if you want a smoky taste. These methods add a nice char that complements the garlic butter. For the full recipe, check out the detailed steps above and enjoy a delightful dinner! {{image_2}} You can play with flavors to make this dish your own. Adding fresh herbs like thyme or dill gives a bright note to the rich sauce. Just chop a tablespoon and mix it in when you add the cream. This makes each bite fresh and aromatic. For spice lovers, you can crank up the heat! Adding more red pepper flakes gives the dish a nice kick. Just be careful not to overdo it. Start with a pinch and taste as you go. This lets you find the perfect balance of heat and flavor. Presentation can elevate your meal. Serve the lobster tails on a large platter, surrounded by lemon wedges. This adds color and a zesty touch. Drizzle extra creamy garlic butter over the tails for a luxurious look. Sprinkle with fresh parsley for a pop of green. Pair your lobster tails with a glass of white wine. A crisp Chardonnay or a light Sauvignon Blanc complements the rich butter sauce. The wine’s acidity balances the flavors perfectly. Enjoy this delightful dinner with friends or family, and watch them be impressed! To keep lobster tails fresh, store them in the fridge. Place them in an airtight container. This helps keep out moisture and air. Use the leftover lobster within two days for the best taste. If you want to store them longer, freezing is a great option. For freezing, wrap each lobster tail in plastic wrap. Then put them in a freezer bag. Remove as much air as you can before sealing. This helps prevent freezer burn. You can store lobster tails in the freezer for up to three months. When it’s time to reheat leftover lobster tails, do it gently. You want to keep them juicy and tender. One method is to use the oven. Preheat your oven to 350°F (175°C). Place the lobster tails in a baking dish. Add a splash of water to keep them moist. Cover the dish with foil. Heat for about 10-15 minutes. You can also use the microwave. Place the lobster tails in a microwave-safe dish. Add a little butter or water. Cover with a damp paper towel. Heat on medium power for 1-2 minutes. Check often to avoid drying out the meat. For the best results, always reheat lobster tails slowly and carefully. This will help maintain their delicious flavor. How to choose fresh lobster tails? To pick fresh lobster tails, look for tails with a firm shell. The shell should feel hard and smooth. Check for a shiny appearance and no dark spots. Fresh tails will smell like the ocean, not fishy. Choose tails that are heavy for their size. Can I make this dish ahead of time? You can prepare the creamy garlic butter sauce in advance. Store it in the fridge for up to two days. When ready to serve, warm it up and cook the lobster tails. It’s best to cook the lobster fresh for the best taste. What sides pair well with creamy garlic butter lobster tails? Great sides include garlic bread, roasted vegetables, or a simple salad. You can also serve with rice or pasta. Lemon wedges add a nice touch to balance the richness of the lobster. How to prevent lobster from getting rubbery? To keep lobster tender, avoid overcooking. Cook lobster tails until they are just opaque. Use a meat thermometer; the internal temperature should reach 140°F (60°C). Cooking quickly at high heat helps too. Is it possible to make this recipe dairy-free? Yes, you can swap the butter and cream for vegan alternatives. Use plant-based butter and coconut cream for a rich flavor. This keeps the dish creamy while making it dairy-free. Now you know how to make creamy garlic butter lobster tails. We covered the key ingredients, cooking steps, and useful tips. Don’t forget to adjust your seasonings and play with flavors to fit your taste. This dish is special for a reason. It can impress anyone at your table. Store leftovers carefully and reheat them right to keep their flavor. Enjoy this treat on occasions, and share your delicious results with friends.

Creamy Garlic Butter Lobster Tails Delightful Dinner

Get ready to impress at dinner with Creamy Garlic Butter Lobster Tails! This dish is simple and full of rich

- 8 oz egg noodles - 1 lb flank steak, thinly sliced - 3 tablespoons soy sauce - 2 tablespoons hoisin sauce - 2 tablespoons oyster sauce (optional) - 2 teaspoons cornstarch - 2 tablespoons vegetable oil - 1 tablespoon ginger, minced - 2 cloves garlic, minced - 1 red bell pepper, thinly sliced - 1 cup snap peas - 3 green onions, sliced (both white and green parts) - 1 teaspoon sesame oil - Salt and pepper to taste - You can use rice noodles instead of egg noodles. They have a nice texture. - For beef, chicken or pork can work well. You can also use tofu for a vegan dish. - If you want a healthier option, try zucchini noodles or whole wheat noodles. Mongolian Beef Noodles can fit many tastes with these swaps. Enjoy making it your own! For more details, check the Full Recipe. - Start by cooking 8 oz egg noodles according to the package instructions. - Once cooked, rinse them under cold water to prevent sticking. Set aside for later use. - In a bowl, combine sliced flank steak with 3 tablespoons soy sauce, 2 tablespoons hoisin sauce, and 2 teaspoons cornstarch. - Mix well until the beef is coated. Let it marinate for 15 minutes to soak in the flavors. - Heat 1 tablespoon of vegetable oil in a large skillet or wok over medium-high heat. - Add the marinated beef slices in a single layer. Cook for 2-3 minutes until browned and tender. - Remove the beef from the pan and set aside to keep it juicy. - In the same skillet, add 1 tablespoon of vegetable oil. - Toss in 1 tablespoon minced ginger and 2 cloves minced garlic, stirring for about 30 seconds. This brings out a great aroma. - Next, add 1 red bell pepper and 1 cup snap peas. Sauté for 2-3 minutes until the veggies are tender-crisp. - Return the cooked beef to the skillet with the sautéed vegetables. - Add the cooked egg noodles and toss everything together. Drizzle with 1 teaspoon sesame oil. - Season with salt and pepper to taste. Stir-fry for another minute to heat through and mix flavors. - Transfer the Mongolian beef noodles to serving plates. - Garnish with sliced green onions for a pop of color. - You can also add lime wedges on the side for a fresh squeeze before eating. - To avoid overcooking the beef, cook it quickly. High heat helps keep it tender. - Cook the beef for just 2-3 minutes. Take it out when it turns brown. - For vegetables, add them after the beef. They should stay crisp, not mushy. - Stir-fry the veggies for 2-3 minutes. You want them tender but still bright. - Use soy sauce, hoisin sauce, or oyster sauce for rich flavor. They add depth. - For a kick, try adding chili sauce or red pepper flakes. - Fresh herbs like cilantro or basil can brighten the dish. Add them right before serving. - Green onions are great for garnish. They add a fresh crunch and color. - A wok is best for stir-frying. It heats evenly and allows great movement. - If you don’t have a wok, a large skillet works too. - Use a sharp knife to slice the beef thinly. A good knife makes it easier. - Have a spatula ready for tossing the ingredients. It helps mix everything well. {{image_2}} You can switch up the protein in this dish. Chicken or pork works well. Just slice them thinly like the beef. Marinate them in the same sauces for great flavor. If you prefer a vegetarian dish, try tofu. Firm tofu holds up well when stir-fried. Cut it into cubes and use the same marinade. If you want to change the noodles, consider rice noodles or udon. Rice noodles are light and cook quickly. Udon noodles are thick and chewy, adding a nice texture. For a gluten-free option, use rice noodles. They are naturally gluten-free and easy to find. Adding seasonal vegetables boosts nutrition and flavor. In spring, try asparagus or peas. In summer, use zucchini or bell peppers. Fall brings great options like carrots or sweet potatoes. In winter, consider broccoli or bok choy. You can also mix in greens like spinach or kale for extra nutrients. To store leftover Mongolian beef noodles, let them cool first. Place them in airtight containers. Glass or plastic containers work well. Store them in the fridge for up to three days. This keeps the flavors fresh and tasty. For longer storage, you can freeze the noodles. Use freezer-safe bags or containers to prevent freezer burn. Make sure to remove as much air as you can. When you want to eat them, thaw in the fridge overnight. Reheat in a pan or microwave until hot. To keep your dish fresh, eat within three days when stored in the fridge. If frozen, use within two months for best flavor. Check for signs of spoilage, like off smells or changes in color. If you notice these signs, it’s best to toss the leftovers. Enjoy your delicious meal worry-free! You can try many sauces to mix things up. Here are some tasty options: - Teriyaki sauce for sweetness. - Black bean sauce for deep flavor. - Chili paste for heat. These alternatives will change the taste. Experiment to find your favorite! Yes, you can make this dish ahead. Here’s how: - Cook the noodles and store them in the fridge. - Marinate the beef and keep it sealed. - Sauté vegetables fresh when you are ready to eat. This method keeps the dish tasty and fresh! You can change the spice level easily. Here are some ideas: - Add crushed red pepper for heat. - Use fresh chili peppers for a kick. - Skip the spicy ingredients for a milder dish. Adjust to your taste for the perfect balance! For the complete recipe, refer to the Full Recipe section. It has all the details you need! Yes, this dish is perfect for meal prep. Try these tips: - Divide the meal into containers. - Store the beef and noodles separately to avoid sogginess. - Reheat in the microwave or on the stove. You’ll have a quick, delicious meal ready to go! Mongolian Beef Noodles offers a tasty and simple meal you can make at home. We covered key ingredients, step-by-step cooking, and various tips to enhance flavors. You can also try new proteins and vegetable options for variety. Remember to store leftovers properly to keep them fresh. This dish is easy to adjust to your taste. Enjoy experimenting with the recipe and making it your own!

Mouthwatering Mongolian Beef Noodles Easy Stir-Fry Recipe

Craving a tasty dish that’s quick and easy? Look no further! My Mouthwatering Mongolian Beef Noodles recipe will satisfy your

- 2 cups all-purpose flour - 1/2 cup granulated sugar - 1/2 cup brown sugar, packed - 1/2 cup unsalted butter, softened - 1 teaspoon baking powder - 1/2 teaspoon baking soda - 1/2 teaspoon ground cinnamon - 1/2 teaspoon ground nutmeg - 1/4 teaspoon salt - 2 cups diced apples (Granny Smith or Honeycrisp recommended) - 1 tablespoon lemon juice - 1/4 cup raisins (optional) - 1 tablespoon cornstarch The ingredients for perfect apple pie cookies are simple yet full of flavor. The mix of all-purpose flour, sugars, and softened butter creates a rich dough. The balance of baking powder and baking soda helps the cookies rise, making them light and fluffy. For flavor, I like to use ground cinnamon and nutmeg. These spices give warmth to each bite. The salt enhances the sweetness, making the cookies even better. The star of the show? The apples! I prefer Granny Smith or Honeycrisp for their tartness. Tossing them with lemon juice keeps them fresh and bright. If you want to add a chewy texture, include raisins. The cornstarch helps thicken the filling, making each cookie a delightful surprise. You can find the full recipe in the article. Just gather these ingredients and get ready for a treat! - Preheat your oven to 350°F (175°C). - Prepare a baking sheet with parchment paper. This helps the cookies not stick. - In a large bowl, combine the dry ingredients: flour, sugars, baking powder, baking soda, salt, cinnamon, and nutmeg. Whisk until everything is mixed well. - In a separate bowl, cream the softened butter until it is smooth. - Add an egg and vanilla extract to the butter. Mix until everything is well combined. - Gradually add the dry ingredients to the wet mixture. Mix until a dough forms. Don’t overmix! - Toss the diced apples with lemon juice, raisins, and cornstarch in a small bowl. This keeps the filling thick and tasty. - Take a tablespoon of dough. Flatten it in your palm. Place a teaspoon of the apple mixture in the center. Fold the dough over the filling and pinch the edges to seal it. - Repeat this step until you use all the dough and filling. - Place the cookies on the prepared baking sheet. Leave space between each cookie. - Brush the tops with milk for a nice golden finish. - Bake in the oven for 15-20 minutes. Look for a golden brown color. - Once baked, cool the cookies on a wire rack for 10 minutes. Enjoy your perfect apple pie cookies! For the full recipe, check out the complete instructions above. To get the best texture, avoid overmixing the dough. This helps keep your cookies light and flaky. Mix just until the ingredients blend. Also, ensure your butter is just softened, not melted. Soft butter helps to create a tender cookie. For a richer taste, use freshly ground spices. Fresh spices have more flavor and make a big difference. You can also experiment with different apple varieties. Each type of apple brings its own texture and taste. For a firmer bite, try Granny Smith, and for sweetness, go for Honeycrisp. Dust your cookies with powdered sugar before serving. This adds a lovely touch and makes them look fancy. Serve the cookies warm for the best experience. Warm cookies bring out all the flavors and make your home smell amazing. For the full recipe, check out the details above! {{image_2}} You can change the flavor of your apple pie cookies easily. - Add nuts like walnuts or pecans for crunch. - Include caramel or butterscotch chips for extra sweetness. These additions give a fun twist. They can make each bite unique. You can mix and match to find your favorite combo. Want to make these cookies fit your diet? Here are some ideas: - Substitute gluten-free flour for a gluten-free option. - Replace sugars with organic or alternative sweeteners. These changes help you enjoy the cookies while sticking to your needs. You can savor the taste without worry. Don’t feel stuck with just apples! You can use other fruits too. - Try pears or peaches for a different flavor. - Make a savory version with cheese and herbs. This way, you can create a variety of cookies. Each one can be a new surprise! Explore these options to keep things fun in the kitchen. For the full recipe, check the earlier section. To keep your perfect apple pie cookies fresh, store them in an airtight container. They will stay tasty at room temperature for up to 3 days. This way, you can enjoy them anytime during the week! If you want to save cookies for later, freeze them. You can keep them in the freezer for up to 3 months. Just lay them flat in a freezer-safe bag or container. When you're ready to eat, thaw the cookies at room temperature. They will taste just as good! Sometimes, you may want a warm cookie. You can warm them in the microwave for a few seconds. For a crispier texture, reheat them in the oven. Just a few minutes will bring back that fresh-baked feel. Enjoy your cookies warm! Yes, wrap and refrigerate the dough for up to 24 hours. This makes it easy for you to plan your baking. Just remember to let it sit at room temperature for a few minutes before rolling it out. Granny Smith and Honeycrisp are preferred for balance in sweetness and tartness. These apples hold their shape well when baked. Their flavors blend perfectly with the spices in the cookies. Yes, experimenting with allspice or cloves can add unique flavors. You can adjust the spices based on your taste. A hint of nutmeg or ginger also works well for extra depth. Look for a golden brown color and a firm texture when lightly pressed. The edges should be set while the center remains slightly soft. This ensures a nice chewy cookie inside. In this blog post, we covered the key ingredients and steps for making delicious apple pie cookies. We discussed tips to enhance flavor and texture, plus creative variations to try. Remember, choosing the right apples is crucial for the best taste. Whether you prefer classic flavors or want to experiment, these cookies are bound to impress. With a few easy tricks, you can create treats that are warm and inviting. Now, gather your ingredients and enjoy baking these delightful cookies!

Perfect Apple Pie Cookies Simple and Tasty Treat

Craving a delicious dessert that combines warm apples with a flaky cookie? You’re in for a treat! These Perfect Apple

- 1.5 lbs boneless, skinless chicken thighs - 1/4 cup low-sodium soy sauce - 1/4 cup honey - 2 tablespoons rice vinegar - 2 cloves garlic, minced - 1 tablespoon fresh ginger, grated - 1 tablespoon sesame oil - 1 teaspoon cornstarch (optional for thickening) - 2 cups broccoli florets - 2 carrots, sliced - 1 red bell pepper, sliced - 1 cup cooked brown rice or quinoa This dish shines with simple yet flavorful ingredients. Chicken thighs give you juicy meat. The teriyaki sauce combines sweet and savory notes. For veggies, I love using broccoli, carrots, and bell pepper. They add color and crunch. - Additional veggies like snap peas or mushrooms - Proteins like tofu or shrimp - Garnishing options such as sesame seeds and green onions Feel free to mix in other veggies. Snap peas add a nice snap. Mushrooms bring an earthy taste. For proteins, try tofu for a vegetarian twist. You can also garnish with sesame seeds or sliced green onions to make it pop. - Large skillet or pan for cooking - Mixing bowls for the marinade - Resealable bags or shallow dishes for marinating - Meal prep containers for storage Having the right tools makes cooking easier. A large skillet helps cook the chicken evenly. Use mixing bowls for preparing the marinade. Resealable bags are perfect for marinating. Finally, meal prep containers keep your food fresh and ready to eat. For the full recipe, check out the Easy Teriyaki Chicken Meal Prep. To start, gather the marinade ingredients. In a bowl, mix: - 1/4 cup low-sodium soy sauce - 1/4 cup honey - 2 tablespoons rice vinegar - 2 cloves garlic, minced - 1 tablespoon fresh ginger, grated - 1 tablespoon sesame oil If you want a thicker sauce, add 1 teaspoon cornstarch mixed with a splash of water. Stir well until combined. For the best flavor, let the chicken marinate longer. I recommend at least 30 minutes in the fridge. If you have time, marinate overnight for a deeper taste. This step is key to tender and tasty chicken. Next, heat a large skillet over medium heat. While it warms up, take the chicken thighs out of the marinade. Place them in the hot pan. Cook for about 6-7 minutes on each side. You want them golden brown and fully cooked. Use a meat thermometer to check. The inside should reach 165°F (75°C). This ensures the chicken is safe to eat. While the chicken cooks, it's time for the veggies. You can steam or sauté them. For this dish, I like to use: - 2 cups broccoli florets - 2 carrots, sliced - 1 red bell pepper, sliced If you sauté, add a little oil to a separate pan. Cook the veggies for about 4-5 minutes. This keeps them tender-crisp. The bright colors of the vegetables make the dish pop. Don't overcook; you want them vibrant and fresh. Once everything is cooked, you can combine it and finish your Easy Teriyaki Chicken Meal Prep. For the full recipe, check out the sections above. Marinating your chicken is key for great taste. I recommend marinating for at least 30 minutes. If you have time, let it sit overnight. This helps the chicken soak up all the flavors. You can also add more seasonings to the marinade. A pinch of red pepper flakes adds heat, while a splash of orange juice gives a sweet touch. To make meal prep easier, gather all your ingredients before you start. This saves time and keeps things organized. Cook in batches to prepare multiple meals at once. You can grill several chicken thighs or steam a lot of vegetables. This way, you have meals ready for days. If you want a thicker sauce, cornstarch works well. Mix it with a little water before adding it to the sauce. This helps it thicken nicely. If you don't have cornstarch, try mashing some cooked veggies into the sauce. This adds thickness and flavor without any extra ingredients. {{image_2}} You can easily switch up the protein in this recipe. Chicken thighs are great, but chicken breast works well too. It’s leaner and still tasty. If you want a meat-free option, try tofu. Press it first to remove extra water. Then, cube it and marinate just like the chicken. You could also use pork or beef. Both soak up the teriyaki flavors nicely. Feel free to get creative with vegetables! Broccoli, carrots, and red bell peppers are fantastic, but many others fit too. Think snap peas, zucchini, or bell peppers in different colors. Seasonal vegetables can add a fresh twist. For instance, asparagus in spring or squash in fall. If you have veggies you need to use up, toss them in! This teriyaki chicken pairs so well with many sides. You can serve it over rice, quinoa, or noodles for a filling meal. Want something lighter? Try it on a salad for a fresh crunch. You can even wrap it in lettuce or tortillas for a fun twist. This dish works for any meal of the day! For the full recipe, check back to ensure you have all the ingredients ready. To keep your Easy Teriyaki Chicken fresh, use airtight containers. Glass containers are great since they don’t stain. Plastic containers work too. Make sure they seal well. Store your meal prep in the fridge for up to four days. This way, you can enjoy it all week! You can freeze your teriyaki chicken for later. Let the chicken cool fully before packing it. Divide it into single servings. Use freezer-safe containers or bags. Label them with the date. When you're ready to eat, thaw it in the fridge overnight for best results. To reheat your teriyaki chicken, the microwave is quick. Place it in a microwave-safe dish and cover it. Heat it in short bursts. Stir often to avoid hot spots. You can also reheat it on the stove. Just add a splash of water to keep it moist. Heat over low until warm. This method helps keep the chicken juicy and tasty. You can store Easy Teriyaki Chicken in the fridge for up to four days. Make sure to keep it in an airtight container. This helps to keep it fresh and safe to eat. If you want to keep it longer, you can freeze it. When frozen, it can last for about three months. Just remember to thaw it in the fridge before reheating. Yes, you can make this dish vegetarian! Replace the chicken with firm tofu or tempeh. Both options absorb flavors well. You can also use seitan for a meat-like texture. For the marinade, ensure the soy sauce is gluten-free if needed. Feel free to add more veggies for extra nutrients and flavor. Using bottled teriyaki sauce is fine! It saves time and is easy to use. However, store-bought sauces can have added sugars and preservatives. If you prefer a healthier option, making your own is best. You have control over the ingredients and can adjust the flavor to your liking. Teriyaki chicken pairs well with many sides. Here are a few tasty ideas: - Steamed rice or quinoa - Stir-fried vegetables - Asian coleslaw - Cucumber salad - Kimchi These sides add balance and enhance the meal's flavor. They also make your plate colorful and appealing. Enjoy experimenting with different combinations! This guide has shown you how to make easy teriyaki chicken. You learned about key ingredients, tools, and cooking methods. We covered tips for flavor and meal prep efficiency. Variations help you customize the dish to your taste. Remember to store and reheat your meals properly to keep them fresh. Enjoy your cooking journey and share your tasty results!

Easy Teriyaki Chicken Meal Prep Quick and Simple Dish

If you’re looking for a quick and tasty meal prep option, you’ve found it! This Easy Teriyaki Chicken recipe is

- 1 cup red lentils, rinsed - 1 large onion, finely chopped - 2 garlic cloves, minced - 2 medium carrots, diced - 1 medium potato, diced - 1 teaspoon ground cumin - 1 teaspoon ground coriander - 1/2 teaspoon turmeric - 1/2 teaspoon paprika - 4 cups vegetable broth - 2 tablespoons olive oil - Salt and pepper to taste - Fresh parsley, chopped (for garnish) - Lemon wedges (for serving) Red lentils are the star of this soup. They cook quickly and give a nice creamy texture. The onion and garlic add depth and flavor. Carrots and potatoes bring sweetness and heartiness. The spices—cumin, coriander, turmeric, and paprika—give it a warm, rich taste. Vegetable broth is key for a flavorful base. Olive oil adds richness and helps cook the vegetables. When buying lentils, look for bright color. Avoid any with dark spots. Fresh onions should feel firm and have no soft spots. Choose garlic that is dry and firm. Go for organic carrots and potatoes if you can. Fresh spices have more flavor, so check the date on the package. For broth, pick low-sodium options for better control over salt. Always choose fresh parsley for the best garnish. For the full recipe, click here: [Full Recipe]. To begin, gather all your ingredients. This makes cooking easier and more fun. Here’s what you need: - 1 cup red lentils, rinsed - 1 large onion, finely chopped - 2 garlic cloves, minced - 2 medium carrots, diced - 1 medium potato, diced - 1 teaspoon ground cumin - 1 teaspoon ground coriander - 1/2 teaspoon turmeric - 1/2 teaspoon paprika - 4 cups vegetable broth - 2 tablespoons olive oil - Salt and pepper to taste - Fresh parsley, chopped (for garnish) - Lemon wedges (for serving) Now, you will need to rinse the red lentils. This helps remove any dirt or dust. Chop the onion, garlic, carrots, and potato into small pieces. This allows them to cook evenly. Next, heat the olive oil in a large pot over medium heat. Add the chopped onion. Cook it for about 5 to 7 minutes until it turns soft and clear. Then, add the minced garlic and cook for one more minute. This step is key; it brings out the garlic’s flavor. Now, stir in the diced carrots and potatoes. Cook these for 4 to 5 minutes until they start to soften. This adds more texture to the soup. After that, sprinkle in the spices: cumin, coriander, turmeric, and paprika. Stir well to coat the vegetables. Cook this mixture for one more minute to toast the spices. Next, add the rinsed lentils and vegetable broth. Bring everything to a boil. Then, reduce the heat to low, cover the pot, and let it simmer for 25 to 30 minutes. This will cook the lentils and vegetables until they are tender. Once the soup has cooked, you can blend it. Use an immersion blender for a smooth texture. If you prefer a chunkier soup, just mash some lentils with a fork. After blending, taste the soup and add salt and pepper. Adjust these to your liking. For the best presentation, ladle the soup into bowls. Top each bowl with chopped parsley. Serve with lemon wedges on the side. The lemon brightens the dish and adds a refreshing taste. For the full recipe, check the details above. Enjoy your meal! When making Iraqi lentil soup, avoid overcooking the lentils. They can turn mushy. Also, be careful with salt. Adding too much early can make the soup taste too salty. You want to taste and adjust at the end. Lastly, don't skip the blending step. A smooth texture makes the soup nice and creamy. To boost the flavor, try toasting your spices. Heat them briefly in the pot before adding other ingredients. This helps release their oils and enhances the taste. Using fresh garlic and onions also adds depth. If you want a hint of acidity, squeeze fresh lemon juice before serving. It makes a big difference! Serve your soup hot in deep bowls. Garnish with fresh parsley for color and taste. Pair it with crusty bread to soak up every drop. For a twist, add a dollop of yogurt on top. You can also serve it with a light salad on the side. If you want to explore more, check out the Full Recipe for variations and tips! {{image_2}} Iraqi lentil soup is naturally vegetarian and vegan. You only need plant-based ingredients. The main star is the red lentils. They provide protein and fiber. This soup is hearty and filling without meat. You can enjoy it as is or add more veggies for fun. Feel free to add more vegetables if you like! Carrots and potatoes are great, but you can try: - Spinach - Kale - Zucchini - Bell peppers These add color, flavor, and nutrients. Just chop them up and add them when you cook the onions. They will cook well in the broth. If you enjoy heat, add spices! Try these: - Cayenne pepper - Red pepper flakes - Chopped jalapeños Add them when you sprinkle in the cumin and other spices. Start with a little, then taste. You can always add more if you want more heat! This makes the soup exciting and warms you up. Explore these variations to make your soup your own. Check out the Full Recipe for more details on how to make this delicious dish! To store your Iraqi lentil soup, let it cool first. Pour it into a clean container. Seal it tightly with a lid. This helps keep air out. You can store it in the fridge for up to five days. Make sure it is in a shallow container. This allows it to cool faster. You can freeze the soup for later. Use freezer-safe containers or bags. Leave some space at the top, as it will expand. Label the containers with the date. The soup stays good for up to three months. Thaw it in the fridge overnight before using. When you are ready to eat, reheat the soup on the stove. Pour it into a pot over medium heat. Stir occasionally to heat it evenly. You can add a splash of water or broth if it is too thick. Heat until hot, but do not boil it again. Enjoy your delicious bowl of Iraqi lentil soup! Traditional Iraqi Lentil Soup is a warm, hearty dish made with red lentils. It often includes onions, garlic, carrots, and potatoes. The soup is flavored with spices like cumin and coriander. This recipe is simple yet full of flavor. Many families enjoy it during cold months. It is comforting and nutritious, making it a popular choice. Yes, you can make Iraqi Lentil Soup in a slow cooker! To do this, add all the ingredients to your slow cooker. Use the same amounts as in the recipe. Set it on low for 6 to 8 hours, or on high for 3 to 4 hours. This method lets the flavors blend well. Just remember to blend the soup after cooking for a smooth texture. Iraqi Lentil Soup pairs well with various sides. Here are some great options: - Fresh bread: Pita or crusty bread works best. - Salad: A simple green salad adds freshness. - Rice: Serve with white or brown rice for a filling meal. - Lemon wedges: These add a bright flavor when squeezed in. For the full recipe, check out the detailed cooking steps and tips! Iraqi lentil soup is easy to make with the right ingredients and steps. Focus on quality when choosing your items. Follow our detailed cooking process for great taste and texture. Avoid common mistakes for the best result, and try our variations for a twist. Store leftovers properly to enjoy later. You can confidently make this soup, and I hope you find joy in cooking it. Let every bowl warm your heart and spirit.

Iraqi Lentil Soup Hearty and Flavorful Recipe

If you’re looking for a warm, filling meal, you must try my Iraqi Lentil Soup. This dish blends simple ingredients

To make the 20-Minute One-Pan Spinach Gnocchi, gather these key components: - 1 pound store-bought potato gnocchi - 2 cups fresh spinach, roughly chopped - 1 cup cherry tomatoes, halved - 1 cup heavy cream - 1/2 cup grated Parmesan cheese - 2 cloves garlic, minced - 2 tablespoons olive oil - 1/2 teaspoon red pepper flakes (optional, for heat) - Salt and pepper to taste - Fresh basil leaves for garnish Using fresh ingredients makes a big difference in flavor. Fresh spinach adds a bright taste. Cherry tomatoes burst with juice, enhancing the dish. Heavy cream creates a rich and creamy sauce. If you prefer, frozen ingredients can work too. Just thaw the spinach and tomatoes before cooking. They may not taste as vibrant, but the dish will still be good. For those with dietary needs, substitutions are easy. Use gluten-free gnocchi instead of regular ones. This keeps the dish friendly for gluten-sensitive eaters. You can also swap heavy cream with a non-dairy option like coconut cream. Enjoy making this meal suit your taste! For the full recipe, check out the One-Pan Wonder: Spinach Gnocchi Delight. 1. Preparing the skillet and sautéing garlic Start by heating 2 tablespoons of olive oil in a large non-stick skillet over medium heat. Once the oil is hot, add 2 cloves of minced garlic. Sauté for about 1 minute. You want the garlic to be fragrant but not browned. This step adds a lovely base flavor. 2. Cooking the cherry tomatoes Next, you will add 1 cup of halved cherry tomatoes to the skillet. Cook these for about 2-3 minutes. You want them to start softening and releasing their juices. This will help create a nice sauce for the gnocchi. 3. Adding gnocchi and heavy cream Now, it’s time to add 1 pound of store-bought potato gnocchi to the skillet. Stir gently and cook for about 3-4 minutes. You want the gnocchi to get a little golden. Then, pour in 1 cup of heavy cream. If you like heat, sprinkle in 1/2 teaspoon of red pepper flakes. Season with salt and pepper to taste. 4. Incorporating spinach and finishing touches Gently fold in 2 cups of roughly chopped fresh spinach. Allow the mixture to simmer for another 5-6 minutes. This step thickens the cream and wilts the spinach. The colors will be bright and inviting. 5. Presentation tips for serving Once everything is done, sprinkle 1/2 cup of grated Parmesan cheese over the top. Stir until the cheese melts into the dish. For serving, you can either keep it in the pan for a casual meal or spoon it into bowls. Top with fresh basil leaves for a pop of color. This makes the dish look beautiful and fresh. You can find the [Full Recipe] for more details. Enjoy your quick and easy meal! To get the best texture for gnocchi, choose store-bought options. They offer a soft, pillowy bite. Be gentle when stirring in the pan. Over-mixing can break them apart. Adjust cooking time based on your stove. If it cooks fast, check the gnocchi sooner. If it’s slower, give it a bit more time. Always keep an eye on the pan. Seasoning is key! Taste as you cook and adjust salt and pepper. A hint of red pepper flakes can add a nice kick. Save time by prepping ingredients first. Chop garlic and tomatoes right before you start cooking. This way, you won’t waste time looking for things. While the gnocchi cooks, wash your cutting board and tools. This keeps your kitchen tidy and ready for the next meal. You can also set the table or prep drinks during cooking. {{image_2}} You can easily swap out ingredients in this dish. Try using kale or broccoli instead of spinach. Both add great flavor and nutrition. If you want a different cheese, consider using mozzarella or feta. Each offers a unique taste that can change the dish. Adding proteins like chicken or sausage can make it heartier. Just cook the protein first, then add the other ingredients. Herbs can really lift the flavors in this dish. Fresh basil, parsley, or oregano add brightness. You can also try spicy variations by adding different peppers. Jalapeños or red pepper flakes can bring some heat. Adjust the amount based on your spice level. These enhancements make the dish fun and exciting. You can create a new meal every time! To keep your leftover gnocchi fresh, store it in the fridge. Place it in an airtight container. You can enjoy the gnocchi for up to three days. If you want to keep it longer, freeze it. Put it in a freezer-safe bag or container. Frozen gnocchi stays good for about two months. When reheating gnocchi, keep its texture in mind. The best way is to use a skillet. Add a splash of water or cream to help it heat evenly. Warm it over low heat, stirring gently. This method keeps the gnocchi soft and tasty. Avoid using the microwave, as it can make the gnocchi tough. For a full experience, check out the Full Recipe for detailed steps and tips! Can I make my own gnocchi? Yes, you can make your own gnocchi at home. It’s fun and simple! You’ll need potatoes, flour, and eggs. Cook the potatoes, mash them, then mix with flour and egg. Roll, cut, and shape them into small pieces. This adds a special touch to your meal. How do I know when the gnocchi is cooked? Gnocchi is cooked when it floats to the top of the water. This means they are light and ready to eat. You can also taste one to check for doneness. It should be soft but not mushy. What can I serve with 20-Minute One-Pan Spinach Gnocchi? This dish is great on its own, but you can add a side salad. A fresh green salad adds crunch and color. Garlic bread also pairs well. It helps soak up the creamy sauce and adds flavor. Can this dish be made ahead of time? Yes, you can prepare this dish ahead of time. Cook it, let it cool, and store it in the fridge. Reheat it in a skillet or microwave when you are ready to eat. The flavors will blend nicely overnight. What to do if the sauce is too thick or too thin? If the sauce is too thick, add a splash of water or broth. Stir well until it reaches your desired consistency. If the sauce is too thin, let it simmer longer. This helps it thicken up. You can also add more cheese for richness. For the full recipe, check out the [Full Recipe]. You learned how to make a tasty 20-Minute One-Pan Spinach Gnocchi. We covered ingredients, steps, and tips for cooking. Fresh ingredients can boost flavor, and substitutions make it easy for everyone. I shared quick cooking tips to keep you efficient. Remember, feel free to change the recipe with different veggies or proteins to suit your taste. With the right storage, your leftovers can last. Enjoy your cooking journey, and have fun creating your own versions of this dish!

20-Minute One-Pan Spinach Gnocchi Quick and Easy Meal

Looking for a quick meal that’s full of flavor? You’re in the right place! My 20-Minute One-Pan Spinach Gnocchi is

Older posts
Newer posts
← Previous Page1 … Page44 Page45 Page46 … Page55 Next →

dsad

© 2025 Lisa Dishes • Built with GeneratePress

Our Policies

  • Copyright Policy
  • Cookie Policy
  • GDPR Policy
  • Privacy Policy
  • Disclaimer
  • Terms Of Use

More Information

  • Home
  • About
  • Contact
  • Appetizers
  • Dessert
  • Dinner
  • Drinks
©2025, Lisa Dishes About Back To Top