Skip to content
DisclaimerTerms Of UseGDPR PolicyCookie Policy

Lisa Dishes

  • Home
  • Drinks
  • Appetizers
  • Dinner
  • Dessert
  • About
  • Contact
  • Privacy Policy
DisclaimerTerms Of UseGDPR PolicyCookie Policy

lisa

To make crispy oven baked sweet potato fries, gather these simple ingredients. You will need two large sweet potatoes, olive oil, and a mix of spices. These items create a tasty treat that everyone loves. - 2 large sweet potatoes, peeled and cut into thin fries - 2 tablespoons olive oil - 1 teaspoon paprika - 1 teaspoon garlic powder - 1 teaspoon onion powder - ½ teaspoon cayenne pepper (optional, for extra heat) - Salt and pepper to taste - Fresh parsley, chopped (for garnish) These key ingredients combine to create crispy, flavorful fries. Sweet potatoes offer sweetness and nutrients. Olive oil helps them crisp up nicely in the oven. The spices add layers of flavor that make each bite exciting. You can change up the recipe with some optional ingredients. Here are a few ideas: - Chili powder for a smoky kick - Parmesan cheese for a savory touch - Fresh herbs like rosemary or thyme for extra flavor These variations let you enjoy the fries in new ways. Experiment and find your favorite flavors! Start by peeling two large sweet potatoes. Next, cut them into thin fries. Aim for uniform thickness to ensure they cook evenly. This step is key to getting crispy fries. Once cut, place the fries in a bowl. Rinse them in cold water to remove some starch. This helps with crispiness. Drain the fries and pat them dry with a clean towel. Removing excess moisture is important for the best results. In a large bowl, toss the sweet potato fries with two tablespoons of olive oil. Make sure each fry gets a nice coat of oil. This will help the fries crisp up in the oven. Now, it’s time to add flavor. Sprinkle in one teaspoon of paprika, one teaspoon of garlic powder, and one teaspoon of onion powder. If you like heat, add half a teaspoon of cayenne pepper. Finish with salt and pepper to taste. Mix everything well until all fries are covered with the spices. Preheat your oven to 425°F (220°C). Line a large baking sheet with parchment paper. This makes clean-up easy and helps the fries not stick. Spread the fries out in a single layer on the sheet. Avoid overcrowding; this helps them get crispy. Bake for 20 minutes, then flip the fries for even cooking. Return them to the oven for another 10-15 minutes. Look for a golden brown color and a crispy texture. Once done, take them out and let them cool for a few minutes. Garnish with fresh parsley before serving. For a fun twist, serve with your favorite dipping sauce. To get your sweet potato fries crispy, follow a few simple steps. First, cut the fries thinly and evenly. This helps them cook at the same rate. Second, soak the cut fries in cold water for about 30 minutes. This removes some starch and helps with crispiness. After soaking, dry them well with a towel before seasoning. Finally, make sure to spread them out on the baking sheet. Less crowding means better air flow, which leads to crispier fries. Use a large baking sheet for best results. A rimmed sheet works well to keep any oil from spilling. If you have a wire rack, place it on the sheet. This allows heat to circulate around the fries, making them crispier. Also, line your baking sheet with parchment paper. It helps prevent sticking and makes clean-up easy. Avoid cutting your fries too thick. Thick fries tend to be soft inside and will not crisp up as well. Don’t skip soaking them in water; this step is key for crunch. Another mistake is not using enough oil. A light coating of oil helps the fries brown and crisp. Lastly, don’t overcrowd the baking sheet. If fries touch, they will steam instead of bake. For the best result, keep the fries in a single layer, giving them room to breathe. Try these tips, and your crispy oven baked sweet potato fries will be a hit! For the full recipe, check out the detailed instructions above. {{image_2}} You can play with flavors to make your fries unique. Try adding cumin for a warm note. Or mix in some chili powder for a smoky taste. You can also use Italian herbs like oregano and thyme for a fresh twist. Don't forget to adjust salt to balance the flavors. Experiment with these combinations until you find your favorite blend! Dips can change the whole experience of your fries. For a sweet option, try honey mustard or maple syrup. These add a nice contrast to the fries. For a savory choice, garlic aioli or ranch dressing works great. You can even mix Greek yogurt with herbs for a healthier dip. Have fun trying different dips with each batch! If you want to try something new, use an air fryer. It cooks fries faster and makes them crispier. Set your air fryer to 400°F and cook for 15-20 minutes. Shake halfway through for even cooking. You can also make these fries on the grill. Just place them in a grill basket and cook over medium heat. Each method gives a different taste and texture, so explore what you like best! After you enjoy your crispy oven baked sweet potato fries, store any leftovers. Place them in an airtight container. Keep the fries in the fridge for up to three days. If you want to keep them longer, freezing is a great option. To keep your fries crispy, reheat them in the oven. Preheat the oven to 400°F (200°C). Spread the fries out on a baking sheet. Bake for about 10 minutes. This method helps restore crispiness. Avoid using the microwave, as it makes fries soggy. To freeze your fries, let them cool first. Lay them in a single layer on a baking sheet. Freeze until solid, about one to two hours. Then, transfer the fries to a freezer bag. They can stay in the freezer for up to three months. When ready to cook them, bake straight from the freezer. This way, you get freshly baked fries any time! For more details, check the Full Recipe. To make sweet potato fries crispy, start by cutting them thin. Thin fries cook better and crisp up nicely. Coat them with olive oil to help with browning. Use a mix of spices for flavor, like paprika and garlic powder. It's key to spread them out in one layer on the baking sheet. If they are too close, they will steam instead of crisp. Flip them halfway through baking. This helps achieve an even crunch. Yes, you can use other potatoes! Regular russet potatoes work great. They also give a crispy result. Yukon golds are a good choice too, but they may not be as crisp. Each type of potato has its own flavor and texture. Experiment to find your favorite. Just remember to cut them thin for the best results. Sweet potato fries taste great with many dips. Garlic aioli adds a rich, creamy flavor. Spicy ketchup gives a nice kick. You can also try a zesty yogurt dip or a tangy ranch dressing. For something sweet, a honey mustard dip is fun too. Choose a dip that matches your mood or the meal. In this blog post, we explored how to make delicious sweet potato fries. We covered key ingredients and some optional ones for different tastes. You learned step-by-step instructions for preparing, seasoning, and baking your fries to perfection. I shared tips to achieve maximum crispiness and common mistakes to avoid. Remember, experimenting with spice combinations and dips can add zest to your fries. You can even use different cooking methods for variety. Enjoy your tasty snacks today!

Crispy Oven Baked Sweet Potato Fries Recipe Guide

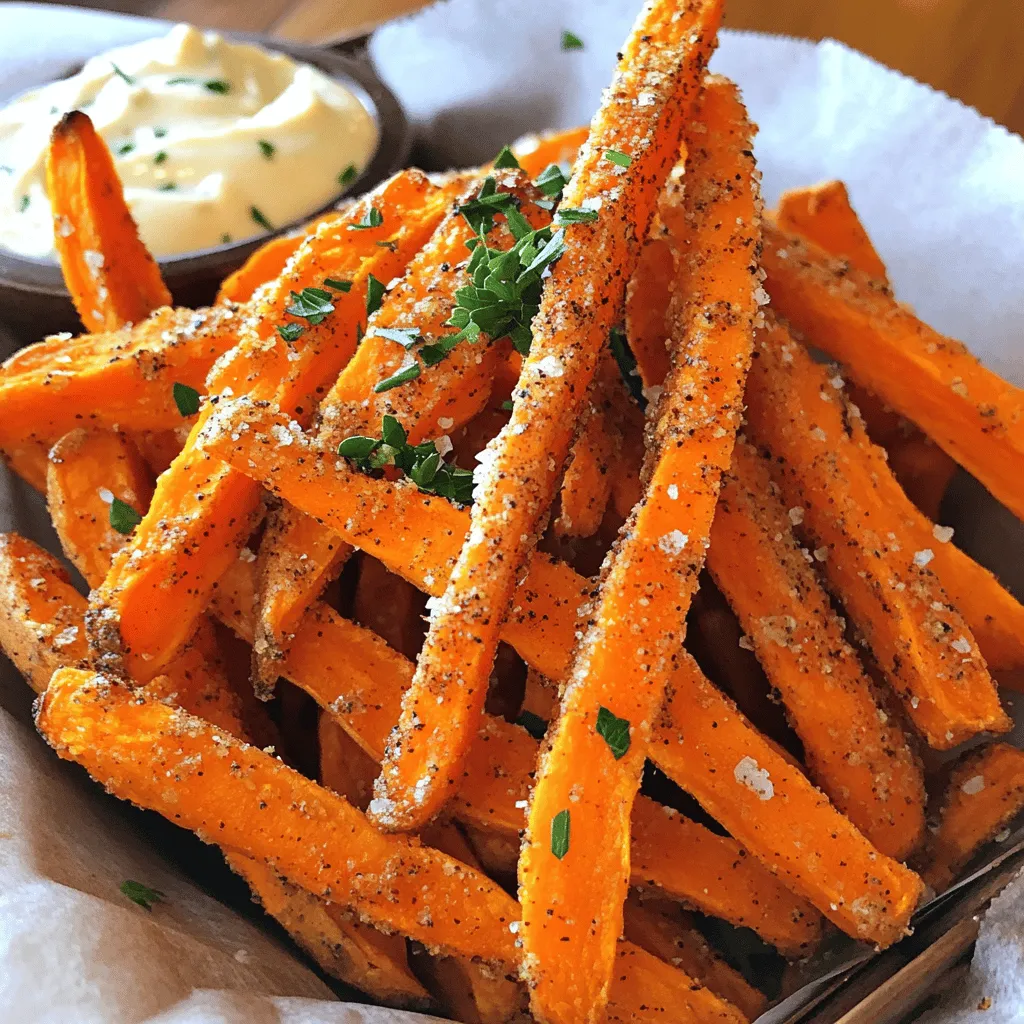
Looking for the perfect side dish? Let’s dive into crispy oven-baked sweet potato fries! This guide will show you how

To make an Amish Hamburger Steak Bake, you need a few key ingredients: - 1 pound ground beef - 1 cup onion, finely chopped - 1 cup mushrooms, sliced - 2 cloves garlic, minced - 1 teaspoon Worcestershire sauce - 1 teaspoon smoked paprika - Salt and pepper, to taste - 4 large potatoes, peeled and sliced - 1 cup beef broth - 1 cup shredded cheddar cheese - 1 tablespoon olive oil - Fresh parsley, chopped for garnish These ingredients create a hearty meal. The ground beef gives it richness, while the onions and mushrooms add depth. The potatoes provide a comforting base, and the cheese tops it all with creamy goodness. This recipe serves six people. Each person will enjoy a generous portion that fills the plate. If you want to adjust the number of servings, you can multiply or divide the ingredients easily. If you need substitutions, you can use ground turkey or chicken instead of beef. For dairy-free options, try a plant-based cheese. You can swap out the mushrooms for sweet bell peppers or zucchini for added flavor and color. First, preheat your oven to 375°F (190°C). This helps the dish cook evenly. While the oven heats, gather your ingredients. You will need ground beef, onions, mushrooms, garlic, and seasonings. Next, heat the olive oil in a large skillet over medium heat. Add the chopped onions and minced garlic. Sauté until the onions look clear. This step adds flavor to the beef. After the onions are ready, add the ground beef. Use a wooden spoon to break it up. Cook it until it turns brown. Then, stir in the sliced mushrooms, Worcestershire sauce, smoked paprika, salt, and pepper. Cook everything for about five more minutes. The mushrooms should be soft. Remove the skillet from heat and set it aside. Now, grab a greased 9x13 inch baking dish. Start layering half of the sliced potatoes in the bottom. Season them lightly with salt and pepper. Next, spoon the beef mixture over the potatoes. Spread it out evenly. This helps all the flavors mix well. Then, add the rest of the sliced potatoes on top. Season them with salt and pepper again. Carefully pour the beef broth over the dish. This broth adds moisture as the potatoes cook. Cover the baking dish tightly with aluminum foil. This keeps the steam in while baking. Bake the dish in the preheated oven for 45 minutes. This time helps the potatoes cook through. After 45 minutes, remove the foil. Sprinkle the shredded cheddar cheese over the top. Return the dish to the oven, uncovered. Bake for an additional 15 minutes. This step makes the cheese melt and bubble nicely. Once everything is done, let it cool for a few minutes before serving. Garnish with fresh parsley for a nice touch. Enjoy your meal! For the full recipe, check the link. To effectively brown the ground beef, start with a hot skillet. Use medium-high heat. Break the meat into small pieces as it cooks. This helps it brown evenly. Stir often for the best results. You want a nice, deep brown color. This adds great flavor to your dish. For perfect mushroom texture, choose fresh mushrooms. Slice them thick for a hearty bite. Add the mushrooms to the skillet after the beef is browned. This keeps them firm. Cook them until they soften but still hold shape. You want them tender, not mushy. Using fresh herbs and spices can really boost flavor. Try adding fresh parsley or thyme to the beef mixture. You can also sprinkle some on top before serving. Fresh herbs give a bright taste. They make the dish feel more special. For side dishes, think about serving a simple salad or steamed veggies. A light salad can balance the richness of the bake. Steamed green beans or broccoli add color and nutrition. These sides make the meal feel complete and satisfying. Check out the Full Recipe for all the details and tips to make your Amish Hamburger Steak Bake perfect! {{image_2}} You can change the meat in this dish easily. If you want a leaner option, use turkey or chicken. Ground turkey offers a great taste and cuts some fat. If you prefer, try a mix of meats for a richer flavor. Adding seasonal vegetables can also create new tastes. Consider carrots, peas, or zucchini. These veggies add color and nutrition. Chop them finely and mix them in with the beef. This keeps the dish exciting and fresh. You can cook this meal in a slow cooker. First, brown the meat on your stove. Then, layer the potatoes and beef in the slow cooker. Pour in the broth and cook on low for 6-8 hours. You will love how tender this makes everything. If you own an Instant Pot, you can use it too. After browning the meat, layer the potatoes and beef as before. Add the broth, then seal the lid. Cook on high pressure for about 20-25 minutes. This method saves time and keeps the flavors strong. For more details, check the Full Recipe for Amish Hamburger Steak Bake. After enjoying your Amish Hamburger Steak Bake, store leftovers properly. Use airtight containers to keep them fresh. Glass or plastic containers work well. Make sure they cool to room temperature before sealing. Place them in the fridge. They will stay good for about three to four days. If you want to keep them longer, consider freezing. For freezing, first, let your dish cool completely. Then, cut it into portions. Wrap each portion tightly in plastic wrap, then place it in a freezer-safe bag. This helps avoid freezer burn. You can keep it in the freezer for up to three months. When it's time to eat leftovers, you want the best texture. The oven works great for reheating. Preheat your oven to 350°F (175°C). Place the bake in an oven-safe dish and cover it with foil. This keeps it moist. Heat for about 20-25 minutes, or until warm throughout. You can also use the microwave for quick reheating. Place a portion on a microwave-safe plate. Cover it with a microwave-safe lid or another plate. Heat in 1-minute bursts, checking for warmth in between. Always ensure leftovers are heated to at least 165°F (74°C) for safety. Use a food thermometer if needed. Enjoy your meal again without losing flavor or texture! What is Amish cuisine known for? Amish cuisine is known for its hearty, simple meals. It focuses on fresh, local ingredients. Dishes often feature meats, vegetables, and baked goods. Comfort food plays a big part in their cooking style. Many recipes use traditional methods passed down through generations. This makes the food feel warm and inviting. Can I make this dish ahead of time? Yes, you can prepare this dish ahead of time. You can assemble it the night before. Just cover it tightly and keep it in the fridge. This allows the flavors to blend. When you're ready to bake, adjust the time slightly if it's cold. This makes it easy to serve a warm meal on busy days. Why are my potatoes not cooking through? If your potatoes are not cooking through, they may be too thick. Make sure to slice them thin and evenly. Layering them properly also helps with cooking. The beef broth is crucial for moisture. Always ensure you pour enough broth over the dish. How can I avoid a watery dish? To avoid a watery dish, ensure you drain excess liquid from the beef mixture. Cook the beef until all the moisture evaporates. Also, do not skip the step of covering with foil while baking. This keeps moisture in without making it too wet. Caloric breakdown per serving Each serving of Amish Hamburger Steak Bake has about 400 calories. This includes protein from the beef and healthy fats from the cheese. The potatoes add carbs, making it a filling meal. Common dietary considerations This dish is not gluten-free due to the Worcestershire sauce. If you're watching sodium, use low-sodium broth. You can adjust cheese amounts to lower fat content. If you prefer a lighter option, use lean ground beef or turkey. This blog post covers the key ingredients and steps for preparing a fantastic Amish Hamburger Steak Bake. You learned about essential components like ground beef, mushrooms, and cheese, along with measurement tips and cooking techniques. I shared helpful tricks to enhance flavor and addressed common FAQs. In closing, this dish is versatile and rewarding. With just a bit of effort, you can create a comforting meal that delights. Enjoy experimenting with variations, and don’t hesitate to make it your own!

Amish Hamburger Steak Bake Hearty and Satisfying Meal

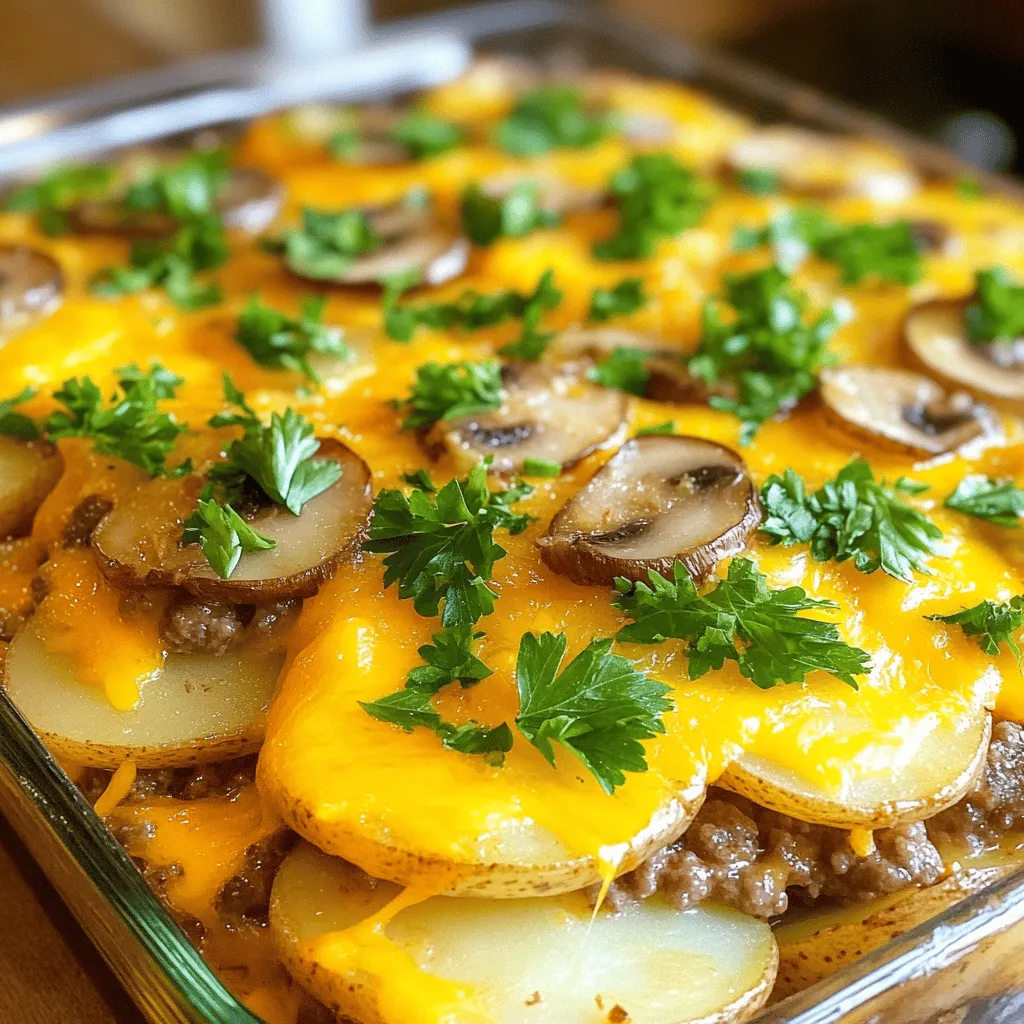
Looking for a warm, home-cooked meal that hits all the right spots? The Amish Hamburger Steak Bake merges simple ingredients

- 4 ripe peaches, halved and pitted - 2 tablespoons honey - 1 teaspoon cinnamon - 1 tablespoon lemon juice - 1 tablespoon melted butter (or coconut oil for a vegan option) - Vanilla ice cream or Greek yogurt for serving Fresh peaches are the star of this dish. Look for peaches that are soft and fragrant. They should give a little when you press them gently. This means they will cook well in the air fryer and taste sweet. The glaze brings a rich flavor. Honey adds sweetness, while cinnamon gives warmth. Lemon juice brightens the dish. The melted butter or coconut oil makes everything smooth and tasty. You can top the peaches with vanilla ice cream or Greek yogurt. This adds creaminess and a cool touch. The warm peaches will pair well with the cold toppings. You can also sprinkle nuts for crunch, if you like. For the full recipe, check the details above. Start by washing your peaches under cool water. This removes dirt and makes them clean. Next, cut each peach in half and remove the pits. I like to slice a small crosshatch in the flesh. This helps the flavors soak in during cooking. In a small bowl, whisk together the honey, cinnamon, lemon juice, and melted butter. This glaze adds flavor and sweetness to the peaches. Make sure it’s mixed well. A good glaze makes all the difference! Preheat your air fryer to 350°F (175°C). Place the peach halves cut side up in the air fryer basket. Brush the glaze over each peach half. Cook for 10 to 12 minutes until they are soft and caramelized. The sweet smell fills the kitchen! Once done, use tongs to carefully remove the peaches. Enjoy them warm, maybe with ice cream or yogurt. This recipe is simple and tasty! For the full recipe, check out the details above. When picking peaches, look for ones that are ripe. They should feel slightly soft when you press them. A sweet smell is a good sign, too. Avoid peaches that are too hard or have blemishes. Yellow or orange skin indicates ripeness. If you can’t find ripe peaches, choose firm ones. You can let them ripen at home for a few days. A few mistakes can ruin your air fryer peaches. First, don’t skip the glaze. It adds flavor and helps caramelize the peaches. Second, make sure to slice a small crosshatch in the flesh. This lets the glaze soak in better. Finally, don’t overcrowd the air fryer basket. This ensures even cooking and browning. To make your peaches pop with flavor, try adding different spices. Cinnamon works well, but nutmeg or cardamom can add a lovely twist. For a tangy taste, consider adding more lemon juice. If you love sweetness, a dash of brown sugar can enhance the glaze. You can also sprinkle nuts or coconut on top for extra crunch. Each choice adds a new layer of flavor to your peaches. For the complete recipe, check out the Full Recipe section. {{image_2}} You can easily make this recipe vegan. Instead of using honey, try maple syrup. This keeps the flavor sweet and delicious. For the butter, swap it for coconut oil. It adds a nice tropical taste. The rest of the steps stay the same. You will love the tasty result! You have many choices for sweeteners. If you don’t have honey or maple syrup, use agave nectar. Brown sugar is another great option. It adds a rich flavor. You can also try stevia for a low-calorie choice. Adjust the amount to match your taste. Each sweetener gives a unique twist to the dish. To serve air fryer peaches, think about great pairings. Vanilla ice cream is a classic favorite. The cold ice cream contrasts well with warm peaches. Greek yogurt adds creaminess and a tangy taste. For a crunch, sprinkle chopped nuts on top. You can also drizzle extra honey or caramel over the peaches for more sweetness. Each topping makes the dish special! Check out the Full Recipe for more ideas. Once you make air fryer peaches, let them cool. Place them in an airtight container. Store in the fridge for up to three days. This keeps them fresh and tasty. If you want to eat them later, you can enjoy them cold or warmed up. To reheat your peaches, use the air fryer. Set it to 350°F (175°C) for about 3-5 minutes. This method keeps the peaches soft and brings back their sweet flavor. You can also warm them in the microwave. Heat for just 20-30 seconds, so they don’t get too hot. If you want to save your peaches longer, freezing is a great option. First, let them cool completely. Place the peach halves in a single layer on a baking sheet. Freeze them for about two hours. Then, move them to a freezer bag. They can last up to three months. When you are ready to eat them, thaw them in the fridge overnight before reheating. For the full recipe, check out the detailed steps above. Yes, you can use frozen peaches. Just make sure to thaw them first. Pat them dry with a paper towel. This helps avoid excess moisture during cooking. Frozen peaches may not get as caramelized as fresh ones. However, they will still taste great! You will know the peaches are done when they feel soft. A fork should easily pierce the flesh. Look for a light golden color on the edges. This shows they are caramelizing nicely. Keep an eye on them while cooking to avoid overcooking. Air fryer peaches are delicious on their own. You can serve them with vanilla ice cream or Greek yogurt. The cool creaminess pairs well with warm peaches. You might also add chopped nuts for a nice crunch. For a twist, drizzle extra honey on top for added sweetness. For the full recipe, check the section above! In this post, we covered how to make delicious air-fried peaches. You learned about fresh peaches, glaze ingredients, and toppings. I shared steps for preparing, mixing, and air frying. We discussed tips for choosing peaches and avoiding mistakes. You explored variations, storage tips, and answers to common questions. Air frying peaches is simple and tasty. You can enjoy them fresh or create fun variations. Try it out and enjoy your sweet treat!

Easy Air Fryer Peaches Simple and Delicious Recipe

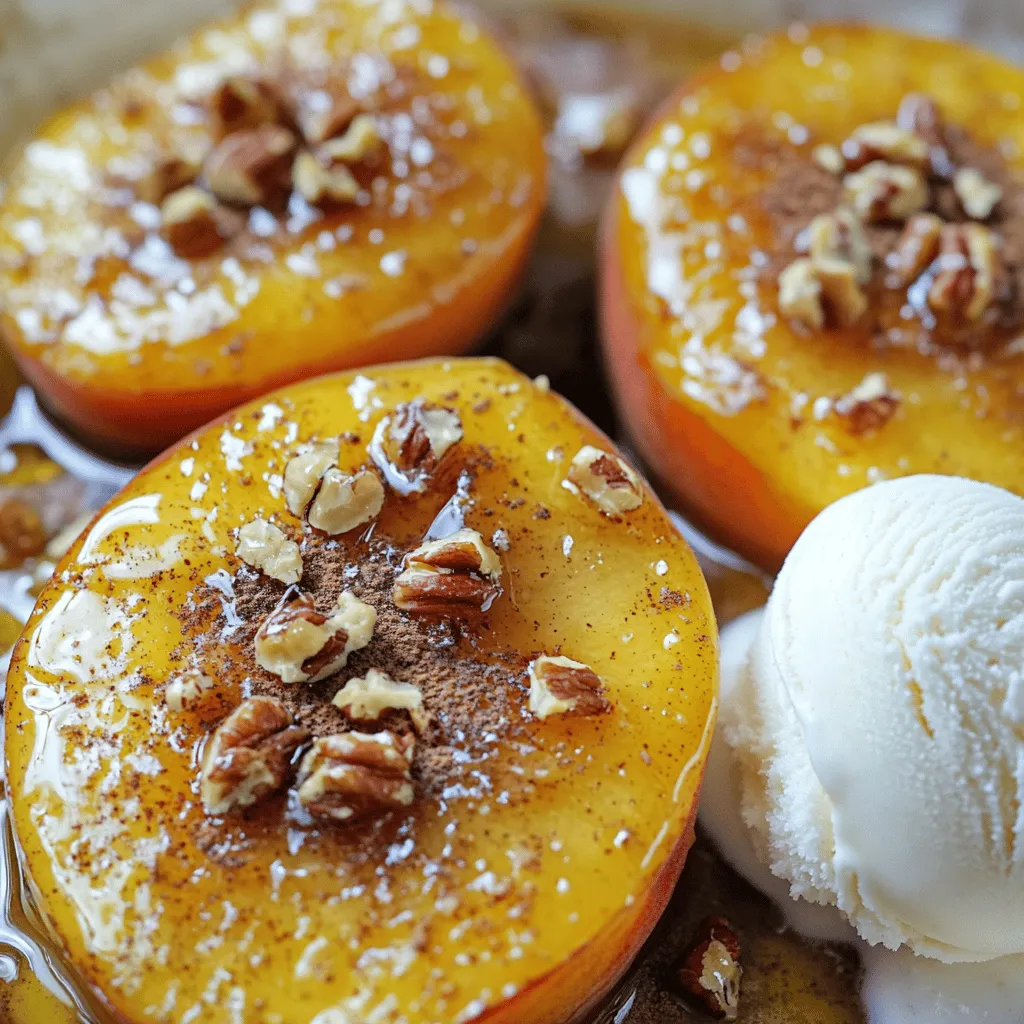
Looking for a sweet treat that’s easy and healthy? Try my Easy Air Fryer Peaches! This simple recipe brings out

- 4 chicken thighs, skinless and boneless - 1 can (14 oz) coconut milk - 2 tablespoons coconut oil - 1 onion, finely chopped - 3 cloves garlic, minced - 1 red bell pepper, diced - 1 green bell pepper, diced - 1-2 jalapeños, finely chopped (adjust for spice preference) - 1 tablespoon fresh ginger, grated - 2 teaspoons ground cumin - 1 teaspoon smoked paprika - 1 teaspoon turmeric - Salt and pepper, to taste - 1 lime, juiced - Fresh cilantro, for garnish This dish centers on chicken, coconut milk, and spices. The chicken provides protein, while coconut milk adds creaminess. The mix of spices creates a warm, inviting flavor. Next, we add colorful vegetables and garnishes. Onions and bell peppers bring sweetness and crunch. Jalapeños add a kick, while ginger gives a fresh zing. The lime juice brightens up the dish. Fresh cilantro on top makes it look lovely and tastes great. For the full recipe, check out the instructions to bring this flavorful delight to life. Start by making your marinade. Mix lime juice, garlic, ginger, cumin, smoked paprika, turmeric, salt, and pepper in a bowl. Then, add the chicken thighs. Make sure every piece is well-coated. Cover and let this marinate for at least 30 minutes. If you have more time, marinate for a few hours. This helps the flavors soak in deeply. Next, heat coconut oil in a large skillet over medium heat. Add the chopped onion and sauté for about 5 minutes. You want them to turn translucent. Then, stir in the diced red and green bell peppers, along with the jalapeños. Cook this mix for another 3 to 4 minutes. The veggies should soften and release their lovely scents. Now, it’s time to cook the chicken. Add the marinated chicken thighs to the skillet. Brown each side for about 6 to 7 minutes. You want them fully cooked through. Once done, pour in the coconut milk and stir well. Bring this mixture to a gentle simmer. Let it cook for about 10 minutes. This allows the flavors to meld, and the sauce will thicken slightly. For the full recipe, check the details above. To elevate the taste of Spicy Brazilian Coconut Chicken, consider adding a few extra spices. You could use coriander for a fresh touch or a pinch of cayenne for added heat. Fresh herbs like basil or parsley can also enhance the dish. For richer results, try grilling the chicken instead of pan-frying. This method adds a nice char and depth of flavor. You can also roast the vegetables before adding them to the skillet. Roasting brings out their sweetness and adds complexity. Serving is key for making this dish shine. Place the spicy chicken over a fluffy bed of jasmine rice or creamy quinoa. This allows the sauce to soak in and adds a nice contrast. For garnishes, sprinkle fresh cilantro on top before serving. Add lime wedges for a bright pop of color and a zesty kick. You might also consider thinly slicing red peppers for an eye-catching touch. These small details make your dish look as good as it tastes. Enjoy your culinary journey with this flavorful delight! {{image_2}} You can switch out the chicken thighs for other cuts. Chicken breast works well too. For a vegetarian option, try firm tofu or chickpeas. Both will soak up the flavors nicely. If you need a dairy-free version, coconut milk is already perfect. For a spice adjustment, use fewer jalapeños for less heat. You can also add more spices like paprika or a dash of cayenne for extra kick. Brazil has many dishes with similar flavors. Moqueca is a famous Brazilian fish stew that uses coconut milk and spices. It brings a unique taste and showcases Brazil’s love for bold flavors. Other cultures offer their own twists. Thai cuisine uses coconut milk in curries, often with lemongrass. Indian dishes like coconut chicken curry also highlight the creamy texture of coconut milk. Each dish brings a different story and taste to the table. To keep your Spicy Brazilian Coconut Chicken fresh, store it in an airtight container. This will prevent moisture loss and keep flavors intact. It can last in the fridge for up to four days. If you want to save it for a longer time, freeze it. In the freezer, it can remain good for about three months. When it comes to reheating, you want to keep the flavors bright and the chicken juicy. The best method is to use a skillet. Heat it on low and add a splash of coconut milk to keep it moist. Stir occasionally for even heating. You can also use a microwave, but be careful not to overheat. For serving after reheating, try spooning it over rice or quinoa. Add a fresh squeeze of lime and some chopped cilantro for a burst of flavor. This keeps the dish vibrant and enjoyable, even on the second day. Enjoy your meal! Spicy Brazilian Coconut Chicken comes from Brazil's rich culinary scene. This dish blends indigenous flavors with African and Portuguese influences. Coconut is a key ingredient in many Brazilian recipes. It adds a creamy texture and a sweet taste. Many Brazilian dishes use spices and peppers, making them bold and exciting. This dish reflects Brazil's vibrant food culture, showcasing its love for fresh, local ingredients. Yes, you can prepare this recipe ahead of time. Marinate the chicken earlier in the day or even the night before. This helps the flavors soak in well. After cooking, let the dish cool down. Store it in an airtight container in the fridge. It will stay fresh for about three days. You can also freeze it for up to three months. Just remember to thaw it in the fridge before reheating. You can easily change the spice level to fit your taste. For mild heat, use just one jalapeño or omit it. You can also replace jalapeños with sweet peppers. For more heat, add extra jalapeños or use a hotter pepper like serrano. Another option is to add crushed red pepper flakes to the sauce. Always taste as you go, so you get the spice just right! This blog post covered a tasty recipe for Spicy Brazilian Coconut Chicken. We looked at the key ingredients, like coconut milk and spices, along with marinating and cooking steps. I shared tips to boost flavor and present your dish beautifully. You learned how to store leftovers and answers to common questions. Trying this recipe will bring exciting flavors to your meals. Don’t hesitate to experiment with variations. Enjoy cooking, and make this dish your own!

Spicy Brazilian Coconut Chicken Flavorful Delight Recipe

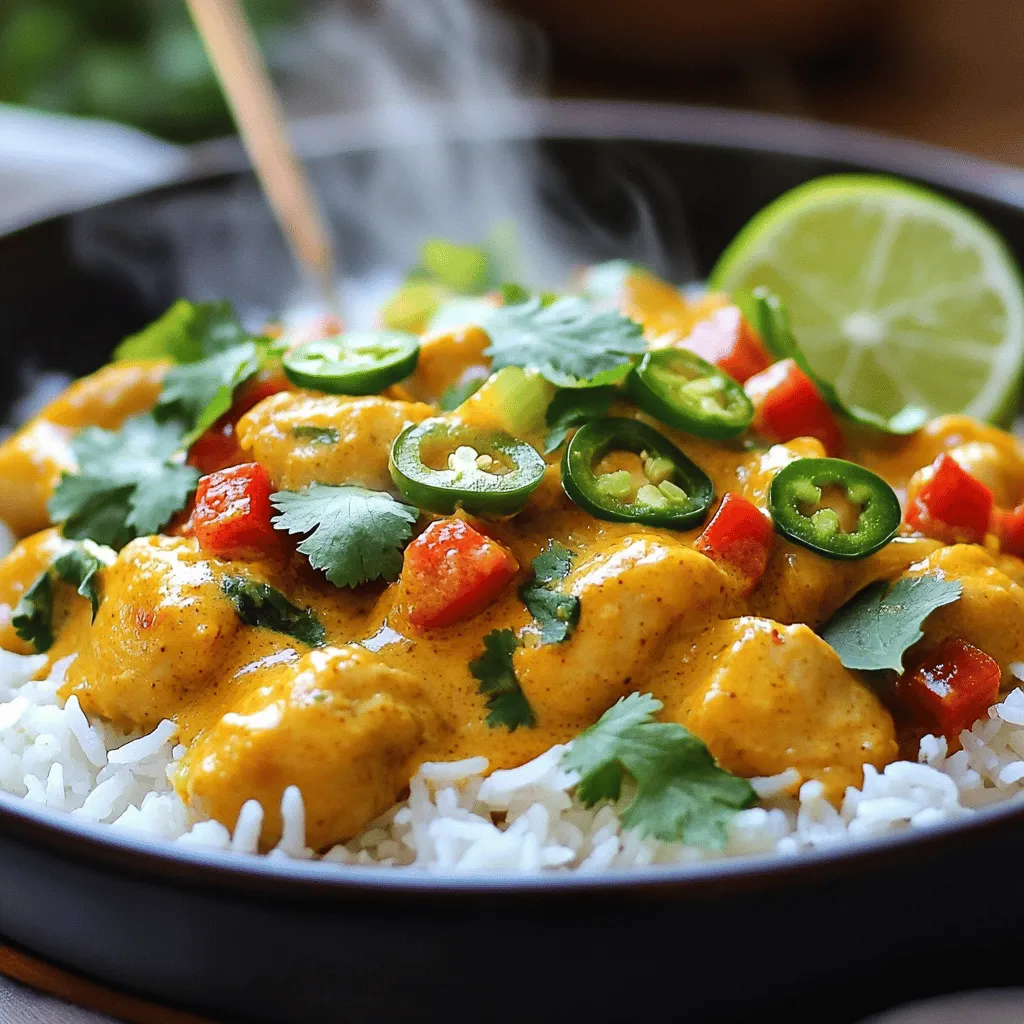
Are you ready to spice up your dinner routine? This Spicy Brazilian Coconut Chicken recipe will take your taste buds

- 2 pounds chicken wings - Necessary kitchen tools: baking sheet, wire rack, large bowl - 2 tablespoons baking powder - 1 tablespoon smoked paprika - 1 tablespoon garlic powder - 1 tablespoon onion powder - 1 teaspoon salt - 1 teaspoon black pepper - 1 teaspoon cayenne pepper - 1 teaspoon dried thyme - 1 teaspoon brown sugar - 1 teaspoon lemon zest When it comes to making crispy dry rub chicken wings, the right ingredients are key. First, you need fresh chicken wings. I prefer using two pounds for a good serving. Make sure you have a baking sheet and a wire rack. These tools help the wings cook evenly and get extra crispy. Next, let’s talk about the dry rub. This mix gives your wings that amazing flavor. You will need baking powder, smoked paprika, garlic powder, onion powder, salt, and black pepper. For some heat, add cayenne pepper. Dried thyme adds a nice touch of earthiness. Brown sugar brings a hint of sweetness, and lemon zest brightens everything up. Gather these ingredients, and you are ready to make the best crispy wings. You can find the full recipe to guide you through every step. - Preheat oven to 425°F (220°C). - Line a baking sheet with aluminum foil. Place a wire rack on top. This rack helps air circulate and makes the wings crispy. - Pat the chicken wings dry with paper towels. This helps with crispiness. You want no moisture left. - In a bowl, mix the dry rub ingredients. Use baking powder, smoked paprika, garlic powder, onion powder, salt, black pepper, cayenne, dried thyme, brown sugar, and lemon zest. - Coat the wings with the dry rub. Make sure every wing gets a good amount of rub. - Place the wings on the wire rack. Make sure they are in a single layer. This helps them cook evenly. - Bake for 40-45 minutes. Flip the wings halfway through cooking for even crispiness. - Broil for 2-3 minutes at the end. This step gives your wings that extra crunch. Watch closely to avoid burning. For the full recipe, check the details above. Enjoy the crispy wings! To get the best crispy chicken wings, drying them is key. First, pat the wings with paper towels until they are very dry. This step makes a huge difference in texture. Moisture creates steam, which prevents crisping. Baking powder is another secret weapon. It helps to create a light and crisp skin. When you mix it with the spices, it reacts with the moisture in the chicken. This reaction leads to a wonderful crispiness. You can easily customize your chicken wings. Add spices like cumin or coriander for a twist. A little chili powder can bring the heat if you like spice. Feel free to experiment until you find your perfect mix! For oils, consider using avocado or peanut oil. They can add a rich flavor and help achieve that crispy finish. If you prefer, you can marinate the wings in a mix of your favorite sauces. Just remember to dry them well after marinating. Serve your crispy wings with delicious dips. Ranch or blue cheese dressing are great choices. They add a creamy contrast that pairs well with the wings. You can also try a spicy sriracha sauce for a kick! For a lovely presentation, use a rustic wooden platter. Arrange the wings neatly and add celery sticks for crunch. A sprinkle of fresh parsley on top adds color and freshness. Your guests will be impressed with both taste and look! For the full recipe, check out the [Full Recipe]. {{image_2}} To mix things up, you can try different dry rubs for your wings. Here are two great options: - Spicy buffalo dry rub alternative: If you love heat, add cayenne pepper and crushed red pepper flakes. This mix will give your wings a fiery kick. Combine it with garlic powder and onion powder for a robust flavor. - Sweet and smoky dry rub option: For a sweeter taste, use brown sugar and smoked paprika. This blend offers a nice balance of sweetness and smokiness. You can add cinnamon for a unique twist. You can also change how you cook your wings. Here are two popular methods: - Air fryer method for quick cooking: Use an air fryer for crispy wings in less time. Cook them at 400°F (200°C) for about 25-30 minutes. Flip halfway for even cooking. The air fryer gives you that crunch without much oil. - Grill adaptation for summer barbecues: Grill your wings for a smoky flavor. Preheat your grill to medium heat. Cook wings for 20-25 minutes, turning often. This method adds a nice char and flavor to your wings perfect for outdoor gatherings. Pairing sides with your wings makes for a complete meal. Here are some great options: - Recommended sides to serve with chicken wings: Serve wings with crispy celery sticks, carrot sticks, or a fresh salad. These add crunch and freshness. - Perfect drink pairings for a complete meal: Enjoy your wings with a cold beer or a tangy lemonade. Both drinks balance the spicy and smoky flavors, making your meal more enjoyable. For the full recipe, check out the Crispy Dry Rub Chicken Wings section above! To keep your leftover crispy dry rub chicken wings tasty, store them right. Use airtight containers to lock in flavor. Allow the wings to cool first. This step helps prevent moisture buildup. Refrigerate them within two hours of cooking. They will stay fresh for up to three days. Reheating wings can be tricky. You want them crispy, not soggy. The best method is the oven. Preheat it to 350°F (175°C). Place the wings on a baking sheet. Bake for about 10-15 minutes until heated through. Check that they are hot in the middle. You can use the microwave, but they might lose crispiness. If you must, heat them for 30 seconds. Flip them halfway for even warmth. If you want to save wings for later, freezing is a great option. Start by letting them cool completely. Next, place them in a single layer on a baking sheet and freeze for about an hour. Once frozen, transfer them to a freezer-safe bag. Remove as much air as possible. They can stay in the freezer for up to three months. When ready to eat, thaw them overnight in the fridge. This keeps them juicy and tasty. To get chicken wings extra crispy, you need to use a few key techniques: - Pat wings dry: Remove moisture with paper towels. This step is vital for crispiness. - Use baking powder: It helps draw moisture out and makes the skin crisp. - Bake on a wire rack: This allows air to circulate around the wings, promoting even cooking. - Flip halfway: Turning the wings at the halfway mark ensures they crisp evenly on both sides. - Broil at the end: Broiling for a few minutes gives that extra crunch. By following these steps, you can achieve a perfect texture every time. Yes, you can use fresh herbs in the dry rub! Fresh herbs add a vibrant flavor. Here are some great options: - Parsley: Adds freshness and a pop of color. - Thyme: Offers an earthy taste that pairs well with chicken. - Oregano: Gives a slightly sweet, aromatic flavor. - Rosemary: Adds a piney touch, great for roasting. When using fresh herbs, chop them finely and mix them into your dry rub. Just remember to adjust the amount, as fresh herbs are stronger in flavor. The best temperature for baking chicken wings is 425°F (220°C). This temperature helps achieve crispy skin while cooking the meat thoroughly. Here’s why: - High heat: It provides a good sear on the outside for crispiness. - Even cooking: It helps cook the wings all the way through without drying them out. If you want different outcomes, you can experiment with lower or higher temperatures, but 425°F gives the best balance. You learned how to make delicious, crispy chicken wings at home. With a simple dry rub, you can enhance flavor and texture. Using the right tools and techniques is key. Don't forget the tips for storing and reheating leftovers. Experiment with different spices and cooking methods to make wings your way. Enjoy the journey of crafting the perfect wing dish for friends and family. Happy cooking!

Crispy Dry Rub Chicken Wings Flavorful and Easy Recipe

If you crave irresistible, crispy chicken wings, look no further! In my guide to Crispy Dry Rub Chicken Wings, I’ll

To make creamy potato puffs, you need these key ingredients: - 3 large russet potatoes - 1 cup cream cheese - ½ cup grated Parmesan cheese - ½ cup shredded cheddar cheese These ingredients create a rich and creamy filling that makes the puffs so delightful. You can enhance your potato puffs with some optional garnishes. Consider adding: - Fresh chives - Other toppings Chives add a fresh flavor and a pop of color. You can also try different toppings based on your taste. If you want to switch things up, you can use different ingredients. For example: - Alternative cheeses like goat cheese or mozzarella can change the flavor. - If you need gluten-free options, use gluten-free breadcrumbs. These substitutions keep the dish tasty while meeting different dietary needs. You can find the full recipe above for detailed instructions. - Boil the potatoes: Start by placing the cubed potatoes into a large pot filled with salted water. Bring this water to a boil and cook the potatoes until they are fork-tender, which usually takes about 15 to 20 minutes. Once they are soft, drain them and let them cool for a bit. - Mash the potatoes: Take the drained potatoes and place them into a mixing bowl. Use a potato masher or fork to mash the potatoes until they are smooth. This smooth texture is key for your creamy potato puffs. - Combine creamy ingredients: To the smooth mashed potatoes, add the cream cheese, Parmesan, and cheddar cheese. You should also mix in the beaten egg, garlic powder, onion powder, salt, and black pepper. Mix everything together until it forms a creamy and well-combined mixture. - Shape the puffs: With your hands, take a tablespoon of the creamy potato mix and shape it into small balls or puffs. Aim for a size similar to a golf ball. This size helps them cook evenly and stay crispy. - Coat the puffs: Next, roll each shaped puff in breadcrumbs. Make sure they are fully coated. This breadcrumb layer is what gives them that crispy and crunchy outside. - Fry the puffs: In a deep frying pan, heat oil over medium heat. Once the oil is hot, gently drop in the potato puffs in small batches. Fry them until they turn golden brown and crispy, about 3 to 4 minutes on each side. Use a slotted spoon to remove them from the oil, and let them drain on paper towels. These steps will help you create deliciously creamy potato puffs that are perfect for any snack time. For the exact details, don’t forget to check the Full Recipe. - Tips for smooth potato mash: Start with hot, boiled potatoes. Use a ricer or masher to break them down. Avoid over-mixing, as this can make the mash gummy. - Perfecting the breadcrumb coating: Use panko breadcrumbs for extra crunch. Ensure each puff is fully coated to get that crispy bite. - Additional spices: Add a pinch of smoked paprika or cayenne pepper for heat. Fresh herbs like parsley or dill can boost flavor too. - Cheese variations: Try using feta or goat cheese for a tangy taste. Mixing different cheeses adds depth to each puff. - Frying tips for crispy results: Heat oil to 350°F before frying. Do not overcrowd the pan; fry in batches for even cooking. - Using the oven instead of frying: Preheat your oven to 400°F. Place puffs on a baking sheet lined with parchment paper. Bake for 20-25 minutes until golden brown. This method is healthier and still tasty. For a full recipe, see the earlier section. {{image_2}} You can change the taste of creamy potato puffs easily. Add vegetables like spinach, broccoli, or peas for a fresh twist. Herbs like parsley or basil can brighten the flavor too. Spices such as paprika or cumin can add warmth. For cheese lovers, mix different cheeses. Try mozzarella for a stretchier bite or feta for a tangy kick. Each cheese brings its own unique flavor to the dish, making it fun to experiment. You can prepare creamy potato puffs in various ways. Frying gives them a crispy and golden outside. Bake them for a healthier option. If you choose to bake, preheat your oven to 400°F (200°C). Place the puffs on a baking sheet lined with parchment paper. Bake for about 20-25 minutes until they are golden brown. You can also use an air fryer. Set it to 375°F (190°C). Cook the puffs in batches for around 12-15 minutes. This method keeps them crunchy with less oil. Serve creamy potato puffs with tasty dips. Sour cream, ranch, or spicy mayo are great choices. You can also pair them with a fresh salad or a vegetable platter for balance. For a fun twist, stack them on a skewer with cherry tomatoes or mini bell peppers. This adds color and makes them easy to grab at parties. Enjoy these delightful snacks hot or warm for the best flavor. For the full recipe, check the section above. To keep your creamy potato puffs fresh, store them in an airtight container. Place a paper towel at the bottom to absorb moisture. This helps maintain their crispy texture. You can refrigerate them for up to three days. If you want to save them for longer, freezing is a great option. For freezing, lay the puffs on a baking sheet. Make sure they don't touch each other. Freeze them for about an hour, then transfer them to a freezer-safe bag. They can last up to three months in the freezer without losing taste. When you want to enjoy your creamy potato puffs again, reheating is key. The best method is to use an oven or air fryer. Preheat your oven to 375°F (190°C). Place the puffs on a baking sheet for 10-15 minutes. This will keep them crispy. If using an air fryer, set it to 350°F (175°C). Cook for about 5-7 minutes. Avoid microwaving, as it can make them soggy. In the fridge, creamy potato puffs last about three days. Look for signs of spoilage. If they smell sour or have mold, it's time to toss them. A good rule is to trust your senses. If they look and smell good, they are likely still safe to eat. You can use several options if you need a cream cheese substitute. For a dairy-free version, try: - Silken tofu: Blend it until smooth for a creamy texture. - Cashew cream: Soak cashews in water, then blend until creamy. - Vegan cream cheese: Many brands offer this option at stores. Each alternative brings a unique flavor. Adjust the seasoning in your creamy potato puffs to match. Yes, you can prepare creamy potato puffs in advance. Follow these steps: 1. Make the mixture: Prepare the potato mix and shape it into puffs. 2. Chill: Place shaped puffs in the fridge for up to 24 hours. This helps them hold their shape. 3. Fry when ready: Cook them just before serving for the best taste and texture. If you want to reheat puffs, bake them in the oven at 350°F until warm and crispy. To make creamy potato puffs gluten-free, use gluten-free breadcrumbs. Here are some options: - Crushed gluten-free crackers: These can also add flavor. - Ground nuts: Almonds or walnuts work well for extra crunch. - Rice flour: Use it to coat the puffs before frying. These options keep the puffs crispy and tasty. Enjoy your gluten-free snack without missing out on flavor! For the full recipe, check out the detailed instructions above. This article shared a simple guide to making creamy potato puffs. We looked at key ingredients, easy steps, and helpful tips for the best results. You can also try various flavors and cooking methods to suit your taste. Remember to store your puffs right to keep them fresh. Making and enjoying these tasty snacks can be a fun kitchen project. Try out your own ideas and enjoy the journey. Your creamy potato puffs will impress everyone!

Creamy Potato Puffs Delightful Flavorful Snack

If you’re craving a snack that’s both creamy and crispy, you’ve landed in the right spot! My Creamy Potato Puffs

- Ground beef: I use a blend of 80% lean and 20% fat. This mix keeps the burger juicy while cooking. The fat adds great flavor and moisture, making each bite rich and satisfying. - Irish cheddar cheese: Aged Irish cheddar gives a sharp, tangy taste. It melts beautifully, adding creaminess to the burger. Always opt for high-quality cheese for the best flavor. - Seasonings: I use dried thyme and garlic powder. These spices enhance the burger's flavor without overpowering it. Salt and pepper are also crucial for balance. - Fresh greens: I recommend arugula or mixed greens. They add a nice crunch and freshness. You can also use lettuce if you prefer a classic touch. - Condiments: Choose Guinness mustard or whole grain mustard for a unique twist. They provide a slight tang that pairs well with the beef. - Creative garnishes: Sliced pickles or crispy bacon add texture and extra flavor. You can also experiment with sautéed onions or jalapeños. - Essential kitchen tools: You will need a mixing bowl, spatula, and a knife. A grill or skillet is necessary for cooking the burgers. - Cooking surface options: A grill adds a smoky flavor, while a skillet offers great control over heat. Both methods work well, so choose what you prefer. To start, gather your ingredients. In a large bowl, combine the ground beef, diced cooked potatoes, shredded Irish cheddar cheese, chopped chives, dried thyme, garlic powder, salt, and pepper. Mix these well, but be careful not to overwork the meat. Overmixing can make the burger tough. You want a light touch here. Just combine until everything is mixed evenly. Next, divide the mixture into four equal portions. Roll each portion into a ball and then flatten it gently to form a patty. The key is to make a slight indentation in the center of each patty. This helps the burgers cook evenly and prevents puffing. A good patty shape is crucial for a juicy bite. Now, it's time to cook your burgers. Preheat your grill or skillet to medium-high heat. Once hot, add the patties. Cook for about 4-5 minutes on each side for a medium doneness. You can adjust the time to your liking. If you want them well-done, add an extra minute. In the last minute of cooking, place a slice of Irish cheddar on each patty to melt. This adds extra flavor and creaminess to your burger. To make the best Irish pub burger, start with the right beef blend. I recommend an 80/20 blend of ground beef. This mix has enough fat to keep your burger juicy. The fat adds flavor and moisture, making each bite delightful. When cooking, keep these tips in mind for moisture retention. Do not press down on the patties while they cook. This traps the juices inside, making your burger tender. Also, consider placing an indentation in the center of the patty. This helps it cook evenly and prevents puffing. Pair your Irish pub burger with tasty options. A classic choice is crispy potato wedges. They add a nice crunch and complement the burger well. You can also serve them with coleslaw for a refreshing contrast. For beverages, I suggest a cold pint of stout or lager. The rich flavors in these drinks match the burger's taste. You could also try a light cider for a fruity twist. Plating your burger nicely makes it more appealing. Start with a clean plate. Place the bottom half of the bun on the plate. Add a layer of arugula, then the burger patty. For garnish, sprinkle some fresh chives or add a slice of pickle on top. This adds color and texture. A drizzle of mustard on the side can enhance the look too. Remember, people eat with their eyes first! {{image_2}} You can swap proteins in this burger. Try ground turkey or chicken for a lighter option. If you prefer plant-based meals, use lentils or black beans. They work well with the same seasonings. For cheese, consider dairy-free options like cashew or almond cheese. These can add a nice, creamy touch without dairy. To make your burger pop, add spices or sauces. A dash of smoked paprika brings warmth. A splash of Worcestershire sauce adds depth. You might also try hot sauce for some heat. In Ireland, burgers often include local favorites like stout or whiskey in the mix. These ingredients enhance the burger's flavor and give it a unique twist. Grilling is a classic way to cook these burgers. It gives them a nice char and smoky flavor. Ensure your grill is hot before adding the patties. If you prefer pan-frying, use a cast-iron skillet. This method helps the burger keep its juices. You can also bake them in the oven at 375°F. This will take a bit longer but is an easy hands-off method. For the full recipe, check the Delicious Irish Pub Burger section. Enjoy experimenting with these ideas! After you enjoy your Delicious Irish Pub Burger, put any leftovers in an airtight container. This helps keep them fresh. Store the burgers in the fridge for up to three days. Remember to let them cool before sealing. This step prevents moisture loss. If you want to keep the burgers longer, freezing is the best choice. Wrap each burger tightly in plastic wrap. Then, place them in a freezer bag. They can last up to three months in the freezer. When ready to eat, move them to the fridge overnight to thaw. For quick thawing, you can use the microwave on the defrost setting. To keep your burgers tasty, reheat them in the oven. Set the oven to 350°F (175°C) and place the burgers on a baking sheet. Heat for about 10-15 minutes. This method helps maintain their juiciness. Avoid using the microwave if you want to keep the texture. Microwaves can make the buns soggy. Enjoy your meal by following these tips. An Irish pub burger stands out due to its unique blend of flavors. The key features include: - Ground beef mixed with diced cooked potatoes for added texture. - Aged Irish cheddar cheese, adding a rich flavor. - Fresh chives and thyme for an herby taste. This burger brings a taste of Ireland to your plate. Yes, you can prepare these burgers ahead of time. To do so: - Shape the patties and store them in the fridge for up to 24 hours. - You can also freeze patties for later use. Just wrap them tightly. - Thaw in the fridge before cooking. This keeps the flavor fresh. Pair these burgers with tasty side dishes like: - Crispy potato wedges or fries for crunch. - A fresh side salad for a light touch. - Coleslaw adds a creamy contrast. These sides enhance the burger experience. You can find the complete Delicious Irish Pub Burger recipe online. Following the full recipe ensures you capture every flavor and detail. Authenticity in cooking makes your meal truly special. This guide covered everything for making your perfect Irish pub burger. From choosing the right ground beef and Irish cheddar cheese to optional toppings and cooking methods, you can create a delicious meal. Remember to consider ingredient swaps and cooking methods to suit your taste. Proper storage and reheating will keep your burgers fresh. Follow these tips, and you’ll impress your friends and family. Enjoy the process and savor every bite of your creation.

Delicious Irish Pub Burger Flavorful Food Experience

If you crave a flavorful experience, the Delicious Irish Pub Burger is your answer. I’ll guide you through every step,

To make Overnight Crème Brûlée French Toast, you need some simple ingredients that pack a big flavor. Here’s what you'll need: - 1 loaf of brioche bread, sliced 1-inch thick - 4 large eggs - 2 cups whole milk - 1 cup heavy cream - 3/4 cup granulated sugar - 2 teaspoons vanilla extract - 1 teaspoon ground cinnamon - 1/4 teaspoon salt - 1/2 cup brown sugar (for topping) - 2 tablespoons unsalted butter (for greasing) - Fresh berries (for garnish) - Mint leaves (for garnish) Each ingredient plays a special role. The brioche bread gives a rich taste and soft texture. Eggs, milk, and cream create a creamy custard that soaks into the bread. Sugar and vanilla add sweetness and warmth. Cinnamon and salt balance the flavors perfectly. Brown sugar on top gives that crunchy, caramelized finish. Lastly, berries and mint make your dish look beautiful and fresh. For the full recipe, check out the detailed instructions on how to combine these ingredients for a delicious meal. - First, grease the baking dish with unsalted butter. - Next, arrange the brioche slices in the dish. Make sure they overlap a little. - In a large bowl, whisk together: - 4 large eggs - 2 cups whole milk - 1 cup heavy cream - 3/4 cup granulated sugar - 2 teaspoons vanilla extract - 1 teaspoon ground cinnamon - 1/4 teaspoon salt - Whisk until it is smooth and well mixed. - Pour the custard over the bread slices. Make sure every piece soaks well. - Cover the dish tightly and refrigerate overnight. This helps the bread soak up the custard. - The next day, preheat the oven to 350°F (175°C). - Take off the cover and sprinkle 1/2 cup of brown sugar over the top. - Bake for 45-50 minutes. Keep an eye on it until the top is golden brown. - For a nice finish, use a torch to caramelize the brown sugar on top until crispy. If you lack a torch, broil it in the oven for 2-3 minutes. - Serve warm, and garnish with fresh berries and mint leaves. This dish is truly a flavorful delight! For the complete instructions, check out the Full Recipe. Soaking the bread is key to a rich flavor. I recommend soaking the brioche for at least eight hours. This allows the bread to absorb all the custard. You want even absorption for the best texture. Press down gently on the bread after pouring the custard. This helps each slice soak up the mixture. If you skip this step, some bread may not soak well. Baking gives this dish its perfect golden brown top. Preheat your oven to 350°F (175°C) before placing the dish inside. Bake for 45 to 50 minutes. Keep an eye on it during the last few minutes. You want the top to be golden, not burnt. For that caramelized topping, sprinkle brown sugar evenly on top. You can finish it with a torch for a crisp layer. If you don’t have a torch, broil it for 2-3 minutes. Just watch closely so it doesn’t burn. For the full recipe, check the section above. {{image_2}} You can make Overnight Crème Brûlée French Toast even better. Adding fruit or nuts gives it a nice twist. Fresh berries, like strawberries or blueberries, add sweetness and color. You can slice bananas or peaches too. Nuts, like pecans or walnuts, add crunch and flavor. Just chop them up and sprinkle them on top before baking. Using different types of bread also changes the taste. While brioche is soft and rich, you can use challah for a similar texture. Sourdough gives a tangy flavor, while whole wheat adds a nutty taste. Each bread type brings its own charm to the dish. If you need gluten-free options, choose gluten-free bread. Many brands offer tasty bread that works well in this recipe. Just make sure it has the right texture for soaking. For dairy-free alternatives, use almond milk or coconut milk instead of whole milk and cream. You can also replace heavy cream with coconut cream. These swaps keep the dish creamy while making it dairy-free. Enjoying this dish can be easy for everyone! To keep your Overnight Crème Brûlée French Toast fresh, store it in the fridge. Place it in an airtight container. This helps avoid drying out. You can keep it for up to three days. When reheating, use the oven for the best texture. Set your oven to 350°F (175°C). Bake for about 10-15 minutes. This warms it through and keeps the edges crisp. If you have leftovers, you can freeze them. Cut the French toast into portions. Wrap each piece in plastic wrap. Then, place them in a freezer bag. This helps prevent freezer burn. You can freeze it for up to three months. To thaw, move it to the fridge overnight. For reheating, use the oven again. Bake at 350°F (175°C) for 15-20 minutes. This method keeps your French toast tasty and warm. Enjoy your delicious treat! For the complete recipe, check the Full Recipe section. Can I make this recipe without overnight refrigeration? You can skip the overnight step, but it won’t be as good. The bread needs time to soak in the custard. If you rush it, the texture will be off. What’s the best way to reheat French toast? The best way is to use an oven. Preheat it to 350°F (175°C). Place the French toast on a baking sheet. Heat for about 10-15 minutes. This keeps it warm and crisp. You can use a microwave too, but it may make it soggy. Can I use a different type of bread? Yes, you can use other types of bread. Challah and sourdough work well too. Just make sure the bread is thick and sturdy. This helps it soak up the custard without falling apart. How do I know when it’s done baking? Check for a golden brown top. You can also insert a knife in the center. If it comes out clean, it’s done. The custard should be set but still soft. Best toppings for Overnight Crème Brûlée French Toast. Some great toppings are fresh berries, whipped cream, or maple syrup. You can also add a sprinkle of powdered sugar for extra sweetness. A bit of mint can add a nice touch too. Can I make this recipe in smaller batches? Yes, you can! Just cut the ingredients in half and use a smaller dish. This makes it easy to serve fewer people. You can also try different flavors in each batch for fun. This blog post shared a simple way to make Overnight Crème Brûlée French Toast. We covered ingredients, step-by-step instructions, and tips to perfect your dish. Remember to soak the bread well for best results. Don't forget to explore fun variations and easy storage tips. With these insights, you can create a delicious breakfast. Enjoy impressing your family with this treat!

Overnight Crème Brûlée French Toast Flavorful Delight

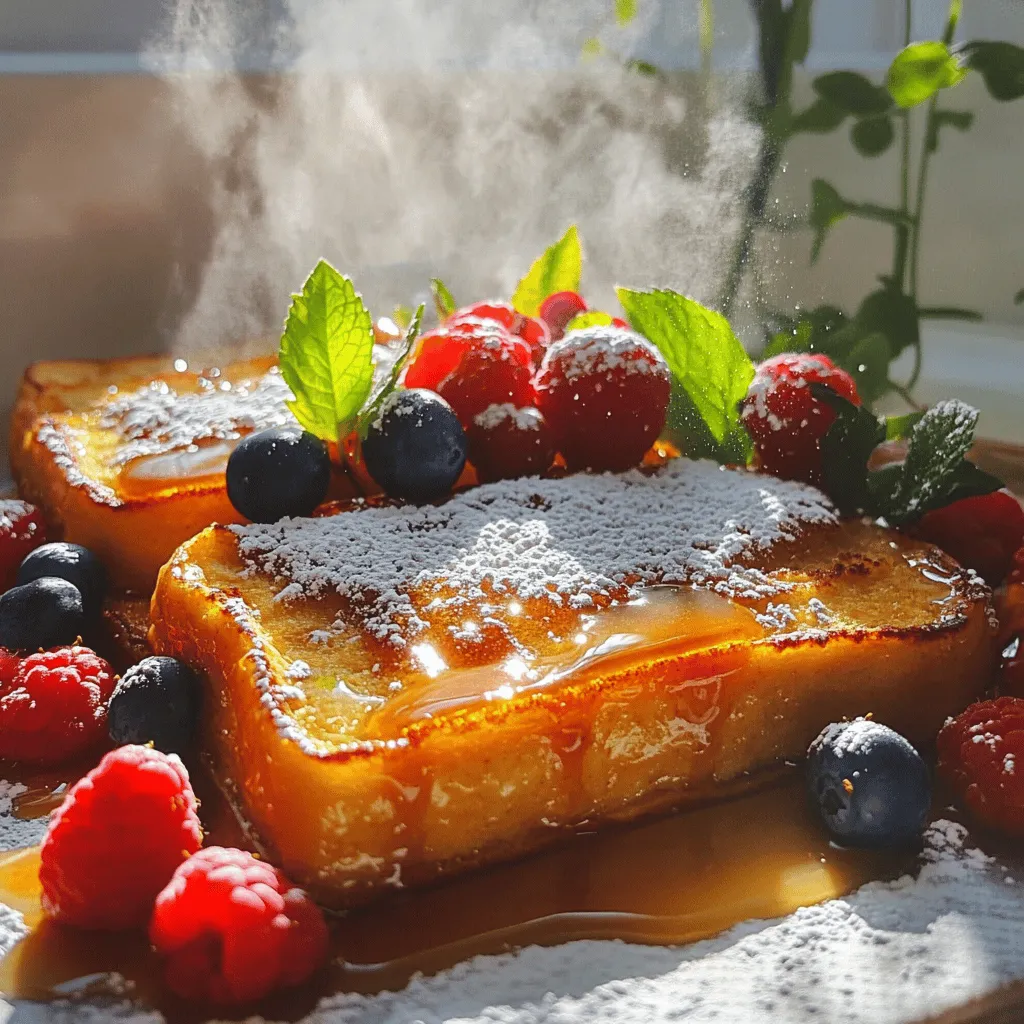
Looking for a breakfast treat that feels like dessert? Overnight Crème Brûlée French Toast is your answer! This easy recipe

- Fresh shrimp: Use 1 lb of large shrimp, peeled and deveined. Large shrimp cook well and offer a nice bite. - Essential dairy products: You need 4 tablespoons of unsalted butter and 1 cup of heavy cream. These create a rich and creamy sauce. - Flavor enhancers: Gather 4 minced garlic cloves, 1/2 cup of chicken broth, 1 teaspoon of paprika, 1/2 teaspoon of red pepper flakes, and 1 teaspoon of lemon juice. These ingredients add depth and zest to the dish. - Recommended pasta choices: I suggest using spaghetti or fettuccine. Both pair nicely with the creamy sauce. - Alternative herbs or spices: You can add fresh herbs like basil or parsley for extra flavor. - Additional protein options: Try adding cooked chicken or tofu for more protein and texture. - Vegetable add-ins: Consider spinach, bell peppers, or mushrooms. These veggies add color and nutrition to your dish. This list covers everything you need to make creamy garlic shrimp. For the full recipe, check out the detailed steps to create this delightful meal. Start by cooking the pasta according to the package instructions. It’s key to aim for al dente texture. This means the pasta should be firm to the bite. Overcooking can lead to mushy pasta, which won’t hold the sauce well. When you drain the pasta, make sure to reserve about 1/2 cup of the pasta water. This water can help if your sauce is too thick later. Set the drained pasta aside while you prepare the shrimp and sauce. Heat a large skillet over medium heat and melt 2 tablespoons of butter. Once the butter is hot, add the shrimp in a single layer. Sprinkle with salt and pepper. Cook the shrimp for about 2 to 3 minutes on each side. They should turn pink and opaque when done. Take the shrimp out of the skillet and set them aside. This step is crucial because overcooked shrimp can become rubbery and tough. In the same skillet, add the remaining 2 tablespoons of butter. Once it melts, add minced garlic. Sauté the garlic for about 30 seconds. Be careful not to burn it, as burned garlic can taste bitter. Next, pour in the chicken broth and bring it to a simmer. Then stir in the heavy cream, paprika, and red pepper flakes. Cook this mixture for about 3 to 4 minutes. This will allow the sauce to thicken slightly. If you prefer a thicker sauce, let it reduce a bit longer. Now it’s time to bring everything together. Return the cooked shrimp to the skillet. Add the lemon juice and taste to check for seasoning. Adjust with salt and pepper if needed. If the sauce feels too thick, add your reserved pasta water a little at a time until you get your desired consistency. Finally, add the cooked pasta to the skillet. Toss everything together so the pasta gets coated with the creamy garlic sauce. Cook for one more minute to heat through. I love serving this creamy garlic shrimp pasta in a large bowl, topped with fresh parsley. It not only looks pretty but tastes amazing too! For the full recipe, check out the complete instructions. To make a great sauce, avoid burning the garlic. Cook it just until soft. If you burn it, the sauce will taste bitter. If your sauce is too thick, add some pasta water. Start with a small amount and mix well. You want a creamy but pourable texture. If it’s too thin, simmer it longer to thicken. You can elevate the taste by adding white wine. Just pour it in after sautéing the garlic. Let it reduce before adding cream. This adds depth and richness. To balance flavors, add a splash of lemon juice. This brightens the dish and cuts through the creaminess. Try tasting and adjusting as you cook. To make this dish gluten-free, use gluten-free pasta. There are many good options that taste great. For a dairy-free version, swap heavy cream for coconut milk. It gives a nice creaminess without dairy. You might also use cashew cream for a richer taste. {{image_2}} You can cook shrimp in different ways. Sautéing is the most common method. It gives a nice sear and keeps the shrimp juicy. Simply heat some butter in a pan, add shrimp, and cook until pink. Grilling shrimp adds a smoky flavor. To grill, marinate shrimp with garlic and lemon juice. Skewer them and grill for a few minutes on each side. The result is tasty and fun for summer meals. Baking is another easy option for creamy garlic shrimp. Preheat your oven to 400°F (200°C). Place shrimp in a baking dish with the garlic sauce. Bake for about 15 minutes or until the shrimp are cooked. This method is great for a fuss-free meal. You can customize your creamy garlic shrimp with different sauces. For a twist, try adding a splash of white wine or a hint of soy sauce. This adds depth and new flavors to the dish. For those who love heat, spice it up! Start with a little red pepper. You can increase the amount to suit your taste. Adding diced jalapeños or hot sauce gives it an extra kick. Pair creamy garlic shrimp with a fresh salad or crusty bread. A simple side salad with mixed greens, tomatoes, and vinaigrette brightens the meal. For bread lovers, serve it with crusty baguette. It’s perfect for dipping into the creamy sauce. For special occasions, think about how you present the dish. Serve it in a large bowl and sprinkle with parsley. Add lemon wedges on the side for a pop of color. You can even use a fancy plate to show off your cooking skills! Check out the Full Recipe to make this dish your own! To keep creamy garlic shrimp fresh, cool it down quickly. Place it in the fridge within two hours. Use airtight containers for the best results. Glass or plastic containers work well. Make sure to leave some space for the sauce to expand if you freeze it. Shrimp can last in the fridge for up to three days. If you want to keep it longer, consider freezing it. Frozen shrimp can last for about two months. When reheating creamy garlic shrimp, avoid using high heat. Low heat helps keep the shrimp tender. You can use a skillet or microwave. If you use a skillet, add a splash of chicken broth or cream. This helps keep the sauce creamy. Stir gently to avoid overcooking the shrimp. If the sauce is too thick, add more broth or a bit of reserved pasta water to reach your desired consistency. Enjoy your creamy garlic shrimp just as delicious as when you first made it! Look for a few signs to know when shrimp are done. First, check their color. Cooked shrimp turn pink and opaque. Second, feel their texture. They should feel firm but not tough. Lastly, they curl slightly when cooked. If you see these signs, your shrimp are ready to eat! Yes, you can prep this dish ahead. Cook the shrimp and sauce separately. Store them in airtight containers. Keep the pasta separate, too. When ready to eat, just reheat the shrimp and sauce. Combine everything with the pasta and enjoy a quick meal! This dish pairs well with several sides. Consider a fresh green salad with a light dressing. Crusty bread is perfect for soaking up the sauce. You can also serve it with steamed veggies or garlic bread. These choices balance the meal and add freshness. You can lighten up this dish easily. Use half-and-half instead of heavy cream. This swap cuts calories but keeps creaminess. You can also use less butter. Add more veggies for volume without many calories. Try spinach or zucchini for a tasty boost. Here are some mistakes to watch out for: - Overcooking shrimp makes them rubbery. - Burning garlic can ruin the sauce’s flavor. - Not reserving pasta water may lead to a thick sauce. - Forgetting to taste and adjust seasoning can leave your dish bland. Yes, frozen shrimp work well! Just thaw them before cooking. To thaw, place shrimp in the fridge overnight or run them under cold water. Pat them dry before cooking. This helps achieve that perfect texture and flavor in your creamy garlic shrimp. For the full recipe, check here. In this post, we explored how to make creamy garlic shrimp. We covered key ingredients, like fresh shrimp, garlic, and heavy cream. You learned step-by-step instructions to cook pasta and sauté shrimp perfectly. We also shared tips for customization, dietary adjustments, and reheating leftovers. Creamy garlic shrimp is versatile and easy to make. Try out variations to suit your taste. With practice, you’ll create a delicious dish that impresses everyone. Enjoy cooking and experimenting with your recipes!

Creamy Garlic Shrimp Savory and Simple Recipe

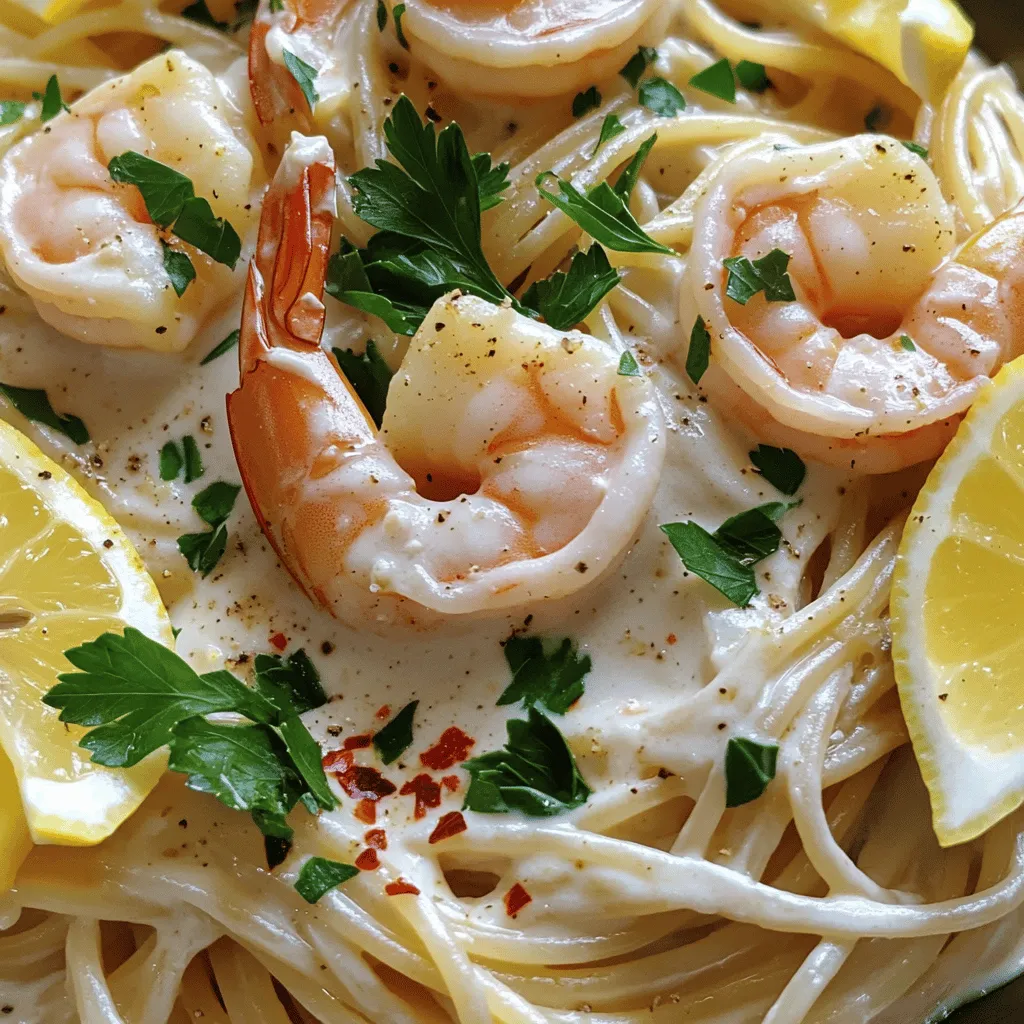
If you love quick, delicious meals, you’re in for a treat with my creamy garlic shrimp recipe! This dish is

To make delicious banana mochi rolls, you need some simple ingredients. Here’s what you will need: - 1 cup glutinous rice flour - 1/4 cup sugar - 1/2 cup water - 1/2 teaspoon vanilla extract - 2 ripe bananas, sliced - 1/4 cup sweetened coconut flakes - Cornstarch or potato starch, for dusting - Optional: 1 tablespoon sesame seeds for garnish Each ingredient plays a key role. Glutinous rice flour gives the mochi its chewy texture. Sugar and vanilla add sweetness and flavor. Water helps mix everything together. The ripe bananas provide a fruity filling. Coconut flakes bring a delightful crunch. Dusting with cornstarch keeps the dough from sticking. Make sure to choose ripe bananas. They should be soft and sweet. This will enhance the flavor of your rolls. The coconut flakes can be sweetened or unsweetened, based on your taste. For the full recipe, follow the instructions carefully to create these fun and tasty rolls! To start, mix the glutinous rice flour and sugar in a bowl. This is the base of our mochi. Gradually add the water and vanilla extract. Stir the mixture until it is smooth and free of lumps. A smooth mixture is key. It helps the dough cook evenly and taste great. Now, transfer the mixture to a microwave-safe bowl. Cover it tightly with plastic wrap. Microwave on high for 1 minute. After the first minute, carefully stir the dough. Cover it again and microwave for another minute. Repeat this process one more time, cooking for about 3 minutes total. The dough should look translucent and feel sticky. Once the dough is cooked, allow it to cool for a few minutes. It should be warm but easy to handle. Dust your working surface with cornstarch or potato starch. This prevents the dough from sticking. Take small portions of the dough, about a tablespoon each, and flatten them into thin discs. Use your hands or a rolling pin for this. Dust with starch as needed to keep it from sticking. Next, place a slice of banana in the center of each disc. Fold the edges over to create a roll. Make sure to seal the banana inside well. This prevents it from leaking out while you enjoy your treat. Once sealed, roll each mochi in sweetened coconut flakes. This adds a delightful texture. If you want, sprinkle sesame seeds on top for extra crunch. To know if your mochi is cooked right, look for a smooth, shiny surface. It should be slightly sticky but not wet. A common mistake is overcooking the dough, which makes it tough. Always check after each minute in the microwave. If it feels too firm, it needs more time. When you serve banana mochi rolls, presentation is key. Use a wooden board or a bright plate. Sprinkle extra coconut flakes on top for a fun touch. You can also serve it with chocolate sauce or honey for a sweet dip. Fresh fruit on the side adds color and taste. You’ll need some basic tools to make these mochi rolls: - Microwave-safe bowl - Plastic wrap - Mixing spoon - Rolling pin - Dusting surface For ingredients, I recommend brands like Mochiko for glutinous rice flour and Ghirardelli for chocolate sauce. These brands ensure quality and taste. Check your local stores or online shops for the best deals. To make this delightful treat, follow the Full Recipe for step-by-step guidance. {{image_2}} To make banana mochi rolls vegan and gluten-free, use specific substitutes. Replace sugar with maple syrup or agave nectar. Choose gluten-free glutinous rice flour instead of regular flour. This keeps the mochi soft and chewy. To maintain flavor and texture, add a small pinch of salt. This enhances the sweetness without affecting the diet. If the dough feels too sticky, add a bit of starch. This helps you handle the dough easily. Besides bananas, many fruits work well in mochi rolls. Try strawberries, mangoes, or even blueberries. Each fruit brings a fresh twist that excites your taste buds. You can also explore creative fillings. Consider nut butter, chocolate, or sweetened red bean paste. These options add fun flavors and textures. Adding extracts or powders can change the dough's taste. A few drops of almond or coconut extract create depth. You can also mix in cocoa powder for a chocolatey experience. For natural colorings, use beet juice or matcha powder. These ingredients not only brighten the dough but also add unique flavors. To keep your banana mochi rolls fresh, use an airtight container. This helps avoid moisture loss and keeps the rolls soft. Line the container with parchment paper to absorb any excess moisture. Store your mochi rolls in the fridge. The ideal temperature is around 35 to 40 degrees Fahrenheit. This keeps them cool and enjoyable for days. Banana mochi rolls last about three to five days in the fridge. Make sure to check for any signs of spoilage before enjoying them. If you want to save some for later, freezing is a great option. To freeze, wrap each roll in plastic wrap and place them in a freezer-safe bag. They can stay fresh for up to three months in the freezer. Just thaw them in the fridge before serving. For detailed instructions, check the Full Recipe. You can use regular rice flour as a substitute. However, it will change the texture. Regular rice flour makes the mochi less chewy. You can also try sweet rice flour. This flour gives a similar chewy feel to glutinous rice flour. However, it may not be as easy to find. Always check your local grocery store. Yes, you can use frozen bananas. They work well in this recipe. Just remember to thaw them first. Frozen bananas tend to be softer than fresh ones. This can make them easier to mash. However, they may not hold their shape as well in the rolls. If you prefer a firmer bite, use fresh bananas. You can find banana mochi rolls in local Asian grocery stores. Many places sell fresh mochi in their dessert sections. If you can't find them nearby, you can order online. Many websites offer ready-made mochi, including banana flavor. Just make sure to read reviews before ordering to ensure quality. Yes, you can prepare banana mochi rolls in advance. Make the rolls and store them in the fridge. They will stay fresh for a few days. If you want to serve them later, chill them for 30 minutes before serving. You can also freeze the rolls. Just let them thaw in the fridge before enjoying them again. You’ve learned how to make banana mochi rolls from start to finish. We covered key ingredients, cooking methods, and helpful tips. Remember to aim for a smooth dough and avoid common mistakes. Don’t hesitate to try different fillings or flavors. Mochi is versatile and fun to make. With the right storage, your treats can last longer. Enjoy sharing your creations with friends and family. Making mochi can be an exciting and tasty adventure that enhances your cooking skills.

Banana Mochi Rolls Tasty and Fun Dessert Recipe

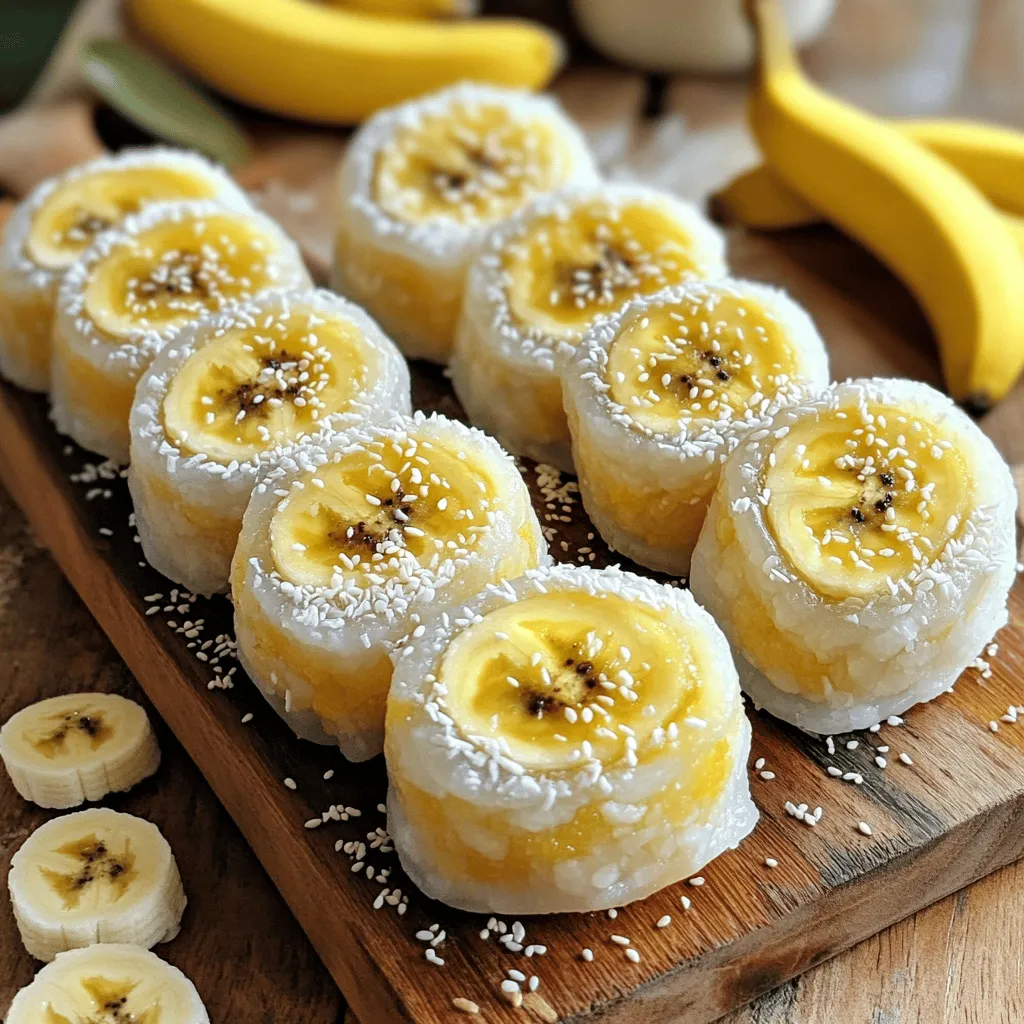
Looking for a fun, tasty dessert? Try my Banana Mochi Rolls! This easy recipe blends the sweet flavors of ripe

Older posts
Newer posts
← Previous Page1 … Page42 Page43 Page44 … Page55 Next →

dsad

© 2025 Lisa Dishes • Built with GeneratePress

Our Policies

  • Copyright Policy
  • Cookie Policy
  • GDPR Policy
  • Privacy Policy
  • Disclaimer
  • Terms Of Use

More Information

  • Home
  • About
  • Contact
  • Appetizers
  • Dessert
  • Dinner
  • Drinks
©2025, Lisa Dishes About Back To Top