Skip to content
DisclaimerTerms Of UseGDPR PolicyCookie Policy

Lisa Dishes

  • Home
  • Drinks
  • Appetizers
  • Dinner
  • Dessert
  • About
  • Contact
  • Privacy Policy
DisclaimerTerms Of UseGDPR PolicyCookie Policy

lisa

To make the best Shrimp Creole, you need fresh and tasty ingredients. Here’s the list you will need: - 1 pound large shrimp, peeled and deveined - 2 tablespoons olive oil - 1 medium onion, finely chopped - 1 green bell pepper, diced - 1 red bell pepper, diced - 3 garlic cloves, minced - 2 cups diced tomatoes (canned or fresh) - 1 teaspoon tomato paste - 1 teaspoon cayenne pepper (adjust for heat preference) - 1 teaspoon dried thyme - 1 teaspoon paprika - 1 teaspoon dried oregano - 1/2 cup celery, diced - 1 tablespoon Worcestershire sauce - 1 cup chicken or vegetable broth - 2 green onions, chopped (for garnish) - Fresh parsley, chopped (for garnish) - Salt and pepper to taste - Cooked white rice (for serving) Each ingredient adds depth and flavor. For example, the cayenne pepper gives it heat, while the fresh vegetables add sweetness. You can adjust the spice level to suit your taste. If you want a milder dish, use less cayenne. The shrimp is the star of this dish. Always choose fresh or high-quality frozen shrimp. This ensures a great texture and taste in your meal. For a fun twist, try adding different herbs or spices. Fresh parsley and green onions on top make the dish pop. This Shrimp Creole is not just a meal; it’s a celebration of flavors. For the complete cooking instructions, check out the Full Recipe! - Step 1: Heat the olive oil over medium heat in a large skillet or Dutch oven. This step is key for flavor. - Step 2: Sauté the chopped onion, green bell pepper, and red bell pepper until soft. This should take about 5-7 minutes. You want them to get tender and sweet. - Step 3: Incorporate the minced garlic and cook briefly until fragrant. Garlic adds a lovely aroma to the dish. - Step 4: Add diced tomatoes and tomato paste; simmer for 5 minutes. This will create a rich base for your sauce. - Step 5: Season with cayenne pepper, thyme, paprika, oregano, salt, and pepper. Adjust the spices to your taste. - Step 6: Mix in diced celery, Worcestershire sauce, and broth; bring to a boil. The broth will add depth to your flavors. - Step 7: Reduce heat and simmer for about 15 minutes. This lets the flavors meld together nicely. - Step 8: Add shrimp and cook until pink; adjust seasoning before serving. Watch the shrimp closely; they cook fast! - Step 9: Serve over rice, garnished with green onions and parsley. This adds a fresh touch to your dish. For the full details, check the Full Recipe. Enjoy your cooking! - Adjusting spice levels for personal taste: Start with a small amount of cayenne pepper. You can always add more if you want it spicier. Taste as you go. This way, you control the heat. - Using fresh herbs versus dried herbs for improved taste: Fresh herbs like parsley and thyme bring a bright flavor. Dried herbs work well but can lose some taste. Use fresh when you can. - The importance of properly cooking shrimp for perfect texture: Cook shrimp just until they turn pink. Overcooking makes them tough. They should be firm yet tender when done. - Recommended pans and skillets for best results: A heavy-bottomed skillet or Dutch oven works best. These distribute heat evenly and prevent burning. Non-stick pans are great for easy cleanup. - Selecting the right knives for ingredient prep: A sharp chef's knife is key for chopping veggies. It makes cutting easier and safer. Use a paring knife for peeling garlic or herbs. - Ideas for garnishing and serving for visual appeal: Sprinkle chopped green onions and parsley on top. This adds color. Serve in a bowl over rice for a comforting look. - Suggestions for side dishes to pair with Shrimp Creole: A crisp salad or crusty bread pairs well. You can also serve it with cornbread for a Southern touch. These sides balance the flavors of the dish. For the full recipe, check out the instructions provided above. Enjoy cooking! {{image_2}} You can switch shrimp with other seafood. Crab and scallops taste great in this dish. They bring their own unique flavor. You can also try vegan options. Plant-based shrimp or firm tofu work well as substitutes. These choices suit many diets while keeping the dish tasty. Shrimp Creole changes by region. New Orleans style is famous for its bold flavors. It often uses spicy elements like cayenne pepper and paprika. Traditional Southern style may focus on milder spices and local ingredients. Different cultures add unique spices too. For example, some recipes might include Creole seasoning or even curry powder. This adds new layers of taste. Pair Shrimp Creole with simple side dishes. A light salad or garlic bread complements it well. You can also serve it over cooked white rice. This helps soak up the tasty sauce. If you have leftovers, get creative! Use the Shrimp Creole in tacos or pasta. It’s versatile and delicious, no matter how you serve it. For the full recipe, check out the detailed instructions above. To keep your leftover Shrimp Creole fresh, follow these steps: - Refrigerate promptly: Store your Shrimp Creole in an airtight container. Make sure to refrigerate it within two hours of cooking. This keeps it safe to eat. - Use within 3 to 4 days: Enjoy your leftovers within this time for the best taste and safety. - Freezing servings: If you want to save it longer, you can freeze your Shrimp Creole. Portion it into freezer-safe bags or containers. Remove as much air as possible. Label each container with the date. When it's time to enjoy your Shrimp Creole again, follow these tips to keep the flavor intact: - Stovetop method: The best way to reheat is on the stove. Place your Shrimp Creole in a pot over medium heat. Stir frequently until warmed through. This usually takes about 5 to 10 minutes. - Microwave method: If you prefer the microwave, put your Shrimp Creole in a microwave-safe dish. Heat in 1-minute intervals, stirring after each minute. This helps heat evenly. Aim for about 2 to 3 minutes total, depending on your microwave. - Check temperature: Always ensure it's heated to at least 165°F to be safe to eat. Using these techniques, you can enjoy your Shrimp Creole without losing any of its delightful flavors. For the full recipe, check the link above. How long does Shrimp Creole stay fresh in the fridge? Shrimp Creole stays fresh for about three days in the fridge. Store it in an airtight container. This keeps the flavors intact and safe for later meals. Can I make Shrimp Creole in advance? Yes, you can make Shrimp Creole in advance. It tastes even better the next day as the flavors meld. Just reheat it gently on the stove before serving. What type of shrimp is best for Shrimp Creole? Large shrimp work best for Shrimp Creole. They hold up well during cooking and offer a nice bite. Fresh or frozen shrimp are both great options. Is Shrimp Creole spicy, and can I customize the heat? Shrimp Creole can be spicy, but you can control the heat. Adjust the cayenne pepper to your taste. Start with less and add more if you like it spicier. Can I substitute the rice with other grains? Yes, you can use other grains. Quinoa, couscous, or even cauliflower rice make great options. Choose what you enjoy most! Tips for ensuring shrimp are not overcooked. Cook shrimp just until they turn pink. This usually takes about 5-7 minutes. Remove them from heat as soon as they're cooked to avoid toughness. What to do if Shrimp Creole turns out too salty or spicy. If it’s too salty, add a bit of sugar or more tomatoes. For too much spice, stir in a dollop of sour cream or yogurt. These help balance the flavors nicely. In this post, I shared how to make Shrimp Creole. You learned about its ingredients, cooking steps, and ways to enhance flavor. There are tips for serving and storage, plus variations to try. This dish is easy to make and full of flavor. Feel free to adjust it based on your tastes. Whether you enjoy it right away or save some for later, Shrimp Creole can fit any meal. Enjoy your cooking adventure!

Best Shrimp Creole Delightful and Flavorful Recipe

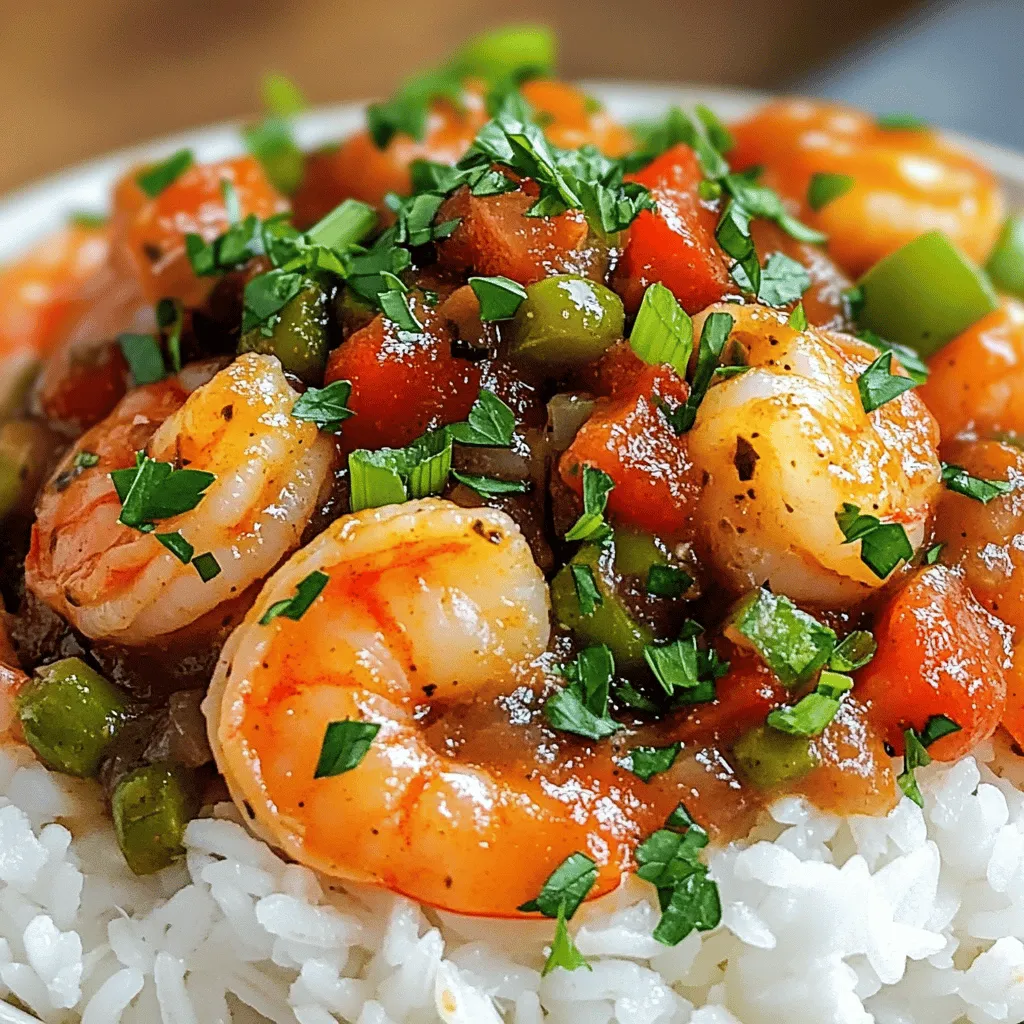
If you love bold flavors, then you need to try this Best Shrimp Creole recipe. It’s a delightful dish packed

To make the viral homemade Dunkaroo dip, you will need: - 1 cup vanilla frosting - 1 cup cream cheese, softened - 1 teaspoon vanilla extract - 1/2 cup chocolate sprinkles - 1/2 cup rainbow sprinkles - 1/4 cup mini chocolate chips - 1/2 cup crushed graham crackers (for dipping) - Assorted fruit and cookie dippers (like apple slices, strawberries, cookies, etc.) Using quality ingredients is key for this dip. The cream cheese must be soft. This makes it easy to mix and gives a smooth texture. The vanilla frosting should be fresh. It adds sweetness and a lovely flavor. Sprinkles bring fun colors and crunch. Always choose sprinkles that you love. The better the ingredients, the better the taste. You can dip many things into this delightful mix. Here are some great choices: - Fruits: Try apple slices, strawberries, or banana pieces. - Cookies: Use graham crackers, animal crackers, or chocolate chip cookies. - Pretzels: Add a salty crunch with pretzel sticks. These options make the experience even more fun. You can mix and match to find your favorite! To make this fun Dunkaroo dip, start by gathering your ingredients. You will need vanilla frosting, cream cheese, and some sweet toppings. This recipe is quick and easy, taking just ten minutes to prepare. 1. In a large mixing bowl, add 1 cup of softened cream cheese. 2. Then, mix in 1 cup of vanilla frosting. Use a hand mixer or whisk to blend them well. 3. Next, pour in 1 teaspoon of vanilla extract for that extra flavor. 4. Mix until the dip is smooth and creamy. This step is key for a great texture. 5. Now, fold in 1/2 cup each of chocolate sprinkles and rainbow sprinkles. 6. Add 1/4 cup of mini chocolate chips for a fun crunch. 7. Your dip is almost ready! Transfer it to a serving bowl. Smooth the top and add a few extra sprinkles for decoration. Serve your Dunkaroo dip with 1/2 cup of crushed graham crackers. You can also add assorted fruit and cookie dippers, like apple slices and strawberries. This makes it fun and colorful! Enjoy this treat with friends or family. It’s great for parties or any fun gathering. For the full recipe, check above! To get that perfect creamy texture in your Dunkaroo dip, use softened cream cheese. Cold cream cheese will not mix well. I recommend letting it sit out for about 30 minutes before you start. Mix the cream cheese and vanilla frosting together really well. A hand mixer works best here. It helps blend everything smoothly. You want the dip to be soft and fluffy. If it feels too thick, you can add a splash of milk. This will also add to the creaminess. If you have leftovers, store them in an airtight container. Make sure to keep it in the fridge. The dip will stay fresh for about three days. When you want to eat it again, mix it well. Sometimes it may thicken a bit in the fridge. If that happens, just add a bit of milk and stir. You can also cover the dip with plastic wrap. This helps keep it fresh longer. Serving this dip at parties is a big hit! Use a nice bowl to make it look fun. You can add extra sprinkles on top for a colorful touch. Serve it with graham crackers, fruits, or cookies. I love using apple slices and strawberries. They add a fresh taste. Set out a few different dippers. This way, guests can choose what they like best. Remember, the more colors on the table, the better! This makes the snack look fun and inviting. For the full recipe, check out the detailed section above. {{image_2}} You can switch up the flavor of your Dunkaroo dip. Try adding chocolate, peanut butter, or even fun flavors like cookies and cream. For chocolate, mix in 1/2 cup of cocoa powder. This gives a rich, chocolatey taste. If you love peanut butter, stir in 1/2 cup of creamy peanut butter. This adds a nutty flavor that pairs well with the sweetness. You can also use flavored frosting, like chocolate or peanut butter, for a quick twist. These simple changes keep your dip fun and fresh! If you want a healthier dip, you can make a few swaps. Use low-fat cream cheese instead of regular cream cheese. This cuts down on fat without losing taste. For the frosting, try sugar-free vanilla frosting. It still tastes great but reduces sugar. You can also use Greek yogurt for a tangy twist. Add a touch of honey or maple syrup to sweeten it up. With these changes, you can enjoy a tasty treat without the guilt. Make your Dunkaroo dip fit seasonal themes. For Halloween, add orange food coloring and pumpkin spice. This gives a festive look and flavor. For Christmas, use red and green sprinkles. You can also mix in crushed peppermint candies for a minty taste. For birthdays, add colorful sprinkles and fun-shaped cookie cutters for serving. These creative touches make your dip festive and fun for any occasion. To keep your Dunkaroo dip fresh, store it in an airtight container. This helps prevent it from drying out or absorbing other smells from your fridge. Make sure the lid is tightly sealed. I like to place a piece of plastic wrap directly on the dip before sealing the lid. This adds extra protection. When stored correctly, your Dunkaroo dip can last for about 3 to 5 days in the fridge. After that, the taste and texture may change. Always check for any signs of spoilage before enjoying. If it looks or smells off, it’s best to toss it. Freezing Dunkaroo dip is not the best idea. Cream cheese does not freeze well. It can become grainy and lose its creamy texture. If you have leftovers, it’s better to enjoy them fresh. However, if you must freeze it, store it in a freezer-safe container. Just know that the quality may not be the same once thawed. You can use Greek yogurt or mascarpone cheese. Both offer a creamy texture. Greek yogurt gives a tangy taste. Mascarpone is rich and smooth. Choose based on your taste. Yes, you can! Prepare the dip a day in advance. Store it in the fridge. This way, the flavors blend well. Just remember to stir before serving. To reduce sweetness, cut down on the frosting. You can also add more cream cheese. Another option is to mix in sour cream. This gives a nice balance of flavors. Absolutely! Flavored frosting can add a fun twist. Try chocolate or strawberry frosting. It will change the taste but keep it yummy. You can dip fruits like apples or strawberries. Cookies are great too! Graham crackers work well for a crunchy bite. Get creative with your dippers! The dip stays fresh for about three days in the fridge. Store it in an airtight container. Always check for any changes in smell or texture before eating. Freezing is not recommended. It may change the texture. If you need to store it longer, keep it in the fridge instead. Enjoy it fresh for the best taste! Try milk, fruit juices, or even soda. A creamy drink like a milkshake works great too. Choose what you love for a fun treat! Yes! This dip is fun and easy to share. Guests will love dipping their favorite snacks. It’s colorful and perfect for any gathering. This blog post covered key points for making Dunkaroo dip. We discussed important ingredients and their quality. You learned how to mix and serve this tasty treat. I offered tips for a creamy texture and great storage ideas. I also shared fun variations to keep things fresh. In conclusion, this dip is easy and fun for all. Enjoy experimenting with flavors and sharing it at your next gathering!

Viral Homemade Dunkaroo Dip Easy and Fun Recipe

Craving a fun and tasty treat? I’ve got just the recipe for you! The Viral Homemade Dunkaroo Dip is not

- 2 cups short-grain sushi rice - 3 cups water - 1 tablespoon rice vinegar - 1 tablespoon sugar - 1/2 teaspoon salt - 1 cup kimchi, chopped - 1 cup shredded mozzarella cheese - 1 carrot, julienned - 1 cucumber, julienned - 4 sheets of nori (seaweed) - 1 tablespoon sesame oil - Sesame seeds for garnish - Additional vegetables (e.g., spinach, radish) - Protein options (e.g., egg, tofu) When making Korean cheese kimchi kimbap, the key ingredients are essential for flavor. Short-grain sushi rice is a must. It gives the kimbap a nice sticky texture. I use water to cook the rice. This helps the rice become fluffy. Seasoning the rice with rice vinegar, sugar, and salt makes it tasty. Kimchi adds a spicy kick, while mozzarella cheese offers a creamy touch. I love adding julienned carrots and cucumbers for crunch. Nori wraps everything together. For extra fun, you can mix in other veggies or proteins. Spinach or radish work well. If you want protein, try eggs or tofu. These options make your kimbap even better. You can find all these ingredients at local stores. Some items, like good kimchi or nori, may also be available online. For the complete dish, check the full recipe. - Rinse 2 cups of short-grain sushi rice under cold water. - Once the water runs clear, cook the rice in a pot with 3 cups of water. - Bring it to a boil, then lower the heat, cover, and simmer for 20 minutes. - After cooking, let the rice sit covered for 10 minutes. - In a small bowl, mix 1 tablespoon of rice vinegar, 1 tablespoon of sugar, and 1/2 teaspoon of salt until dissolved. - Fluff the rice with a fork. Gently fold in the vinegar mixture while the rice is warm. - Allow the rice to cool slightly. - Heat 1 tablespoon of sesame oil in a pan over medium heat. - Add 1 julienned carrot and 1 julienned cucumber. Sauté for 2-3 minutes. - Cook until they are tender, but still crisp. - Remove the pan from heat and let the vegetables cool before you assemble. - Place a sheet of nori on a bamboo mat or clean surface. - Wet your hands to prevent sticking. Spread a thin layer of rice on the nori, leaving the top edge bare. - In the center of the rice, layer 1 cup of chopped kimchi, the sautéed carrots, cucumber, and 1 cup of shredded mozzarella cheese. - Begin rolling the kimbap from the bottom edge. Use the bamboo mat to help you. - Roll tightly until you reach the bare edge of the nori. Use a little water to seal the edge. - Slice the rolled kimbap into bite-sized pieces with a sharp knife. - Wipe the knife with a wet cloth to avoid sticking. - Sprinkle sesame seeds over the kimbap pieces for added flavor and crunch. For the full recipe, check out the "Cheesy Kimchi Kimbap Delight" section. Rinsing your rice is key. It removes excess starch. This helps the rice become fluffy. Soak the sushi rice for about 30 minutes. This step makes the rice tender and sticky. After cooking, let the rice sit covered for 10 minutes. This helps the moisture settle. Rolling kimbap may seem tricky, but practice makes perfect. Spread the rice evenly, leaving space at the top. Use wet hands to keep the rice from sticking. Start rolling from the bottom edge. Apply gentle pressure as you roll tightly. Balance your fillings to avoid overflow. Too much filling makes rolling hard. Kimbap pairs well with pickled radish or a light soup. You can also serve it with a side salad. For a fun twist, try dipping it in soy sauce. To present your kimbap nicely, slice it into bite-sized pieces. Arrange them on a colorful plate and sprinkle sesame seeds on top. This adds flavor and makes it look great. {{image_2}} You can easily make this dish vegetarian. Just swap the mozzarella cheese with tofu. Tofu brings a nice texture and absorbs flavors well. You can marinate it in soy sauce for more taste. To create a vegan kimbap, skip the cheese altogether. Use more veggies like avocado or mushrooms instead. This way, you keep the dish fresh and tasty. If you want to try different flavors, consider using alternative cheeses. Cream cheese or even a vegan cheese can work well. They add creaminess that pairs nicely with the kimchi. You can also explore different types of nori. Toasted nori gives a crunchier texture. Seaweed snacks can lend a fun twist if you want a lighter option. Kimbap varies across Korea. In some places, you might find spicy versions with gochujang sauce. Others use pickled vegetables for a tangy kick. You can also mix in elements from other cuisines. Adding ingredients like smoked salmon gives a fusion feel. Try adding a bit of Italian flair with pesto or sun-dried tomatoes for a unique taste. To keep your kimbap fresh, place it in an airtight container. This helps prevent drying out. Wrap each roll in plastic wrap for extra protection before storing. You can store kimbap in the fridge for up to three days. After that, the rice might get too hard, and the flavors may fade. To reheat kimbap, use a microwave for a quick fix. Place it on a microwave-safe plate and cover it with a damp paper towel. Heat for about 20 seconds. This keeps the rice moist. If you prefer cold kimbap, serve it straight from the fridge. The flavors blend well when served cold. Enjoy it with a dipping sauce for an extra kick. For more details, check the Full Recipe for perfect serving tips. Korean Cheese Kimchi Kimbap is a tasty dish made with rice, kimchi, and cheese. The main ingredients include: - 2 cups short-grain sushi rice - 3 cups water - 1 tablespoon rice vinegar - 1 tablespoon sugar - 1/2 teaspoon salt - 1 cup kimchi, chopped - 1 cup shredded mozzarella cheese - 1 carrot, julienned - 1 cucumber, julienned - 4 sheets of nori (seaweed) - 1 tablespoon sesame oil - Sesame seeds for garnish This dish mixes salty, spicy, and creamy flavors. The cheese makes it rich and smooth, while the kimchi adds a punch. Each bite is a blend of textures and tastes. Yes, you can make kimbap ahead of time! I suggest wrapping it tightly in plastic wrap. It will stay fresh for about a day. Store it in the fridge to keep it cool. If you make it too early, the rice can dry out. One common mistake is using sticky rice. If your rice is too sticky, add a little more vinegar mix to it. This can help loosen it up. Another issue is rolling it too loosely. Make sure to roll tightly for the best shape. You can find kimbap ingredients at local Asian markets or grocery stores. They often carry kimchi and nori. Look for brands that have good reviews for quality. If you can't find them nearby, try ordering online. For the full recipe, check out "Cheesy Kimchi Kimbap Delight." In this blog post, we explored how to create Cheesy Kimchi Kimbap. We reviewed essential ingredients, preparation of rice, and cooking your veggies. You also learned how to layer and roll kimbap, along with storage tips and variations. Enjoying this dish can be simple and fun, even for beginners. Embrace your creativity with ingredient choices. Dive in and share your kimbap adventures with friends!

Korean Cheese Kimchi Kimbap Flavorful Easy Recipe

Are you ready to dive into a delicious fusion of flavors? Korean Cheese Kimchi Kimbap is a fun twist on

- 1 lb sirloin steak, cut into bite-sized tips - 4 tablespoons unsalted butter - 4 cloves garlic, minced - 1 teaspoon fresh thyme leaves (or ½ teaspoon dried) - 12 oz rigatoni pasta - 1 cup heavy cream - 1 ½ cups shredded mozzarella cheese - ½ cup grated Parmesan cheese - Salt and pepper, to taste - Fresh parsley, chopped for garnish When making Garlic Butter Steak Tips with Cheesy Rigatoni, you need to focus on the right ingredients. I love using fresh sirloin steak. It has a great flavor and tenderness. You will want to cut it into small tips to cook fast. Unsalted butter makes the garlic sauce rich and tasty. Garlic adds a nice punch. Fresh thyme brings a lovely herbal note. I often choose rigatoni pasta for this dish. Its shape holds the cheesy sauce well. For the cheesy sauce, heavy cream gives it a smooth texture. Shredded mozzarella melts beautifully, while Parmesan adds depth. Do not forget seasoning! Salt and pepper are key. Fresh parsley at the end adds color and freshness. These ingredients come together to create a dish that is both comforting and gourmet. For the full recipe, check out the details in the earlier section. 1. Start by filling a large pot with water. Add a generous amount of salt. Bring it to a boil. 2. Once the water is boiling, add the rigatoni. Cook it according to the package instructions until it is al dente. This usually takes about 10-12 minutes. 3. Drain the pasta in a colander, but save ½ cup of the pasta water. Set the rigatoni aside. 1. In a large skillet, melt 2 tablespoons of butter over medium-high heat. 2. Season the steak tips with salt and pepper. Make sure they are evenly coated. 3. Once the butter is hot and sizzling, add the steak tips to the skillet. Cook for about 4-5 minutes, turning them to brown on all sides. 4. When the steak tips are browned, remove them from the skillet and set them aside. 1. In the same skillet, reduce the heat to medium and add the remaining 2 tablespoons of butter. 2. Add the minced garlic and fresh thyme. Cook for 1-2 minutes until the garlic is fragrant but not browned. 3. Pour the heavy cream into the skillet and bring it to a gentle simmer. Stir often to prevent sticking. 4. Gradually mix in the mozzarella and Parmesan cheese. Stir until the cheese is melted and the sauce is smooth. If it gets too thick, add some reserved pasta water until it reaches the right consistency. 1. Add the cooked rigatoni and the steak tips back into the skillet with the cheesy sauce. 2. Gently toss everything together, ensuring the pasta is well-coated in the sauce. 3. Taste and adjust the seasoning if needed, adding more salt or pepper to your liking. For the full recipe, check out the complete guide. To cook steak tips just right, you need to know your doneness. Use a meat thermometer for best results. Aim for 130°F for medium-rare and 140°F for medium. This keeps your steak juicy and tender. For searing, heat your skillet until it’s very hot. Add the butter right before cooking the steak. This helps form a nice crust. Do not overcrowd the pan; cook in batches if needed. This step is key to getting maximum flavor. To get your sauce perfect, you may need to adjust its thickness. If it’s too thick, add a little reserved pasta water. Stir well to combine. If it’s too thin, let it simmer for a few minutes. This thickens the sauce nicely. Cheese can clump if added too fast. Gradually add mozzarella and Parmesan while stirring. This keeps the sauce smooth and creamy. Remember, patience is key here. Pair your Garlic Butter Steak Tips with side dishes like a simple salad or garlic bread. These complement the rich flavors well. For presentation, use a large platter to serve. Place the rigatoni in the center and top with steak tips. Sprinkle chopped parsley on top for color. This makes the dish look stunning and appetizing. For the full recipe, check the link provided. {{image_2}} You can switch the steak for chicken or shrimp if you like. - Chicken: Use boneless, skinless chicken breast or thighs. Cut into bite-sized pieces. Cook until golden brown. - Shrimp: Use large shrimp, peeled and deveined. Add them to the pan for just a few minutes until pink and cooked through. - Vegetarian: Try using mushrooms instead of meat. Portobello or cremini mushrooms work well. Sauté them until they are tender. If you want to switch up the pasta, there are many great options. - Other Pasta Shapes: Penne, fusilli, or farfalle are all good choices. They hold the sauce nicely. - Gluten-Free Alternatives: Use gluten-free pasta made from rice, quinoa, or chickpeas. They taste great and keep the dish delicious. You can add more flavor with just a few ingredients. - Adding Vegetables: Toss in fresh spinach or bell peppers for color and nutrition. Sauté them with the garlic. - Different Herbs and Spices: Try adding basil, oregano, or even a pinch of red pepper flakes. This can give the dish a new twist. These variations let you customize your Garlic Butter Steak Tips with Cheesy Rigatoni just the way you like. For the full recipe, check the detailed instructions above. To keep your Garlic Butter Steak Tips with Cheesy Rigatoni fresh, follow these steps: - Let the dish cool to room temperature. - Use airtight containers to store leftovers. - Divide into single servings for easy reheating. - Keep in the fridge for up to three days. I recommend glass containers. They keep food fresh and heat evenly. When reheating, it's key to avoid dryness. Here’s how: - Stovetop: Heat a skillet over medium-low heat. Add a splash of cream or water to help moisten. Stir frequently until heated through. - Microwave: Place in a microwave-safe dish. Cover with a damp paper towel. Heat in short intervals, stirring in between. Both methods work well, but stovetop keeps it creamier. Yes, you can freeze this dish! Here’s how: - Store in airtight containers or freezer bags. - Label with the date for tracking. - It can freeze for up to three months. To thaw, place in the fridge overnight. Reheat gently on the stovetop. Adding a bit of cream helps restore that creamy texture. Enjoy your meal again! It takes about 15 minutes to prep and 30 minutes to cook. In total, you can have this dish ready in about 45 minutes. This time includes boiling the water, cooking the pasta, and perfecting the steak tips and sauce. Yes, you can make the sauce ahead. Cook the garlic and butter mix first. Then, store it in the fridge. When you're ready, gently reheat it and add the cream and cheese. This saves you time on a busy day. Sure! For a dairy-free option, use coconut milk instead of heavy cream and dairy-free cheese. For gluten-free, you can swap rigatoni with gluten-free pasta. Both options still taste great! To ensure tenderness, choose a good cut like sirloin. Cut it into small pieces for quick cooking. Cook them over high heat for a short time. This method keeps them juicy and tender. This blog post covered how to make Garlic Butter Steak Tips with Cheesy Rigatoni. You learned about the key ingredients, step-by-step cooking methods, and helpful tips. We also explored variations and storage options. Remember, cooking is an art. Feel free to tweak ingredients to suit your taste. Enjoying your dish is the goal. With these tips, you can create a great meal that impresses. Happy cooking!

Garlic Butter Steak Tips with Cheesy Rigatoni Bliss

Get ready for a meal that will make your taste buds dance! In this post, Garlic Butter Steak Tips with

To make these zesty no-bake mini key lime pies, you will need the following ingredients: - 1 cup graham cracker crumbs - 1/4 cup unsweetened coconut flakes - 1/3 cup granulated sugar - 1/2 cup unsalted butter, melted - 1 can (14 oz) sweetened condensed milk - 1/2 cup fresh key lime juice (or regular lime juice) - Zest of 2 key limes (or regular limes) - 1 cup heavy whipping cream - 2 tablespoons powdered sugar - Lime slices and fresh mint leaves for garnish If you find yourself short on any ingredient, don't worry. Here are some easy swaps: - Graham cracker crumbs: You can use crushed cookies like digestive biscuits or vanilla wafers. - Coconut flakes: If you don't like coconut, just skip it. The crust will still taste great. - Sweetened condensed milk: Use a dairy-free version if you're lactose intolerant. - Key lime juice: Regular lime juice works fine and is often easier to find. - Heavy whipping cream: For a lighter option, use whipped topping or coconut cream. Choosing fresh limes is key to making your pies taste great. Here are some tips: - Look for limes that are firm and heavy for their size. They should feel juicy. - Check for smooth skin. Avoid any limes with blemishes or soft spots. - When you squeeze a lime, it should yield a little but not feel mushy. - For zesting, choose limes with bright green skin. They have more flavor. Using fresh limes enhances the taste of your mini key lime pies and makes them shine. Enjoy making your pies with these tips and ingredients! For the full recipe, check out the [Full Recipe]. To start, gather your ingredients for the crust. You will need graham cracker crumbs, coconut flakes, granulated sugar, and melted butter. In a medium bowl, mix the graham cracker crumbs, coconut flakes, and sugar. Pour in the melted butter and stir until it looks like wet sand. Next, take small dessert cups or muffin tins. Spoon the crumb mixture into the bottoms. Press it down firmly to make a nice crust. Use the back of a spoon or your fingers to flatten the layer evenly. Now, it’s time to make the key lime filling. In a new bowl, whisk together the sweetened condensed milk, fresh key lime juice, and lime zest. Mix until it’s smooth and well combined. In a separate bowl, whip the heavy cream with an electric mixer. Beat it until soft peaks form. Gradually add in the powdered sugar while whipping until you see stiff peaks. Gently fold this whipped cream into the key lime mixture. Be careful not to deflate it, as you want a light filling. Once your crusts and filling are ready, it’s time to assemble. Spoon or pipe the key lime filling on top of each crust. Use a spatula to smooth the tops if you like. Now, place the mini pies in the fridge for at least four hours. This helps them set nicely. When you are ready to serve, garnish each pie with a slice of lime and a fresh mint sprig. Enjoy your zesty no-bake mini key lime pies! For the full recipe, check the details above. To make great whipped cream, start with very cold heavy cream. Chill your mixing bowl and beaters too. This helps the cream whip faster. Whip the cream on medium speed until soft peaks form. Then, add powdered sugar slowly. Continue whipping until you see stiff peaks. This means the cream holds its shape well. Be gentle when folding it into the key lime mixture. You want to keep it light and fluffy. Your filling should be smooth and creamy. After mixing sweetened condensed milk, lime juice, and zest, watch for lumps. If you see any, mix a bit longer. The key lime juice gives a tangy taste. When you fold in the whipped cream, do it slowly. This helps keep the air in the cream. The final filling should be thick but pourable, like cake batter. If it feels too runny, let it sit for a few minutes. Presentation makes your mini pies look special. Use clear dessert cups or small jars to show off the layers. Top each pie with a slice of lime and a mint sprig. This adds color and freshness. You can even use a piping bag for the filling. This makes it look neat and fancy. Chill the pies well before serving. Cold pies taste best. If you want to impress, sprinkle some coconut flakes on top too. For more details on making these tasty treats, check the Full Recipe. {{image_2}} You can switch up the crust for a fun twist. Instead of graham cracker crumbs, try crushed cookies like Oreos or vanilla wafers. A nut-based crust made from almonds or pecans adds a crunchy texture. Just blend the nuts with butter and press them into your cups. If you want a gluten-free option, use gluten-free graham crackers or almond flour. Each crust gives the pies a unique flavor and texture. These mini key lime pies can be more than just lime. Add coconut for a tropical taste. Mix in some fresh berries for a fruity twist. Try pureeing strawberries or blueberries and folding them into the filling. You can also use lemon juice for a zesty lemon pie. Each flavor change keeps the dessert exciting and fresh. If you need a vegan option, replace the sweetened condensed milk with coconut cream. Use a vegan butter for the crust and coconut whip for the topping. For a gluten-free dessert, make sure your crust is gluten-free. Check all your ingredients to ensure they fit your dietary needs. These small changes let everyone enjoy this tasty treat. For the full recipe, check out the recipe section. Store your no-bake mini key lime pies in the fridge. Place them in an airtight container. This keeps them fresh and tasty. They can last up to 5 days in the fridge. Just check for any changes in smell or texture before serving. You can freeze these mini pies for longer storage. Wrap each pie tightly in plastic wrap. Then, place them in a freezer-safe container. They will stay good for about 2 months. To serve, thaw them in the fridge overnight. Avoid refreezing them once thawed, as it can change the texture. No need to reheat these pies since they are served cold. Enjoy them straight from the fridge or thawed from the freezer. If you want them a bit warmer, let them sit at room temperature for a few minutes before serving. This allows the flavors to shine even more. No-bake mini key lime pies last about 3 to 4 days in the fridge. Store them in an airtight container to keep them fresh. If you notice any change in texture or smell, it's best to toss them. I always recommend enjoying them within this time for the best taste. Yes, you can use bottled key lime juice. It saves time and still adds great flavor. However, fresh juice often tastes brighter and zestier. If you want the best flavor, I suggest using fresh key limes when possible. The zest from fresh limes also adds a nice touch to the pies. If you don’t have graham crackers, try using crushed cookies like vanilla wafers or digestive biscuits. You can also use oats or almond flour for a gluten-free option. Just mix them with melted butter and sugar to get the right texture. This allows you to customize the crust to your taste. You learned about making no-bake mini key lime pies. We covered ingredients, recipes, and tips. I shared ways to choose fresh limes and perfect the whipped cream. You explored variations for different diets and flavors. Lastly, I provided storage and reheating advice. Remember, these pies are fun and easy to make. Experiment, share, and enjoy this tasty treat!

No-Bake Mini Key Lime Pies Simple and Tasty Treat

Craving a sweet treat that’s easy and quick? No-Bake Mini Key Lime Pies are just what you need! These mini

To make a great Black Forest cake, you need a few key ingredients. Each plays a vital role in creating the cake's rich flavor and texture. Here’s what you will need: - For the Chocolate Cake: - 1 ¾ cups all-purpose flour - 1 ¾ cups granulated sugar - ¾ cup unsweetened cocoa powder - 1 ½ teaspoons baking powder - 1 teaspoon baking soda - 1 teaspoon salt - 2 large eggs - 1 cup whole milk - ½ cup vegetable oil - 2 teaspoons vanilla extract - 1 cup boiling water - For the Cherry Filling: - 2 cups fresh or frozen cherries, pitted - ¼ cup granulated sugar - 1 tablespoon cornstarch - 1 tablespoon lemon juice - For the Whipped Topping: - 2 cups heavy whipping cream - ½ cup powdered sugar - 1 teaspoon vanilla extract - For Garnish: - Chocolate shavings - Fresh cherries The cherry filling gives this cake its signature taste. You can use fresh or frozen cherries. I love using fresh cherries when they are in season. They add a bright, juicy flavor. Combine the cherries with sugar, cornstarch, and lemon juice. The sugar brings out their sweetness, while cornstarch helps thicken the mixture. Cooking this mix until it bubbles creates a rich, flavorful filling. Let it cool before using it in your cake. The whipped topping is creamy and light, balancing the rich chocolate and cherries. You will use heavy whipping cream for the best results. Beat it until it thickens, then add powdered sugar and vanilla extract. The sugar adds sweetness, while vanilla gives a lovely aroma. Whip until stiff peaks form for a fluffy topping. This topping is perfect for layering between cake layers and decorating the top. For the full recipe, check out the complete instructions in the recipe section. To start, you need to preheat your oven to 350°F (175°C). Then, grab a large mixing bowl. Combine 1 ¾ cups of all-purpose flour, 1 ¾ cups of granulated sugar, ¾ cup of unsweetened cocoa powder, 1 ½ teaspoons of baking powder, 1 teaspoon of baking soda, and 1 teaspoon of salt. Whisk these dry ingredients until they are well mixed. Next, it’s time for the wet ingredients. Add 2 large eggs, 1 cup of whole milk, ½ cup of vegetable oil, and 2 teaspoons of vanilla extract into the bowl. Mix everything until it’s smooth. Now, carefully pour in 1 cup of boiling water. Mix again, but remember, the batter will be thin and runny. Now that your batter is ready, divide it evenly between two greased 9-inch round cake pans. Place them in your preheated oven. Bake for 30 to 35 minutes. To check if they are done, insert a toothpick in the center. If it comes out clean, your cakes are ready. Once baked, let them cool in the pans for about 10 minutes. Then, transfer the cakes to wire racks to cool completely. After your cakes have cooled, it’s time to assemble them. Carefully slice each cake in half horizontally. This gives you four layers in total. Place one layer on a serving plate. Spread some of the cherry filling on top, then add a layer of whipped cream. Repeat this for the next two layers, stacking them one on top of the other. Finally, place the last layer of chocolate cake on top. Frost the top and sides of your cake with the remaining whipped cream. For the finishing touch, garnish with chocolate shavings and fresh cherries. Your Black Forest Cake is now ready to impress! If you want to see the complete recipe, check out the Full Recipe. To make your Black Forest cake moist, use these tips: - Use fresh ingredients. Fresh eggs and dairy give the best results. - Don't overmix the batter. Mix just until combined for a light texture. - Include boiling water. This step helps the cake rise and stay moist. - Cool the cakes properly. Let them cool in the pans for ten minutes, then move them to a wire rack. To wow your guests, try these decorating ideas: - Layered cherries and cream. Alternate layers of cherries and whipped cream for a beautiful effect. - Top with chocolate shavings. Use a vegetable peeler to create shavings from a chocolate bar. - Fresh cherries as garnish. Place whole cherries on top for a pop of color. - Serve with extra cherry filling. A small bowl of cherry filling on the side looks appealing. Avoid these common mistakes: - Skipping the baking powder. It’s vital for the cake to rise. - Ignoring cake temperature. Ensure cakes are completely cool before frosting. - Using too much cornstarch. This can make the cherry filling too thick. - Rushing the assembly. Take your time to layer and frost carefully. These tips will help you create a beautiful and moist Black Forest cake. For the complete recipe, check out the Full Recipe. {{image_2}} You can make a delicious eggless Black Forest cake. Substitute eggs with yogurt or applesauce. Use ½ cup of yogurt or ¼ cup of applesauce for each egg. This keeps the cake moist. Mix the dry ingredients as usual. Then, add your yogurt or applesauce when you mix wet ingredients. This simple swap makes the cake just as tasty! Making a vegan Black Forest cake is easy too! Replace eggs with flaxseed meal. Mix 1 tablespoon of flaxseed meal with 3 tablespoons of water. Let it sit for five minutes. This creates a great egg substitute. Use almond milk or coconut milk instead of dairy milk. For the whipped topping, you can use coconut cream. Chill it, then whip it like regular cream. Your vegan cake will be rich and creamy! Want to make your cake unique? Try adding coffee to the chocolate batter. This deepens the flavor. You can also mix in orange zest for a fresh twist. It adds a nice citrus note. Consider using different fruits too. Raspberries or strawberries can be great alternatives to cherries. They bring a fun flavor and color to your cake. Get creative and have fun with your Black Forest cake! For a full recipe, check out the [Full Recipe]. To keep your Black Forest Cake fresh, wrap it well. Use plastic wrap or foil. Store it in the fridge. This will help keep the cake moist. It can last for up to five days in the fridge. Make sure to check for any signs of spoilage before serving again. If you want to save the cake for later, freezing is a great option. First, cut the cake into slices. Wrap each slice in plastic wrap. Then place the wrapped slices in a freezer bag. This helps prevent freezer burn. The cake can last for up to three months in the freezer. When you're ready to enjoy it, just take out a slice, and let it thaw in the fridge overnight. When serving leftover cake, you can enjoy it cold or warm. If you prefer it warm, preheat your oven to 350°F (175°C). Place the slice on a baking sheet and warm it for about 10 minutes. This will bring back some of the original texture. Serve with fresh whipped cream and extra cherries for a delightful treat. You can find the Full Recipe in this article for more tips on preparation! Black Forest Cake comes from Germany. It is named after the Black Forest region. This area is famous for its cherry trees and schnapps. The cake blends chocolate, cherries, and whipped cream. It became popular worldwide in the 20th century. Today, many people enjoy this rich and tasty dessert. Yes, you can use other fruits if you like. Raspberries, strawberries, or blueberries work well. These fruits add a different flavor. You can also mix fruits for a fun twist. Just make sure to choose fruits that go well with chocolate. This way, you keep that tasty balance. To make a gluten-free Black Forest Cake, use gluten-free flour. Many brands offer all-purpose gluten-free flour. You can substitute it one-to-one with regular flour. Check the baking powder and cocoa for gluten-free labels. Follow the same steps from the Full Recipe. Enjoy a delicious cake without gluten! This guide shared the key elements for a great Black Forest Cake. You learned about traditional ingredients, making the batter, and assembling layers. Tips on keeping your cake moist and ideas for decoration were also discussed. We explored variations, including eggless and vegan options. Finally, we covered how to store and reheat leftovers. Black Forest Cake can be fun and easy to make. With practice, you’ll impress everyone who tries it. Enjoy baking your own delicious version!

Black Forest Cake Delight Easy and Delicious Recipe

If you’ve ever craved a sweet treat that’s rich, creamy, and simply divine, Black Forest Cake is the answer! This

To make easy fried rice, you need the following ingredients: - 2 cups cooked jasmine rice (preferably day-old) - 2 tablespoons vegetable oil - 2 large eggs, beaten - 1 cup mixed vegetables (carrots, peas, corn, bell peppers) - 3 green onions, sliced - 3 cloves garlic, minced - 4 tablespoons soy sauce (low sodium) - 1 teaspoon sesame oil - Salt and pepper to taste - Optional: 1 teaspoon sriracha sauce for a spicy kick Day-old rice is best because it is drier. Fresh rice can clump. For frying, I recommend vegetable oil. It has a high smoke point and a neutral flavor. You can also use canola oil. For a richer taste, try sesame oil. When you add sesame oil, it gives the dish a nice aroma. To make your fried rice exciting, consider adding: - Cooked chicken or shrimp for protein - Chopped bell peppers for sweetness - Peas for a pop of color - Pineapple for a sweet twist - Cashews for crunch These add-ins boost flavor and nutrition. Get creative! You can mix and match as you like. For the full recipe, check the details above. Use day-old rice for the best fried rice. It has less moisture. If you only have fresh rice, spread it on a baking sheet. Let it cool for 15 to 20 minutes. This helps dry it out. Dry rice will fry better and not clump together. Heat one tablespoon of vegetable oil in a large skillet or wok. Use medium-high heat. Pour in the beaten eggs and scramble them. Cook until they are fully set. This should take about two minutes. Once done, place the eggs on a plate and set them aside. In the same skillet, add the other tablespoon of oil. Heat it up, then add minced garlic. Sauté the garlic for about 30 seconds until it smells great. Next, toss in your mixed vegetables. Stir-fry for three to four minutes. If you use fresh veggies, cook them a bit longer until they are soft. Add the cooked rice into the skillet. Break apart any clumps as you mix it in. Stir-fry for about two minutes. Next, drizzle soy sauce and sesame oil over the rice. Mix in the scrambled eggs and sliced green onions. Stir everything well to coat the rice with sauce. Season with salt, pepper, and optional sriracha. Cook for one more minute. Serve your fried rice hot, garnished with more green onions. Enjoy it with lime wedges for an extra kick! For the complete recipe, check out the [Full Recipe]. Using day-old rice makes a big difference. Fresh rice holds too much moisture. This moisture can turn your fried rice into a sticky mess. When you use day-old rice, it dries out. This helps each grain stay separate and fluffy. If you have no day-old rice, spread fresh rice on a baking sheet. Let it cool for 15 to 20 minutes before cooking. This trick helps reduce moisture too. Flavor is key in fried rice. Soy sauce is a must for that umami taste. Low-sodium soy sauce keeps it tasty without too much salt. Adding sesame oil gives a nice nutty flavor. Just a teaspoon adds depth. Want some heat? A splash of sriracha works wonders! You can also try oyster sauce for more richness. Mix these sauces well for the best flavor. Don’t forget to taste as you go! A few common mistakes can ruin your fried rice. Avoid overcrowding the pan. If you add too many ingredients at once, the rice steams instead of fries. This makes it soggy. Another mistake is not using enough oil. Oil helps everything cook evenly and adds flavor. Lastly, remember to stir frequently. This ensures even cooking and prevents burning. Keep these tips in mind for the best fried rice! {{image_2}} You can easily make a tasty vegetarian fried rice. Start with the base recipe. Swap in veggies like broccoli, zucchini, or mushrooms. You can add tofu for protein too. Use soy sauce for flavor. You might also toss in some fresh herbs like basil or cilantro. These herbs will add a fresh taste. Feel free to experiment with what you have on hand. Adding protein makes fried rice heartier. Chicken is a great option. Cook diced chicken until golden brown, then set it aside. Add it back when mixing in the rice. Shrimp works well too. Just sauté the shrimp until they turn pink. Tofu is perfect for a plant-based meal. Use firm tofu, and fry it until crispy. Each protein gives a different texture and flavor. If you love heat, make your fried rice spicy. Start by adding sriracha to the sauce mix. Just one teaspoon can boost the flavor. You can also add chili flakes for more spice. For a smoky touch, try adding a dash of smoked paprika. If you like it really spicy, chop up fresh chili peppers. Adjust the heat to your taste. With these options, you can create a fiery dish. Try these variations to keep your fried rice exciting. You can mix and match flavors to create your own perfect bowl. For full details on the main recipe, check out the Full Recipe. To keep your fried rice fresh, store it in an airtight container. Make sure it cools to room temperature first. Place the lid on tightly. You can keep it in the fridge for up to three days. If you want to save it longer, consider freezing it. When you’re ready to eat your leftover fried rice, you can reheat it easily. The best way is to use a skillet. Heat a bit of oil over medium heat. Add the fried rice and stir it often. This helps it heat evenly. You can also use the microwave. Place the rice in a microwave-safe bowl. Cover it with a damp paper towel. Heat for about one to two minutes. Check if it's hot all the way through before serving. If you want to freeze your fried rice, it’s simple. First, let it cool completely. Then, scoop it into freezer bags. Try to remove as much air as possible before sealing. Label the bags with the date. You can keep frozen fried rice for up to three months. When you are ready to use it, thaw it in the fridge overnight. Reheat as mentioned above for a quick meal. This way, you can enjoy your easy fried rice any day! Yes, you can use different types of rice. Jasmine rice is popular for its soft texture. You might also try basmati rice for a nutty flavor. Brown rice adds a nice chew and extra fiber. Just make sure the rice is cooked and cooled before frying. This helps prevent sogginess. The best way to reheat fried rice is in a skillet. Heat a little oil in the pan over medium heat. Add the fried rice and stir often. This helps it heat evenly. You can add a splash of water to create steam, which warms the rice without drying it out. Microwave reheating works too, but the texture may not be as good. Adding more veggies is easy! You can use any fresh or frozen vegetables. Try broccoli, zucchini, or snap peas for color and crunch. Just chop them small for quick cooking. Sauté them with garlic before adding the rice. This gives the dish more flavor and nutrition. You can even mix in leftover veggies from other meals for a tasty twist. For the full recipe, check the earlier sections! Fried rice is simple and fun to make. We covered essential ingredients, cooking tips, and tasty variations. Remember to choose the right rice and oil for the best taste. Avoid common mistakes to ensure perfect results. You can even store and reheat leftovers easily. Now you have all the keys to creating delicious fried rice at home. Try your own mix and enjoy!

Easy Fried Rice Recipe Quick and Flavorful Meal

Looking for a quick and tasty meal? This Easy Fried Rice Recipe is your answer! With simple ingredients and easy

To make the Banana Caramel Nut Cheesecake, you need a mix of simple ingredients. Each element adds flavor and texture. Following my full recipe will guide you step by step. Here are the ingredients you will need: - 1 1/2 cups graham cracker crumbs - 1/4 cup unsweetened cocoa powder - 1/2 cup unsalted butter, melted - 2 cups cream cheese, softened - 1 cup granulated sugar - 3 large eggs - 1 teaspoon vanilla extract - 2 large ripe bananas, mashed - 1/2 cup heavy cream - 1/4 cup caramel sauce (plus extra for drizzling) - 1/2 cup chopped mixed nuts (walnuts, pecans, almonds) - 1/2 teaspoon cinnamon Each ingredient plays a key role. The graham cracker crumbs create a sweet crust. The cream cheese gives the cheesecake its creamy base. Bananas add natural sweetness, while nuts provide a crunchy contrast. You can swap some ingredients if needed. Here are a few ideas: - Use almond flour instead of graham cracker crumbs for a gluten-free crust. - Replace cream cheese with a dairy-free option for a vegan version. - Try brown sugar instead of granulated sugar for a richer taste. These substitutions can help meet different dietary needs. Do not hesitate to experiment! Start by preheating your oven to 325°F (160°C). In a mixing bowl, combine the graham cracker crumbs, cocoa powder, and melted butter. Mix them well until you see a sandy texture. Press this mixture firmly into the bottom of a 9-inch springform pan. This creates a solid crust. Bake the crust for about 10 minutes. After baking, let it cool slightly before adding the filling. In a large bowl, beat the softened cream cheese and granulated sugar together until it becomes creamy and smooth. This takes about 3 to 5 minutes. Next, add the eggs one at a time. Mix well after adding each egg. Then, stir in the mashed bananas, heavy cream, cinnamon, and vanilla extract. Make sure everything is blended well. Finally, gently fold in the caramel sauce and mixed nuts into the cheesecake batter. Pour the cheesecake filling over the cooled crust in the springform pan. Bake the cheesecake for about 45 to 50 minutes. It should be set but slightly jiggle when shaken. Once done, turn off the oven and crack the door open. Let the cheesecake cool in the oven for about one hour. Transfer it to the refrigerator to chill for at least 4 hours or overnight. Before serving, drizzle more caramel sauce on top and add a sprinkle of nuts. Enjoy your delicious creation! For the full recipe, check the earlier section. To get a creamy cheesecake, use soft cream cheese. Let it sit out for 30 minutes before mixing. This helps it blend smoothly. Mix on low speed to avoid too much air. Too much air can make your cheesecake crack. When you add eggs, do it one by one. This keeps the texture nice and even. Avoid overmixing once the eggs are in. This keeps your cheesecake dense and rich. When serving, think about presentation. A beautiful slice on a plate looks great. Drizzle caramel sauce on top for extra sweetness. Sprinkle chopped nuts for a nice crunch. You can also add whipped cream. It adds a light texture that pairs well with the cheesecake. Serve with fresh banana slices for color and flavor. This makes your dessert look as good as it tastes! One mistake is not cooling the cheesecake slowly. After baking, leave it in the oven with the door cracked. This helps avoid cracks. Another mistake is rushing the chilling time. Always chill the cheesecake for at least 4 hours. Overnight is even better! Also, don't forget to use a springform pan. This makes it easier to remove the cheesecake. Following these tips will help you create the best Banana Caramel Nut Cheesecake. For the full recipe, check out the section above. {{image_2}} You can change up the nuts and fruits in this cheesecake. If you love hazelnuts, try using them instead of walnuts. Pecans give a rich flavor, while almonds add a nice crunch. You can also add some diced apples or pears for a fruity twist. Chopped strawberries or blueberries can bring a fresh touch. Be creative with your mix! Just remember to keep the balance of flavors in mind. Caramel sauce is a star in this dessert, but you can try other sauces too. Chocolate sauce adds a sweet touch, while peanut butter sauce gives a nutty flavor. You can drizzle some raspberry sauce for a fruity zing. Whipped cream on top will make it extra special. Sprinkle some crushed nuts or chocolate shavings for added texture. Play around with what you have on hand! You can make this cheesecake gluten-free by swapping the graham cracker crumbs for gluten-free ones. For a dairy-free version, use vegan cream cheese. Coconut cream can replace heavy cream, giving a lovely flavor. Make sure to check your caramel sauce too; some brands offer dairy-free options. These tweaks keep all the yummy taste while fitting different diets. Check out the Full Recipe to see how to bring all these variations to life! After you enjoy your Banana Caramel Nut Cheesecake, store any leftovers right. First, cover the cheesecake with plastic wrap or foil. This keeps it fresh. Place it in the fridge for up to five days. Make sure it is tightly wrapped to avoid dry spots. Freezing is a great way to save your cheesecake for later. First, let it cool completely in the fridge. Next, slice the cheesecake into pieces. Wrap each slice in plastic wrap. Then, place the wrapped slices in a freezer-safe bag. You can freeze it for up to three months. Label the bag with the date. This way, you know when to use it. When you’re ready to enjoy your frozen cheesecake, take it out of the freezer. Let it thaw overnight in the fridge. If you want to eat it warm, preheat your oven to 300°F (150°C). Place the cheesecake on a baking sheet for about 10 minutes. This will warm it up without cooking it. Enjoy your creamy, dreamy dessert! For the full recipe, check the Full Recipe section. Making this cheesecake takes about five hours. This includes prep time and chilling. You spend about 15 minutes getting the crust and filling ready. Then, you bake it for 45 to 50 minutes. After baking, you let it cool in the oven for an hour. Finally, chilling in the fridge for at least four hours lets the flavors mix. Yes, you can make this cheesecake ahead of time. It tastes even better after a day in the fridge. This allows the flavors to blend well. Just cover it tightly with plastic wrap or foil. It keeps well in the fridge for up to five days. If you plan to serve it later, you can freeze it too. To slice a cheesecake, use a sharp knife. Dip the knife in hot water, then dry it off. This helps the knife glide smoothly through the creamy filling. After each cut, rinse and dry the knife again. This keeps the slices neat and pretty. You can also use a cake server for easy lifting. This blog post gives you a full guide to making Banana Caramel Nut Cheesecake. You learned about ingredients, step-by-step instructions, and common mistakes to avoid. We also covered fun variations and how to store your cheesecake. Keep these tips in mind to create a perfect dessert. Experiment with ingredients for your own twist. Enjoy making this treat and share it with others. A delicious cheesecake awaits you in your kitchen!

Banana Caramel Nut Cheesecake Creamy Dreamy Dessert

Are you ready to impress your friends and family with a creamy, dreamy dessert? This Banana Caramel Nut Cheesecake will

- 1 lb ground beef or turkey - 1 cup fresh spinach, chopped - 3 cloves garlic, minced - 1 cup shredded mozzarella cheese - 1/2 teaspoon red pepper flakes - 1 teaspoon Italian seasoning - Fresh basil leaves for garnish - Mixing bowl - Baking sheet - Parchment paper To make the Spinach Garlic Meatballs with Mozzarella, you need fresh and flavorful ingredients. The ground beef or turkey forms the base of the meatballs. I love using fresh spinach for a bright, nutritious punch. Garlic adds a wonderful aroma and taste that you can’t resist. Don’t forget the mozzarella cheese! It gives a creamy, gooey texture when melted. You can spice things up with red pepper flakes or Italian seasoning. Fresh basil makes a lovely garnish to add color and freshness. For tools, a mixing bowl is essential for combining your ingredients. A baking sheet lined with parchment paper helps prevent sticking and makes cleanup easy. Check out the Full Recipe to see how to bring these flavors together in a delicious dish. 1. First, preheat your oven to 400°F (200°C). This helps the meatballs cook evenly. 2. Line a baking sheet with parchment paper. This keeps the meatballs from sticking. 3. In a mixing bowl, combine the ground meat, chopped spinach, minced garlic, red pepper flakes, Parmesan cheese, breadcrumbs, beaten egg, Italian seasoning, salt, and black pepper. Mix until smooth but don’t overmix. 1. Now, shape the mixture into 1.5-inch meatballs. Use your hands for this. 2. Place the meatballs on the baking sheet. Leave some space between each one. 3. Bake the meatballs for about 15 minutes. They should turn brown and be fully cooked. 1. While the meatballs bake, heat the marinara sauce in a saucepan over medium heat. This warms it up for serving. 2. Once the meatballs are done, take them out of the oven. Carefully transfer them to the warm marinara sauce. 3. Gently stir the meatballs to coat them in the sauce. 4. Sprinkle the shredded mozzarella cheese over the meatballs in the sauce. 5. Cover and cook on low heat for 5 minutes. This lets the cheese melt nicely. 6. When the cheese is bubbly, it's time to serve. Enjoy your flavorful dish! For the full recipe, check the complete details above. To get the best meatballs, avoid overmixing the meatball mixture. Too much mixing makes them tough. Mix until just combined; that’s all you need! For baking, use parchment paper on your sheet. This helps with sticking and cleanup. Bake at 400°F (200°C) for 15 minutes. Check the meatballs for a nice brown color. They should feel firm, yet springy. When serving, think of presentation. Place the meatballs in a shallow dish. Pour extra marinara sauce over them. Sprinkle with melted mozzarella cheese for a tasty look. Fresh basil leaves add a touch of color and flavor. For sides, consider a simple salad or garlic bread. These pair well and make a full meal. Want to change up your meatballs? You can substitute proteins! Use ground chicken or even plant-based meat. Each option gives a different taste. If you need gluten-free, swap regular breadcrumbs for gluten-free ones. This keeps the meatballs tasty for everyone. {{image_2}} If you want a meatless version, use plant-based meat alternatives. You can find many good options like lentil or chickpea mixes. These ingredients work well and give a nice texture. Feel free to add more veggies, too. Chopped bell peppers or grated carrots add color and flavor. You can also mix in some mushrooms for a nice umami taste. To make these meatballs really pop, add extra spices. A pinch of smoked paprika or cumin can give a warm kick. You can also add in fresh herbs like parsley or oregano. Mixing in different types of cheese brings more flavor. Try using feta or gouda for a unique twist. Each cheese adds its own special taste to the dish. You can enjoy meatballs in many ways. For a classic meal, serve them over pasta with extra marinara. If you want something quick, put them on a sub roll for a tasty sandwich. You can also make them bite-sized for appetizers or sliders. This way, they are perfect for parties or game days. These options make the meal fun and flexible for any occasion. To store leftovers in the fridge, let the meatballs cool first. Place them in an airtight container. Keep them in the fridge for up to three days. This way, they stay fresh and tasty. To freeze meatballs, let them cool completely. Arrange them on a baking sheet and place them in the freezer for an hour. This helps them freeze without sticking together. Once frozen, transfer them to a freezer bag. They can last for about three months. For thawing, move the meatballs to the fridge overnight. Reheat them in the oven at 350°F for about 15 minutes. You can also warm them in marinara sauce on the stove for a quick meal. If you have leftover spinach or cheese, consider adding them to soups or salads. You can use extra meatballs in pasta dishes, sandwiches, or as party snacks. Try making a meatball sub with marinara and melted cheese. It’s a fun way to enjoy your leftovers! For the full recipe, check out the Spinach Garlic Meatballs with Mozzarella. To keep your meatballs tender, do not overmix the meat. Mix just until combined. Use fresh ingredients like spinach and garlic to add moisture. Adding breadcrumbs and egg also helps create a soft texture. Lastly, baking at the right temperature ensures they stay juicy. Yes, you can make these meatballs ahead of time. Form the meatballs and place them on a baking sheet. Cover them and store in the fridge for up to 24 hours. You can also freeze them before baking. Just thaw and bake them later for a quick meal. These meatballs pair well with many sides. You can serve them over pasta with marinara sauce. A simple green salad is a fresh option. Garlic bread makes a great side too. Try them as a sub sandwich with extra cheese and sauce. To lighten the recipe, use ground turkey instead of beef. You can also reduce the amount of cheese. Substitute whole-wheat breadcrumbs for regular ones. Adding more spinach can boost nutrition without many calories. For a lighter sauce, try a homemade tomato sauce with less oil. You can find the Full Recipe to explore these options. In this blog post, we explored a delicious recipe for Spinach Garlic Meatballs with Mozzarella. We covered main ingredients, preparation steps, and helpful tips to make perfect meatballs. You learned about optional spices and serving ideas to please everyone. Finally, you found out how to store leftovers and repurpose ingredients. I hope you feel inspired to try this recipe. Enjoy the cooking process and share your tasty creations!

Spinach Garlic Meatballs with Mozzarella Flavor Punch

Are you ready to elevate your dinner game? These Spinach Garlic Meatballs with Mozzarella deliver a flavor punch you won’t

To make the best lemon crumb bars, gather these key ingredients: - 1 ½ cups all-purpose flour - ½ cup powdered sugar - ½ teaspoon baking powder - ½ teaspoon salt - ½ cup unsalted butter, softened - 1 large egg - 1 cup granulated sugar - 2 large lemons (zest and juice) - 2 tablespoons cornstarch - 1 teaspoon vanilla extract - Powdered sugar for dusting (optional) These ingredients work together to create a sweet and tart treat. The lemons give a bright flavor, while the butter adds richness. You can switch things up with a few optional ingredients: - A pinch of cinnamon for warmth - Fresh berries like raspberries or blueberries for added flavor - Coconut flakes for a tropical twist These options let you get creative. Experiment to find your favorite combination! To make these lemon crumb bars, you will need: - An 8x8 inch baking dish - A mixing bowl - A whisk - A knife for cutting - Parchment paper (optional, for easy cleanup) Having the right tools makes the process easier and more fun. With this equipment, you’ll be ready to bake and enjoy! For the complete recipe, check out the Full Recipe section. To start, preheat your oven to 350°F (175°C). This step is key for a nice, even bake. Next, grab a mixing bowl. Combine 1 ½ cups all-purpose flour, ½ cup powdered sugar, ½ teaspoon baking powder, and ½ teaspoon salt. Whisk these dry ingredients well. Now, add ½ cup softened unsalted butter. Mix until it looks like coarse sand. Take about ½ cup of this crumb mixture and set it aside for later. Press the rest of the mixture into the bottom of an 8x8 inch baking dish. Make sure it's even and compact. Bake this crust for 15 minutes. Look for a light golden color. Once done, remove it from the oven. Let it cool slightly while you work on the lemon filling. In a clean bowl, whisk together 1 cup granulated sugar, 1 large egg, the zest and juice of 2 large lemons, 2 tablespoons cornstarch, and 1 teaspoon vanilla extract. Mix until the filling is smooth and creamy. This filling is the heart of your bars, so make it nice! Pour this mixture evenly over your slightly cooled crust. Make sure it covers every bit. Now, sprinkle the reserved crumb mixture on top of the filling. This will create a lovely crumble once baked. Now it’s time to bake again! Place the dish back into the oven. Bake for another 20 to 25 minutes. Look for a set filling and a golden brown top. When it’s done, remove it from the oven. Let it cool completely on a wire rack. Once cool, slice your bars with a sharp knife. You can dust them with powdered sugar if you like. Enjoy your delicious lemon crumb bars! For the full recipe, check the section above. Use fresh lemons for the best flavor. Their zest adds a nice zing. Make sure your butter is soft. This helps blend well with the other ingredients. Don’t skip preheating the oven. It ensures even baking. Let the crust cool a bit before adding the filling. This keeps the crust crisp. When adding the lemon filling, spread it evenly. This helps each bar bake perfectly. One common mistake is overmixing the crust. Mix just until crumbly. If you bake too long, the filling can get dry. Check for a light golden top. Avoid using old baking powder. Fresh ingredients lead to better results. If you rush cooling, the bars may crumble. Give them time to set well in the pan. Serve your lemon crumb bars chilled or at room temperature. Dust with powdered sugar for a nice touch. Pair them with fresh berries for extra flavor. A dollop of whipped cream makes a lovely addition. Consider a scoop of vanilla ice cream on the side. It adds creaminess to the tangy bars. For a fun twist, try adding mint leaves as garnish. This adds color and a fresh taste. {{image_2}} You can add fruits to your lemon crumb bars for a twist. Consider using fresh berries like blueberries or raspberries. These fruits pair well with the tartness of lemon. You can also experiment with other flavors. Try adding a touch of almond extract instead of vanilla. A hint of coconut can bring a tropical vibe to the bars. If you need a gluten-free version, swap the all-purpose flour for a gluten-free blend. Many blends work well in baking. Look for one that includes xanthan gum. This helps mimic the texture of regular flour. You can make the crust and filling just like the traditional recipe. The taste will be just as delightful! Want to make these bars vegan? Replace the egg with a flax egg. Mix one tablespoon of ground flaxseed with three tablespoons of water. Let it sit until it thickens. Also, use vegan butter instead of regular butter. This keeps the same creamy texture while making it plant-based. You can still enjoy the zesty flavor and crumbly texture. These variations allow you to enjoy lemon crumb bars in many ways. Each twist brings a new and exciting flavor to this classic treat! To keep your lemon crumb bars fresh, store them in an airtight container. This helps to lock in moisture and flavor. You can layer parchment paper between bars to prevent sticking. If you have extra bars, you can also wrap them in plastic wrap before placing them in the container. Lemon crumb bars can last for about four to five days at room temperature. They can be stored in the fridge for up to one week. Make sure the container is sealed well to keep them from drying out. The taste remains fresh, and the filling stays zesty this way. If you want to save some for later, freezing is a great option. Wrap each bar tightly in plastic wrap. Then, place them in a freezer-safe bag or container. They can last for up to three months in the freezer. When you're ready to enjoy, simply thaw them in the fridge overnight. To cut lemon crumb bars, first, let them cool completely. Use a sharp knife for clean cuts. I recommend using a ruler for even slices. Cut the bars into squares or rectangles. Wipe the knife with a damp cloth between cuts to keep edges clean. This makes each piece look nice and neat. Yes, you can make lemon crumb bars ahead of time. They taste great after resting for a few hours. For the best flavor, I suggest making them the day before serving. Store them in an airtight container at room temperature. If you need to, you can also refrigerate them. Just bring them back to room temp before serving. You will know the lemon crumb bars are done when the top is golden brown. The filling should also look set and not jiggly. A toothpick inserted in the center should come out clean. If it has some filling, bake for a few more minutes. Keep a close eye on them to avoid overbaking. You learned about the key ingredients and steps needed to make lemon crumb bars. These treats are simple and tasty, with options for all diets. Use tips to avoid mistakes and serve them like a pro. I hope you feel ready to bake. Don’t forget to store them right to keep the flavor fresh. Enjoy making your bars and experiment with flavors. You'll impress everyone with your skills. Happy baking!

Lemon Crumb Bars Delightful and Easy Recipe

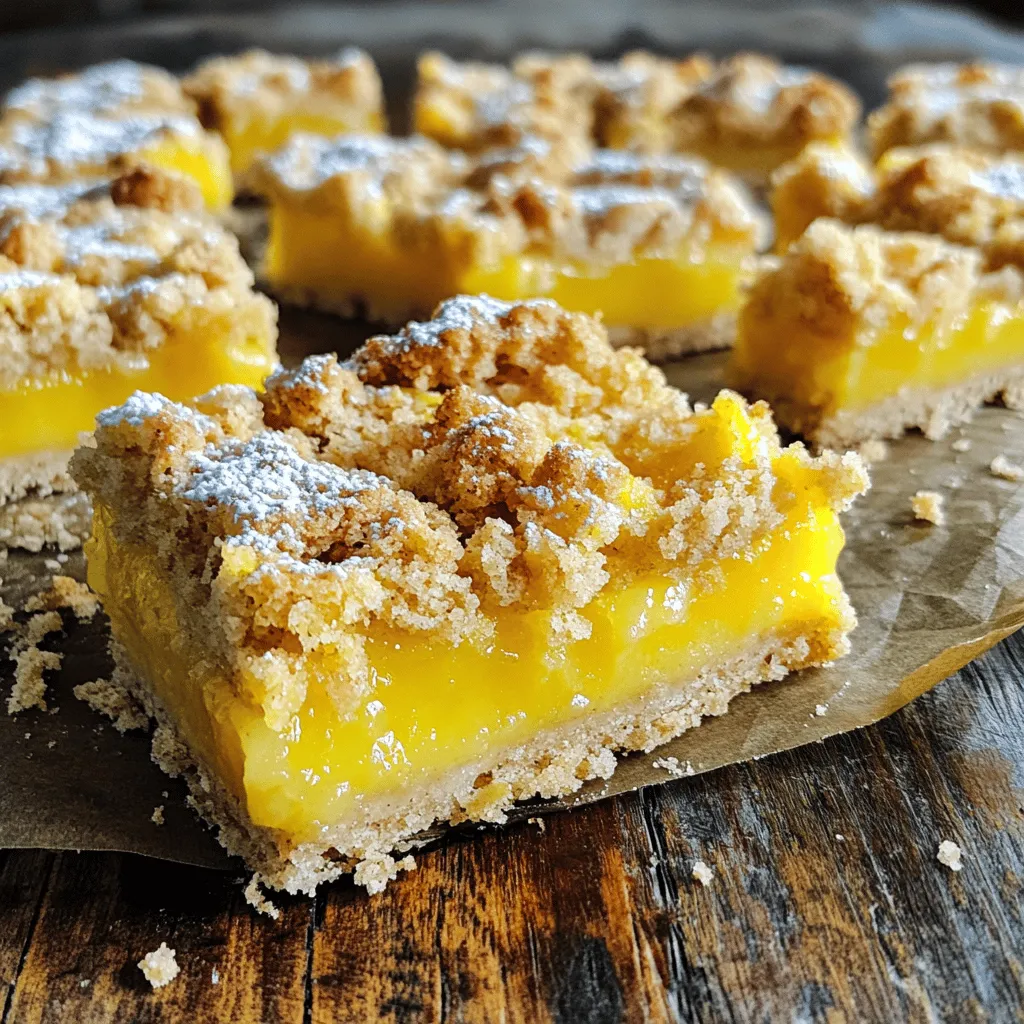
If you love zesty desserts, you’re in for a treat! Lemon Crumb Bars are a perfect mix of sweet and

Older posts
Newer posts
← Previous Page1 … Page41 Page42 Page43 … Page55 Next →

dsad

© 2025 Lisa Dishes • Built with GeneratePress

Our Policies

  • Copyright Policy
  • Cookie Policy
  • GDPR Policy
  • Privacy Policy
  • Disclaimer
  • Terms Of Use

More Information

  • Home
  • About
  • Contact
  • Appetizers
  • Dessert
  • Dinner
  • Drinks
©2025, Lisa Dishes About Back To Top