Skip to content
DisclaimerTerms Of UseGDPR PolicyCookie Policy

Lisa Dishes

  • Home
  • Drinks
  • Appetizers
  • Dinner
  • Dessert
  • About
  • Contact
  • Privacy Policy
DisclaimerTerms Of UseGDPR PolicyCookie Policy

lisa

To make this vegan chocolate avocado pudding, you need a few simple ingredients. Here is the list: - 2 ripe avocados - 1/2 cup unsweetened cocoa powder - 1/2 cup maple syrup - 1/4 cup almond milk - 1 teaspoon vanilla extract - A pinch of salt - Optional toppings: shredded coconut, fresh berries, or chopped nuts Each ingredient plays a key role in the final taste and texture of the pudding. The avocados provide a creamy base, while cocoa powder adds rich chocolate flavor. Maple syrup gives sweetness without the use of refined sugars. Almond milk keeps the pudding smooth and dairy-free. Vanilla enhances the overall flavor, and a pinch of salt balances the sweetness. Using ripe avocados is crucial. They ensure a silky texture. If they are not ripe, your pudding will be chunky. You can check if an avocado is ripe by gently squeezing it. It should give slightly without feeling mushy. Feel free to customize your toppings! Shredded coconut adds texture, fresh berries provide brightness, and nuts offer crunch. These options make your pudding even more enjoyable. Now that you have the ingredients ready, you can follow the [Full Recipe] to create this creamy delight! - Step 1: Combine ingredients in a blender Start by placing the ripe avocados, cocoa powder, maple syrup, almond milk, vanilla extract, and a pinch of salt into your blender. Make sure you scoop out all the flesh from the avocados. This gives the pudding its creamy texture. - Step 2: Blend until smooth Blend the mixture on high speed. It should turn smooth and creamy. Scrape down the sides as needed. This helps mix all the ingredients well. You want to avoid lumps for the best texture. - Step 3: Adjust sweetness if needed Taste the pudding. If it needs more sweetness, add a little more maple syrup. Blend again for a few seconds to mix it in. This step is key for your perfect flavor. - Step 4: Transfer to serving bowls Once the pudding is nicely blended, spoon it into individual serving bowls. This recipe makes about four servings. You can use cute cups for fun presentation. - Step 5: Refrigerate to chill Place the bowls in the fridge for at least 30 minutes. Chilling helps the pudding set and enhances the flavors. It’s worth the wait for a cool treat. - Step 6: Add toppings before serving Just before serving, stir the pudding again. Then, add your favorite toppings. Shredded coconut, fresh berries, or chopped nuts work great. These toppings add color and crunch to your dessert. Enjoy making this tasty vegan chocolate avocado pudding! For the full recipe, check out the previous section. To make the best vegan chocolate avocado pudding, you need ripe avocados. Look for avocados that yield gently to pressure. A ripe avocado feels soft but not mushy. This ensures your pudding will be creamy. Blending is key. Use a good blender or food processor. Blend until the mix is smooth and silky. Stop to scrape down the sides. This helps mix everything well. You want no lumps in your pudding. If your pudding is too thick, add more almond milk. Start with a tablespoon at a time. Blend again after each addition. This helps you find the right creaminess. You want it to be rich but not too heavy. You can boost the flavor of your pudding easily. Add a dash of cinnamon or a drop of espresso. Both can deepen the chocolate taste. For a fun twist, try a splash of orange juice or zest. When choosing cocoa powder, go for unsweetened. Look for high-quality brands for the best taste. A good cocoa powder has a rich, deep flavor. Avoid anything that looks dull or has added sugar. For the full recipe, check out the details provided earlier. {{image_2}} You can change the taste of your vegan chocolate avocado pudding in fun ways. One option is to make mint chocolate avocado pudding. Just add a few drops of mint extract to the mix. The mint gives it a fresh twist. It's like a dessert and a breath of fresh air all in one! Another exciting option is a spicy chocolate version. Add a pinch of cayenne pepper for a kick. The heat from the cayenne adds a unique flavor that surprises your taste buds. It’s rich, creamy, and a little bit daring! If you need gluten-free options, you’re in luck! All the ingredients in this pudding are naturally gluten-free. Just ensure your cocoa powder and syrup are labeled gluten-free. This way, everyone can enjoy it without worry. For those who need nut-free variations, consider using coconut milk instead of almond milk. Coconut milk adds a creamy texture and a hint of coconut flavor. This makes the pudding rich and satisfying. You can enjoy a delicious treat without any nuts! To keep your vegan chocolate avocado pudding fresh, store it in an airtight container. This prevents air from getting in and keeps it creamy. Always place a piece of plastic wrap directly on the surface of the pudding before sealing the container. This can help prevent browning. You can store it in the fridge for up to three days. After that, the texture may change, and the taste might not be as good. Yes, you can freeze vegan chocolate avocado pudding! It’s a great way to save some for later. To freeze, pour the pudding into a freezer-safe container. Leave some space at the top, as it may expand. You can freeze it for up to two months. When you’re ready to eat it, thaw it in the fridge overnight. If it's too thick after thawing, blend it again with a bit of almond milk. This will help restore its creamy texture. You can then serve it as you like! For the full recipe, check out the earlier section. Avocados are very healthy. They are high in good fats, which help your heart. They contain vitamins like E, K, and B. These vitamins boost your skin and bones. Avocados also have fiber, which helps digestion. Eating avocados can make you feel full, which may help with weight control. Yes, vegan chocolate avocado pudding is healthy. It uses avocados, which provide nutrients. The cocoa powder adds antioxidants. Maple syrup is a natural sweetener with fewer chemicals. This pudding has no dairy, so it is light and easy to digest. Enjoy this treat without guilt! Yes, you can use other sweeteners. Agave nectar works well as a substitute. You can also try date syrup or coconut sugar. Adjust the amount based on your taste. Always taste as you mix. This way, you get the sweetness you like. You can serve it with many tasty options. Fresh berries add a nice touch. Chopped nuts give a crunchy texture. You can also sprinkle shredded coconut on top. These toppings make your pudding look and taste even better. To lower calories, try these tips. Use less maple syrup or sweetener. You can also add more almond milk. This keeps the pudding creamy without too many calories. Another option is to use less avocado, but keep the flavor strong. This blog post detailed how to make vegan chocolate avocado pudding. You learned about the simple ingredients and clear steps to blend a delicious dessert. We explored tips for the best texture and flavor, as well as tasty variations. Proper storage methods keep your pudding fresh. Now, you can enjoy this treat any time. It’s easy to make and healthy, too. Try it out and impress your friends with a sweet yet nutritious dessert!

Vegan Chocolate Avocado Pudding Creamy Delight Recipe

Are you ready to indulge in a sweet treat that’s both delicious and healthy? This Vegan Chocolate Avocado Pudding is

Here’s what you need to make sweet potato black bean enchiladas. Gather these simple items before you start cooking. - Sweet Potatoes: 2 medium, peeled and cubed - Black Beans: 1 can (15 oz), rinsed and drained - Corn Kernels: 1 cup (fresh, frozen, or canned) - Spices: 1 teaspoon ground cumin, 1 teaspoon chili powder, salt and pepper to taste - Tortillas: 8 corn or flour - Enchilada Sauce: 2 cups (store-bought or homemade) - Cheese: 1 cup shredded (cheddar or a blend) - Garnishes: Fresh cilantro, sliced avocado (optional) Having these ingredients ready makes cooking easier. The sweet potatoes give a creamy texture, while black beans add protein. The spices bring warmth and flavor. Choose your favorite tortillas, and don’t forget the cheese! For the full recipe, check out the cooking steps. Happy cooking! Cooking Sweet Potatoes: Start by peeling and cubing the sweet potatoes. Place them in a medium pot and cover with water. Bring the water to a boil. Let the sweet potatoes cook for about 10-15 minutes. They should become fork-tender. Drain them and let them cool slightly. Mixing Filling: In a large bowl, mash the sweet potatoes using a fork. Mix in the black beans, corn, cumin, chili powder, salt, and pepper. Stir everything well until it's fully combined. This filling is flavorful and packed with nutrients. Preheating the Oven: Preheat your oven to 375°F (190°C). This temperature helps to bake the enchiladas evenly and ensures a nice, warm meal. Filling and Rolling: Take one tortilla and place it on a clean surface. Spoon 2-3 tablespoons of the sweet potato and black bean mixture onto the center. Roll the tortilla tightly and place it seam-side down in your baking dish. Repeat this process with the remaining tortillas and filling. Make sure they fit snugly in the dish. Covering and Baking: Once all the enchiladas are in the dish, pour the remaining enchilada sauce over them. Ensure each enchilada is well covered. Then sprinkle the shredded cheese on top. Cover the baking dish with foil. Bake it for 20 minutes. This keeps the enchiladas moist. Checking for Doneness: After 20 minutes, remove the foil. Bake for an additional 10-15 minutes. Look for bubbly cheese and a golden top. That’s when you know they are done! Enjoy your Sweet Potato Black Bean Enchiladas, bursting with flavor. For the complete process, refer to the Full Recipe. - Perfecting the Sweet Potatoes: You can roast or steam sweet potatoes. Roasting gives a caramelized flavor. Cut them into cubes, toss with olive oil, and roast at 400°F for 25-30 minutes. Steaming keeps them moist. Just boil water and steam until fork-tender. - Enchilada Sauce Options: You can choose homemade or store-bought sauce. Homemade sauce has fresh flavors. Use tomatoes, garlic, and spices. Store-bought sauce saves time and is convenient. Look for low-sodium options for a healthier choice. - Garnishing Ideas: Top your enchiladas with fresh cilantro, sliced avocado, or lime wedges. These add color and zest. You can also sprinkle some queso fresco or sour cream for creaminess. - Pairing Dishes: Serve enchiladas with a side of rice or a fresh salad. A simple green salad brings a nice crunch. You can also add chips and salsa for a fun touch. Try pairing with a light beer or a refreshing drink. For the full recipe, check out the Sweet Potato Black Bean Enchiladas section. {{image_2}} You can switch up the beans in this recipe. If you don't have black beans, try pinto or kidney beans. Both add a nice texture and flavor. They also keep the dish hearty and filling. For cheese, there are many options. Use dairy-free cheese if you want a vegan meal. Low-fat cheese is also a great choice for a lighter version. Both options melt well and complement the flavors. If you like heat, consider adding hot sauce or sliced jalapeños to your enchiladas. These additions bring a kick that many enjoy. Hot sauce can be mixed into the filling or drizzled on top before serving. You can also change the spices for new flavors. Try adding smoked paprika for a subtle smokiness. Or, mix in some cayenne pepper for more heat. Each spice adds a unique twist, so feel free to experiment! To keep your sweet potato black bean enchiladas fresh, follow these steps: - Refrigeration Guidelines: First, let the enchiladas cool down. Place them in an airtight container. They can stay in the fridge for up to 3 days. If you want to enjoy them later, make sure to cover them with foil to keep moisture in. - Freezing Instructions: For long-term storage, you can freeze the enchiladas. Wrap them tightly in plastic wrap, then put them in a freezer-safe bag. They will last for up to 3 months. To avoid freezer burn, try to remove as much air as possible from the bag. When it’s time to enjoy your enchiladas again, you have two good options: - Microwave vs. Oven: The microwave is quick, but it may make the enchiladas a bit soggy. Place a single enchilada on a plate, cover it with a wet paper towel, and heat for 1-2 minutes. If you want that fresh-baked taste, use the oven. Preheat it to 375°F (190°C). Place the enchiladas in a baking dish and cover them with foil. Bake for about 15-20 minutes, until heated through. This method keeps the cheese nice and melty. For more details, check the Full Recipe. Can I make enchiladas ahead of time? Yes, you can prepare these enchiladas in advance. First, cook the sweet potatoes and mix your filling. Then, assemble the enchiladas in a baking dish. Cover and store in the fridge for up to two days. When ready to eat, just bake them as directed. This makes meal prep easier and saves time on busy nights. Are sweet potato black bean enchiladas healthy? Absolutely! These enchiladas are packed with nutrients. Sweet potatoes provide fiber and vitamins. Black beans add protein and iron. The corn adds more vitamins and minerals. Together, they make a balanced meal. This dish is low in fat and high in flavor, making it a great choice for health-conscious eaters. What can I use instead of tortillas? If you need a tortilla substitute, try using lettuce wraps or cabbage leaves. Both options are gluten-free and add a nice crunch. You can also use quinoa or brown rice as a base. This gives you a fun twist on the classic enchilada while keeping it tasty and satisfying. For more ideas, check out the Full Recipe. You now have a complete guide to making delicious sweet potato black bean enchiladas. From gathering ingredients to baking them just right, each step matters. Remember, cooking can be flexible, so feel free to swap ingredients or add your favorite spices. These enchiladas are tasty, healthy, and perfect for any meal. Enjoy trying different variations and serve them with your favorite sides. Happy cooking!

Sweet Potato Black Bean Enchiladas Flavorful Delight

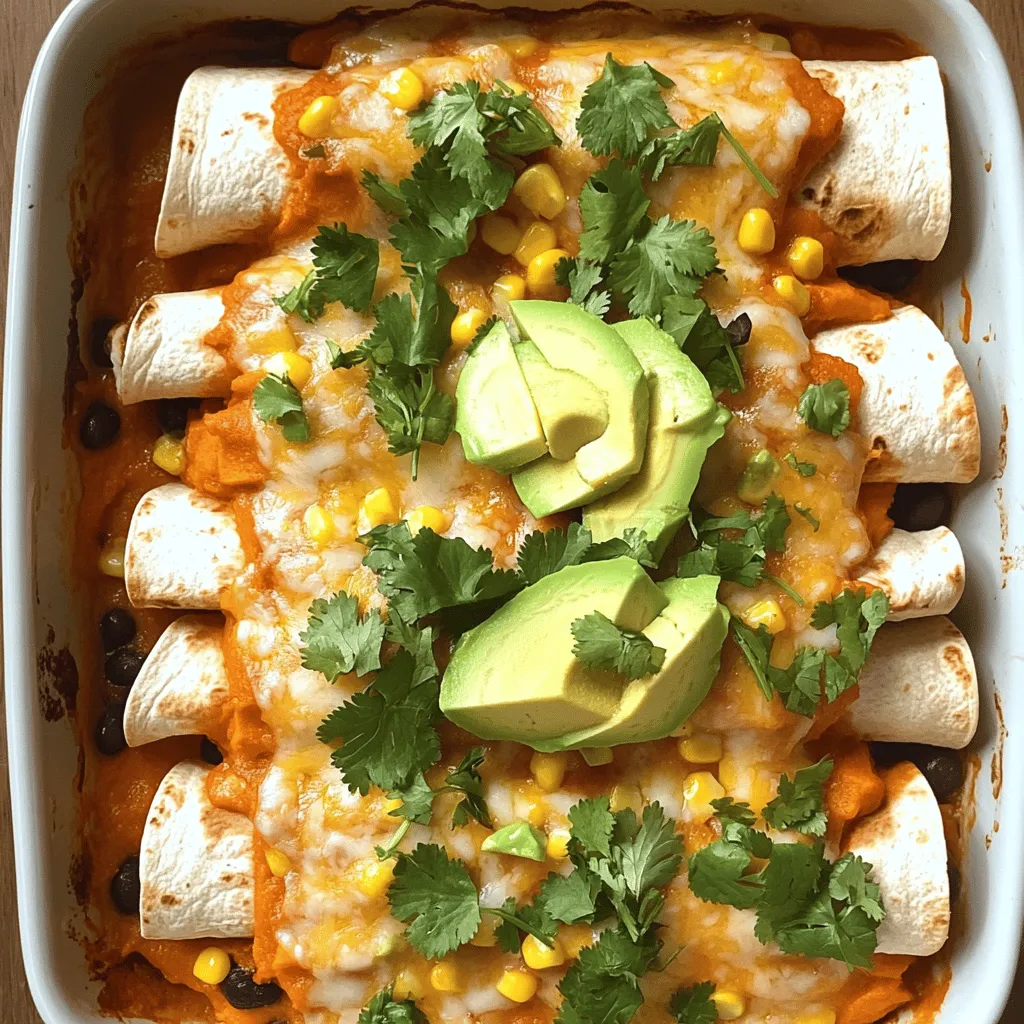
Get ready to savor a dish that warms your heart and fills your belly: Sweet Potato Black Bean Enchiladas! These

To make crispy air fryer chicken wings, you need: - 2 pounds chicken wings, split at the joint These wings are the star of the dish. Splitting them at the joint helps them cook evenly. For the dry seasoning mix, gather these items: - 1 tablespoon baking powder - 1 teaspoon garlic powder - 1 teaspoon onion powder - 1 teaspoon smoked paprika - 1 teaspoon salt - ½ teaspoon black pepper - ½ teaspoon cayenne pepper (adjust for heat) This blend gives the wings that delicious, crispy taste. Baking powder is key for crunch. The spices boost flavor and make each bite tasty. You will also need: - 2 tablespoons olive oil - Fresh parsley, chopped (for garnish) - Optional: Your favorite dipping sauce (ranch, blue cheese, etc.) Olive oil helps the seasoning stick and adds flavor. Parsley makes your wings look pretty. Dipping sauces add fun and flavor, so pick your favorite! For the full recipe, check out the steps to make these wings shine! Start by preheating your air fryer to 360°F (182°C). This helps cook the wings evenly. Next, rinse the chicken wings under cold water. Pat them dry with paper towels. It's really important to dry them well. If the wings are wet, they won’t get crispy. In a large bowl, mix the dry seasonings. Combine 1 tablespoon baking powder, 1 teaspoon garlic powder, 1 teaspoon onion powder, 1 teaspoon smoked paprika, 1 teaspoon salt, ½ teaspoon black pepper, and ½ teaspoon cayenne pepper. Stir this blend well. Then, add the chicken wings to the bowl. Drizzle 2 tablespoons of olive oil over them. Toss everything together until the wings are fully coated in the seasoning mix. Place the seasoned wings in a single layer in the air fryer basket. Make sure not to overcrowd them. If your air fryer is small, you may need to cook in batches. Cook the wings for 25 to 30 minutes. Flip them halfway through for even cooking. Look for a nice golden brown color and crispy texture. If they need more crispiness, air fry them for an extra 5 minutes. Once done, take them out and let them rest for a few minutes. Add fresh parsley on top for a beautiful finish. Enjoy your crispy chicken wings with your favorite dipping sauce! To get the best crispiness, start with dry wings. After rinsing, pat them dry well. This step helps remove moisture. Use baking powder in your dry mix. It helps create a crunchy texture. Don't skip the olive oil either; it aids in browning. Spread the wings out in the air fryer basket. Leave space for air to flow around them. Check the color of your wings. They should be golden brown and crispy. Use a meat thermometer to be sure. The internal temperature should reach 165°F. If they need more time, air fry them for 5 more minutes. Flip them halfway through for even cooking. Always preheat your air fryer. This step helps with even cooking. Avoid overcrowding the basket. Cook in batches if needed. Keep the wings in a single layer. This allows hot air to circulate freely. Finally, let the wings rest for a few minutes before serving. This helps the skin stay crisp. For more details, refer to the Full Recipe for perfect air fryer chicken wings. {{image_2}} You can change the taste of your wings easily. For a spicy kick, toss them in Buffalo sauce after cooking. You can also use BBQ sauce for a sweet glaze. Just remember to coat them lightly to keep the crispy skin. If your wings are thicker, they may need more time. Increase the cooking time by 5 to 10 minutes. Keep an eye on them to avoid overcooking. The wings should still be golden brown and crispy when done. Want to cut down on sodium? Use low-sodium soy sauce instead of salt in your mix. You can also skip the salt altogether. The spices still add great flavor, making your wings tasty and healthy. For the full recipe, check the section above. To store leftover chicken wings, let them cool to room temperature. Place them in an airtight container. You can also use a resealable plastic bag. Make sure to remove as much air as possible. Store the wings in the fridge for up to three days. To reheat your wings and keep them crispy, use the air fryer. Preheat the air fryer to 350°F (175°C). Place the wings in a single layer in the basket. Heat them for 8 to 10 minutes. Check them halfway through to ensure they are warm and crispy. If you want to keep wings longer, freezing is a great option. First, let the wings cool completely. Arrange them in a single layer on a baking sheet. Freeze for about an hour until solid. Then, transfer the wings to a freezer-safe bag. Label the bag with the date. You can freeze them for up to three months. The best temperature for air frying chicken wings is 360°F (182°C). This temperature helps cook the wings evenly and makes them crispy. I recommend preheating your air fryer before adding the wings. This step ensures they start cooking right away for the best results. Yes, you can use frozen chicken wings. However, they will need extra cooking time. I suggest adding about 10 to 15 minutes to the cooking time. Make sure to check that they reach 165°F (74°C) inside. Thawing them first can help them cook more evenly. To make chicken wings spicier, you can add more cayenne pepper or use hot sauce. Mix the hot sauce into your seasoning blend before coating the wings. You can also toss the cooked wings in buffalo sauce for an extra kick. Adjust the spice to your taste for the perfect flavor. Air fryer chicken wings pair well with many sides. Here are some great options: - Celery sticks - Carrot sticks - Ranch dressing - Blue cheese dressing - French fries - A fresh salad These sides balance the meal and add crunch. You can mix and match based on your mood and taste. For the full recipe, check the details above. You now know how to make tasty chicken wings in an air fryer. We covered the main ingredients, like chicken wings and dry seasoning. I shared easy steps for prep, coating, and cooking. You learned how to get wings crispy and checked for doneness. We explored fun flavor ideas and storage tips too. With these guidelines, you can serve delicious wings any time. Enjoy your cooking!

Crispy Air Fryer Chicken Wings Simple and Tasty Meal

If you’re craving a crispy snack, you’re in the right place! These air fryer chicken wings are easy to make

To make Garlic Butter Shrimp Pasta, you need: - 8 oz spaghetti or linguine - 1 lb large shrimp, peeled and deveined - 4 tablespoons unsalted butter - 4 cloves garlic, minced - 1/2 teaspoon red pepper flakes - Zest of 1 lemon - 2 tablespoons fresh lemon juice - 1/4 cup fresh parsley, chopped - Salt and pepper to taste - Grated Parmesan cheese, for serving These ingredients come together to create a dish that is both rich and bright. You will need some basic tools to cook this meal: - A large pot for boiling pasta - A large skillet for sautéing shrimp - A sharp knife for chopping garlic and parsley - A cutting board for prep work - A colander for draining pasta Having the right equipment makes cooking easier and more fun. You can add these items for more taste: - Cherry tomatoes, halved - Spinach or arugula, for greens - A splash of white wine for depth - Crushed garlic chips for garnish These extras can elevate your dish and impress your guests. You can find the Full Recipe in the next section for detailed steps on how to use these ingredients. To make garlic butter shrimp pasta, start with the pasta. Boil salted water in a large pot. Add 8 oz of spaghetti or linguine. Cook according to package directions until al dente. Drain the pasta but save 1/2 cup of the water. Next, heat a large skillet over medium heat. Melt 4 tablespoons of unsalted butter in the skillet. Add 4 minced garlic cloves and 1/2 teaspoon of red pepper flakes. Cook this for about 1 minute until it smells great. Now, it’s time to add the shrimp. Use 1 lb of large, peeled shrimp and season with salt and pepper. Cook the shrimp for 2-3 minutes on each side until they turn pink. Once cooked, add the pasta to the skillet. Pour in the reserved pasta water, lemon zest, and lemon juice. Toss everything gently to mix. Finally, add 1/4 cup of chopped parsley and check the seasoning. Serve right away with some grated Parmesan on top. To cook pasta well, always use plenty of water. Salt the water before adding the pasta. This helps to flavor the pasta. Stir the pasta a few times while it cooks. This prevents it from sticking together. Taste the pasta a minute before the timer goes off. It should be firm but not hard. If it needs more time, keep cooking. Drain the pasta but do not rinse it. Rinsing washes away the flavor and starch. For the best shrimp, start with fresh or frozen shrimp that is peeled and deveined. If frozen, thaw it in the fridge overnight or run it under cold water. Make sure not to overcrowd the skillet. This helps the shrimp cook evenly and quickly. Cook shrimp just until they turn pink and opaque. Overcooking shrimp makes them tough. If you want even more flavor, marinate the shrimp in lemon juice and garlic for 15 minutes before cooking. This adds a zesty punch to your dish. Enjoy this garlic butter shrimp pasta as a simple and flavorful meal! For the full recipe, refer to the earlier sections. When making garlic butter shrimp pasta, avoid overcooking the shrimp. They cook fast, usually in just a few minutes. If you leave them too long, they can become tough. Always check for that lovely pink color. Also, don’t skip the pasta water. It helps the sauce stick to the pasta. To boost flavor, use fresh garlic instead of jarred. Fresh garlic packs more punch and makes a big difference. Adding a splash of white wine while cooking shrimp can give depth. For more zest, try adding more lemon juice or extra lemon zest. You can also mix in some capers for a briny touch. Serve your garlic butter shrimp pasta with a side of garlic bread. A simple green salad can also balance the meal. For a fun twist, add some cherry tomatoes or spinach directly into the pasta. This adds color and nutrients. Pair with a glass of chilled white wine for the perfect finish. Check out the Full Recipe for more details! {{image_2}} You can add some heat to your dish. To make spicy garlic butter shrimp pasta, mix in extra red pepper flakes. You can also use diced jalapeños for a fresh kick. Another option is to drizzle some sriracha on top before serving. This twist makes your pasta bold and exciting. For a creamy version, add heavy cream or cream cheese to the pan. Stir it in after sautéing the shrimp. This makes the sauce rich and smooth. You might also sprinkle in some grated cheese for more flavor. This creamy dish feels cozy and comforting. If you want a vegetarian twist, swap shrimp for veggies. Use mushrooms, zucchini, or asparagus instead. Sauté them in butter and garlic just like the shrimp. You can still enjoy the lemon and parsley for fresh flavor. This way, you keep the essence of the dish while making it plant-based. For the full recipe, check out the Garlic Butter Shrimp Pasta with a Zesty Twist. After enjoying your Garlic Butter Shrimp Pasta, let any leftovers cool. Place them in an airtight container. This keeps the dish fresh. Store the container in the fridge for up to three days. Make sure to keep it sealed well to avoid any unwanted flavors. When you’re ready to eat the leftovers, take them out of the fridge. You can reheat them on the stove or in the microwave. For the stove, add a splash of water or broth in a pan. Heat it over medium-low until warm. Stir gently to keep the pasta from sticking. In the microwave, cover the bowl with a lid or a damp paper towel. Heat in short bursts, stirring in between, until warm. This method helps keep the shrimp juicy. If you want to save your Garlic Butter Shrimp Pasta for later, freezing is a great option. First, let it cool completely. Then, place it in a freezer-safe container. You can also use freezer bags. Try to remove as much air as possible. This helps prevent freezer burn. When you’re ready to eat, take it out of the freezer and thaw it overnight in the fridge. Reheat as mentioned above. Enjoy your meal even after a few days! If you don't have shrimp, you can use chicken or scallops. Both options add great taste. Tofu is a nice choice for a vegan meal. It soaks up the garlic butter well. Yes, you can make this recipe gluten-free. Simply use gluten-free pasta. There are many brands available. Always check the label for safety. Garlic Butter Shrimp Pasta stays fresh in the fridge for up to three days. Store it in an airtight container. Make sure it cools before sealing. You can find the Full Recipe online for easy access. It has tasty variations. Try adding more veggies for extra nutrition. You can also mix in different herbs to change the flavor. In this post, we covered all you need for Garlic Butter Shrimp Pasta. We listed the ingredients, equipment, and optional flavors to enhance your dish. You learned step-by-step instructions and tips for perfect pasta and shrimp. We shared common mistakes to avoid and quick serving ideas. Plus, we explored tasty variations and essential storage information. Remember, cooking is fun and personal. Feel free to experiment with flavors and ingredients. Enjoy your cooking journey!

Garlic Butter Shrimp Pasta Simple and Flavorful Meal

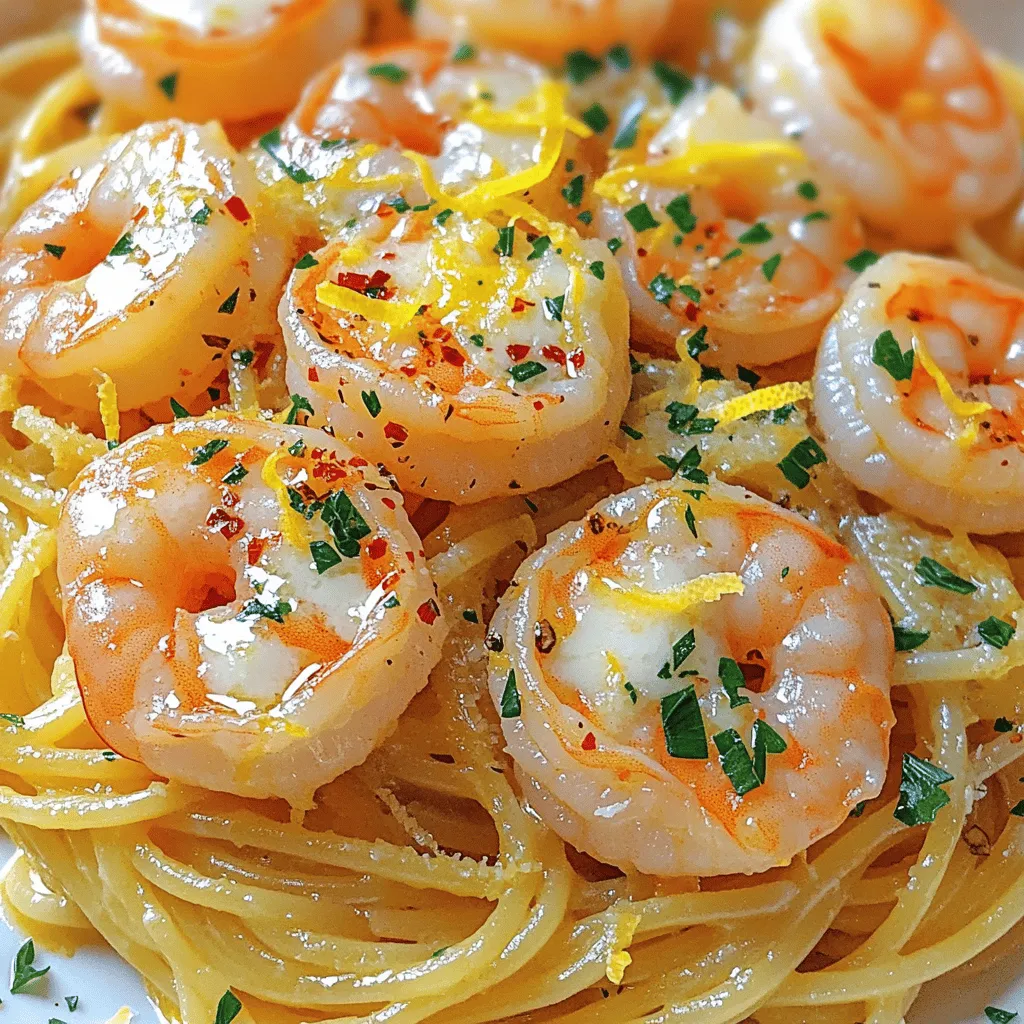
If you’re looking for a quick and tasty meal, Garlic Butter Shrimp Pasta is your answer. This dish combines juicy

- 2 cups gluten-free all-purpose flour - 1 cup fresh blueberries (plus extra for topping) - 1/2 cup coconut sugar (or brown sugar) - 1 tablespoon baking powder - 1/2 teaspoon baking soda - 1/4 teaspoon salt - 1/2 cup unsweetened applesauce - 1/2 cup almond milk (or other dairy-free milk) - 1/4 cup melted coconut oil (or vegetable oil) - 1 teaspoon vanilla extract - Zest of 1 lemon These ingredients create a tasty treat. Each plays a unique role. The gluten-free all-purpose flour holds everything together. Fresh blueberries burst with flavor in every bite. Coconut sugar gives a little caramel taste that is delightful. Baking powder and baking soda help the muffins rise well. Unsweetened applesauce keeps the muffins moist. Almond milk keeps them dairy-free, but any milk works. Coconut oil adds healthy fats and makes them rich. Vanilla extract adds warmth to the flavor. Lastly, lemon zest brightens the muffins with a zesty kick. If you need alternatives, try brown sugar instead of coconut sugar. You can use any dairy-free milk you like. For oil, vegetable oil works just as well as coconut oil. If you want a sweeter muffin, feel free to add more sugar. For a fun twist, you can mix in nuts or seeds. Chocolate chips could also add a sweet surprise. Remember, you can find the full recipe in the previous section. Enjoy creating these muffins! 1. Preheat your oven to 350°F (175°C). This helps your muffins bake evenly. Prepare your muffin tin by lining it with muffin liners or lightly greasing it. This makes it easy to remove the muffins later. 2. Mix your dry ingredients in a large bowl. Combine 2 cups of gluten-free all-purpose flour, 1/2 cup of coconut sugar, 1 tablespoon of baking powder, 1/2 teaspoon of baking soda, and 1/4 teaspoon of salt. Stir these well to ensure they blend evenly. 3. Combine your wet ingredients in another bowl. Whisk together 1/2 cup of unsweetened applesauce, 1/2 cup of almond milk, 1/4 cup of melted coconut oil, 1 teaspoon of vanilla extract, and the zest of 1 lemon. This mixture brings flavor and moisture to your muffins. 4. Fold in the blueberries gently. Add 1 cup of fresh blueberries to the batter, saving a few for topping. Transfer the batter to the muffin tin, filling each cup about 3/4 full. This ensures they have room to rise while baking. 1. Bake your muffins for 18-20 minutes. Check for doneness by inserting a toothpick in the center. If it comes out clean, they are ready. This is a crucial step to avoid under or overbaking. 2. Cool your muffins in the tin for about 5 minutes after baking. This helps them set. Then, transfer them to a wire rack to cool completely. This prevents sogginess and keeps them fluffy. For the complete recipe, check out the Full Recipe. To make perfect gluten-free muffins, avoid overmixing the batter. Mix the wet and dry ingredients until they just come together. This helps keep your muffins light and fluffy. Overmixing can make them dense and hard. To get a good rise in gluten-free baked goods, add a bit of baking powder and baking soda. These ingredients help create air bubbles that expand when baked. Make sure your baking powder is fresh to ensure it works well. When measuring ingredients, use the spoon and level method. This means spooning flour into a measuring cup and leveling it off with a knife. This method ensures you use the right amount. Too much flour can lead to dry muffins. Always check the freshness of your ingredients. Old baking powder or expired flour can ruin your bake. Fresh ingredients make a big difference in taste and texture. Using fresh blueberries also adds great flavor to your muffins. {{image_2}} You can easily make these muffins vegan. For applesauce, use mashed bananas or silken tofu. Both options work well in muffins. For the milk, swap almond milk for any plant-based milk. Oat or soy milk also makes a great choice. These changes keep the muffins moist and tasty. Want to switch things up? You can add zest or spices to boost flavor. Try a teaspoon of cinnamon for warmth. Lemon or orange zest gives a fresh kick. For fruit, consider adding raspberries, chopped strawberries, or diced peaches. These fruits mix well with blueberries. You can even use a mix of fruits for a fun twist! To keep your blueberry muffins fresh, store them in an airtight container. Place a piece of parchment paper between layers if you stack them. This helps prevent sticking. Keep the container at room temperature for up to three days. For longer storage, try freezing them. To freeze muffins, wrap each one tightly in plastic wrap. Then, place them in a freezer-safe bag or container. Remove as much air as possible before sealing. Frozen muffins can last for up to three months. When you're ready to enjoy them, simply thaw them at room temperature. To bring muffins back to their fresh state, preheat your oven to 350°F (175°C). Place the muffins on a baking sheet. Heat them for about 5 to 10 minutes. This warms them through and helps regain some of their original texture. You can also microwave one muffin for about 15-20 seconds for a quick warm-up. Enjoy your muffins warm to savor their delicious blueberry flavor! Yes, you can use frozen blueberries. They will add a nice burst of flavor. However, they may change the texture. Frozen blueberries can make the batter a bit wetter. This may increase baking time by a few minutes. Watch them closely while baking. If you notice them leaking juice, it’s okay. Just let them bake a bit longer until a toothpick comes out clean. You can lower the sugar by using natural sweeteners. Try using mashed ripe bananas or unsweetened applesauce. Both add sweetness without too much sugar. You can also use stevia or monk fruit sweetener. These options are great for keeping the flavor while cutting calories. Just remember to adjust the liquid if needed. If your muffins are dense, try a few tips. First, check your baking powder. Make sure it’s fresh. Old baking powder may not help the muffins rise. Next, mix the batter gently. Overmixing can lead to dense muffins. Finally, add a bit more liquid. This can help create a lighter texture. Gluten-free muffins can last about 3 to 4 days at room temperature. Store them in an airtight container to keep them fresh. If you want them to last longer, freeze them. They can stay good in the freezer for up to 3 months. Just look for signs of spoilage, like a dry texture or off smell, before eating. This blog post on gluten-free blueberry muffins covers all you need to know. You learned about the key ingredients, step-by-step baking instructions, and helpful tips for perfect results. We discussed variations like vegan options and flavor twists, along with storage methods for freshness. Remember, each step matters in baking, and small changes can lead to big differences. Enjoy your baking journey, and feel free to experiment with flavors and techniques. Your gluten-free muffins can be delicious and healthy!

Gluten-Free Blueberry Muffins Simple and Tasty Treat

If you crave a delicious treat that’s easy to make, try my gluten-free blueberry muffins! These muffins are soft, moist,

Making Coconut Curry Lentil Soup is simple and fun. You only need a few key ingredients to create this warm and rich dish. Here's what you'll need: - 1 cup red lentils, rinsed - 1 can (14 oz) coconut milk - 4 cups vegetable broth - 1 medium onion, diced - 2 cloves garlic, minced - 1 inch ginger, grated - 1 tablespoon red curry paste - 1 teaspoon turmeric powder - 1 teaspoon cumin powder - 1 bell pepper, diced - 2 cups spinach (fresh or frozen) - 1 tablespoon olive oil - Salt and pepper to taste - Fresh cilantro, for garnish - Lime wedges, for serving These ingredients create a tasty and hearty soup. I love the way the coconut milk adds creaminess. The spices give it a nice kick. Don't forget to check the [Full Recipe] for all the steps to make this delicious soup. 1. First, heat 1 tablespoon of olive oil in a large pot over medium heat. 2. Add the diced onion. Sauté it until it becomes translucent, about 3-4 minutes. The onion should soften and smell sweet. 1. Next, stir in 2 cloves of minced garlic and 1 inch of grated ginger. Cook them for about 1-2 minutes until they smell fragrant. This step adds a nice depth of flavor. 2. Now, mix in 1 tablespoon of red curry paste. Stir it well with the onion mixture. Let it cook for 1-2 minutes to let the flavors develop. 3. Pour in 4 cups of vegetable broth and 1 can (14 oz) of coconut milk. Stir until everything combines. This creates a creamy, rich base. 1. Add 1 cup of rinsed red lentils, 1 teaspoon of turmeric, 1 teaspoon of cumin, and 1 diced bell pepper. Bring the mixture to a boil. 2. Once boiling, reduce the heat to a simmer. Cover the pot and let it cook for 20-25 minutes. Stir occasionally until the lentils are tender. 3. After the lentils are cooked, stir in 2 cups of spinach until it's wilted. Season with salt and pepper to taste. 4. Remove from heat and let the soup rest for a few minutes before serving. You can find the full recipe to make this delicious soup. Enjoy the warmth and flavor of this dish! To make the best coconut curry lentil soup, rinse your lentils well. This step removes dust and small stones. It also helps the lentils cook evenly. You can adjust the curry paste based on your taste. Start with one tablespoon, and add more if you like it spicier. You can add extra spices for more depth. Consider cumin or coriander. Fresh herbs like basil or mint can brighten the dish. For garnishing, use fresh cilantro. A squeeze of lime makes a big difference in taste. Watch the cooking time for lentils. Overcooking can make them mushy. Taste and adjust your seasonings as needed. Don’t skip this step; it’s key for great flavor. Explore the [Full Recipe] for the complete list of ingredients and steps! {{image_2}} You can swap out red lentils for chickpeas or quinoa. Chickpeas add a hearty texture. Quinoa boosts protein and gives a nice crunch. You can also mix in veggies like carrots, zucchini, or mushrooms. Each choice adds a new layer of flavor to your soup. To spice things up, consider adding more heat. Red pepper flakes or fresh chili can make the soup hotter. You can also try different curries. Green curry paste will give a fresh taste, while massaman curry provides a sweet and nutty flavor. This soup can easily become vegan or gluten-free. The recipe is already vegan since it uses coconut milk. For gluten-free, just check your curry paste. You can also lower the calories by using less coconut milk or adding more veggies. This keeps it tasty without the extra fat. To store your leftovers, let the soup cool first. Pour the soup into an airtight container. It keeps well in the fridge for up to five days. Always label your container with the date. This way, you'll know when to enjoy it again! For long-term storage, freezing works great. Use a freezer-safe container or zip-top bag. Leave some space at the top of the container, as the soup will expand when frozen. Your soup can last up to three months in the freezer. When you're ready to eat, thaw it in the fridge overnight. To reheat frozen soup, warm it on the stove over low heat. Stir often to prevent sticking. You can also use the microwave, but stir halfway through to heat it evenly. This soup pairs well with many side dishes. Try serving it with crusty bread for dipping. Rice is another excellent option, as it soaks up the flavors. You can also add a simple salad for freshness. Each bite will be a delight! Coconut curry lentil soup lasts about 4 to 5 days in the fridge. Make sure to store it in a tightly sealed container. If you freeze it, it can last up to 3 months. Just thaw it overnight in the fridge before reheating. Yes, you can make this soup ahead of time. Prepare the soup and let it cool completely. Then, store it in the fridge or freeze it. If you freeze it, portion it out for easy meals later. Reheat it on the stove or in the microwave before serving. If you want to avoid coconut milk, try almond milk or soy milk. Both can add creaminess to the soup. You can also use vegetable broth with a splash of olive oil for richness. Remember to adjust seasonings to match your choice! This blog post covered making a delicious coconut curry lentil soup. We listed the essential ingredients, shared step-by-step cooking instructions, and highlighted tips for perfecting your dish. Remember to rinse your lentils and adjust flavors to your taste. You can also swap ingredients and make it fit your diet. Don’t be afraid to get creative with flavors and variations. Enjoy this warming soup, and share it with friends and family. Happy cooking!

Coconut Curry Lentil Soup Easy and Flavorful Recipe

Looking for a warm, tasty dish that’s easy to make? Try my Coconut Curry Lentil Soup! This hearty recipe uses

To make mouthwatering teriyaki chicken bowls, you will need: - 2 boneless, skinless chicken breasts - 1 cup jasmine rice - 1 1/2 cups water or chicken broth - 1/3 cup soy sauce (low sodium) - 2 tablespoons honey or maple syrup - 1 tablespoon sesame oil - 1 tablespoon rice vinegar - 2 cloves garlic, minced - 1 inch ginger, grated - 1 tablespoon cornstarch mixed with 2 tablespoons water (for thickening) - 1 cup broccoli florets - 1 bell pepper, sliced (red or yellow for color) - 1 carrot, julienned - 2 green onions, chopped (for garnish) - Sesame seeds (for garnish) These ingredients create a balanced dish with protein, carbs, and veggies. Feel free to add your own twist! Here are some optional ingredients to consider: - Snow peas for extra crunch - Avocado for creaminess - Pineapple chunks for sweetness - Red pepper flakes for heat - Other veggies like zucchini or mushrooms You can mix and match to suit your taste. Each serving of teriyaki chicken bowls can be nutritious. Here’s a quick look: - Calories: About 400-500 (varies by ingredients) - Protein: 30-35 grams - Carbohydrates: 50-60 grams - Fats: 10-15 grams This meal is high in protein and offers a good amount of vitamins from the veggies. You can tweak the recipe to fit your dietary needs. For more details, check the full recipe. To start, grab a bowl. Mix the soy sauce, honey (or maple syrup), sesame oil, rice vinegar, minced garlic, and grated ginger. This mix will give your chicken great flavor. Add the chicken breasts to the bowl. Make sure they are well-coated in the marinade. Let them sit for at least 30 minutes. If you have time, marinate them overnight for even better taste. Rinse the jasmine rice in cold water. Keep rinsing until the water runs clear. In a pot, bring 1 1/2 cups of water or chicken broth to a boil. Add the rice, then lower the heat. Cover it and let it simmer for 15 minutes. Once done, remove it from heat, but leave it covered for another 5 minutes. This will make your rice fluffy. Heat a skillet over medium-high heat. Take the chicken out of the marinade but save it for later. Add the chicken to the skillet. Cook for 5-7 minutes on each side. The chicken should look golden brown and cooked all the way through. After cooking the chicken, pour the saved marinade into the skillet. Add the cornstarch mixture to thicken it. Stir until the sauce bubbles and looks glossy, about 2-3 minutes. Once done, put the chicken back into the skillet to coat it in the sauce. In a separate pan, drizzle a bit of sesame oil. Add the broccoli, bell pepper, and carrot to the pan. Sauté them on medium heat for about 5-7 minutes until they are tender but still crisp. This step adds color and crunch. Fluff the cooked jasmine rice using a fork. Divide the rice into serving bowls. Slice the teriyaki chicken and place it on top of the rice. Add the sautéed vegetables next to the chicken. For the finishing touch, sprinkle chopped green onions and sesame seeds on top. This adds extra flavor and makes your dish look amazing. For more details on making this dish, check out the Full Recipe. To make your teriyaki chicken bowls burst with flavor, follow these tips: - Use fresh ginger and garlic. Fresh ingredients give a bright taste. - Marinate overnight. This step helps the chicken soak up all the flavors. - Choose low-sodium soy sauce. This option keeps the dish balanced and not too salty. Even the best cooks can make mistakes. Here are some common ones to watch out for: - Skipping the marination. This step is key for juicy chicken. - Overcooking the chicken. Cook it until just done, about 5-7 minutes per side. - Not thickening the sauce. Use cornstarch to create a glossy sauce that clings well. You want your chicken to be tender and juicy. Here’s how: - Pound the chicken. This step evens out the thickness for even cooking. - Let it rest after cooking. Resting allows the juices to settle back in. - Cook with care. Use medium-high heat for a nice sear without drying it out. For a complete guide on making teriyaki chicken bowls, check the Full Recipe. {{image_2}} You can easily swap chicken for tofu or tempeh. Both options soak up flavors well. For tofu, choose firm or extra-firm for the best texture. Press it to remove water. Cut the tofu into cubes and marinate like the chicken. Cook it until golden brown, just like you would with chicken. You can also use seitan for a meat-like texture. If you want a twist on teriyaki, try a mango or pineapple sauce. These fruity options add a sweet and tangy flavor. You can also use hoisin sauce for a richer taste. Simply mix it with soy sauce for depth. For a spicy kick, add sriracha or chili paste to your marinade. This makes the dish exciting and new. For gluten-free options, use tamari instead of soy sauce. Serve over quinoa or cauliflower rice for a low-carb choice. Pair with steamed greens like bok choy or spinach for added nutrients. If you want a heartier meal, add edamame or chickpeas. This keeps the meal balanced and filling. You can also add nuts like cashews for crunch and flavor. These variations ensure everyone enjoys teriyaki chicken bowls. To store leftover teriyaki chicken bowls, let them cool first. Place the chicken, rice, and veggies in airtight containers. You can store them in the fridge for up to three days. If you want to keep them longer, freeze the bowls. Just make sure to use freezer-safe containers. Frozen chicken bowls can last up to three months. When you're ready to eat your leftovers, reheating is key. For best results, use the microwave. Place the bowl in the microwave and cover it with a lid or microwave-safe wrap. Heat for 1-2 minutes, stirring halfway through. If you prefer, you can also reheat on the stove. Heat a skillet over medium heat and add a splash of water or broth. Stir often until hot. This helps keep the flavors fresh. Meal prepping can save time and effort. Cook a big batch of teriyaki chicken bowls. Store them in individual containers for easy grab-and-go meals. For meal prep, keep the rice and chicken separate until you are ready to eat. This helps keep the rice from getting soggy. You can also mix and match veggies based on your taste. Enjoy the Full Recipe for more details on creating this tasty dish! You can use tamari or coconut aminos. Both options taste great in teriyaki chicken bowls. Tamari is a gluten-free soy sauce alternative. Coconut aminos are sweeter and lower in sodium. If you want a quick fix, mix equal parts of water and Worcestershire sauce for a similar flavor. Yes, you can make teriyaki chicken bowls in advance. Cook and store the chicken and rice separately. This keeps the rice from becoming soggy. You can also chop your veggies ahead of time. When ready to eat, simply heat everything up and assemble your bowl. To make your teriyaki chicken bowls gluten-free, swap the soy sauce for gluten-free tamari. Check that the rice and other ingredients are gluten-free as well. Most vegetables are naturally gluten-free, so you can add your favorites without worry. Great vegetables for teriyaki chicken bowls include broccoli, bell peppers, and carrots. Snap peas, zucchini, or green beans also add nice crunch and color. You can mix and match based on what you like or have on hand. Fresh veggies keep the dish vibrant and healthy. You learned how to make delicious teriyaki chicken bowls. We covered essential and optional ingredients, giving you room to customize. I shared step-by-step instructions for marinating the chicken and cooking the rice. We discussed tips to get the best flavor and avoid common mistakes. Finally, I shared storage tips and tasty variations to try. Now, you can create a meal that fits your taste and needs. Enjoy your cooking journey and the wonderful flavors ahead.

Mouthwatering Teriyaki Chicken Bowls Easy Recipe Guide

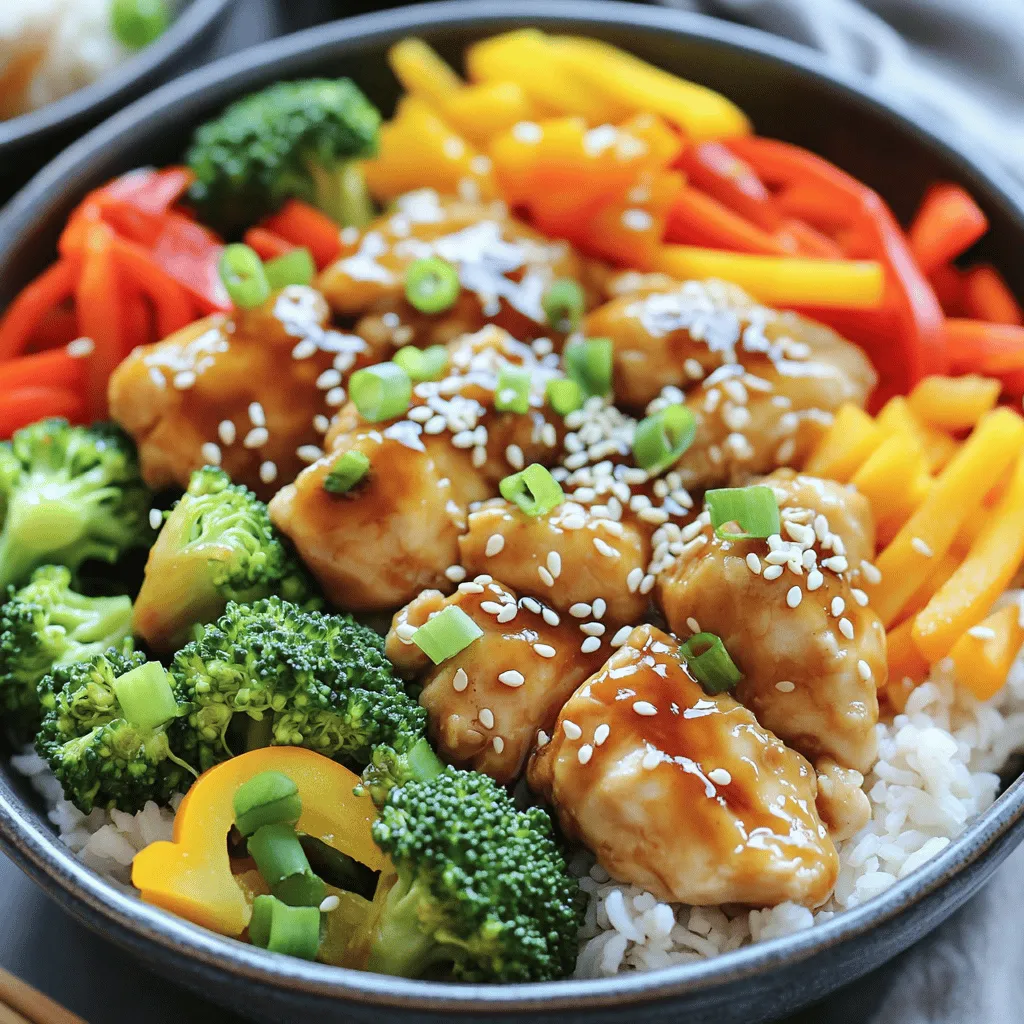
Are you ready to elevate your weeknight meals? My easy guide to mouthwatering teriyaki chicken bowls is just what you

- Chicken: Use 1 lb of boneless, skinless chicken thighs. Cut them into bite-sized pieces. Thighs stay juicy and tender. - Spices: Essential spices are key for flavor. You’ll need: - 2 tablespoons garam masala - 1 tablespoon ground cumin - 1 tablespoon ground coriander - 1 teaspoon turmeric powder - 1 teaspoon chili powder - 1 teaspoon salt - Other essential ingredients: These add depth and creaminess: - 1 cup plain Greek yogurt, for marinating - 1 tablespoon vegetable oil, for sautéing - 1 medium onion, finely chopped - 4 cloves garlic, minced - 1 inch ginger, grated - 1 can (14 oz) crushed tomatoes - 1/2 cup heavy cream, for richness - Fresh cilantro for garnish, to brighten the dish These ingredients come together to make a tasty meal in your Instant Pot. For the full recipe, check the detailed instructions above. Marinating the chicken Start by mixing yogurt, garam masala, cumin, coriander, turmeric, chili powder, and salt in a bowl. This mix is your marinade. Add the chicken pieces and stir well. Make sure each piece gets coated. Let this sit for at least 30 minutes. For a deeper flavor, marinate overnight. Sautéing the aromatics Next, turn on your Instant Pot and set it to Sauté mode. Once hot, pour in the vegetable oil. Add the chopped onion and cook for about 3-4 minutes. You want it soft and clear. Then, mix in minced garlic and grated ginger. Sauté for one more minute until fragrant. Cooking under pressure Now it’s time to add the crushed tomatoes and the marinated chicken to the pot. Pour in everything from the marinade too, and give it a gentle stir. Close the lid and set the valve to Sealing. Cook on high pressure for 10 minutes. Mixing in the cream When the cooking time is up, let the pressure release naturally for about 5 minutes. Then, switch the valve to Venting to let out any extra steam. Open the lid and stir in the heavy cream. Mix until you see a nice, creamy blend. Adjusting seasoning Take a moment to taste the dish. You might want to add more salt or spices to fit your taste. Serving suggestions Serve hot, garnished with fresh cilantro. Pair it with rice or naan for a complete meal. For the full recipe, check out the section above. Marination makes a big difference. I suggest marinating the chicken for at least 30 minutes. For even richer flavor, let it sit overnight in the fridge. This allows the spices to soak in fully. Adjusting spices is key. If you like it spicier, add more chili powder. For a milder dish, reduce the chili powder and garam masala. Tasting the marinade before adding the chicken can guide you. Avoid burning by keeping an eye on the Sauté mode. Stir the onions often to prevent sticking. If they start to brown too quickly, lower the heat. For pressure release, let it happen naturally for about five minutes. Then, switch to Venting to let out the remaining steam. This helps keep the chicken tender and juicy. For the Full Recipe, refer to the beginning of this article. {{image_2}} Alternative proteins You can swap chicken for other proteins. Try shrimp or tofu for a new taste. Both options work well with the spices. Just adjust the cooking time. Shrimp cooks fast, while tofu needs a bit more time to soak up flavors. Dairy-free options If you need a dairy-free meal, use coconut milk instead of heavy cream. It adds a nice sweetness. You can also use cashew cream for a rich texture. This makes the dish creamy without dairy. Adding vegetables You can boost nutrition by adding veggies. Try bell peppers, spinach, or peas. Add them during the last few minutes of cooking. This keeps them fresh and vibrant. They add color and taste to the dish. Heat level adjustments If you like it spicy, add more chili powder. You can also toss in some fresh chopped chili. For milder flavors, reduce the chili powder. Taste your sauce as you go. This way, you can find the perfect heat for your family. For the complete recipe, visit the [Full Recipe]. After you enjoy your Instant Pot Chicken Tikka Masala, save the leftovers. Let the dish cool to room temperature. Then, place the chicken in airtight storage containers. This way, you keep it fresh and tasty. You can store it in the fridge for up to three days. Be sure to label the containers with the date. This helps you remember when you made it. If you want to save it for later, freezing is a great choice. Divide the chicken into meal-sized portions. Use freezer-safe bags or containers. Squeeze out as much air as you can to prevent freezer burn. You can freeze it for up to three months. To enjoy later, thaw the chicken in the fridge overnight. If you're in a hurry, you can use the microwave. Just remember to heat it thoroughly before serving. Enjoy your meal again with the same great flavors! For the full recipe, check out the Full Recipe link. How do I make it spicier? To add heat, increase the chili powder. You can also add diced fresh chilies. Try using cayenne pepper for an extra kick. Adjust slowly to find your perfect spice level. Can I use chicken breast instead of thighs? Yes, you can use chicken breast. They are leaner than thighs, so the dish may be less rich. Adjust cooking time to ensure they stay juicy. Cook them for about 8 minutes under pressure. What if I don’t have an Instant Pot? If you lack an Instant Pot, use a slow cooker or a stovetop pot. Cook on low for 6-8 hours in the slow cooker. On the stovetop, simmer on low heat for about 30-40 minutes. Stir often to prevent burning. Can I adjust the serving size easily? Yes, adjusting the serving size is simple. Double or halve the ingredients based on your needs. Just keep the cooking time the same for best results. What can I use instead of Greek yogurt? You can use sour cream or regular plain yogurt. Coconut yogurt is a great dairy-free option. It may change the taste a bit but will still be tasty. Are there any vegan substitutes available? Yes, you can use tofu or chickpeas as the protein. For the yogurt, use cashew cream or coconut yogurt. Adjust spices to your taste for a vegan twist on this dish. This blog post covered the main ingredients and steps for your dish, alongside tips, variations, and storage info. You learned how to marinate chicken and adjust spices. You saw how to cook under pressure and mix in cream. There are many options for ingredient swaps and flavor changes. Remember, cooking is personal. Enjoy experimenting with your own style. Use leftovers wisely and get creative with them. With what you’ve learned, I’m sure you’ll create something tasty!

Instant Pot Chicken Tikka Masala Easy Family Dinner

Looking for a quick, delicious family dinner? You’ve found it! Instant Pot Chicken Tikka Masala brings rich flavors and tender

For the sweet potato chickpea curry, you'll need: - 2 medium sweet potatoes, peeled and diced - 1 can (15 oz) chickpeas, drained and rinsed - 1 onion, chopped - 3 cloves garlic, minced - 1 inch ginger, grated - 1 can (14 oz) coconut milk - 1 cup vegetable broth - 2 tablespoons red curry paste - 1 teaspoon ground cumin - 1 teaspoon turmeric - 1 tablespoon olive oil - Salt and pepper to taste - Fresh cilantro, chopped (for garnish) - Lime wedges (for serving) These ingredients create a rich and creamy curry with a nice balance of flavors. If you need to make changes, here are some simple swaps: - Sweet Potatoes: Use butternut squash or carrots for a similar texture. - Chickpeas: Substitute with lentils or black beans for a different protein. - Coconut Milk: Almond milk or oat milk can work, but they will change the flavor. - Red Curry Paste: Try yellow curry paste for a milder taste. These options make the dish versatile for various diets. When picking sweet potatoes and other veggies, follow these tips: - Sweet Potatoes: Look for smooth, firm skin without bruises. They should feel heavy for their size. - Onions: Choose onions that are dry and have no soft spots. - Garlic: Pick bulbs that are firm and dry. Avoid any that show signs of sprouting. - Ginger: Select ginger that is firm and smooth. The fresher, the better. Fresh produce enhances the flavor and nutrition of your curry. Enjoy the cooking process! To start, gather your ingredients. You need sweet potatoes, chickpeas, onion, garlic, ginger, coconut milk, vegetable broth, and spices. Once you have everything, peel and dice the sweet potatoes. Then, chop the onion and mince the garlic. Grating the ginger adds a nice zing. Next, heat olive oil in a large pot over medium heat. Add the chopped onion and sauté for about 5 minutes. The onion should turn soft and shiny. After that, stir in the minced garlic and grated ginger. Cook for about 2 minutes until you smell the lovely aroma. Now, toss in the diced sweet potatoes. Add the red curry paste, cumin, and turmeric. Stir everything well. This step allows the sweet potatoes to soak up the spices. Cook for 3-4 minutes, stirring often. Then, pour in the coconut milk and vegetable broth. Bring this mix to a simmer. Let it cook for 15-20 minutes. The sweet potatoes should become tender. After the sweet potatoes are soft, add the drained chickpeas. Cook for another 5 minutes to heat them through. Season with salt and pepper to your taste. Finally, remove the pot from the heat. Let it sit for a few minutes to thicken up. Using fresh ingredients makes a big difference. Fresh herbs, like cilantro, bring bright flavors. Always sauté your onions first; this builds a strong base for your dish. When you add spices, cook them briefly. This releases their oils and boosts their taste. The coconut milk adds creaminess, while the vegetable broth enhances the overall flavor. Don’t forget to taste along the way. Adjust the spices to your liking. If you want more heat, add extra curry paste. The key to a great curry is the right thickness. If your curry is too thin, let it simmer longer. This will help it reduce and thicken. If it’s too thick, add a bit more vegetable broth or coconut milk. Stir well and let it heat through. For a silky texture, mash a few sweet potatoes in the pot. This will make the curry creamier without needing extra cream. Remember, letting the curry rest for a short while helps it set up nicely. Serve it hot, garnished with fresh cilantro and lime wedges for a pop of color and flavor. For the complete recipe, check out the Full Recipe. To make your sweet potato chickpea curry even tastier, try these tips: - Add fresh herbs: Fresh cilantro or parsley adds brightness and flavor. - Use lime juice: A squeeze of lime at the end lifts the dish. - Experiment with spices: Add a pinch of cayenne for heat or some garam masala for more depth. - Include a dash of soy sauce: This adds a nice umami flavor to the mix. These small changes can really make your dish pop! When cooking sweet potato chickpea curry, avoid these common errors: - Not cutting sweet potatoes evenly: Uniform pieces cook at the same rate. - Skipping the sauté step: Cooking the onion, garlic, and ginger first builds flavor. - Overcooking the chickpeas: They only need a few minutes to heat up. Too long makes them mushy. - Ignoring seasoning: Taste as you go! Adjust salt and pepper for the best result. These tips will help you avoid pitfalls and create a better dish. Having the right tools can make cooking easier. Here’s what you need: - Large pot: A sturdy pot helps in even cooking and stirring. - Wooden spoon: This will make mixing easy and prevents scratching your pot. - Sharp knife: A good knife makes chopping sweet potatoes and onions quick and safe. - Cutting board: A solid board provides a safe space to prepare your ingredients. With these tools, you’ll be ready to make a delicious sweet potato chickpea curry. For the full recipe, check out the details above! {{image_2}} You can easily add more veggies to your sweet potato chickpea curry. Think about adding spinach, bell peppers, or carrots. Chopped spinach adds bright color and extra nutrients. Bell peppers give a nice crunch. Carrots add a sweet touch that pairs well with the curry. Simply chop them and add during cooking. This way, they soften but keep some texture. If you want to boost protein, try adding tofu or tempeh. Both are great plant-based options. Cube firm tofu and sauté it with the onions. Tempeh can add a nutty flavor. You can also use cooked lentils for a quick protein fix. If you want meat, chicken or shrimp works well too. Just cook them first, then add to the curry. Adjust the spice level to fit your taste. For a spicy curry, add more red curry paste or a pinch of cayenne pepper. If you prefer mild, use less curry paste. You can also add a dollop of yogurt as a cooling agent. This helps balance the heat and adds creaminess. Remember, you can always serve hot sauce on the side for those who want more heat. For more tips and to see the complete dish, check out the Full Recipe. Store your sweet potato chickpea curry in an airtight container. Let it cool to room temperature first. Then, place it in the fridge. It will stay fresh for up to four days. Label the container with the date for easy tracking. If you want to keep it longer, consider freezing it. To reheat the curry, heat it on the stove over low heat. Stir it often to avoid burning. You can also use a microwave. Place the curry in a microwave-safe bowl. Cover it loosely and heat in short bursts, stirring in between. This keeps the flavors fresh and the texture nice. Freezing is a great option if you have extra curry. Portion the curry into freezer-safe containers. Leave some space at the top for expansion. It can stay frozen for up to three months. When you’re ready to eat it, thaw it in the fridge overnight. Reheat it on the stove or in the microwave as needed. Enjoy the deliciousness again! You can find the full recipe above for more details. Yes, you can use fresh chickpeas. They need cooking first. Soak them overnight and boil them until tender. This takes about 1 to 2 hours. Using fresh gives a nice texture. However, canned chickpeas are quick and easy. They save time, which is great for busy days. Absolutely! Sweet potato chickpea curry is perfect for meal prep. It keeps well in the fridge. You can make a big batch and store it. Just divide it into containers. This dish tastes great even after a few days. It also freezes well, making it a smart choice for quick meals. In the fridge, it lasts about 4 to 5 days. Be sure to store it in an airtight container. This keeps it fresh and flavorful. If you notice any signs of spoilage, toss it out. Enjoy it warm for best taste. Check out the Full Recipe for more details on making this dish! This blog post covered all you need to know about making sweet potato chickpea curry. We discussed ingredients, cooking steps, and storage tips. You learned how to choose fresh produce and avoid common mistakes. Variations showed how to customize flavors and add protein. Proper storage methods will help keep your leftovers tasty. Cooking can be fun and rewarding. With these tips, you can enjoy a delicious meal anytime. Let your creativity shine as you explore this dish!

Sweet Potato Chickpea Curry Flavorful and Simple Dish

If you’re looking for a dish that’s both easy to make and packed with flavor, you’ve found it! Sweet Potato

To make these mini grilled cheese sandwiches, you need a few key ingredients. Here’s what you’ll need: - 8 slices of sourdough bread - 4 slices of sharp cheddar cheese - 4 slices of mozzarella cheese These ingredients are the base of your sandwiches. The sourdough gives a nice crunch, while the cheeses add creamy goodness. You can boost the flavor with some optional ingredients. Consider adding: - 1 ripe avocado, sliced - 1 small jalapeño, thinly sliced (for heat) - Fresh basil leaves (for garnish) - Salt and pepper to taste Avocado adds creaminess and jalapeño adds a kick. Fresh basil brightens the flavors. You can mix and match bread and cheese for your mini sandwiches. While I love sourdough, you can try: - Whole grain bread for a nutty taste - Brioche for a sweet touch For cheese, consider: - Gouda for a smoky flavor - Pepper jack for extra spice These options can help you find your perfect grilled cheese combo. For the full recipe, check the details above. Start by gathering all your ingredients. You will need: - 8 slices of sourdough bread - 4 slices of sharp cheddar cheese - 4 slices of mozzarella cheese - 1 ripe avocado, sliced - 1 small jalapeño, thinly sliced (optional for heat) - 1 tablespoon garlic butter - Fresh basil leaves (for garnish) - Salt and pepper to taste First, prepare your garlic butter. Just mix one tablespoon of softened butter with one clove of minced garlic. This adds a nice flavor to your sandwiches. Now it’s time to build your mini grilled cheese sandwiches. Spread a thin layer of garlic butter on one side of each slice of sourdough. This helps create a crispy crust. On the unbuttered side of four slices, layer one slice of sharp cheddar cheese. Then, add one slice of mozzarella cheese. For extra flavor, place 2-3 slices of avocado on top. If you like heat, add a few jalapeño slices. Finish by topping each with another slice of bread, ensuring the buttered side faces out. Next, heat a skillet or griddle over medium heat. Place the assembled sandwiches on the skillet. Grill for about 3-4 minutes, or until the bread turns golden brown and the cheese begins to melt. Carefully flip each sandwich over. Cook for another 3-4 minutes on this side. Once done, remove them from the skillet and let them cool for a minute. Finally, cut each sandwich in half. Add a pinch of salt and pepper. Don’t forget to garnish with fresh basil leaves before serving. Enjoy this quick and easy treat! For the full recipe, check out the instructions above. To get that nice crunch, use enough garlic butter on the bread. Spread it thick, but not too thick. Heat your skillet to medium, not high. If it’s too hot, the bread will burn before the cheese melts. Grill each side for about 3-4 minutes. Watch for that golden color, as it means you are on the right track! Think beyond cheese! Avocado adds creaminess. Jalapeños give a spicy kick. You can also try adding tomato slices or crispy bacon. Fresh herbs like basil or cilantro can brighten up the flavor too. Pair your mini sandwiches with marinara sauce or aioli for dipping. This adds a fun twist that everyone will love! If you don’t have a skillet, don’t worry! You can use a griddle or even a panini press. A toaster oven works well too, but keep an eye on the time. Each method has its own charm and can get the job done. Just remember, the key is to keep the heat steady for that perfect melt! {{image_2}} You can use a variety of cheeses for mini grilled cheese sandwiches. Each cheese brings its own flavor. Try gouda for a smoky taste or pepper jack for a spicy kick. Swiss cheese adds a nice nutty touch. Mixing different cheeses can create a fun flavor profile. Add-ins make these sandwiches even more exciting. You can include sliced turkey or ham for protein. Fresh spinach or arugula adds a hint of green. Tomatoes or roasted peppers give a burst of flavor. Use your favorite ingredients to create your perfect blend. You can easily make vegan mini grilled cheese sandwiches. Use dairy-free cheese made from nuts or soy. Spread avocado instead of butter for richness. Whole grain bread or gluten-free bread works well too. This way, everyone can enjoy this tasty treat. For the full recipe, check out the details above. To store leftover mini grilled cheese sandwiches, let them cool first. Then, place them in an airtight container. You can keep them in the fridge for up to three days. This keeps them fresh and ready to eat. To reheat your sandwiches, use a skillet. Heat it over medium-low heat. Place the sandwiches in the skillet and cover with a lid. This helps the cheese melt well. Heat for about 2-3 minutes on each side. You can also use a microwave, but it may make the bread soft, not crispy. If you want to save some sandwiches for later, freezing works well. Wrap each sandwich in plastic wrap and then in foil. This will protect them from freezer burn. You can freeze them for up to a month. When ready to eat, thaw in the fridge overnight, then reheat as described above. Enjoy your mini grilled cheese sandwiches anytime! Check out the Full Recipe for more details. You can use many cheeses for grilled cheese. Some good choices are gouda, swiss, and provolone. Each cheese adds its own unique flavor. Mixing cheeses can create a fun taste. For example, try combining cheddar and pepper jack for a spicy twist. Yes, you can use whole-grain bread. It gives a different taste and texture. Whole-grain bread adds fiber, making it a healthier choice. Just remember, the cooking time may change slightly. Keep an eye on it while grilling. To make mini grilled cheese in the oven, preheat your oven to 375°F. Assemble your sandwiches on a baking sheet. Brush the tops with garlic butter. Bake for about 10 minutes, flipping halfway through. This method makes them crispy and golden brown. Absolutely! You can add many fun ingredients. Try adding cooked bacon, sliced tomatoes, or even spinach. These add flavor and nutrition. Be creative with what you have at home! You will know they are done when they are golden brown and the cheese is melted. You can also check by pressing gently on the sandwich. It should feel warm and soft inside. You can prepare the sandwiches ahead. Just keep them in the fridge for a few hours. When ready to eat, grill them as usual. They will still taste great! For the full recipe, check out the details in the article. Enjoy your cooking! Mini grilled cheese sandwiches are fun and easy to make. We discussed the best ingredients and how to make them crispy. I shared tips for flavor and storage, so you can enjoy them later. You can try different cheeses, add meats or veggies, or even go vegan. These little sandwiches are great for parties or snacks. With these steps, you will impress your friends and family. Get creative and make your own tasty versions!

Mini Grilled Cheese Sandwiches Quick and Easy Treat

Craving a warm, gooey snack? Look no further than mini grilled cheese sandwiches! They are a quick and easy treat,

Older posts
Newer posts
← Previous Page1 … Page40 Page41 Page42 … Page55 Next →

dsad

© 2025 Lisa Dishes • Built with GeneratePress

Our Policies

  • Copyright Policy
  • Cookie Policy
  • GDPR Policy
  • Privacy Policy
  • Disclaimer
  • Terms Of Use

More Information

  • Home
  • About
  • Contact
  • Appetizers
  • Dessert
  • Dinner
  • Drinks
©2025, Lisa Dishes About Back To Top