![- 4 large bell peppers (any color) - 1 cup cooked quinoa - 1 cup black beans, rinsed and drained - 1 cup corn kernels (fresh, frozen, or canned) - 1 cup diced tomatoes (canned or fresh) - 1 teaspoon ground cumin - 1 teaspoon chili powder - ½ teaspoon garlic powder - 1 cup shredded cheddar cheese (plus extra for topping) - ¼ cup chopped fresh cilantro (optional) - Salt and pepper to taste - Olive oil for drizzling These ingredients make cheesy stuffed bell peppers both tasty and healthy. The bell peppers are colorful and fun to eat. Quinoa adds protein and fiber, making this dish filling. Black beans bring extra protein and a nice texture. Corn kernels sweeten the mix, while tomatoes add moisture and flavor. Spices like cumin and chili powder kick up the flavor. Garlic powder gives it a nice aroma. Cheddar cheese makes it cheesy and rich. You can sprinkle some fresh cilantro on top for a fresh taste. Use olive oil to help the peppers cook and brown nicely. Each stuffed pepper has about 300 calories. It has 15 grams of protein, 45 grams of carbs, and 10 grams of fat. Key ingredients offer great health benefits: - Bell Peppers: High in vitamin C and antioxidants. - Quinoa: A complete protein with all nine essential amino acids. - Black Beans: Good source of fiber and protein. - Corn: Adds vitamins and minerals, plus a bit of sweetness. - Cheddar Cheese: Provides calcium and protein. You can find the full recipe in the article. Enjoy cooking! 1. Preheat your oven to 375°F (190°C). This ensures even cooking for our stuffed peppers. 2. Cut the tops off the bell peppers. Remove the seeds and membranes. You want them clean and ready for stuffing. 3. Brush the outside of each pepper with olive oil. This helps them roast nicely in the oven. 4. Place the peppers upright in a baking dish. This keeps them stable while they cook. 1. In a large bowl, mix together the filling ingredients: cooked quinoa, black beans, corn, diced tomatoes, ground cumin, chili powder, garlic powder, and half of the shredded cheddar cheese. Stir until everything is well combined. 2. Season the mixture with salt and pepper. Taste it to make sure the flavors pop! 3. Stuff each bell pepper with the quinoa mixture. Press down lightly to pack it in. Fill them generously for a hearty meal. 4. Top each stuffed pepper with the remaining cheddar cheese. This will melt beautifully and add flavor. 1. Cover the baking dish with aluminum foil. This traps steam and helps the peppers cook through. 2. Bake for 25 minutes. This softens the peppers and warms the filling. 3. Remove the foil and bake for an additional 10-15 minutes. You want the cheese to melt and bubble. 4. Once done, take them out of the oven and let cool for a few minutes. This makes serving easier and safer. For the full recipe, refer to the [Full Recipe]. To bring out the best in your cheesy stuffed bell peppers, use fresh herbs and spices. I love adding a pinch of smoked paprika for a subtle smokiness. You can also try oregano or thyme for extra depth. Always season your mix with salt and pepper. Taste as you go. This simple step helps ensure every bite is packed with flavor. Baking is key for even cooking. Preheat your oven to 375°F (190°C) for the best results. Place the stuffed peppers upright in a baking dish, allowing them to cook evenly. Cover the dish with foil for the first part of baking. This traps steam and helps the peppers get tender. After 25 minutes, remove the foil to let the cheese get bubbly and golden. To make your dish shine, garnish with fresh cilantro or parsley. A dollop of sour cream or a slice of avocado adds color and creaminess. Serve the peppers on a colorful plate to make them pop. Pair them with a simple side salad or some crusty bread. This balance makes for a delightful meal. {{image_2}} You can change the protein in cheesy stuffed bell peppers to fit your taste. Use ground turkey, chicken, or beef for a meaty twist. Each option adds a unique flavor to the peppers. If you want to go meat-free, try black beans, lentils, or chopped mushrooms. These choices keep the dish hearty and satisfying for everyone. Cheese is the star here, but you can mix it up. Cheddar is great, but try pepper jack for a spicy kick. Mozzarella gives a creamy texture. You can also add more flavor with herbs like oregano or basil. Want more crunch? Add diced bell peppers, corn, or even cooked grains like rice or farro for extra texture and taste. If you need gluten-free options, this recipe is naturally safe. Just make sure your ingredients, like the beans and corn, are gluten-free. For those on low-carb or keto diets, swap quinoa for cauliflower rice. This change keeps the dish light while still being full of flavor. You can enjoy cheesy stuffed bell peppers without worry about your diet. Check out the Full Recipe for more ideas! To store leftovers, let the stuffed peppers cool first. Place them in an airtight container. They will last for up to four days in the fridge. When you’re ready to eat, reheat them in the oven or microwave. Use a microwave-safe dish and cover with a damp paper towel to keep them moist. If reheating in the oven, set it to 350°F and heat for about 15-20 minutes. Freezing stuffed peppers is easy. First, let them cool completely. Wrap each pepper tightly in plastic wrap or foil. Place them in a freezer-safe bag or container. They can stay frozen for up to three months. To thaw, move them to the fridge overnight. For reheating, bake them at 375°F for about 30-35 minutes, or until hot. You can make these cheesy stuffed bell peppers ahead of time. Prepare the filling and stuff the peppers, then store them in the fridge for up to two days. This makes busy days easier. For portioning, cut the peppers in half if you want smaller servings. This way, you can have quick meals ready to go. To spice up your cheesy stuffed bell peppers, add diced jalapeños or chopped serrano peppers. You can also mix in hot sauce or crushed red pepper flakes into the filling. This will give your dish a nice kick without overpowering the other flavors. Don't be shy; taste as you go to find the heat level you like best! Yes, you can use many types of cheese! Try Monterey Jack for a creamy texture or pepper jack for extra spice. If you want a sharp flavor, go for aged cheddar or even feta for a tangy twist. Mixing two or more cheeses can create a rich experience that elevates your meal. The best way to reheat cheesy stuffed bell peppers is in the oven. Preheat your oven to 350°F (175°C). Place the stuffed peppers in a baking dish and cover with foil to keep them moist. Bake for about 20 minutes or until they are heated through. You can also microwave them, but the oven gives better results. Absolutely! Brown rice makes a great substitute for quinoa. You can also use farro, barley, or even couscous. Each grain will add a unique flavor and texture to the dish. Just make sure to cook the grain first before mixing it with the other ingredients. If you bake stuffed peppers at 400°F (200°C), they usually take about 25 to 30 minutes. Keep an eye on them to ensure they get tender and the cheese melts perfectly. If you like a crispier texture, leave them in for an extra 5 minutes with the foil off. For the full recipe, check out the earlier section! These stuffed bell peppers offer a healthy and tasty meal option. We covered the ingredients, preparation steps, and helpful tips to enhance flavor. I shared variations to suit different diets and how to store leftovers. Remember, these peppers are versatile. You can easily adjust them to fit your taste. In conclusion, stuffed bell peppers are simple to make and full of flavor. Give them a try and enjoy a healthy meal. You'll love how great they taste and how easy they are to prepare.](https://lisadishes.com/wp-content/uploads/2025/05/12f2af8c-30c2-43ec-b748-ad7f52256eb0.webp)
Cheesy Stuffed Bell Peppers Flavorful and Simple Recipe
Get ready to impress your taste buds with my flavorful and simple recipe for cheesy stuffed bell peppers! These vibrant
Get ready to impress your taste buds with my flavorful and simple recipe for cheesy stuffed bell peppers! These vibrant

If you love the rich taste of peanut butter and the sweetness of chocolate, you’re in for a treat! This
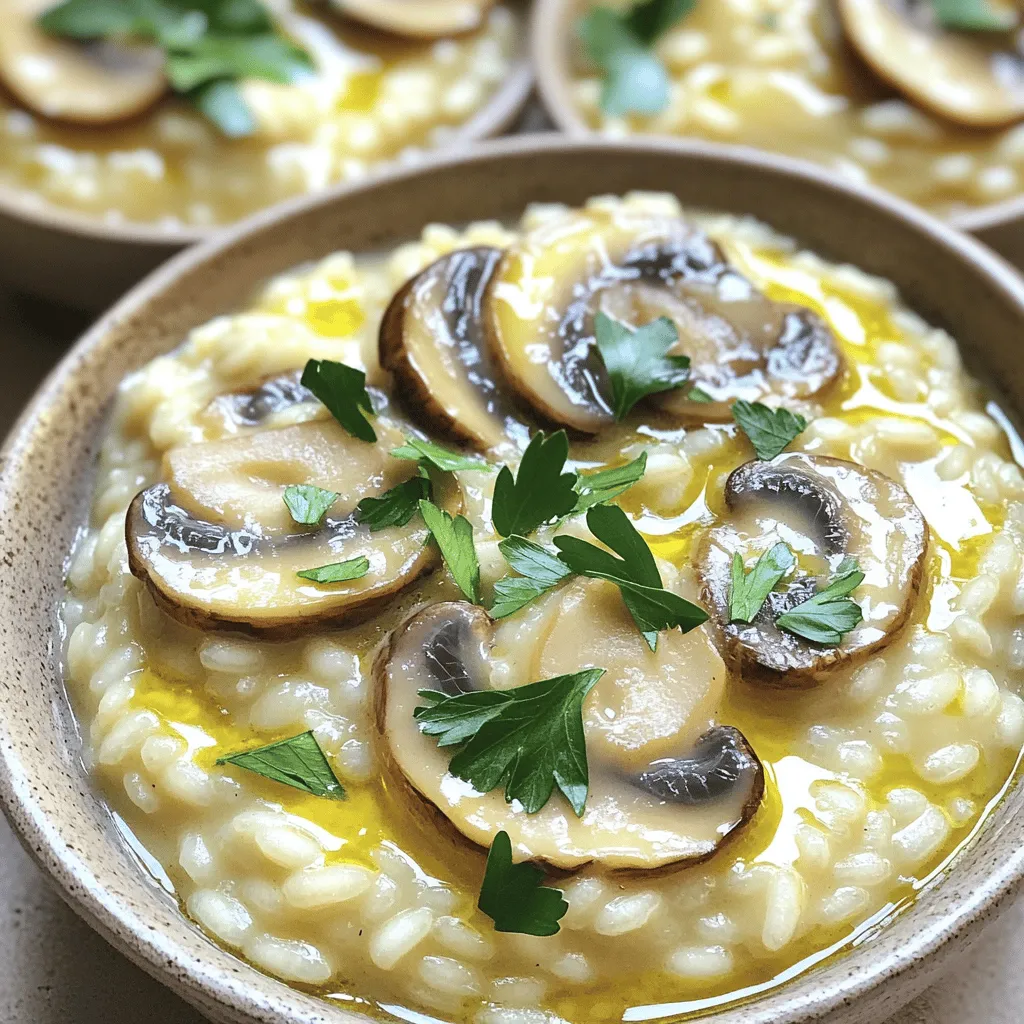
Welcome to a culinary adventure! Today, we dive into the world of creamy mushroom risotto. This dish combines creamy textures
![- 1 lb shrimp, peeled and deveined - 3 tablespoons olive oil - 4 cloves garlic, minced - Chili powder - Paprika - Cumin - Cayenne pepper - Salt and pepper to taste - Juice of 1 lime - 8 small corn or flour tortillas - Shredded cabbage - Diced tomatoes - Chopped fresh cilantro - Sour cream or Greek yogurt (optional) In spicy garlic shrimp tacos, fresh ingredients make all the difference. Start with shrimp. I prefer medium-sized shrimp. They cook quickly and pack a lot of flavor. Peel and devein them for a clean bite. Next, olive oil is key. It helps the shrimp sear well and adds taste. Garlic adds a punch. Use fresh garlic for the best flavor. You can mince it finely or use a garlic press. For seasoning, chili powder, paprika, cumin, and cayenne pepper give a nice kick. Adjust the cayenne to your heat level. Don't forget salt and pepper; they enhance all the flavors. Squeeze a fresh lime over the shrimp at the end. It brings brightness to your dish. Now, think about the tortillas. I love small corn or flour tortillas. They hold the shrimp and toppings well. For toppings, use shredded cabbage for crunch. Diced tomatoes add juiciness, and cilantro brings a fresh taste. If you like creaminess, add sour cream or Greek yogurt. For the full recipe, check the details above. Enjoy the burst of flavors in each bite! - In a bowl, combine the shrimp with olive oil and seasonings. - Toss well until the shrimp are coated. - Let the shrimp sit for a few minutes for optimal flavor. - Heat a skillet over medium-high heat. - Add the seasoned shrimp to the hot skillet in a single layer. - Cook for about 2-3 minutes on each side. - The shrimp should turn pink and opaque. - Squeeze lime juice over the shrimp while they cook. - Warm tortillas in a separate dry skillet for 20-30 seconds on each side. - Lay a generous amount of shredded cabbage on each tortilla. - Top with the spicy garlic shrimp, diced tomatoes, and chopped cilantro. - If you like, add sour cream or Greek yogurt on top. - Serve with lime wedges for added zing. For the complete recipe, refer to the [Full Recipe]. To cook shrimp perfectly, aim for 2-3 minutes on each side. They should be pink and opaque. Overcooking makes them tough. If you like more heat, add extra cayenne pepper. If you prefer milder flavors, cut back on it. You can also swap spices to fit your taste. Warm tortillas bring out the best in your tacos. Heat them in a dry skillet for 20-30 seconds on each side. This makes them soft and pliable. You can choose between corn or flour tortillas. Corn adds a nice flavor, while flour is softer. Try both to find your favorite! Serve your tacos with sides like rice or beans for a full meal. A fresh salad pairs well too. For garnishes, add lime wedges, cilantro, or diced avocado. These add a splash of color and flavor. They make your tacos look great and taste even better! For the full recipe, check out the instructions provided earlier. {{image_2}} You can swap shrimp for other proteins. Fish works well, too. Try using white fish like tilapia or cod. Chicken is another great choice. Just grill or sauté it with the same spices. For a vegetarian meal, use black beans or mushrooms. Both add great texture and flavor to your tacos. Adding fruits can take your tacos to the next level. Mango adds a sweet touch that pairs well with shrimp. Avocado also brings creaminess and richness. You can mix in different sauces or salsas, like mango salsa or a spicy chipotle sauce. These additions bring freshness and a kick of flavor. If you need a gluten-free choice, use gluten-free tortillas. They hold up well and taste great. You can also add toppings like crunchy radishes or fresh jalapeños for extra texture. These toppings add a nice crunch and boost the flavor profile of your tacos. For the full recipe, refer to the complete guide above. To keep your cooked shrimp fresh, place them in an airtight container. This method prevents moisture loss and keeps them tasty. Store the shrimp in the fridge for up to three days. After that, they may lose their flavor and texture. Always check for any off smells before using leftover shrimp. For the toppings, store them separately. Use small containers to keep the shredded cabbage, diced tomatoes, and cilantro fresh. This way, they stay crisp and ready to use. When you want to enjoy your tacos again, reassemble them just before eating. Warm the tortillas slightly for the best experience. Yes, you can freeze cooked shrimp! Place them in a freezer-safe bag, removing as much air as possible. They can stay frozen for up to three months. For tortillas, wrap them in foil or wax paper and then place them in a freezer bag. You can also freeze toppings like shredded cabbage. Just thaw everything in the fridge before using. For a detailed recipe, check the Full Recipe for Spicy Garlic Shrimp Tacos. You can serve a variety of sides with spicy garlic shrimp tacos. Here are some great options: - Mexican rice - Black beans - Corn on the cob - Grilled veggies - Fresh guacamole - Salsa or pico de gallo - Chilled drinks like limeade or a light beer These sides add color and flavor. They also make your meal feel complete and festive. To lower the heat in your shrimp tacos, you can make a few simple changes: - Reduce the cayenne pepper to ¼ teaspoon or omit it. - Add more olive oil to tone down the spice. - Include a mild sauce or yogurt to balance flavors. These adjustments keep the meal tasty without overwhelming your palate. Yes, you can make these tacos ahead of time. Here are some tips: - Cook the shrimp and store it in the fridge for up to two days. - Prepare toppings like cabbage and tomatoes early. Keep them in airtight containers. - Warm tortillas just before serving for the best texture. This way, you can enjoy a delicious meal with less stress. For the full recipe, check out the details above. Spicy Garlic Shrimp Tacos are a treat packed with bold flavors and easy steps. Start with fresh shrimp and vibrant spices for a delightful meal. You learned to marinate and cook shrimp perfectly, plus tips for warming tortillas and assembling tasty tacos. Try different proteins and toppings to keep it fun. Store leftovers wisely for future meals. Enjoy your cooking, and share these tacos with friends!](https://lisadishes.com/wp-content/uploads/2025/05/babfcd82-150e-47e1-9ddb-a5b21c640193.webp)
Get ready to spice up your taco night with my delicious Spicy Garlic Shrimp Tacos! These easy-to-make tacos pack a
. Using fresh strawberries makes a big difference in taste. Make sure to choose ripe and juicy berries for the best flavor. You can also adjust the sugar based on how sweet your strawberries are. Enjoy gathering these ingredients as you prepare for a fun cooking experience! - First, slice 2 cups of fresh strawberries. - Add 1 tablespoon of sugar to the strawberries. - Toss them gently to coat in the sugar. - Set the bowl aside for 15 minutes. - This lets the strawberries macerate, which brings out their natural juices. - In a clean bowl, pour in 1 cup of heavy whipping cream. - Use an electric mixer to whip the cream. - Beat it until you see stiff peaks form. - This should take about 4 to 5 minutes. - In another bowl, beat 8 ounces of softened cream cheese. - Add the remaining 1 tablespoon of sugar and 1 cup of powdered sugar. - Mix in 1 teaspoon of vanilla extract. - Beat until the mixture is smooth and creamy. - Gently fold in the whipped cream until combined. - Start with a layer of crushed graham crackers. - Follow this with a layer of the cream cheese mixture. - Next, add a layer of the macerated strawberries. - Repeat these layers until you finish your ingredients. - End with a layer of strawberries on top. - Chill the assembled shortcake in the refrigerator. - Let it sit for at least 1 hour. - This helps the flavors blend and the texture set. - Before serving, add fresh mint leaves for a lovely touch. To see the full process, check the Full Recipe! - Use clear glasses for visual appeal. - Show off the layers of strawberries and cream. - Add fresh mint leaves on top for a pop of color. - Drizzle some sauce or syrup around the plate for flair. - Ensure strawberries are fresh for the best taste. - Choose ripe, sweet berries for maximum flavor. - Adjust sugar levels based on berry sweetness. - Taste the strawberries first to decide how much sugar to add. - Use a hand mixer or stand mixer for whipping cream. - A large mixing bowl helps mix the cream cheese and sugar well. - Clear serving containers let guests see the dessert layers. - Individual cups or jars work great for single servings. For the complete list of ingredients and steps, check out the Full Recipe. {{image_2}} You can easily change the flavor of your no-bake strawberry shortcake. - Add lemon zest for a fresh, zesty kick. - Substitute strawberries with blueberries, raspberries, or blackberries for a fruit twist. These swaps keep the dessert fun and exciting. You can mix and match flavors based on the season or your mood. The base of your shortcake can vary too. - Use crushed digestive biscuits instead of graham crackers. This gives a richer taste. - Try homemade sponge cake layers for a delightful texture. These alternatives can bring a unique twist while keeping the dessert easy to prepare. Dietary needs can change how we make recipes. - Make it gluten-free by using gluten-free crackers. This way, everyone can enjoy it. - Use low-fat cream cheese for a lighter version that still tastes great. These modifications help accommodate different diets without losing flavor. You can enjoy this treat while being mindful of your health! To keep your no-bake strawberry shortcake fresh, store leftovers in the fridge. Use an airtight container to prevent odors from other foods. The shortcake stays tasty for about three days. However, the texture may change if left too long. You can freeze the assembled shortcake for up to a month. Wrap it tightly in plastic wrap, then place it in a freezer-safe container. This helps keep the layers intact. When you're ready to enjoy it, defrost the shortcake in the fridge overnight. Avoid using a microwave, as it can alter the texture. Let it sit at room temperature for about 30 minutes before serving. This way, you can enjoy that creamy, delicious flavor just like when it was fresh. No-Bake Strawberry Shortcake lasts for about 3 days when stored in the fridge. Make sure to keep it covered. This helps keep it fresh and tasty. The flavors will blend nicely, giving you a delightful dessert each time you serve it. Yes, you can make this dessert ahead of time. It’s best to prepare it at least 1 hour before serving. This allows the layers to set and flavors to meld. You can keep it in the fridge for up to 3 days. Just remember to cover it well to prevent drying out. You can use many other fruits in this recipe. Here are some great options: - Blueberries - Raspberries - Peaches - Bananas Feel free to mix and match your favorite fruits. Just be sure to adjust the sugar to fit the sweetness of the fruit you choose. This no-bake strawberry shortcake combines fresh strawberries, creamy layers, and crunchy graham crackers. You learned how to prep the strawberries, whip the cream, make the cream cheese mix, and assemble the dessert. I shared tips for presentation, texture, and flavor. There are variations for different tastes and dietary needs. Lastly, you discovered how to store leftovers correctly. Enjoy making this simple, tasty treat. It’s a delicious way to impress family and friends!](https://lisadishes.com/wp-content/uploads/2025/05/d961113d-0439-4de9-8331-830a733de89d.webp)
Are you craving a sweet treat that’s easy and delicious? Look no further! My No-Bake Strawberry Shortcake is a quick
 for Jalapeño Popper Dip. Jalapeño Popper Dip blends creamy flavors with spicy heat, making it a star dish. You learned the main ingredients and flavor enhancers that bring this dip to life. We covered how to prepare, bake, and serve it for the best results. Remember to experiment with variations to suit your taste. This dip is perfect for parties or quiet nights at home. Enjoy making it now, and you'll impress everyone with your skills!](https://lisadishes.com/wp-content/uploads/2025/05/6c6a93e6-cdae-48b6-a926-195b7c075a7c.webp)
Are you ready for a dip that combines creamy goodness with just the right kick? Jalapeño Popper Dip is your
![- 1 cup green or brown lentils, rinsed - 1 medium onion, diced - 2 garlic cloves, minced - 2 medium carrots, diced - 2 celery stalks, diced - 6 cups vegetable broth - 2 cups fresh spinach, roughly chopped When making lentil soup with spinach, the main ingredients bring flavor and nutrition. Lentils are rich in protein and fiber. Onions and garlic add depth to the dish. Carrots and celery bring sweetness and crunch. The vegetable broth enhances the taste, while spinach adds vibrant color and nutrients. - 1 tablespoon olive oil - Juice of 1 lemon - Fresh parsley for garnish You can use olive oil for sautéing to add healthy fats. Lemon juice brightens the soup's flavor. Fresh parsley makes the dish look pretty and adds a fresh taste. - 1 teaspoon ground cumin - 1 teaspoon smoked paprika - Salt and pepper to taste Seasonings make your soup unique. Cumin gives it warmth, while smoked paprika adds a hint of smokiness. Salt and pepper enhance all the flavors. For the full recipe, check out the Full Recipe section. First, heat the olive oil in a large pot over medium heat. Add the diced onion. Sauté it until it turns soft and clear, about 5 minutes. Then, stir in the minced garlic. Cook this mixture for one more minute to release its nice flavor. Next, add the diced carrots and celery. Cook these vegetables for 3 to 4 minutes until they begin to soften. These steps create a great base for your soup. Now, it’s time to add the star of the dish: the lentils. Pour in the rinsed lentils, along with ground cumin, smoked paprika, salt, and pepper. Mix everything well to combine. Next, add the vegetable broth. Bring the soup to a boil, then reduce the heat to a simmer. Cover the pot and let it cook for about 25 to 30 minutes. The lentils should be tender when done. Once the lentils are ready, stir in the chopped spinach and lemon juice. Cook for another 5 minutes until the spinach wilts. The bright green color adds a fresh look. Taste the soup and adjust the seasoning if needed. If you prefer a creamier soup, use an immersion blender. Blend a portion of the soup while leaving some lentils whole for texture. Enjoy your warm and tasty lentil soup with spinach! For the complete recipe, check out the [Full Recipe]. To make your lentil soup taste amazing, use the right spices. My favorites are ground cumin and smoked paprika. They give a warm, rich flavor. You can add black pepper and salt to taste. Fresh herbs like parsley can also brighten the dish. When it comes to broth, homemade always wins. Homemade broth has deep flavor. You can control the salt and ingredients. If you use store-bought, choose low-sodium for better control over taste. Blend the soup when the lentils are soft. This helps create a smooth base. If you want some texture, blend just half. I love using an immersion blender for easy mixing. For a creamier soup, add a splash of cream or coconut milk. It makes a big difference! Pre-rinsing lentils is a must. It helps remove dust and debris. Simply rinse them under cold water until the water runs clear. This step ensures your soup is clean and delicious. Using a pressure cooker can save time. If you are busy, this is perfect. You can cut the cooking time in half. Just follow the same steps, but cook on high pressure for about 10-15 minutes. It’s a game changer! For the full recipe, check out Lentil & Spinach Delight. {{image_2}} You can make your lentil soup even better with extra ingredients. Adding protein sources boosts flavor and nutrition. Consider using chicken or sausage. They add heartiness and taste. If you prefer a lighter option, try cooked quinoa or chickpeas. You can also change the vegetables. Kale or zucchini work well in this soup. They add texture and color. Feel free to mix in your favorites. This flexibility makes the recipe your own. Want to make this soup vegan or vegetarian? Simply skip the meat. Use vegetable broth and add more beans for protein. Tofu is another great option. It soaks up flavors and adds a nice texture. For gluten-free options, check your broth. Most vegetable broths are gluten-free. This soup is naturally gluten-free because it uses lentils. Enjoy it without worry! You can spice things up with different flavor profiles. For a spicy lentil soup, add red pepper flakes or diced jalapeños. This gives it a kick that many people love. You might also want to try Mediterranean-inspired additions. Add olives, sun-dried tomatoes, or feta cheese. These ingredients add a lovely twist to the traditional recipe. They bring bright flavors that make the soup sing. For the full recipe, check out the Lentil & Spinach Delight. Enjoy the mix of flavors and healthy options! To keep your lentil soup fresh, use airtight containers. Glass or plastic containers work great. Fill them with soup, leaving some space at the top. This helps with expansion when freezing. If you plan to eat it soon, refrigerate the soup. Make sure to cover it well. You can store it in the fridge for up to five days. For longer storage, freeze the soup. It can last up to three months in the freezer. When it's time to eat, there are easy ways to reheat your soup. You can use the microwave or a pot on the stove. If using the microwave, heat in short bursts. Stir in between to avoid hot spots. On the stove, warm it over low heat. Stir often and heat until it's hot throughout. After storing, taste your soup and adjust the seasoning. Sometimes, flavors change a bit, so you may need more salt or pepper. How long will lentil soup last in the fridge? Properly stored, your soup will last about five days. If it smells sour or looks off, it's time to toss it. Signs of spoiled lentil soup include strange colors or mold. Always check before eating leftovers to stay safe. Lentils are a powerhouse of nutrition. They are rich in protein, fiber, and iron. This makes them great for heart health and digestion. Spinach adds even more nutrients. It has vitamins A, C, and K, plus iron and calcium. Together, lentils and spinach create a balanced meal. They help keep your energy up and your body strong. Plus, they are low in calories. This makes lentil soup a smart choice for anyone. Yes, you can use canned lentils. They save time and are convenient. If you choose canned, rinse them first to reduce sodium. Use about one and a half cups of canned lentils. Add them near the end of cooking. This keeps them tender and tasty. Dried lentils take longer to cook but have a fresher taste. Both options work well, so pick what suits you best. Lentil soup pairs well with many sides. Here are some ideas: - Crusty bread for dipping - A fresh green salad for crunch - Rice or quinoa for added texture - Grilled cheese for a classic combo - Roasted veggies for extra flavor These sides enhance the soup's taste and make for a complete meal. Enjoy experimenting with different pairings! If you want the full recipe, check out the Lentil & Spinach Delight. Lentil soup with spinach is a simple and healthy meal. You learned key ingredients, steps for preparation, and ways to enhance flavors. Remember, you can adjust the recipe for your taste and dietary needs. Explore variations to keep it exciting. Storing leftovers properly helps maintain freshness. This soup is not only tasty but packed with nutrients. Try it out and enjoy a warm, hearty bowl. You will love how easy it is to make!](https://lisadishes.com/wp-content/uploads/2025/05/9e41fe5a-6a77-40cb-b4d4-28cfdf8f42af.webp)
Are you looking for a healthy yet delicious meal option? Lentil Soup with Spinach checks both boxes! Packed with nutrients,
![To make this Crispy Chickpeas and Spinach Salad, gather these fresh ingredients: - 1 can (15 oz) chickpeas, rinsed and drained - 1 tablespoon olive oil - 1 teaspoon smoked paprika - 1 teaspoon garlic powder - Salt and pepper to taste - 4 cups fresh spinach, washed and dried - 1 cup cherry tomatoes, halved - ½ cucumber, diced - ¼ red onion, thinly sliced - 2 tablespoons lemon juice - 1 tablespoon tahini - 1 tablespoon honey (or maple syrup for a vegan option) - 1 tablespoon water You can switch some ingredients if needed: - Use dried chickpeas instead of canned. Just cook them first. - Swap olive oil for avocado oil for a different flavor. - Try smoked salt if you want a smoky taste without paprika. - For a different green, replace spinach with kale or arugula. - Use any nut butter instead of tahini for the dressing. To make this salad, you will need: - A baking sheet for the chickpeas - A large mixing bowl for the salad - A small bowl for mixing the dressing - A whisk or fork to mix the dressing - Measuring spoons for accurate portions - A paper towel to dry the chickpeas You can find the full recipe to guide you through each step. Start by gathering all your ingredients. You need chickpeas, spinach, olive oil, and spices. Rinse and drain the chickpeas well. Use a paper towel to pat them dry. This step helps them get crispy. Next, wash and dry your spinach. Cut the cherry tomatoes in half. Dice the cucumber and slice the red onion. Set everything aside for later. Preheat your oven to 400°F (200°C). This temperature helps the chickpeas get extra crispy. In a bowl, toss the dried chickpeas with olive oil, smoked paprika, garlic powder, salt, and pepper. Make sure they are coated evenly. Spread the chickpeas on a baking sheet. Bake them for 25 to 30 minutes. Stir them halfway through to cook evenly. They should be golden brown and crunchy when done. While the chickpeas bake, prepare the dressing. In a small bowl, mix lemon juice, tahini, honey, and water. Whisk until smooth. If it’s too thick, add more water. In a large bowl, combine the spinach, cherry tomatoes, cucumber, and red onion. Drizzle the dressing over the salad. Toss gently to coat everything well. Once the chickpeas are ready, let them cool for a few minutes. Add them to the salad and toss again. Serve this delicious dish warm for the best flavor. For the full recipe, check out Crispy Chickpeas & Spinach Delight. To get crispy chickpeas, start by drying them. Use a paper towel to remove all moisture. This step is key. The drier the chickpeas, the crispier they will get. Toss them with olive oil and spices. I love using smoked paprika and garlic powder. Spread them on a baking sheet in a single layer. Bake at 400°F for 25-30 minutes. Stir halfway to ensure they cook evenly. Keep an eye on them. You want them golden brown and crunchy. For a great dressing, mix lemon juice, tahini, honey, and water. Whisk until smooth. If it’s too thick, add a bit more water. Don't forget to season with salt. This dressing adds bright flavor to the salad. You can also add herbs like parsley or dill for extra taste. If you want a kick, try adding a pinch of cayenne pepper. Serve this salad right away for the best texture. The warm chickpeas add a nice crunch. You can add more toppings, like feta cheese or avocado. This salad also pairs well with grilled chicken or shrimp. If you want a heartier meal, serve it with quinoa or brown rice. For a fun touch, use different colored cherry tomatoes. They make the salad look beautiful. Find the full recipe to explore more tasty ideas! {{image_2}} You can easily boost the protein in this salad. Try adding grilled chicken or shrimp for extra flavor. For a vegetarian option, add hard-boiled eggs or feta cheese. These additions make the salad heartier and more filling. Just remember to adjust the dressing if needed. This salad is naturally vegetarian and can be made vegan. Use maple syrup instead of honey for the dressing. You can skip the cheese or choose a plant-based cheese to keep it vegan. These small swaps let everyone enjoy this dish. Feel free to change ingredients based on the seasons. In summer, add fresh corn or bell peppers for a sweet crunch. In fall, diced apples or roasted squash can add warmth. These swaps keep the salad fresh and exciting all year long. For the full recipe, check out the [Full Recipe] section. You can store any leftover salad in the fridge. Place it in a bowl and cover it tightly. The crispy chickpeas will lose some crunch over time, so try to enjoy the salad within two days. Keep the dressing separate if you want the salad fresh for longer. Use glass or plastic containers with tight-fitting lids for best results. These containers keep the salad fresh and are easy to stack in the fridge. If you have a lot of salad, divide it into smaller portions. This way, you can grab a quick meal when you're hungry. To bring back the crunch, reheat the chickpeas in the oven. Preheat to 375°F (190°C). Spread the chickpeas on a baking sheet and heat for about 5-10 minutes. Keep an eye on them to avoid burning. You want them warm and crispy again. Enjoy them with your salad for the best taste! Yes, you can make this salad ahead of time. You can prep the veggies and dressing a day before. Store them in separate containers. Mix them just before serving to keep the spinach fresh. For extra crunch, consider adding nuts or seeds. Almonds, walnuts, or sunflower seeds work great. You can also use crispy tortilla strips or croutons for added texture. To keep your chickpeas crispy, dry them well before cooking. Remove all moisture. Roast them at a high heat for the best crunch. Store any leftovers in an open container to keep them from getting soggy. Yes, you can use canned spinach, but fresh is best for taste. If using canned, drain and rinse it well. Squeeze out excess moisture to avoid sogginess in the salad. For the best flavor, use the full recipe for fresh ingredients. You now have all the details to create a great salad. We covered ingredients, important tools, and step-by-step instructions. Remember to keep those chickpeas crispy for best taste. Use the tips for flavor and serving ideas. Feel free to try different proteins and seasonal swaps to make it your own. Store leftovers correctly, and enjoy even later. This salad is simple and tasty, perfect for any meal. Enjoy making it!](https://lisadishes.com/wp-content/uploads/2025/05/40322c7c-5355-454c-9e56-561a7f6f67f6.webp)
Are you ready for a salad that shines? This Crispy Chickpeas and Spinach Salad is fresh, healthy, and full of
![- Chicken: 4 boneless, skinless chicken breasts - Marinade: 1/4 cup olive oil, 2 lemons (juice and zest), 4 cloves garlic, minced - Fresh Herbs: 1 tablespoon each of rosemary, thyme, and parsley - Seasoning: Salt and pepper to taste - Garnish: Lemon slices and herb sprigs When I make Lemon Herb Grilled Chicken, I love using fresh ingredients. They make a big difference in taste. I choose boneless, skinless chicken breasts. They cook evenly and stay juicy. The marinade is the key. It blends olive oil, lemon juice, zest, garlic, and herbs. This mix makes the chicken flavorful. I prefer using fresh herbs like rosemary, thyme, and parsley. They add bright flavors to the dish. It is so easy to chop them up. You can use dried herbs, but fresh ones give a better taste. Don't forget the salt and pepper! They enhance the flavors of the chicken. I suggest using a good quality olive oil. It adds richness to the marinade. For a beautiful finish, I like to garnish the chicken with lemon slices and herb sprigs. It makes the plate look lovely and inviting. You can find the full recipe above. It covers everything you need to know for this dish. Enjoy cooking! To make the marinade, start by whisking together the following ingredients: - 1/4 cup olive oil - Juice and zest of 2 lemons - 4 cloves garlic, minced - 1 tablespoon fresh rosemary, finely chopped - 1 tablespoon fresh thyme, finely chopped - 1 tablespoon fresh parsley, finely chopped - Salt and pepper to taste Whisk these ingredients in a bowl until they blend well. This mix brings a bright flavor to the chicken. Next, place the chicken breasts in a resealable plastic bag or a shallow dish. Pour the marinade over the chicken. Seal the bag or cover the dish and put it in the fridge. Let it marinate for at least 1 hour, but if you can, let it sit for up to 4 hours. This time helps the flavors soak in. Now, it’s time to grill! First, preheat your grill to medium-high heat. This step ensures the chicken cooks evenly. Take the chicken out of the marinade. Let any extra marinade drip off, then discard the marinade. Place the chicken on the hot grill. Cook it for about 6-8 minutes on each side. You want the chicken to reach an internal temperature of 165°F (74°C). Look for nice grill marks, too. After grilling, take the chicken off the grill. Let it rest for a few minutes. This step keeps it juicy. For a beautiful presentation, slice the chicken and arrange it on a platter. Add some fresh lemon slices and herb sprigs as garnishes. These small touches make your dish pop visually. For the complete recipe, check the [Full Recipe]. How long should I marinate the chicken? Marinate the chicken for at least 1 hour. For the best flavor, aim for 4 hours. Longer marinating lets the herbs and lemon soak in. This makes each bite full of taste. What temperature is best for marinating? Always marinate in the fridge. Keeping chicken cold prevents bacteria growth. Room temperature is not safe. How do I maintain grill temperature? Preheat your grill to medium-high heat. This gives a nice sear. Keep the lid closed while cooking to hold the heat. You want a steady temperature for even cooking. How do I ensure juiciness in chicken breasts? Let the chicken rest after grilling. This keeps the juices inside. Cutting right away makes juices spill out. What additional spices can I use? Try adding paprika or cumin for a warm flavor. You can also use a pinch of red pepper flakes for a kick. These spices add depth to the marinade. Can I use different meats? Yes, you can use pork or turkey. Just adjust the cooking time. Chicken is great, but other meats can also shine with this marinade. For the full recipe, check out my Lemon Herb Grilled Chicken section! {{image_2}} You can change the taste of the chicken by using different herbs. Try substituting rosemary or thyme with basil or cilantro. Each herb brings its own flavor. For example, basil adds a sweet note, while cilantro gives a fresh taste. You can also mix different herbs. Combining rosemary, thyme, and parsley creates a rich flavor. Feel free to get creative! The more herbs you try, the more unique your dish will be. Think about adding fruit-based marinades for a twist. You can use orange juice or peach puree. These fruits add sweetness and a new flavor profile. If you like heat, add spices or peppers. A pinch of red pepper flakes can bring warmth. You can also use jalapeños for a spicy kick. Adjust the heat based on your taste. You can make this dish even if you don’t have a grill. Baking the chicken in the oven is an easy option. Preheat your oven to 400°F (200°C). Place the marinated chicken on a baking tray. Bake for about 25-30 minutes. Make sure to check that it reaches 165°F (74°C). Stovetop cooking is another great choice. Heat a pan with some olive oil over medium heat. Cook the chicken for about 6-8 minutes on each side. This method helps keep the chicken juicy and flavorful. For the full recipe, refer to the section above. To keep your leftover Lemon Herb Grilled Chicken fresh, store it properly. Place the chicken in an airtight container. You can also wrap it tightly in plastic wrap or aluminum foil. Make sure the chicken cools down first. This way, it won't create steam inside the container. Leftovers stay good in the fridge for about 3 to 4 days. If you plan to eat them later, consider freezing them. Freezing grilled chicken is easy. First, let the chicken cool completely. Then, place it in a freezer-safe bag or container. Remove as much air as possible before sealing it. Label the bag with the date. This helps you keep track of how long it’s been frozen. You can freeze the chicken for up to 3 months. When you’re ready to eat it, thaw it in the fridge overnight. Reheat it in the oven or on the stovetop for best results. To check if your chicken has gone bad, look for a few signs. If it smells sour or off, it’s time to toss it. Also, check for a change in color. Fresh chicken should look pink, while spoiled chicken may appear gray or dull. If you see any slime on the surface, this is another red flag. Always wash your hands and surfaces after handling raw chicken. This helps prevent the spread of germs. You should marinate the chicken for at least 1 hour. This allows the chicken to soak in all the great flavors from the marinade. For the best taste, aim for 4 hours. If you can, marinate overnight in the fridge. This extra time really helps the herbs and lemon infuse into the meat. You can serve Lemon Herb Grilled Chicken with many tasty sides. Here are some great options: - Grilled vegetables, like zucchini or bell peppers - Steamed rice or quinoa for a filling base - A fresh green salad with lemon vinaigrette - Roasted potatoes or sweet potatoes for a crispy side - Garlic bread for a fun touch These sides pair well with the bright flavors of the chicken. Yes, you can use frozen chicken breasts. Just make sure to thaw them first. The safest way is to leave them in the fridge overnight. If you’re short on time, you can also use the microwave. After thawing, follow the recipe as usual. Just remember, if the chicken is still a bit icy, it might not marinate as well. For the best result, always marinate thawed chicken. For the full recipe, check out the details above. Lemon Herb Grilled Chicken is easy and packed with flavor. You learned about the key ingredients and how to make a perfect marinade. I shared tips for grilling and serving your chicken. Plus, you discovered variations and storage tips for leftovers. Cooking should be fun, and this recipe helps you enjoy it. Whether you grill, bake, or adjust flavors, you can create something great. Keep experimenting, and enjoy every bite.](https://lisadishes.com/wp-content/uploads/2025/05/c67e325a-8bae-4f67-945e-8b4bbe019271.webp)
Looking for a delicious and simple way to grill chicken? You’ve come to the right place! In this Lemon Herb
![To make a tasty vegetable fried rice, gather these ingredients: - 2 cups cooked jasmine rice (preferably day-old) - 1 cup mixed vegetables (carrots, peas, bell peppers, and corn) - 1 small onion, finely chopped - 2 garlic cloves, minced - 2 green onions, chopped - 2 tablespoons soy sauce (or tamari for gluten-free) - 1 tablespoon sesame oil - 1 tablespoon vegetable oil - 1 teaspoon ginger, grated - Salt and pepper to taste - Optional: 1/4 cup cooked edamame or chickpeas for added protein You will need a few tools to make this dish: - A large skillet or wok - A spatula for stirring - A cutting board and knife - Measuring spoons and cups Feel free to swap or add these items: - Extra vegetables like broccoli or zucchini - Any protein like chicken or tofu - Spicy sauce to kick it up a notch - Fresh herbs like cilantro or basil for added flavor These ingredients and tools will help you create a flavorful vegetable fried rice. Don’t forget to check out the Full Recipe for more tips and details! Before you start, get everything ready. Gather all your ingredients. Chop the onion, garlic, and green onions. Measure out your mixed vegetables. If using day-old rice, break up any clumps. This makes cooking easier. It helps ensure even frying. 1. Heat the vegetable oil in a large skillet or wok over medium-high heat. 2. Add the chopped onion and sauté for 2-3 minutes until it turns translucent. 3. Stir in the minced garlic and grated ginger. Cook for about one minute until fragrant. 4. Add the mixed vegetables to the skillet. Stir-fry for 4-5 minutes. You want them tender but still crisp. 5. Push the veggie mixture to one side of the skillet. Add the cooked jasmine rice to the other side. 6. Pour the soy sauce and sesame oil over the rice. Use a spatula to break up any clumps. Mix well to combine everything. 7. Season with salt and pepper to taste. Incorporate the green onions and, if using, cooked edamame or chickpeas. 8. Cook all together for an additional 2-3 minutes. Make sure everything is heated through. 9. Remove from heat and serve right away. To get great flavor in your fried rice, follow these tips: - Use day-old rice. It is drier and fries better. - Add fresh herbs like cilantro or basil for a burst of flavor. - For spice, include chili flakes or sriracha. - Don’t skip the sesame oil. It adds a nutty taste that’s key. - Taste as you cook. Adjust salt and pepper to your liking. These steps and tips will help you create a delicious dish that shines with flavor. For the complete recipe, check out the Full Recipe section. Using day-old rice is key for great fried rice. Fresh rice is wet and sticky, which makes it clump. Day-old rice is drier and firmer, perfect for frying. When you use day-old rice, you get fluffy grains that separate easily. Make sure to spread the rice out on a plate and chill it in the fridge. This step helps it dry out even more. To boost the flavor of your fried rice, use a mix of sauces. Soy sauce adds saltiness, while sesame oil gives a nutty taste. You can also add ginger and garlic for extra depth. Fresh herbs like cilantro or basil can brighten the dish. For a spicy kick, toss in some chili flakes or sriracha. These small changes can transform your meal. Avoid cooking too many veggies at once. Overcrowding the pan makes them steam instead of fry. This can lead to soggy vegetables. Always cook in batches if you have a lot. Also, don’t skip on seasoning. A pinch of salt and pepper at the end adds a lot. Finally, be careful not to overcook the rice. It should be heated through but not mushy. For the full recipe, check the complete guide above. {{image_2}} You can change up the veggies in your fried rice. Try using broccoli, zucchini, or snap peas. Each choice adds a new flavor and texture. If you want more color, add red bell peppers or purple cabbage. Mixing different veggies makes the dish fun and tasty. You can also use frozen veggies for a quick option. Just make sure to thaw them first. Adding protein can make your fried rice filling. You can toss in cooked chicken, shrimp, or pork for extra flavor. For a meatless option, try tofu or tempeh. These proteins soak up the sauce, making each bite delicious. If you like legumes, add cooked edamame or chickpeas from the Full Recipe. They provide protein and a nice crunch. You can easily make this dish vegan and gluten-free. Use tamari instead of soy sauce for a gluten-free choice. For a vegan version, skip any animal proteins and stick to plant-based options. You can also add more veggies or nuts for protein. This way, everyone can enjoy a tasty meal, no matter their diet. Store leftover fried rice in an airtight container. Let it cool down first. This helps keep it fresh. You can keep it in the fridge for up to four days. Make sure to label the container with the date. This way, you’ll know when to eat it. To reheat, use a skillet or microwave. If using a skillet, add a splash of water. This keeps the rice from drying out. Heat on medium until warm, stirring often. In the microwave, cover the dish with a damp paper towel. Heat for one to two minutes. Check if it’s hot all the way through. You can freeze vegetable fried rice for up to three months. Portion it into small containers or freezer bags. Remove air from bags before sealing. When you’re ready to eat, thaw it overnight in the fridge. Reheat it in a skillet or microwave as mentioned above. Enjoy your tasty meal without wasting food! The best rice for fried rice is jasmine rice. Its fluffy texture works well. Day-old rice is ideal because it is drier than fresh rice. This prevents clumps and helps fry better. You can also use long-grain rice. But avoid sticky rice as it won't yield the right texture. Yes, you can make fried rice without soy sauce. You can use coconut aminos for a soy-free option. This gives a similar flavor without the soy. You can also use salt, pepper, or other sauces like teriyaki. Just remember to adjust flavors to suit your taste. To make vegetable fried rice spicy, add red pepper flakes. You can also use fresh chili peppers or hot sauce. Start with a small amount and taste as you go. This way, you can control the heat level. Adding ginger will also enhance the flavor and spice. For a full flavor experience, try the [Full Recipe]. You now have all you need to make great vegetable fried rice. We covered ingredients, tools, and cooking steps. You learned tips for flavor and common mistakes to avoid. There are many tasty variations to try, too. Don’t forget how to store and reheat your dish for later. Fried rice is easy to customize to your tastes. Enjoy your cooking adventure and make it your own!](https://lisadishes.com/wp-content/uploads/2025/05/3cb97586-c71c-44f4-85f4-a3ba126b22de.webp)
Are you ready to elevate your weeknight dinners with a dish that’s both simple and delicious? My Vegetable Fried Rice
